

1.Overview
Features:
- You can choose to display the functionality to either registered users or guest users or both.
- You can customize the footer settings for adding the author name, post date, and post name using the PDF plugin.
- Using this WordPress PDF plugin, you can now add more than one meta field in one row
- The plugin allows you to control the nomenclature of the PDF file and lets you choose if you want to display category, taxonomy, or tags.
- You can place the icon for specific post types using advanced settings. The plugin also allows you to place the icon appropriately on your WordPress site.
- You can customize the header, footer, and body settings to suit your company’s needs.
- Exclusive features like RTL support, watermark settings are also available in the plugin.
- You can also upload your ready-to-use PDF posters or files to be directly accessed by registered or guest users.
2.Installation
1. Automatic Installation
Automatic installation of the PDF is the easiest option as WordPress PDF builder handles the file transfers itself and you don’t even need to leave your dashboard.
The steps are as follows:
- Download the zip folder of the PDF plugin with the name-PDF Generator for the WordPress plugin.
- Click on the Add new button. Upload the zip file by browsing and Activate the product filter plugin.
Download Now
2. Manual Installation
The manual installation of the WordPress PDF plugin is another option to install the plugin to your WordPress environment. The manual installation method involves downloading our PDF Generator for WordPress and uploading it to your webserver via your favorite FTP application.
The steps are as follows:
- Upload the PDF Generator for WordPress folder to the /wp-content/ plugins/ directory.
- Activate the PDF Generator for WordPress plugin through the ‘Plugins’ menu in WordPress.
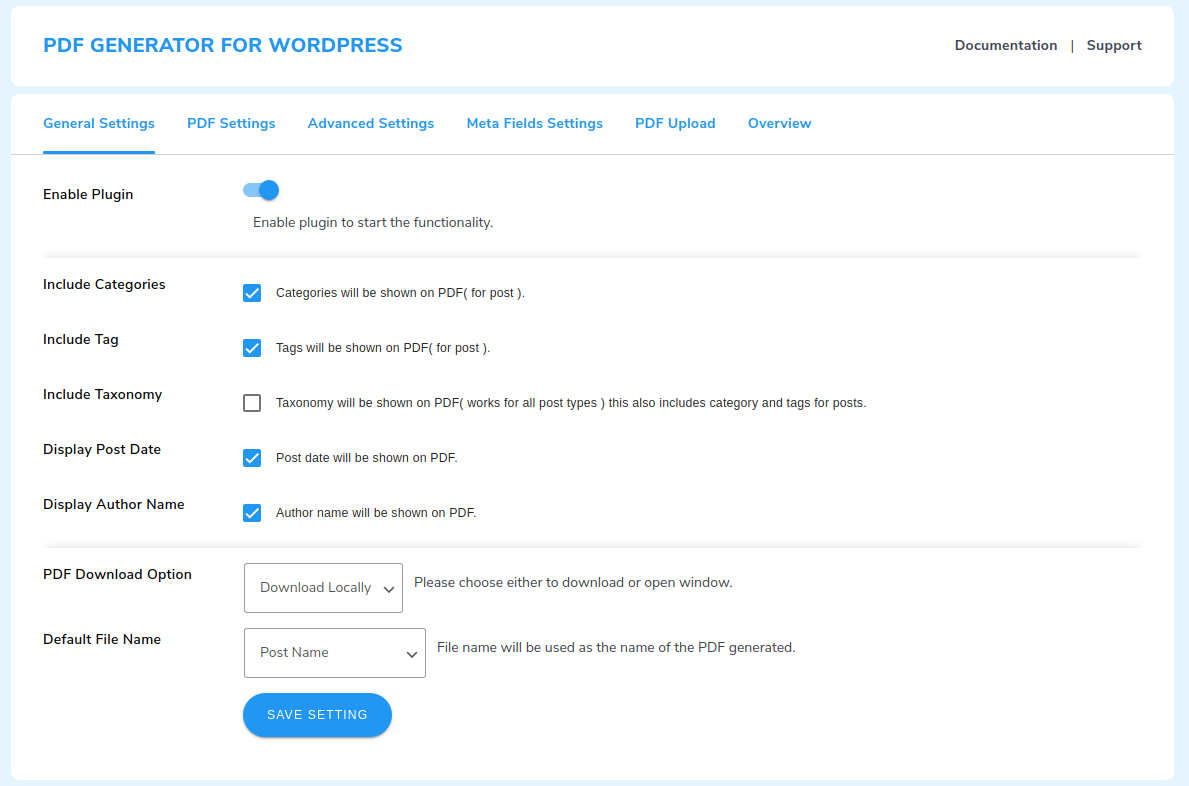
3.General Settings
To use the plugin, you need to activate the plugin functionalities by turning on the toggle switch in General Settings.
- In the admin panel, click on WP Swings→ PDF Generator→ General Settings.
- Activate the plugin by turning on the toggle switch.
- Tick the checkbox Include Categories to display categories in the PDF file for a post on your WordPress site.
- Tick the checkbox Include Tag to display tags in the PDF file for a post on your WordPress site.
- Tick the checkbox Include Taxonomy to display tags in the PDF file for a post on your WordPress site.
- Tick the checkboxes to Display Post Date and Display Author Name respectively if necessary.
- You can choose to allow the users to download the generated PDF files either locally or open new window.
- You can predefine the name of the generated PDF file by choosing one of the options- Post Name, Document_Product Id, or Custom from the Default File Name option. If you want to set a custom name, choose Custom from the dropdown menu and enter the custom file name of your choice in the space provided.
- Click on Save Settings to save your choices.
4.PDF Setting
PDF Settings will allow you to predefine settings for Header, Body, and Footer content. You can also apply exclusive features such as RTL support, and set watermark text and color. Follow the listed steps to save your details:
4.1.Icon Display
- Go to WP Swings→ PDF Generator For WordPress→PDF Settings→ Icon Display.
- To allow the registered/ logged-in users to download PDFs, turn on the toggle switch for Logged in Users. To allow the guest users to download PDF files, turn on the toggle switch for the Guest.
- Choose from the dropdown menu to allow access to generated PDF files for Direct download or Email User for the registered users. Choose from the dropdown menu to allow access to generated PDF files for Direct download or Email Guest for guest users.

- Place the PDF generator icon appropriately by choosing the right option from the Show PDF Icon dropdown menu. The available options to place the icon on the frontend are- Before Content, After Content, Before Add to Cart Form, Before Product Meta Start, After Add to Cart Form, After Single Product Summary, Before Single Product Summary, After Single Product, Before Single Product, After Share Button.
- Set the alignment of the WordPress PDF icon once you have placed it right. You can choose Left, Center and Right alignment from the PDF Icon Alignment dropdown menu.
- Upload the icon of your choice by clicking on the Upload Icon button from the Choose Single Download Pdf Icon setting.
- Predefine the icon size by mentioning the width and height of the same in pixels in the Icon Size setting.
- Turn on the toggle button to Show Pdf Icon According to User Roles. This will restrict other roles from viewing the option to generate PDF files.
- In the setting to Select User Role For Which You Want To Show The Pdf Icon, you can choose various options from the dropdown menu given in the setting.
- Finally, click on the SAVE SETTINGS button to save your changes.
- Use the shortcode [WORDPRESS_PDF] anywhere on your post, page or product to display the PDF icon.
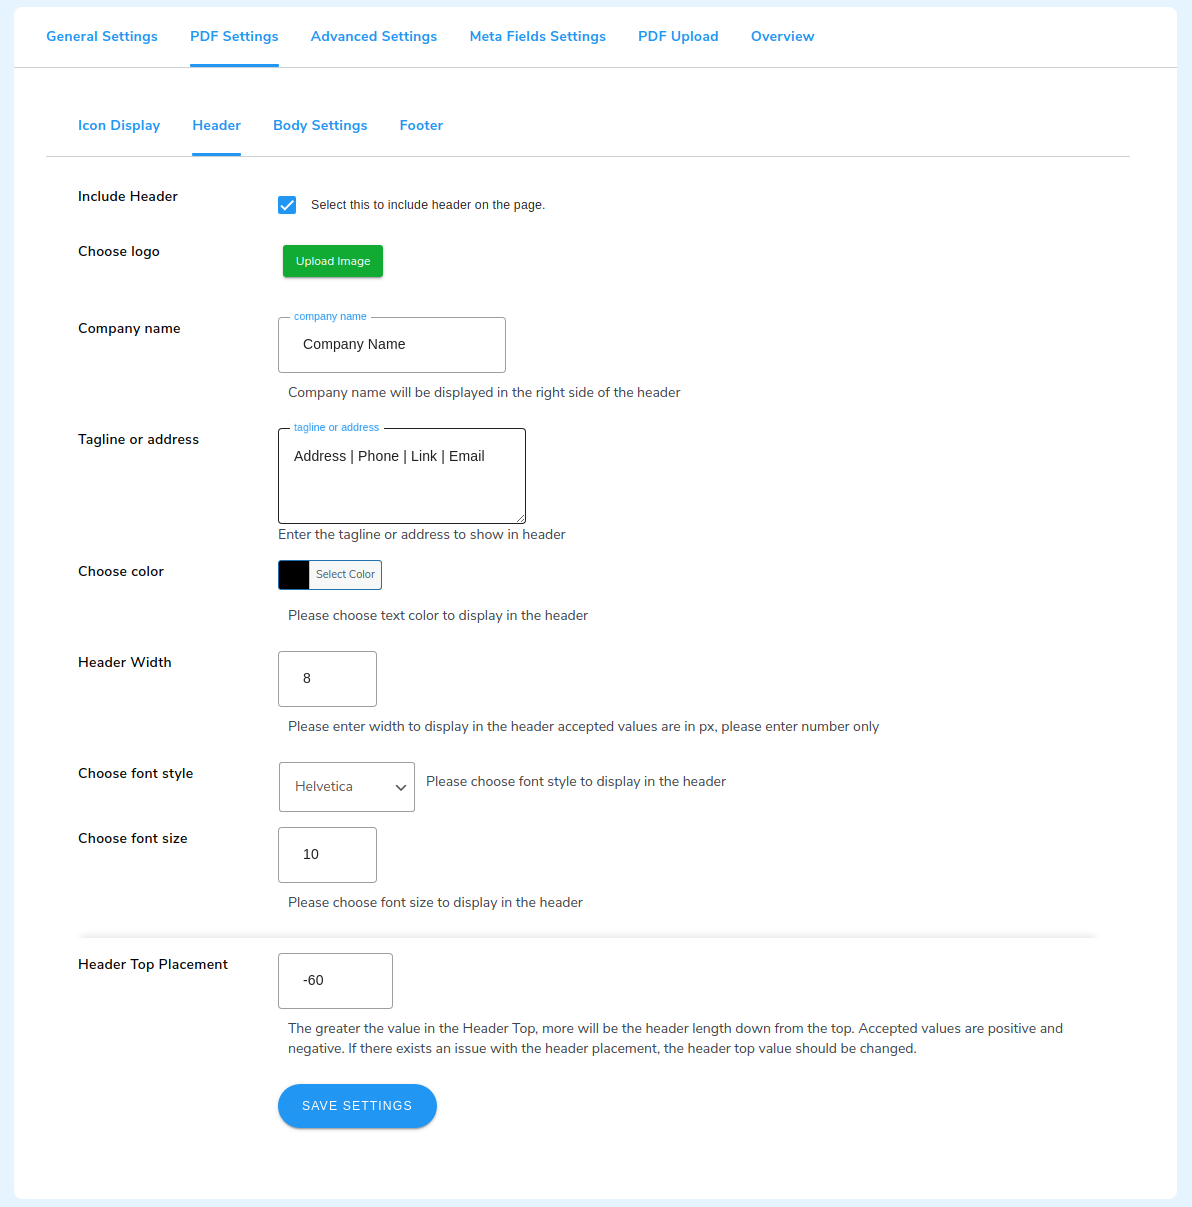
4.2.Header Settings
- Go to WP Swings→ PDF Generator for WordPress→PDF Settings→Header to predefine the header settings for generating PDF files.
- Tick the checkbox to Include the Header in the generated PDF.
- Click on the Upload Image button in the Choose logo setting to upload your company logo.
- Enter the Company Name in the given field.
- Enter your tagline, address or relevant information in the Tagline or address field.
- Select the text colour in the header from the Choose color setting.
- Enter the Header Width in pixels for text padding.
- Choose the font style from the given dropdown menu for the header text.
- Choose font size in the respective setting for the header text.
- You can set the Header Top Placement. The greater the value in the Header Top more will be the header length down from the top.
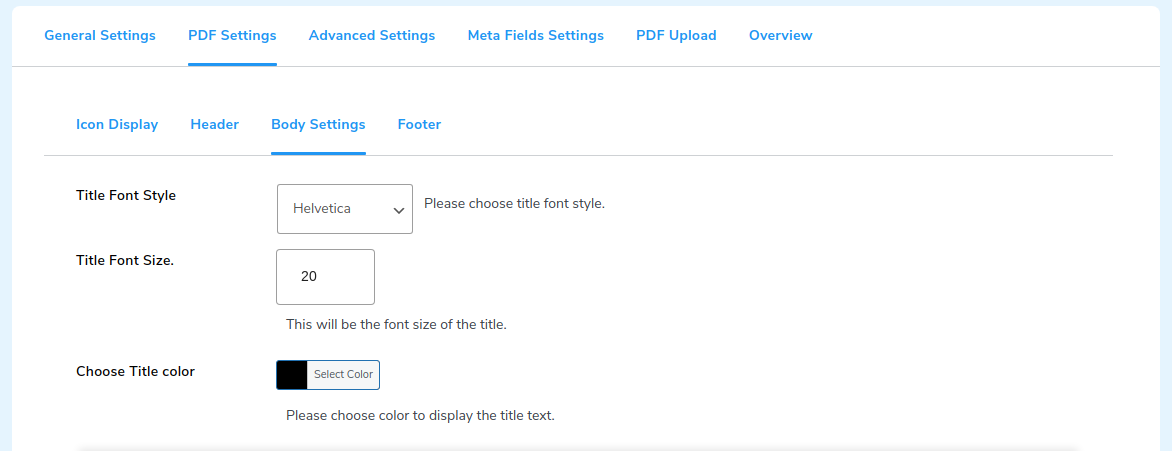
4.3.Body Settings
- Go to WP Swings→ PDF Generator for WordPress→PDF Settings→Body Settings to predefine the body settings for generating PDF files.
- For the title of the PDF body, you can select the Title Font Style from the given dropdown options. Enter the size of the title in the Title Font Size setting and choose the text colour for the title from the given color palette in the Choose Title color setting.
- Select the Page Size from the given dropdown menu. You get to choose from two options- Landscape or Portrait for the Page Orientation.
- For the content in the PDF body, you can choose the Font Style, Font Size and Body Text Color similar to the title settings in the PDF body.
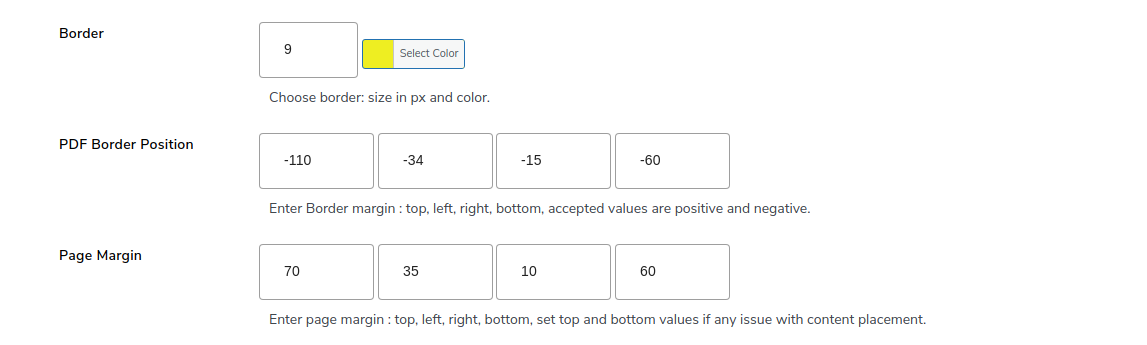
- Border Settings: Select the border size in pixels and the border color. Enter the values for PDF Border Position to set the border position. Enter the values for Page Margin to provide padding and right placement of PDF content.
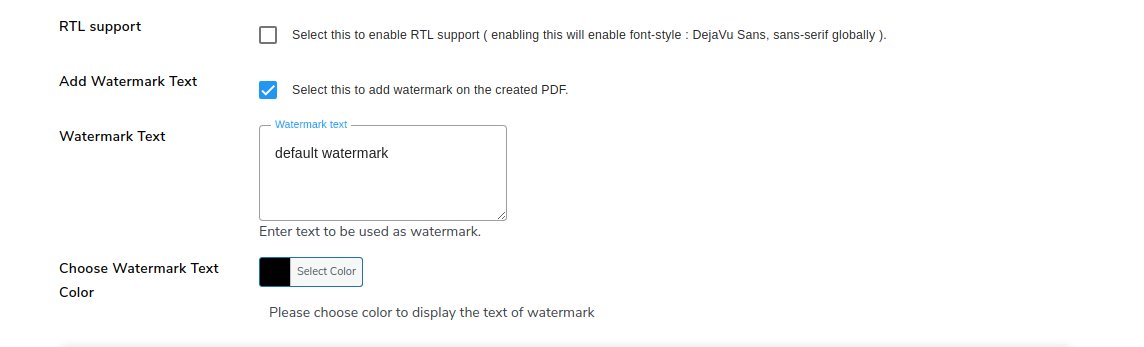
- Enable advanced features like RTL support for Arabic and Hebrew languages by ticking the respective checkbox.
- Enable watermark by ticking the checkbox for Add Watermark Text. Enter the Watermark Text in the given box and choose the colour of the watermark from the color palette.
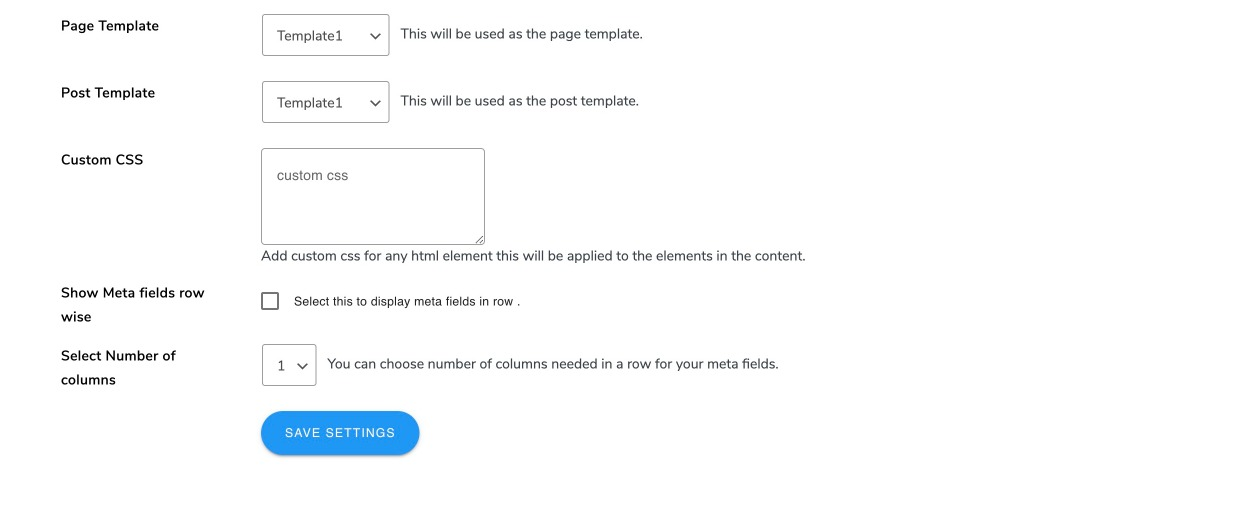
- Choose the templates for generating PDF files for page and posts from the dropdown menu for the Page template and Post template respectively.
- If you wish to display images row-wise, tick the checkbox for the setting: Show images row wise (Template 1)
- Click on the Save Settings button to save your entries.

- You can also add custom CSS for any HTML element using the blank space provided with Custom CSS heading.
- If you wish to display images row-wise, tick the checkbox for the setting: Show images row-wise (Template 1)
- Tick the checkbox to allow displaying the meta fields in your PDF body in a row.
- You can define the number of columns under Select Number of columns setting.
- You can hide the Feature Image, Title, and Description Title from the default PDF template. It will apply only to single PDF files
- Click on the Save Setting button to save your entries.
4.4.Footer Settings
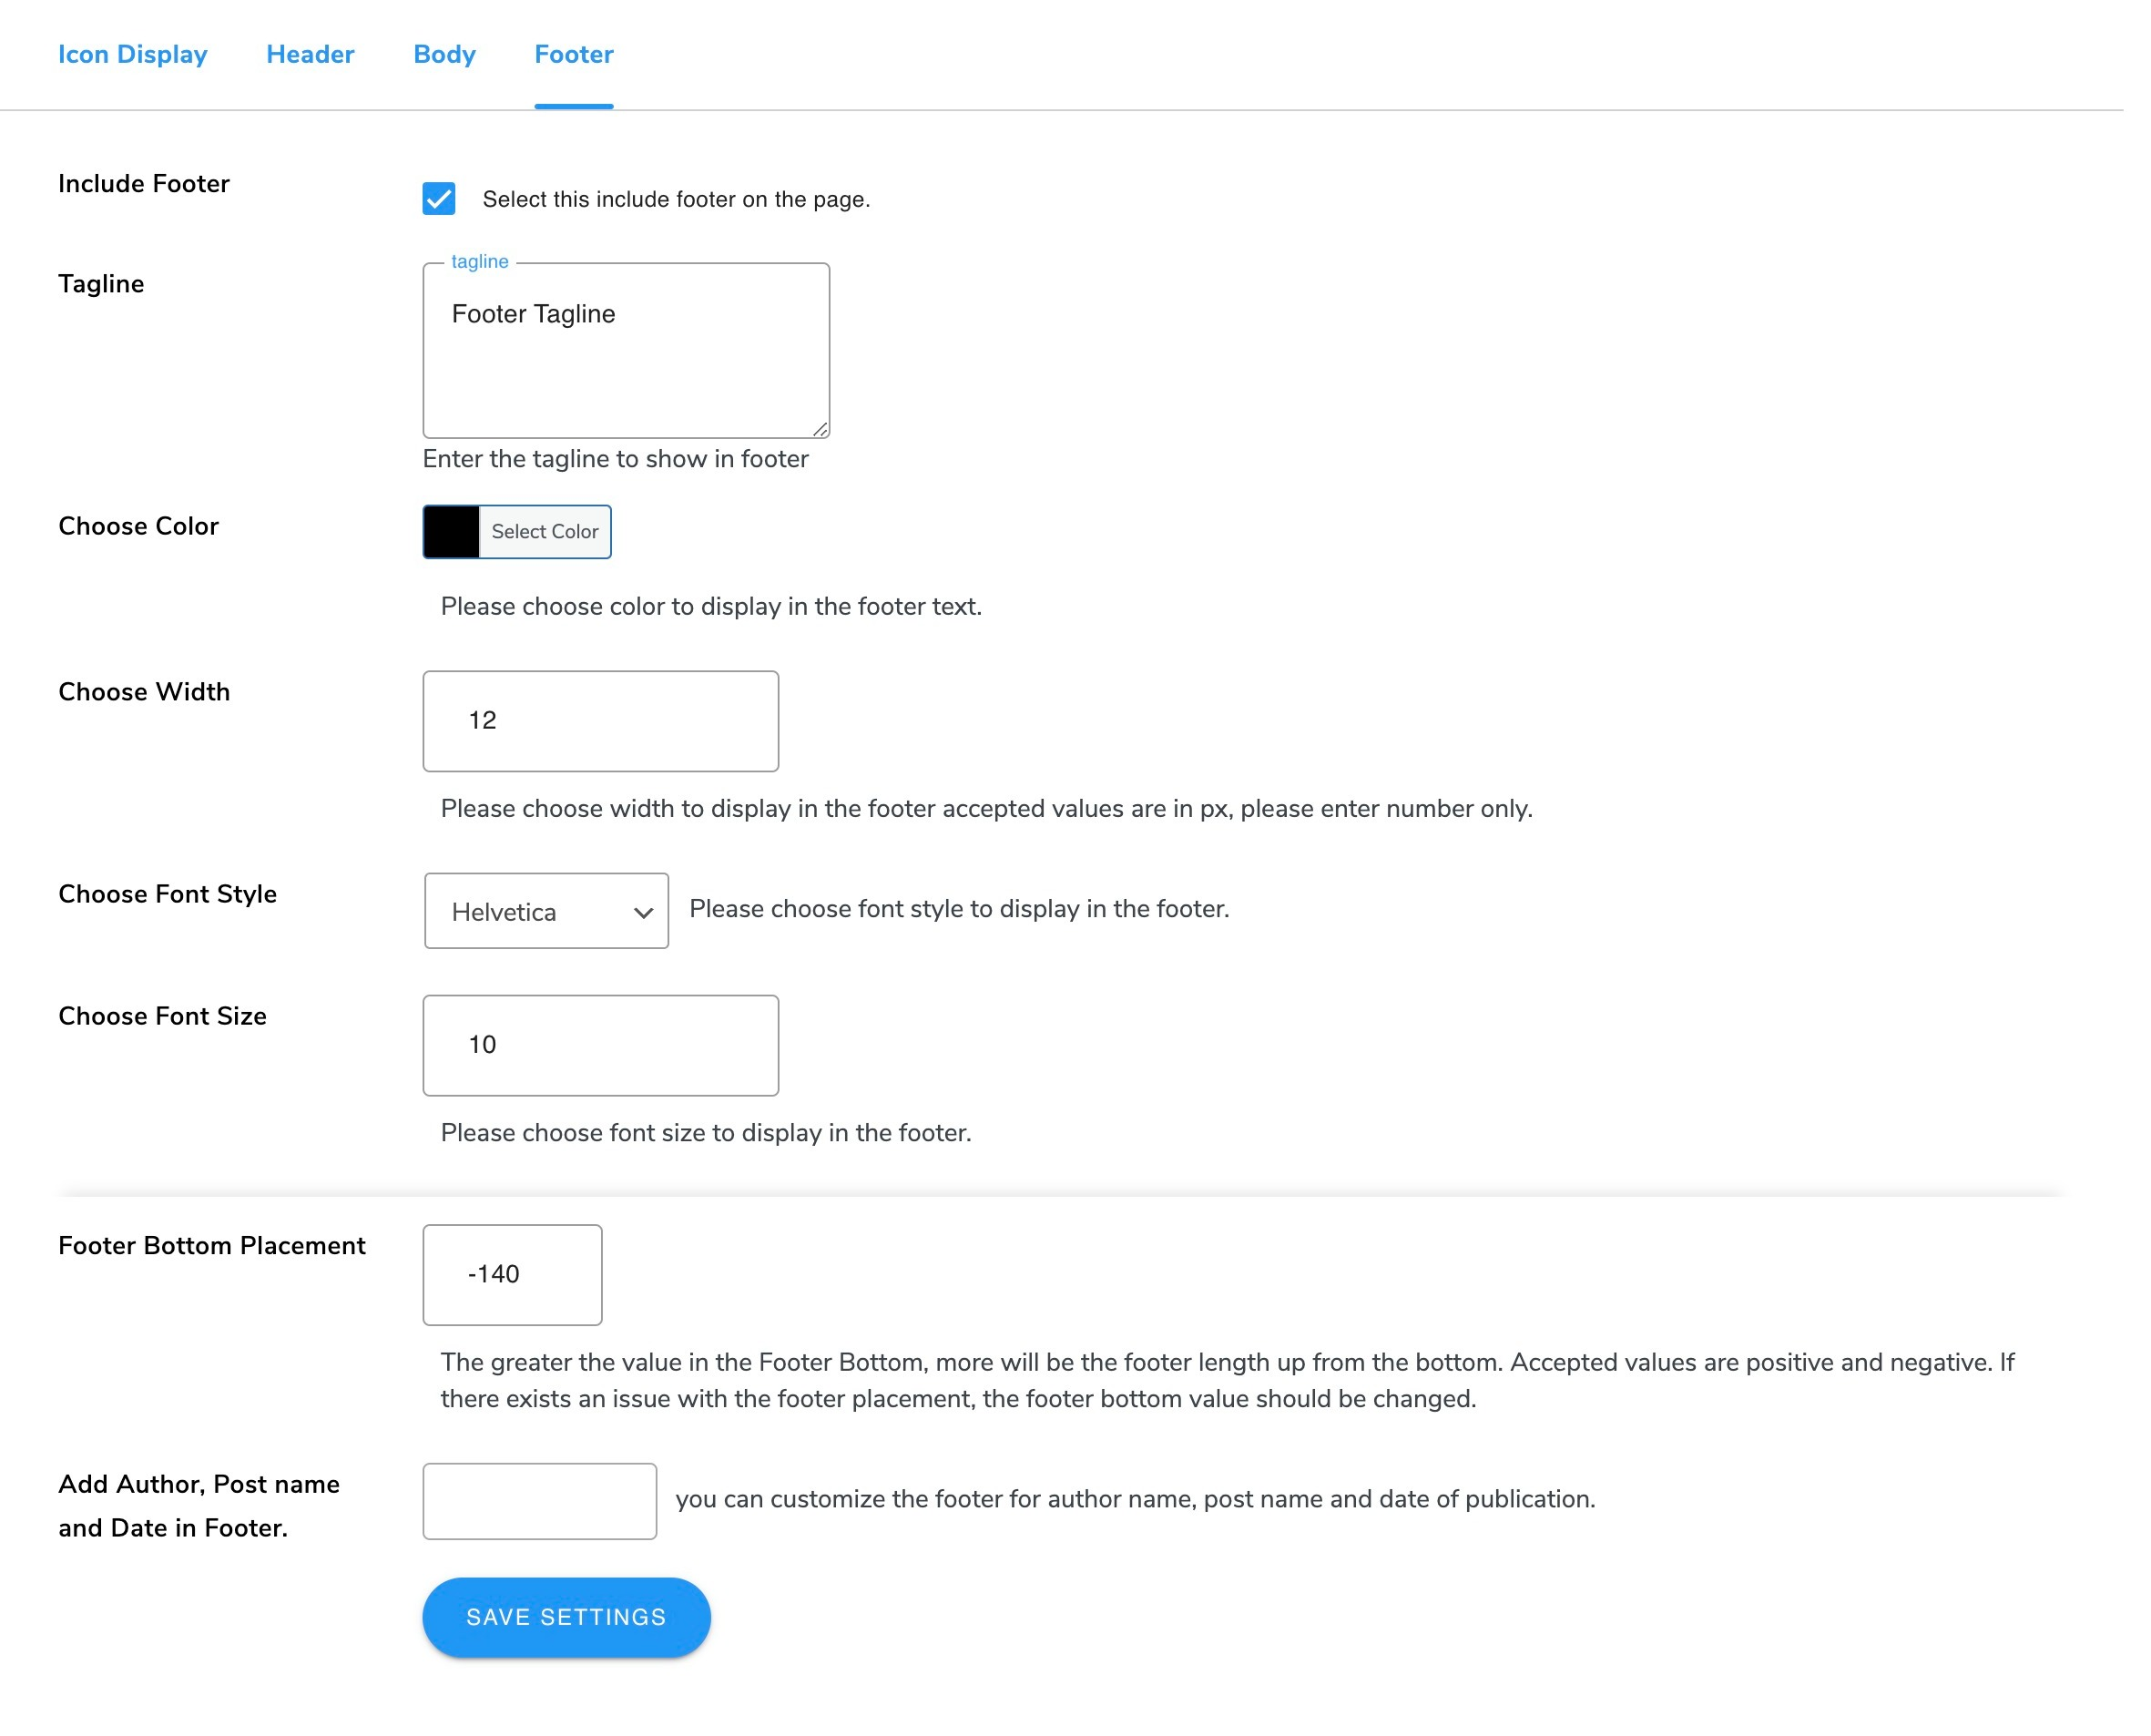
- Go to WP Swings→ PDF Generator for WordPress→PDF Settings→Footer Settings to predefine the footer settings for generating PDF files.
- Tick the checkbox to Include Footer in the generated PDF.
- Enter the footer Tagline in the given field.
- Choose the font color for the footer text from the color palette in Choose Color option.
- Enter the footer width in pixels for display in the Choose width option to provide padding.
- Choose the font style and choose font size by selecting the values in the respective fields.
- Set the Footer Bottom Placement. The greater the value in the footer bottom field more will be the footer length up from the bottom.
- Use the blank space to add author name, post name, and post date in footer settings.
- Click on the Save Setting button to save entries.
5.Advanced Settings
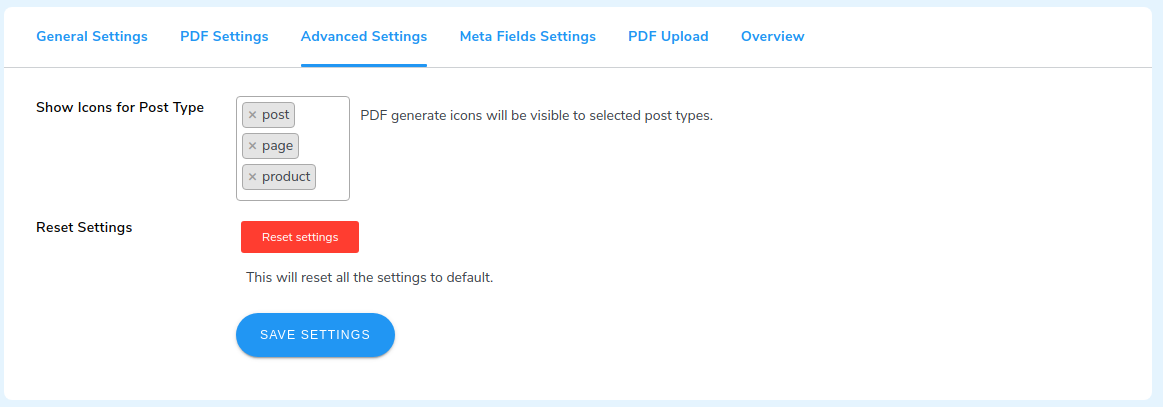
- Go to WP Swings→ PDF Generator for WordPress→Advanced Settings.
- You can choose to show the ‘generate PDF’ icon for selected post types such as post, page and/or product.
- Click on Reset Setting button to set all the settings to default.
- Click on the Save Settings button to save your choices.
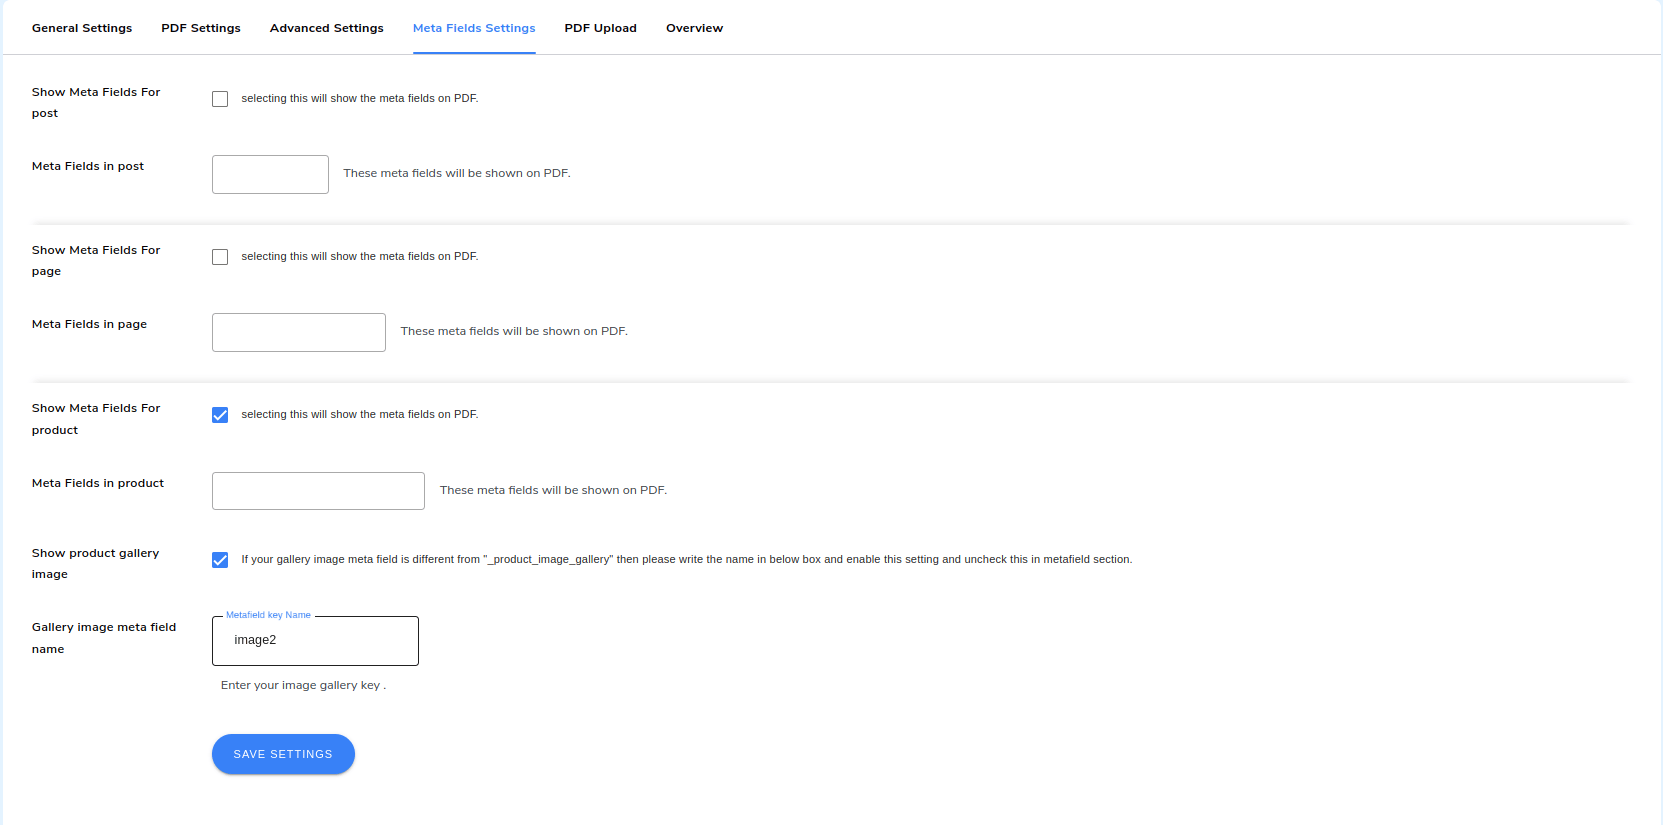
6.Meta Fields Settings
- Go to WP Swings→ PDF Generator for WordPress→Meta Fields Settings.
- Allow displaying meta fields separately for posts, pages, and products. You can also enter the meta fields that you want to display in the generated PDF files.
- Tick the checkboxes and enter the meta fields to display for post, page, and product and respectively.
- If your product images are different from your product image gallery than you can write the name in the box and enable the setting by clicking on Show Product Gallery Image.
- Click on the Save Settings button to save your choices.
7.PDF Upload
- Turn on the toggle to give Access to Users to allow registered or logged in users to download your uploaded document.
- Turn on the toggle to give Access to Guests to allow guest users to download your uploaded document.
- Click on the Upload Doc button to upload your own PDF file or poster in the Choose Poster setting.
- Click on the Save Settings button.
- A shortcode will be generated for your uploaded document. You can place it anywhere on your page or post to allow access to your document to the users.

9.Feedback and Suggestions
If you have a suggestion or any idea you’d like to see in the plugin,we’d love to hear about it.Reach out to our support and we’ll consider adding it to the future release.
10.FAQs
How can i add the PDF button on a single-product page?
You need to follow this step to add a PDF button on a single product page. Pdf Generator > POST META DETAILS tab >select the post type and meta field and fill the name of meta field and save the changes.
This plugin will work with other themes which doesn’t show full article on home page?
We generally fetch the article content from the database, it does not depend on how much content is showing there.
If the content is through meta fields then you have to select it from the settings as provided.
I used the product to assemble a 364 page PDF of all my posts.I ended up creating pdf files with 25 posts each then assembling them into one.
We have the option of the bulk Export on product listing page from where you can export the PDF in a bulk.
Is your plugin compatible with Genesis theme or all WordPress themes ?
Yes, our plugin is compatible with Genesis, Divi, Flatsome and supports all Popular WordPress themes.