1.Overview
The Sync Global Calendar With Airbnb feature helps you manage your bookings seamlessly across platforms by automatically syncing your WooCommerce booking calendar with your Airbnb calendar.
When you’re listing the same property or service on both your WooCommerce store and Airbnb, it’s crucial to keep your availability up to date on both ends to avoid double bookings and disappointed customers. This feature eliminates the need for manual updates — any changes made to availability on Airbnb are reflected on your WooCommerce calendar, and vice versa.
We will explain everything that you need to know in this documentation.
2.Installation
We have mentioned the installation process for both the Free and Premium Versions. The customers can refer to the one that is relevant to them.
It is important to note that before activating the plugin – Bookings For WooCommerce Pro, you should have the Bookings for WooCommerce – WordPress plugin installed, as the plugin will not function without it.
So, if you don’t already have it, you can download it directly from here:
3.Free Version
-
Automatic Installation
When it comes to automatic installation, WordPress is the most user-friendly.
To do so, all you have to accomplish is-
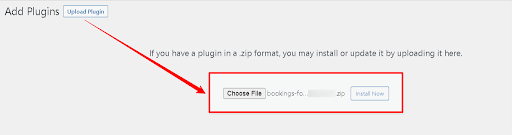
Utilize your username and password and log in to your WordPress admin area. Then navigate to Plugins > Add New inside the leftmost column of your dashboard. At the top of the front page, click the Upload Plugin option.
Choose the Bookings for WooCommerce-based .zip file from the Add New Plugin option, then push Install Now. Activate the WooCommerce booking plugin once it has been properly configured, to make the plugin features in action.
- Manual Installation
Another way to install the WooCommerce appointments plugin in your WordPress environment is to use the manual installation option. Manual installation involves downloading and uploading the Bookings for WooCommerce plugin to the web server using their preferred FTP client.
1. Upload the Bookings for WooCommerce folder to the /WP-content/plugins/directory.
2. Navigate to the Plugins menu in WordPress to activate the plugin.
3. That is all there is to it.
4.Premium Version
-
Automatic Installation
Automatic installation is the easiest option handled by WordPress.
- Download the Bookings For WooCommerce Pro plugin.
- Log in to your WordPress Dashboard.
- Navigate to the sidebar, and click on Plugins.
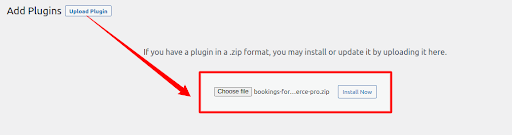
- Click on Add New and then click on Upload Plugins.
- Hit the Browse button, choose your downloaded plugin’s .zip file, and click on Install Now.
- Once installed, activate the Bookings plugin.
-
Manual Installation
- Download the Bookings for WooCommerce PRO plugin from the respective website product page.
- Log in to your WordPress dashboard.
- Navigate to the Plugins > Add New page and hit the Upload Plugin button.
- Upload the .zip file of the plugin and hit the Install button.
- Finally, activate this plugin from the Plugins > Installed Plugins page and hit the Activate button to continue.
5. License
The very last tab in the Bookings for WooCommerce PRO plugin is License. This tab is an activation panel for your plugin license. To accept WooCommerce booking requests from your customers, activate your plugin license before setting up your plugin backend.
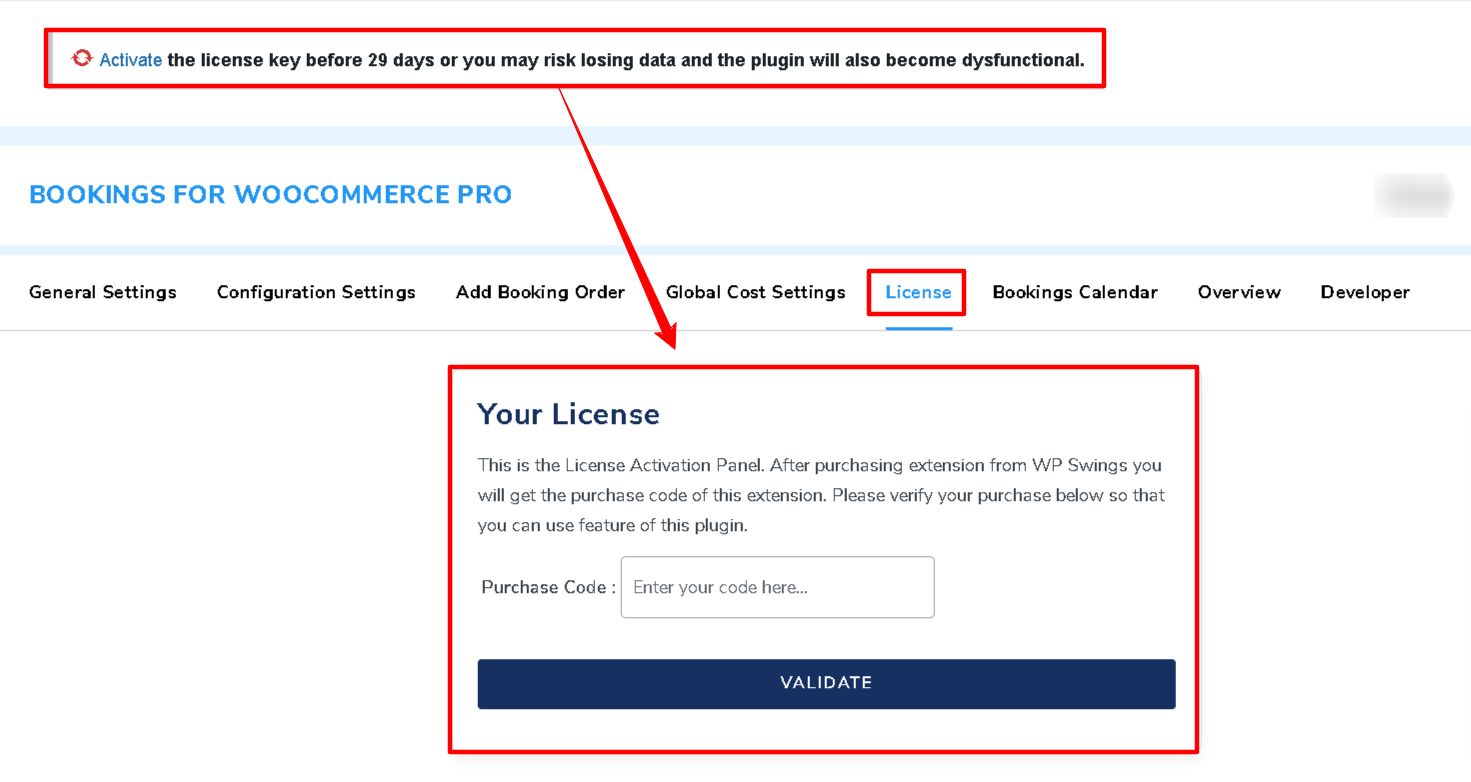
There isn’t any special setting available here, just one that is license activation. You receive an activation code as soon as you purchase the PRO plugin from the site.
After purchasing the premium version, navigate to My Account > Orders > Your Order. There you’ll find the License Key. The License Key is also sent to you at your email address.
Please confirm your purchase code by copy-pasting it in the given Enter Purchase Code text field and hitting the Validate button, so that you can utilize the plugin’s features conveniently even after the 30 days of plugin activation.
Note: Even if the license is not activated, you can use the Bookings for WooCommerce PRO plugin capabilities for 30 days. After that, the PRO plugin features would be automatically disabled, and you might end up losing your customer’s booking data; therefore, it is a must to activate the license before the trial period ends.
6.Global Calendar
Before we understand how to sync the global calendar with Airbnb, it is crucial to understand the concept of Global Calendar booking and how it works –
Global Calendar Booking
Merchants can utilize this functionality to seamlessly incorporate a Global Booking Calendar on any page they want. This eliminates the problem of creating multiple calendars.
Create A Global Calendar
To do so, follow these steps –
- Navigate to “Global Bookings” > “Add new Booking” through the sidebar of the admin’s dashboard.
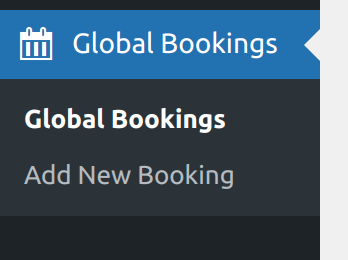
- You can now “create a new global calendar.”
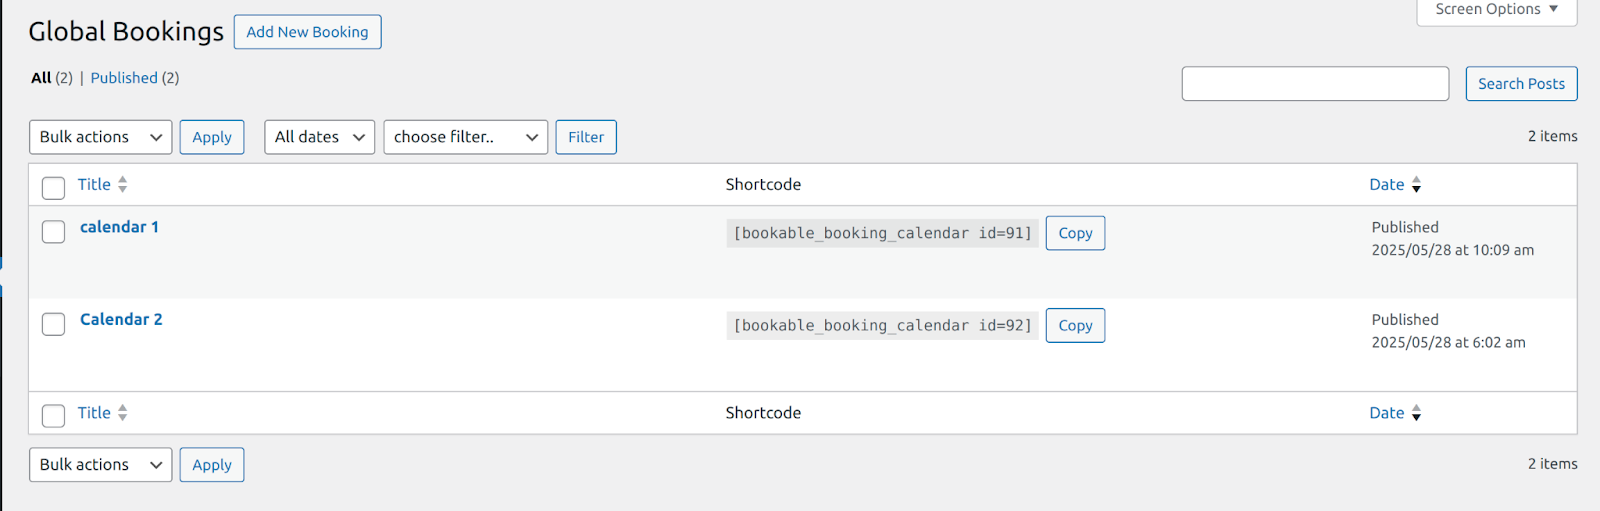
- Admins will now add the following information related to the global calendar.
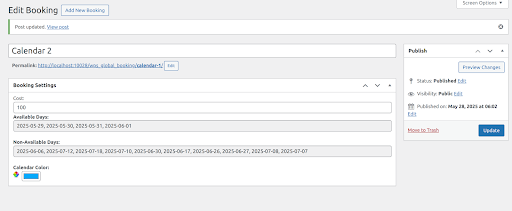
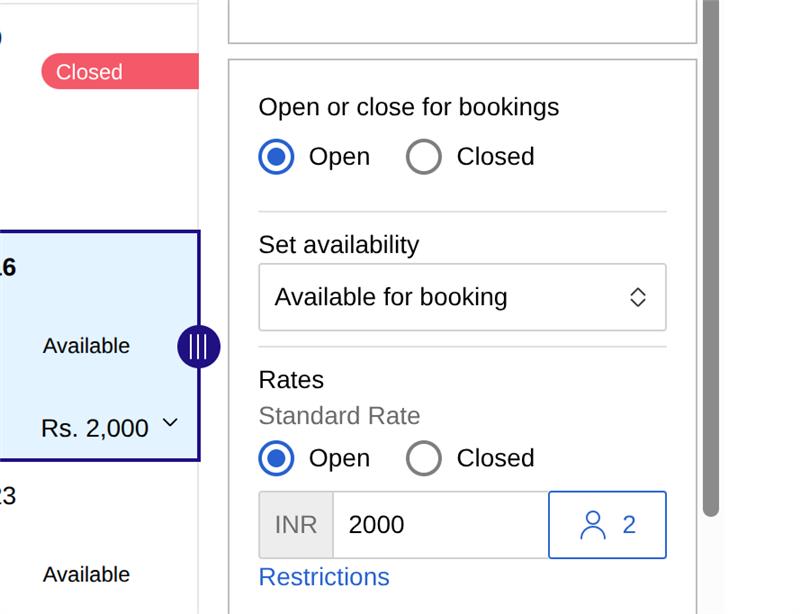
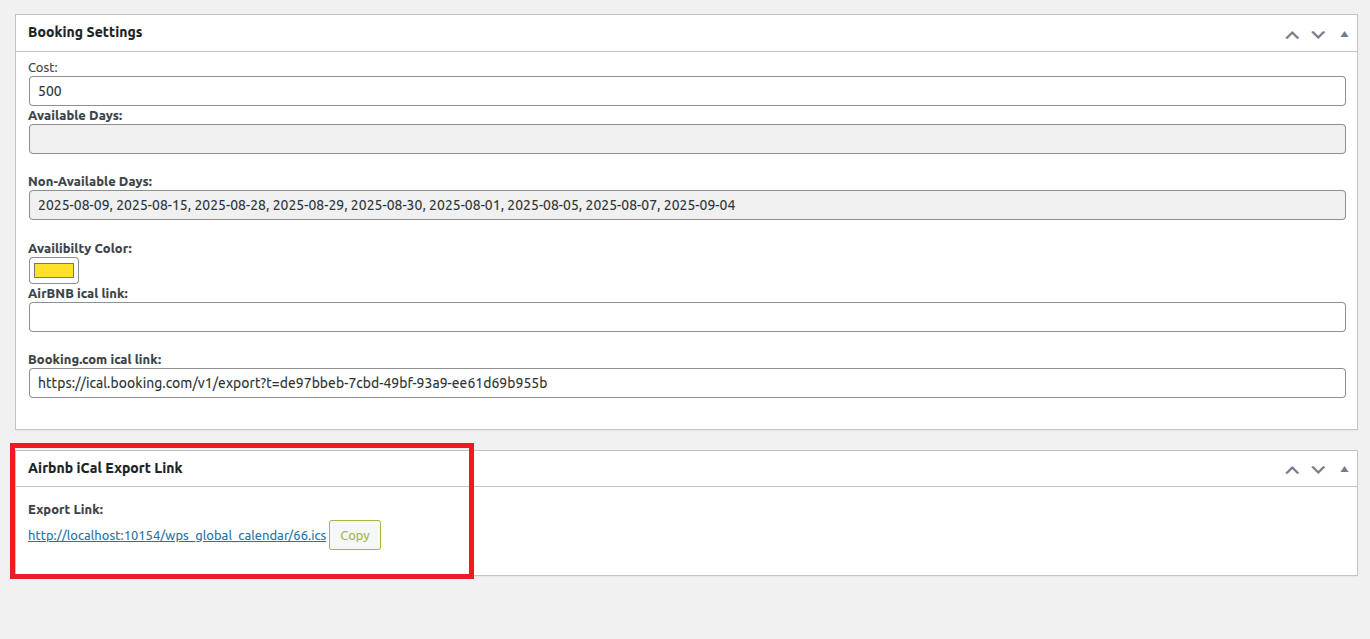
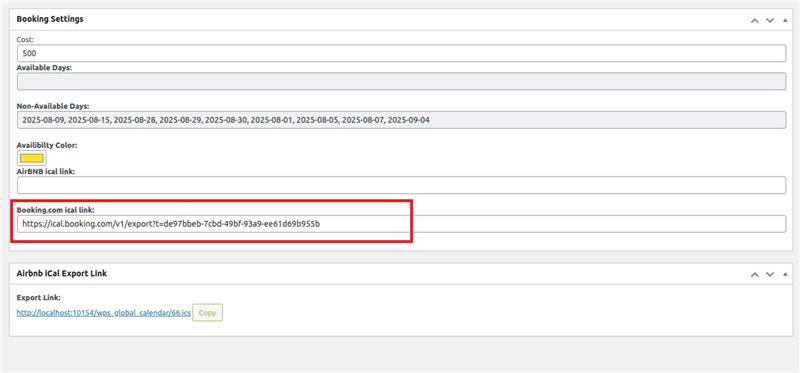
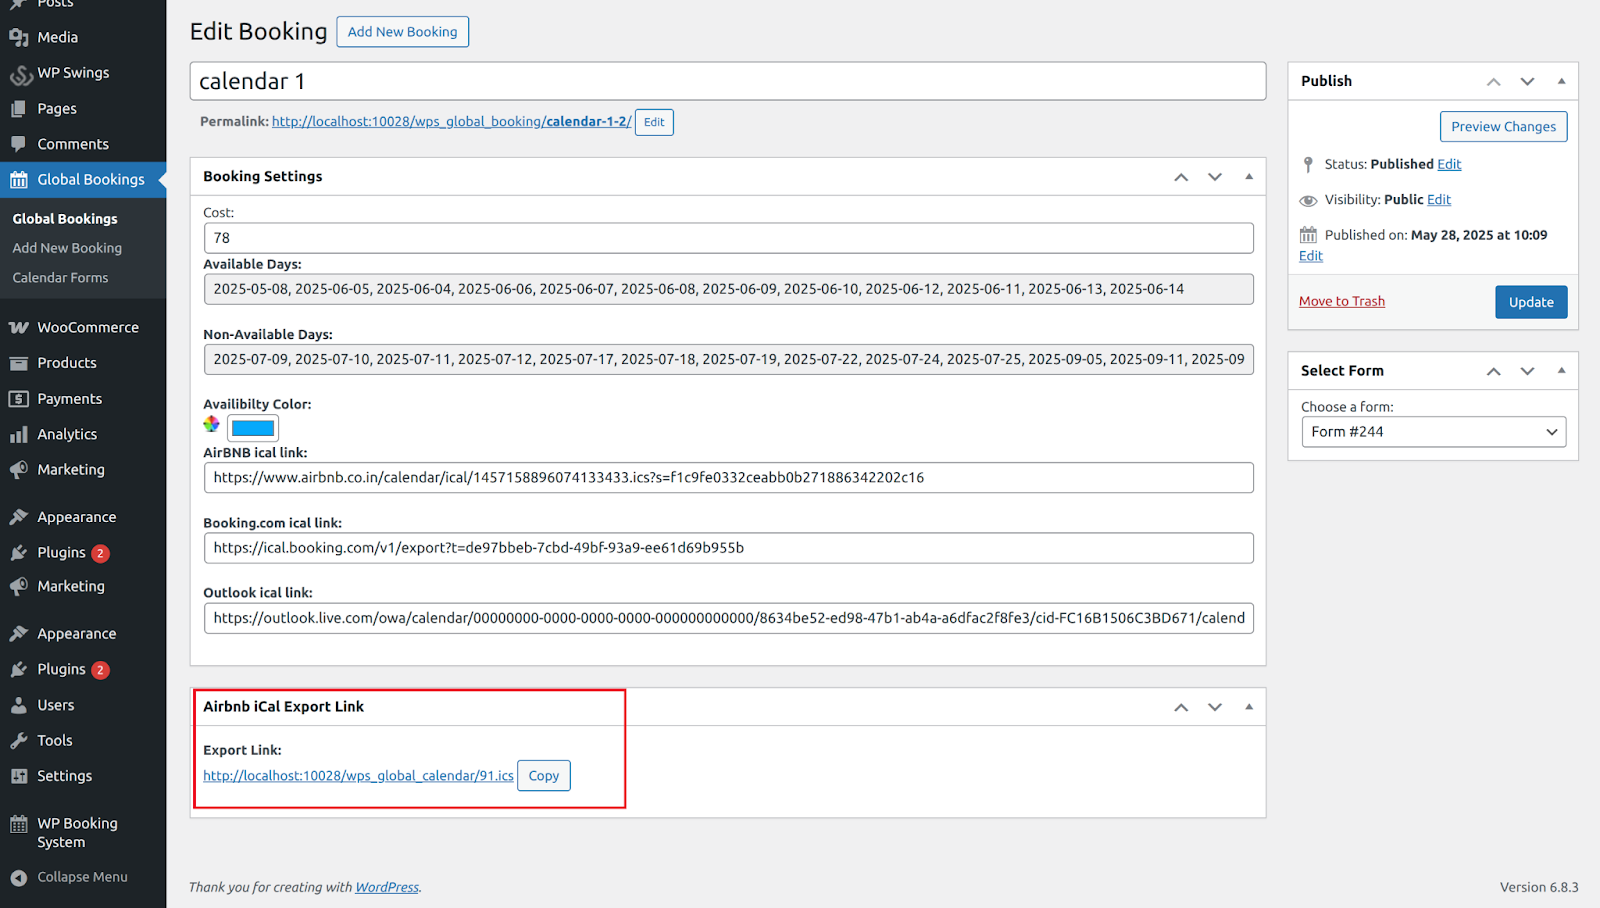
Booking Settings –
- Cost: Specify the cost for booking a slot on the Global Calendar
- Available Days: Mention the available dates.
- Non-Available Days: Mention the non-available dates.
- Calendar Colour: Choose the colour for your calendar.
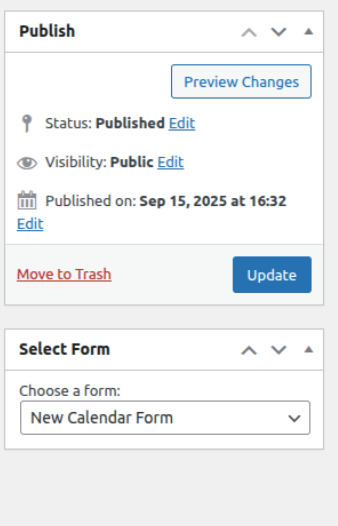
After mentioning all the related data, click on the “update” button to publish the calendar.
Calendar Form Settings
Admins can create a global form for the global calendars, and the admins also gets the chance to select which form they want to display on the frontend.
To create a form, navigate to “Global Bookings” > “Create Calendar Form” through the sidebar of the admin’s dashboard.

After clicking on “add new form”, the admin will be redirected to the form creation page.
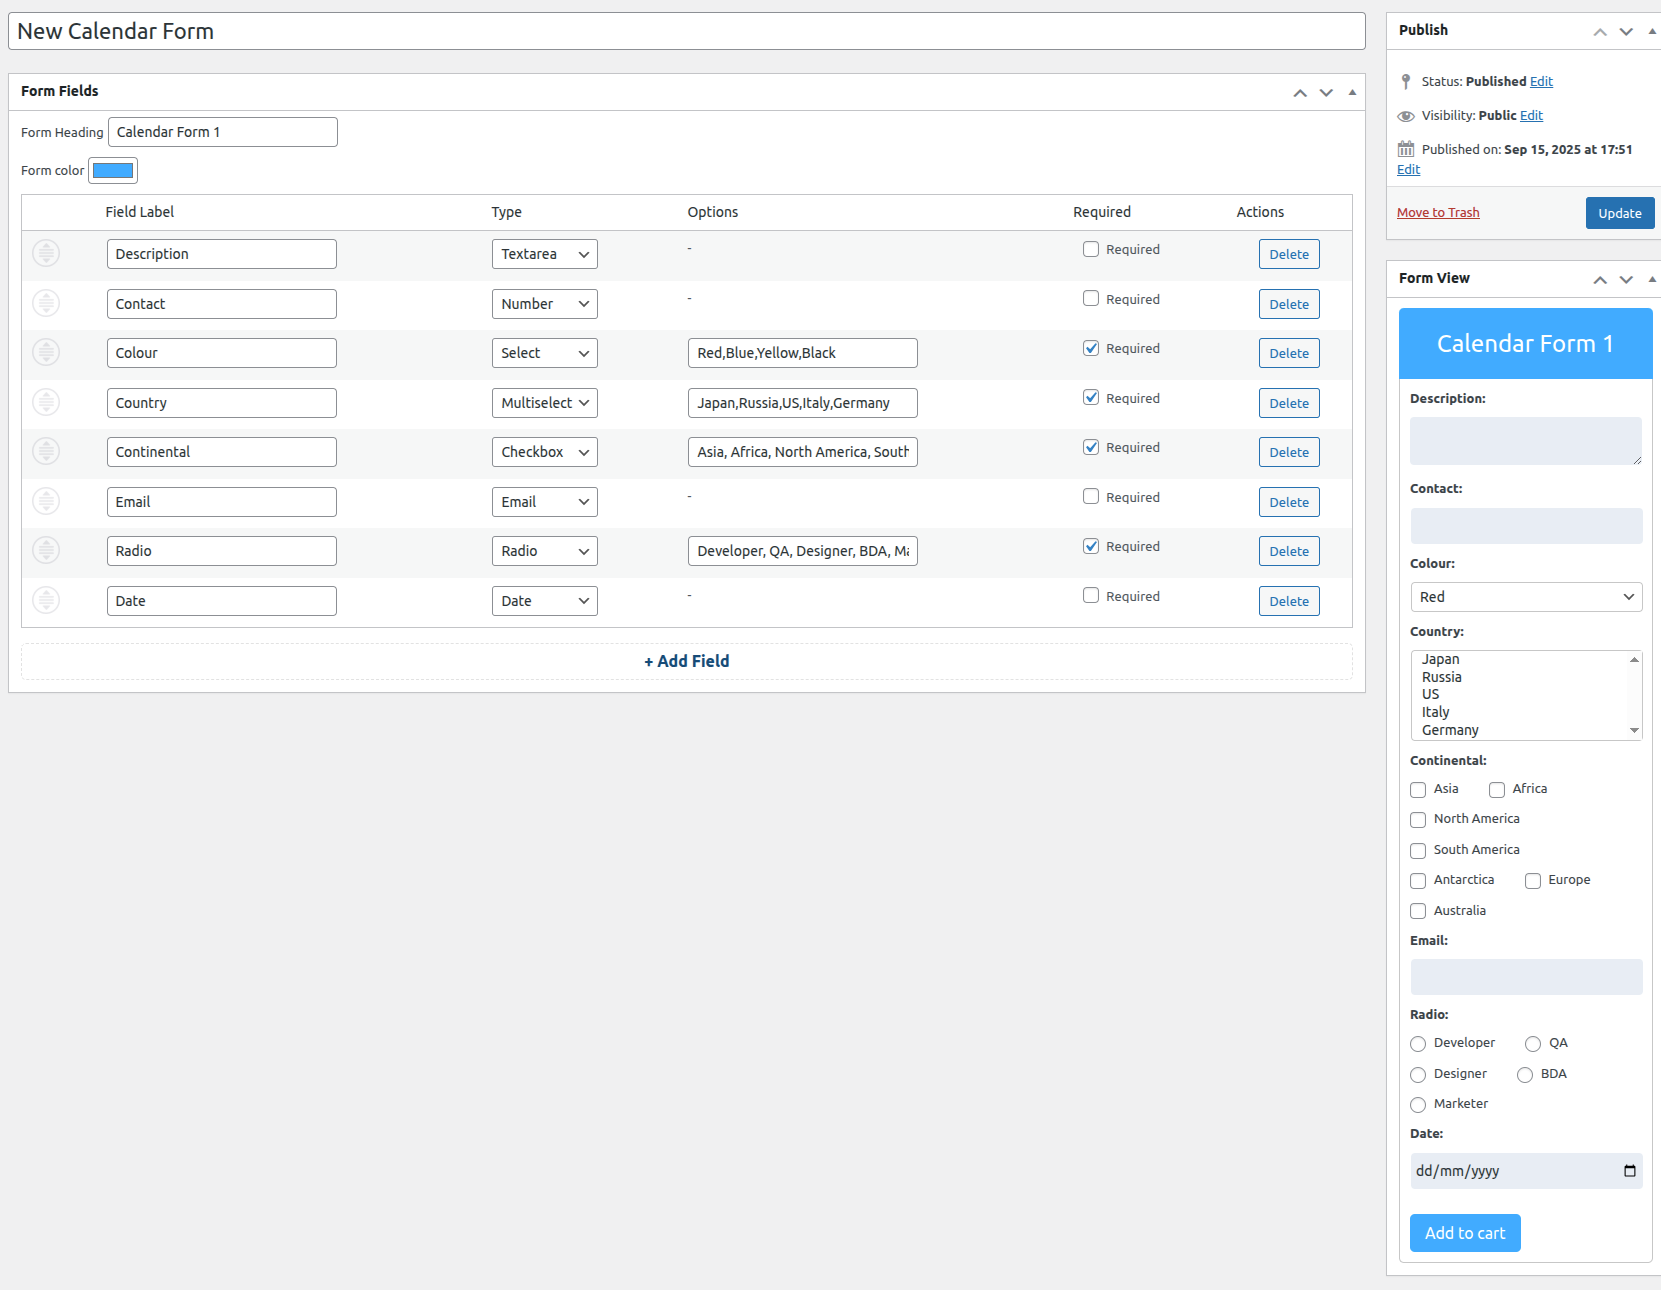
Calendar Form Settings,
- Form Heading: The admins can mention the unique heading for the form, which will be displayed over the frontend.
- Form Colour: The admin can also select the colour of the form as per the requirements of your business.
- Field Label: Utilize this space to mention the Label for the created fields. For example: Name, Contact, Colour, etc.
NOTE: Admins can add up to five fields if you are using the “Free” Version. If you have the premium version, you can create as many fields as you like.
- Type: Utilize this space to mention the type of information that you are collecting. For example, for name you can provide “text space” , for gender you can provide “radio button,” and so on.
- Options: If you have selected the “multiselect” type, you can utilize this section to specify the options.
- Required: Utilize this space to add the “required” tag over the fields in the form.
NOTE: This functionality will also work for the “Premium” version.
- Actions: Utilize this section to delete an existing field.
Admins can also see the “Preview of the created calendar”.
Frontend Representation:
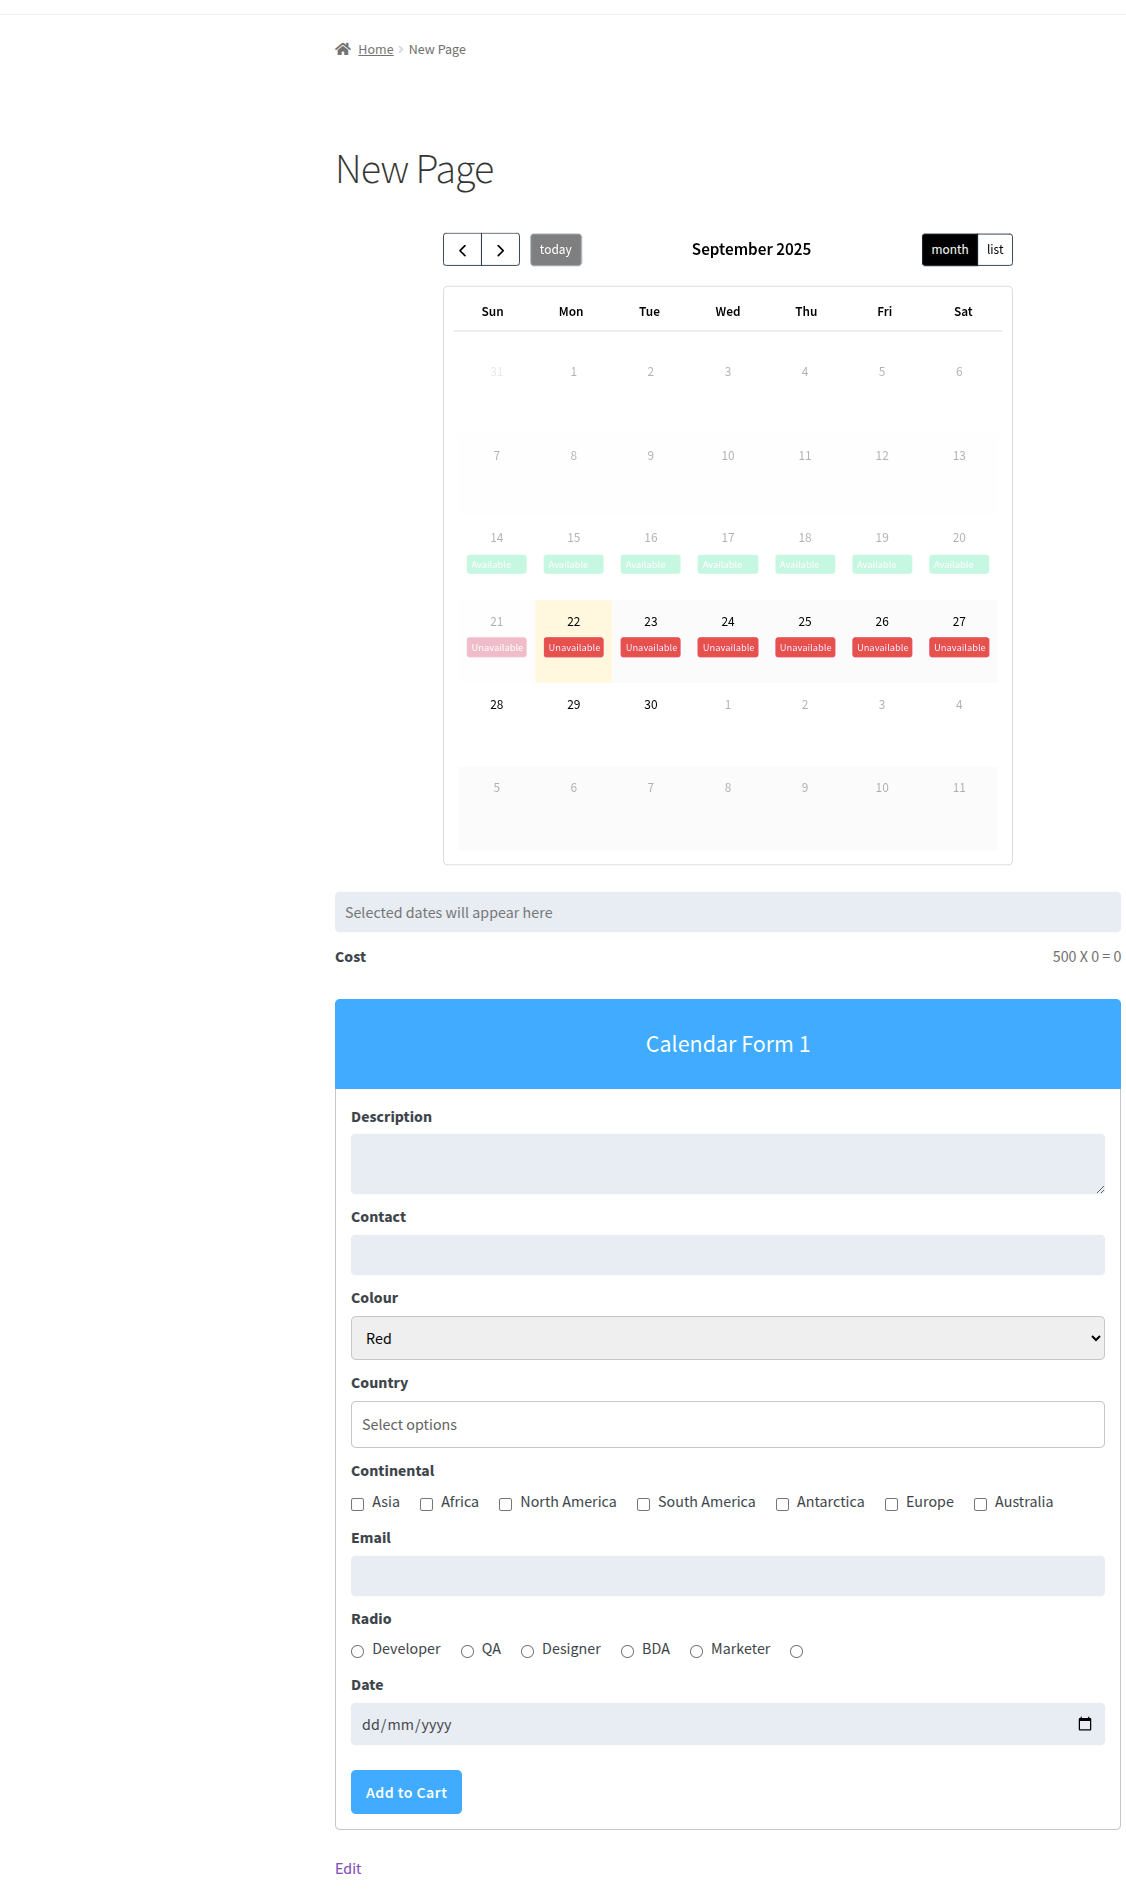
The admin can also select which of the created forms, they want to display over the frontend with the drop-down,
Implementation Of the Global Calendar
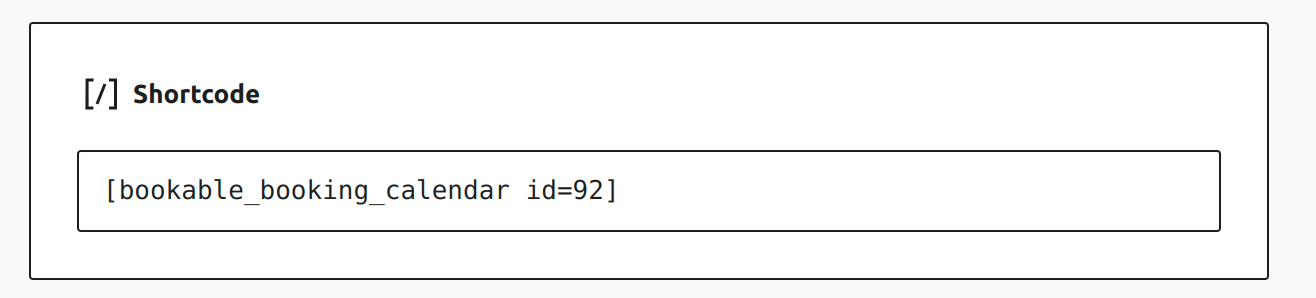
After successfully curating the calendar, the administrator will see the “shortcode for the created calendar” at the “Global Calendar Booking” dashboard.
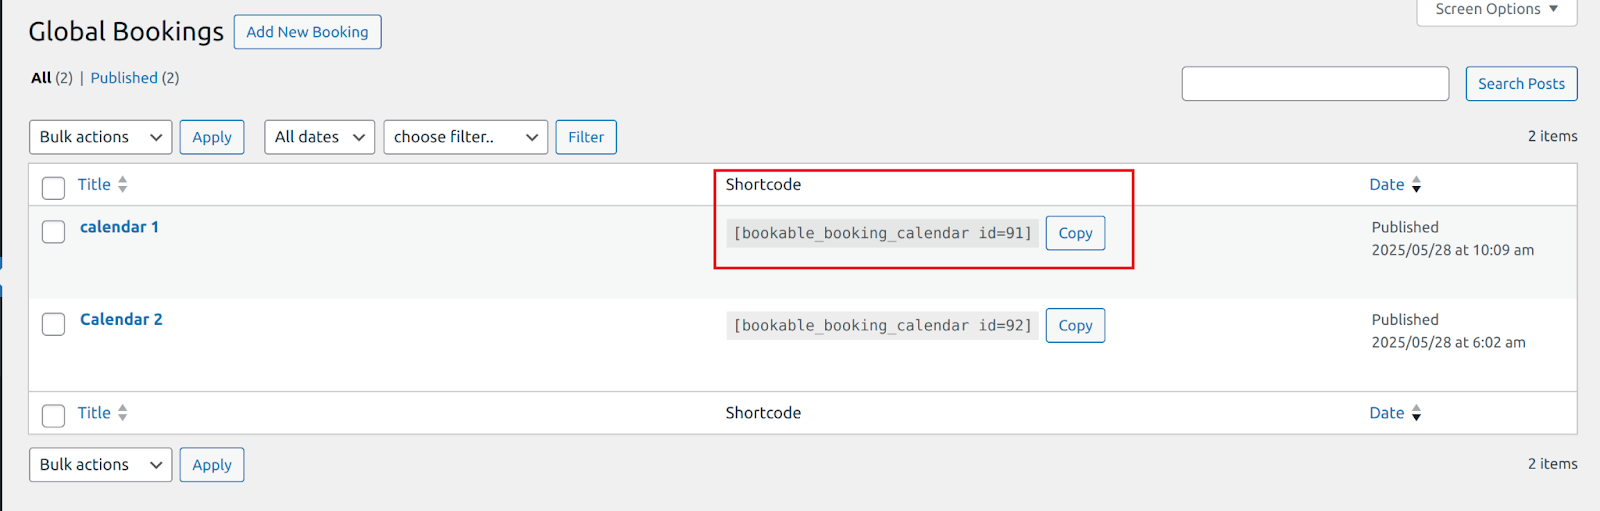 Simply copy the shortcode for the created calendar, and paste it where you want to show this calendar.
 After successfully incorporating the global calendar, this is how it will look on the frontend.

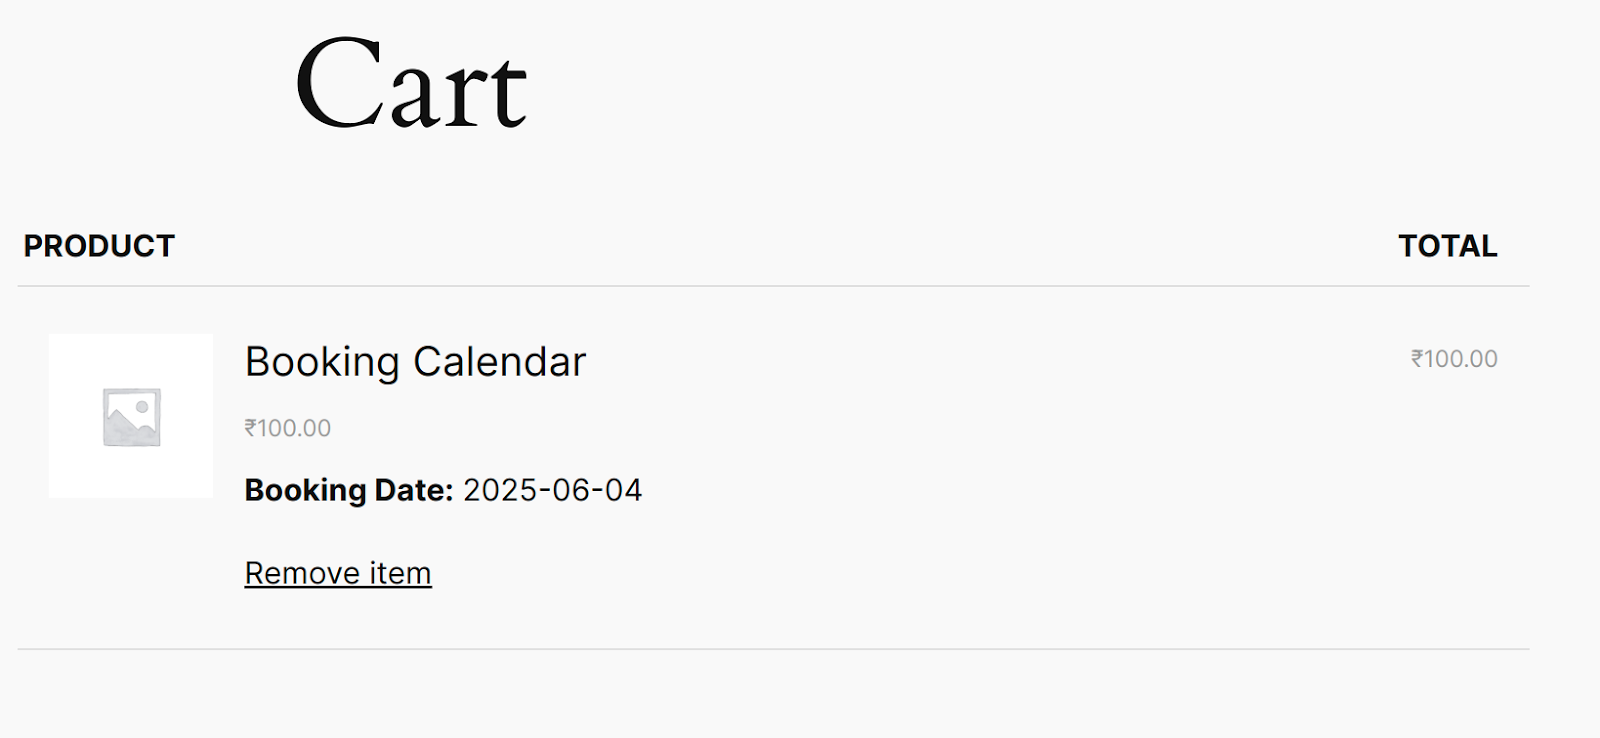
The customers can easily make the booking for the dates they want, and the said bookings will be handled by the admins in the same fashion as for other bookings made over the site.
Frontend For Customers making the booking –
Backend for the admins receiving bookings –

7.Sync Global Calendar with Airbnb
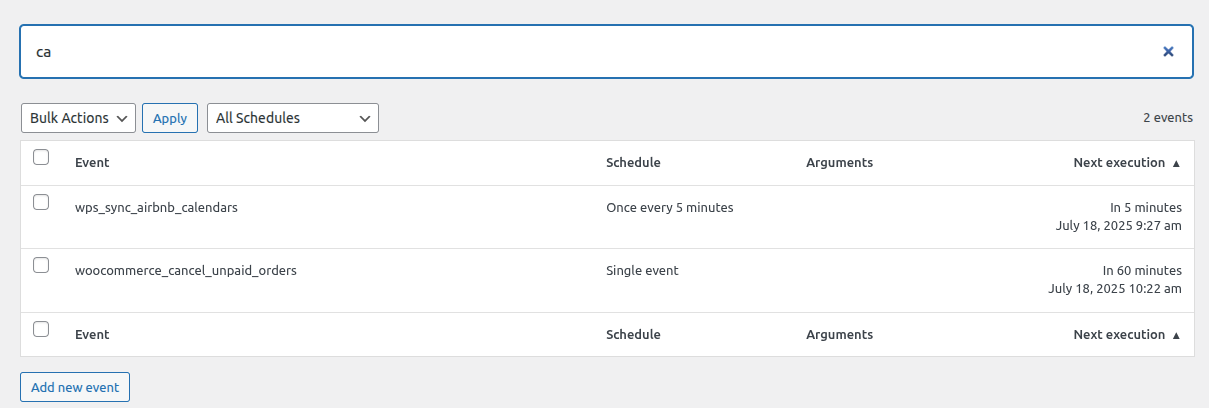
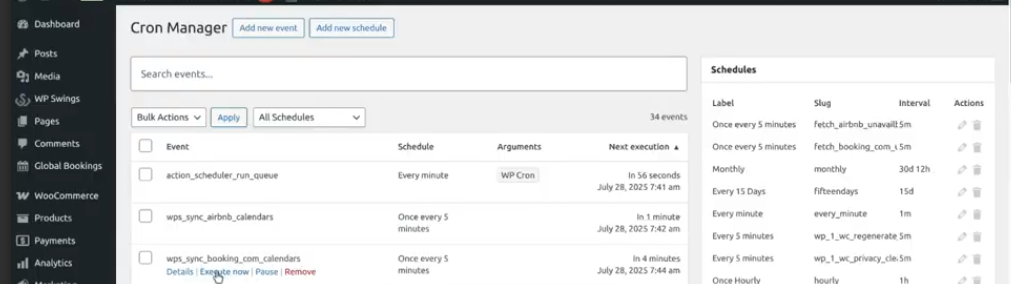
By utilizing this functionality, the admins can sync the global booking calendar with the Airbnb listing calendar. If specific dates are set as unavailable on Airbnb, an automated cron job that runs every 5 minutes will update the bookings calendar( listed on the WooCommerce store) to block those same dates, and vice versa. Similarly, any changes made in the store’s global calendar will reflect on Airbnb’s calendar too, ensuring both stay perfectly in sync.
Set Up Airbnb Host Account
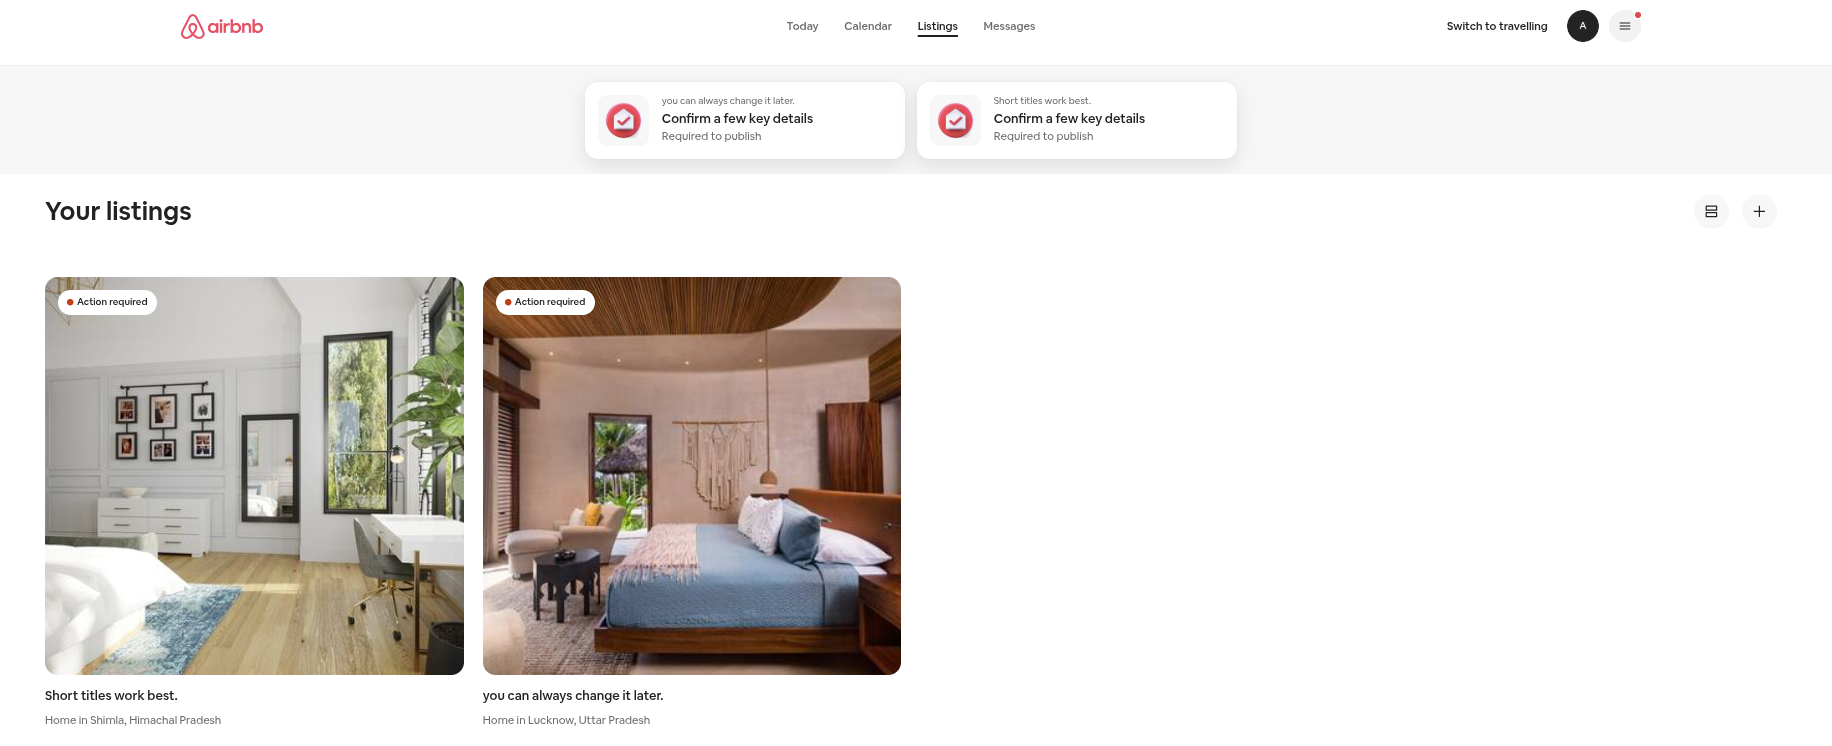
The first step is to successfully set up your host account on Airbnb. To do so, just navigate to Airbnb’s website. Click on the “Switch to host” mode, as shown below – 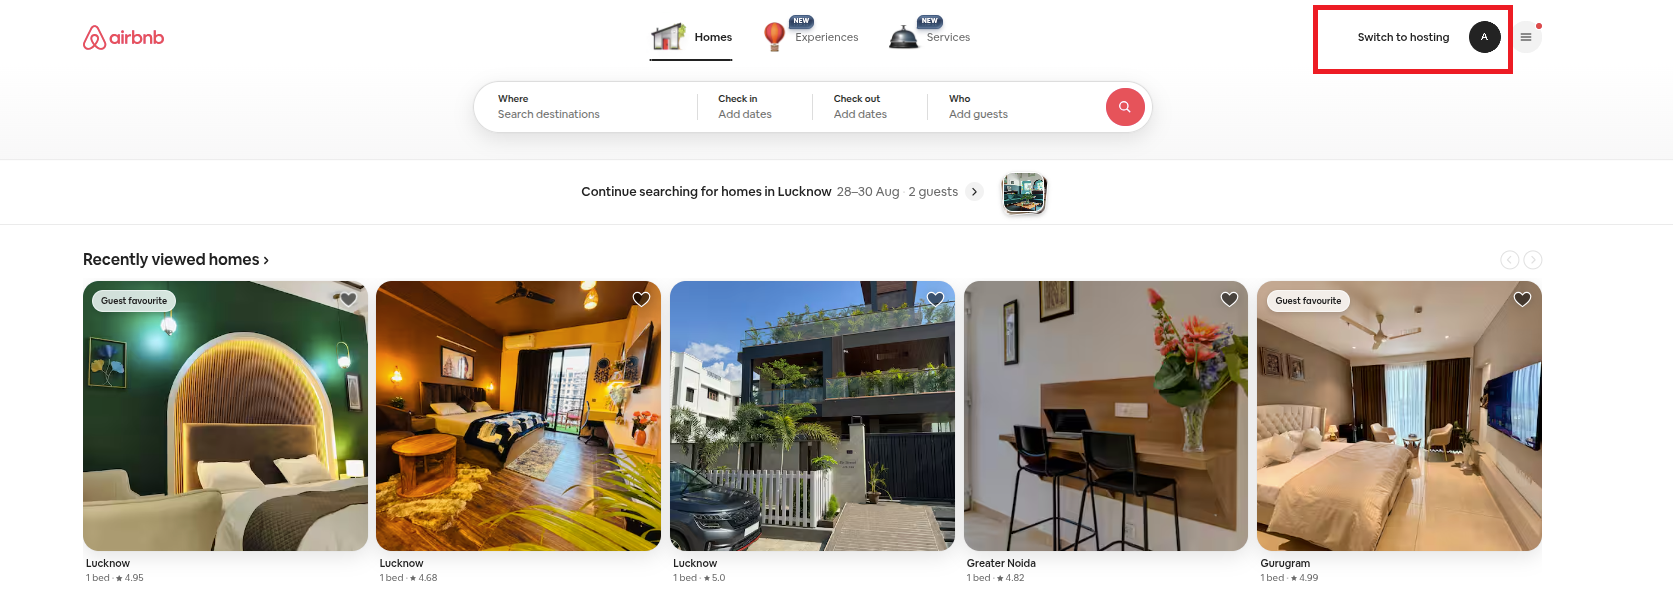 After doing so, you will be shown your already listed properties, and also given a chance to list new properties-
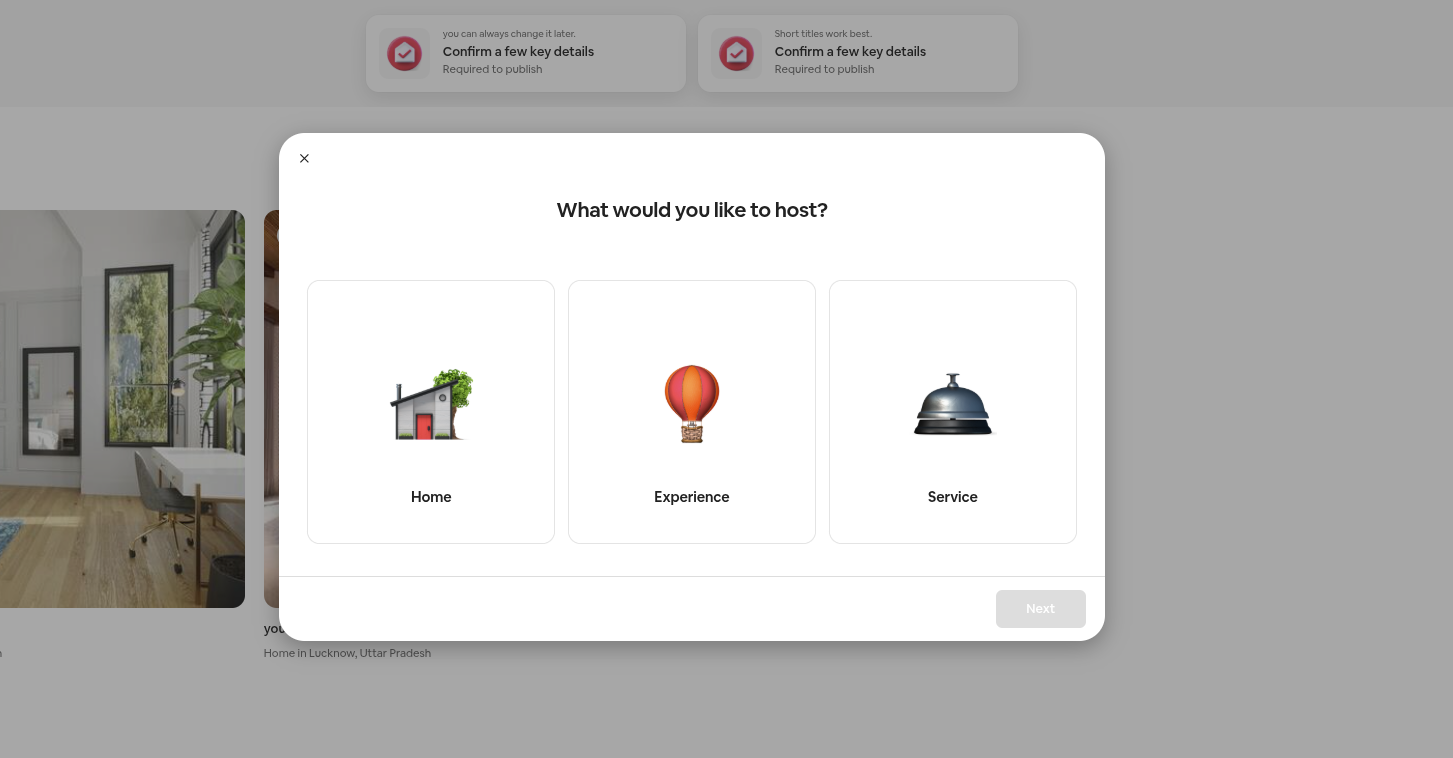
 To create a new listing, you must enter the following information. First, choose what you want to host – a home, an experience, or a service.
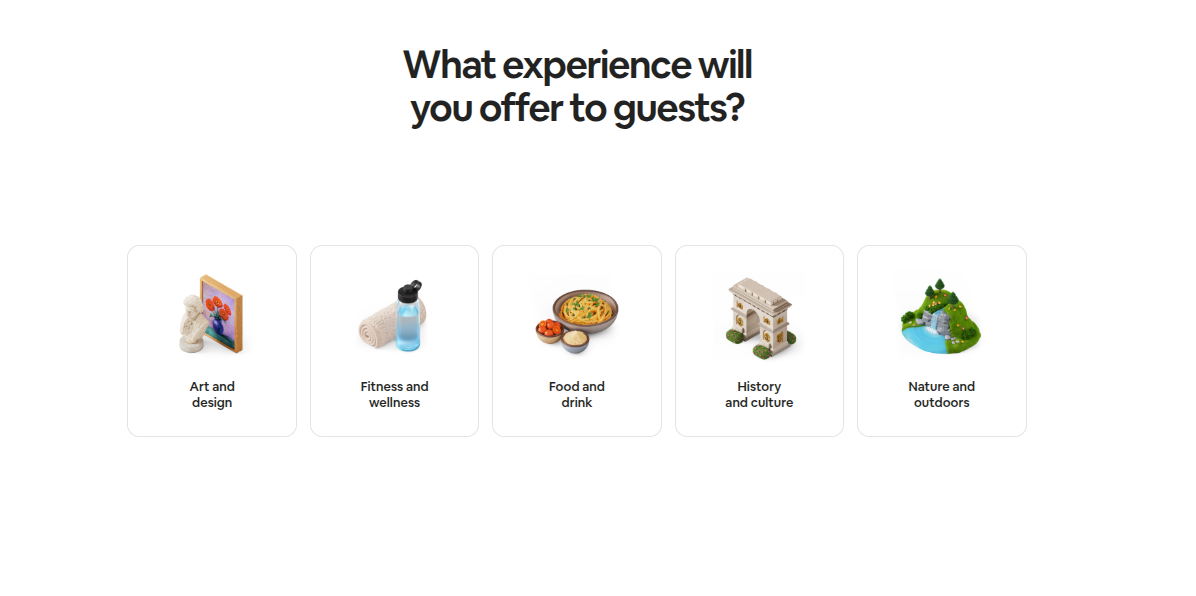
Let’s assume you chose the “experience” option. Now, you must choose the category for the same.
After selecting the category for the experience, admins must also describe the experience.
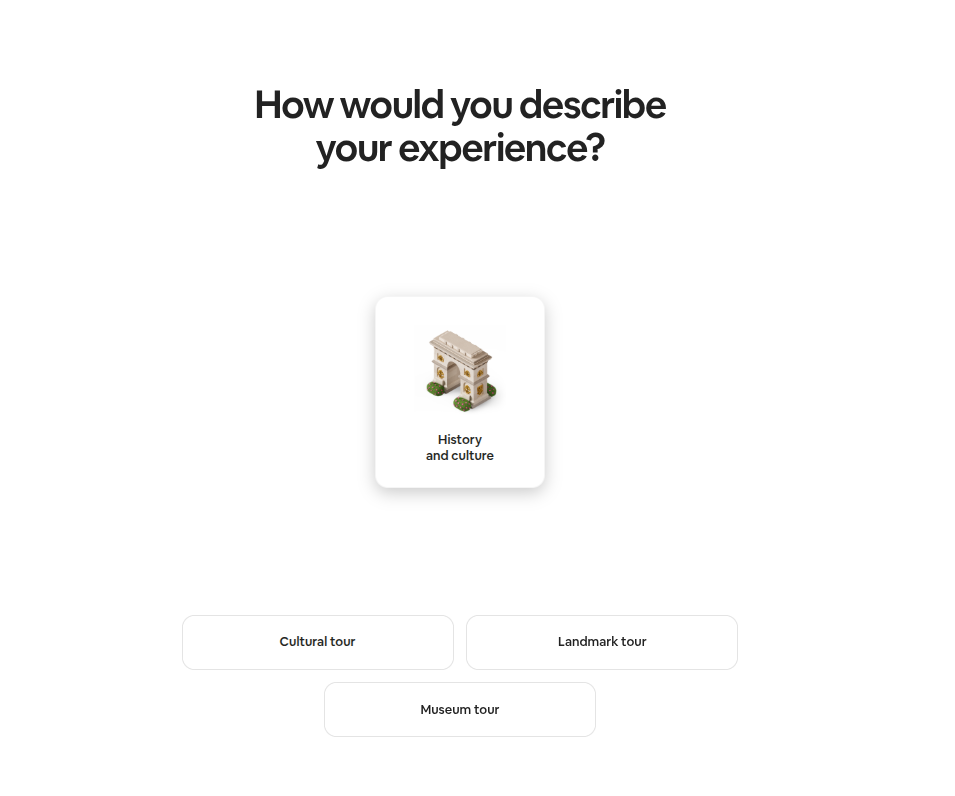
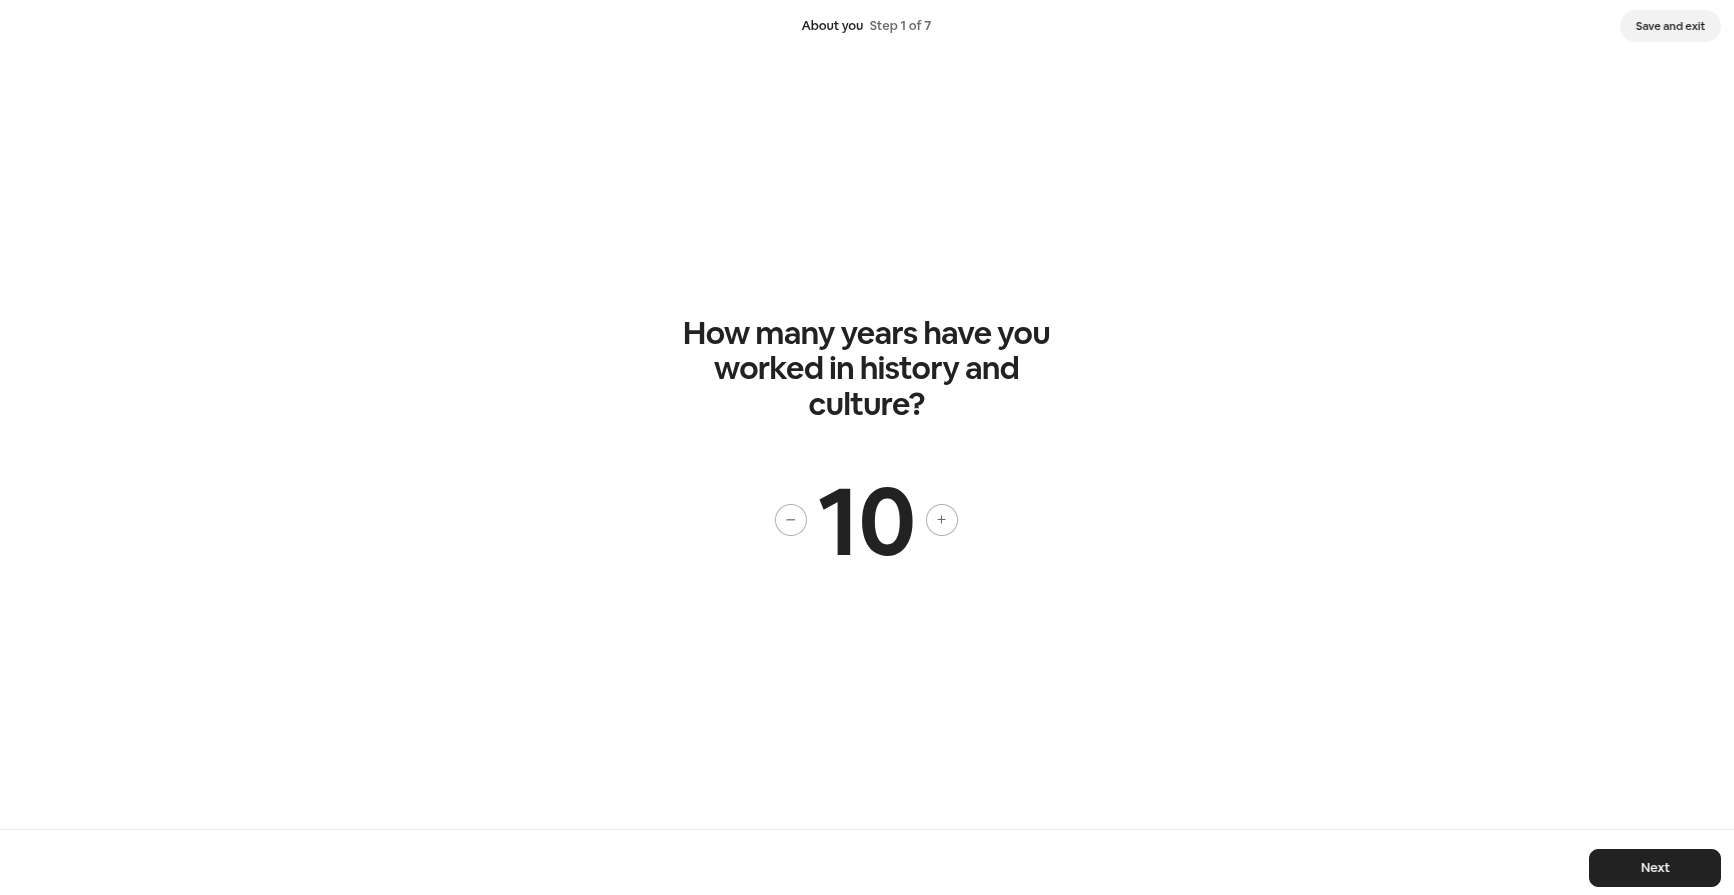
After successfully describing the experience. The admins will have to answer questions about themselves. Just answer the series of questions, as shown in the images.
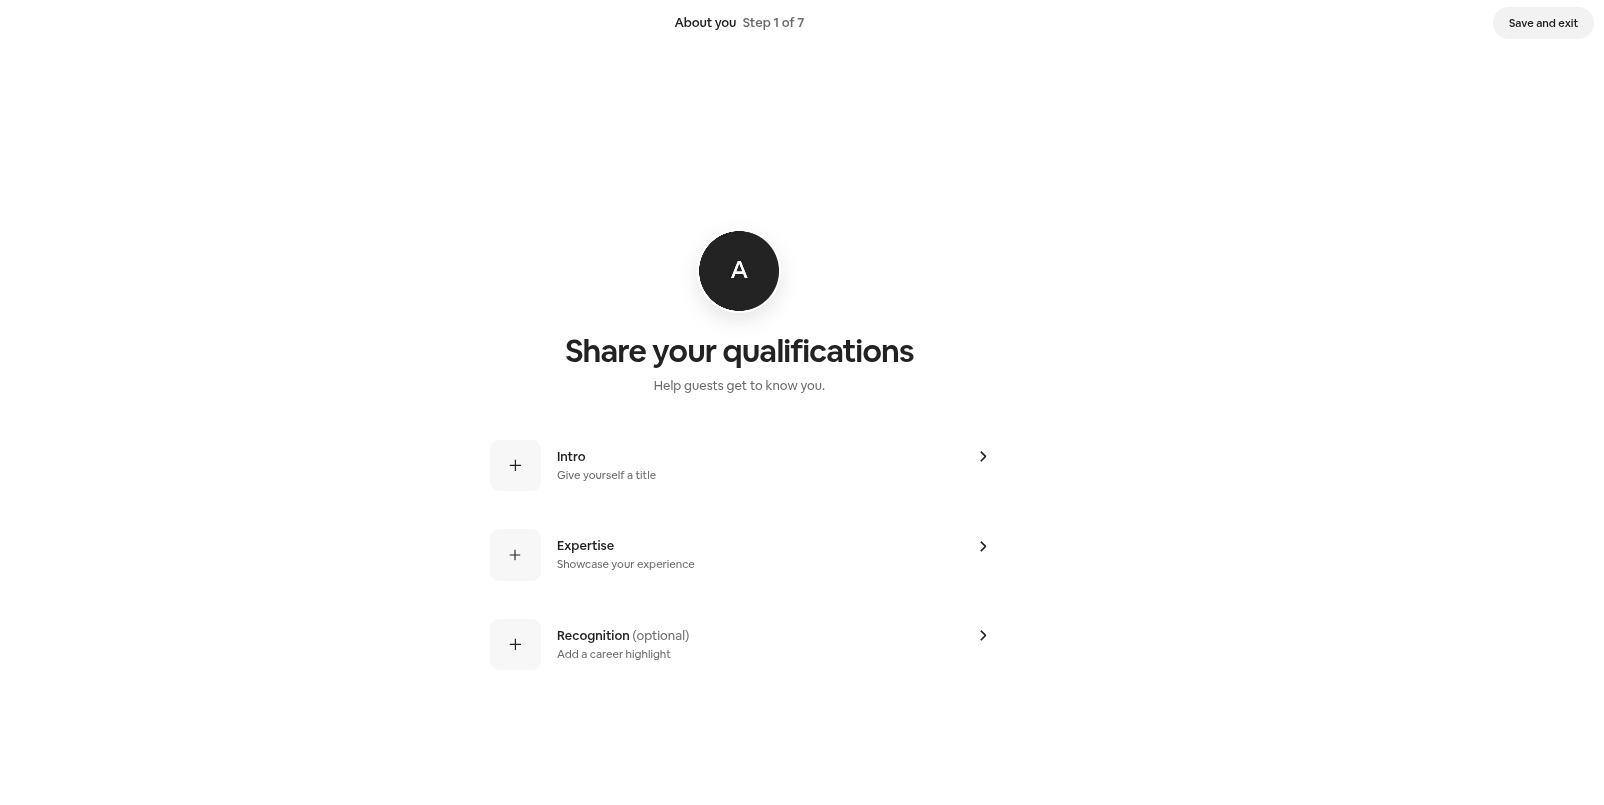
 Add your qualifications
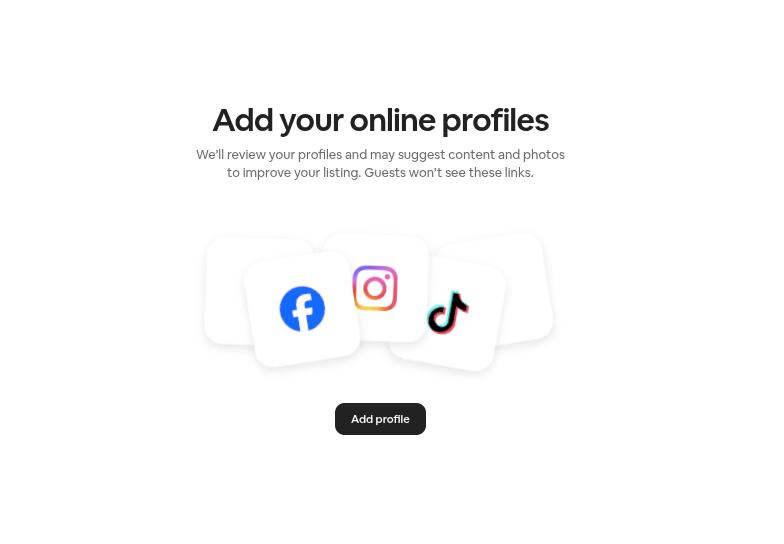
Add links to your social media accounts –
After entering all the details about the experience you are hosting, now answer some questions about yourself –
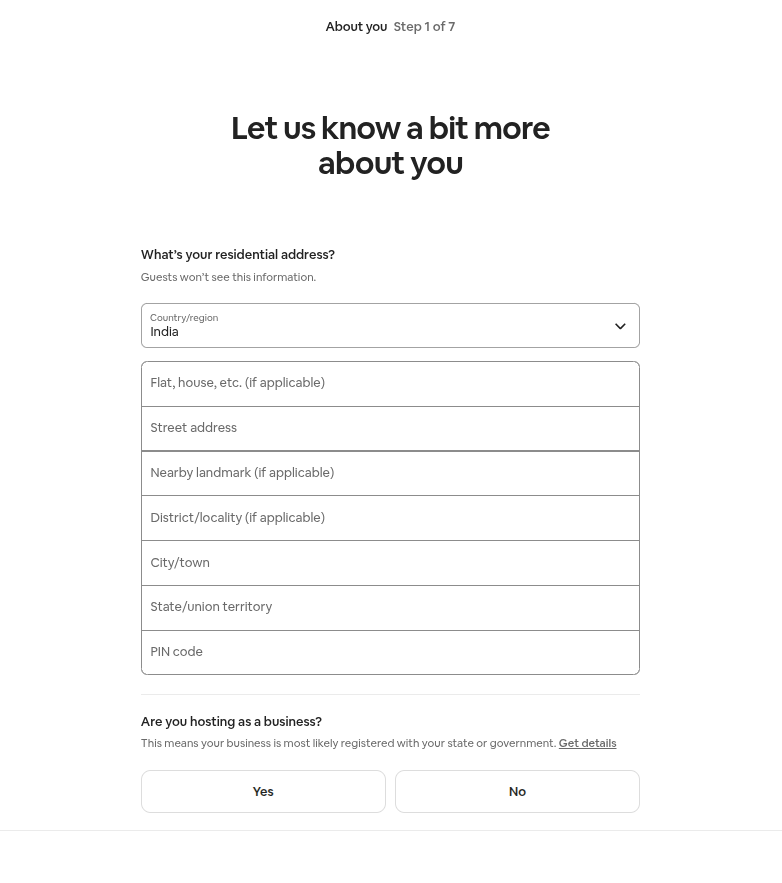
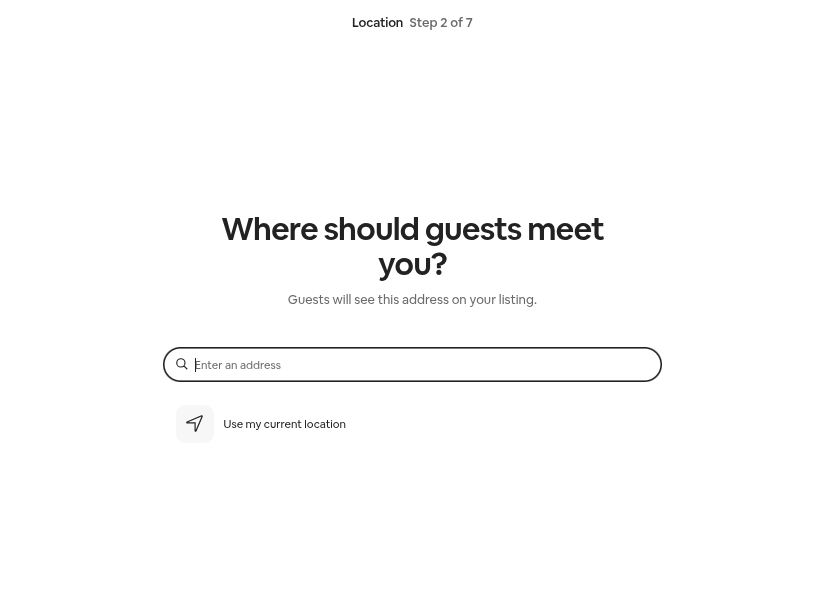
After adding all relevant information about yourself, you must also mention the location of the experience that you are hosting.
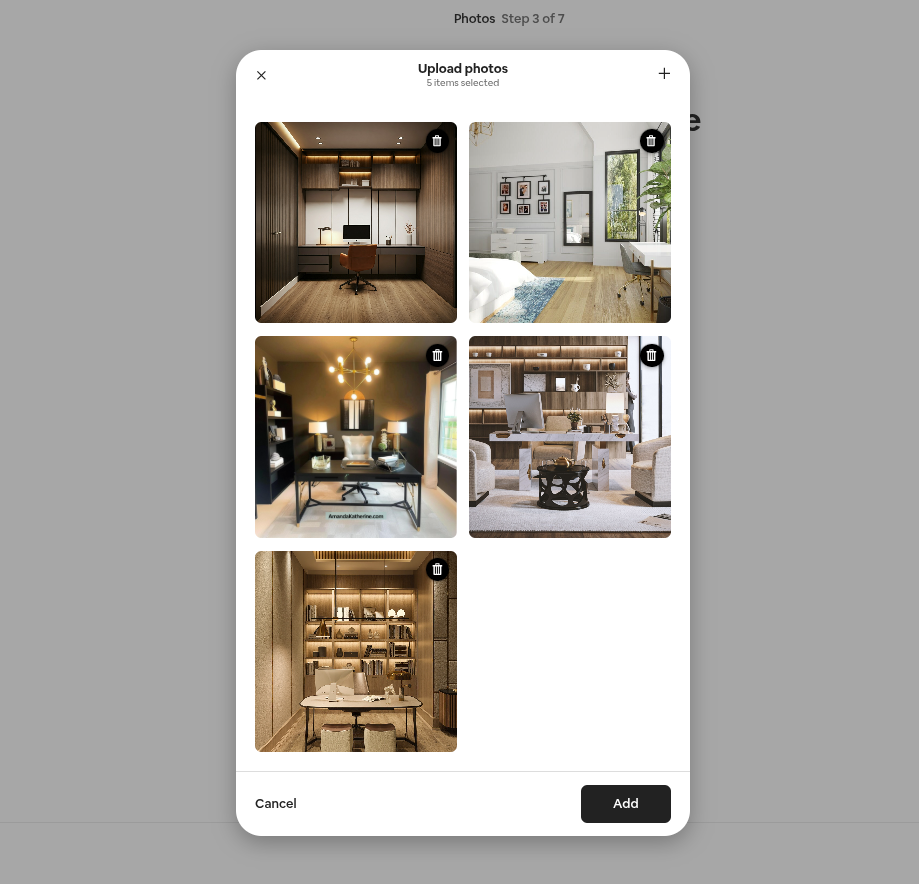
The admins will now have the option to add images that their customers will see before making the final decision/booking.
 After adding all the relevant images and all the other information, it’s time to name the experience that you’re hosting. This is the time to wear your creative hats on, because this name will nudge your customers towards making the final booking.

Now, you have finalized all the requirements related to the experience that you are hosting. Let’s also finalize the pricing for the same.
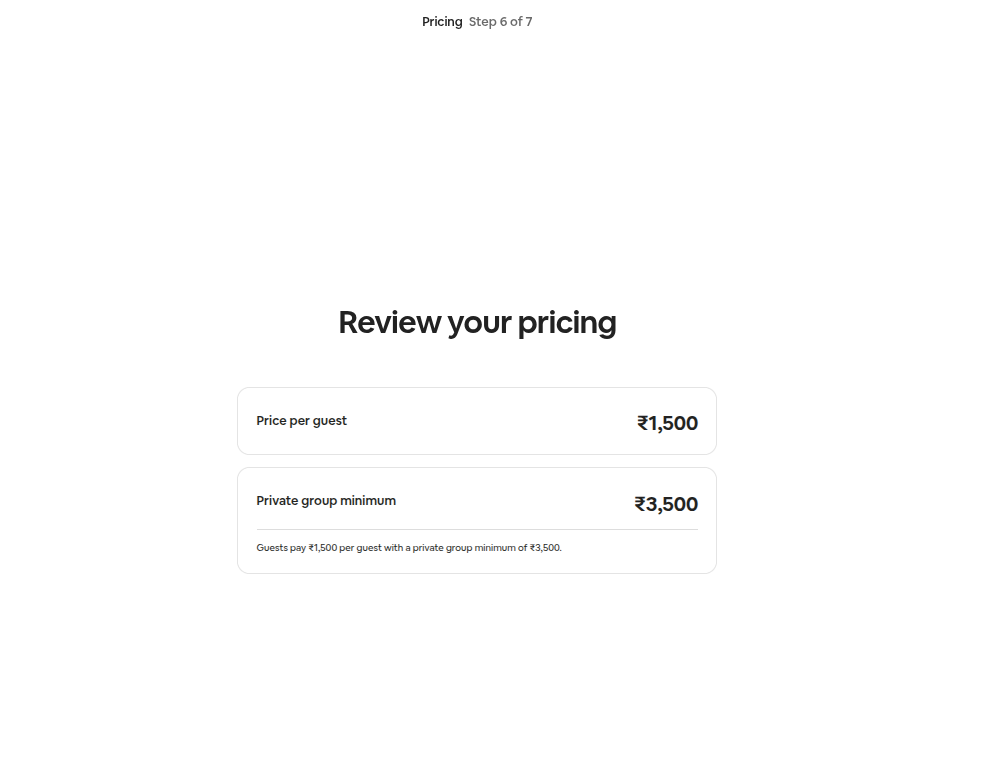 It is also important to note that all the good bookable products only work if you add good discounts. In this step, you spend time doing that –
 I am thrilled to tell you that you have successfully created an Airbnb host account. We can now proceed to sync the global calendar with Airbnb.
Sync Global Calendar
We have already mentioned in the early sections of the documentation about the working of the Global Calendar. (Navigate to section 3)
Now, this functionality only works for syncing the unavailable and available dates of the Global Calendar with the calendar listed on Airbnb.
This works in two scenarios –
A) Import the Airbnb Calendar
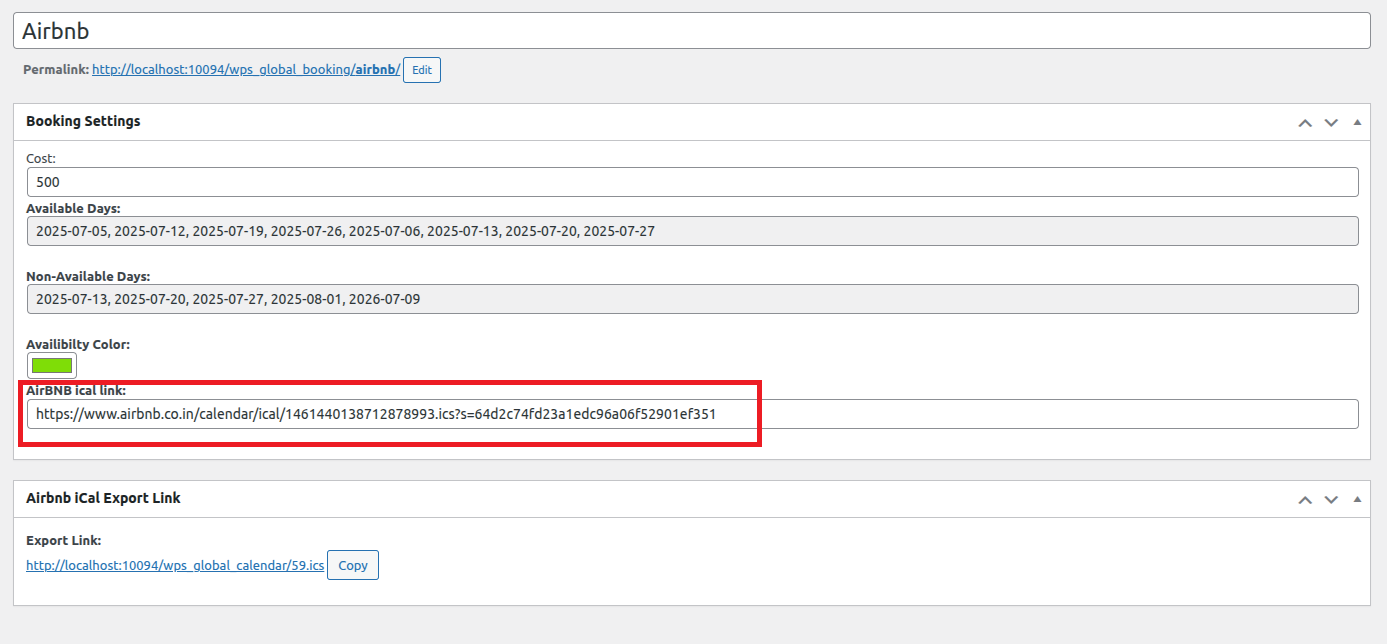
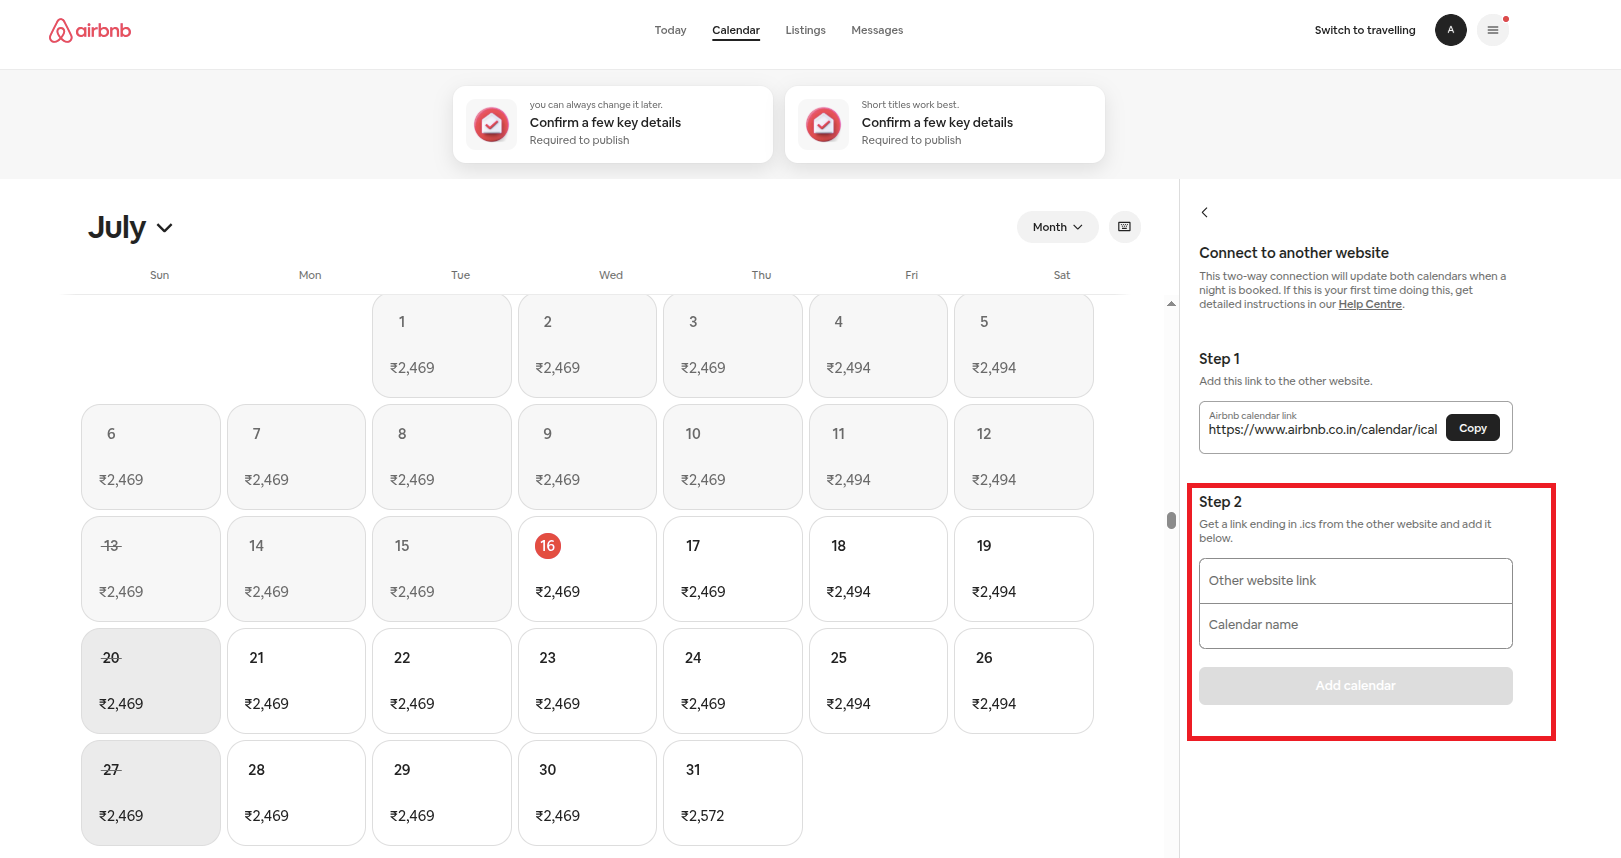
The merchants will simply need to copy Airbnb’s calendar link and paste it into the “Airbnb iCal link” space. To do so,
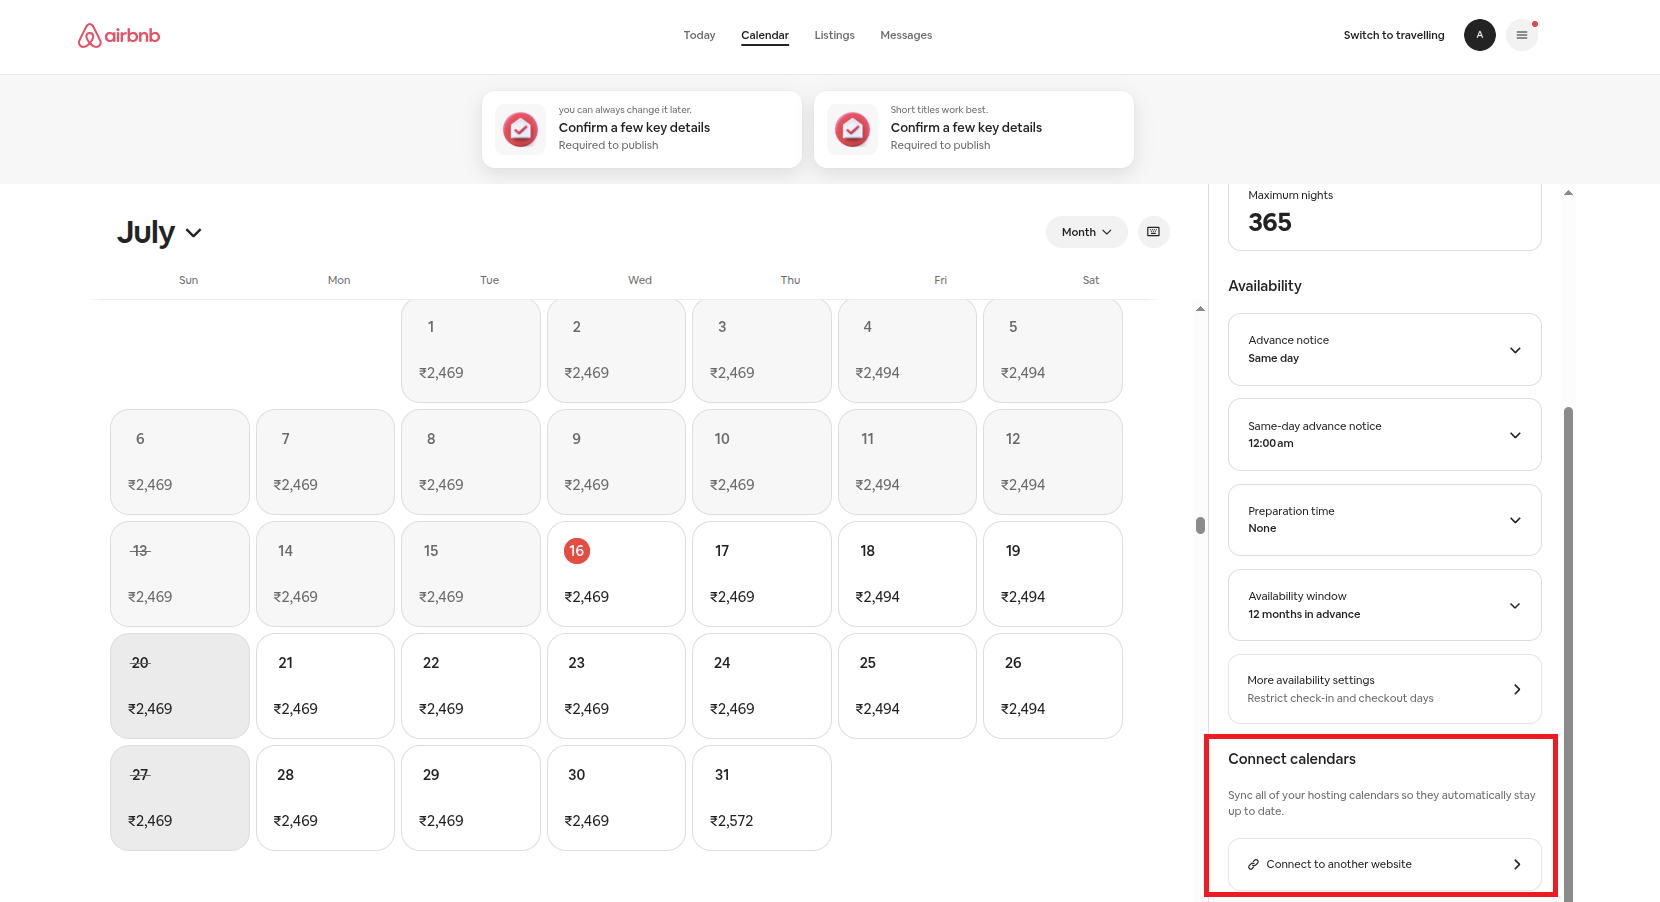 Just click on the “Connect to another website” button. After doing so, you will be navigated to the section where you can access the link.
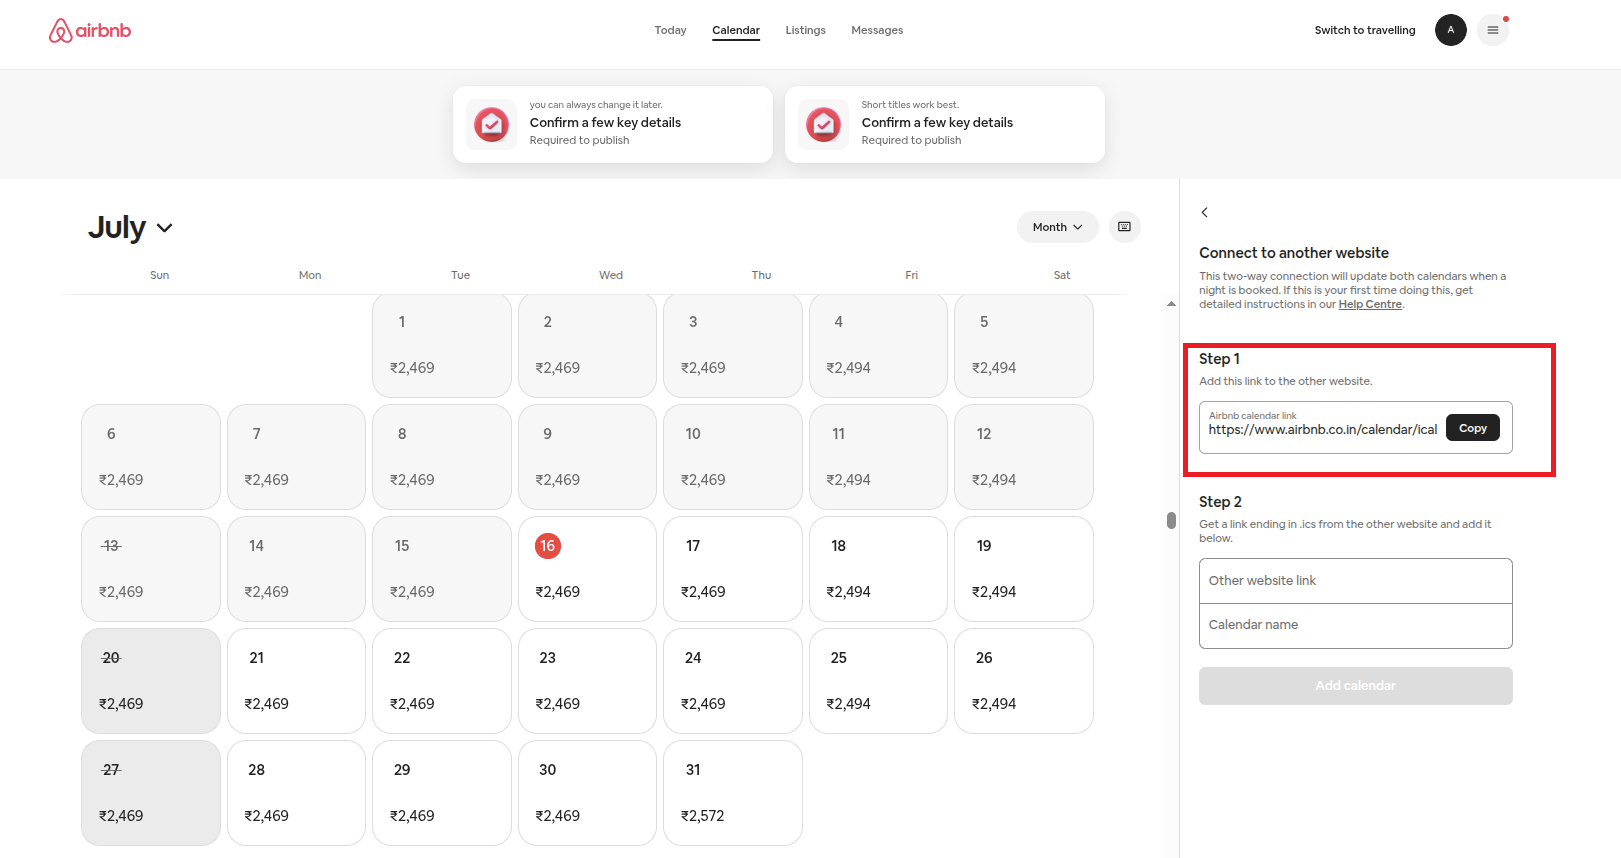 Now, simply copy the mentioned link and paste it into your global calendar’s “Airbnb iCal link” section as shown in the screenshots below –
After doing so, your Global Calendar’s available and unavailable dates will be synced with your calendar listed over “Airbnb” simply by refreshing both pages.
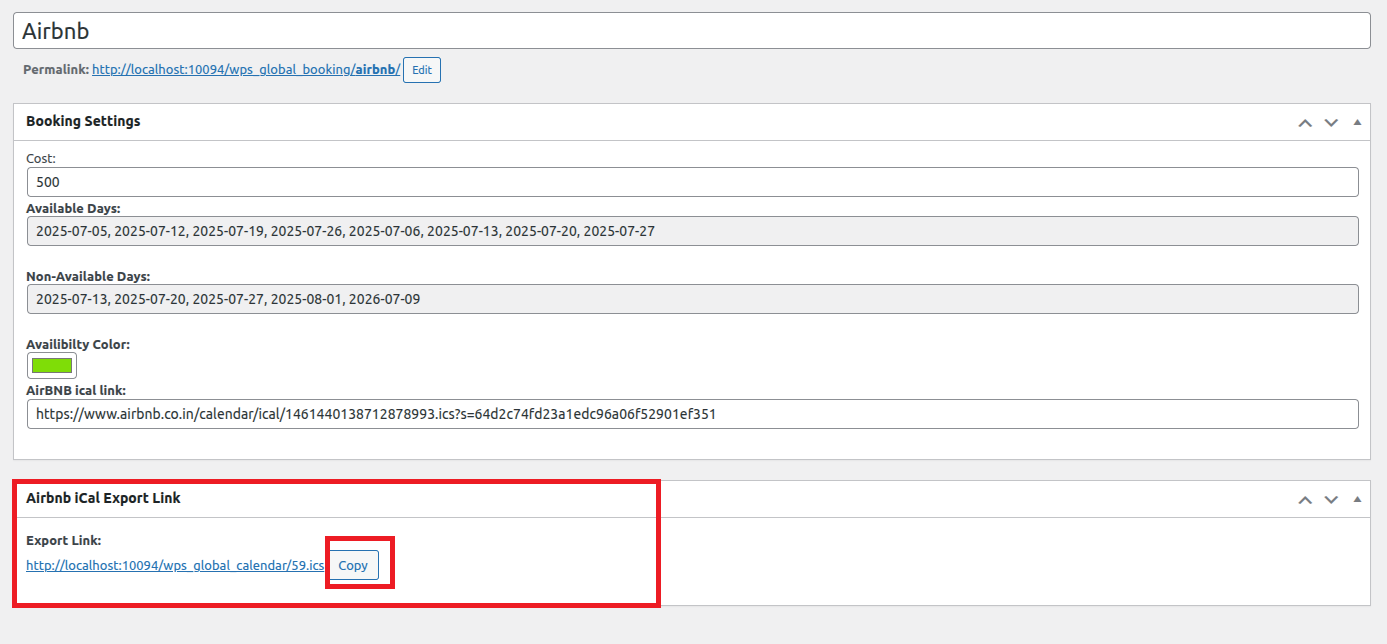
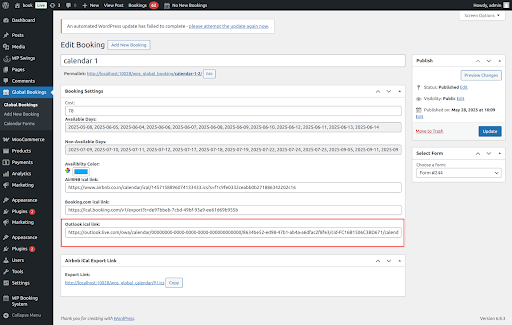
B) Airbnb iCal Export Link
In the next approach, we will export our Global Calendar to sync the available and unavailable dates.
Just copy the “Airbnb’s iCal Export Link.” In the following manner,
 After copying the iCal link, navigate to Airbnb’s Calendar. Here you will see the “Availability Settings”
Just paste the link in the space provided to sync both the calendars.
Let’s also understand how the syncing works, a cron runs at the duration of 5 minutes that syncs both the calendars to avoid any confusion or double bookings.
7.1.Set Up a Partner on Booking.com’s Platform

Just navigate to booking.com’s website and get your property listed there. The process is pretty straightforward; just follow the steps mentioned while you’re registering on their website.
After successfully listing your property on their platform, you can navigate to the extranet section of this platform. The Booking.com extranet is a useful tool for property owners. It helps you manage your listings, communicate with guests, handle payments, and also access support from Booking.com. It makes hosting easier and more profitable.
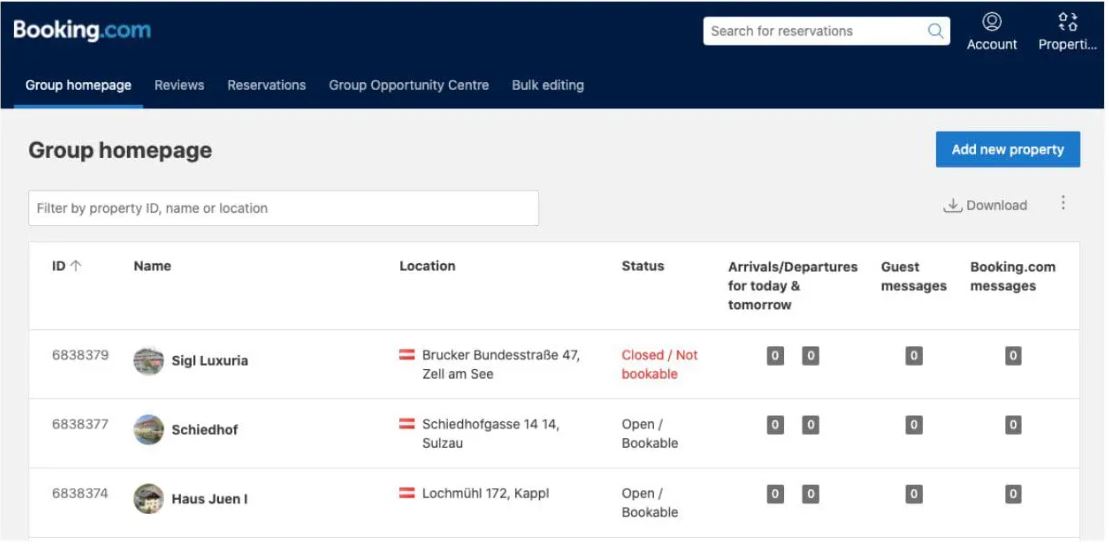
In this section, you can see all your listed properties. Just click on any property, and navigate to the “Calendar Booking” Section.
Here you can see your calendar and set availability and unavailability dates.
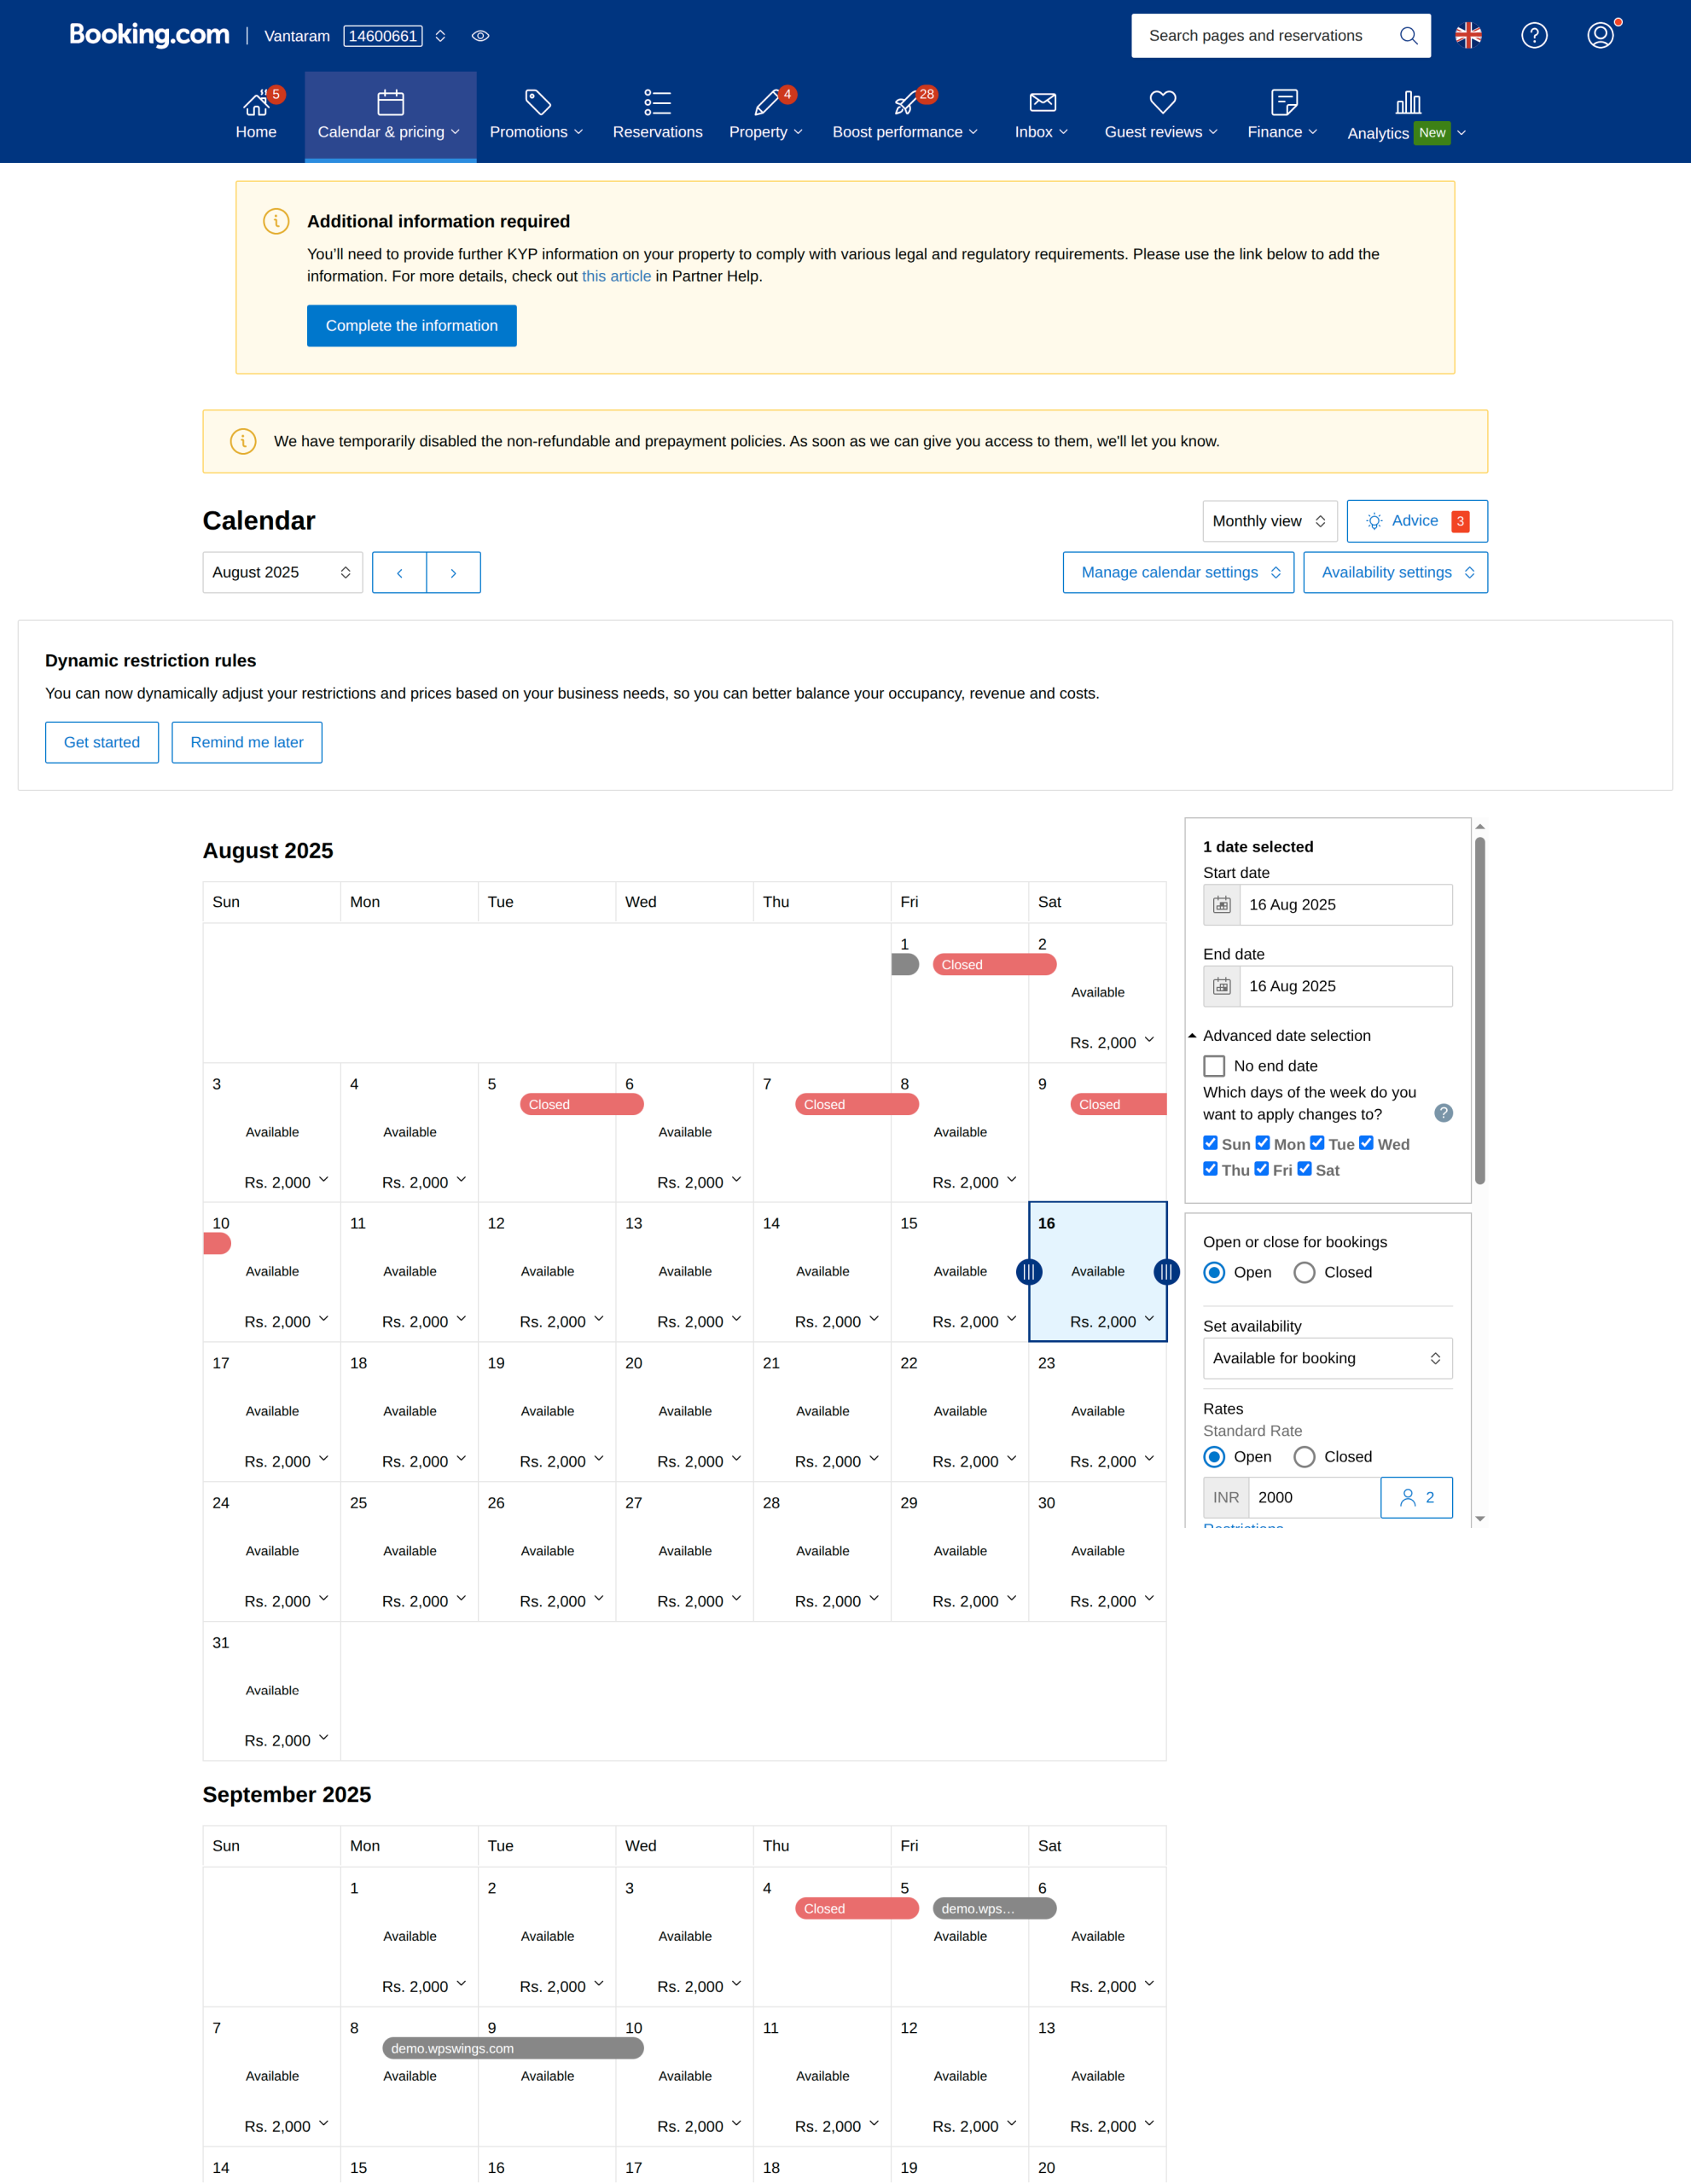 Booking website owners can very conveniently set the available and unavailable dates.
After successfully setting the available and unavailable dates, we can move on to syncing our global calendar with the calendar listed on Booking.com.
8.Sync Global Calendar With Booking.com
We have already mentioned in the early sections of the documentation about the working of the Global Calendar. (Navigate to section 3)
Now, this functionality only works for syncing the unavailable and available dates of the Global Calendar with the calendar listed on Booking.com.
Just navigate to “Manage Calendar Settings”, and click on “Calendar Connection”
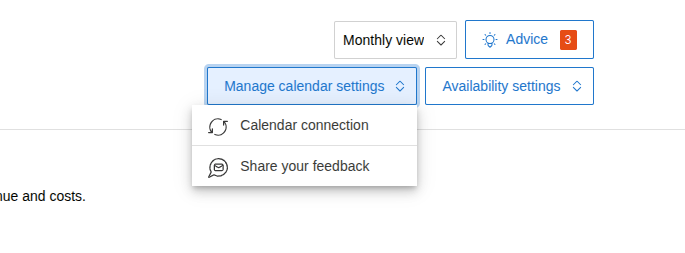
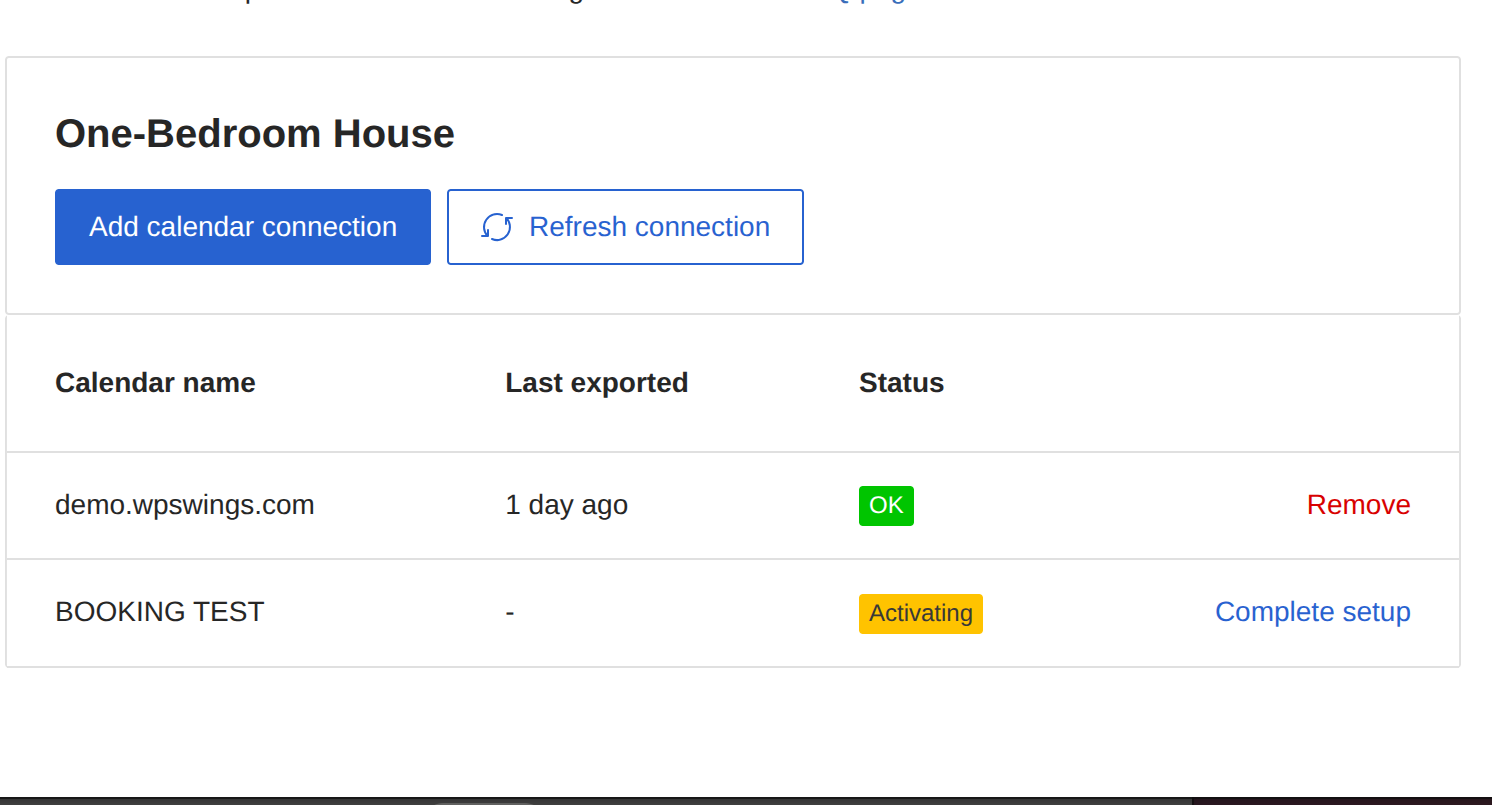
After this, you’ll be taken to a page where you can synchronize your calendar with our global calendar or other calendars.
This works in two scenarios –
1. Import Calendar
Simply copy Airbnb’s iCal link, which we provide in the global calendar’s backend settings –
After copying the iCal link, simply paste it in the space provided. It is also important to note that you will have to give a name to your calendar.
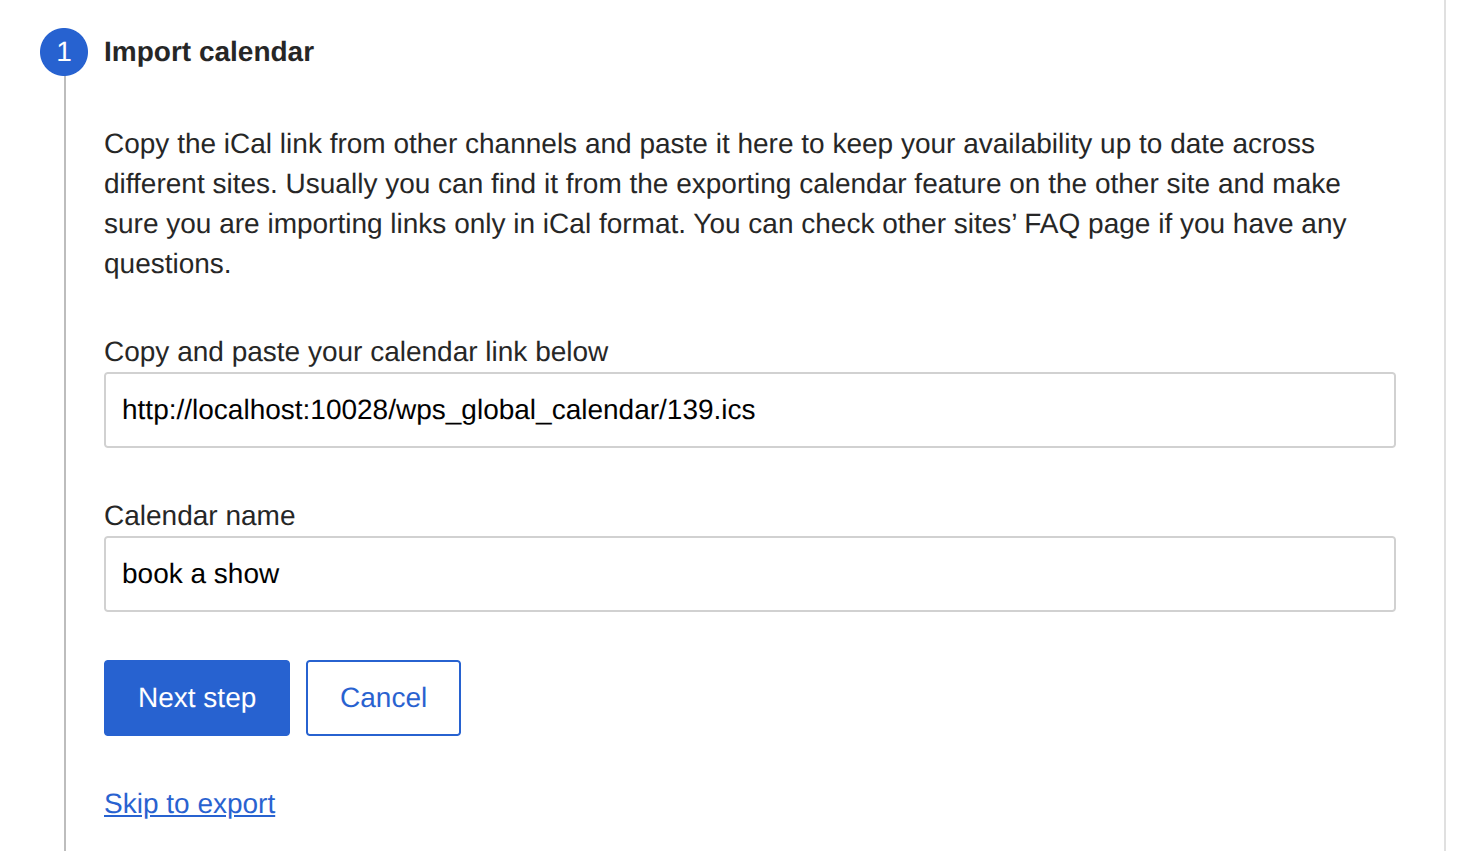 After doing so, your Global Calendar’s available and unavailable dates will be synced with your calendar listed on “booking.com” simply by refreshing both pages.
2. Export Calendar
In the next approach, we will export our Global Calendar to sync the available and unavailable dates.
Simply, copy the booking.com export link. It is important to note that the export link is generated one-time.

And paste the space given in the backend settings of your Global Booking Calendar, to sync both the calendars.
 Let’s also understand how the syncing works, a cron runs at the duration of 5 minutes that syncs both the calendars to avoid any confusion or double bookings.
9.Sync Global Calendar With Outlook
Sync the global booking calendar with Outlook’s calendar. Suppose specific dates are set as unavailable on Outlook’s calendar. In that case, an automated cron job that runs every 5 minutes will update the global bookings calendar (in your WooCommerce store) to block those same dates, and vice versa. Similarly, any changes made to the store’s global calendar will also be reflected in Outlook’s calendar, ensuring both stay perfectly in sync.
This works in two scenarios –
Import Calendar
To import the global calendar to Outlook’s calendar to sync the unavailable dates, simply copy the “Airbnb iCal Export Link.
And click “Add Calendars”> “Subscribe From Web” > and paste the URL that you just copied into the space you are provided with, as shown below –
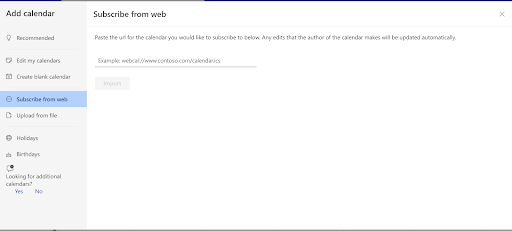 After doing so, you will be able to sync the unavailable dates of the global booking calendar with your Outlook calendar.
Export Link
To export and sync the unavailable dates from Outlook to the global booking calendar, simply navigate to Settings > Shared Calendars > Publish A Calendar. Now, you can simply copy the link mentioned there as shown below –
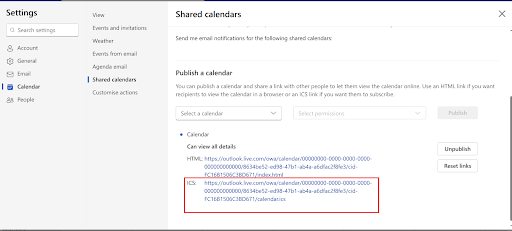 After copying the link, you can paste it in the space provided in the backend settings of the global calendar, as shown below –
After doing this both the calendar’s unavailable dates will be synchronized.
