
1.Overview
- A separate booking list is offered on the WC order listing panel with a specialized WooCommerce Bookings tag for easy sorting.
- A precise number of booking cancellation and processing days can easily be defined.
- Effortlessly show/hide the additional booking form details using render settings.
- Provide booking service location navigation through the booking location feature.
- Early Bird Discount coupons can easily be offered.
- Before the service is available, you will receive email and SMS reminders.
- Fully customized email/SMS templates for different business types.
- Unit, basic, and extra costs can all be specified for WooCommerce bookable products.
- Create a simple list of forthcoming WooCommerce bookings using the Booking Calendar.
- Set the start and finish times for booking WooCommerce appointments for the day with simplicity.
- You can simply establish the maximum number of WooCommerce appointments per day using the HMS unit.
- Make it simple for your clients to cancel their booking appointment requests using the WooCommerce Appointments plugin.
2.Plugin Installation
We have mentioned the installation process for both the Free and Premium Versions. The customers can refer to the one that is relevant to them.
It is important to note that before activating the plugin – Bookings For WooCommerce Pro, you should have the Bookings for WooCommerce – WordPress plugin installed, as the plugin will not function without it.
So, if you don’t already have it, you can download it directly from here:
2.1.Free Version:
1. Automatic Installation
When it comes to automatic installation, WordPress is the most user-friendly.
To do so, all you have to accomplish is-
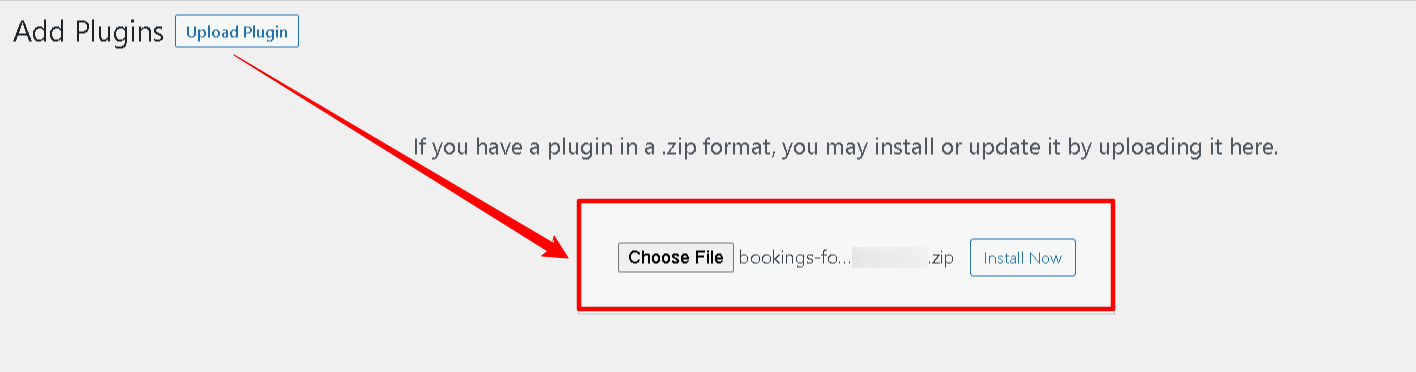
Utilizing your username and password and Login to your WordPress admin area. Then navigate to Plugins > Add New inside the leftmost column of your dashboard. There at the top of the front page, click the Upload Plugin option.
Choose the Bookings for WooCommerce-based .zip file from the Add New Plugin option, then push Install Now. Activate the WooCommerce booking plugin once it has been properly configured, to make the plugin features in action.
2. Manual Installation
Another way to install the WooCommerce appointments plugin in your WordPress environment is to use the manual installation option. Manual installation involves downloading and uploading the Bookings for WooCommerce plugin to the web server using their preferred FTP client.
- Upload the Bookings for WooCommerce folder to the /WP-content/plugins/directory.
- Navigate to the Plugins menu in WordPress to activate the plugin.
- That is all there is to it.
2.2.Premium Version:
Automatic Installation
Automatic installation is the easiest option handled by WordPress.
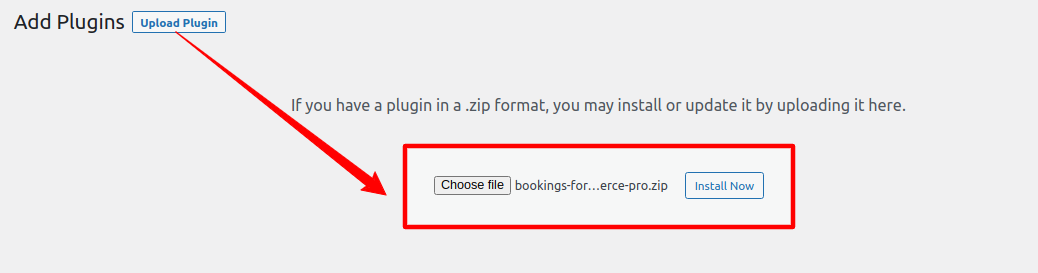
- Download the Bookings For WooCommerce Pro plugin.
- Log in to your WordPress Dashboard.
- Navigate to the sidebar, and click on Plugins.
- Click on Add New and then click on Upload Plugins.
- Hit the Browse button choose your downloaded plugin’s .zip file, and click on Install Now.
- Once installed, Activate the Bookings plugin.
Manual Installation
- Download the Bookings for WooCommerce PRO plugin from the respective website product page.
- Login to your WordPress dashboard.
- Navigate to the Plugins > Add New page and hit the Upload Plugin button.
- Upload the .zip file of the plugin and hit the Install button.
- Finally, activate this plugin from the Plugins > Installed Plugins page and hit the Activate button to continue.
3.License Activation
The very last tab in the Bookings for WooCommerce PRO plugin is License. This tab is an activation panel for your plugin license.
To accept WooCommerce booking requests from your customers, make sure you activate your plugin license before setting up your plugin backend.
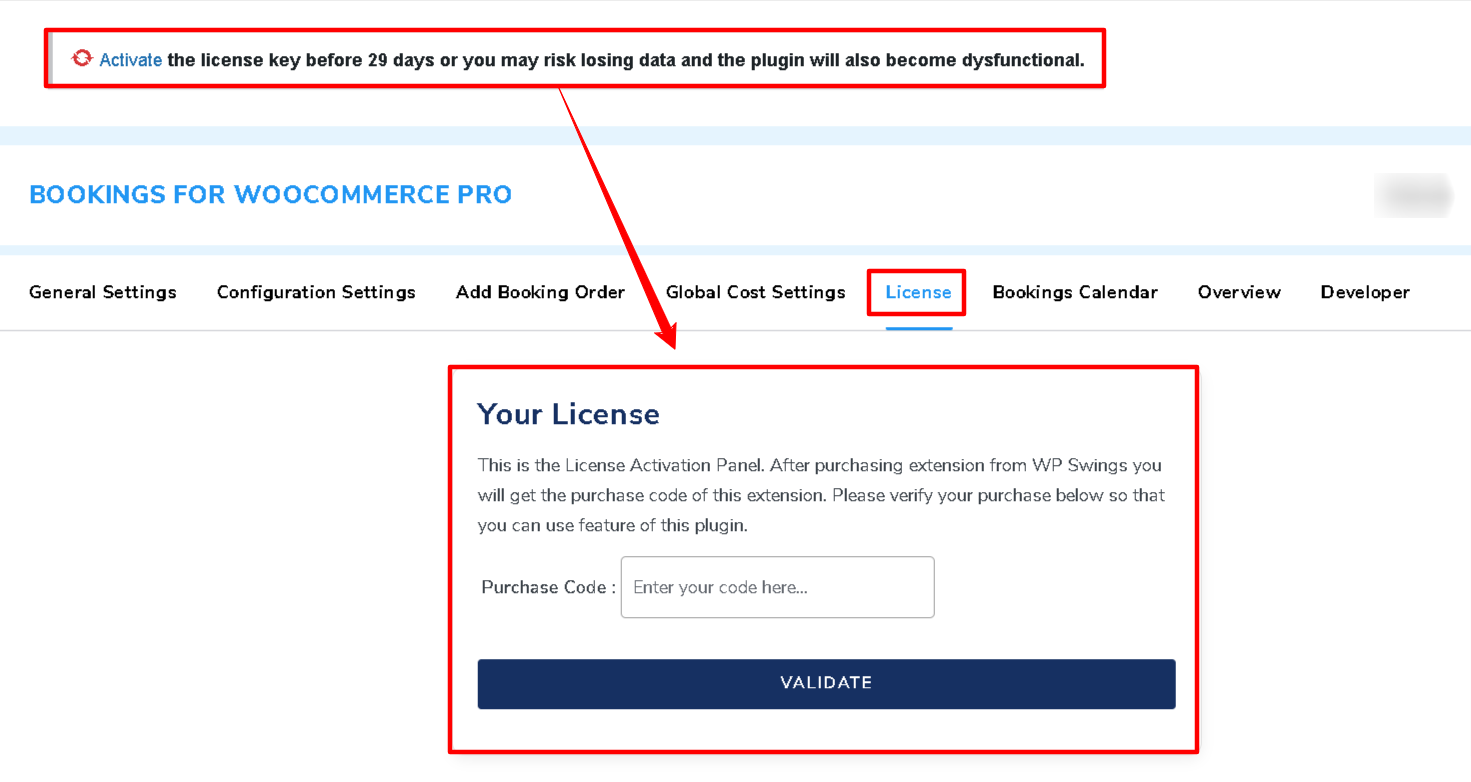
There isn’t any special setting available here, just one that is license activation. As soon as you purchase the PRO plugin from the site, you receive an activation code.
After Purchasing the premium version navigate to My Account > Orders > Your Order. There you’ll find the License Key. The License Key is also sent to you on your mail ID.
Please confirm your purchase code by copy-pasting it in the given Enter Purchase Code text field and hitting the Validate button, so that you can utilize the plugin’s features conveniently even after the 30 days of plugin activation.
Note: Even if the license is not activated, you can use the Bookings for WooCommerce PRO plugin capabilities for 30 days. After that, the PRO plugin features would be automatically disabled, and you might end up losing your customer’s booking data, therefore it is a must to activate the license before the trial period ends.
4.General Settings
This is the initial setup option available on the WooCommerce bookings plugin backend, in order to open the general settings option just navigate WooCommerce Dashboard > WooCommerce Bookings > Settings.
This general settings tab offers multiple setting options like-
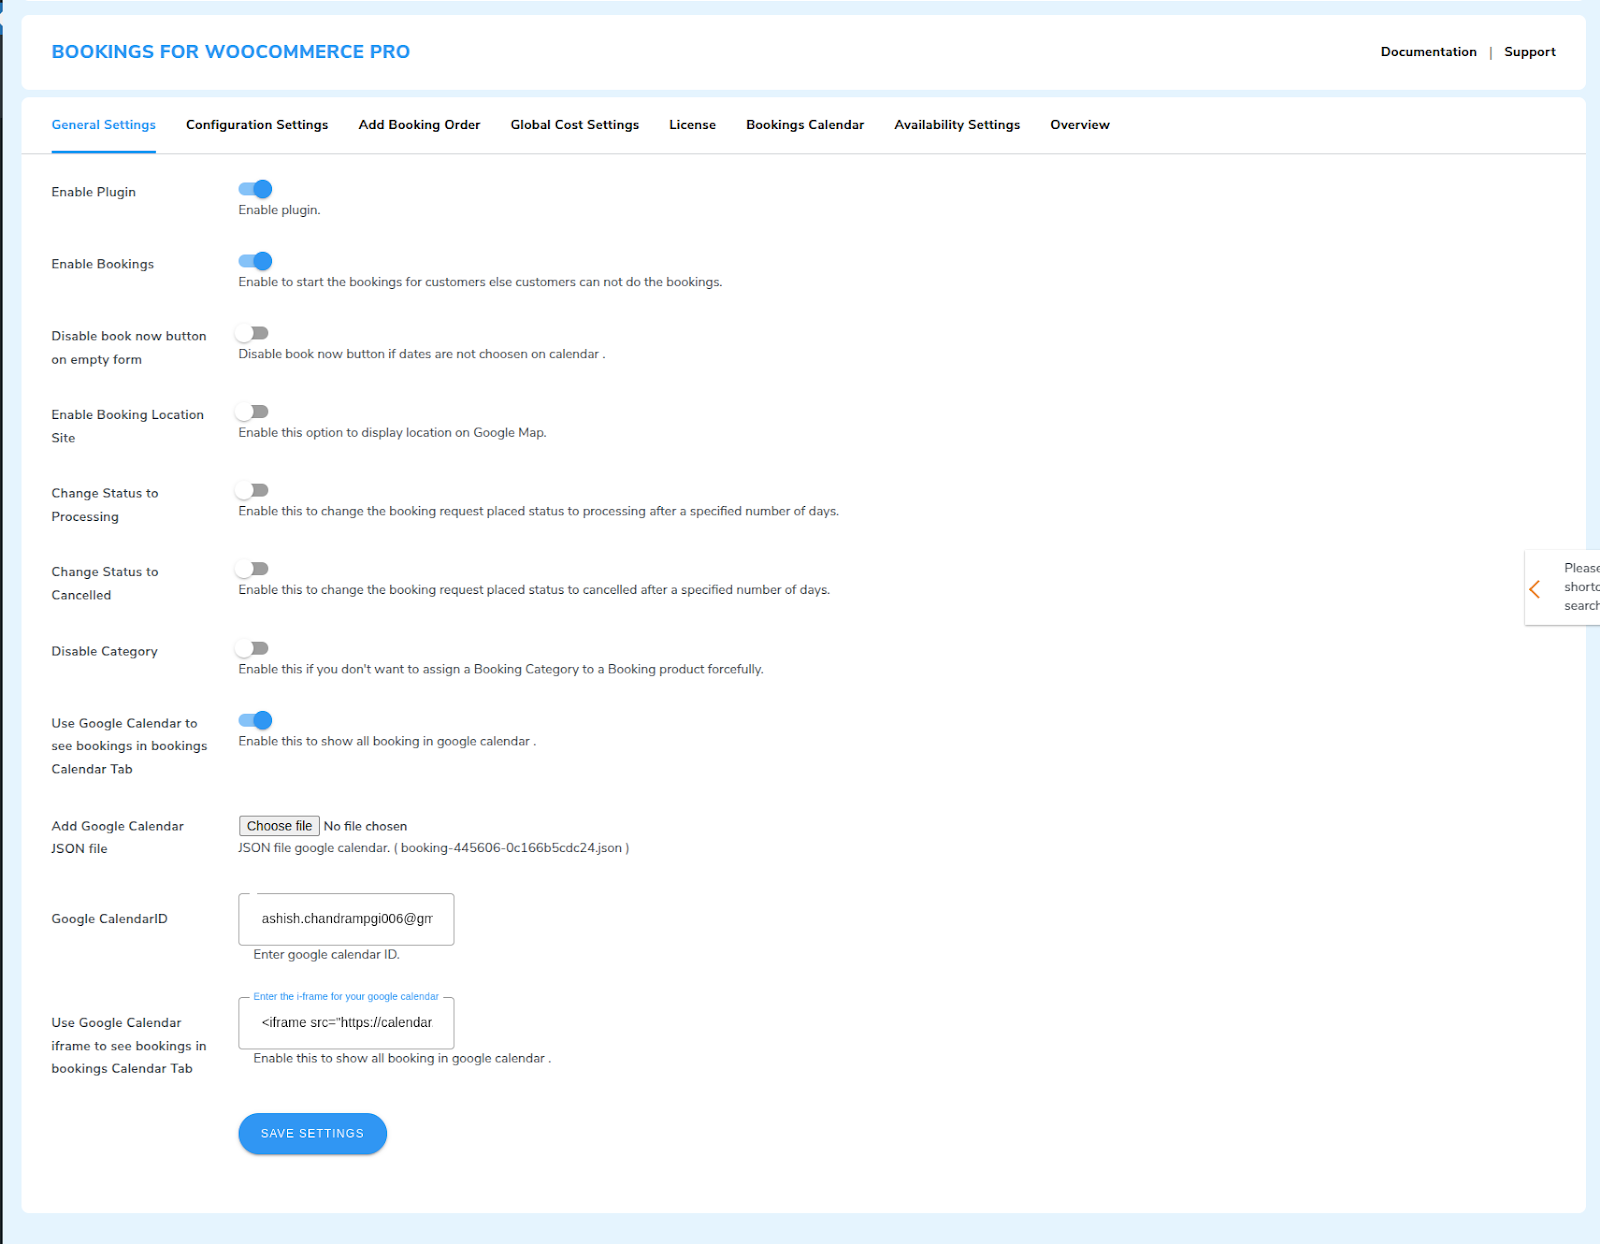
4.1 Bookings General Settings (FREE)
4.1.1 Enable WooCommerce Appointments Plugin
This option comes with a toggle button that you can use to Enable or Disable the Plugin feature in your store by simply turning it on or off.
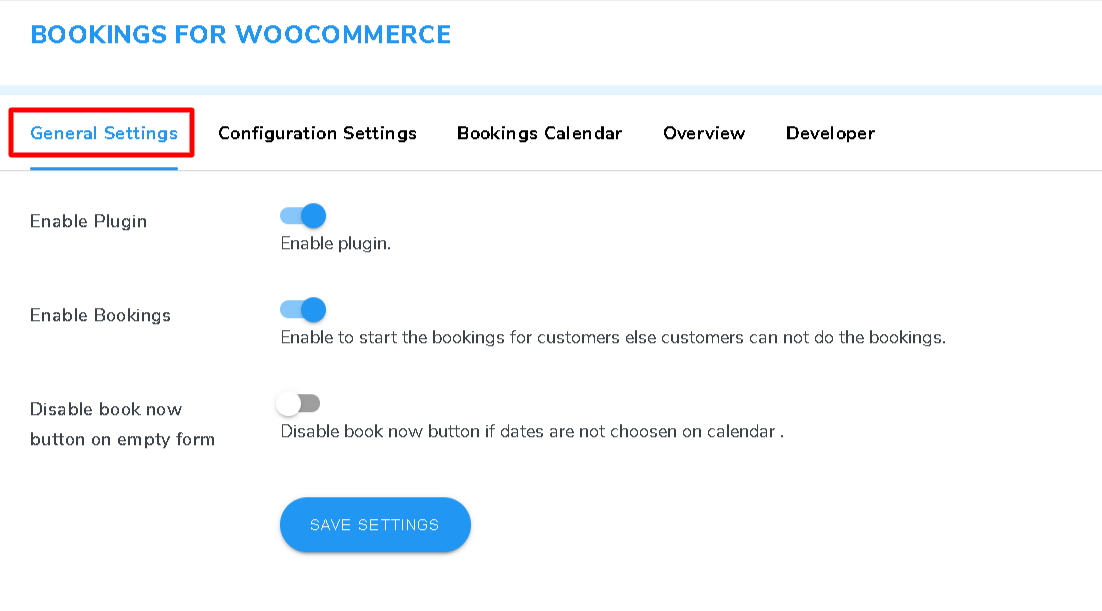
4.1.2. Enable Bookings
This option comes in booking appointment plugin handy with a toggle button along, you just need to toggle that button on/off in order to Enable or Disable the Bookings feature within your store. This setting is quite crucial in its aspect also, this helps you easily allow your customers to begin your WooCommerce bookings; otherwise, your consumers would be unable to do so.
4.1.3. Disable Book Now Button On Empty Form
There is a useful feature that allows you to disable the “Book Now” button in the event that the form is empty. Additionally, this feature can also be configured to disable the “Book Now” button until dates have been selected on the calendar.
Frontend Representation,
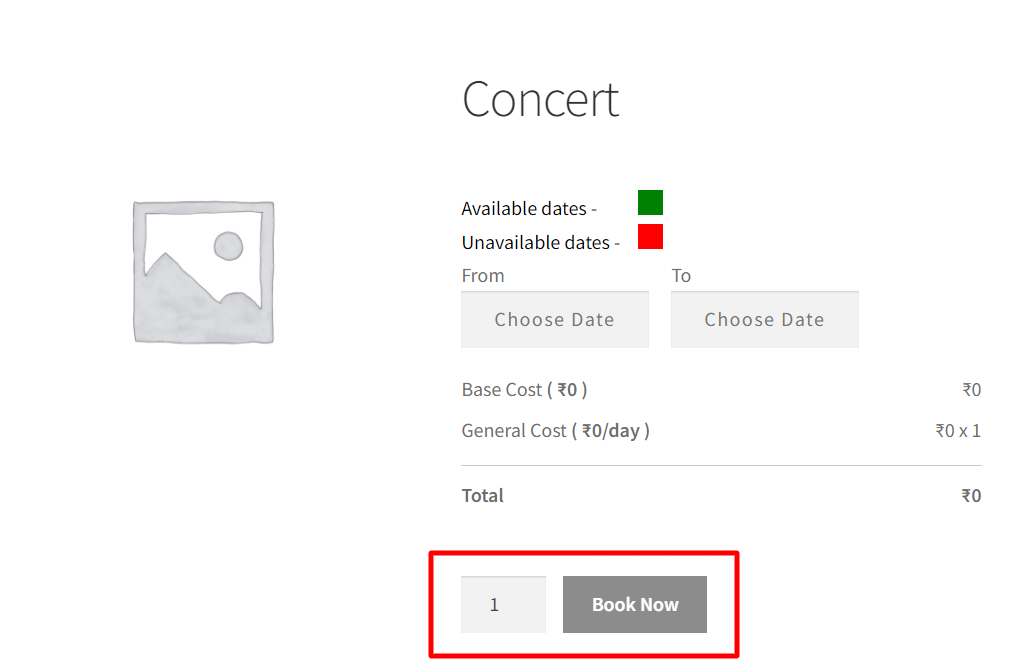 (You can see how the “Book Now” button is disabled because there are no dates selected).
4.2 Bookings General Settings (Premium)
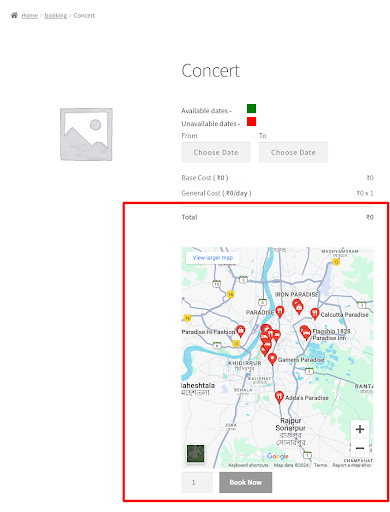
4.2.1. Enable Booking Location SitePremium
This option includes a toggle button; all you have to do to enable or disable the Bookings Enable location feature.
This feature is crucial since it makes it simple for your clients to navigate to the booking service location. Businesses that accept reservations for events, salon services, booking an appointment, or physical storefronts can benefit from using this option.
Frontend Representation
4.2.2. Change Status To ProcessingPremium
This option is a very effective resource for you, just enter the number of days you want and all your paid WooCommerce bookings placed will automatically be set to processing status after the specified period.
To do so, just toggle ON the Change Status to Processing button and specify the number of days in the Enter the Days text box.
4.2.3. Change Status To CanceledPremium
This option in the WooCommerce scheduling plugin, allows you to enter the number of days required to automatically reject the unpaid booking placed and set the booking status to cancel.
To make the setting in action, just toggle ON the Change Status to Cancelled button and specify the number of days in the Enter the Days text box available.
4.2.4 Disable CategoryPremium
Marketers can utilize this setting to disable the default “booking category” of the bookable resources. This further gives them the flexibility to select the category that suits your product the best.
Frontend Representation –
You can see in the screenshot below, how the first bookable resource has a different category mentioned and the second resource has the default category.
4.2.5 Integrate Your Bookings With The Google CalendarPremium
Set Up Google Calendar With Bookings For WooCommerce Pro – Guide
5.Configuration Settings
This tab refers to a group of four setup options that together make up the plugin’s configuration setting in actual, the sub setup available with this tab include-

5.1.Booking Form Settings
This is a secondary setting option offered in the Configuration Settings tab, this option allows you to control the booking form display at the frontend. Some of the options it includes are-
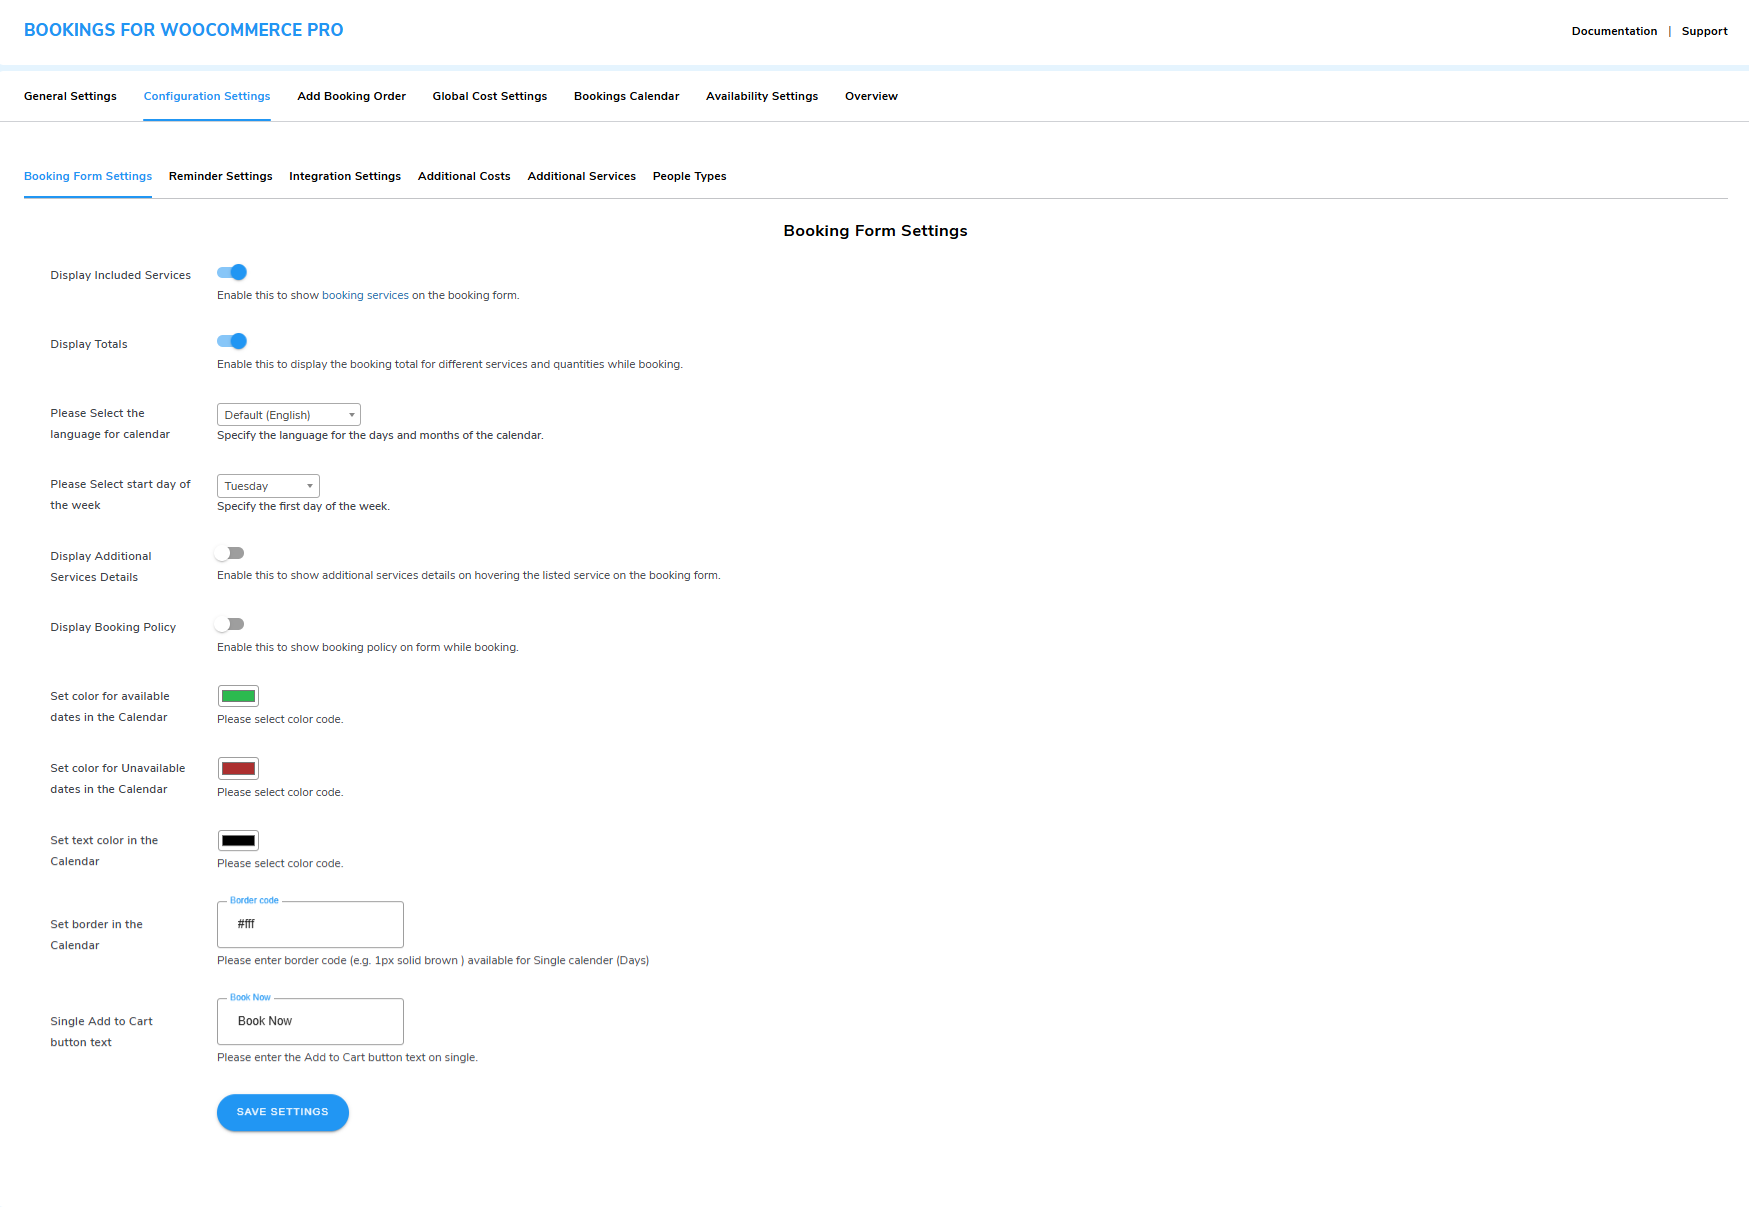
5.1.1. Display Included Services
This toggle button option allows you to show or hide the included services from the frontend booking form means from your customer’s display. This option must be enabled in order to display your booking services over your booking form.
5.1.2. Display Totals
This toggle button allows you to enable or disable the totals booking cost display at the frontend booking form.
If you want your customers to learn about their booking total cost at the booking for itself whilst placing a request. You must enable this to display the total booking cost for different services and quantities during booking.
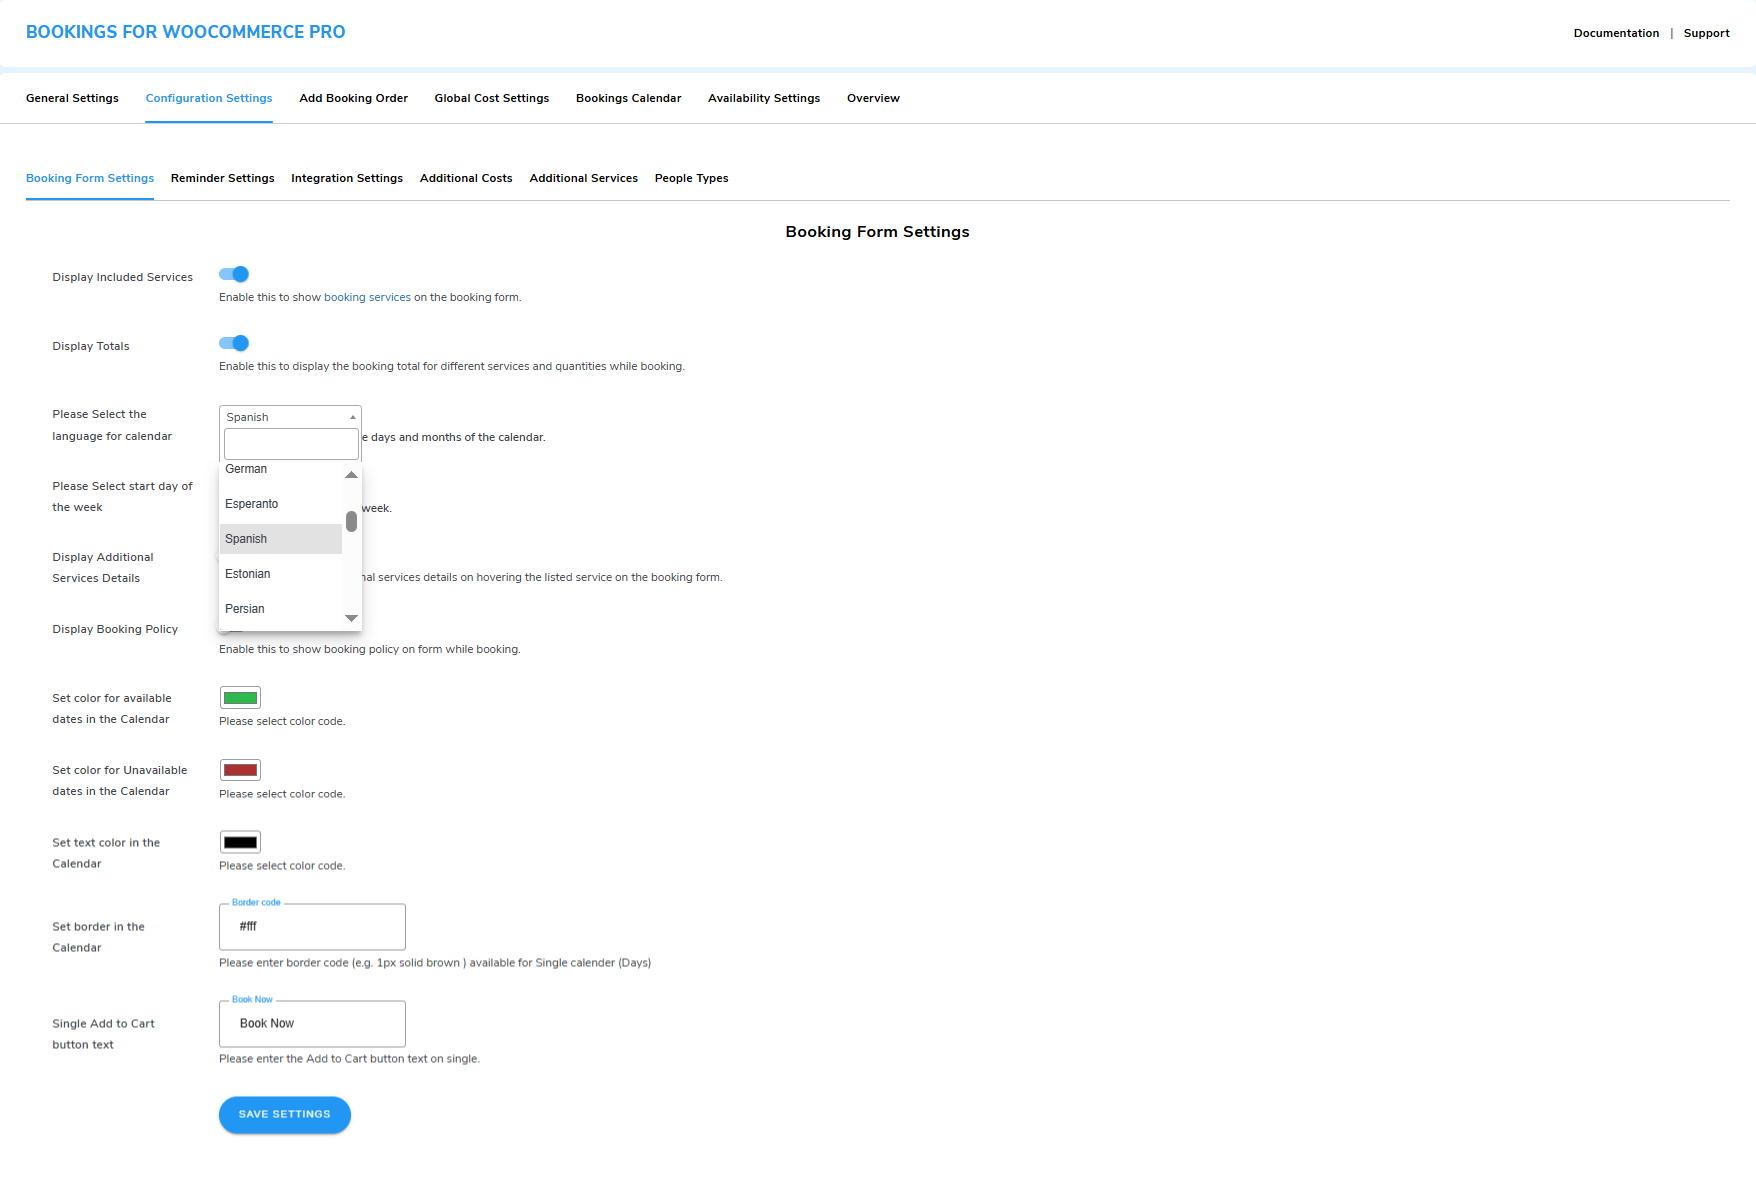
- Please Select The Language For Calendar: Admins can conveniently select the language that sits well with the requirements of your booking website.
 Frontend Representation –

- Please Select The Start Day Of The Week: The merchants can also select the “start day” of the week, as per the global location of your booking website.
 Frontend Representation –
5.1.3. Display Additional Services DetailsPremium
You can easily Enable this toggle button to provide additional WooCommerce service booking details while hovering over it on the booking form.
5.1.4. Display Booking PolicyPremium
You can easily display your WooCommerce booking policies along with the booking form utilizing this feature of the plugin.
To do so, you are just required to turn On the Show Booking Policy toggle button, and then input your booking policies there in the Booking Policy text box available.
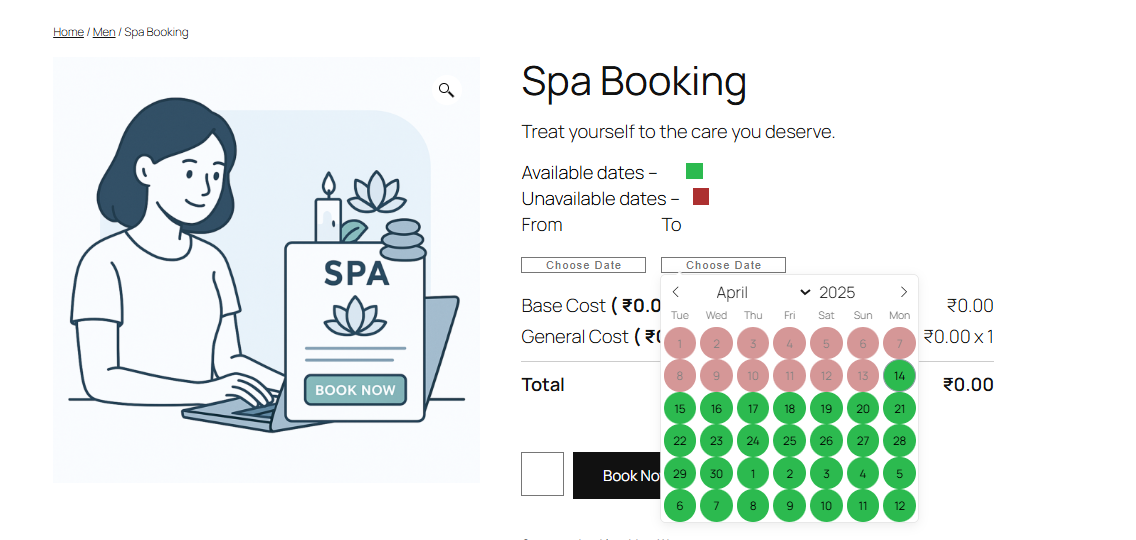
5.1.5. Set Color For Available Dates In The CalendarPremium
Admins can set the color for available dates in the calendar so that the customers will see when they are making an appointment.
5.1.6. Set Color For Unavailable Dates In The CalendarPremium
You can easily set the color for unavailable dates in the calendar so that the customers will see when they are making an appointment.
5.1.7. Set Text Color In The CalendarPremium
The color of the text that will be displayed on the calendar can also be changed dynamically.
5.1.8. Set Border In The CalendarPremium
Admins can enter border code (e.g. 1px solid brown ) available for a Single calendar (Days) for the calendars, that can be seen over the frontend.
5.2.Reminder Settings
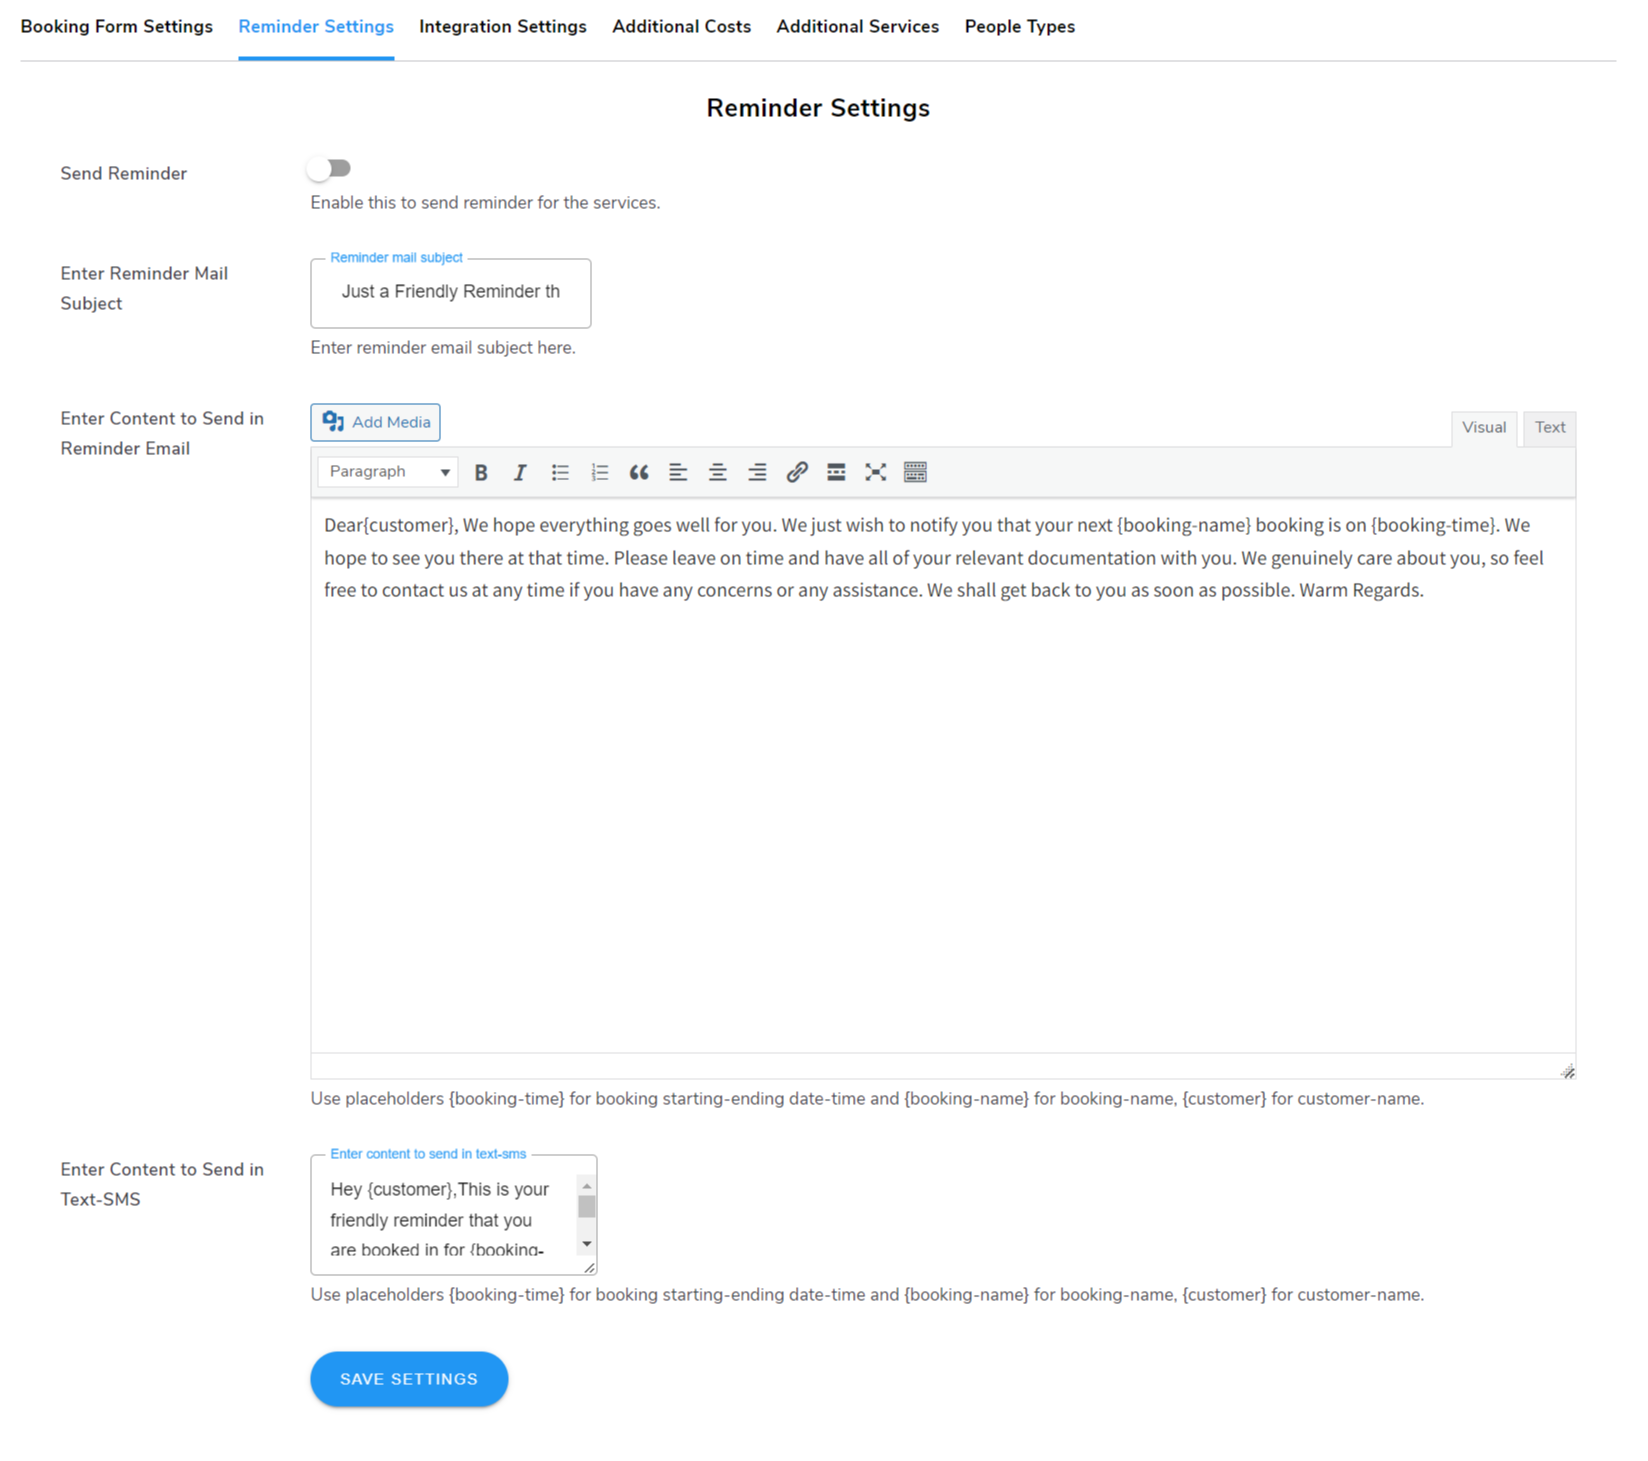
Reminder Settings is the very next setting option available with the plugin. This reminder settings tab offers multiple setting options for setting up your booking email and SMS-based reminders, let’s debunk the setup options here-
5.2.1. Send Reminder
You need to turn On the toggle button available here to Enable the Reminder service for your booking requests placed by the customers.
5.2.2. Enter Reminder Mail Subject
This option lets you input your reminder Email subject, either utilizing the template given or adding your custom email subject manually.
5.2.3. Enter Content To Send In Reminder Email
This option consists of a pre-existing reminder email template for your WooCommerce bookings email reminders, either utilize this or easily input your custom reminder email.
Note: Don’t forget to utilize shortcode placeholders defined here like (booking-time) for booking starting-ending date-time, (booking-name) for booking-name, and (customer) for customer-name respectively, and create your reminder email template for all users effectively.
5.2.4. Enter Content To Send In Text-SMS
Similar to the email reminder content field above, we have this SMS text content field available here. Either make use of the content given as a sample or create your custom version.
Note: Don’t forget the character limit in SMS content and the shortcode placeholder utilization.
5.3.Integration Settings
The very next setup option available on the WooCommerce bookings plugin backend’s Configuration Settings is the Integration Settings tab. This integration settings tab offers multiple setting options like-
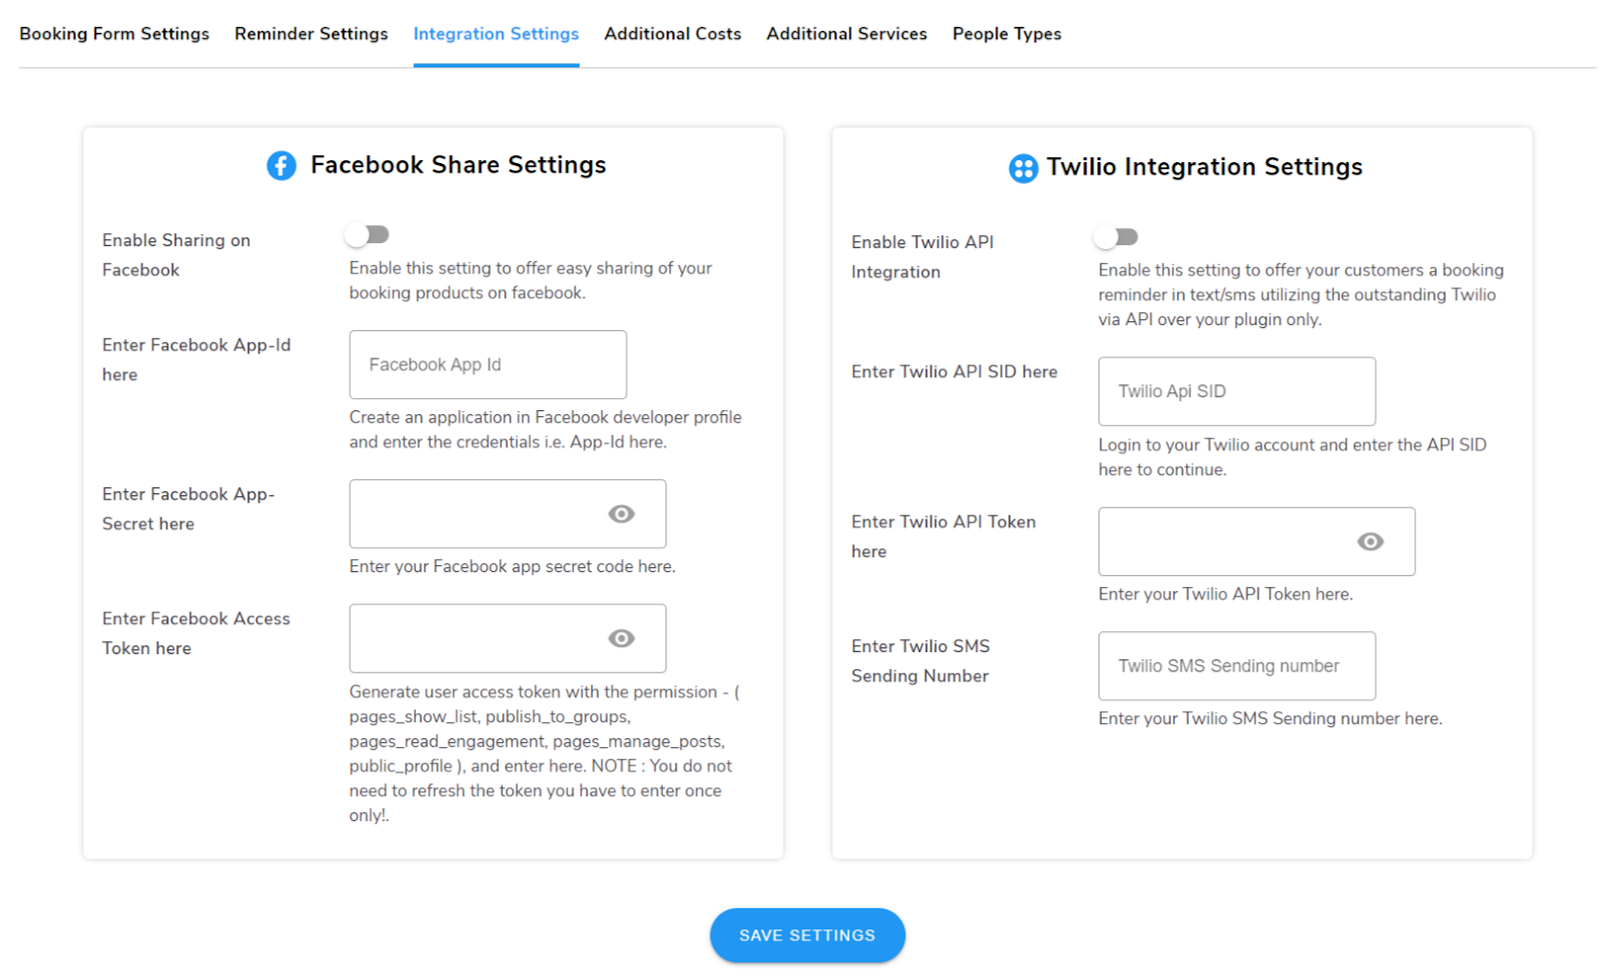
5.3.1 Facebook Share Settings
Facebook Share Settings is the very next setting option available with the plugin. This tab offers multiple setting options for setting up your booking product sharing over Facebook, let’s debunk the setup options here-
a) Enable Sharing On Facebook
This is an effective toggle option available on your plugin backend, you can turn ON the Enable Sharing on the Facebook toggle button and start sharing your booking products easily on Facebook.
This setting can only be effective when you enable the checkbox Share on Facebook option, for a certain booking product.
Note: To create an integration for this Facebook sharing feature of the plugin, you need to first create a Facebook App within your Developer profile.
b) Enter Facebook App-ID Here
This option requires your Facebook App-ID credentials to be entered to process integration with your Facebook account for sharing your products.
c) Enter Facebook App-Secret Here
This option requires your Facebook App-Secret code to be entered to process integration with your Facebook account for sharing your products.
d) Enter Facebook Access Token Here
This option requires your Facebook Access Token details to be entered to process integration with your Facebook account for sharing your booking products.
Enter the user access token you generated along with the permissions i.e. pages show list, publish to groups, pages read engagement, pages manage posts, public profile. This access token is only required for a one-time integration process.
5.3.2 Twilio Integration Settings
Twilio Integration Settings is the very next setting option available with the plugin.
This Twilio Integration Settings tab offers multiple setting options for setting up your booking service-based SMS reminders, let’s debunk the setup options here-
a) Enable Twilio API Integration
This toggle button is required to be enabled to offer easy Twilio service integration for your SMS reminders.
To conceivably send SMS reminders, our plugin has offered Twilio compatibility. You are just required to create your Twilio account link the respective credentials for integration and send easy SMS reminders for your bookings.
b) Enter Twilio API SID here
You are required to input a Twilio API SID here, which you can easily copy-paste from your Twilio account page.
c) Enter the Twilio API Token Here
This setup option requires you to easily enter the Twilio API Token details for integration of your Twilio SMS reminder service.
d) Enter Twilio SMS Sending Number
You need to enter your SMS Sending Number in the text box offered to complete the Twilio account integration settings with your plugin.
6.Additional Costs (Add New Booking Cost)
This is another setting option offered in the Configuration Settings tab, this option allows you to create your own set of custom booking costs and display at the frontend booking request form.
In order to create additional booking costs for your product, you need to first fill this form a whole.
This form would thereby allow you to create different types of additional booking costs for your booking products. There are multiple options available-
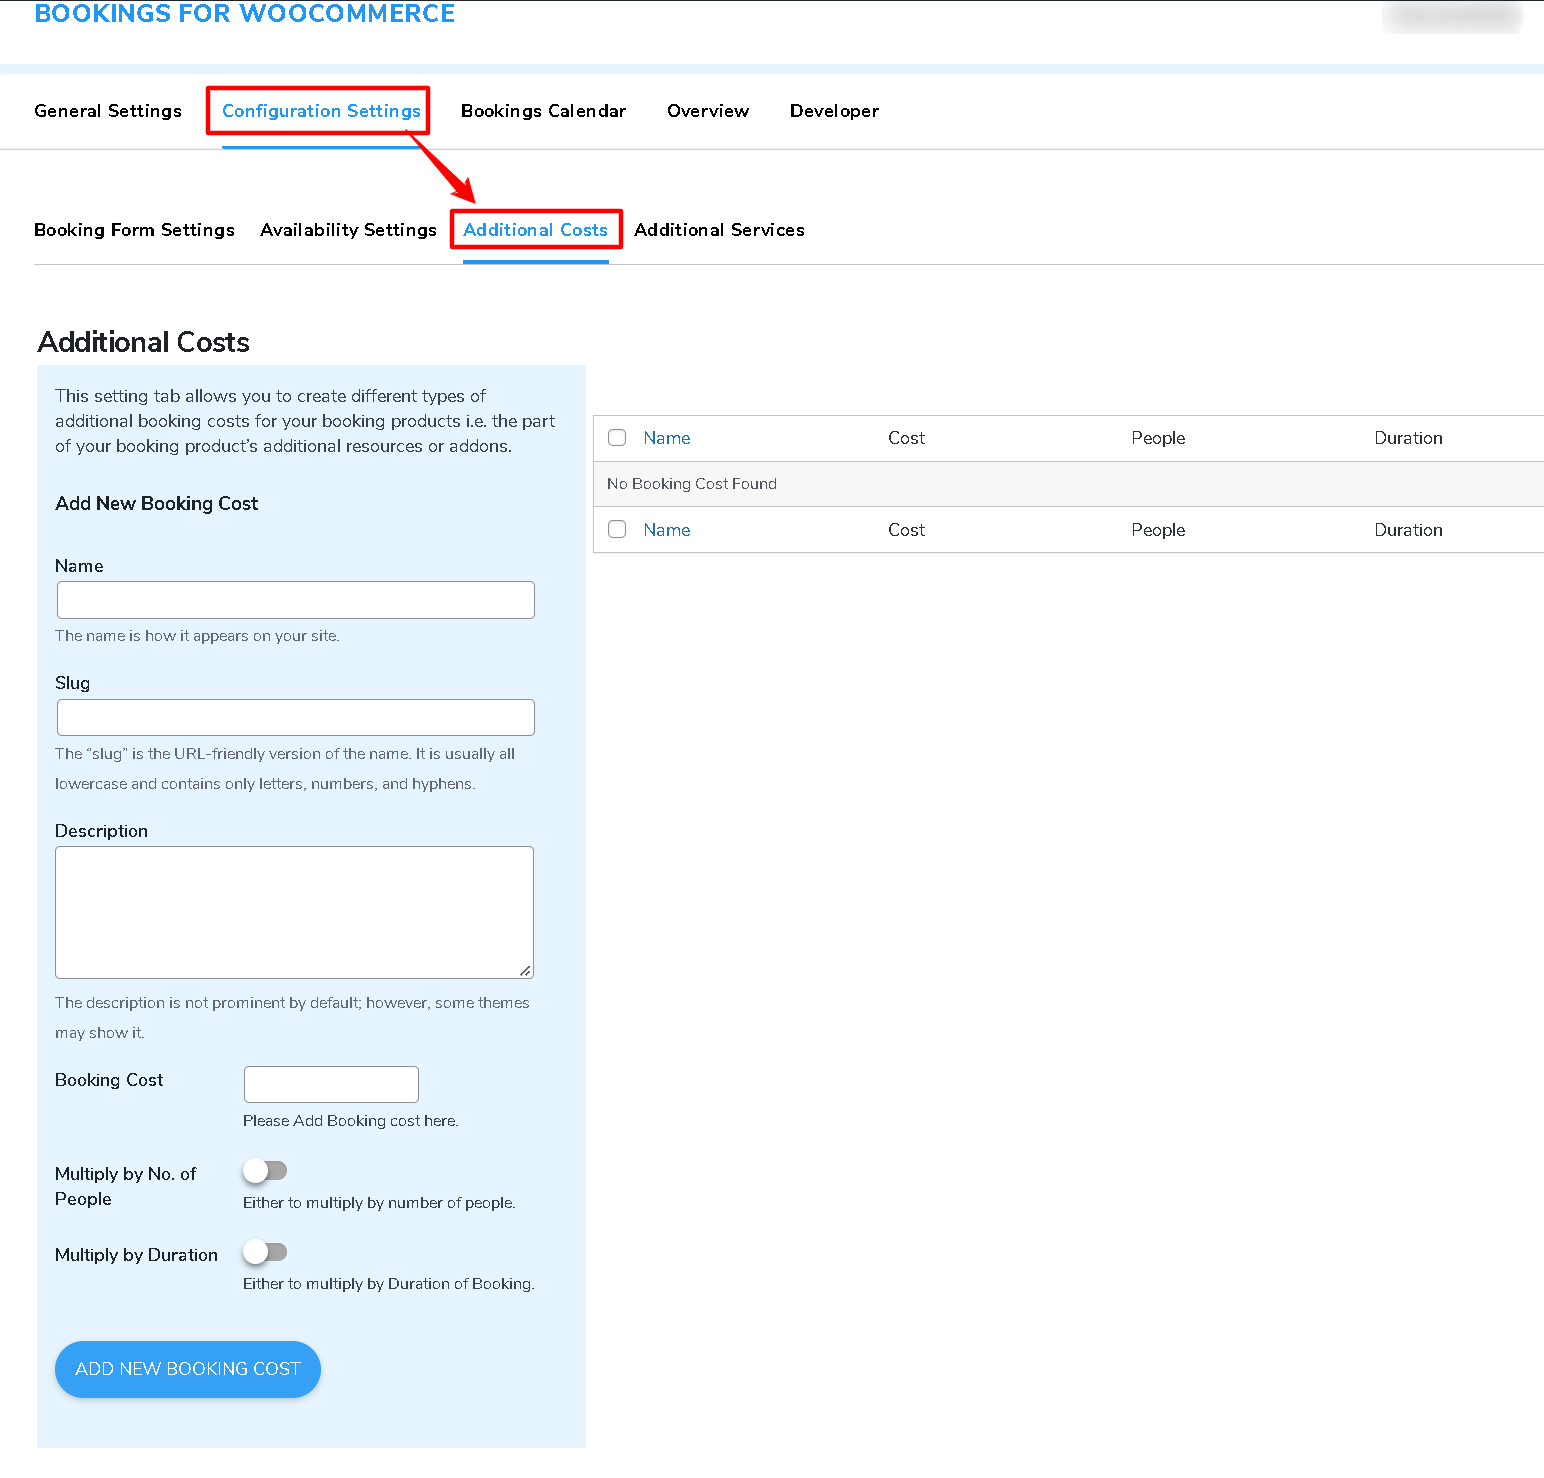
a) . Name
This option allows you to input a unique identifier name for the additional booking cost that you’re supposed to be creating.
b) . Slug
The “slug” is the URL-friendly version of the name. It is usually all lowercase and contains only letters, numbers, and hyphens. Add a slug of your choice that you want to add for your additional booking costs created.
c) . Description
This input box allows you to enter the description for the additional booking costs that you’ve created.
d) . Booking Cost
This input box allows you to enter the booking cost price with respect to the added cost of your bookable product, resource, or service. This option includes different conditions along with-
e) . Multiply Cost by Number of People
If you toggle switch ON this option available, this clearly states that your created additional booking cost will be multiplied by the number of people added to the booking.
f) . Multiply by Duration
If you supposedly toggle switch ON this option this clearly means that you allow your created additional booking cost to be multiplied with the duration of the booking placed.
After you’re done with the options, just hit the Add New Booking Cost button to save the booking cost created. You can conceivably create as much as cost that you desire.
7.Additional Services (Add New Booking Services)
Likewise the above mentioned setting option offered in the Configuration Settings tab, this option also allows you to create your own set of custom booking services and display at the frontend booking request form.
In order to create additional booking services for your product, you need to first fill this form a whole.
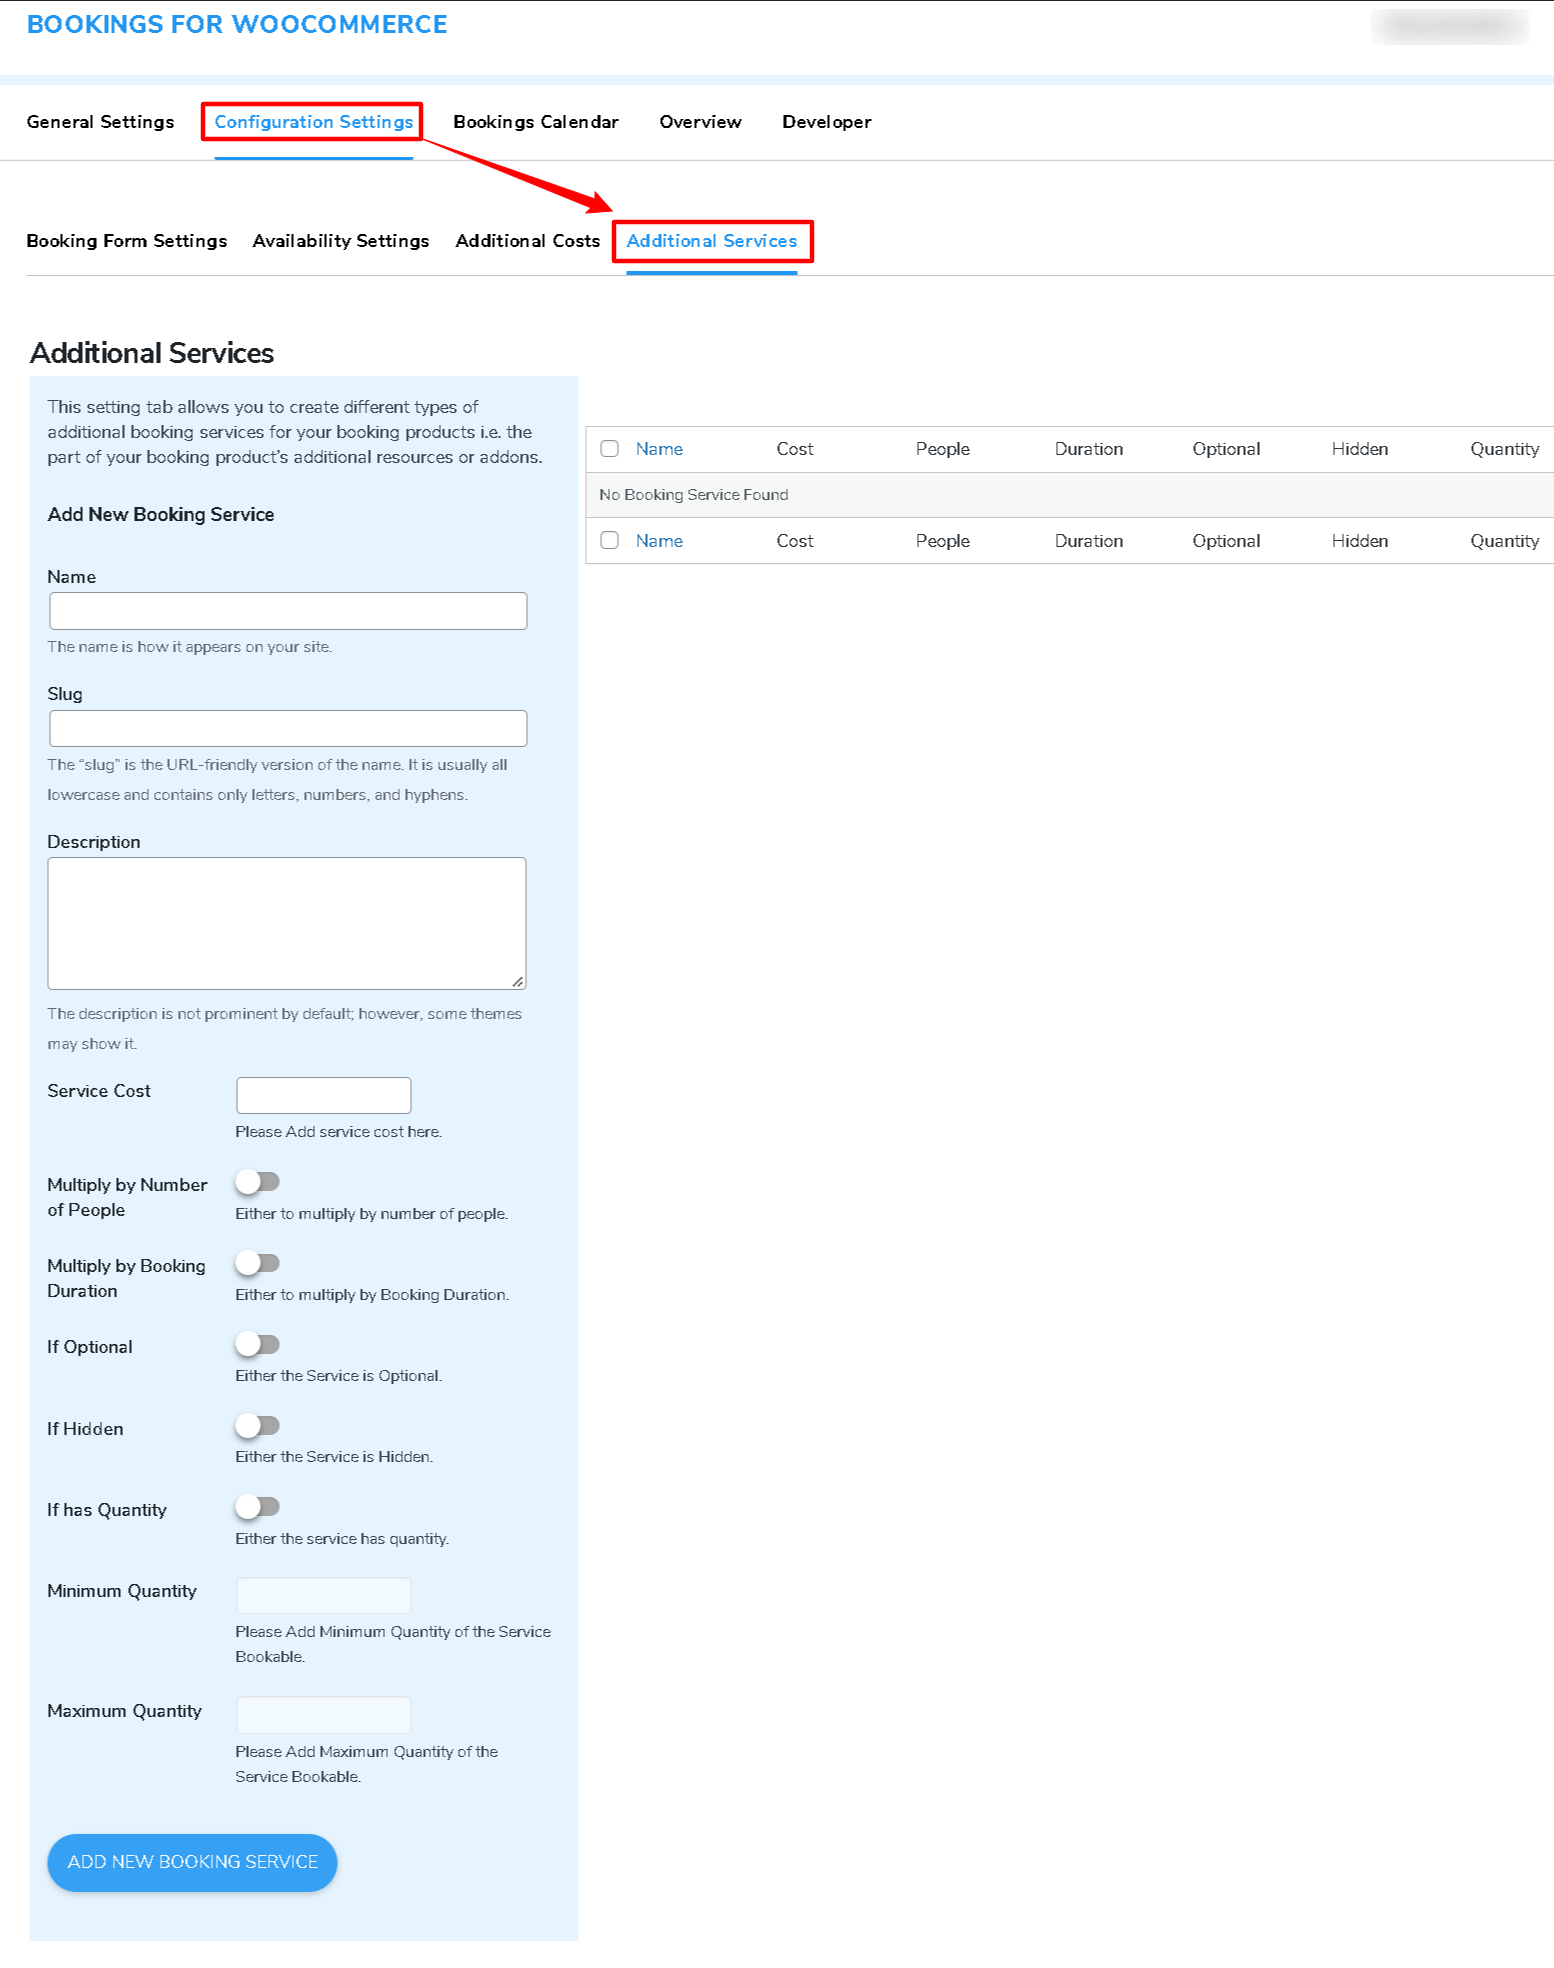
This form would thereby allow you to create different types of additional booking services for your booking products. There are multiple options available-
a) . Name
This input option allows you to enter the name of the booking service that you want to create for your WooCommerce bookings.
b) . Slug
The “slug” is the URL-friendly version of the name. It is usually all lowercase and contains only letters, numbers, and hyphens. Add a slug of your choice that you want to add for your booking service created.
c) . Description
This input box allows you to enter the description for your booking service created.
d) . Service Cost
This option allows you to enter the cost of the booking service that you are including in your booking resources. This option includes different conditions along with-
e) . Multiply Cost by Number of People Per Booking
This option in bookings appointment plugin allows you to calculate your booking service cost according to the people included in that booking. When nothing is specified, then the default service cost for that particular people type will be applied.
f) . Multiply Cost by Duration
If you toggle switch ON this option it means that the service cost of your bookable resource i.e. product or service would be multiplied by the duration. Checking out this option enables your customer to place bookings based on timely schedules.
g) . If Optional
If you toggle switch ON this option, your created additional booking service cost would become optional while making a booking request, and if you left it unchecked, your service included cost would become optional, vice versa.
h) . If Hidden
This option if toggle switch ON allows you to hide your included booking service created from the customer at the time of placing a booking request. There’s a catch that this hidden option only works for included services not for the additional services created.
i) . If Has Quantity
In WooCommerce booking plugin this option enables you to calculate the service booking cost for the booking on the basis of the quantity of the bookable resource available. If you supposedly toggle switch ON this option then two more options are enabled-
j) . Minimum Quantity
This option allows you to input the minimum quantity allowed for the bookable resource to place a booking request.
k) . Maximum Quantity
This option allows you to input the maximum quantity of a bookable resource allowed in order to place a booking request.
After you’re done with the options, just hit the Add New Booking Service button to save the booking cost created. You can conceivably create as much as additional booking services that you desire.
8.People Types (Add New Booking People)
This is the very next tab in the backend setting of the plugin for this, you need to navigate to WooCommerce Dashboard > Bookings > Configuration Settings > People Types.
This tab allows you to create different people types for your booking requests-
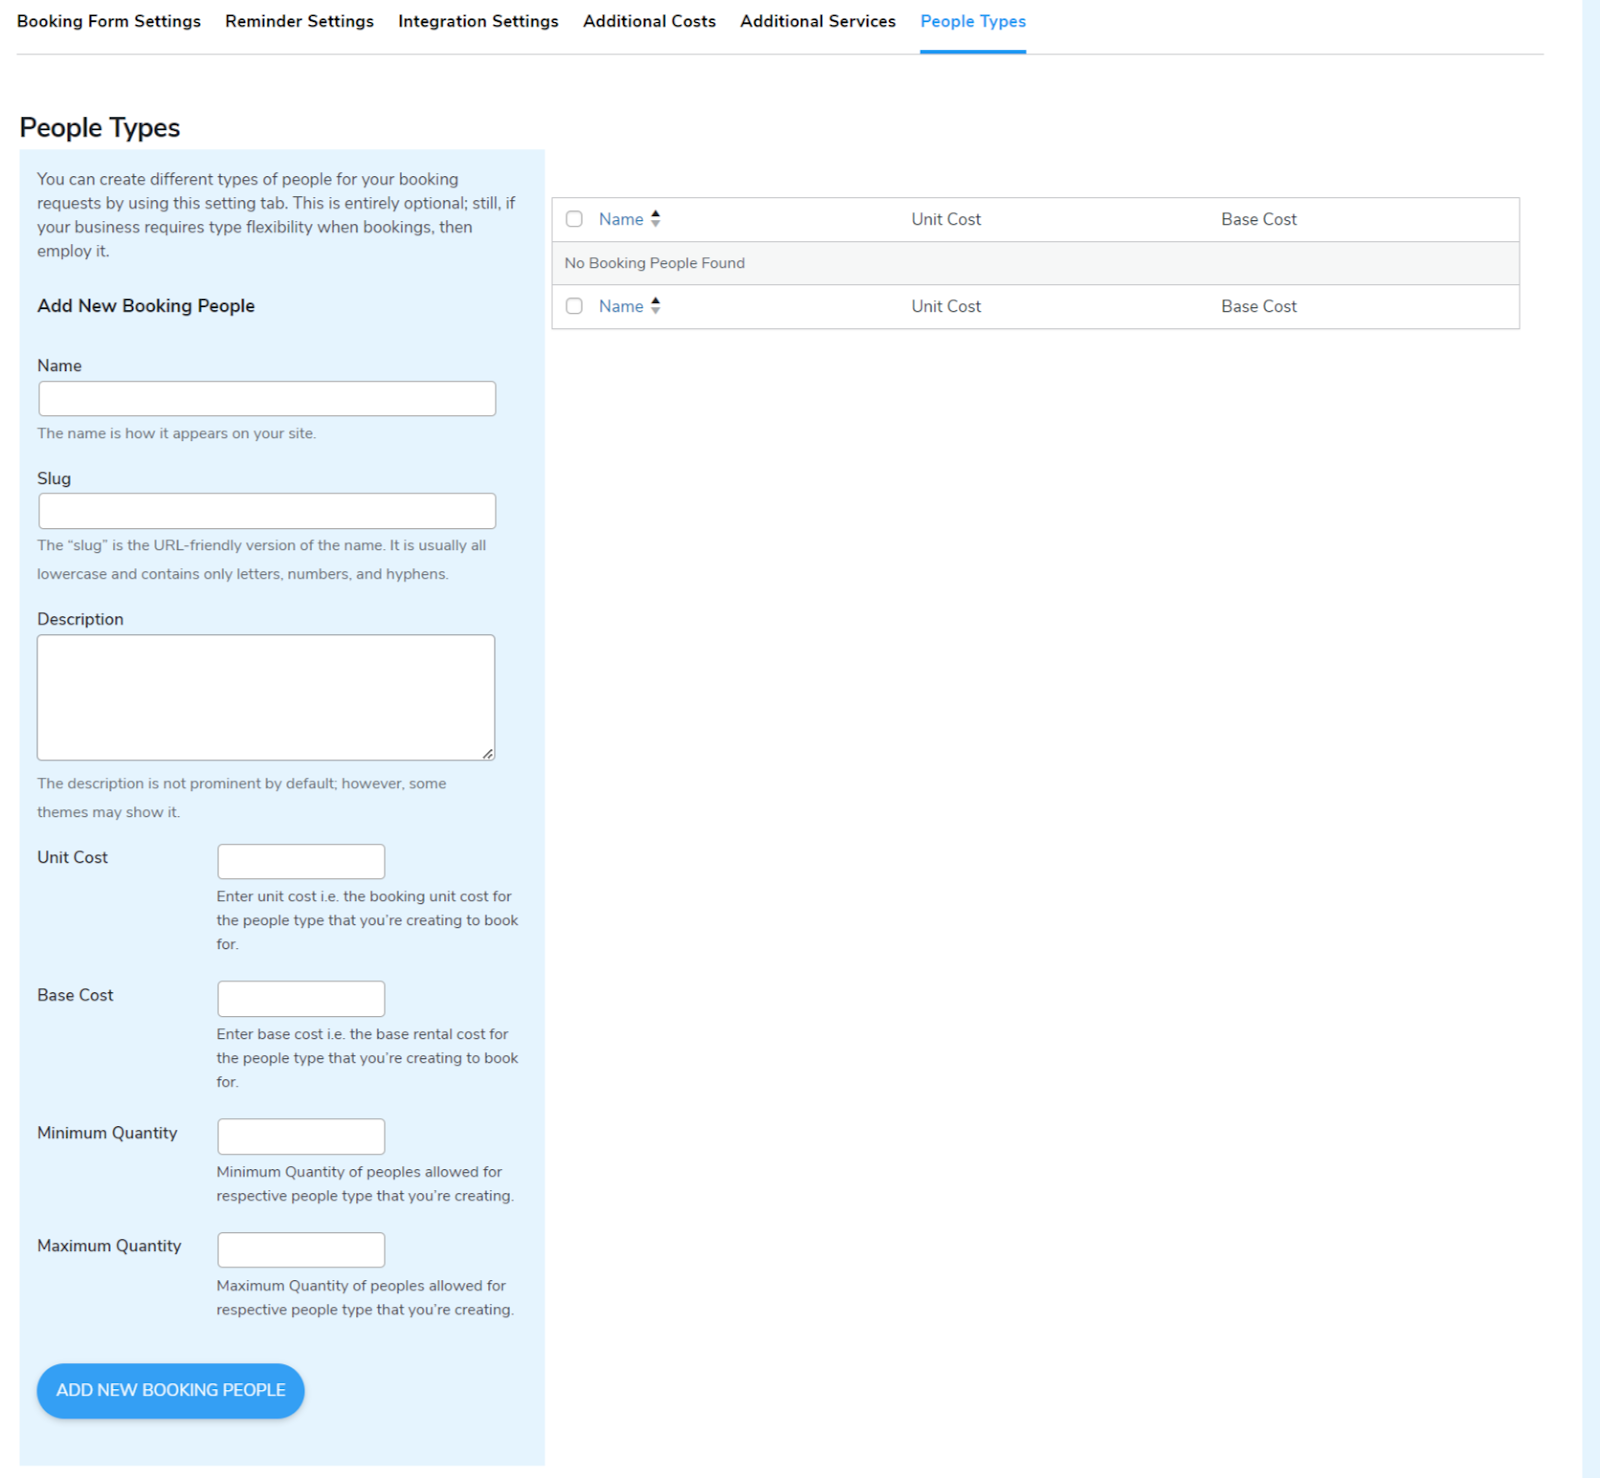
a) . Name
This input option allows you to enter the name of the people type that you want to create for your bookings.
b) . Slug
The “slug” is the URL-friendly version of the name. It is usually all lowercase and contains only letters, numbers, and hyphens. Add a slug of your choice that you want to add for your people type created.
c) . Description
This input box allows you to enter the description for your people type created.
d) . Unit Cost
This option helps you determine the booking unit cost for the particular people type that you’re creating for.
If you leave this option blank, then your booking unit cost for that bookable resource will be applied each time a particular people type is included within a WooCommerce booking request.
e ) . Base Cost
This option helps you determine the base rental cost for the particular people type that you’re creating for.
If you leave this option blank for certain people types then the base cost would be applied each time a particular people type is included within a booking request.
f) . Maximum Quantity
You can input the maximum quantity of people allowed for the respective people type you’re creating.
9.Add Booking Order
This is an outstanding setting option available in the plugin backend that lets you easily create and manage your customer’s booking orders on their behalf, being their agents.
Let’s check out how to do that-
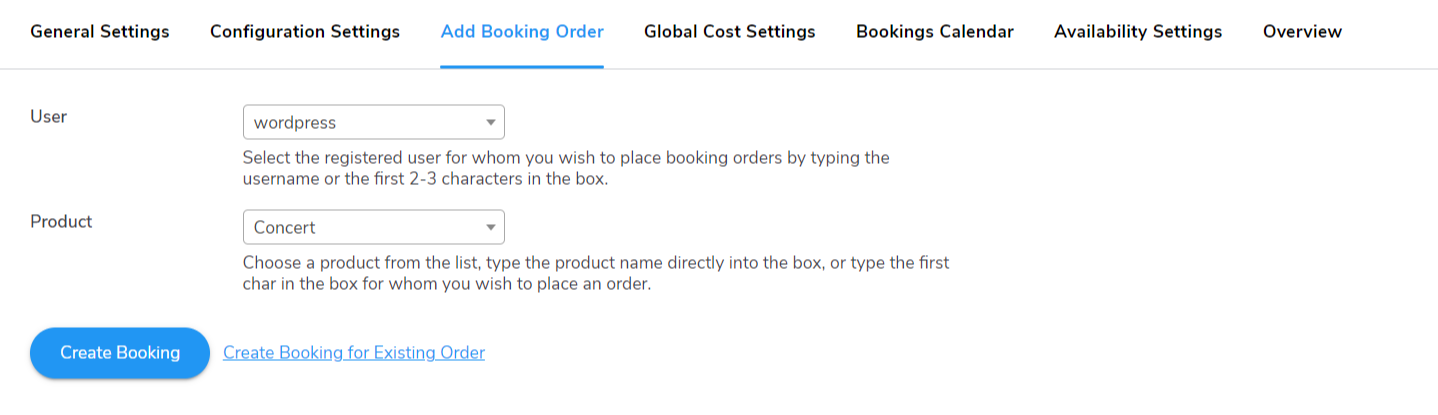
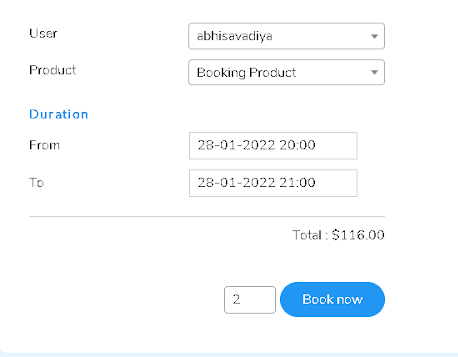
a) . User
Pick your registered user either by typing the username or the initial 2-3 char in the box and pick the one for whom you want to place book orders.
b) . Product
Select the product from the list given here, enter the product name simply, or type the initial char in the box for whom you want to place an order.
Now there are two scenarios here, one for when you want to create a new booking, and the second for creating a booking for an existing order. We will address both scenarios.
c) . Create Booking
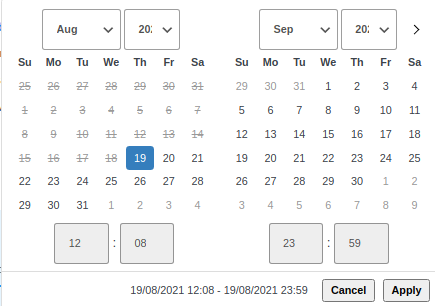
I.) Date and Time
Pick the exact date and time for the specified booking order that needs to be placed utilizing the date and time picker available here and hit Apply or Cancel to choose again.
II.) WooCommerce Booking Unit
Define the WooCommerce booking unit for the booking product and hit the Book Now button to continue.
d) . Create Booking For Existing Order
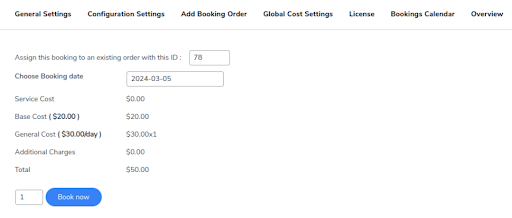
With the WooCommerce booking plugin, the admin can add booking products to the existing order as per the customer’s requirements.
This enables the admins to provide a personalized experience to their customers.
- Assign This Booking To An Existing Order With This ID: Merchants can use this space to put in the existing order ID, to which they want to add the order.
- Choose Booking Date: The admin will now choose the booking date for the order.
After adding all the required information, the admin will click on the “Book Now” button.
10.Global Cost Settings
This is the very next tab in the settings for the bookings plugin. You can make use of this option if you wish to add a few Global Cost Rules for your booking products.
Let’s check out how-

When you initially click on this tab i.e. Global Cost Settings, you are supposed to see a page view somewhat similar to the screenshot below-
Just click the “+Add New Rule” option available on the left corner of the page, which would turn out into a custom rule setup form similar to the screenshot below-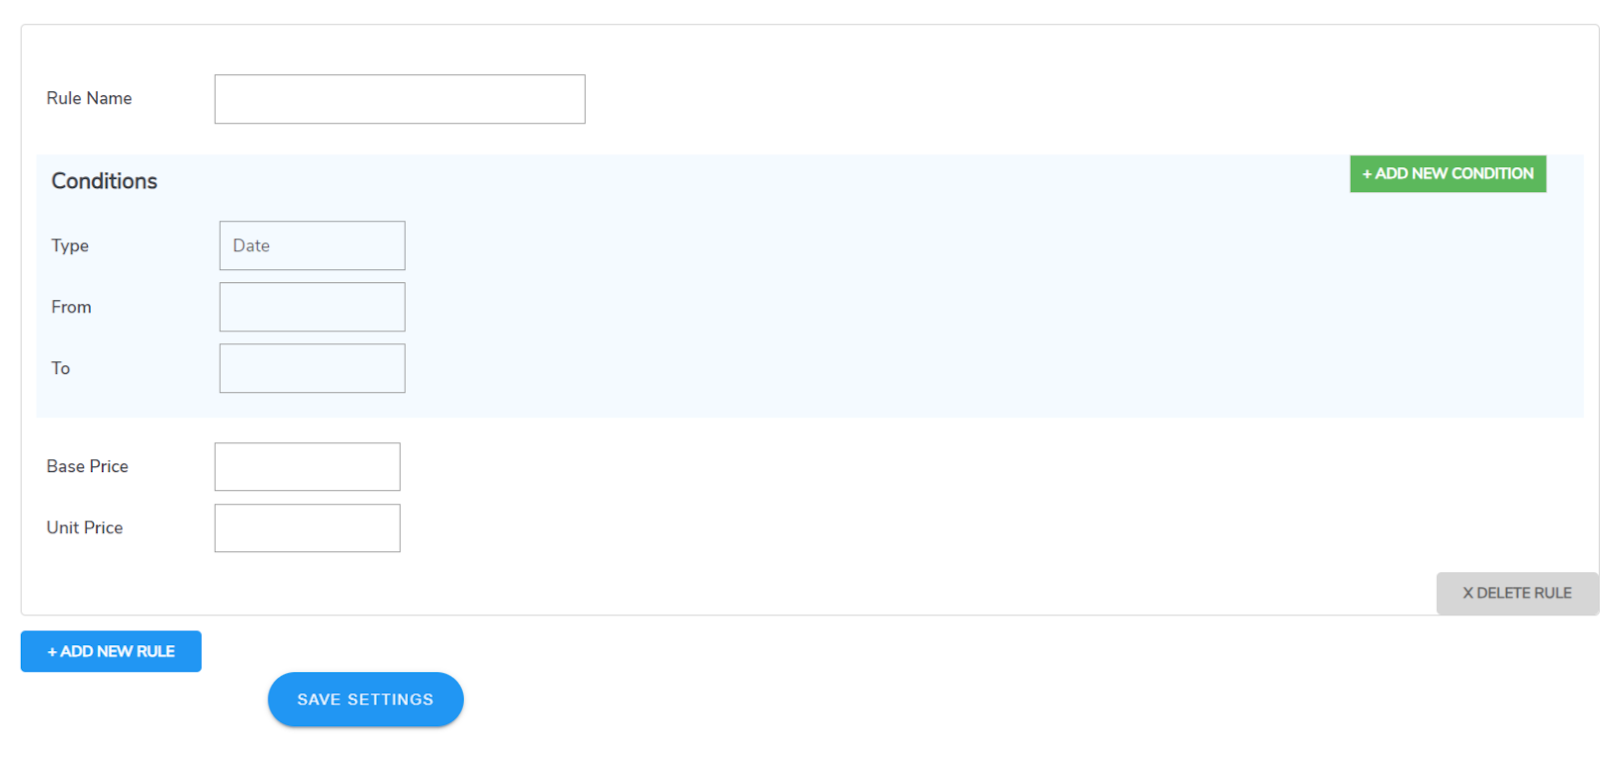 This form consists of multiple options to set up the Global Rules for Cost, let’s check them out.
10.1 Rule Name
It is where you can define a unique yet identifying name for your custom rule, there isn’t any special guideline for the name. Just input whatever name you like.
10.2 Conditions
There are listed condition options offered for the WooCommerce bookings available-
10.3 Type
This option defines the type of the global cost rule created based on four types available-
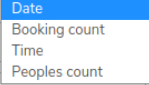
Four respective types defined for a Global Cost Rule are Date, Booking Count, Time, and Peoples Count. The rule created would directly depend on the type defined in this option.
Let’s say, If we opt for Date as our type then the option further would automatically be dependent and would be, Start and End date. Whatever rule created would define that any booking placed from this Start to this End date would abide under this respective cost rule.
Note: Date type would have calendar date picker field options, whereas Time would have a time picker option, and Peoples Count and Booking Count would have the count range options respectively.
10.4 Base Price
Here, you can define the base cost concerning the cost rule created and the conditions specified.
10.5 Unit Price
Here, you can define the unit cost concerning the cost rule created and the conditions specified.
Button controls respectively +Add New Condition, +Add New Rule, and X Delete Rule are available here. In case you require to add a rule rule rule or condition or want to delete one make use of the button controls available for that.
11.Bookings Calendar
This is the very next tab in the bookings plugin’s settings. I.e. Booking Calendar. This is not an actual setting tab rather a tab for the booking request overview.
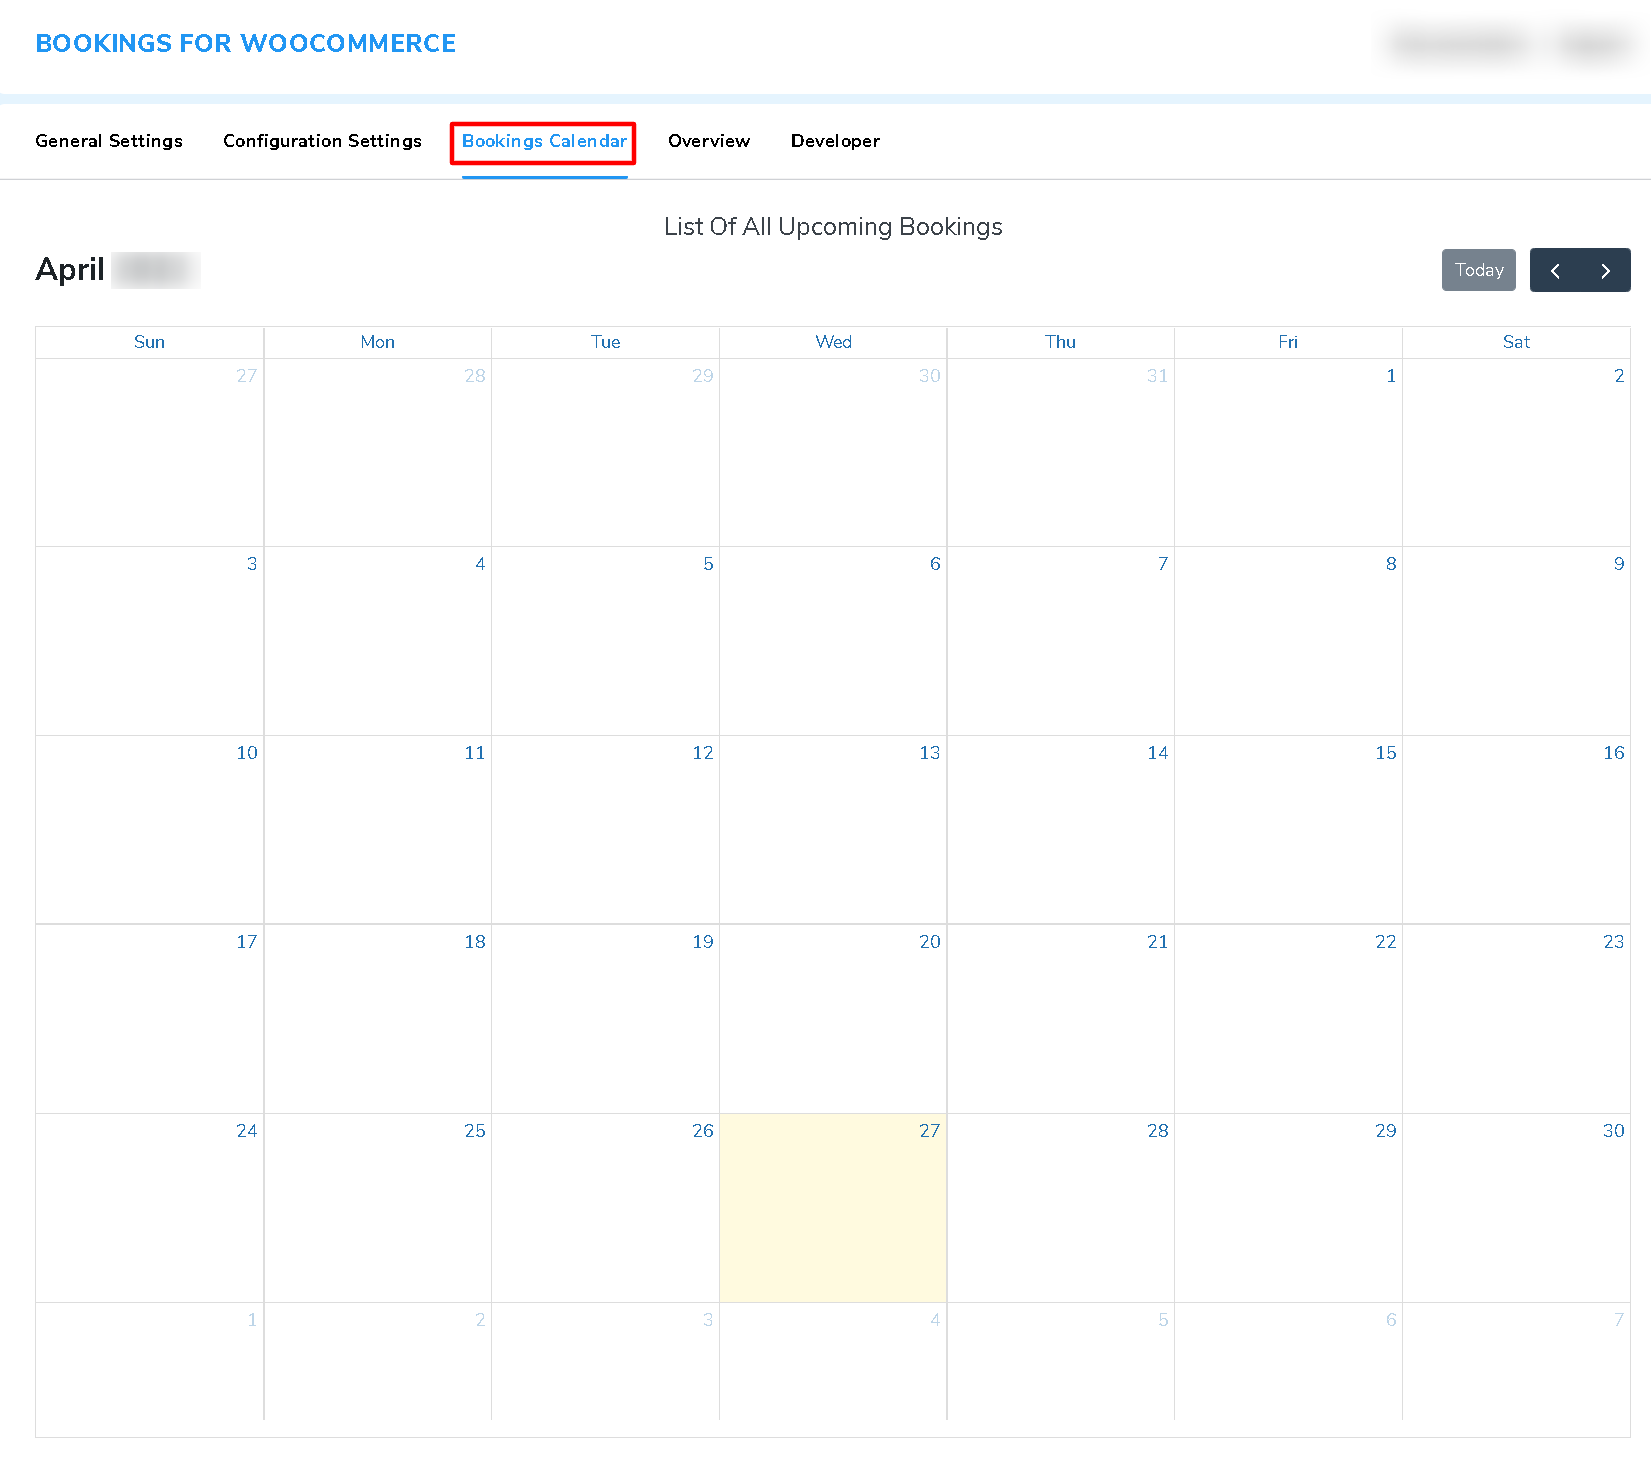
Admin managers can easily check out the detailed booking calendars for different months available here, and determine with ease- How their month is shaping up. Admins can utilize the filter to filter out the bookings by choosing them as per their preference, these being On-hold, pending, processing, or completed. This further helps streamline the booking management process convenient for the websites.
This calendar displays the booking request made by your customers, one can make use of that to schedule their WooCommerce bookings further and plan their workflow.
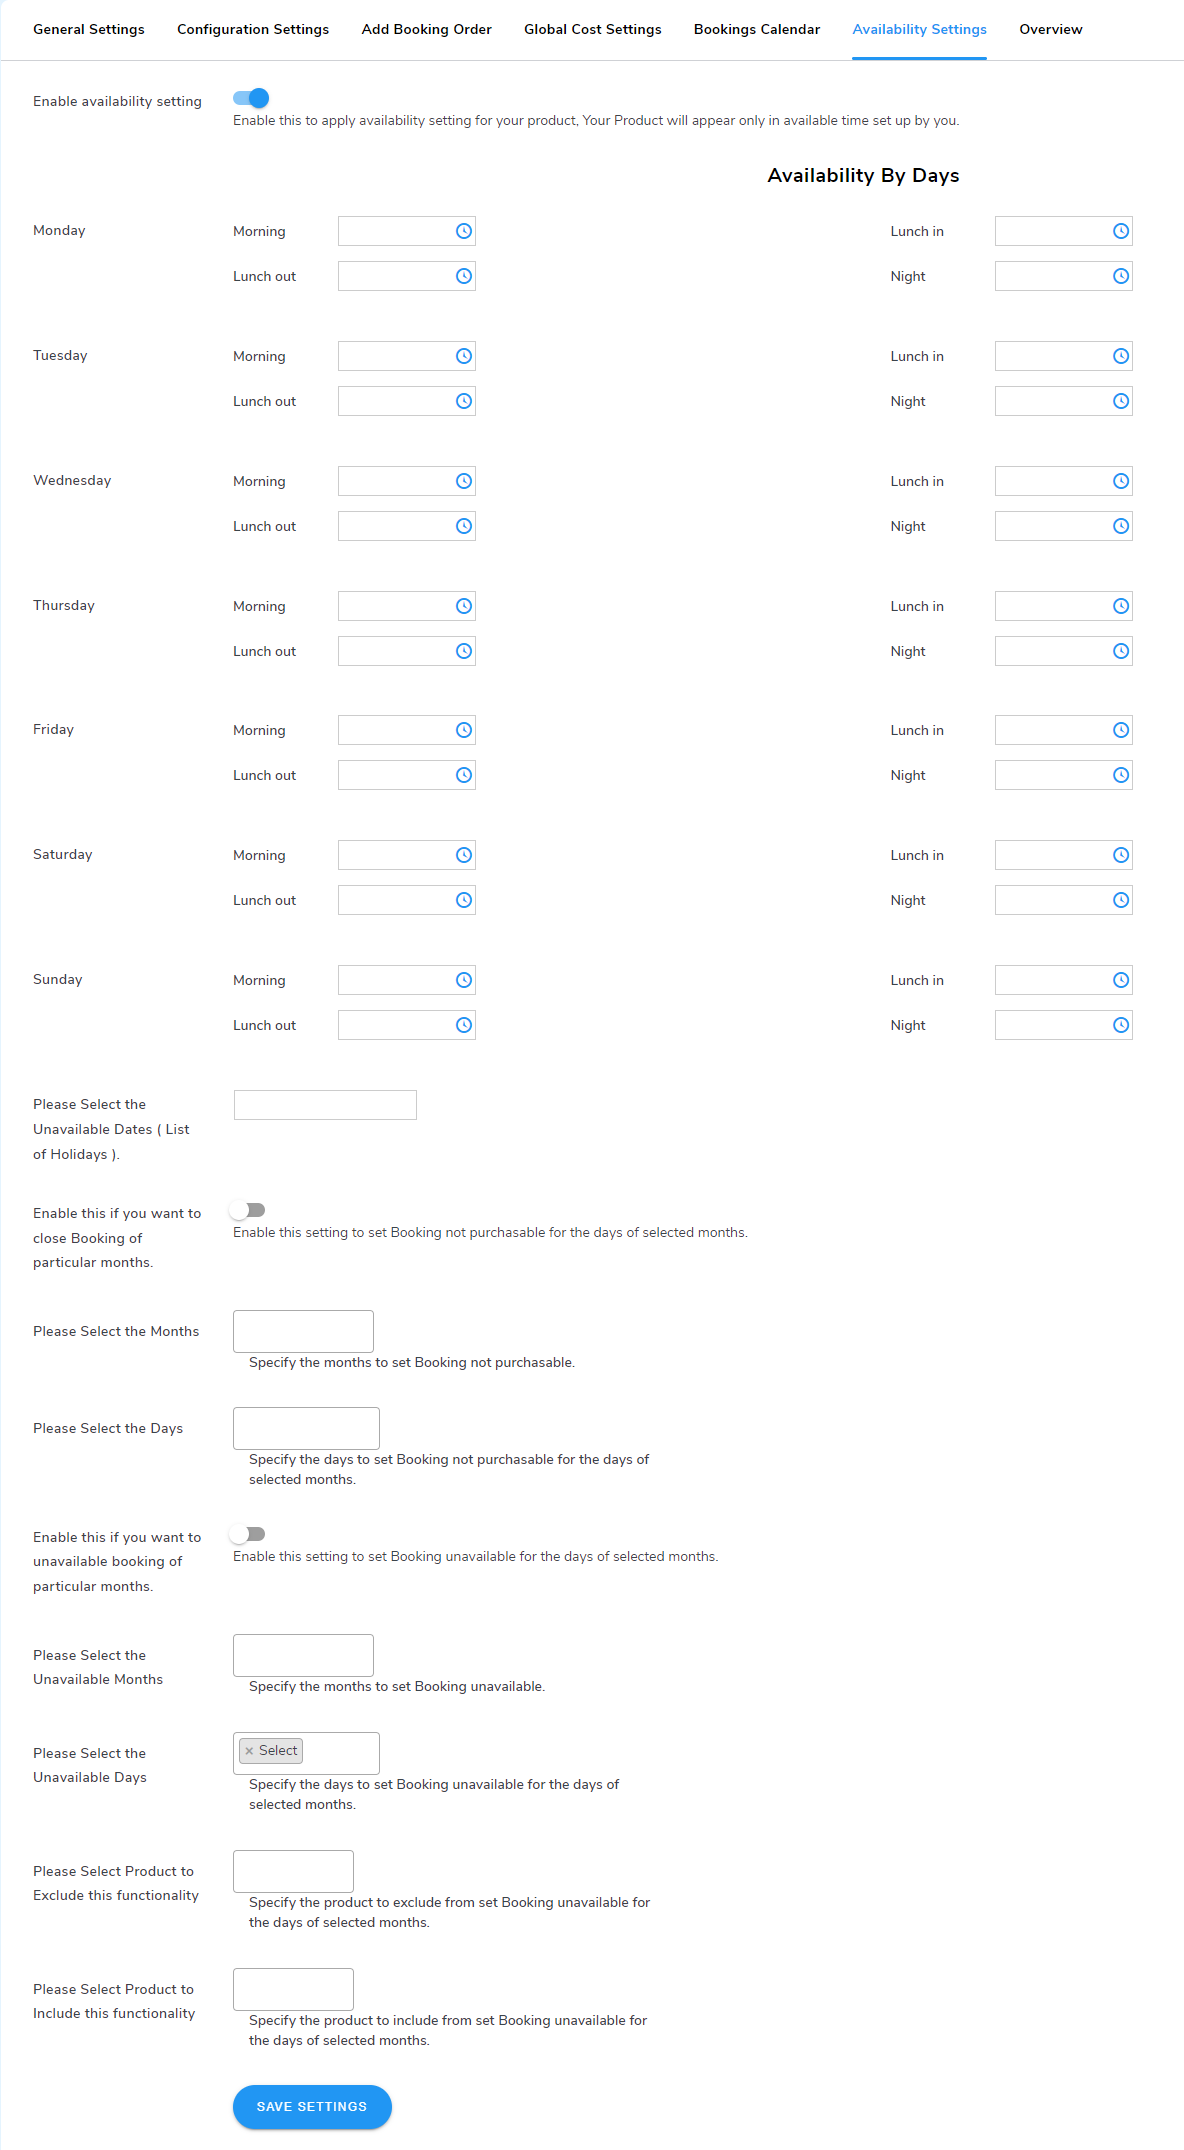
12.Availability Settings
This is the very next tab in the WooCommerce bookings plugin’s configuration settings. i.e. Availability Settings. You may use this option to simply define the exact start and end dates/times of your booking.
Let’s have a look at how-
We will first go through the settings that are provided for the FREE version of the bookings plugin,
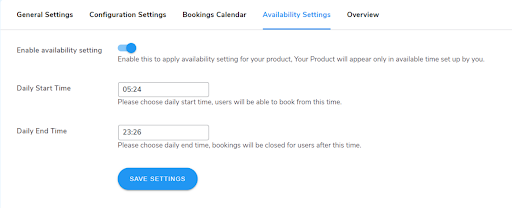 12.1 Enable Availability Setting
The admin can enable this to apply the availability setting for the mentioned booking products over your website. Your products will appear only in the mentioned time set up by you.
12.2 Daily Start Time
Enter your daily start time for the booking requests to be made at your website end. Customers cannot place requests before the specified time.
12.3 Daily End Time
Enter your daily end time for the booking requests to be made at your website end. Customers cannot place requests after the specified time till the very next day.
We will then go through the settings that are provided for the PREMIUM version of the bookings plugin,Premium
This option not only defines the availability but can also act as an effective resource to restrict your booking slots and offer easy booking management for unavailability.
This availability settings tab offers multiple setting options like-
12.4 Availability By DaysPremium
Using the plugin settings, you can easily define your booking Start, End, and Lunch Hours depending on the weekdays.
To do so, you just need to specify the particular day-wise Morning, Lunch In, Lunch Out, and Night time slots utilizing the time range picker available there.
12.5 Please Select the Unavailable Dates ( List of Holidays )Premium
This setup option is quite effective in handling your unavailability depending on a different set of holidays.
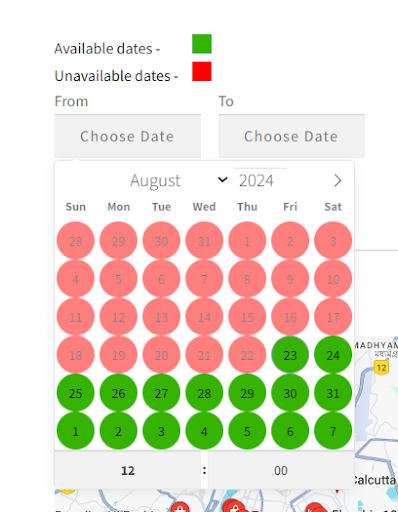
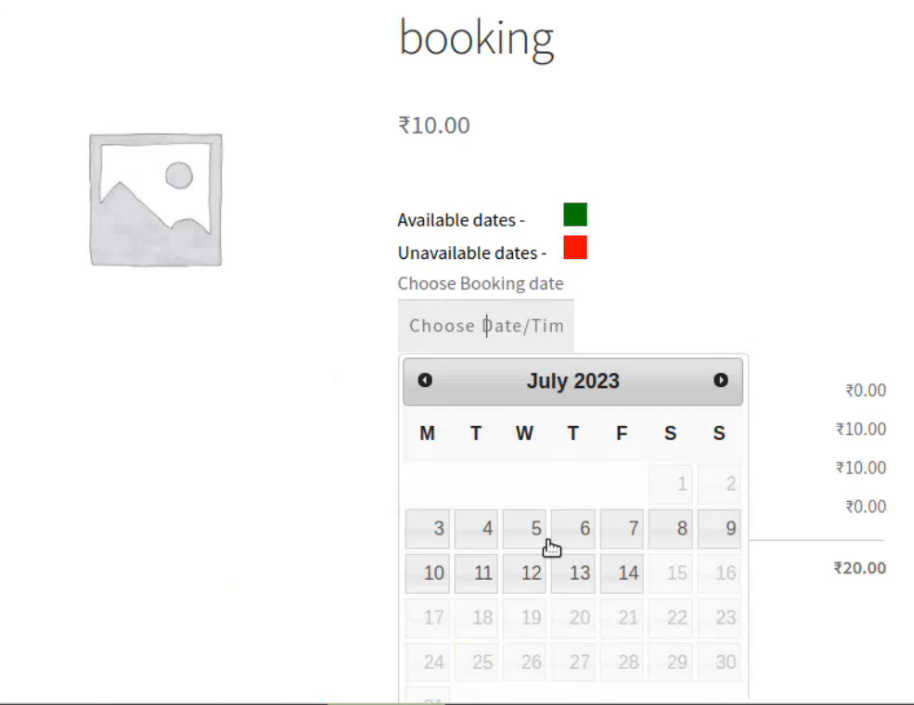
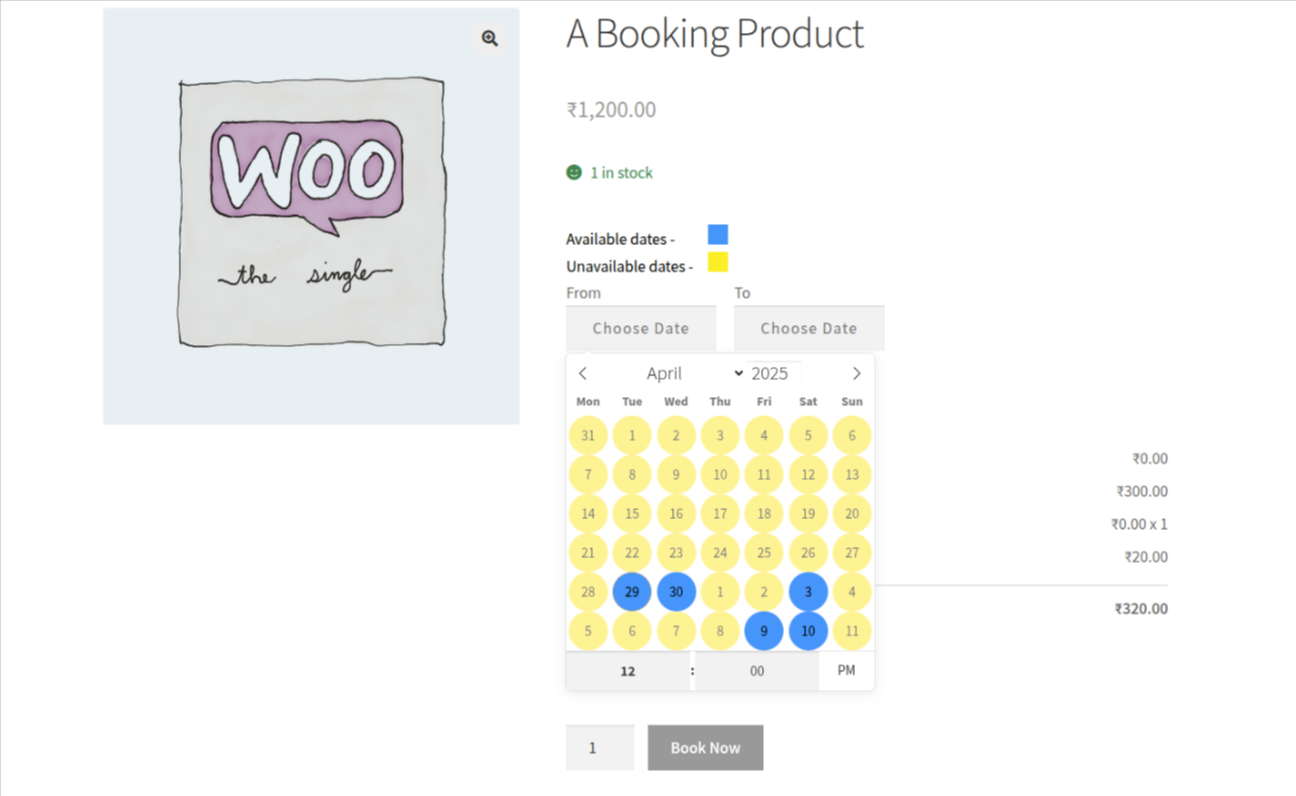
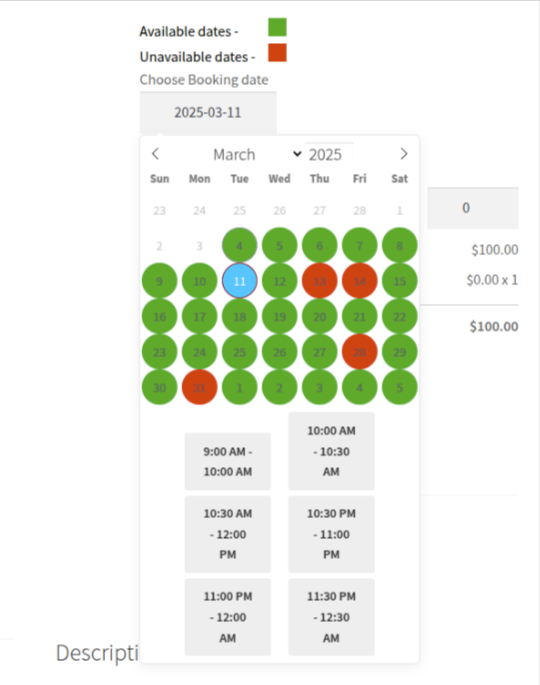
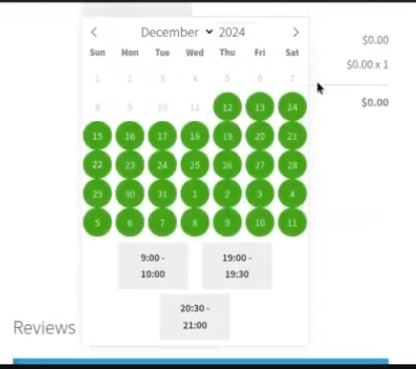
Note- We also have a separate front-end WooCommerce bookings form where the availability dates are displayed separately. These days are displayed on the date picker calendar in different colors based on their status, with green denoting availability for booking and red denoting unavailability on that date. Please see the screenshot below for more clarification—
12.6 Enable This If You Want To Close Days Of Particular MonthsPremium
This is a toggle-based option that allows store owners to enable availability schedules for booking days based on month-wise sorting. Booking under this setting involves days specifications that are unavailable out of selected months.
12.7 Please Select The MonthsPremium
This option involves listing out the unavailable month-wise listings within. The months specified would be set as unavailable or not available in the specified booking place.
12.8 Please Select the DaysPremium
This option involves listing out the unavailable day-wise listings within. The days specified would be set as unavailable or not available in the specified booking placed for different months.
12.9 Enable This If You Want To Unavailable Booking Of Particular MonthsPremium
This option can be utilized if you want to make particular months unavailable for a specified period.
12.10 Please Select the Unavailable MonthsPremium
Utilize this option to specify the months that you want to make unavailable for booking for the customers.
12.11 Please Select The Unavailable DaysPremium
Utilize this option to specify the days that you want to make unavailable for booking for the customers.
12.12 Please Select A Product To Exclude This FunctionalityPremium
The admins can also exclude certain booking products from being unavailable for particular months.
NOTE: This particular setting is only “If You Want To Unavailable Booking Of Particular Months” not for other settings.
You can easily define the list of your holidays and define your booking’s availability with ease by utilizing the calendar picker available there.
12.13 Please Select Product To Include This functionality
The admins can use this setting to make (or include) certain booking products unavailable for specific months.
NOTE: This particular setting is only “If You Want To Unavailable Booking Of Particular Months” not for other settings.
13.Product Data Settings
The Product Data Setting section is located just beneath the product description area.
Tap the dropdown button beside the Product Data and update Product Type with Booking Product.
This section involved different setting options within they are-
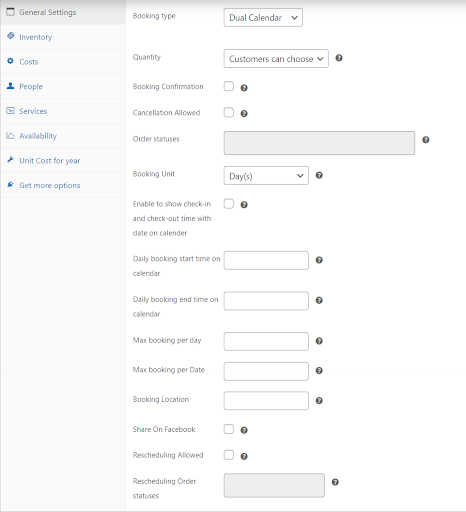
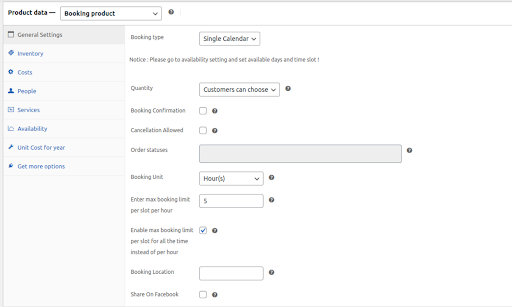
13.1 General Settings
(Some features of the General Settings are different for Single Calendar and Dual Calendar)
Refer to this Screenshot for Dual Calendar for Days – booking unit
 Refer to this Screenshot for a Single Calendar for hour – booking unit
-
Booking Type
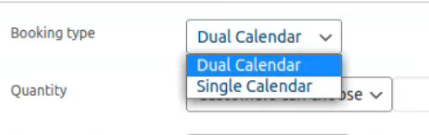
The merchant can now toggle between a single calendar and a dual calendar. With this WooCommerce appointment plugin feature the merchant gets a chance to toggle between Single or Dual Calendar based on the requirements of your organization.
If a merchant decides to go ahead with the Dual Calendar, he will be in a position to mention the dates of booking that are unavailable and the days that are unavailable every week (weekly off). The users can choose “to” and “from” dates for booking.
But if a merchant decides to go ahead with the Single Calendar, he will be in a position to mention the dates of booking that are available. The customer can choose multiple dates
NOTE: If you have more unavailable dates, then you can go for the dual calendar, but if you have more available, you can go for the single calendar.
Front-end For Dual WooCommerce Booking Calendar

Frontend For Single Calendar
-
Quantity
This option in the General Settings tab determines the booking quantity determination type for your booking product.
All you have to do now is tap the dropdown menu. It would display two different sorts of booking appointment quantity determination units, identical to those shown in the screenshot below.-
![]()
Customers Can Choose
You can easily define your WooCommerce booking quantity as the Customers Can Choose type, this depicts that your booking-based quantity determination can be custom-assigned by the consumer at the front end while placing a booking request. i.e. booking duration on the front end is chosen by the customer.
Fixed Unit
This is also a type of booking quantity, if you supposedly set your booking quantity type to be fixed, that means that your booking duration is predefined to 1 i.e. booking quantity, and that cannot be altered by the customer while placing a booking request.
-
Booking Confirmations
This checkbox option allows you to easily enable admin privileges for the booking appointment request made over the website. If you enable this checkbox option then all booking requests for the product require admin confirmation.
-
Cancellation Allowed
This is quite an effective yet straightforward option for the WooCommerce booking requests made over your website. As you enable this option, you offer the ability to your customer to cancel their placed booking requests with ease.
To make the settings in action, just enable the checkbox option available and mention the Order Status in the box beneath for cancellation processing.
-
Order Status
To make the settings in action, just enable the checkbox option available and mention the Order Status in the box beneath for cancellation processing.
-
Booking Unit
This dropdown option lets you easily determine the unit type for your booking orders to be placed for the specified booking product, service, or resource.
It has three options likewise, depending on the booking product you own or for which you’re specifying.
If you decide to go with the “hour” option, you will see the following settings (these are related to hours)
-
Daily Booking Start Time On Calendar
This setting allows you to specify your booking start time for your specified booking product. You can enter your specified booking start time here. The entered would be displayed in the front within the date and time picker calendar.
-
Daily Booking End Time On Calendar
This setting allows you to specify your booking end time for your specified booking product. You can enter your specified booking end time here. The entered would be displayed in the front within the date and time picker calendar,
The admin will see the following option if you select “hours” under the booking unit settings,
-
Max Booking Limit Per Hour
The maximum booking limit can be set using this checkbox option based on booking hours. You can enter whatever number you choose here to prevent being overloaded for the day with the sum of your maximum occupied and unoccupied hours.
-
Enable Max Booking Limit Per Slot For All The Time Instead Of Per HourPremium
Admins can enable this setting, if they want to enable the maximum number of booking slots infinitely instead of per hour.
NOTE: You can only see this feature if you “Single Calendar” selected with calendar type, and “hours” selected for booking unit.
The admin will see the following option if you select “days” under the booking unit settings,
-
Enable To Show Check-In And Check-Out Time With Date On Calendar
If you wish that your user make use of the date picker and time selection options on the calendar to determine your booking requests at the front end, then enable this checkbox option available.
-
Max booking Per Day
The maximum booking limit can be set using this checkbox option based on booking hours. You can enter whatever number you choose here to prevent being overloaded for the day with the sum of your maximum occupied and unoccupied hours.
-
Max Booking Per Date
The admins can also restrict the users by mentioning the maximum booking number on a particular date.
-
Booking LocationPremium
This checkbox option allows you to enter Location which will be shown on a single product page while placing a booking request. Customers can make use of the location feature to track their booked service location.
-
Share on FacebookPremium
This checkbox option allows you to enable the product to be shared on Facebook, for this you integrate your Facebook credentials with the plugin settings available in the Integration Settings tab.
-
Allow for Single Date Booking Only
This functionality enables the merchant to allow their customers to make the booking for a single date/day. This option works only for single calendar bookings.
-
Rescheduling AllowedPremium
This option enables your booking product to be rescheduled if the customer places the rescheduling request.
-
Rescheduling Order StatusPremium
This option is available only if you enable the rescheduling checkbox setting, and define your specific order status on which rescheduling can be specified.
13.2 Unit Cost
It’s essentially the per-unit cost of the bookable resource or the business owner’s main expense. A booking unit’s cost can be any amount you like; you only have to manually type it into the text field next to it.
-
Booking Unit Cost
Utilize this field, to enter the unit cost for a particular service that you are opting to book for.
-
Booking Unit Cost Per People
In terms of the unit cost of the bookable resource, this is a contradicting additional choice. If you select this option, the fee per unit is computed based on the number of people for whom the service is being ordered.
-
Hide Base Cost From Product Page
The admins can utilize this feature to hide the base cost of the booking product from the customers.
-
Base Cost
It is primarily the cost of a bookable resource unit’s base rental fee or optional cost. Because the base cost is an optional charge, the user has complete control over whether or not to use it.
This is a viable possibility. A new option for calculating your base cost is included in Base Cost.
-
Base Cost Per People
If you choose this option, the base price is set by the number of persons that use the booking service.
If you wish to include additional fees in addition to the booking unit and base cost for the booking product, simply follow the steps below.
Note: If you want to add further additional booking costs other than booking included costs for your booking product, refer here.
-
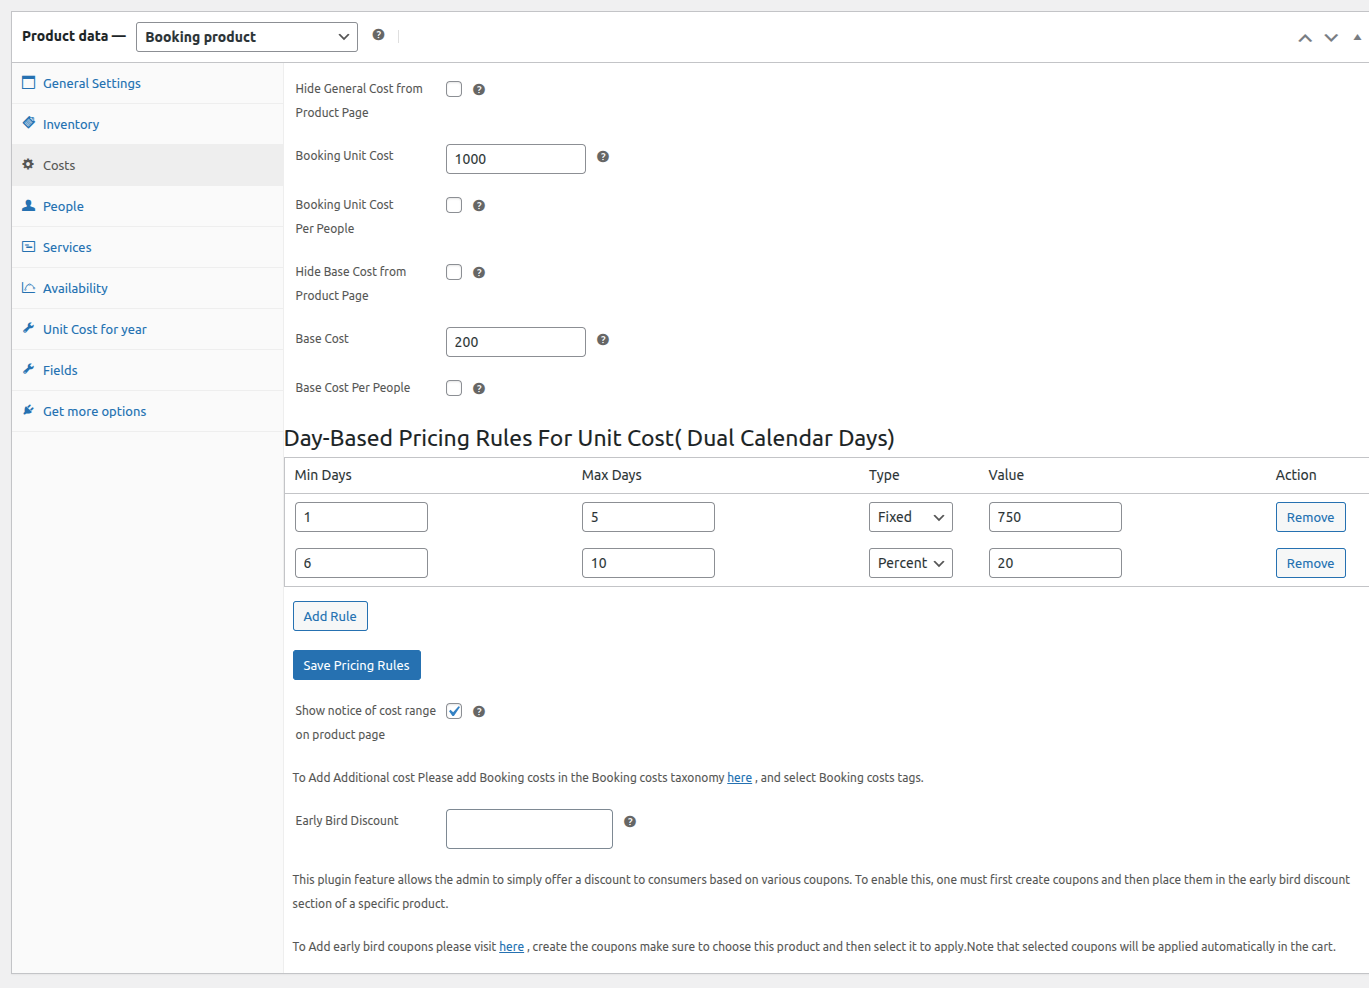
Day-Based Pricing Rule For Unit Cost (Dual Calendar)
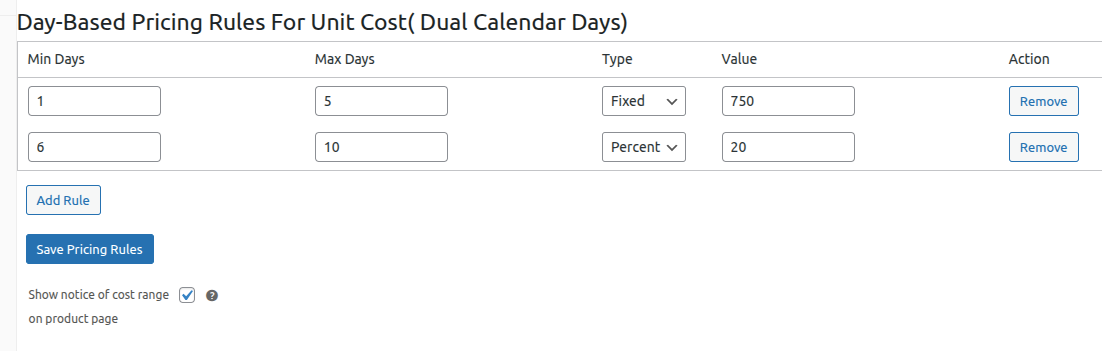
Merchants can offer day-based discounts (for dual calendar), both fixed and variable, to encourage their customers to make bookings for longer time frames.
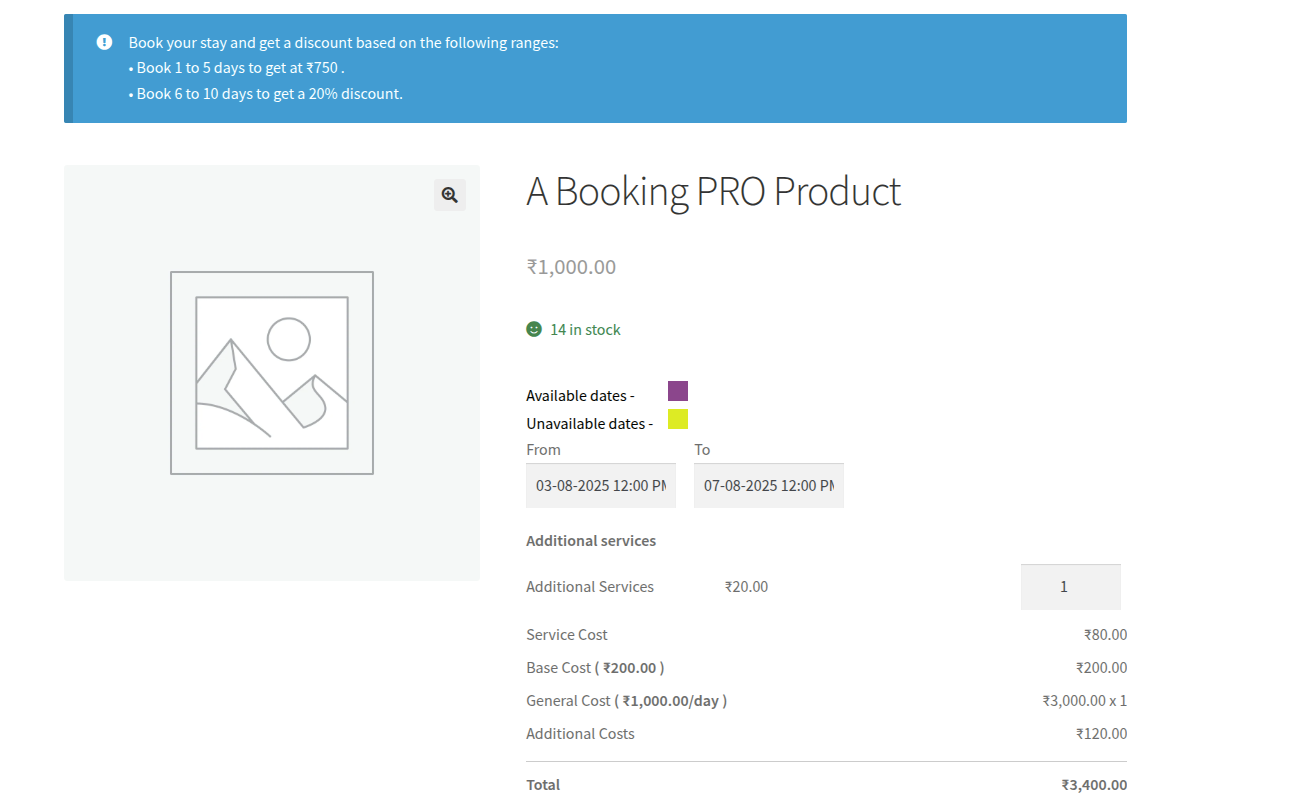
For example, offer a $20 discount for 1-5 days, and a 30% discount for 5-10 days.
This strategy will definitely motivate customers to extend their stay and increase your revenue over time. These are the settings that you will have to configure –
- Minimum Days – Specify the minimum days
- Maximum Days – Specify the Maximum days
- Type Of Discount – Specify if you are doing ahead with the fixed discount type or percent discount type
- Value – Mention the value for the discount that you are offering
- Show Notice Of Cost Range On Product Page: Enable this setting, if you want showcase a message over the product page, specifying the discount rules for that particular booking product.
Frontend Representation –
-
Early Bird Discount
This is an outstanding feature of the plugin that lets the admin manager offer an easy discount based on a different set of coupons for their customers. To do so they are first required to create coupons and append them in the early bird discount section of a particular product to make it in action.
Note: To Add early bird coupons please visit here, create the coupons, make sure to choose this
13.3 People Settings
These are the additional product settings that will be enabled after you tap into the People tab. This set includes multiple settings within-
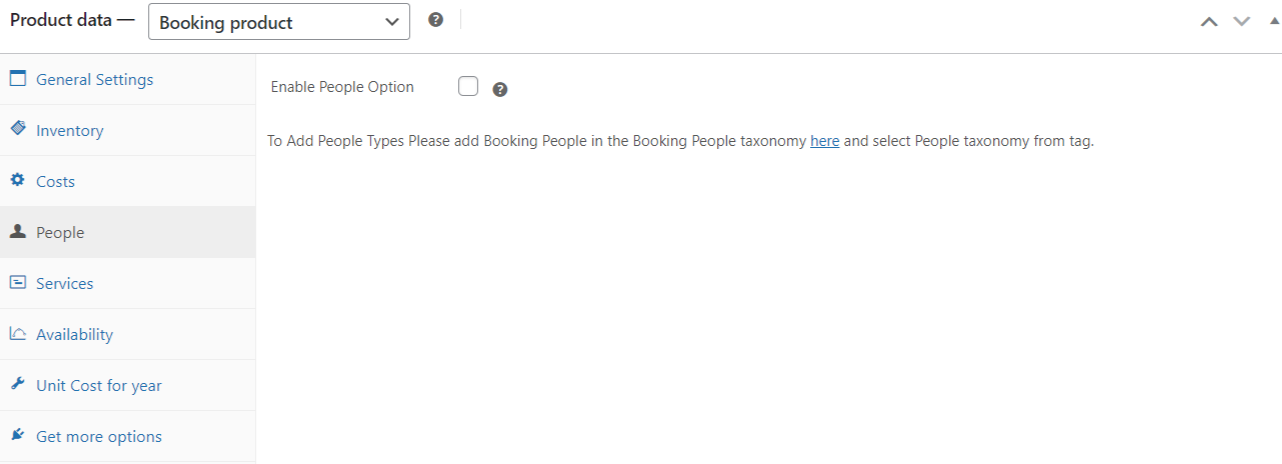
-
Enable People Option
If you wish to offer the people an option for the ease and comfort of your consumers for placing booking requests, then enable the checkbox setting available here.
13.5 Services Settings
These are the additional product settings that will be enabled after you tap into the Services tab. This set includes multiple settings within-
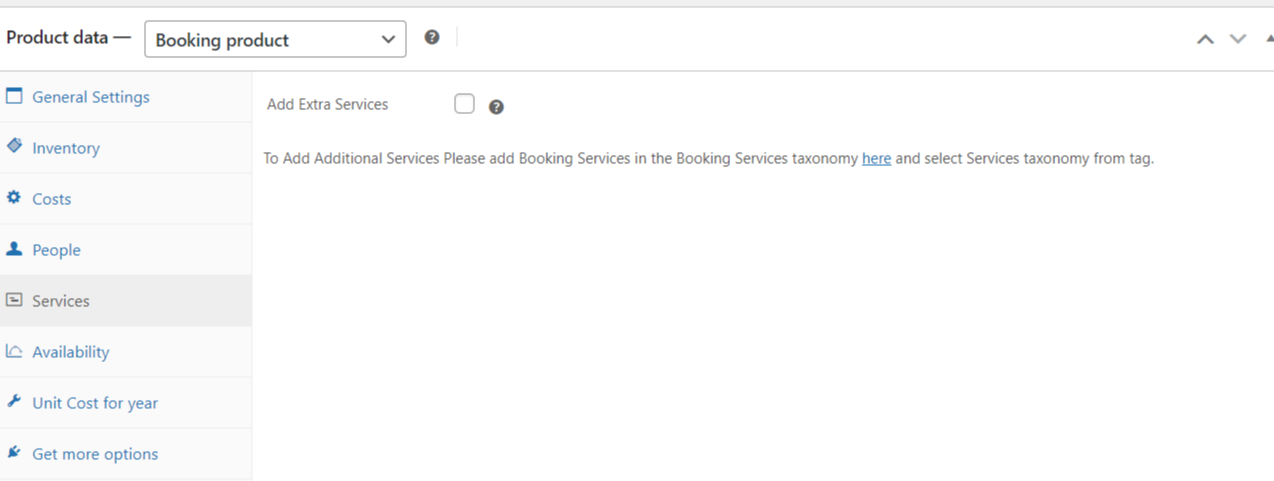
- Add Extra Services
This option enables your customers to choose additional booking services in addition to the product’s predefined booking services when making a booking request.
Note: If you want to add further additional services other than booking included services for your booking product, refer here.
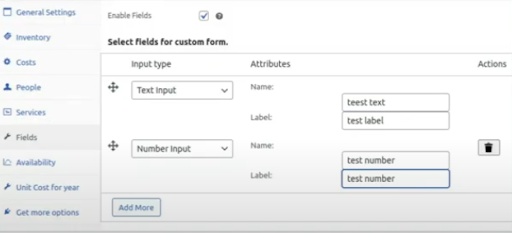
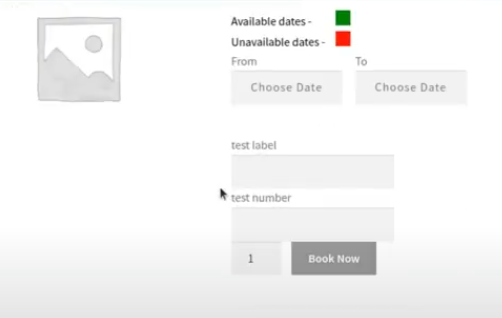
13.6 Fields
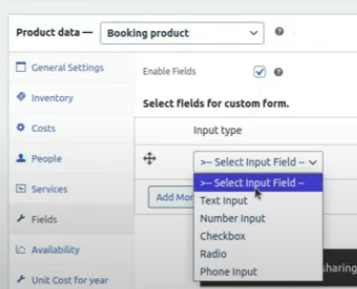
- Enable Fields: Admins can enable this functionality, to add custom fields to the existing booking forms. Further, you can choose from different “input fields options” and customize the booking form as per your requirements.
Here is how you add different options:
Frontend Representation of the custom input fields over the live booking form,
13.6 Availability Settings
These are the additional product settings that will be enabled after you tap into the Availability tab. There will be color codes in the date picker calendar for single & dual calendars.
To define booking availability, you need to navigate to Admin Dashboard > Plugin Backend > Configuration Settings > Availability Settings tab.
Note: In case you require an understanding of the Availability feature of the plugin, just refer here. (Refer to this for the Dual Calendar Booking Type, all the mentioned settings will be reversed for the single calendar type)
-
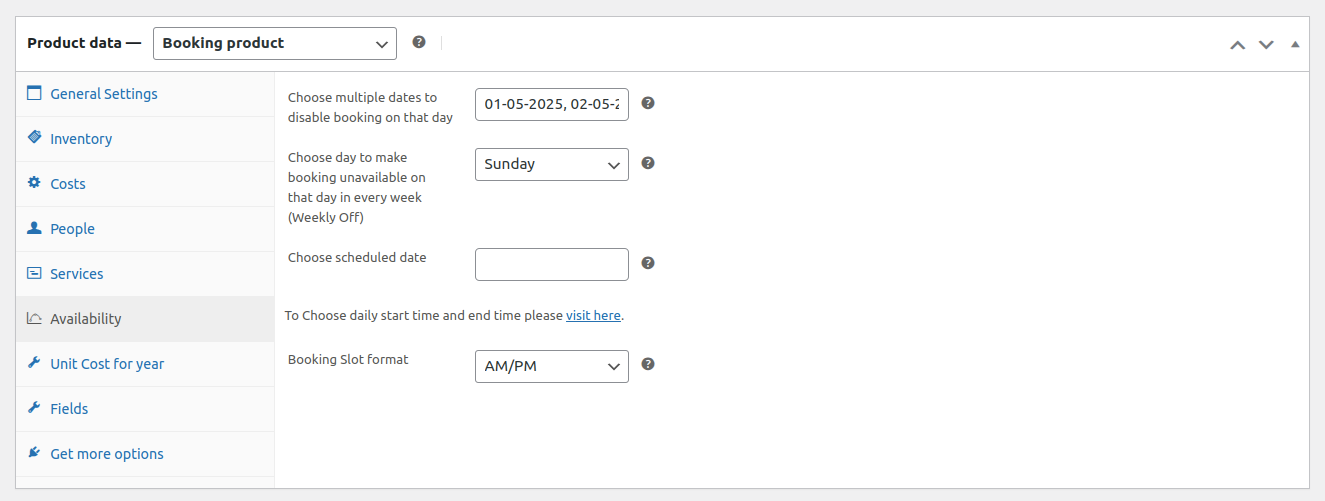
Choose Multiple Dates To Disable Booking On That Day
The admins can choose the dates, you want to disable the booking for your customers.
-
Choose Day To Make Booking Unavailable On That Day In Every Week (Weekly Off)Premium
Simply pick one day from the list of available days to use as your booking service week off. This setting is entirely optional; you are free to use it or leave it as it is.
-
Choose A Scheduled DatePremium
Enter a date here, and it will be taken into account as the start date of your booking services availability.
(Refer to this for the Single Calendar Booking Type )
-
Booking Slot Format
The admin can use this setting to set the timing format that will be shown on the frontend when customers are making the booking. The available formats are 24-hour and AM/PM.
Frontend Representation –
- Choose Scheduled Date
The booking window will start from the selected date.
-
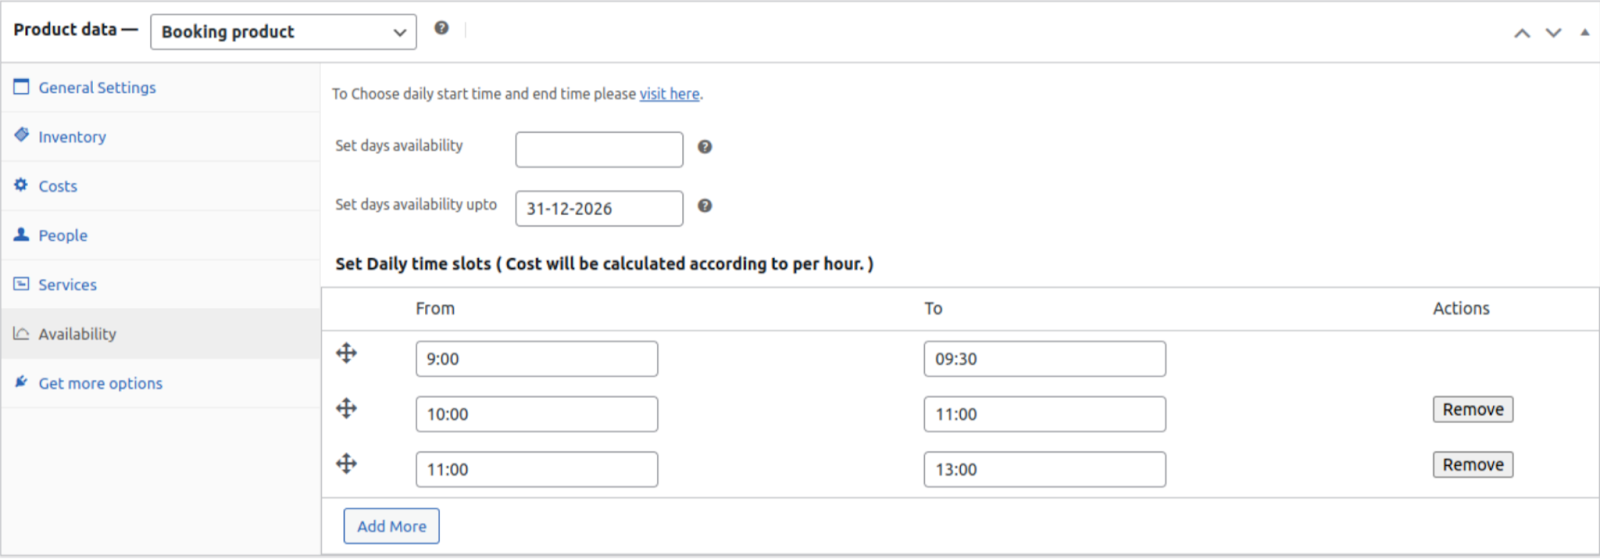
Set Days Availability
Bookings will be available on the specified dates, and minutes.
-
Sets Days Availability Up To Particular Date
Admins can mention the availability window or set the day availability up to a particular date by using this feature.
- Set Days Availability and Days Availability Up To Together
Admins can now make particular dates available up to a particular time. For example – you can make Saturdays and Sundays available up to December.
- Booking Slot Format
The admins can enable this functionality if they want the timing to show AM/PM, time formatting.
Frontend Representation –
- Hide/Disable Unavailable Slots:
Merchants can utilize this functionality to completely hide the unavailable slots to avoid confusion.
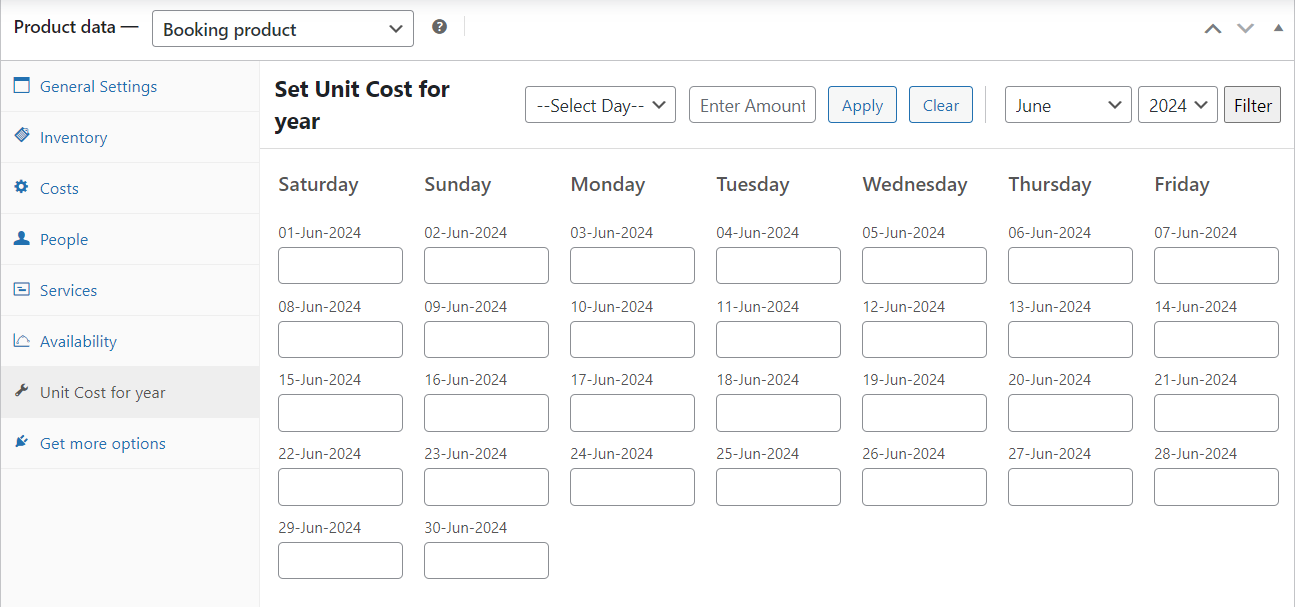
13.7 Unit Cost For Year
The WooCommerce bookings plugin enables the admins to set different prices for different dates throughout the year. By utilizing this section, admins can set different prices for a variety of dates. Further, it provides the admins with the flexibility of providing the customers with dynamic pricing.
From this section, the admin can put different prices for the mentioned dates.
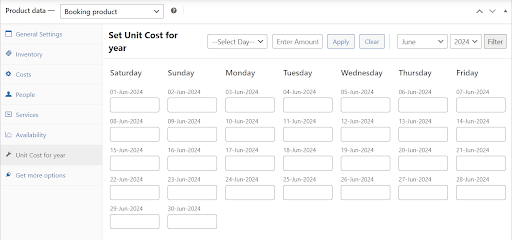 NOTE: The dynamic pricing will only be shown when the admin puts the prices if the space is left blank, then the parent pricing will be shown. The admins can use filters to make bulk edits over these dates.
13.8 Slots Per Day
Utilizing this functionality of the WooCommerce bookings plugin, admins will get a chance to schedule appointments for a particular day. This setting allows the admins to be flexible with their booking slots.
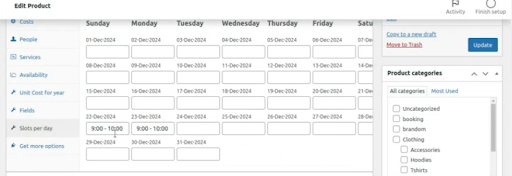 For example, if the admin wants to create extra slots for December 23rd, they can click on that particular date, which will open this window.
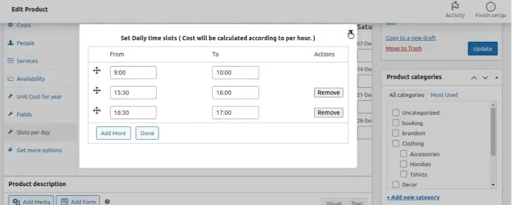
Utilize this window to add as many slots as you want for one particular booking product and a particular day. After adding the slots, you must update the product for it to be showcased in your WooCommerce store.
Frontend Representation –
14.Unit Cost For Year
The WooCommerce bookings plugin enables the admins to set different prices for different dates throughout the year. By utilizing this section, admins can set different prices for a variety of dates. Further, it provides the admins with the flexibility of providing the customers with dynamic pricing.
From this section, the admin can put different prices for the mentioned dates.
15.Slots Per Day Management
You can now manage the per day slots by using this functionality of “Slots per day” on the same day.
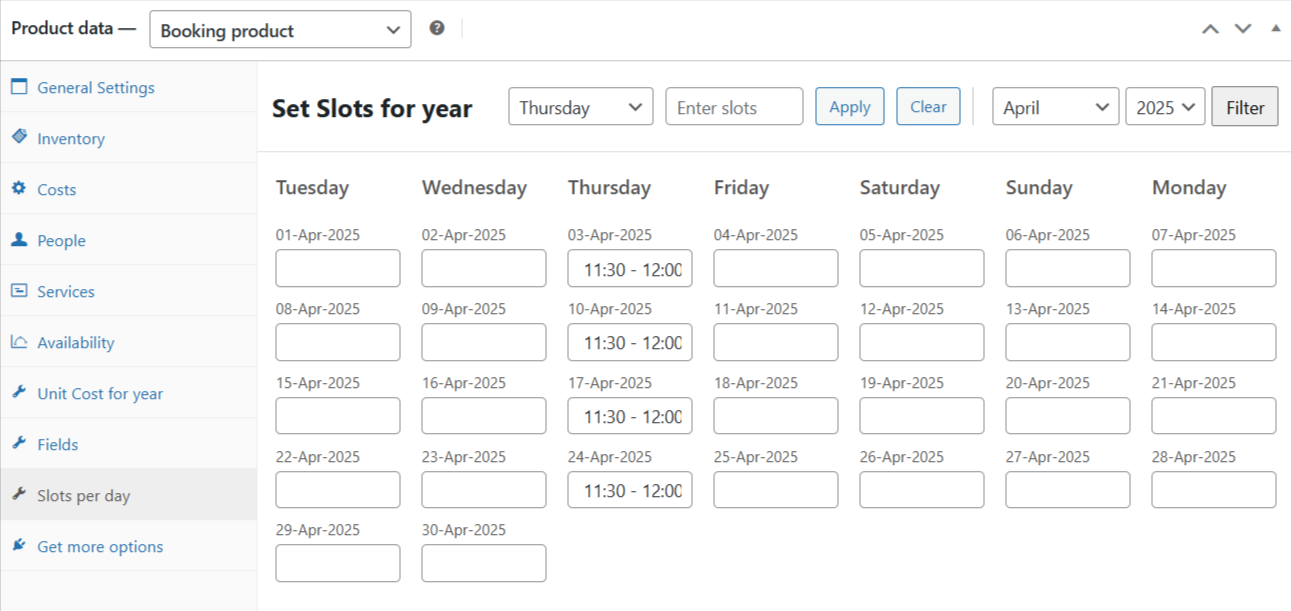
For Example: If you are serving a spa service, and you want to schedule it on every Thursday from 11:30 AM to 12:00 PM, all you need to do is select Thursday from the dropdown, enter the time slot once (like 11:30 – 12:00), and apply it to all Thursdays for the selected month in just a click.
This functionality will helps you in:
-
Offering your services on a repeated schedule.
-
Quickly update your availability for specific days.
-
Avoid chances of manual errors when managing bookings.
With this configuration, you will have complete control over your calendar with minimal effort, and your clients will always see the proper open slots when making reservations.
16.How can Customer Process Booking Requests & Admin review them?
You might be curious about that- How do your customers be able to place booking requests/orders using the frontend?
Need not worry, let me detail you that in an easy stepwise manner.
Let’s start then.
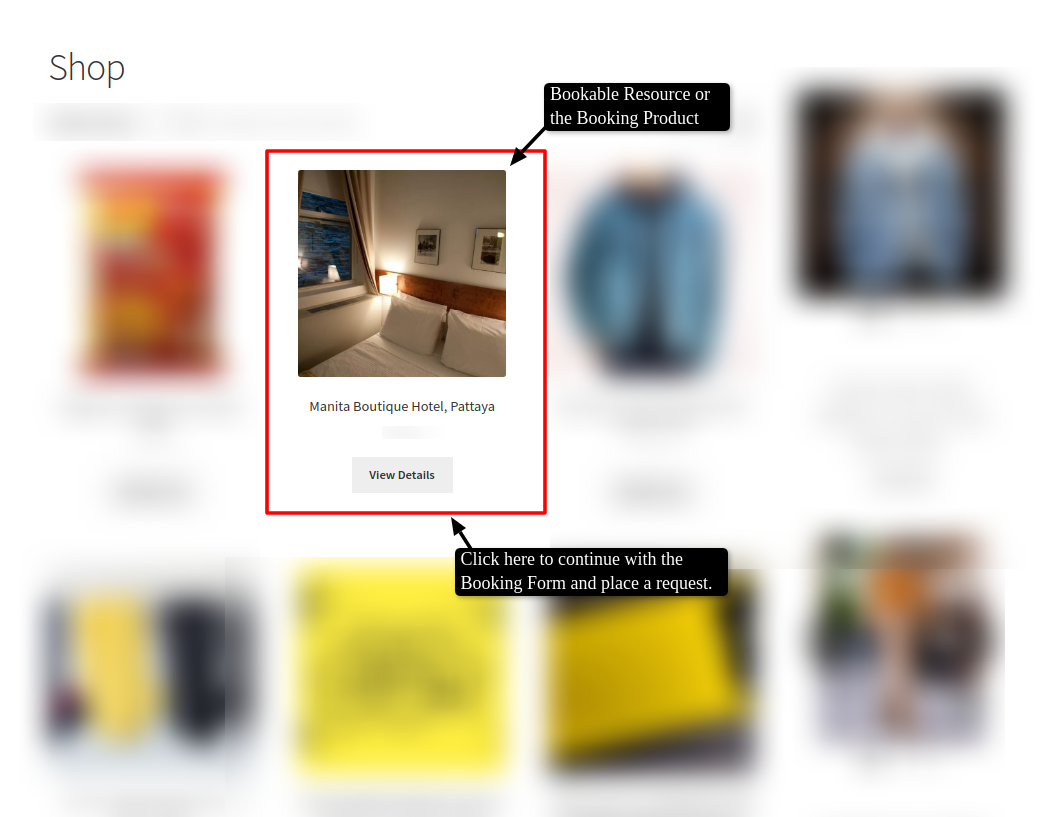
16.1.STEP 1 - Find A Booking Product or Service
In order to place a booking request or order, initially, the consumer needs to place a booking request. For that, he/she is required to fill a booking form.
Just hit the View Details button beneath the bookable resource i.e. product or service available in the store and proceed.
For better understanding do check out the screenshot below-
16.2.STEP 2 - Place Your Booking Request
After that, you would automatically be directed to the bookable resource i.e. product or service Description page. Here, you are supposed to fill out the booking form available, based on different options sets allotted by the store manager itself.
Do refer to the screenshot below for better understanding-
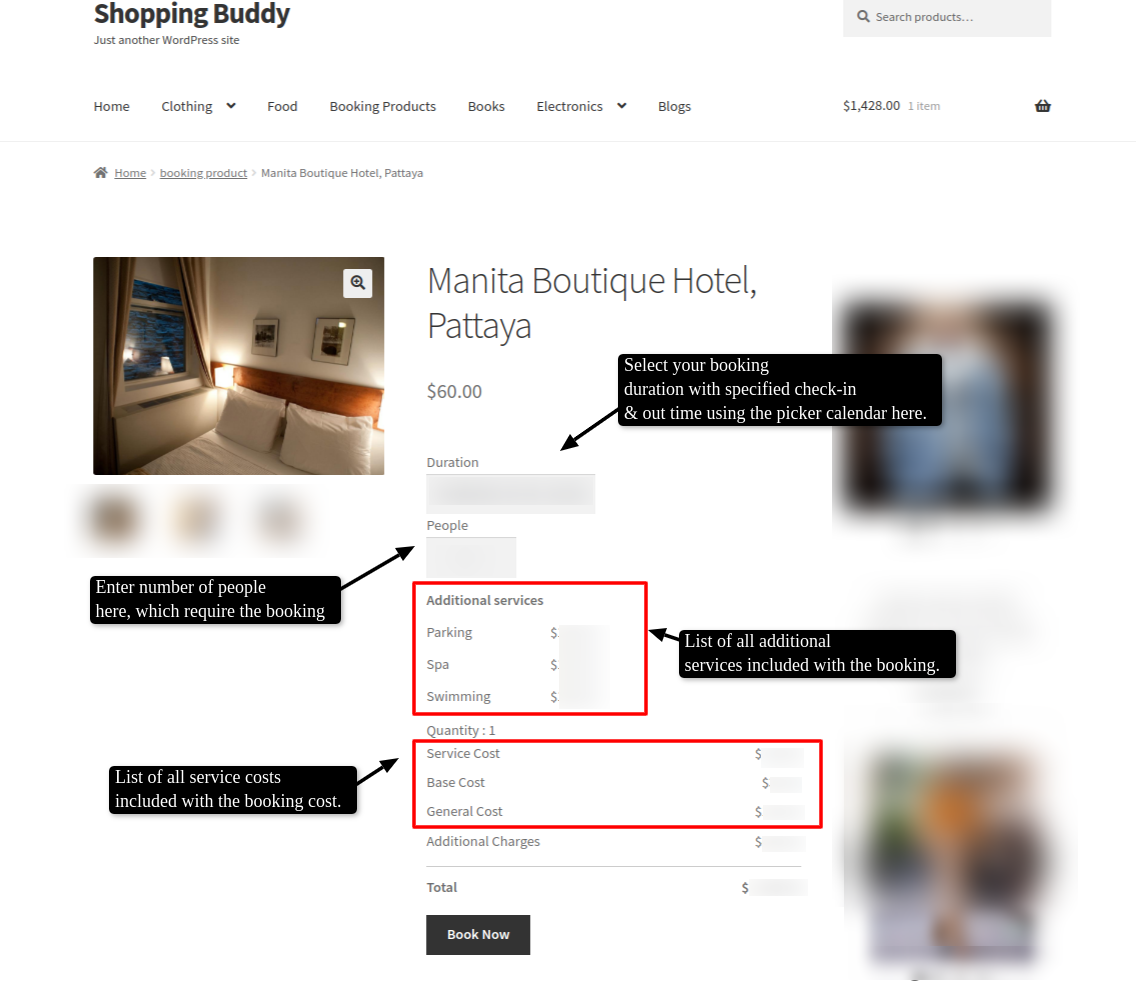
Just fill the Booking Request form given there based on your preferences for booking a certain bookable resource and hit the Book Now button in order to proceed further.
16.3.STEP 3 - Checkout
After hitting the Book Now button, you’ll be automatically redirected to the Checkout page to process the booking order checkout.

Add the Checkout Details in the form given and opt for the preferable Payment Options available there, and proceed to payment in order to complete the booking order.
That’s it, after successful completion of the Payment Process your Booking Placement Process would also be completed simultaneously.
Note: Customers can avail of unpaid booking requests by opting for the payment method as “COD” or Cash on Delivery.
16.4.STEP 4 - Booking Placed Notification
Customers can receive booking notifications via email from the booking store manager after the successful completion of their booking orders.
Mostly the notification email is to be supposedly sent in order to inform the customers regarding their pending payments or to update them about their booking status.
So, that’s all for the booking setup and process.
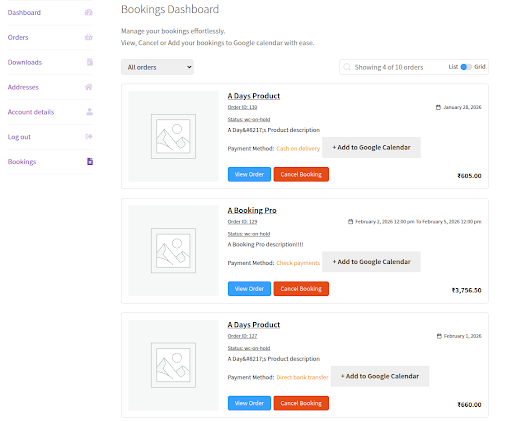
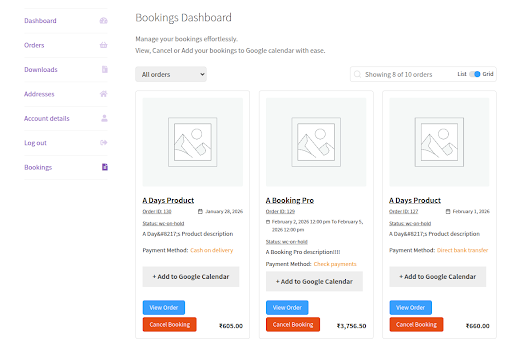
16.5.STEP 5 - Centralized View For Bookings
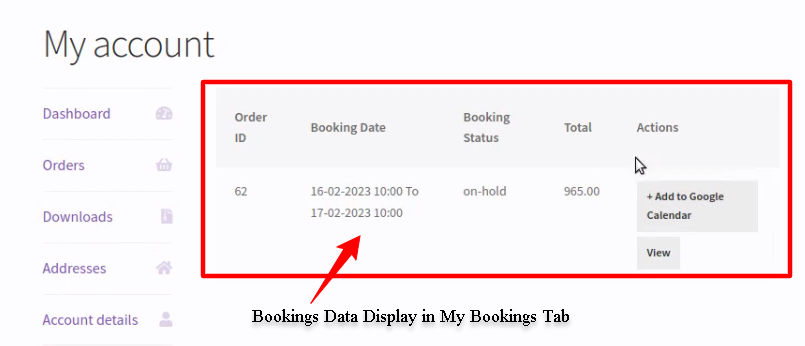
Customers can view their bookings in a centralized manner. They can see the name of the booking product (which is clickable), the payment method they used, the option to add the booking to their Google Calendar, the booking status, and the cancellation option (if the merchant has enabled this functionality). Furthermore, customers can also select whether they want to view the bookings in a list or grid format.
List View –
Grid View –
17.How do admin managers can Review their customer Booking Requests?
As a booking store manager itself, How supposedly you can review the booking requests received using your backend panel?
This might be a question that you might think of now.
Basically, you can review your booking orders or requests received in two possible ways using your Backend Dashboard Area.
How? let me detail:
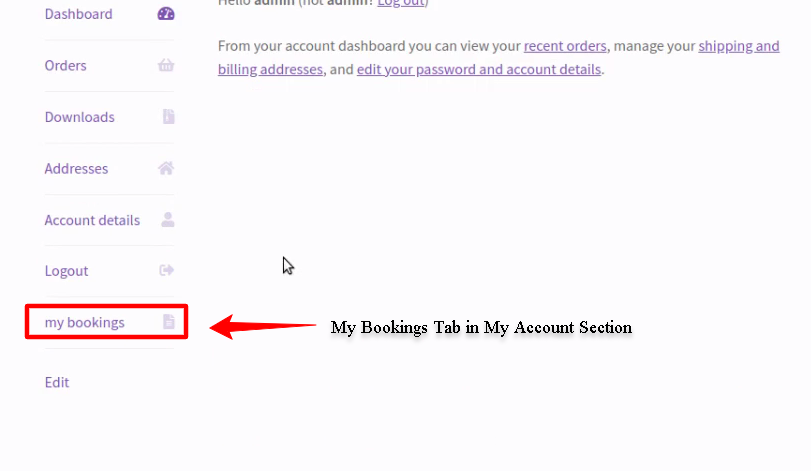
Dedicated My Bookings Tab
Yes, our Booking plugin has a special My Bookings Tab for managing your booking requests easily. Your website’s My account section contains a link to this tab. You can easily visit there and check the information for all of your upcoming reservations.
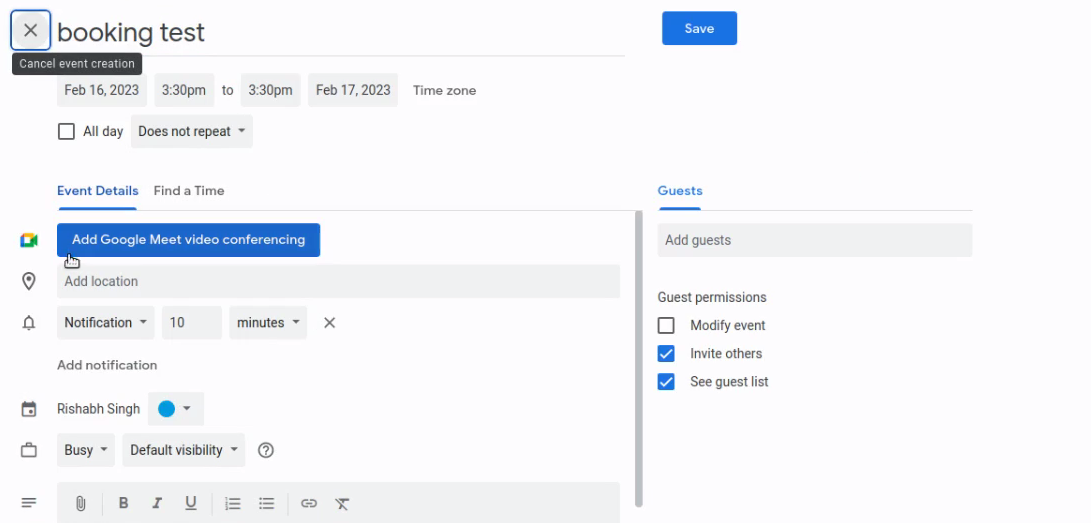
Other than this, our My Bookings tab also offers an specialized button option to Add your Booking to Google Calendar. Yes, you heard me right.
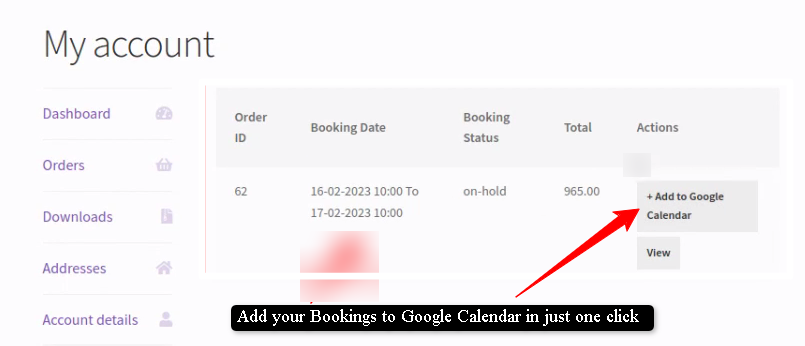
You are just required to click on the +Add to Google Calendar button for your booking order and get it added to Google Calendar right away.
17.1.Bookings Calendar View
The first way to review your placed booking orders or requests in an easy manner is using the Bookings Calendar View. In order to access the calendar view area, you just need to get towards the Dashboard > Bookings > Bookings Calendar tab.
You can review the screenshot given above in order to have a better understanding.
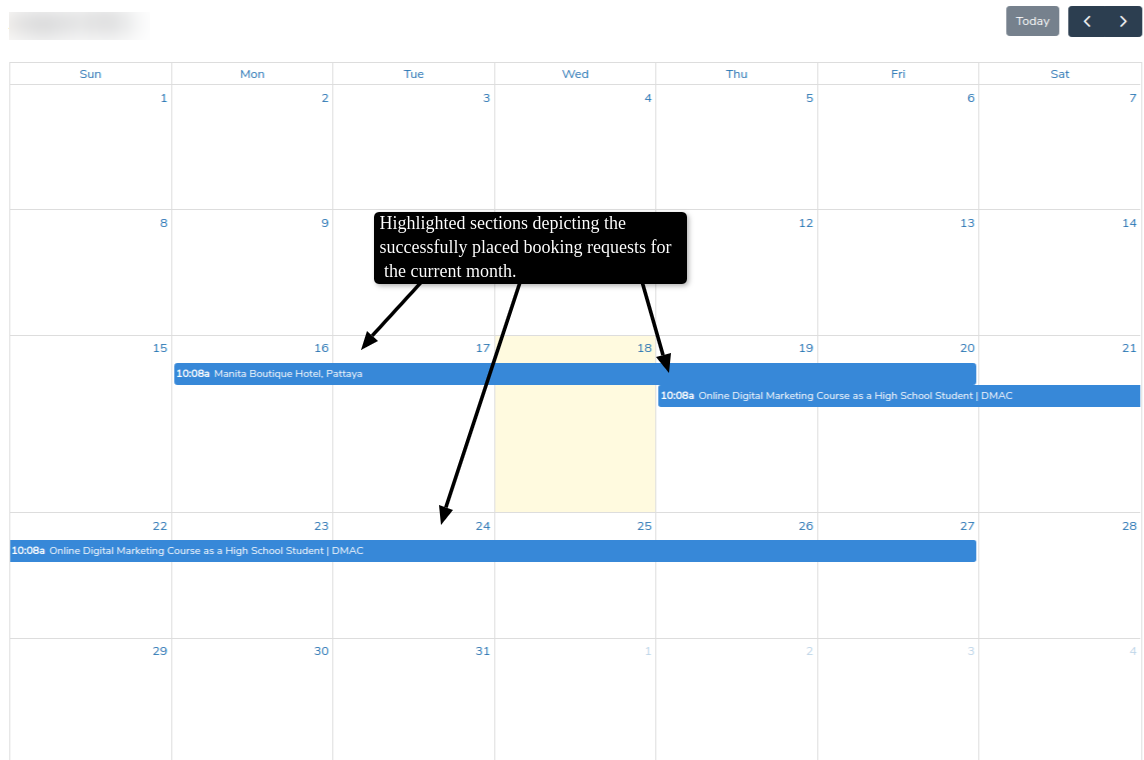
Here, you can now conveniently review all the booking orders or requests placed monthly on this view. If you want to review the particular booking status or details just click over the booking name.
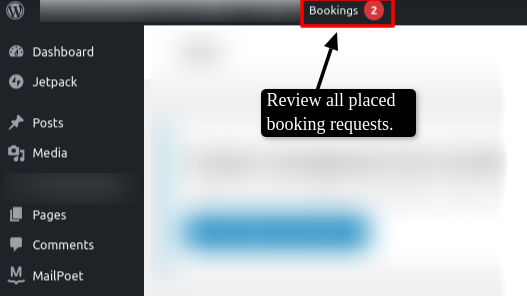
17.2.All Bookings Listing Panel
Another way to conveniently review the booking orders or requests placed is by making use of the Booking Listing Panel. You can navigate towards your WC booking listing panel easily in possible two ways-
First, just hit the Bookings button on the top of your booking dashboard panel and you’ll be redirected. This button also displays the number of booking requests placed.
For more understanding, do refer to the screenshot below-
Other than that, you are required to navigate towards your Dashboard > WooCommerce > Orders tab.
For instance, do refer to the screenshot given below-
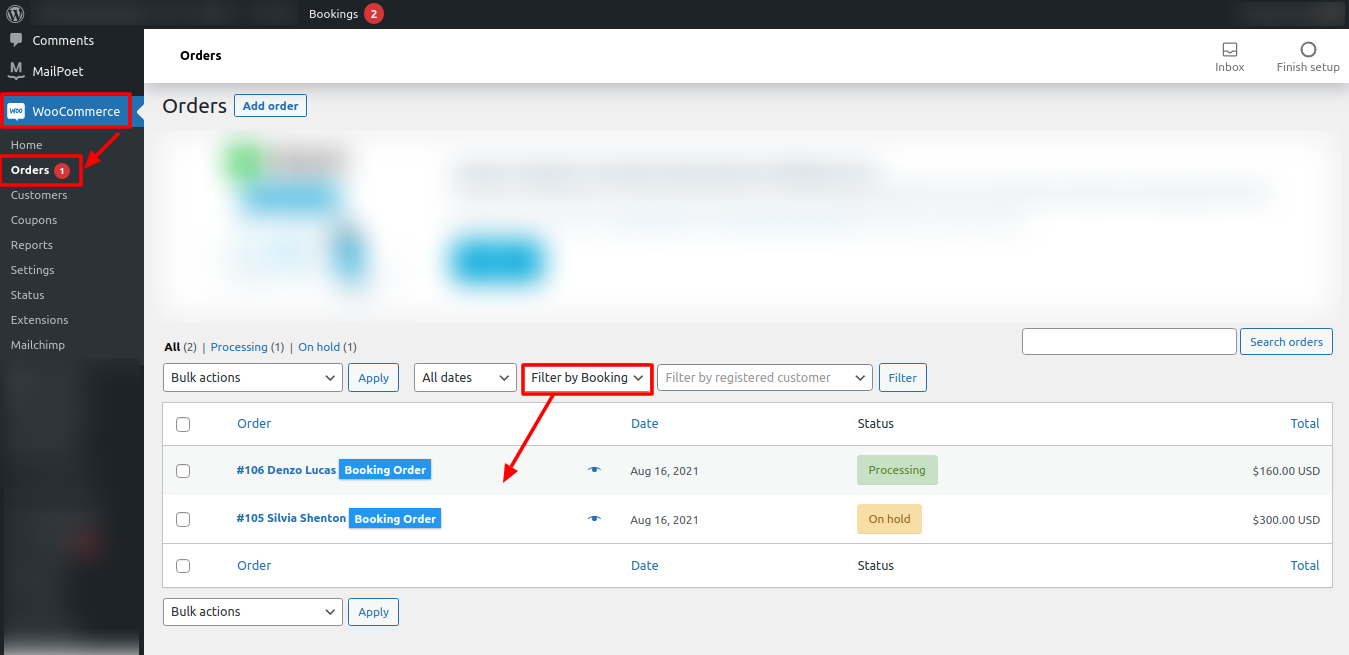
In the given WC Booking list view, you can easily evaluate all of the booking orders or requests that have been placed. Simply click on the booking order to discover the status or details for that specific booking or even edit that on your own.
Here’s where you’ll find a particular Bookings tag for simple sorting of your among the rest of the orders you’ve received through your website.
18.Global Calendar Booking
Merchants can utilize this functionality to seamlessly incorporate a Global Booking Calendar on any page they want. This eliminates the problem of creating multiple calendars.
18.1.Create A Global Calendar
To do so, follow these steps –
Navigate to “Global Bookings” > “Add new Booking” through the sidebar of the admin’s dashboard.

- You can now “create a new global calendar.”
- Admins will now add the following information related to the global calendar.
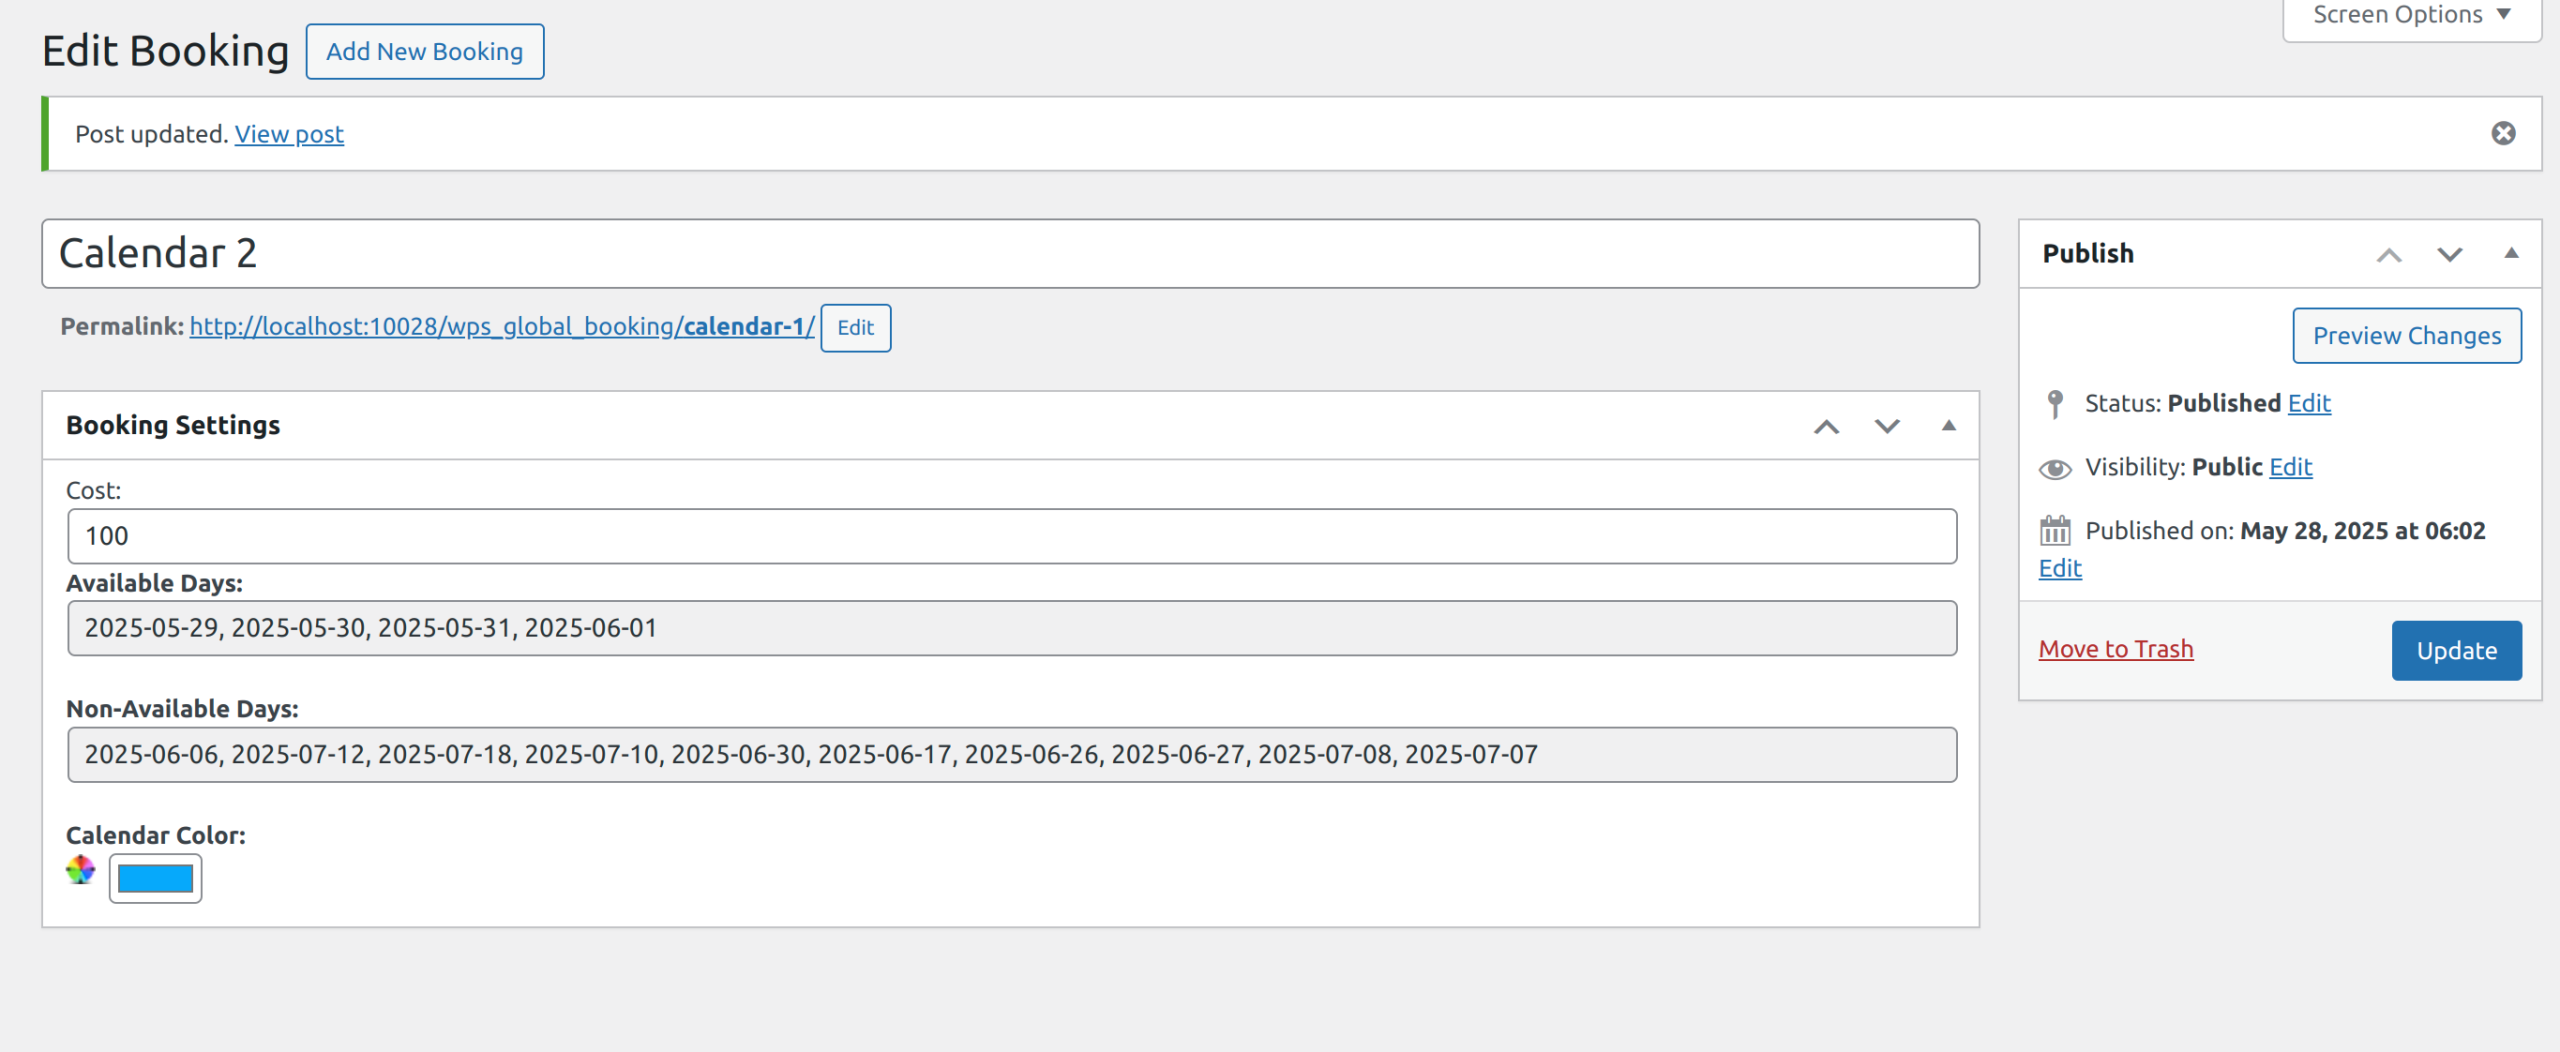
Booking Settings
- Maximum Booking Per Date: The admin can set the maximum number of booking per date. NOTE: This limit will apply to every date.
- Cost: Specify the cost for booking a slot on the Global Calendar
- Available Days: Mention the available dates.
- Non-Available Days: Mention the non-available dates.
- Calendar Colour: Choose the colour for your calendar.
After mentioning all the related data, click on the “update” button to publish the calendar.
18.2.Implementation Of the Global Calendar
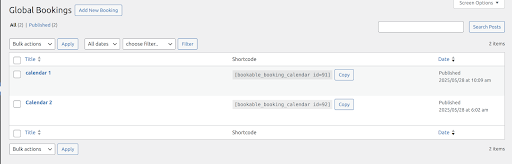
After successfully curating the calendar, the administrator will see the “shortcode for the created calendar” at the “Global Calendar Booking” dashboard.
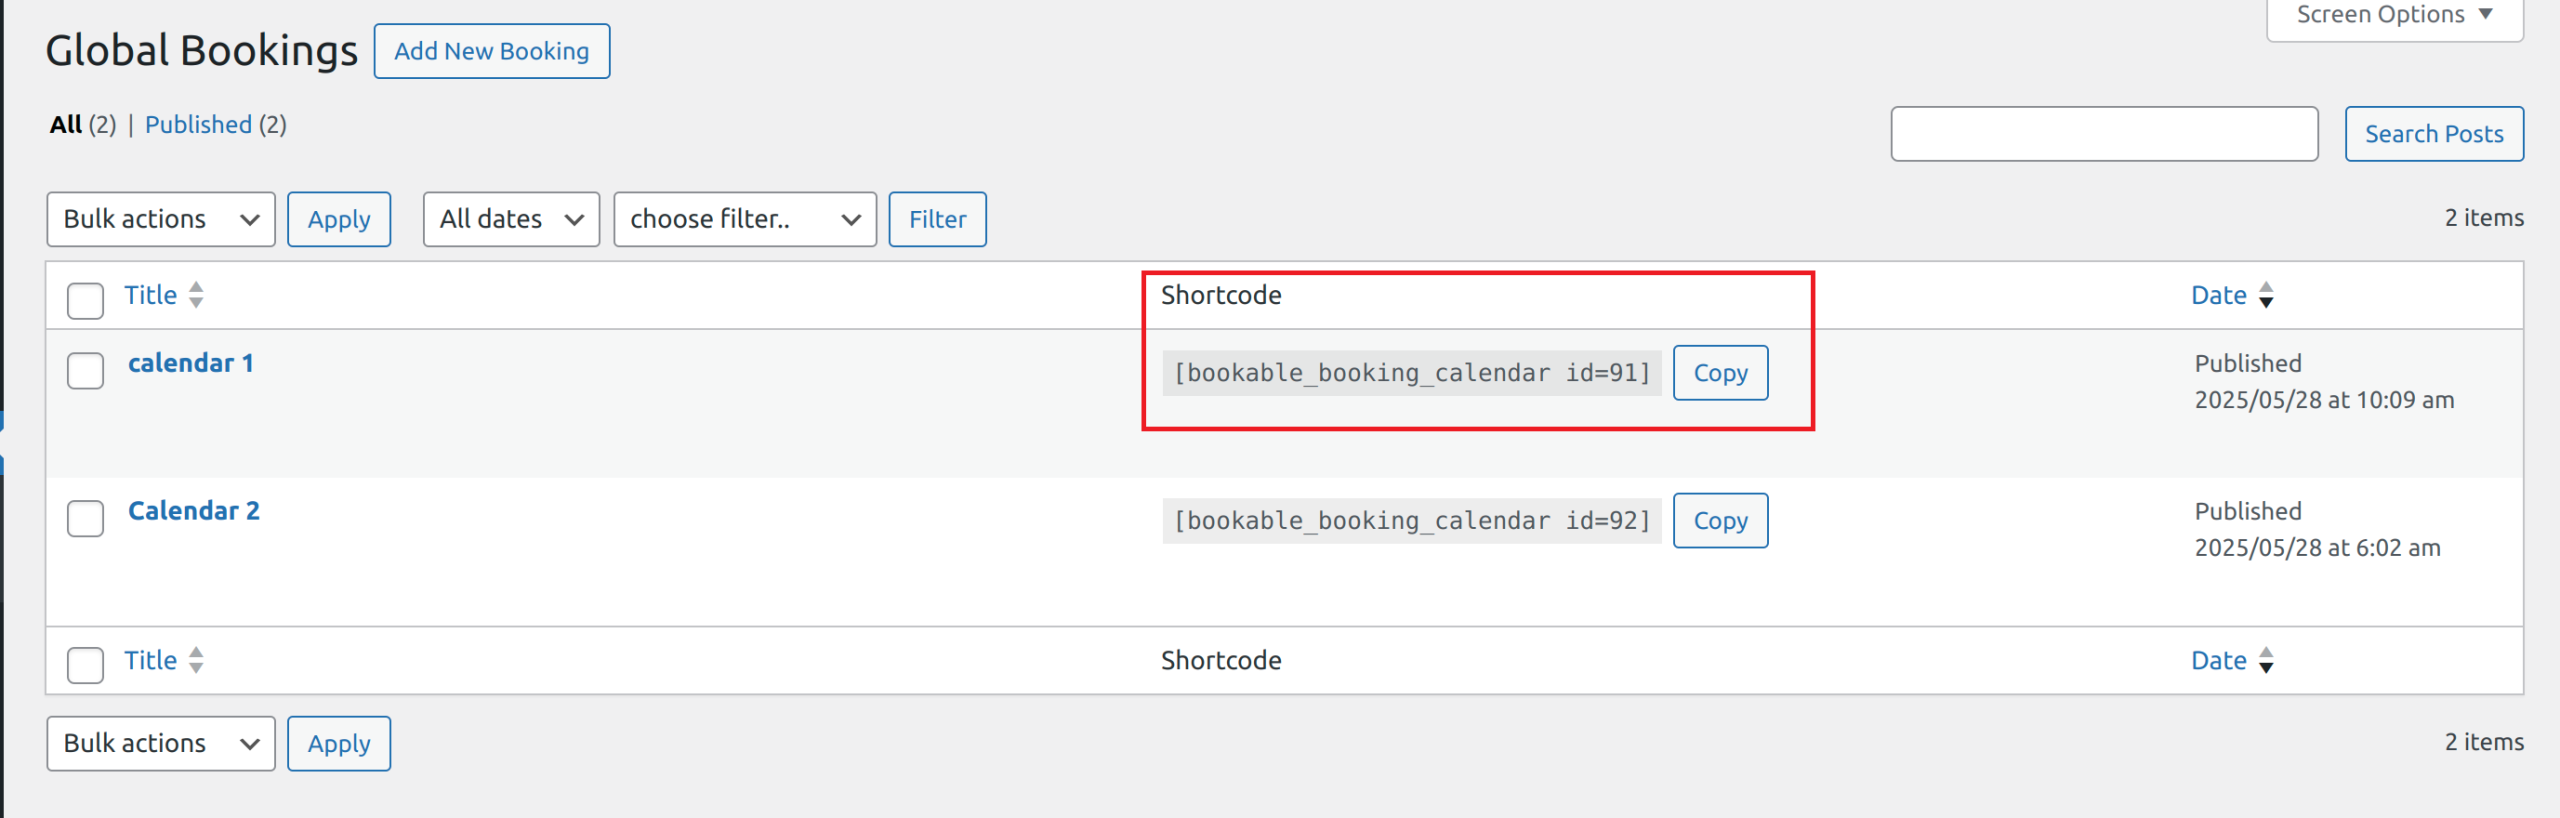
Simply copy the shortcode for the created calendar, and paste it where you want to show this calendar.

After successfully incorporating the global calendar, this is how it will look on the frontend.
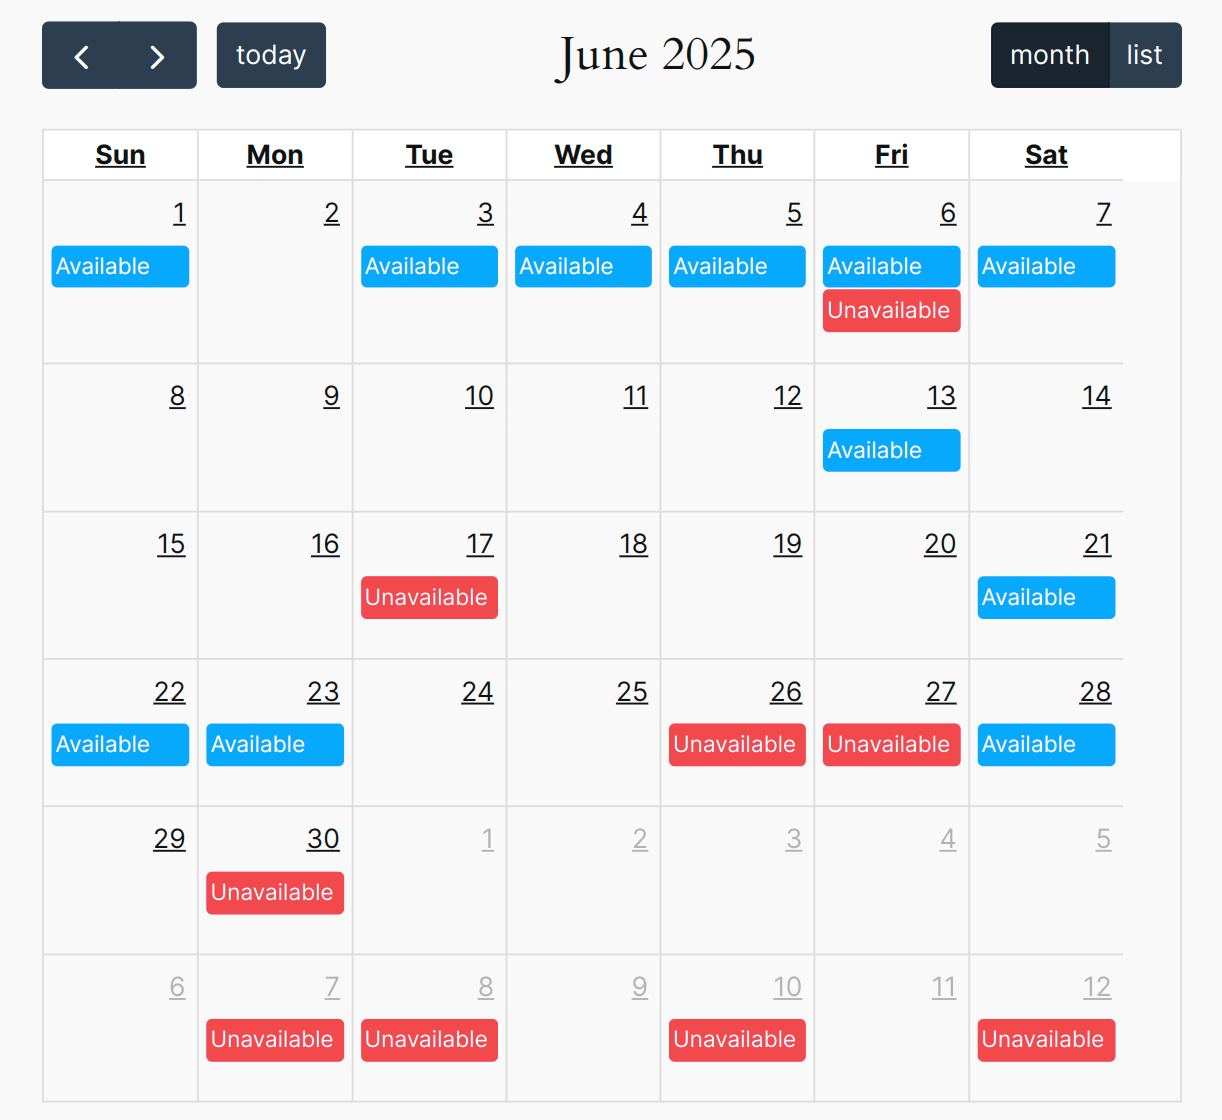
The customers can easily make the booking for the dates they want, and the said bookings will be handled by the admins in the same fashion as for other bookings made over the site.
Frontend For Customers making the booking –

Backend for the admins receiving bookings –
19.Sync Global Calendar With Airbnb
To understand the working of this functionality – Documentation for Syncing Global Calendar with Airbnb.
20.Sync Global Calendar with Booking.com
To understand the working of this functionality – Sync Global Calendar With Third-Party Websites.
21.Compatibilities Of Bookings For WooCommerce
With the WooCommerce Bookings plugin, you can also use additional plugins for enhanced features:
19.1 WPML Compatibility
To facilitate easy translations and localization within the Bookings for WooCommerce appointments plugin, we have now made the plugin perfectly interoperable with the WordPress Multilingual i.e. WPML plugin.
Yes, now you can effectively translate your plugin-based strings in your preferred language. To initiate the translation process, just you have to first extract all your plugin-based strings effectively and then proceed with the following steps-
First head on to your WordPress Backend and then navigate towards WPML > Themes Plugins Localization.
After that select your specified plugin from the list of plugins available there and hit on Scan Selected Plugins for Strings.

- As the scan progresses and completes, thereby you receive the total number of your plugin-based required strings that can be translated into numbers.
- Then click on the number of strings that are highlighted in front of your plugin name in order to initiate the process further.
- After that you’ll be routed to a page with a list of all the plugin’s strings, from that you can then translate each and every one.
- When you arrive at this page, tap the + button beside each string in a sequence to manually process and select a string for the translated version. A pop-up window will appear, spurring you to input the substring translated version.
- Once you’ve finished writing the translation, it will be automatically saved, and then when the customer chooses a different dialect, the English translation of the string will appear.
In this way, you can effectively translate all your plugin-based strings and hence enjoy multilingual integration benefits. It is better advised to generate your required string translations beforehand to avoid linguistic issues.
19.2 Compatibility With Return Refund and Exchange for WooCommerce
To process easy booking refunds for your customers, we’ve made our plugin capable of handling both manual and automated booking refund requests.
You can either let your customers have refunds for their orders using a manual procedure or through a specialized and automated process i.e. utilizing a plugin for that. Our Bookings for WooCommerce PRO plugin is all compatible with an outstanding RMA i.e. Return Refund and Exchange For WooCommerce Free And RMA Return Refund & Exchange for WooCommerce Pro Plugin.
Make use of this outstanding plugin and offer easy refunds for your customers, whose booking order fails or cannot be fulfilled due to unspecified issues.
19.3 Compatibility with Upsell Funnel Builder
WooCommerce bookings plugin is compatible with Upsell Funnel Builder. This allows admins to upsell booking-related items or whatever best suits the requirements of their online booking business.
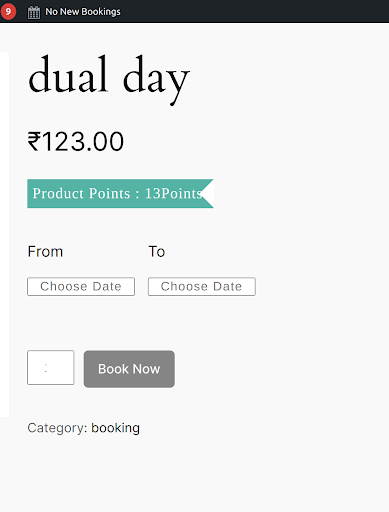
19.4 Compatibility With Points and Rewards for WooCommerce
This compatibility with Points and Rewards for WooCommerce and Points and Rewards for WooCommerce Pro enables merchants to reward customers with reward points on bookable products.
Frontend Representation of this Compatibility –
19.5 Compatibility With Gutenberg Block
Compatibility with Gutenberg Block allows merchants to seamlessly add the global calendar, just by entering the calendar ID to incorporate the calendar into different pages. This eliminates the need to copy and paste the unique global calendar shortcodes.
19.6 Compatibility With Elementor
Elementor Page Builder is compatible with the WooCommerce bookings plugin. This compatibility lets you use Elementor’s capabilities to add the “global calendar” to different pages without copying shortcodes.
19.7 Compatibility With Subscription For WooCommerce
Our Bookings plugin is compatible with Subscriptions for WooCommerce and Subscriptions for WooCommerce Pro. This allows merchants to list subscription-based booking products on their websites. They can charge sign-up fees and make it a recurring booking product, which also allows one-time payment scenarios.
19.8 Compatibility With Gift Card For WooCommerce
WooCommerce Bookings is compatible with Ultimate Gift Cards for WooCommerce and Gift Cards for WooCommerce Pro. This enables merchants to run offers wherein they can offer gift cards for salons, spas, etc, along with their booking products.
19.9 Compatibility With Wallet System For WooCommerce
Bookings for WooCommerce plugin is compatible with our Wallet System for WooCommerce. This allows customers to make bookings through the wallet frontend panel and recharge their wallets to use the balance for future purchases.
22.Feedback and Suggestions
Don’t see a feature in Bookings for WooCommerce plugin that you think would be useful?
We’d love to hear it: Reach out to our Support query and we’ll consider adding it in a future release.
23.FAQs
Can the admin reject unpaid booking?
Yes, the admin can reject unpaid bookings easily. This just requires to Enable the settings from the backend and navigate to Plugin Settings > General Option > Reject Unpaid Booking after the selected specified days.
From where the admin can check all the bookings?
The admin can easily review all of the bookings that have been made by heading to the Booking Tab, where we have included all of the booking sections for the admin to check.
Is it possible for the admin to set the booking and non-booking based on days?
Yes, the admin can set the booking and non-booking days as required. We have a setting called Global Availability Rules for this.
Is there a feature in your plugin that automatically confirms bookings?
Yes, there is a way to do it. Go to Plugin Settings > General Options > Update Status to change the status of a booking. Adjust the status to check whether the customer has already paid the booking fees, either manually or automatically after the specified days.
Is there any functionality through which the admin can add the services?
To do so, just go to Admin Dashboard > Booking Tab > Services and assign that according to your preferences.
Is it possible to add the hidden services with a booking order?
Yes, using our plugin, you can add hidden services. Just go to the Admin Dashboard > Booking Tab > Services >Add Services (enable if hidden).
Can we set the people type for booking?
Yes, for that you just need to navigate towards the Admin Dashboard > Booking Tab > People Type and set the people type for booking.
What is the appropriate way to add the booking product?
To the Admin Dashboard > Products > New Product > Select Data Type > Select MWB Booking and make the settings accordingly.
How many types of booking units are present in your plugin?
In our plugin, there are two types of booking units-
- Fixed Unit
- Customer Selected Unit