1.Overview
Features:
- Adding and selling event tickets for multiple events as products from your WooCommerce store.
- Use the default WooCommerce inventory management system to display the number of tickets left in your store.
- The customers can download tickets as PDFs from their account page.
- Merchants have Multiple Layouts Options to choose from, for their PDF Tickets.
- Customers can transfer their tickets to a different attendee if they aren’t attending your event.
- Customers can see the live location of your events on the product page itself.
- You can easily manage the stocks of your tickets with the robust WordPress Event Management Plugin.
- WooCommerce Event Ticket Manager Pro has been integrated with Twilio and Google Maps to add even more efficient functionalities.
- Collect information from users like gift cards and coupons to allow the customers to avail lucrative discounts.
- Customers can share their tickets with their friends and family by enabling the Allow Ticket Sharing feature.
- Merchants can create events and sell tickets offline as well as online with WooCommerce Events.
- Email reminders before an event can help clients to get notifications about the event and remind them.
- Using the WordPress calendar plugin, sharing on Facebook features can help you get more traffic by sharing.
- Increased Price based on Stock will help you generate more revenue and stock availability notification will be sent to your customer at the last hour.
- Increasing Prices by days will also help you generate revenue and notify customers of the number of days left for an event.
- Now you can send tickets to your customers while the order is in process.
- You can set prices on select user types like adult, child, teacher, or student by utilizing the events calendar plugin.
- The Event Tickets plugin allows customers an easy check-in process by using a QR Code.
- The Event Ticket Manager Plugin supports multisite compatibility.
- Event Tickets WooCommerce allows you to filter all the event-related orders in the order table.
- When transferring tickets to a new client, the Event Ticket Booking plugin allows you to send an email with PDF tickets attached.
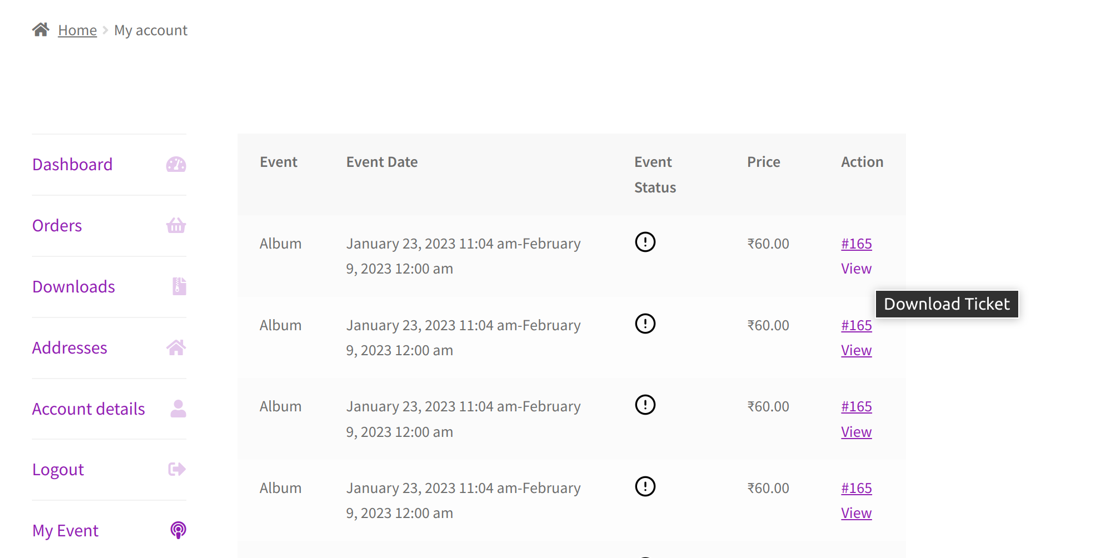
- Customers may instantly download WooCommerce events ticket in PDF format from the “My Account” page.
3.Installation
To Install the events calendar plugin trace the following steps:
-
- Step 1. Visit the Plugins → Add New page and press the Add New button on the top.
-
- Step 2. Upload the .zip file of the plugin and hit the install now button.
-
- Step 3. Once the plugin is installed Plugins → Installed Plugins page and hit the Activate Plugin button just below the installed plugin.
“Before activating the plugin Event Tickets Manager For WooCommerce Pro, you should have the Events Tickets Manager For WooCommerce – WordPress plugin else the plugin will not function. So, if you don’t already have it, you can download it directly from here:” :
4.General Setting
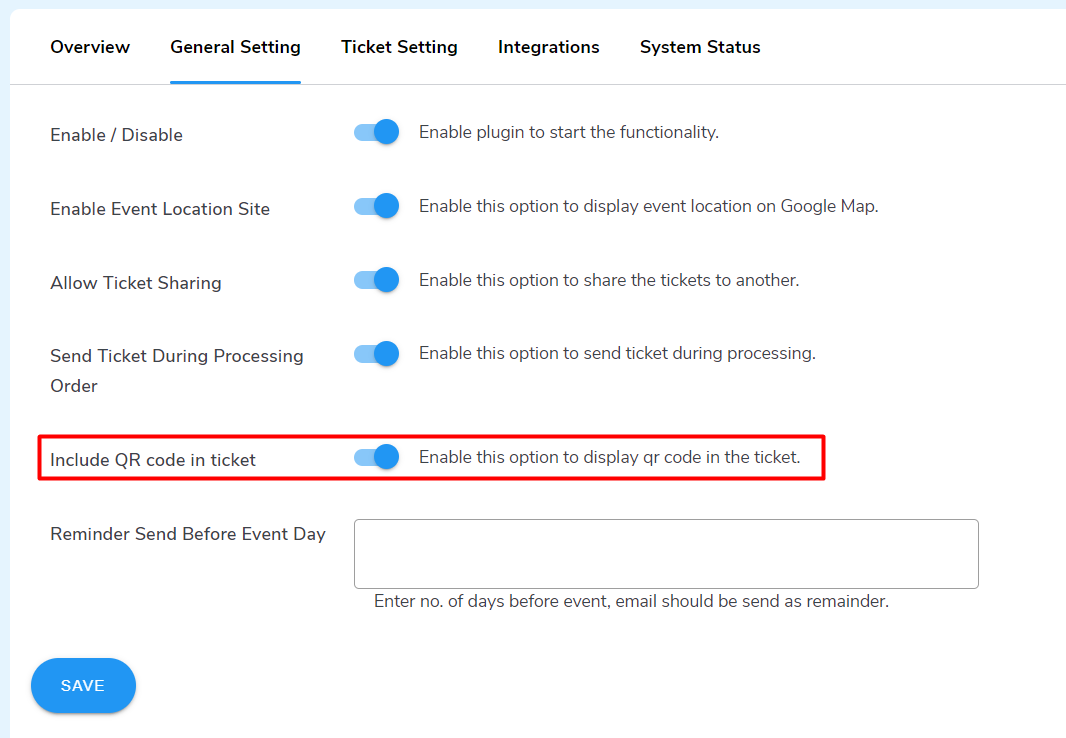
The General Setting tab of the the events calendar plugin has configurations that influence the overall functionality of the plugin. Here are the options that you will find under the General Setting tab:
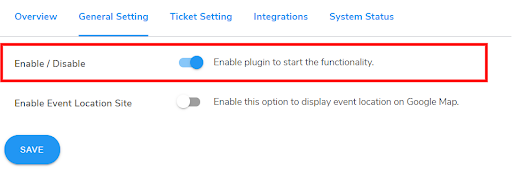
- Enable / Disable: Press the slider switch beside Enable / Disable to enable the events calendar plugin for your WooCommerce store.
- Enable Event Location Site: Enable this option for displaying the live location of your events on the product page.

- Include Barcode In Ticket: By enabling this feature, you can show a unique ticket code that can now be shown in the form of a scannable barcode. This helps the admins to prevent any fraudulent activities.
- Shortcode
- Shortcode for Event Listing: The admin can use the shortcode “[wps_all_event_list]” to show the list of events on any page you want to display with a search filter.
- Shortcode for Event Listing On Calendar: The admin can use the shortcode “[wps_event_in_calendar]” to display the event on any page in the calendar.
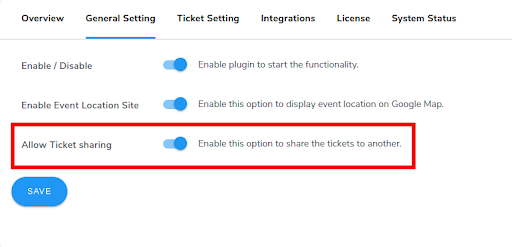
- Allow Ticket sharing: Enable this feature if you want the customers to share their tickets.
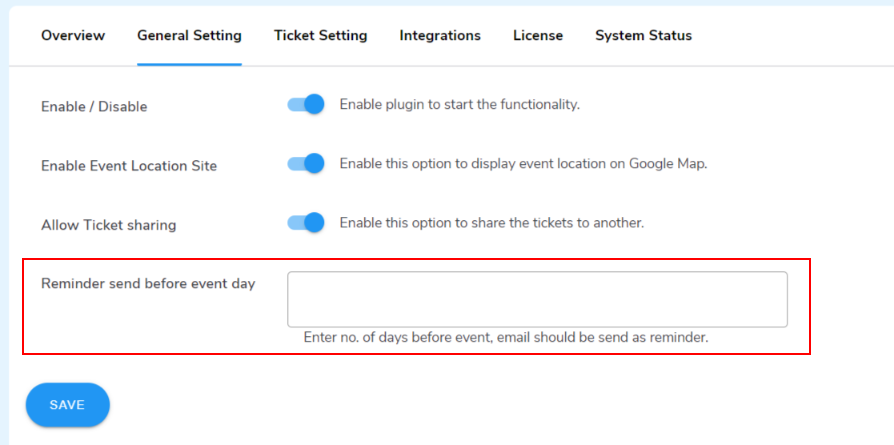
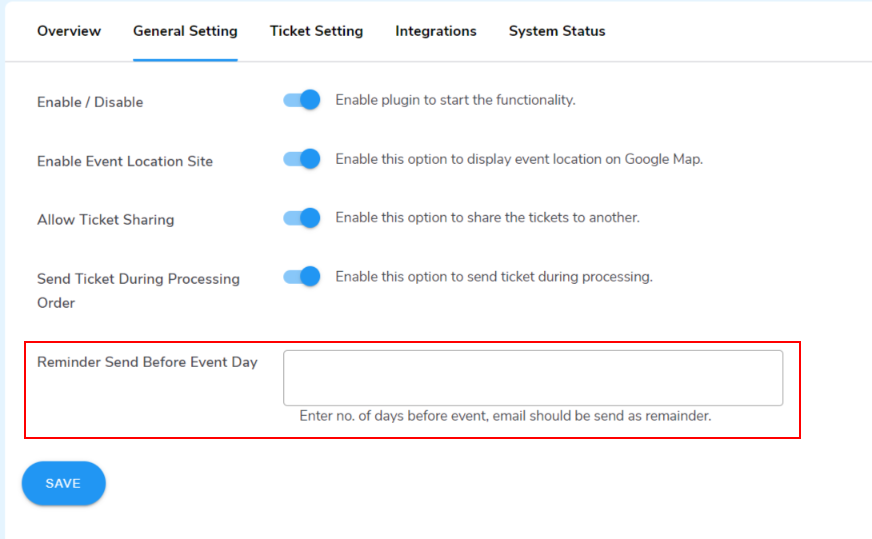
- Email Reminder Before Event: Select or enter manually the no. of days before you want to send the email reminder to your customers about the event to notify them that the event is going to start.
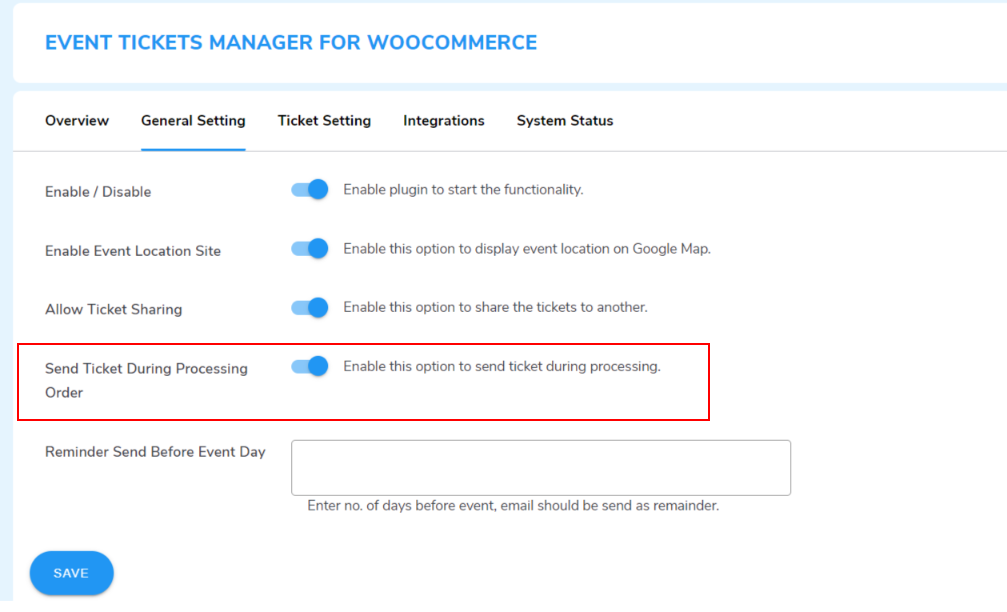
- Send Tickets during Processing Order: Enable the feature and you will be able to send the tickets while your order is in process.
- Include QR Code in Ticket: By Enabling the setting of the events calendar plugin, merchants will be able to include QR Code in the tickets of their customers.
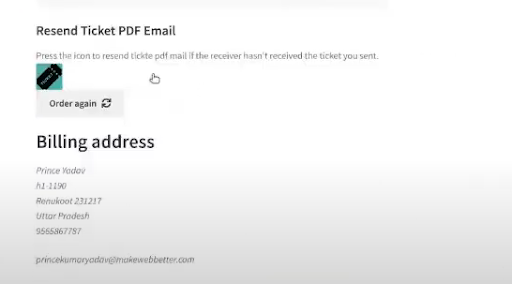
- Enable Resend Button :

This admin can utilize this feature of events calendar plugin, to exercise the opportunity of resending the PDF tickets for an event. After enabling this setting both the admin and the customer will be able to re-send the PDF, if they are not sure about sending it the first time.
For the admin,
The admin can navigate to the order section under WooCommerce, where all the orders are listed. Click on the existing order, and scroll down on the order page. Here you will see the “Resend Ticket PDF Mail” section. You can click on the “ Resend Ticket PDF Mail”.

For the customers,
The customers can navigate through “My Account” > “Orders”. Here they will see all their current orders. Under the “Actions” section, click on “View More”.
They will now see all the details related to the order. The customers will see a section called “Resend Email Ticket PDF”, where they will see this message “Press the icon to resend ticket pdf mail if the receiver hasn’t received the tickets for an event that you have sent. Just click on the icon, to resend the ticket.
- Email Reminder Before Event : The event calendar plugin ,lets you select or enter manually the no. of days before you want to send the email reminder to your customers about the event to notify them that the event is going to start.
- Event Date Format On Product Page : This setting enables the admins to change the formatting of the dates of the events that you are hosting on your website. There are different formatting options to choose from, whichever sits well with the requirements of your eCommerce website.
5.Ticket Setting
From the Ticket Setting tab, you can edit the content of the email and SMS sent to your customers, the events calendar plugin has made the configuration very seamless. From this tab, you can manage the following configurations:
1.Event Ticket Email Subject: Enter the subject of the mail that is sent to your customers when they buy a ticket to the event. Use the [SITENAME] shortcode for the name of your site.
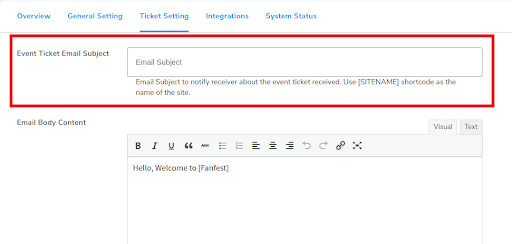
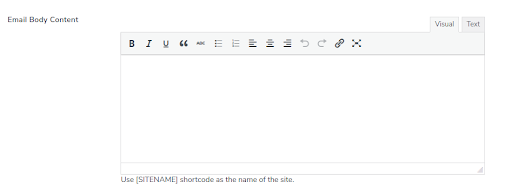
2. Email Body Content: The text field beside Email Body Content is for the body of the mail sent to a customer who has brought the ticket to your event. Use the [SITENAME] shortcode for the name of your site.
3. Upload Default Logo: Upload a default image from the Media Library that will be displayed in the email body and the ticket pdf in the email attachment.

Placeholders:
Use the following placeholders for showing relevant information in your SMS:
- For adding the event’s start and end date and time use the placeholder {event-time}.
- To display the event location use the {venue}.
- For event name use {event-name}
- To fetch customer name {customer} placeholders respectively.
- For ticket number use {ticket}.
Note: Now clients can directly download the event tickets in PDF format from the “My Account” section of the product page under the “My Event” tab by clicking “View.”
6.PDF Ticket Layout Setting
The events calendar plugin features an exciting new option to choose from multiple layouts for your ticket PDFs.
1. Go to the PDF Ticket Layout Setting tab

2. Choose your desired layout
Here are multiple layouts you can choose from according to your event preference.
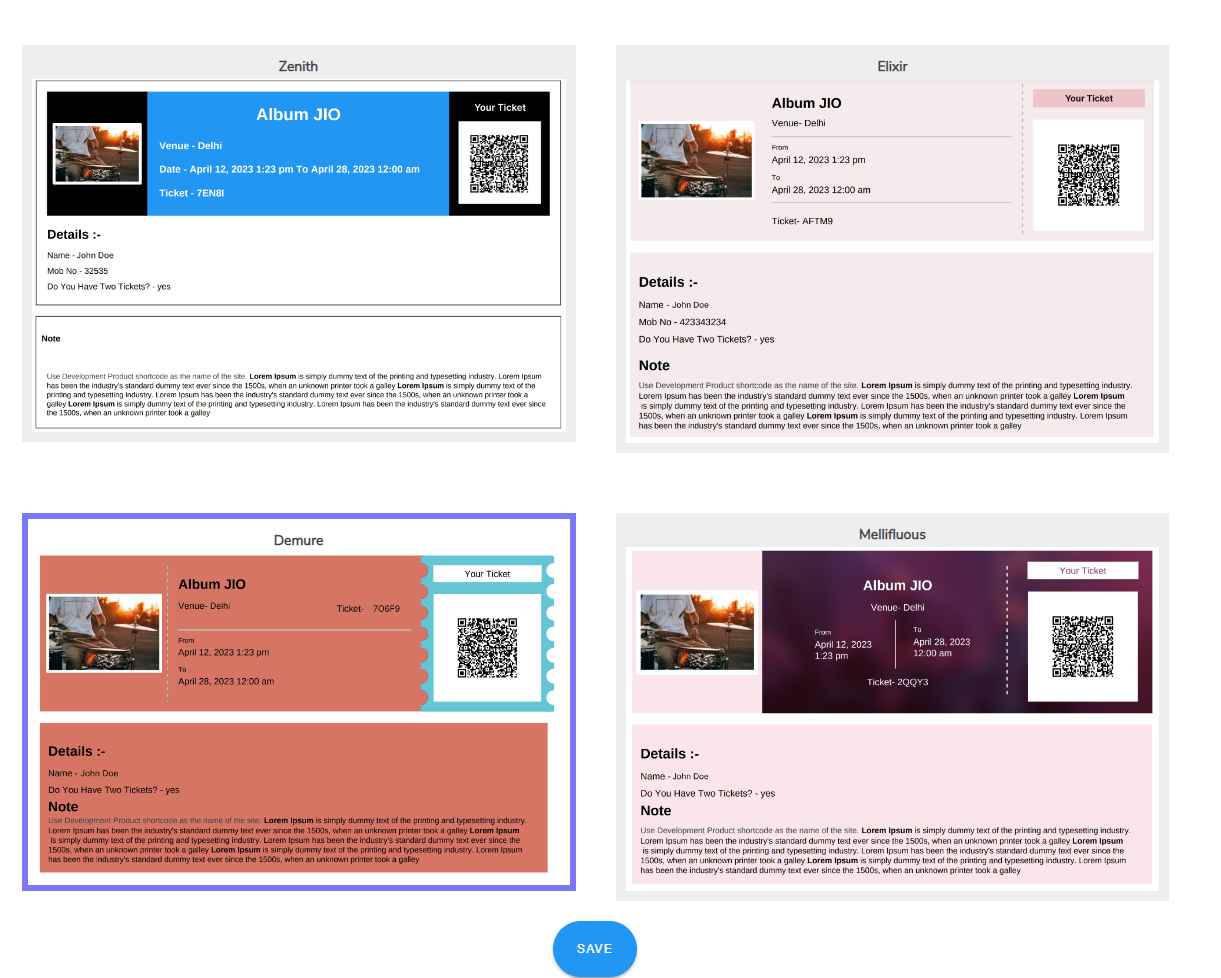
3. Customize the Layouts
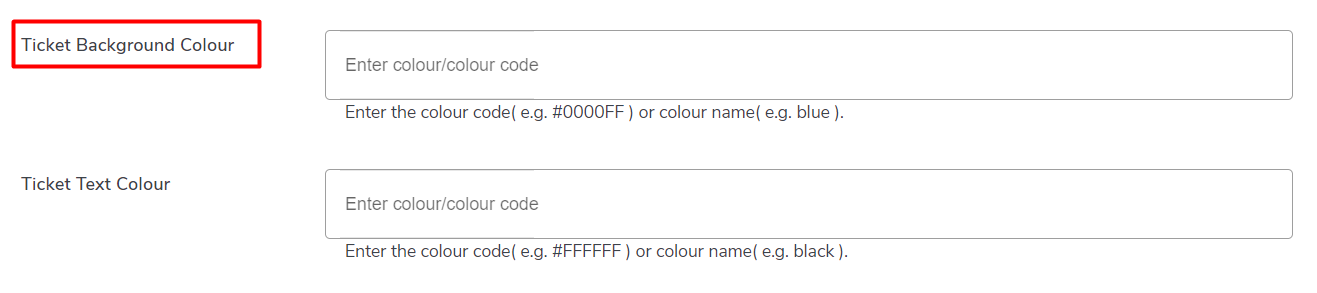
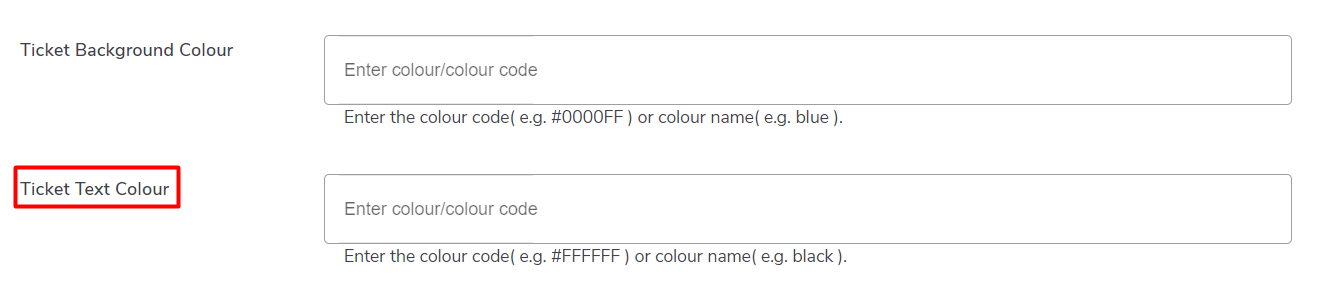
The events calendar plugin lets the admin customize the layout as per his preference. The admin can the layout — the border type & color, Background color, Text color, logo size, and QR size.
4. Click on the Save button to apply the layout
Using this feature of the calendar events plugin, you can provide users with more personalized and visually appealing tickets.
7.Check-In using QR Code
The Event Tickets plugin makes it simple for consumers to check in by scanning a QR code. Scan the created QR Code on the event ticket sent to you through email in pdf format and click the link produced from the QR Code to be routed to the Event’s check-in website.

On QR Scan you will get three different messages on different conditions.
- If you have already checked in manually by entering your credentials, on the QR scan you will get a message “You are already checked in”.
- If you are checked in by QR Scan you will get a message “You are checked in successfully”.
- If you are trying for early check in before the event start you will get a message “Event has not started yet”.
8.Integrations
To enhance the functionality of our the events calendar plugin we’ve integrated it with some esteemed services. You can configure it from the Integrations tab of the plugin. These are options you’ll find under the tab:
8.1.Google Maps
With the help of a WordPress event plugin merchants can display the live location of their offline events on the product page itself. For this, we integrated the Event Ticket Manager For WooCommerce with Google Maps.
For enabling Google maps on the product page:
- Generate an API key. (Check out this documentation on Google Maps API key.
- Now enter the generated API key in the text box beside the Google API Key option.

Note: Make sure you’ve enabled the Maps JavaScript API and Geocoding API.
8.2.Twilio Integration
Event Tickets Manager For WooCommerce Pro has been Twilio which allows the event hosts to send SMS alerts to their attendees.
Follow these steps for implementing the Twilio services:
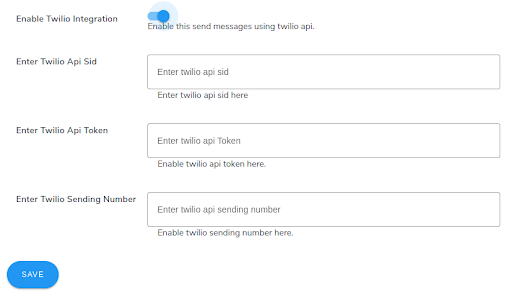
- Enable Twilio Integration: Press the toggle switch next to this option for enabling the Twilio Integration.
- Enter Twilio Api Sid: Enter the API SID in the text field next to the Enter Twilio Api Sid option.
- Enter Twilio Api Token: Next, enter the Twilio API Token next to this option.
- Enter Twilio Sending Number: Enter the phone number from which you want to send a message to your customers.
8.3.Sharing On Facebook
Event Tickets Manager For WooCommerce Pro came up with the Facebook Sharing of Event feature where you can share your events on Facebook to get traffic.
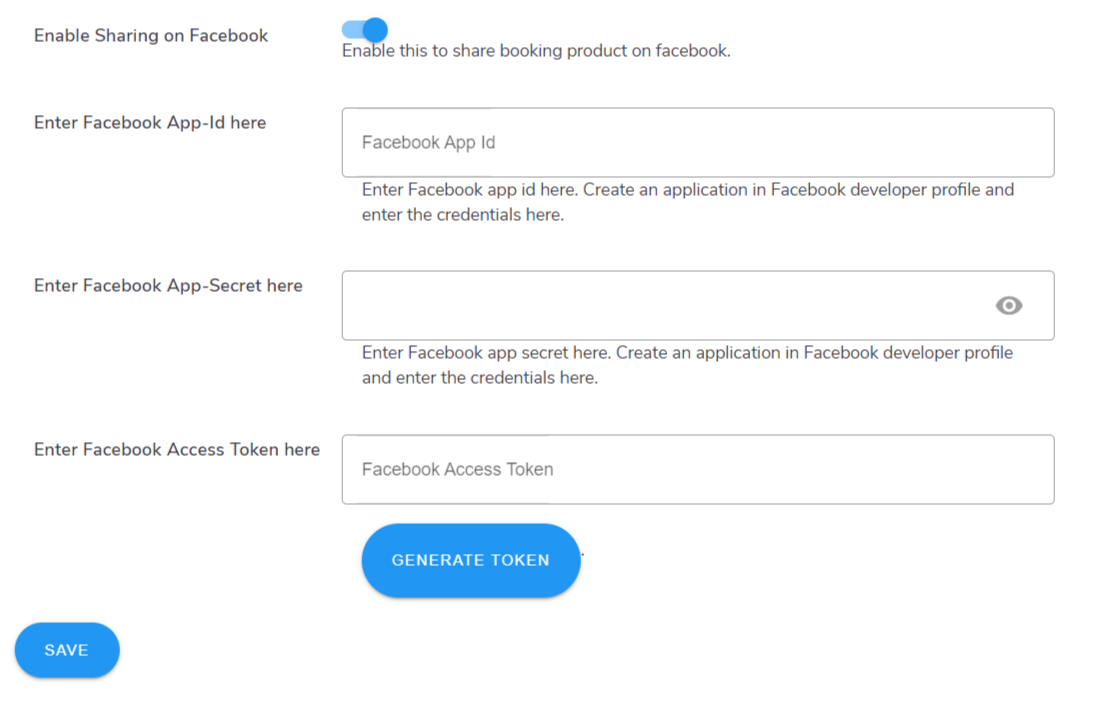
Enable Sharing on Facebook: Press the toggle switch next to this option to enable Sharing on Facebook.
Enter Facebook App-Id Here: Enter the Facebook App ID in the text field and then Create an application in the Facebook developer profile.
Enter Facebook App-Secret Here: Enter Facebook App secret here. Create an application in your Facebook developer profile and enter the credentials here.
Enter Facebook Access Token Here: Enter the Facebook Access Token and Click on Generate Token. To generate a token that will help you in sharing your event on Facebook.
9.Product Settings
7.1 Add New Product
Now we’ll see how as a merchant you can add WordPress events as products to your WooCommerce store and sell the tickets to your attendees.
To add events as products follow these steps:
- Visit Products →Add New page.
- Enter the title of the product.
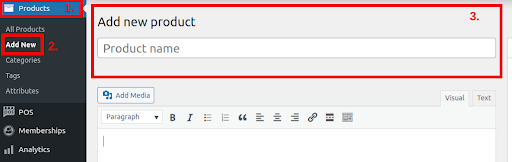
3. Now scroll down the product data box and select Events as the product type from the dropdown menu.

7.2 Event Filter in Order Table
Now as a merchant, you can filter all events related to order in the order table.
For filtering event-related orders as products follow these steps:
- Visit Products → Choose Filter
- Select Filter by Event

After clicking on Filter by Event, all the product related to event will be displayed in the table.

10.Product Data
Once you’ve created a new product, it’s time for adding some details to your event products. Here are the configurations that you’ve to manage:
10.1.General Settings
Input the price of your woocommerce events under the general settings.
You have to enter the following information:
Regular Price: The price at which the event is usually sold on your website.
Sale Price: The price at which you want to sell your event tickets.
Limit User Purchase: The admin can enable this setting if he wants to limit the user purchase of any order.
Set Purchase Limit: Enter the number of quantities that the user can purchase per order.
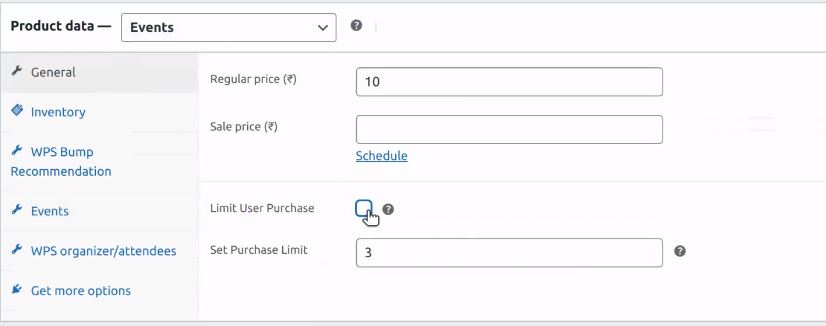
Next press the Schedule button for specifying the sale price of the events.

10.2.Events
Next from the Events tab of the product data box, you can configure the following:

- Start Date/ Time: Fill in the start date and time of the event.
- End Date/ Time: Fill in the date and time when the event ends.
- Venue: Enter the accurate address of the event to get the best Google map results.
- Remove/Hide Product: Click the checkbox and you will be able to remove/hide the product or event on expiration.
- Display event on Google Maps: Click this checkbox if you want to display the location of your event on Google Maps on the product page
- Disable Shipping Charges: Click on the checkbox if you want to disable the shipping charges for a particular product page.
- Share Event on Facebook: Click this checkbox if you want to share your event on Facebook on the product page.
- Event Recurring Settings: Check this box if you want to add the recurring settings to your existing events. After clicking on the checkbox this setting you will automatically see these settings.
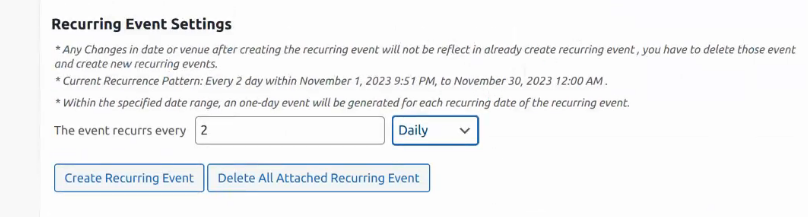
Here the admin is asked to select the number of days when you want the event to recur. They can also select whether they want the event to recur on a daily, weekly, or monthly basis. You are also given the option to either delete the attached recurring event or create a new recurring event. The admin also gets to select the time slot for the recurring events. He can put the start time and the end time as per the requirements.
It is also interesting to note that these recurring events will only recur within the specific date range that you have already selected for the parent event.
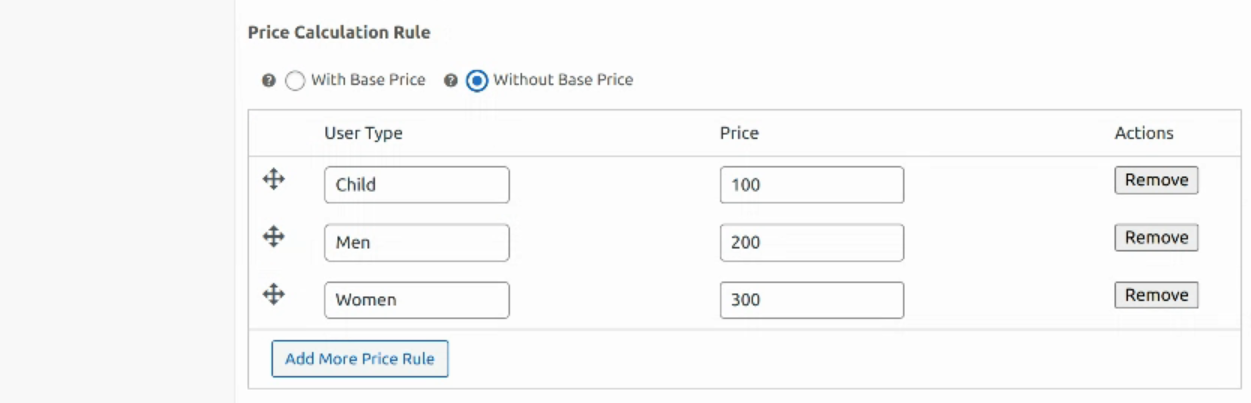
- Set Price for Specific User Type: Create the user type, set the price accordingly and update. Now you are ready to use this feature.
We have enhanced the feature, the merchant can now decide whether he wants to add the base price of an item or remove the base price for specific user types.
- Increase Price Based on Stock: Fill in the stock, select the type, and fill in the amount you want to increase.
- Increase Price by Days: Fill in the Days before the event, select the type, and fill in the amount you want to increase.
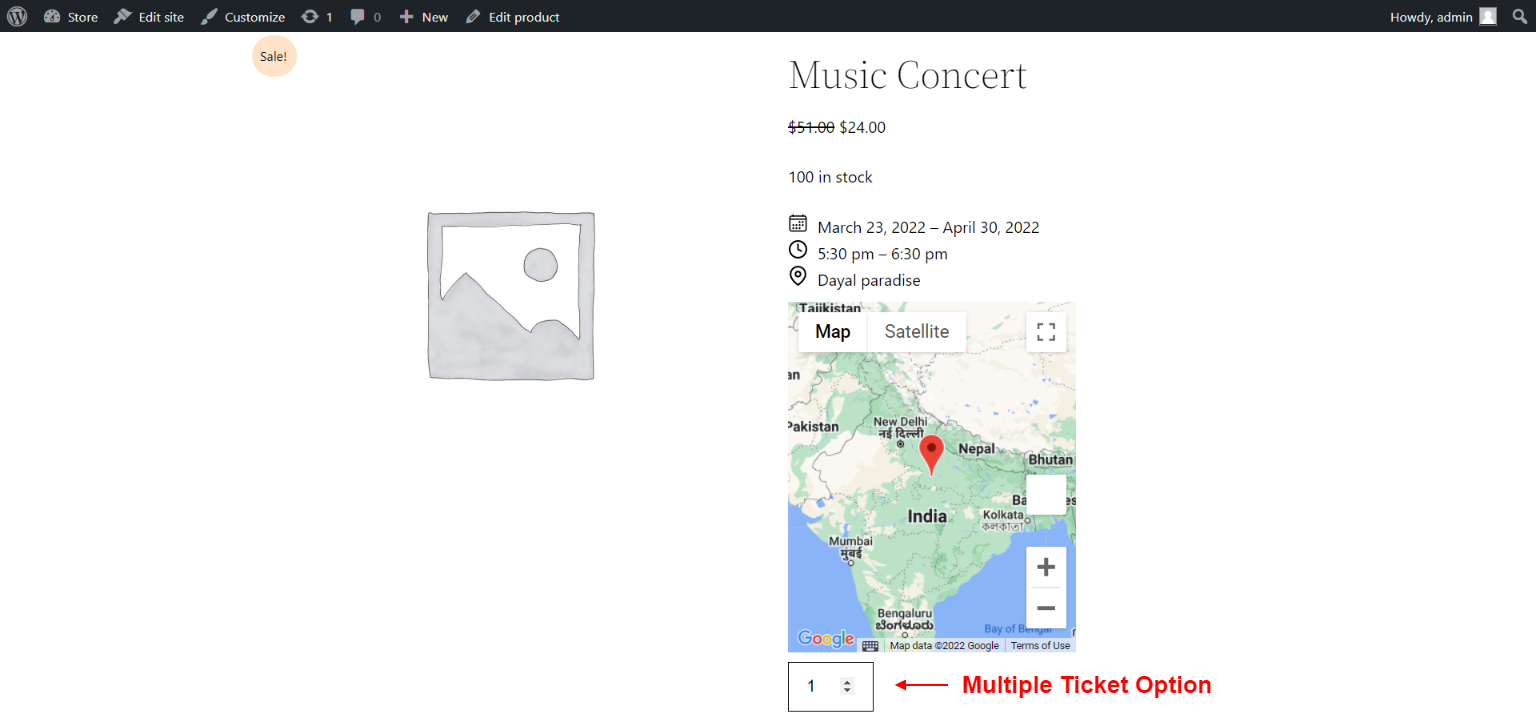
Once you set the price for specific user type. Your customers can easily select the user type from the product page as shown in the image below.

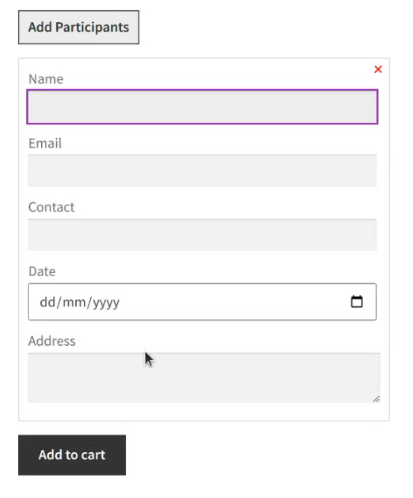
- Set Dynamic Form: With this feature of the WooCommerce events plugin, the merchants can provide the customers with a dynamic form, while they are purchasing a ticket. There are several sections like Name, Email, Contact, Date & Address. The admin can also add or subtract these categories as per the requirements. The customer can dynamically create these for each participant.

Frontend,
10.3.Inventory
The inventory management for event product type is the same as any other WooCommerce product type.
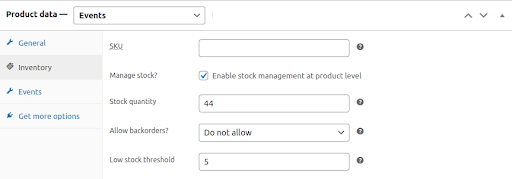
Here are the steps you can follow:
- Enable the Manage stock? Option by clicking on the checkbox.
- Now besides the Stock Quantity option enter the number of available tickets to your event.
11.WPML Compatibility
The Event Tickets Manager For WooCommerce is made compatible with the WordPress Multilingual (WPML) plugin for localization of the Events Manager pro WordPress plugin’s strings.
For translating the plugin the first step is to extract all the strings of the plugin and it can be done with the help of the following steps:
- From your WordPress Admin Panel visit the WPML → Themes and Plugins Localization page.
- Now scroll down to the Strings in the plugins section.
- Lastly, select the Events Ticket Manager For WooCommerce Pro plugin from the list of plugins.
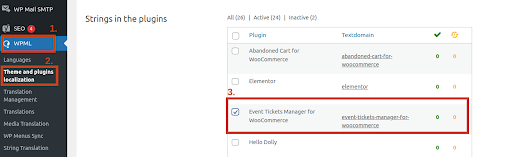
To translate the strings into the language of your choice press the Translate Strings button present next to the plugin.
You’ll be redirected to a page where all the strings of the plugin are listed and you can translate each string from here.
Upon visiting this page you can manually select a string for translation by clicking on the “+” button next to each string in a row.
A popup will occur in which you can write the translation of the string.
Once you’ve written the translation it will be automatically saved and when the customer chooses a different language they’ll see the translated version of the string.

12.Compatibility With Gift Cards For WooCommerce
The WooCommerce Event Tickets plugin is compatible with Ultimate Gift Cards for WooCommerce and Gift Cards For WooCommerce Pro. After this compatibility, both plugins can work seamlessly at the backend of a WooCommerce environment.
13.Multisite Compatibility
The Multisite Compatibility feature allows users to manage multiple websites of similar nature from a single dashboard. With this compatibility, you can install the events calendar plugin on sites within your multisite network.
14.Multiple Tickets
In this feature of Event Tickets Manager For WooCommerce Pro we provide more than one ticket at a time for your customers.
15. Feedback & Suggestions
Don’t see a feature in the Events Tickets Manager for the WooCommerce plugin that you think would be useful?
We’d love to hear it. Reach out to our Support query and we’ll consider adding it in a future release.
16. FAQs
Is it possible to add QR code in the event ticket?
Yes we have provided this feature in our plugin Admin can scan the QR code of the Guests to check in.
Can we display the event location on the tickets and product page?
Yes, the Event Tickets Manager for WooCommerce Provides the exact location of events to the user on the product page and tickets as the plugin is integrated with Google Maps.
How are the Tickets sent to the customer with the Event ticket manager plugin?
Tickets will be sent to the customer via email with a pdf attachment.
Can The Customer Download Tickets for offline use?
Yes, with the help of the Event Tickets Manager plugin customers can download the tickets in PDF format. Also when the customer purchases an event the downloadable PDF file is mailed to the customer.
How many payment gateways do the Event Tickets Manager for WooCommerce plugin support?
The event ticket manager supports all the WooCommerce payment gateway for Example PayPal, Stripe, Direct bank transfer, Check payment.
Can we translate the plugin text and string into other languages in the Event tickets plugin?
Yes, Since the Event tickets manager supports WPML you can translate the strings and text of our extension into other languages
How can we track the check-ins for any event?
In order to track the check-ins for your event trace the following path:
Dashboard → WooCommerce → Events
Is it possible that merchant can share the event in Facebook?
Yes we have this feature in our plugin you need to enable the share event on facebook option. And also Please go to the product edit page and tick the enable facebook sharing.
I have placed a test order and did not receive any event ticket in my mail. Is anything I am doing wrong?
Please make sure that the WooCommerce order status must be marked as completed then only the receiver will get the event ticket via mail.
Can we send the event ticket in processing order status?
Yes for this Please go to the plugin settings >> General settings>> Enable sent ticket during processing status. After this your customer will get the event ticket in processing order status.
Is there any option so that we can set prices according to the user type?
Yes, you can achieve this with a plugin . For this please go to the product edit page then event type there you will find the option for the user type and price you can set it according to your need.
My question is not listed
Please visit the WP Swings knowledge base for more detailed documentation and support
Does any Changes in the main event can cause the same changes in the recurring event?
No, but we can just make any changes to the main event, you have to delete the previous recurring event having old changes and create a new recurring event with new changes.