1.Overview
- Increased Engagement: Motivates customers to participate, boosting engagement.
- Customizable Rewards: Tailors incentives to align with business goals.
- Clear Progress Tracking: Customers easily see their path to higher user levels.
- Visual Recognition: Badges enhance customers’ status and pride.
- Brand Consistency: Customizable badge images maintain brand identity.
2.Download & Install
Install Points and Rewards for WooCommerce by WP Swings. Follow these steps for automatic installation:
- Go to the Admin panel navigate to the sidebar click on the ‘Plugins’ menu > ‘Add New’.
- Navigate to the ‘Add Plugins’ page
- Go to the search bar and type ‘Points and Rewards for WooCommerce’.
Once you find ‘Points and Rewards for WooCommerce’ by WP Swings, you can view the details about it such as the points release, rating, and description. One can install it, simply by clicking “Install Now
3.Configure the Required Settings
To enable the user badges & levels feature, you must reach the underlined setting configurations:
- The admin can toggle the User Badges Settings to enable this setting.
The overall user badges & level settings are divided into two sections, one is based on the entire user badges & level feature, and the second one is focused on the “user badges” settings.
4.User Badges & Levels
The points and rewards plugin enables merchants to possess the authority to establish precise threshold levels that customers must attain to unlock distinct user levels. This provides you with the capability to set attainable milestones that are in sync with your business objectives.
The admins have full control over their position and level names. They can also set the milestone threshold for customers to reach their desired level with ease, and reward point values that the customers will get. Plus, we understand the importance of aesthetics. Merchants can easily customize badge images to align with their brand.
4.1.User Level & Badges Settings
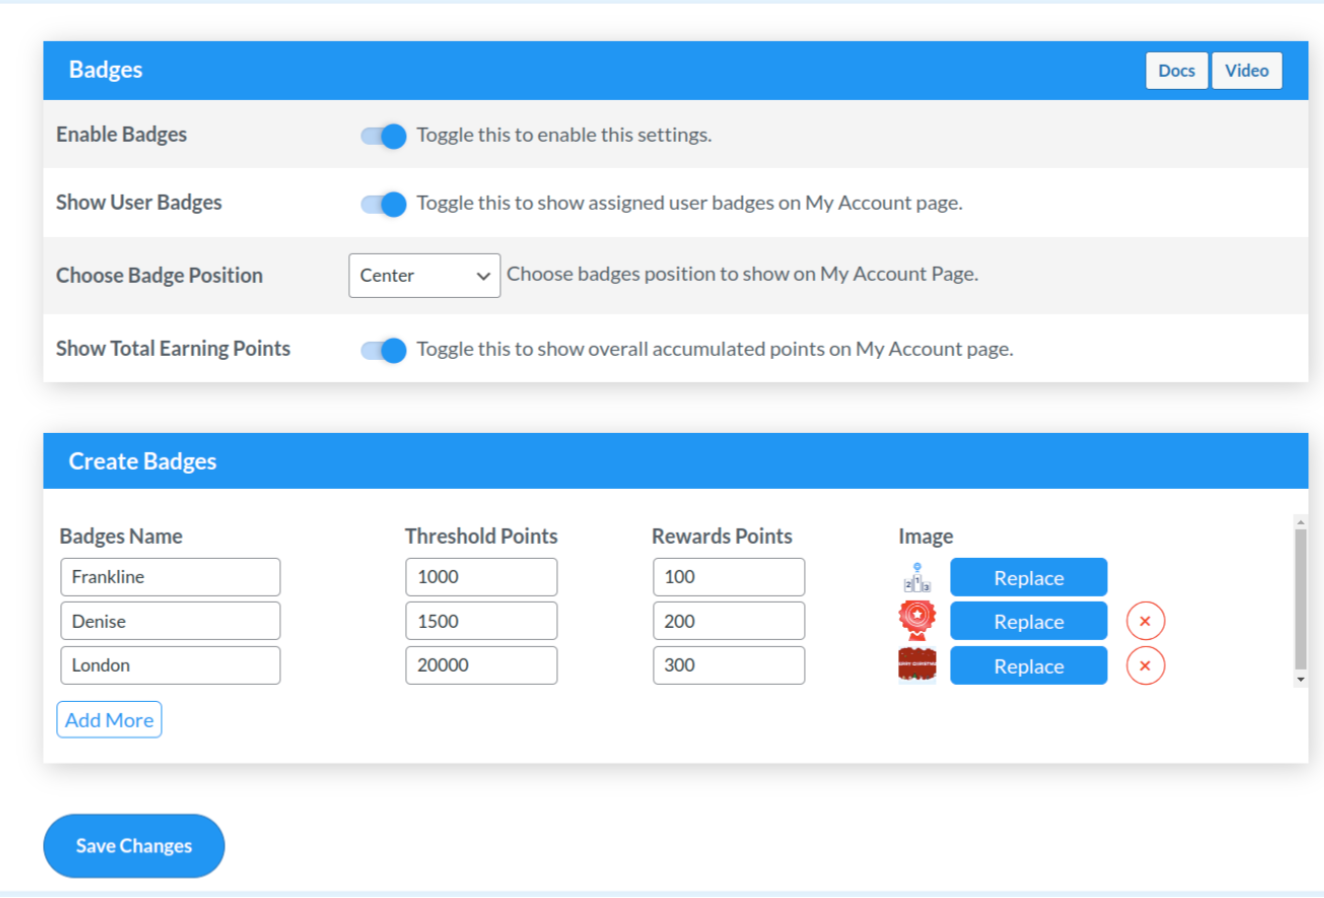
- Toggle User Badges Settings: The admins can check this box, to enable this setting
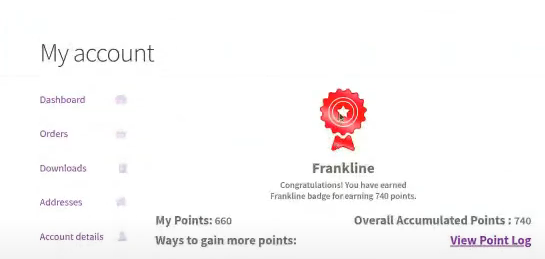
- Toggle To Show User Badges: After enabling this setting, the user badges will be visible on the “My Account” Page.
- Choose Badge Position: Merchants can also choose the position of these badges on the “My Account page”.
4.2.User Badges Settings

- Badges Name: The admin can customize the name of these badges as per the threshold points.
- Threshold Points: Enter the threshold reward points that the customer must earn to receive the designated user badge and reward points.
- Reward Points: Merchants can enter the number of reward points that the customer will earn if he/she reaches a certain user level
- Add Image: There is a default image pre-assigned for the User Levels, but if the admin wants he can customize the image as well, by adding a different image from his system.
NOTE: The merchants can only add two user levels in the free version of the points and rewards plugin. The pro version of the plugin, on the other hand, offers unlimited user levels and badges kinds.
5.Implementation