1.Overview
One Click Upsell Funnel for WooCommerce Pro allows merchants to create upsell offers that are displayed after checkout. Customers can accept these post-checkout offers and buy them without re-entering their payment details. This encourages the customers to spend more at your store which as a result increases your Average Order Value. You can add multiple offers in your WooCommerce upsell funnel so if the customer doesn’t accept the first offer, you can present them with another one with a more attractive discount.
Here are some key features of One Click Upsell Funnel Pro:
- Shows upsell offers after checkout, the best time to persuade customers to buy more since s/he has already made a purchase.
- Comprehensive track report for every single smart funnel.
- Track your upsell funnel sales data on Google Analytics and Facebook Pixel.
- Create a global funnel that triggers regardless of any product or category.
- Offer an Upgrade on the Existing purchase to your customers.
- Show exclusive offers based on the order email.
- Display intelligent upsell offers by skipping the funnel for the same offer product.
- View and edit your smart funnels in sandbox mode.
- Multiple funnels can be created with offers of your own choice.
- Custom offer pages can be created with the help of shortcodes.
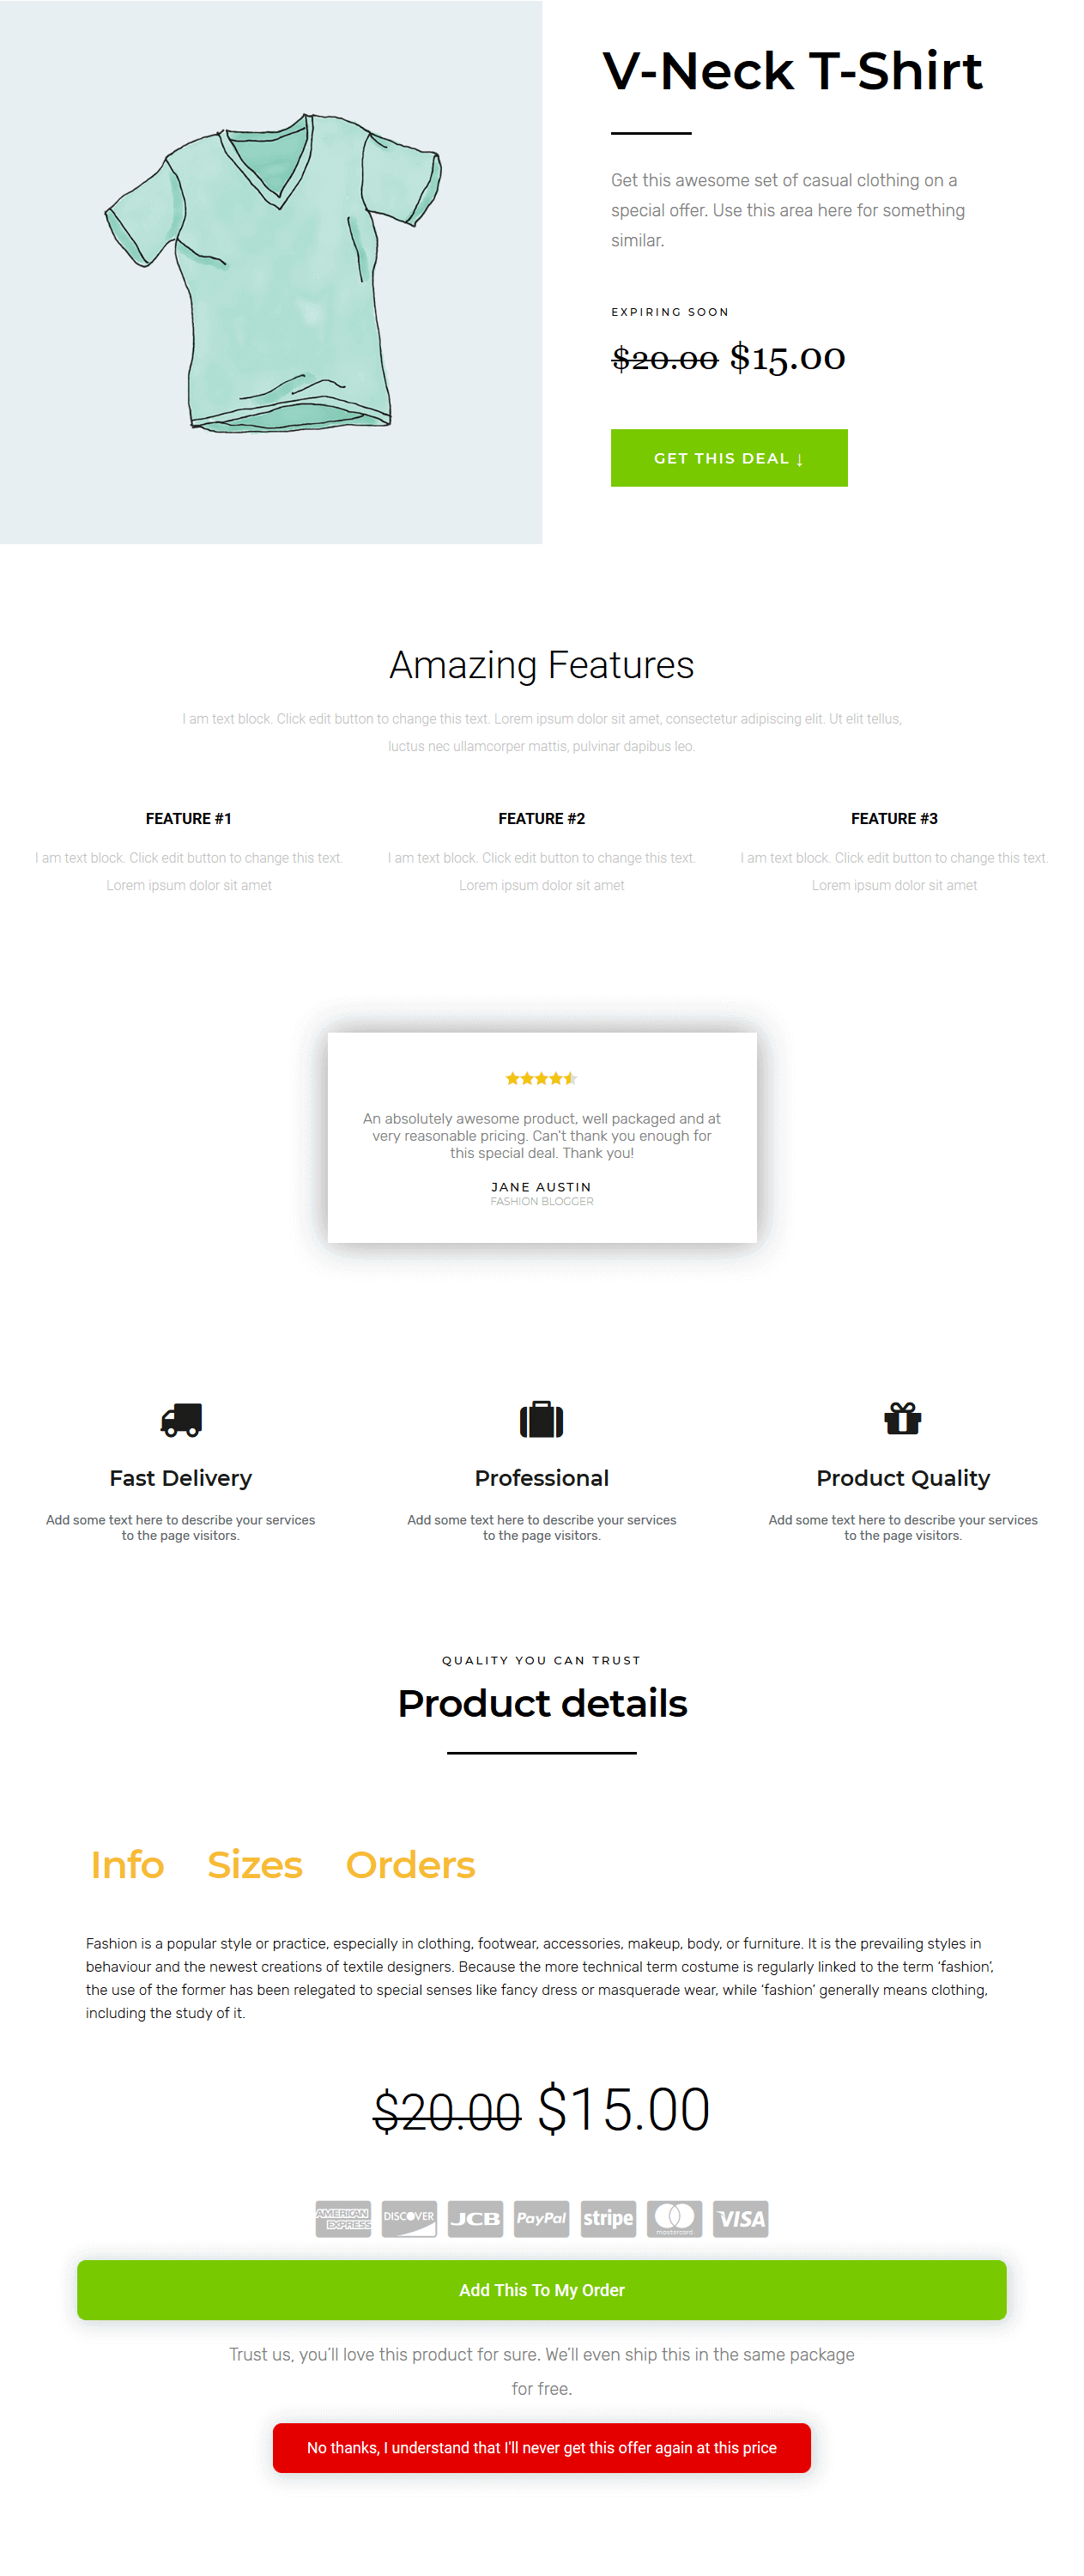
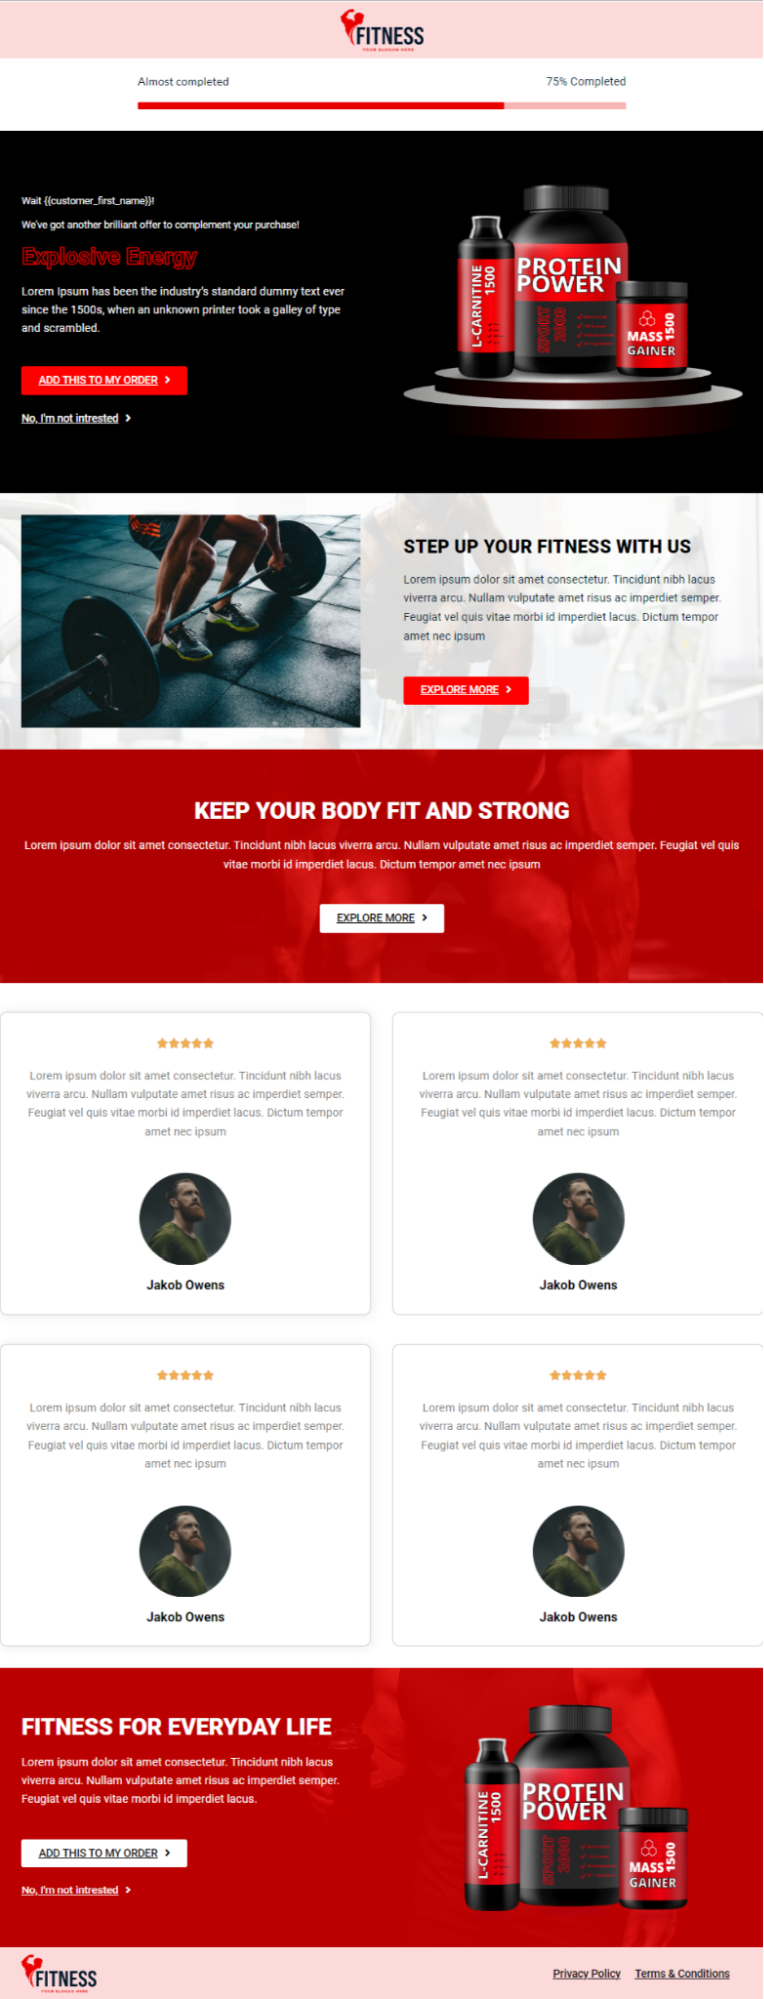
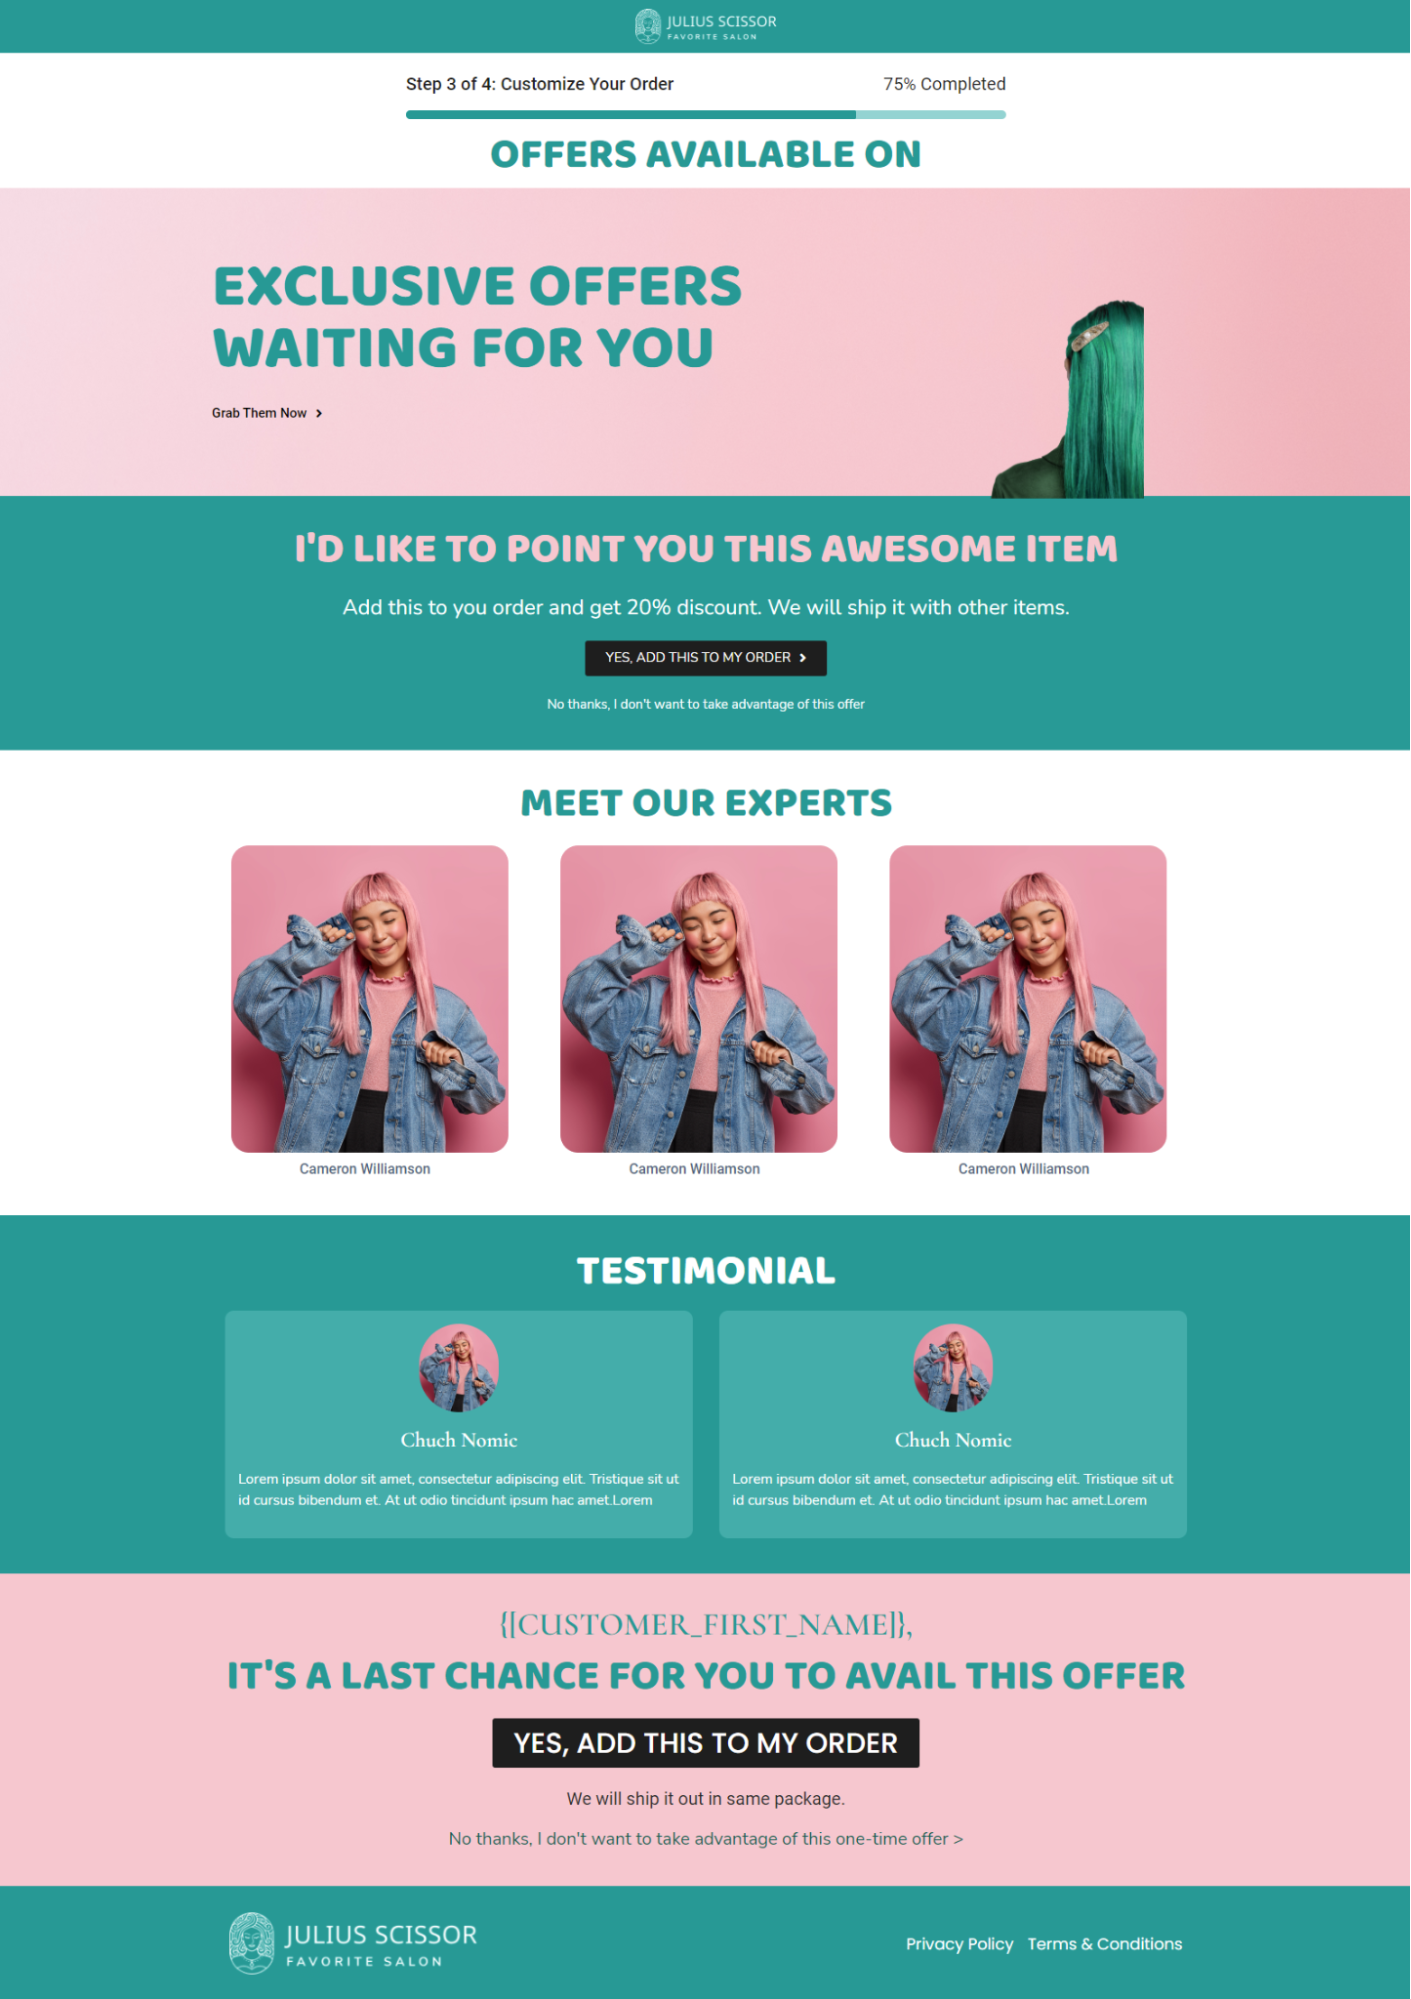
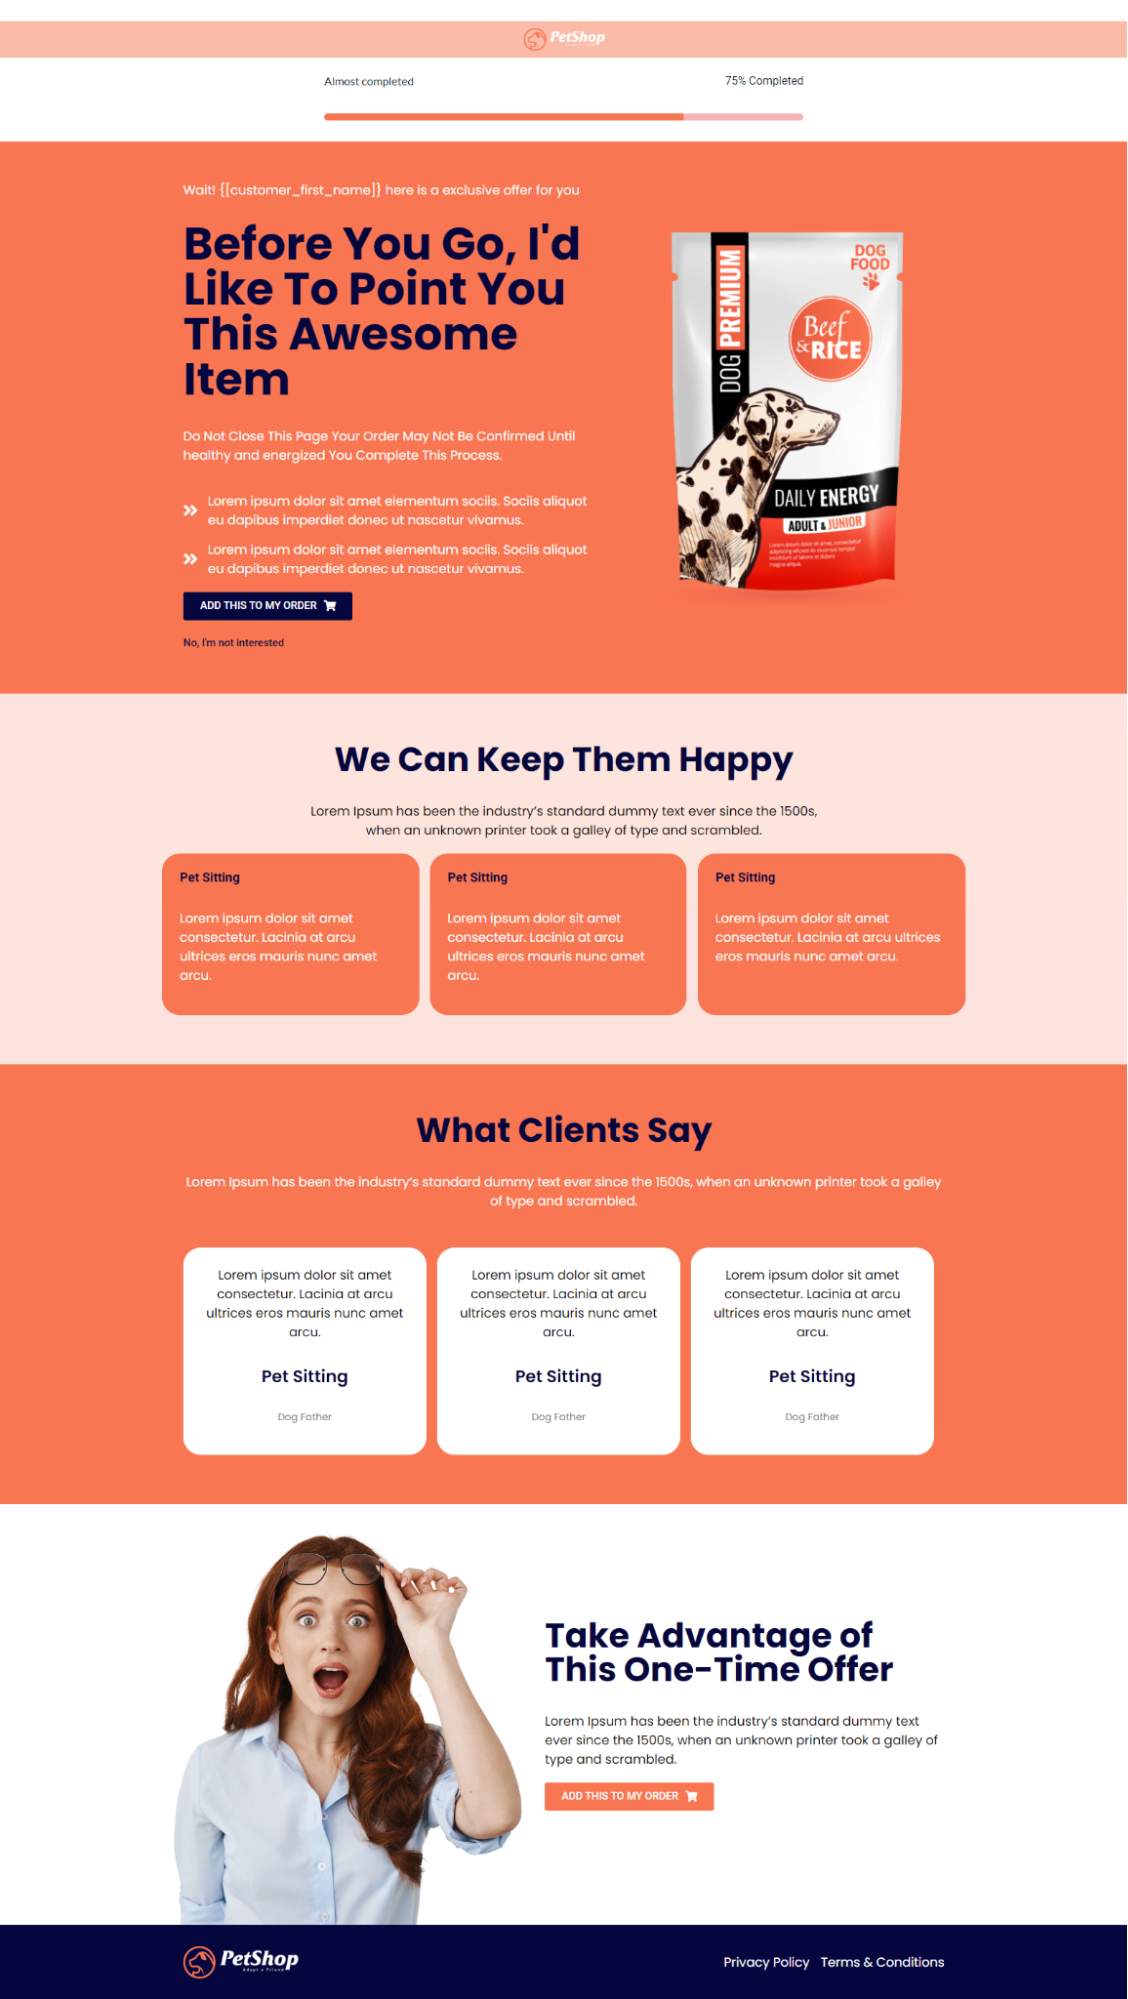
- 8 predefined offer sales funnel templates that are completely customizable with Elementor. But if you want to use other page builders which are compatible with the plugin, use shortcodes provided within the plugin.
- Offers can be purchased with a single click only.
- Custom funnels can be scheduled for specific weekdays.
- Customizable funnel workflow if the customer accepts or rejects an offer.
- Compatibility with all leading page builders.
- Supports Simple, Variable, Subscription, and Bundled Products.
- Secured payment transactions without asking customers for card/account details again to buy upsell products.
- Support major payment gateways such as:
- WooCommerce PayPal Payments
- WooCommerce Stripe Payment Gateway
- Authorize.net
- Braintree
- Square
- Paystack
- Vipps
- Cardcom
- Mollie
- Eway
- Cash On Delivery, Direct Bank Transfer, and Cheque Payments.
- Parent products and Upsell products come in a single combined order.
Benefits:
- Increases your WooCommerce store’s Average Order Value(AOV) and thus your Revenue.
- Introduces valuable items and best sellers to your customers as offers.
- Improves Customer satisfaction by offering them products or services that best meet their needs.
- Significantly boosts your customer LifeTime Value(LTV).
3.Installation
Automatic Installation
Automatic installation is the easiest option handled by WordPress.
- Download One Click Upsell Funnel For WooCommerce Pro plugin.
- Log in to your WordPress Dashboard.
- Navigate to the sidebar, and click on Plugins.
- Click on Add New and then click on Upload Plugins.
- Hit the Browse button choose your downloaded plugin’s .zip file, and click on Install Now.
- Once installed, Activate the Upsell plugin
Manual Installation
- Upload the WooCommerce One Click Upsell Funnel Pro folder to the /wp-content/plugins/directory.
- Activate the plugin through the ‘Plugins’ menu in WordPress.
You can also download One Click Upsell Funnel for WooCommerce Free Version from here:
4.Workflow
With this plugin, you can create or can begin implementing the functionality of one-click upsell in your store.
It provides you with amazing features for creating a custom funnel which will work great for generating funnel offers. Each workflow consists of a sequence of features, such as creating a new funnel, predefined sales funnel templates, global settings, and more.
4.1.Creating New Funnel
In this section, you can create new funnels that will take action on your WooCommerce store when a purchase happens. To create a new WooCommerce funnel, go to the Funnel List section. This section displays the list of all funnels you have created. If you want to create a new funnel, click on the Create New Funnel button.
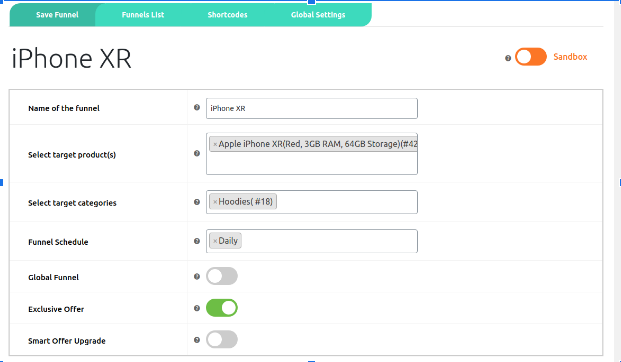
When you click on Create New Funnel, you’ll be asked to add the details about your smart funnel.
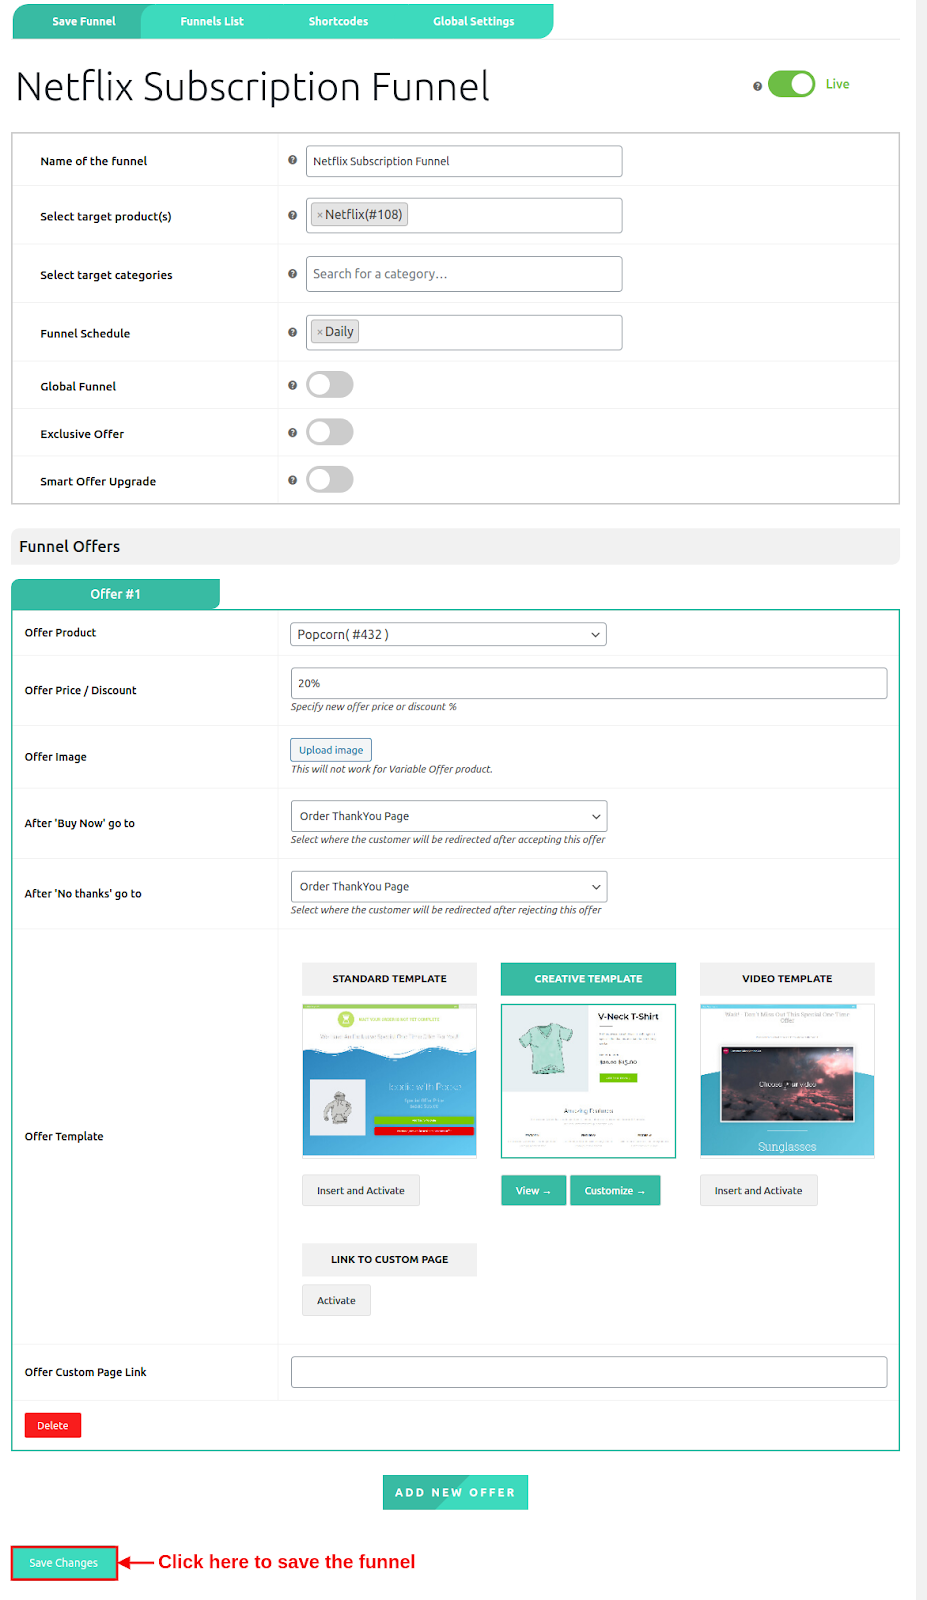
- Name Of The Funnel: Add a name you want to give to your sales funnel.
- Select Target Product(s): Select one or more products as a target product. Whenever a customer purchases a target product, the funnel will come into action.
- Select Target Categories: Select the target categories of the product. Whenever a customer purchases a product from that category, the funnel will come into action.
- Funnel Schedule: Schedule your custom funnel for specific weekdays or let them execute daily.
- Global Funnel: Click on this toggle button and enable it if you want to turn this funnel into a global funnel. A global funnel doesn’t depend on any target product or category. So if you want to trigger this funnel always, enable this feature.
- Exclusive Offer: By enabling this setting, you can create exclusive one-time upsell offers on your store to raise urgency among your customers. The Exclusive Offer will make your post-purchase upsell offers visible to the customer once. This setting works for the billing email.
- Smart Offer Upgrade: By enabling this feature, you can offer an upgrade product to the customers after the purchase is done. If they accept the upgrade offer, the initial product will be replaced by the offer product.
Note: Smart Offer Upgrade feature doesn’t work if the Global Funnel feature is enabled for a similar funnel.
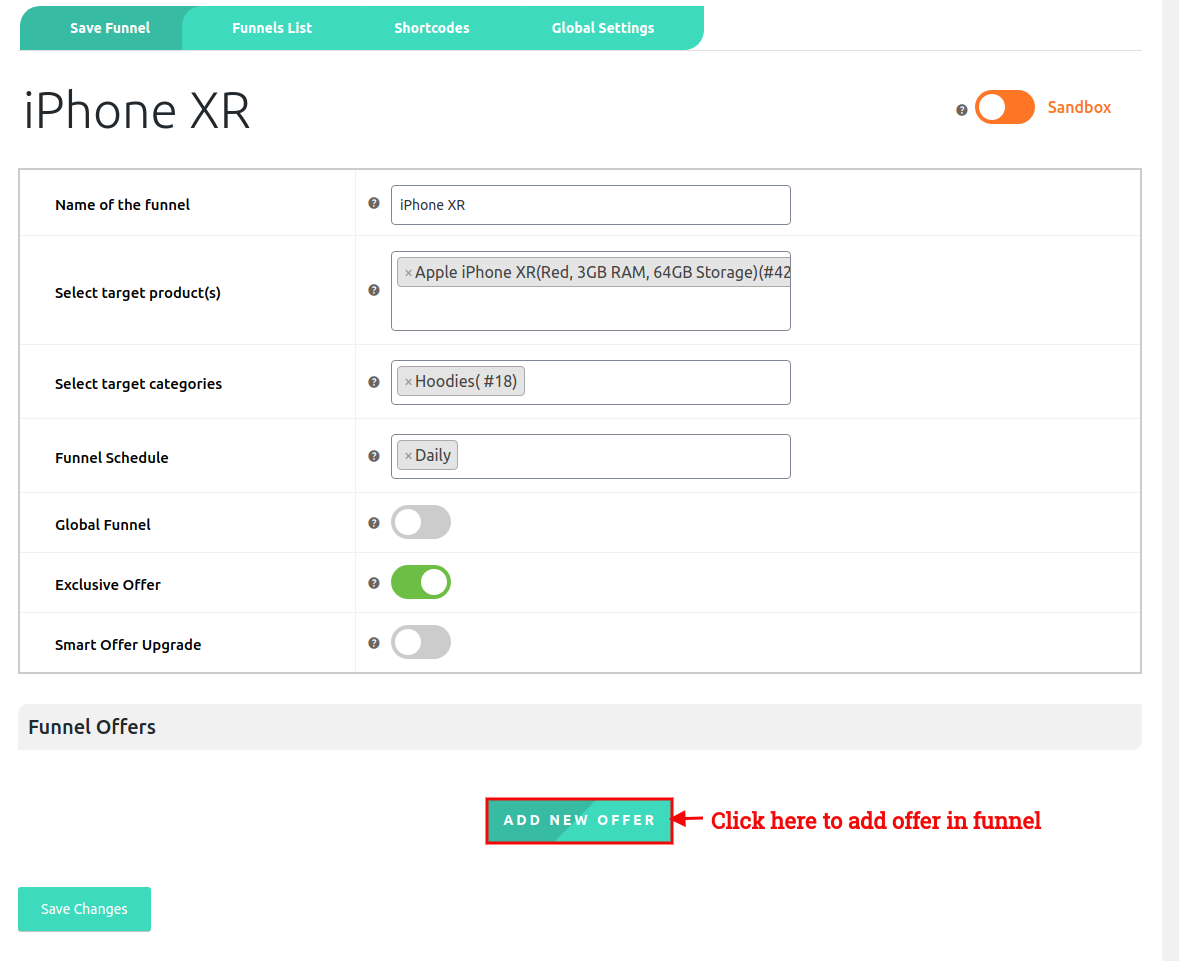
After filling in the details of your WooCommerce funnel, add the offer to your funnel. This offer is responsible for displaying the upsell products after checkout. Click on Add New Offer to add offers to your sales funnel.
-
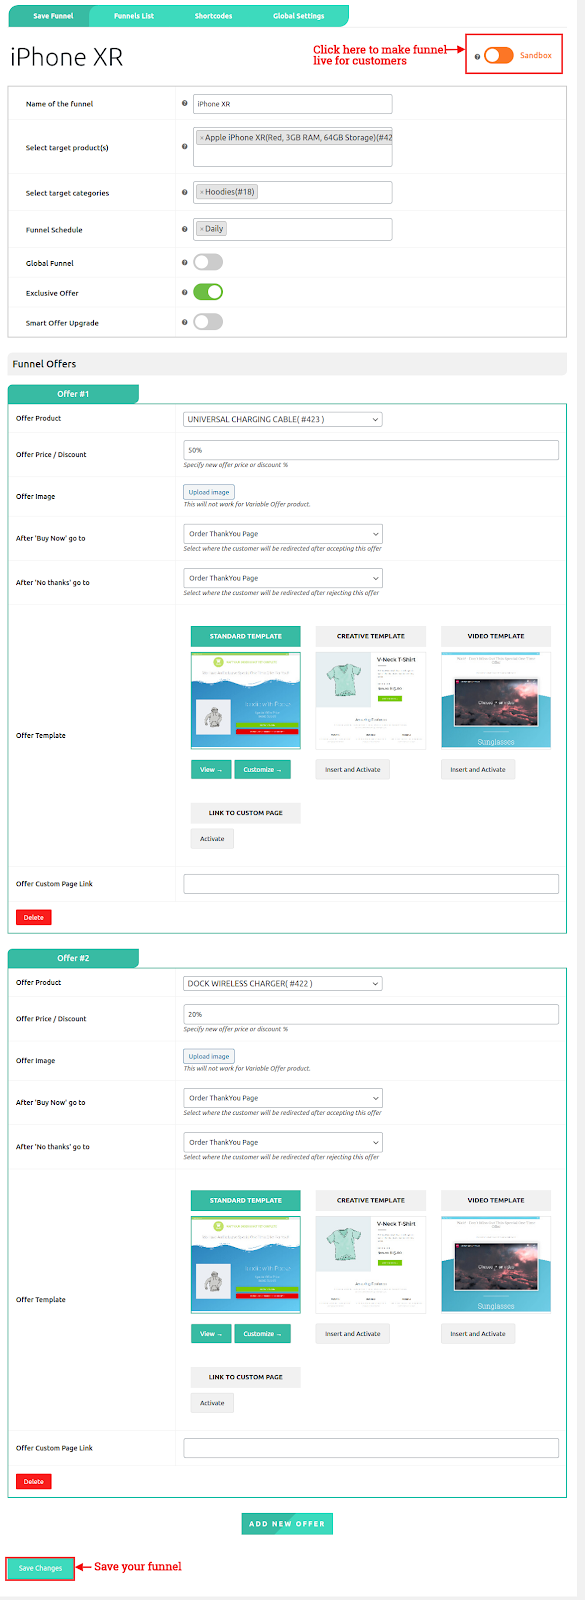
- Offer Product: Add the product you want to offer as an upsell product.
- Offer Price/ Discount: Set the offer price or discount for the offer product. You can either set a percentage or a fixed price discount with this option.
- Offer Image: Upload a custom offer image if you want to show a different image for your offer product.
- After “Buy Now” Go To: Select the page you want to redirect your customers to if they buy the upsell product.
- After “No Thanks” Go To: Select the page you want to redirect your customers to if they don’t buy the upsell product.
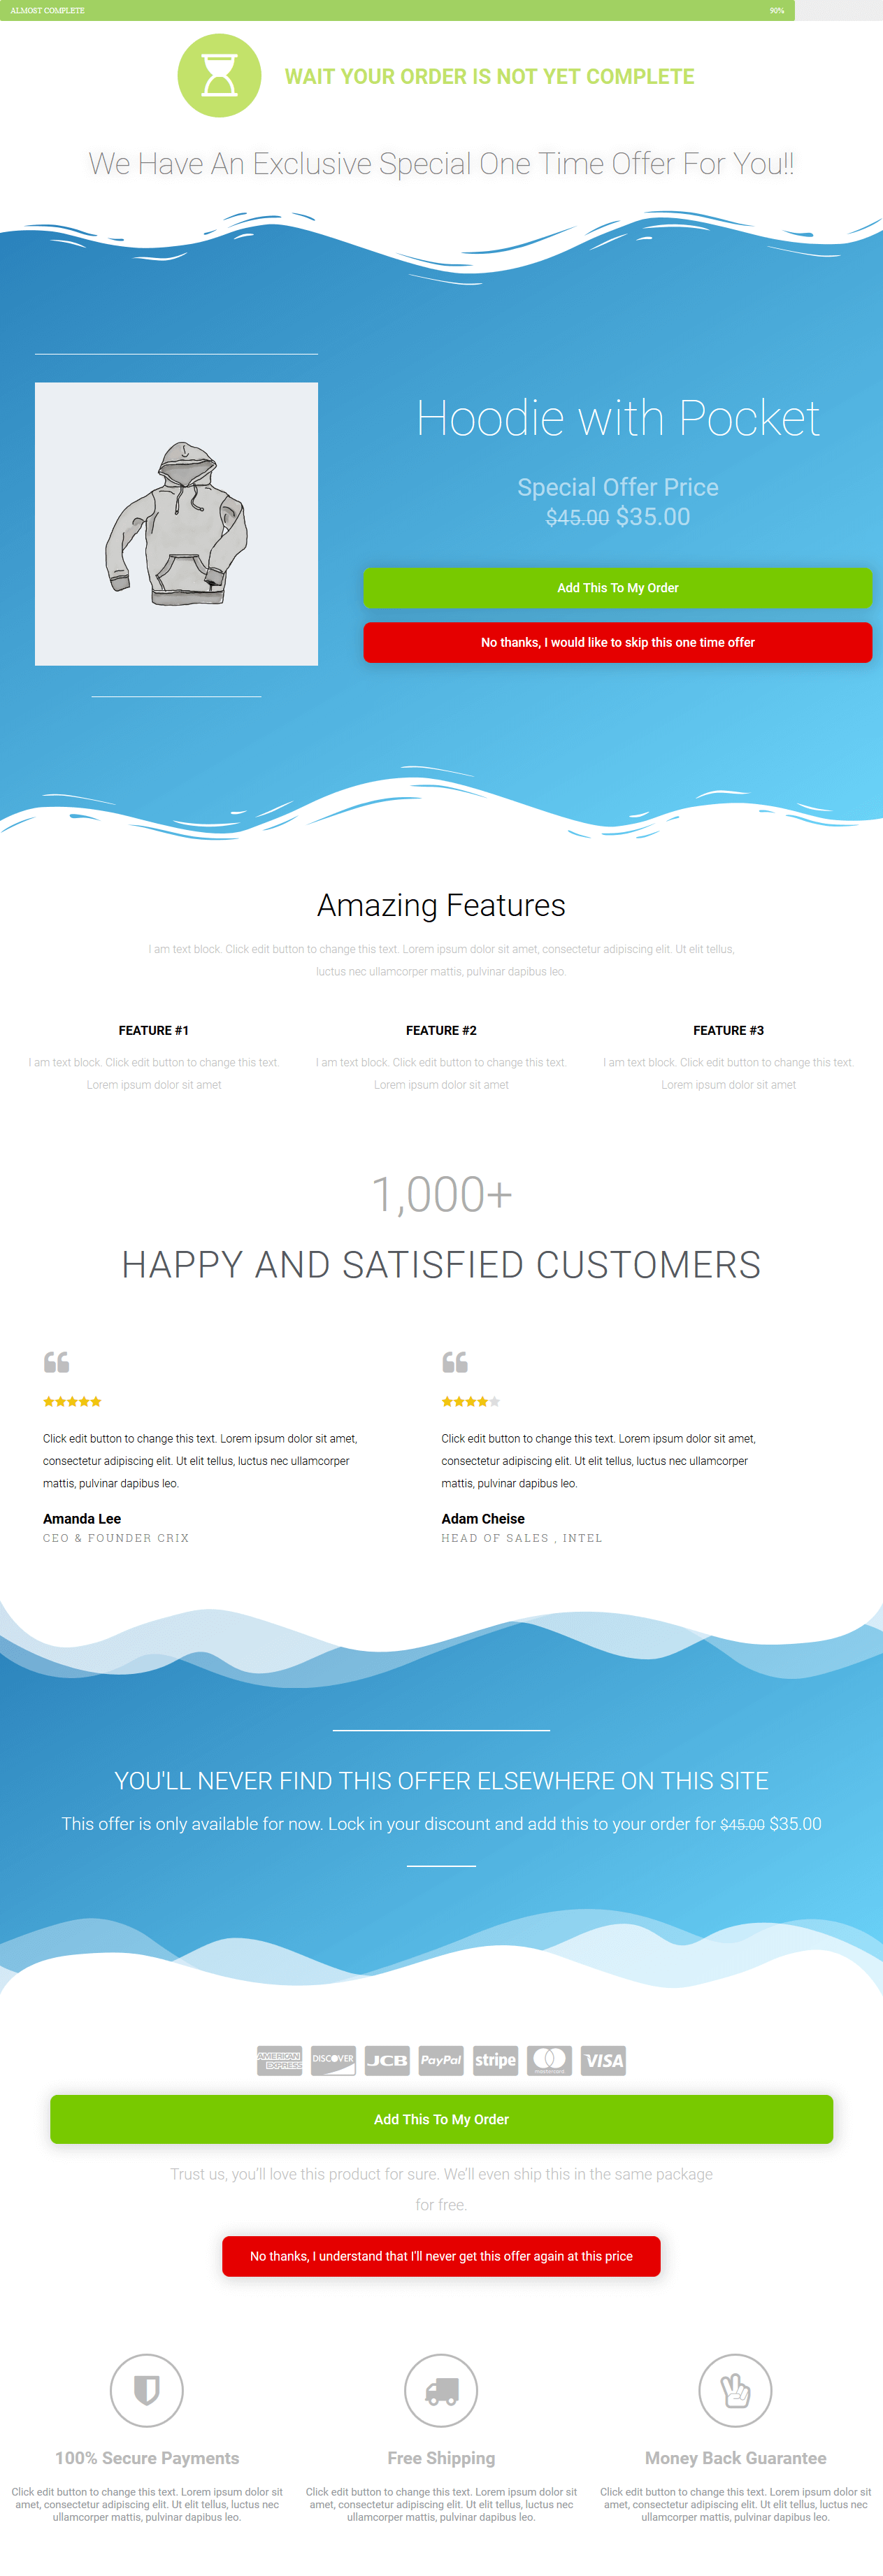
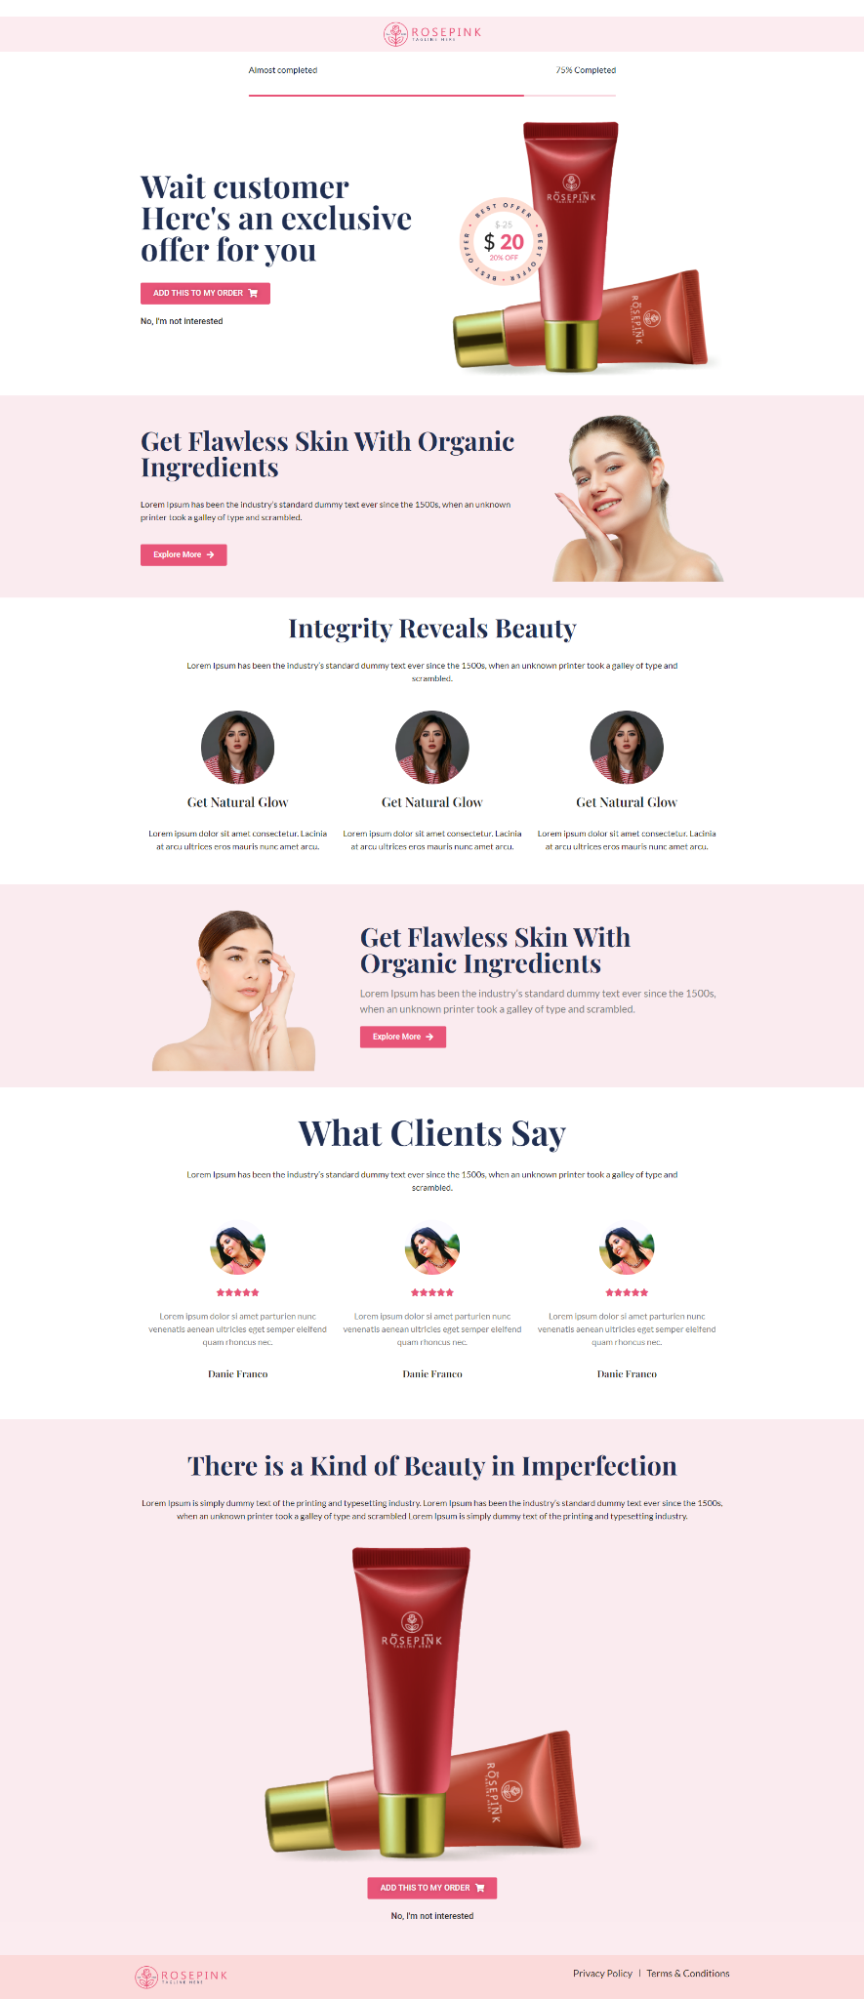
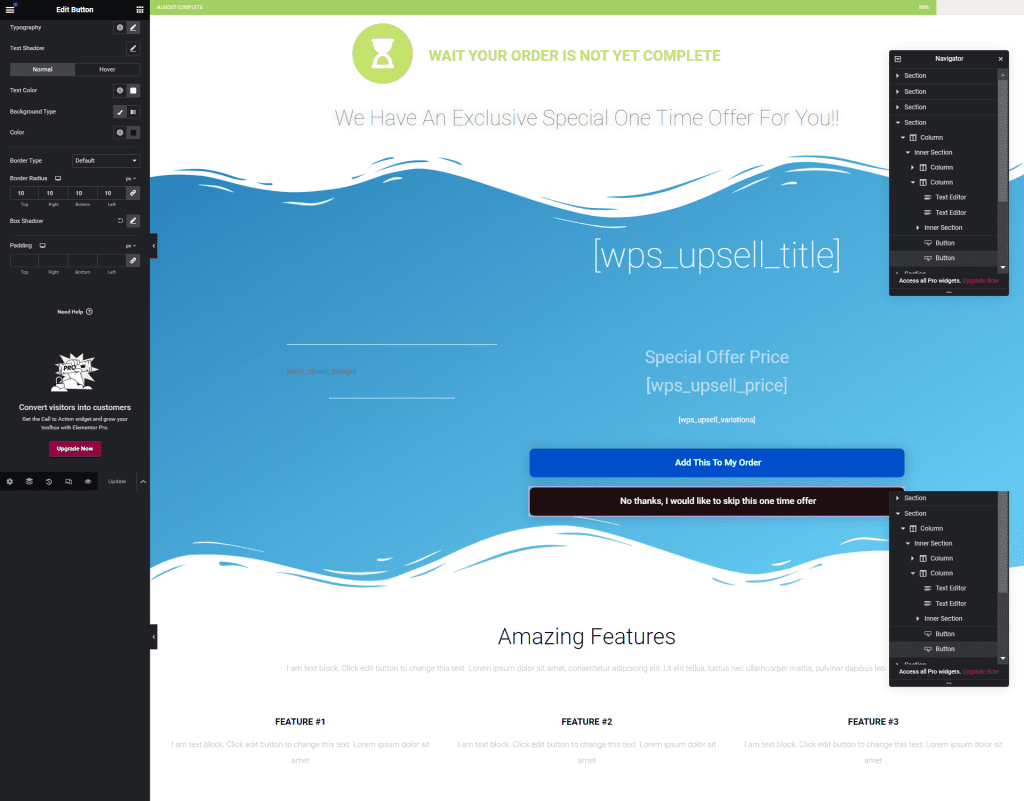
- Offer Template: Choose the offer page template for your upsell offers. We provide 8 offer page templates that you can use to display your upsell offers.
- Offer Custom Page Link: If you like to use a custom page to show upsell offers, then create a new page, design it well, place our shortcodes, and attach its link to “Offer Custom Page Link” in Offer settings.
If you want to add more than one offer to your sales funnel, click on Add New Offer and repeat the above steps.
After setting up your offer, click on the Sandbox toggle button to make the Upsell Funnel Live and click on the Save Changes button.
4.3.Funnel Lists
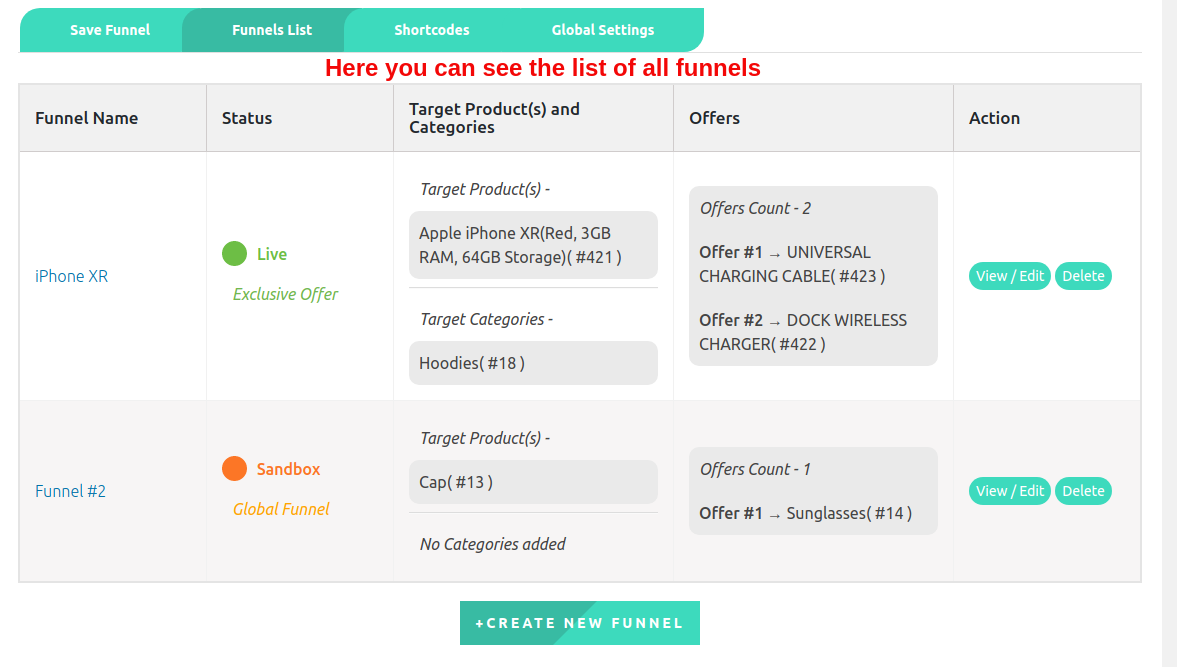
After successfully creating the WooCommerce funnels, you can view the list of total funnels in the Funnel List section. Here you can see all the details of the funnels like Funnel Name, Status, Target Product & Target Categories, and Number of Offered Products in the funnel and also take the proper action according to the need like Edit, View, and Deleting funnel.
4.4.How to Use Shortcodes
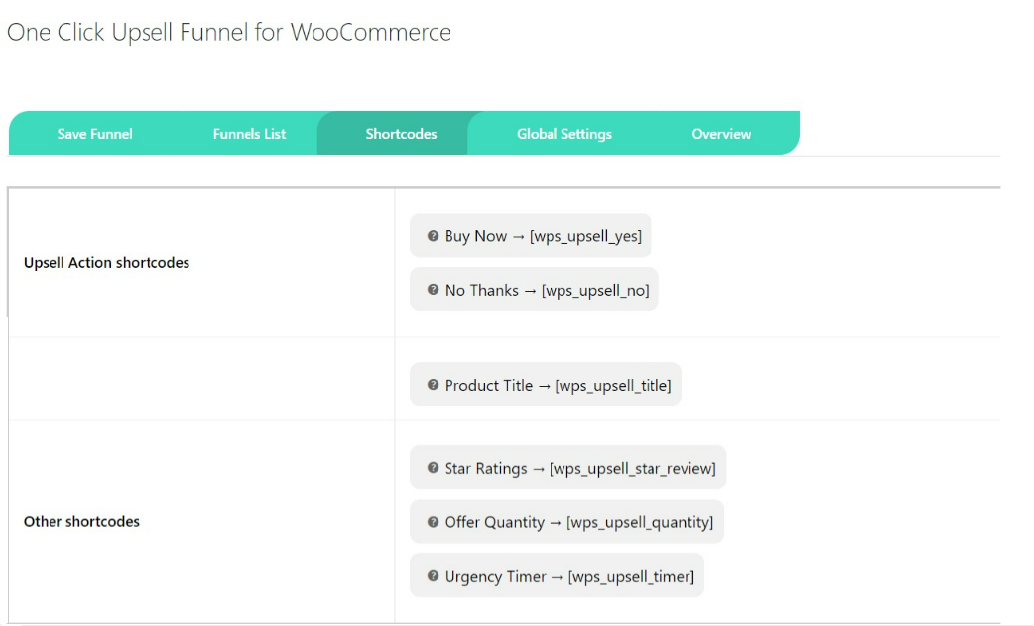
This extension provides some advanced shortcodes to design custom funnel offer pages for your own brand. All that you have to do is just use the suitable shortcodes on the custom page. Here we are providing three types of shortcodes :
Upsell Action Shortcodes:
- Buy Now: This shortcode is used for the “Buy Now” link. In HTML use it as href =”[wps_upsell_yes]” in the anchor tag.
- No Thanks: This shortcode is used for the “No Thanks” link. In HTML use it as href =”[wps_upsell_no]” in the anchor tag.
Product Shortcodes:
- Product Title: This shortcode returns the product title. Use it as [wps_upsell_title]
- Product Description: This shortcode returns the product description. Use it as [wps_upsell_desc]
- Product Short Description: This shortcode returns a short description of the product. Use it as [wps_upsell_desc_short]
- Product Image: This shortcode returns a product image. Use it as [wps_upsell_image]
- Product Price: This shortcode returns the product price. Use it as [wps_upsell_price]
- Product Variation: This shortcode returns product variations. Use it as [wps_upsell_variations]
Other Shortcodes:
- Star Rating: This shortcode returns the star rating. It can be used as [wps_upsell_star_review=4.5]
- Offer Quantity: This shortcode returns the offer quantity field. You can restrict the customer to select the quantity offered. Use it as [wps_upsell_quantity max=4 min=1]. The default quantity is max=3 and min=1.
- Urgency Timer: This shortcode returns the urgency timer. You can specify the timer limit as [wps_upsell_timer minutes=5]. After the timer is over, the No Thanks Upsell action will be triggered.
4.5.How To Design Custom Offer Pages With Advanced Shortcodes: One Click Upsell Funnel For WooCommerce Pro
4.6.Global Setting
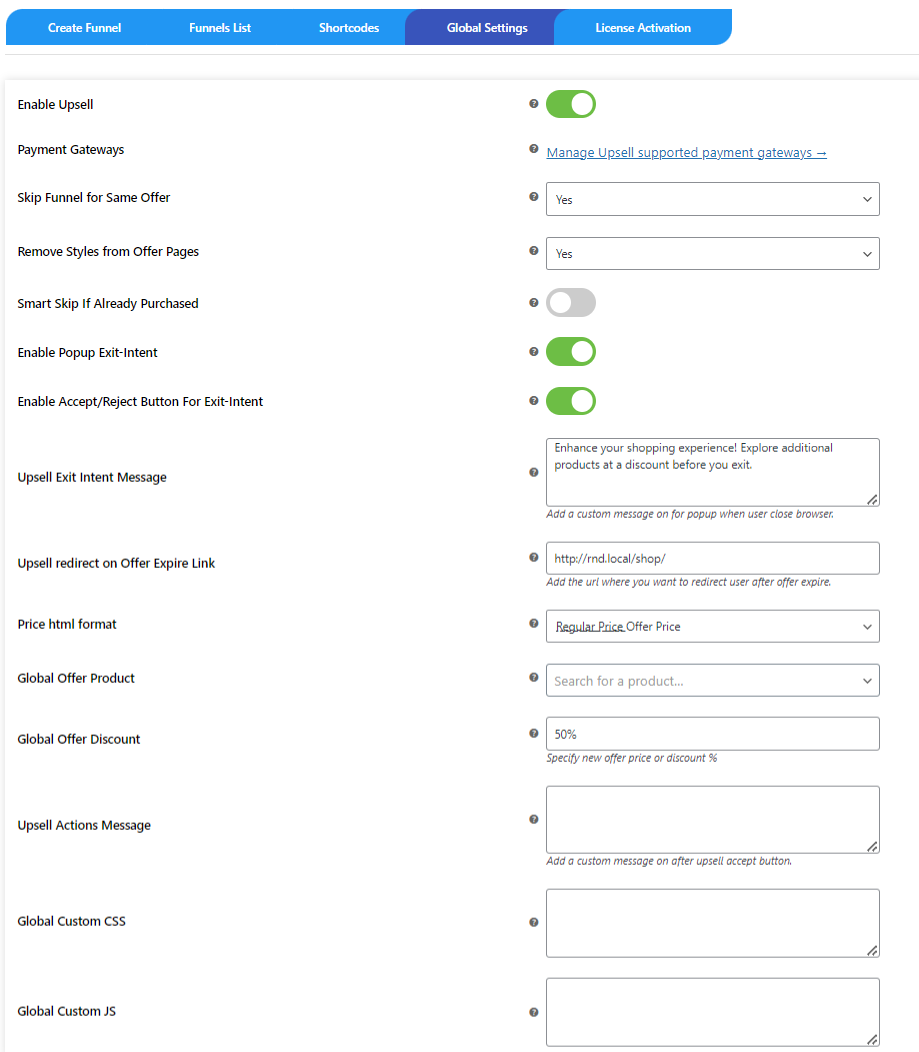
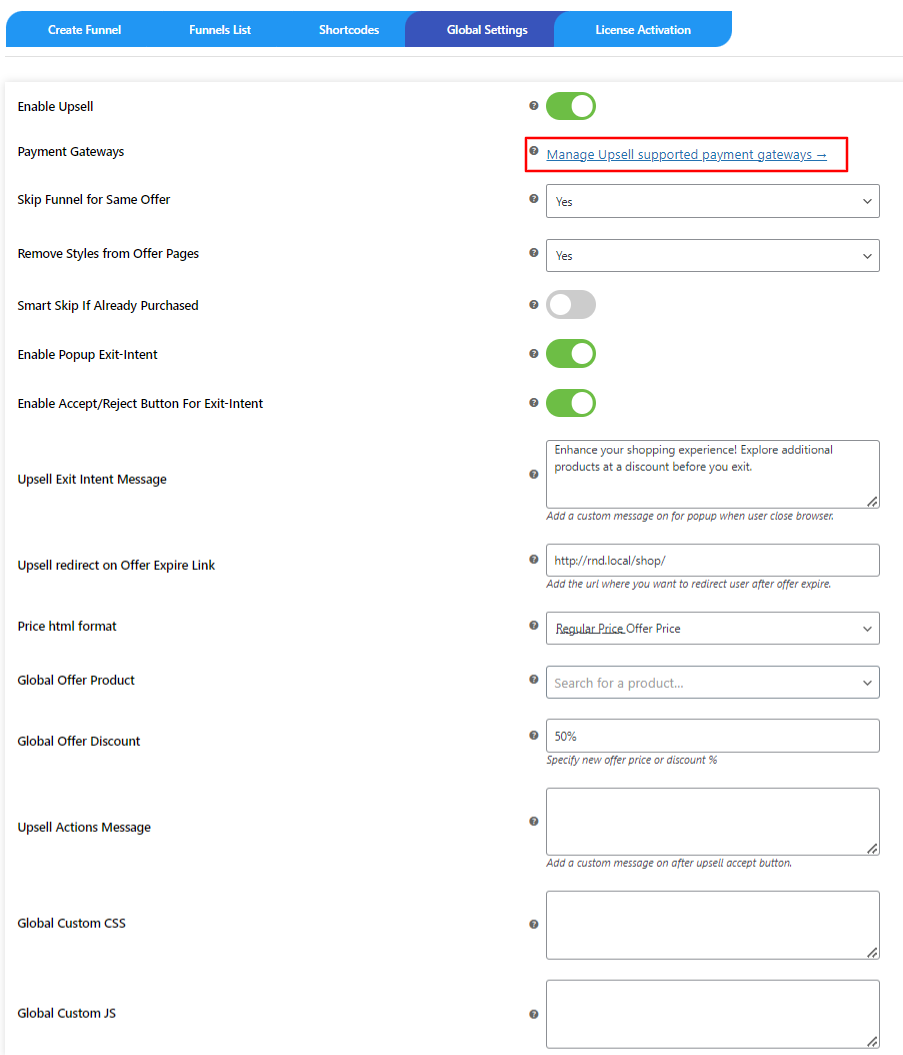
From this section, you can Enable/Disable the plugin functionalities, change the payment gateway settings, and add global offer products, discounts, etc. for the upsell plugin.
- Enable Upsell: Here you can Enable/Disable the plugin functionalities.
- Payment Gateways: This is very important for Upsell offers. You can set up the supported payment gateways here. We have explained this in the next step.
- Skip Funnel for Same Offer: Skip funnel if any offered product in the custom funnel is already present during checkout.
- Remove Style from Offer Pages: Remove the theme and other plugin styles from the offer page. (Note: Not applicable for the custom offer page).
- Smart skip if already purchased: This feature skips the funnel if the offer product was purchased by the customer in the previous orders.
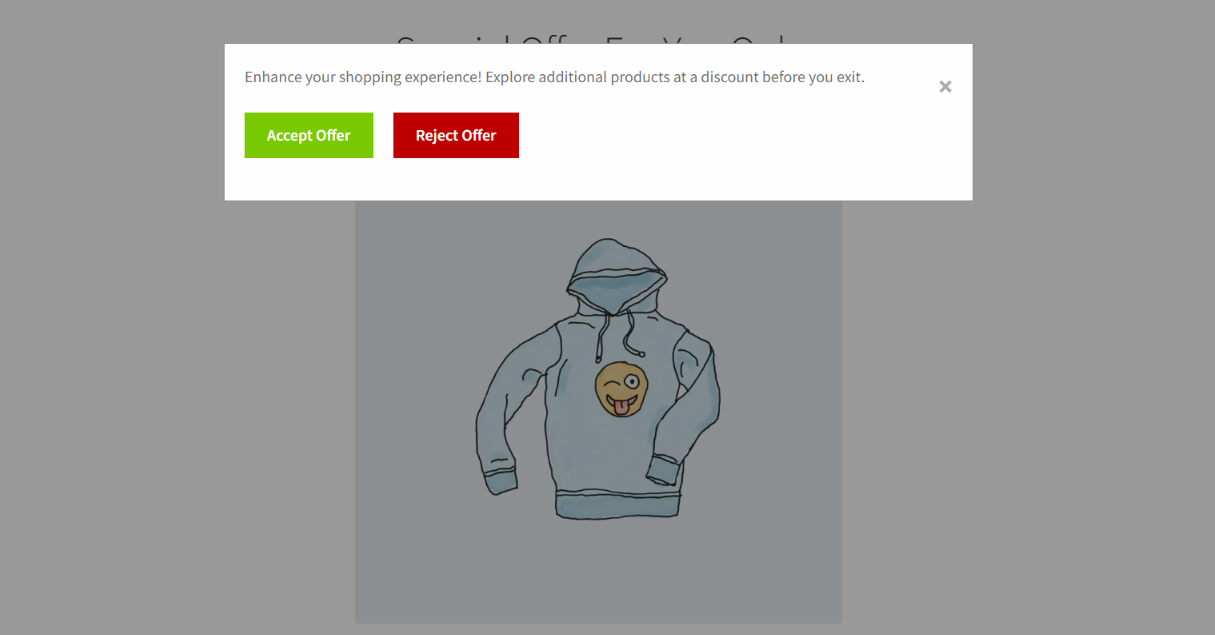
- Pop-up on Exit Intent: Enable this to show a popup on the offer page when a user intends to exit.
- Accept/Reject Button for Exit Intent: Enable to show Accept and Decline buttons on the pop-up of Exit Intent
- Upsell Exit Intent Message: Write Your custom message to show on upsell Exit Intent Pop-up
- Upsell Redirect on Offer Expire: Add Url to Redirect user when an Upsell Offer Gets Expired.
- Price HTML format: Select the format of the price you want to show on the offer page. You get two options here, 1) Regular Price Offer Price and 2) Sale Price Offer Price.
- Global Offer Product: Set the Global Offer Product. When no offer product is set, the global offer product will be visible when the admin simply views the Custom offer page. (Note: Applicable only for custom offer pages in sandbox view, not for Offers that come post-checkout’’).
- Global Offer Discount: Set a Global Offer Discount on the product price. (Note: Applicable only for custom offer pages in sandbox view, not for Offers that come post checkout’’’).
- Upsell Actions Message: This message is displayed along with the loader whenever a customer accepts or rejects the upsell offer.
- Global CSS and JS: Write your custom CSS and JS for the offer page without any script and style tags.
And last, don’t forget to hit the Save Changes button.
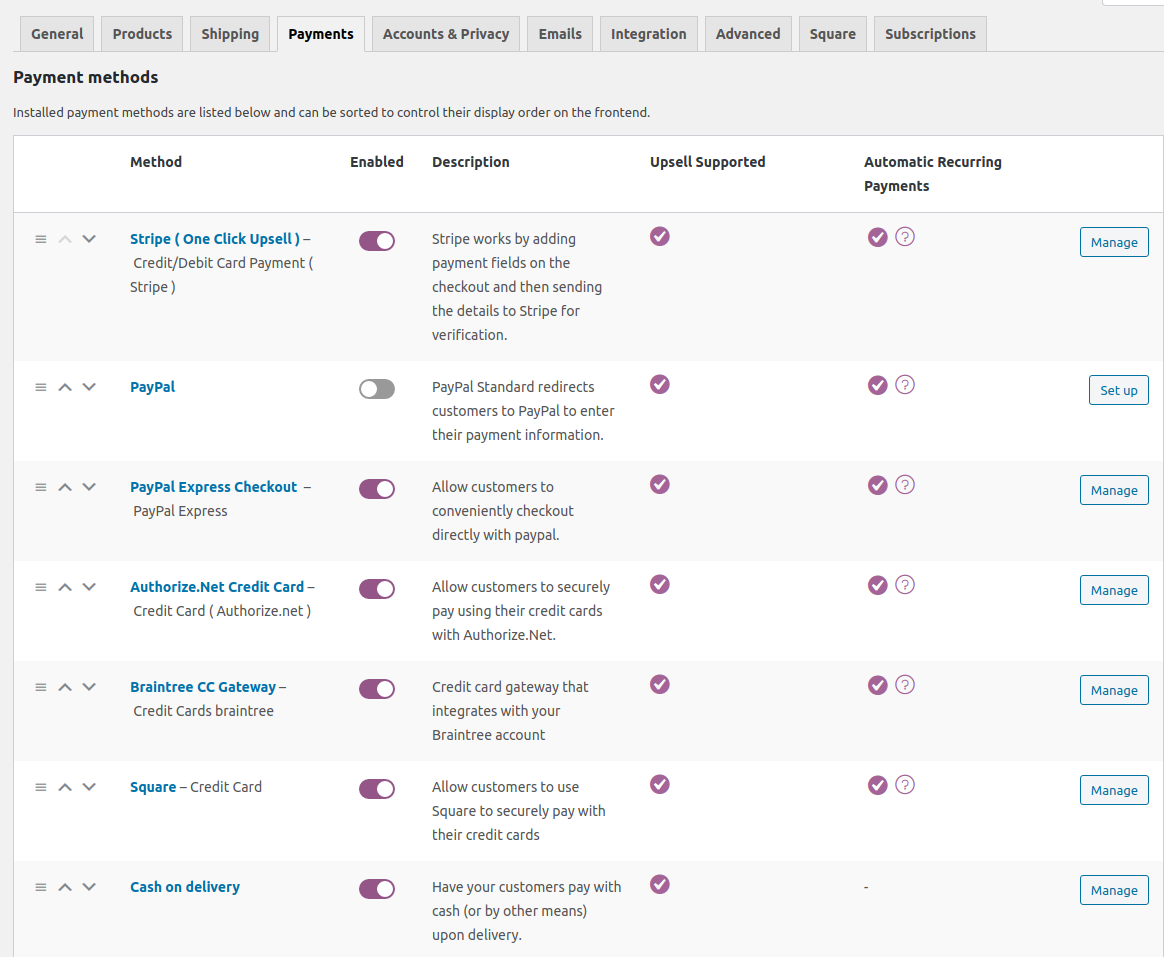
4.8.Payment Gateways
Here you can set up and manage the payment gateways for this plugin.
Here, is a clear explanation of the payment gateways:
- Stripe Settings: The plugin provides a new stripe integration that you can set up. Stripe requires public and secret keys which you can get from the Stripe Dashboard.
Gateway flow: checkout ➝ stripe payment ➝ upsell offer ➝ thank you. - PayPal Settings: This WooCommerce funnel plugin works with WooCommerce Paypal Payments. In WooCommerce PayPal Payments, the customer is redirected to the PayPal page to complete the transaction. WooCommerce PayPal Payments needs API-level credentials such as API Signature, API username, and API password.
Gateway flow: checkout ➝ PayPal payment ➝ upsell offer ➝ thank you. - Authorize.net Credit Card: The plugin provides a new Authorize.net Credit Card Integration. Authorize.net requires an API Login ID, API Transaction Key, and API Signature Key.
Gateway flow: checkout ➝ authorize payment ➝ upsell offer ➝ thank you. - Braintree: The plugin provides integration with Braintree. You need Public Key, Private Key, and Merchant ID to set up Braintree.
Gateway flow: checkout ➝ Braintree ➝ upsell offer ➝ thank you. - Square: Go to the Configure Settings page and connect your Square account.
Gateway flow: checkout ➝ square payment ➝ upsell offer ➝ thank you. - Paystack: WooCommerce upsell plugin is compatible with Paystack.
Gateway flow: checkout ➝ paystack payment ➝ upsell offer ➝ thank you. - Cardcom Settings: The smart funnel plugin provides an integrated Cardcom gateway in order to charge for Upsell Orders. So if you want to use Cardcom, you must use Cardcom provided with the plugin. Cardcom needs a CVV terminal number and API username in order to work.
Gateway flow: checkout ➝ Cardcom ➝ upsell offer ➝ thank you. - Vipps: The plugin is compatible with Vipps
Gateway flow: checkout ➝ Vipps ➝ upsell offer ➝ thank you. - Manual Payment Methods: The plugin also supports manual WooCommerce payments methods. Thus, the merchants can now accept payments through offline methods that include:1. Direct Bank Transfer or BACS2. COD3. Check Payments
- Mollie: The custom funnel plugin supports integration with Mollie.
Gateway flow: checkout ➝ authorize payment ➝ upsell offer ➝ thank you.
(Note: All these credentials are provided by the Payment Gateways. Also, in the case of a redirection-based payment gateway such as PayPal or CardCom the customer is redirected to another page to complete the payment process. As a result, payment will be done for both the product in the cart and the upselling product.)
4.10.Subscription
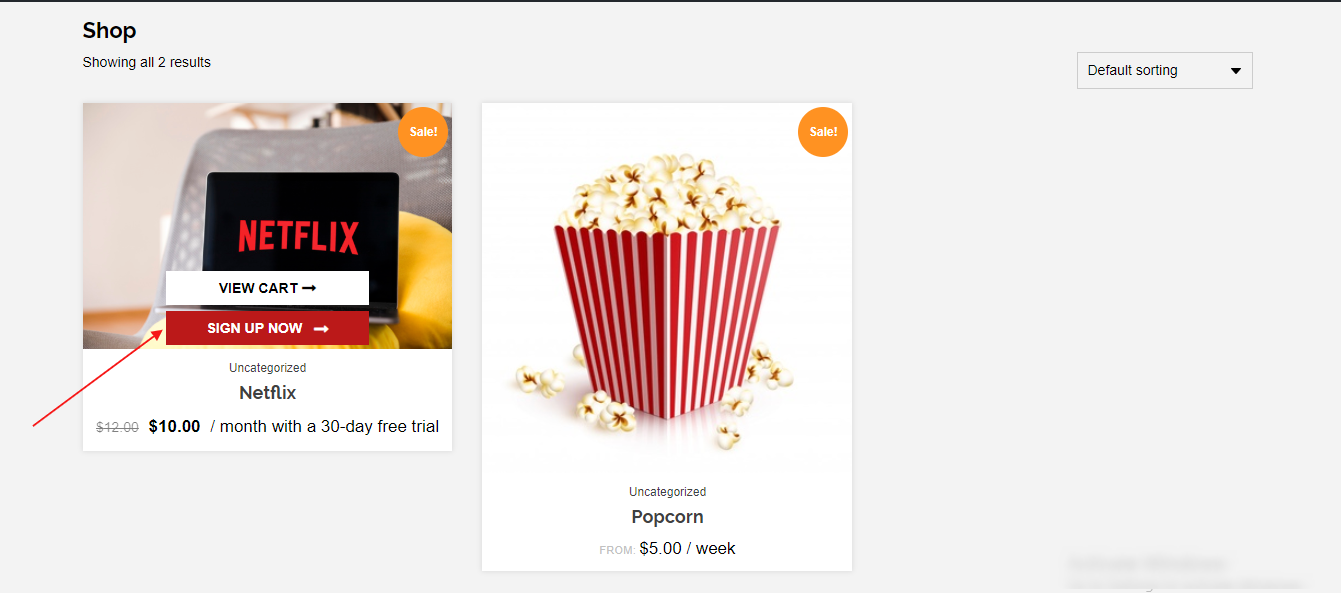
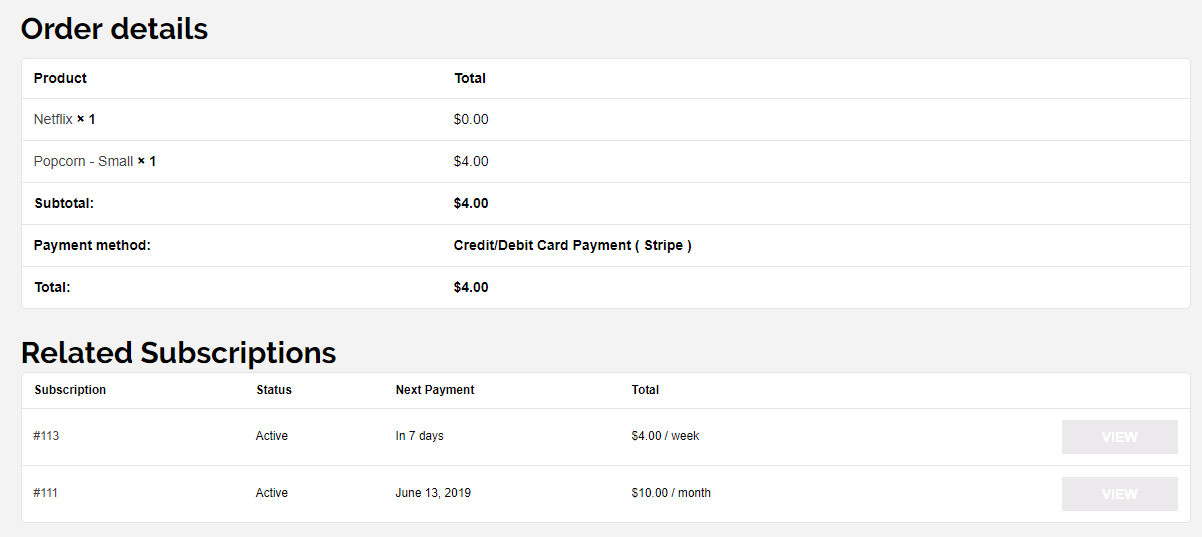
Here you can create a subscription funnel that requires recurring payments. It is similar to a regular funnel. Repeat the same steps you followed to create the regular WooCommerce funnel. Just add a target subscription product to which the offers will be applied. For example, we are adding Netflix as a target subscription product in the funnel and attaching Popcorn subscription as the offer product.
After successfully creating the funnel, the customer can purchase the subscription product by the following steps.
- Go to the Shop page and select a subscription product.
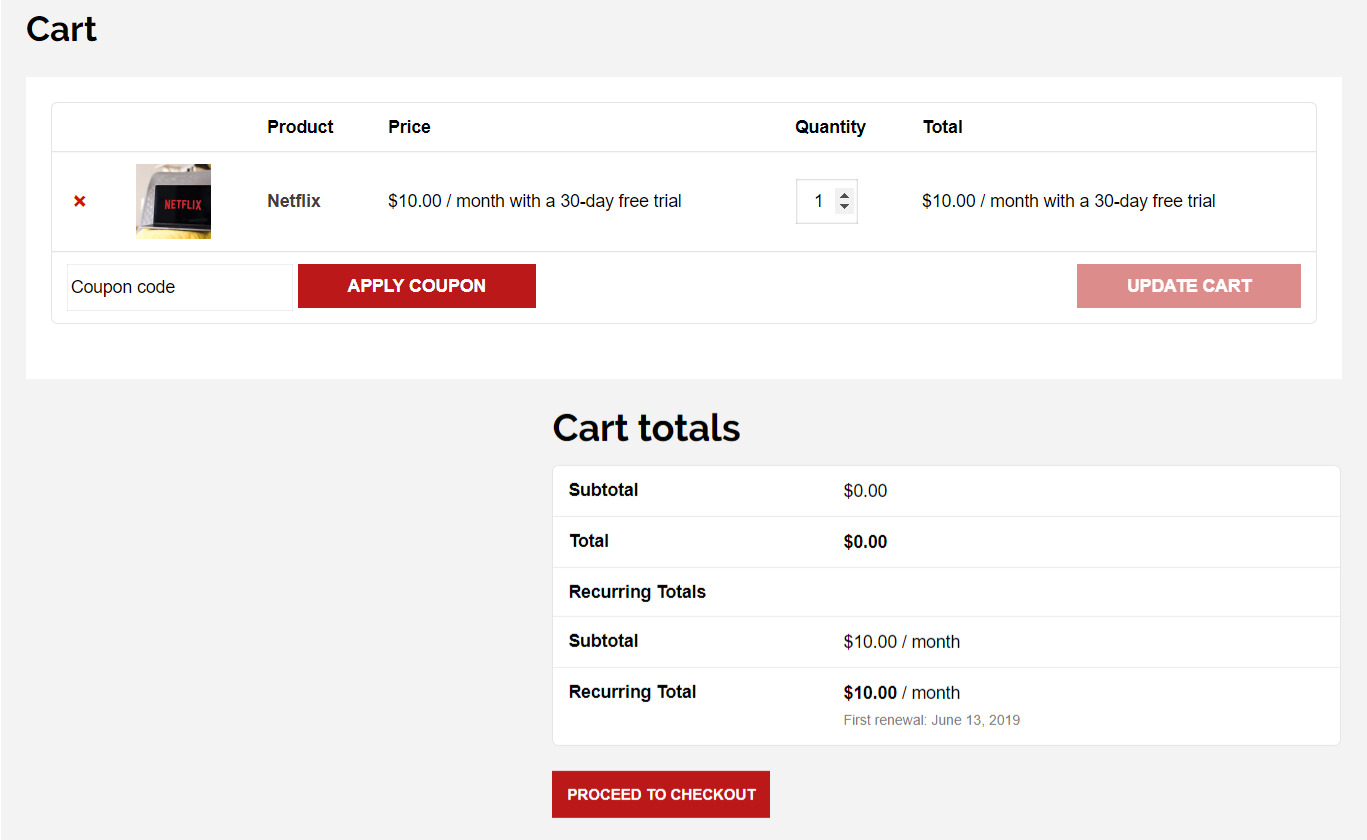
- Click on the ‘Proceed to Checkout’.
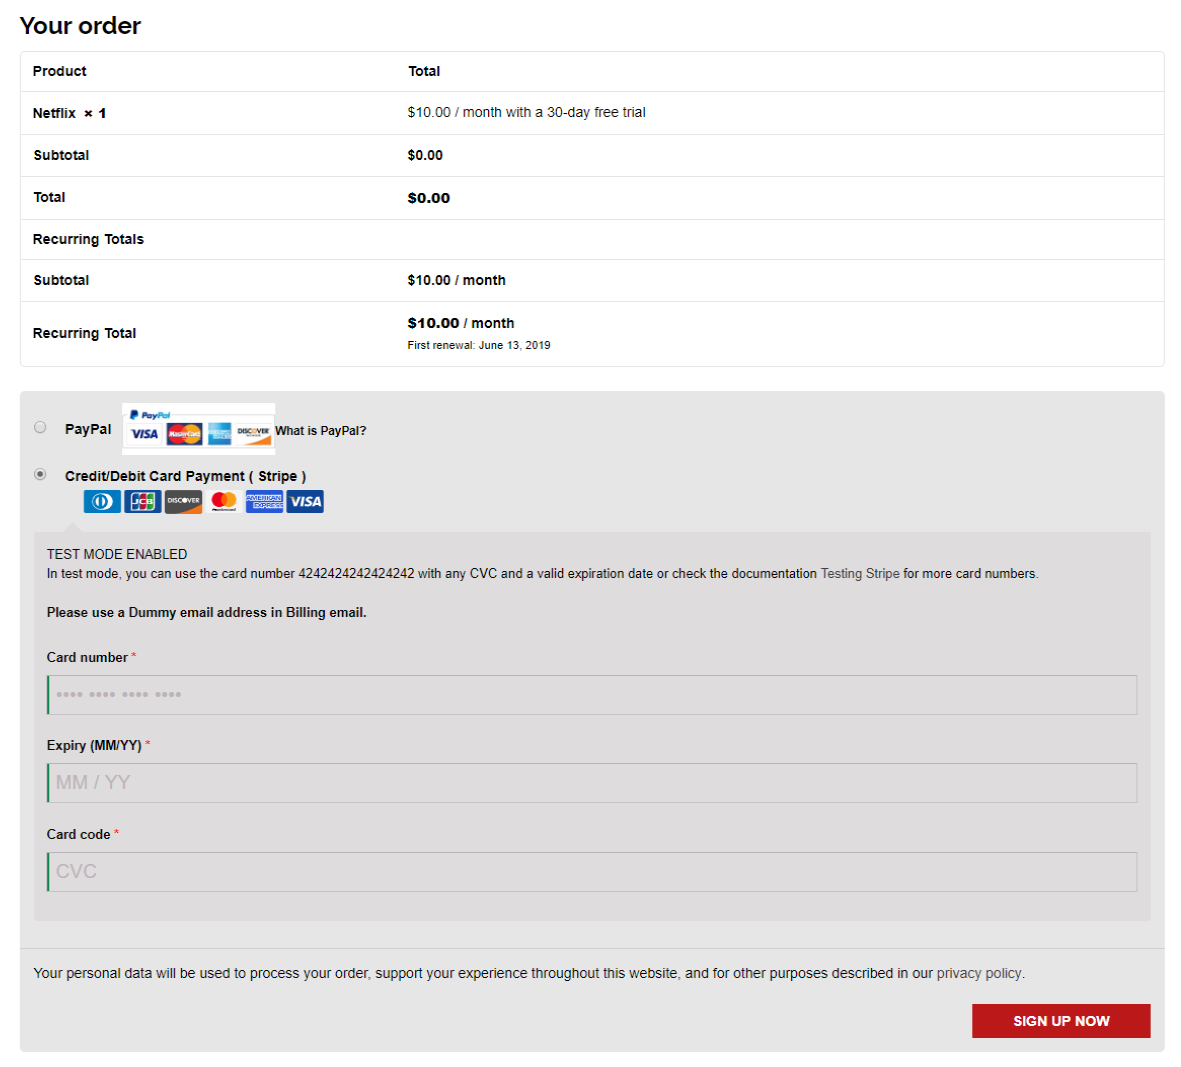
- Select a Payment Gateway either PayPal, Stripe, Authorize.net, Braintree or Square to post-purchase upsell the subscription product, Enter your card details and click on Sign Up Now.
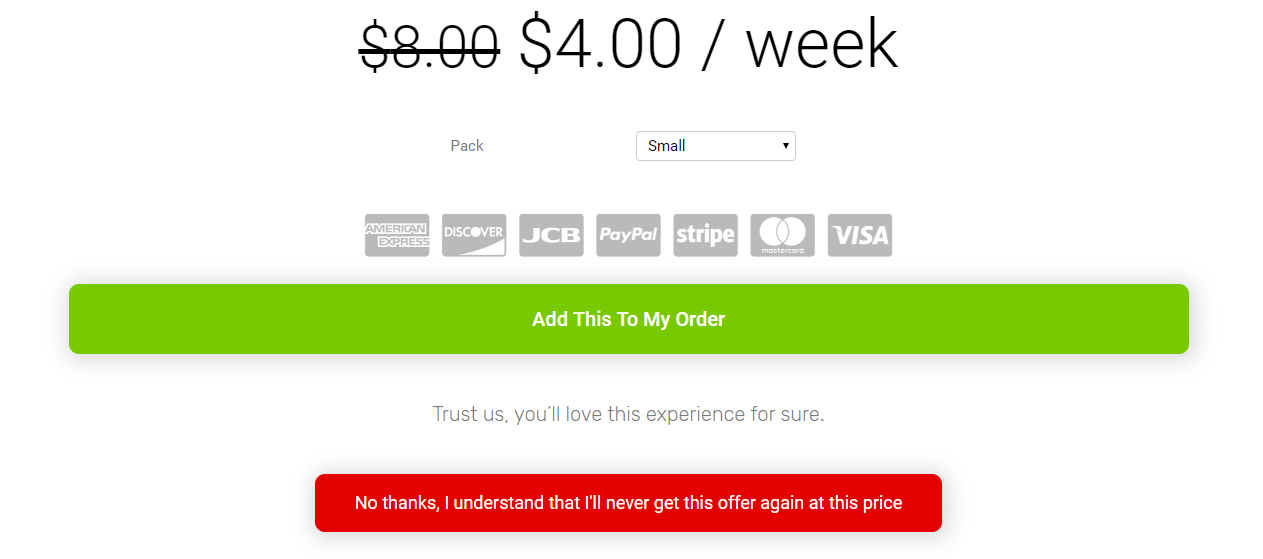
- After a successful sign-up, the subscription offer will appear.
- Now they can Accept the offer with your favorable pack or skip the offer.
- If your customer accepts the offer product then the offer product will be added in the existing order.
You can see the activated subscription products on the WooCommerce > Subscription page.
4.11.Add Additional Offers
The plugin allows the merchants to add additional offers on the post-purchase upsell offer page. To add additional products perform the following steps:
- Visit the Funnel List to add additional products to previous funnels or new funnels.
- Now scroll down towards the Add Additional Offers portion.
- Enable the slider switch beside Add Additional offers to add additional products.
- Now enter the additional product in the input field next to the Additional Offer Product.
Note: The additional offers will only be visible on the first offer of the smart funnel.
4.12. A/B Testing Funnel
To create an A/B Test you must install the Elementor Page builder, after the installation navigate to the Elementor dashboard and create a new customized template.
After customization save the template and copy its URL. Navigate to the funnel section, Enable the A/B testing Method, and paste your Elementor template URL.
That’s it. Now the a/b testing will be running between your customized template and between the template that you’ve selected in the offer section.
You can click on the A/B testing result to see how your A/B testing funnel performed using various matrices like Trigger Count, Success count, Offer Viewed Offer Accepted Offer Rehected Offers Pending, etc.
4.13.Add Dynamic Shipping Price on COD, Wallet, and Stripe
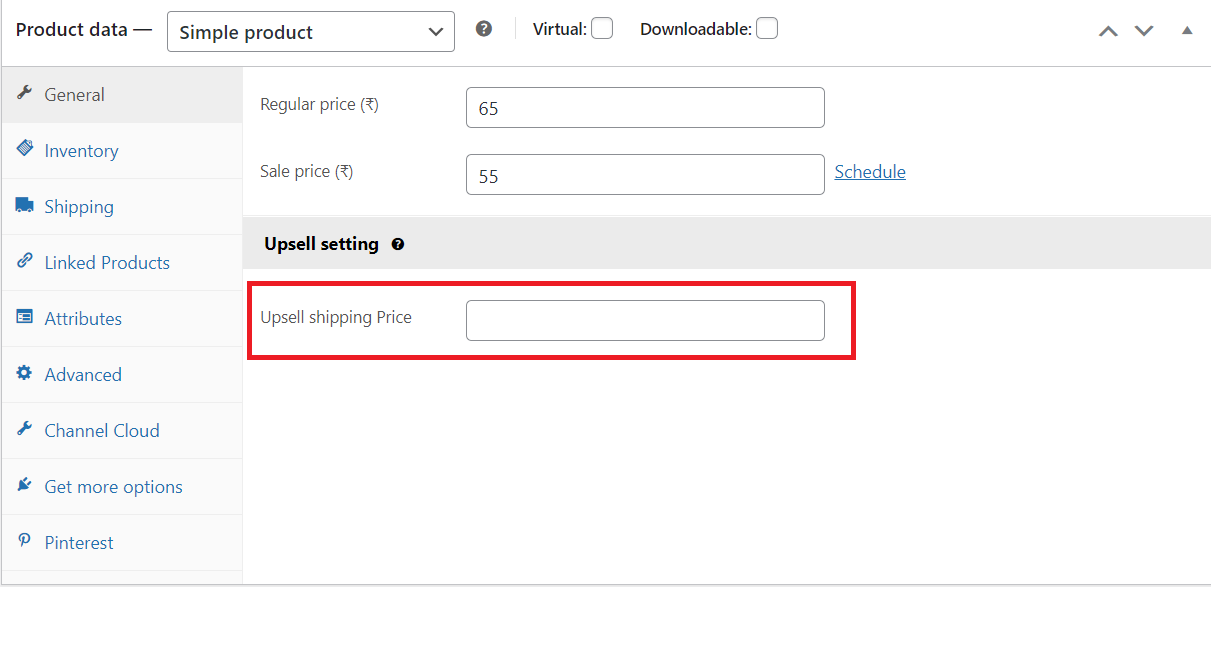
Now, you can put the Shipping price on Cash on Delivery, Wallet, and Stripe while making the WooCommerce one-click checkout by using this latest feature. Letting customers know the accurate accounting of every penny on checkout may increase your AOV and sales.
To add the shipping price of any particular product, you need to go to that specific product under Products, then under General > Upsell setting > Upsell Shipping Price > Enter the price.
4.14.Offer Page Shortcodes
Custom Form: The shortcode is used for adding your custom fields to the upsell offer page. Place the shortcode [wps_form] on the offer to show the custom fields to the customer.
Additional Offers: The additional offer shortcode is for the additional offer products on the upsell offer page. In HTML use it as [wps_additional_offers] in the anchor tag.
4.16.Custom Form Fields On the Offer Page
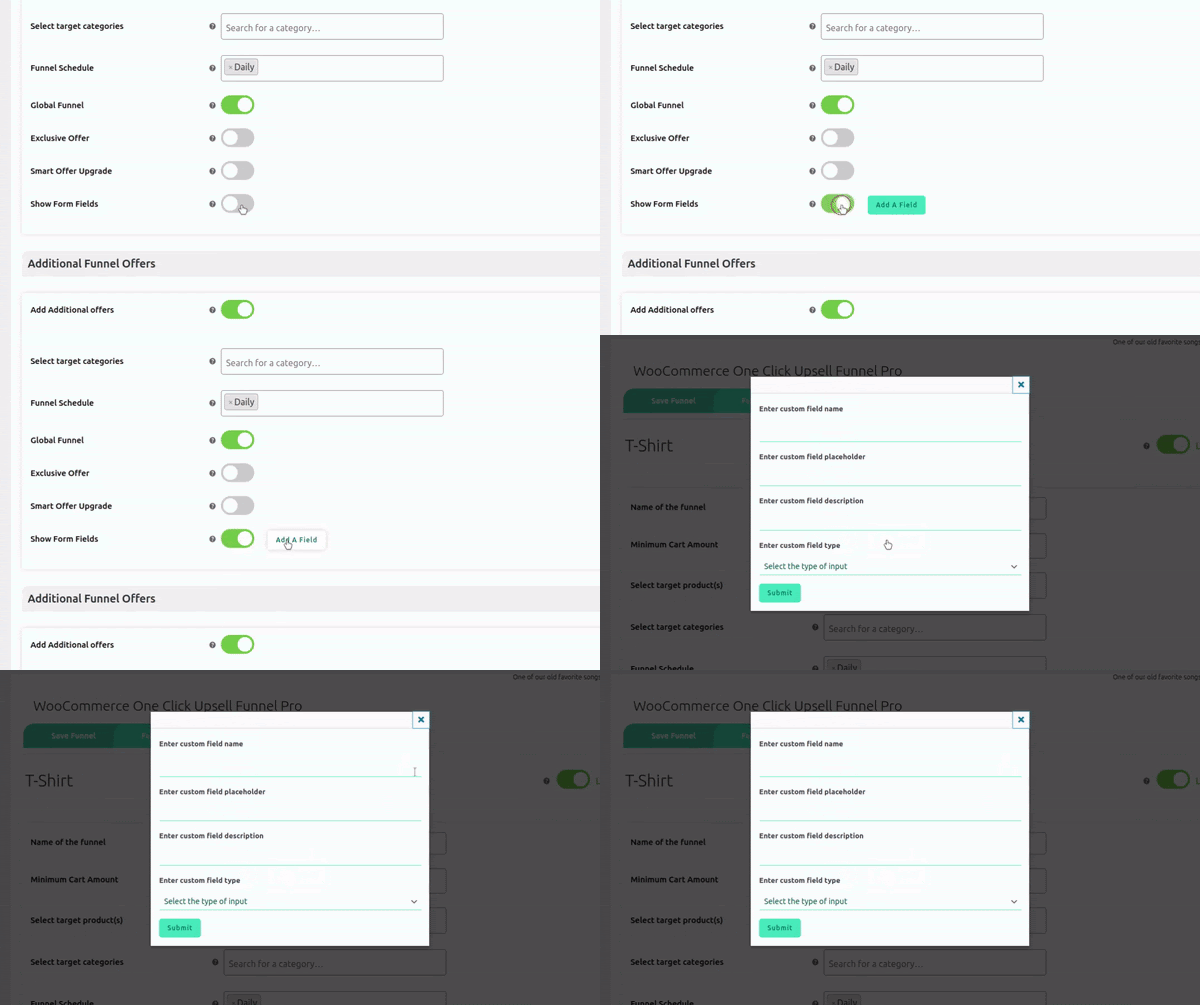
You can add custom fields to your post-purchase upsell offer page by enabling the Show Form Fields.
Perform the following steps to add custom fields to your upsell page:
- Login to your WordPress dashboard.
- Navigate 1 Click Upsell → Funnel & Settings → Funnel List.
- Enable the Show Form Fields feature by clicking the slider switch.
- Now click on the Add A Field button to create a custom field.
Note: The custom form fields will only be visible on the first offer of the custom funnel.
5.Sales Reports & Tracking
5.1.Sales Report
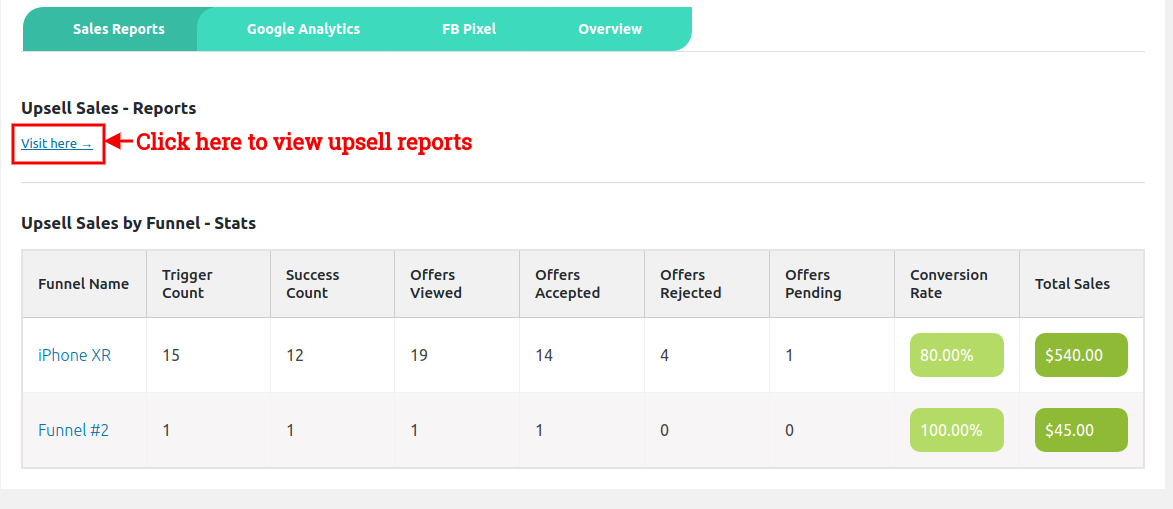
Create a sales report for the products in your store including or excluding items based on net sales, orders placed, orders purchased and refunds, name of order, view count, conversion rates, and total sales, and generate your report with a click.
Quickly create sales reports and analyze your order data for smart decision-making.
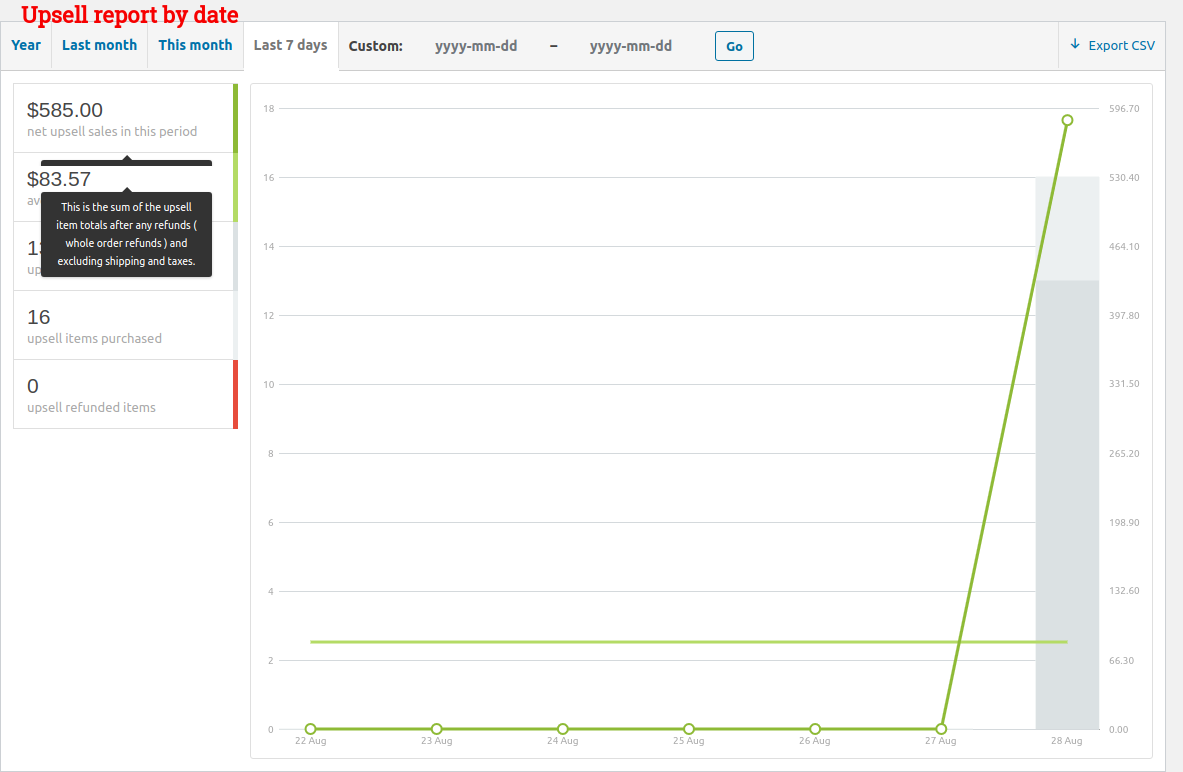
- Upsell Sales – Reports: Click here to check the upsell reports for a specific time period. Here you can check:
- Net upsell sales: This is the sum of the upsell item totals after any refunds (whole order refunds) and excluding shipping and taxes.
- Average net daily upsell sales: Daily average of total upsell sales on the set time.
- Upsell orders placed: Total upsell orders placed on the set time.
- Upsell items purchased: Total number of upsell items purchased on the set time.
- Upsell refunded items: Total upsell refunded items from fully refunded orders.
You can also filter the report according to the product or category.
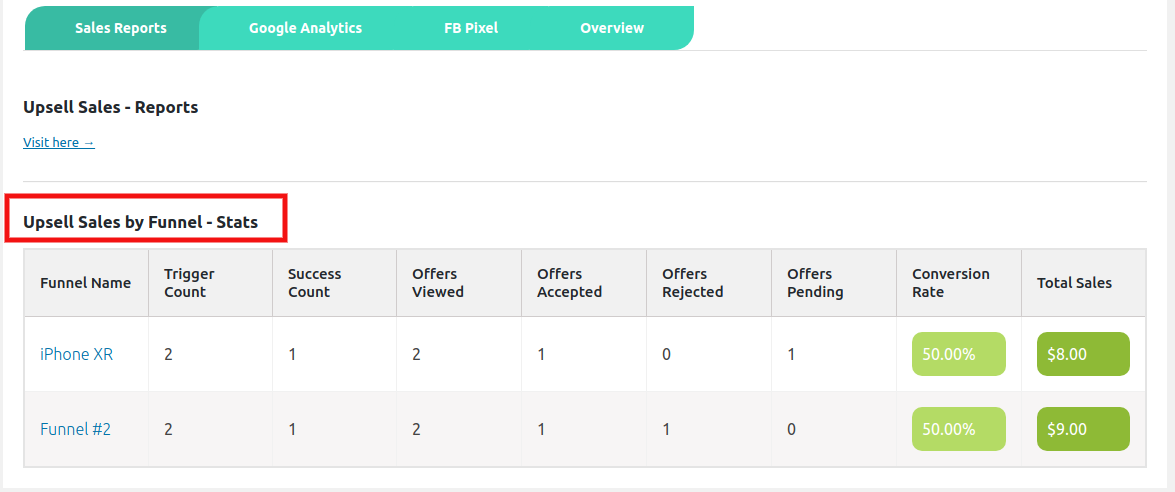
Upsell sales by funnel – Stats: This report shows you the data of every individual custom funnel. With this report, you can check the performance of the funnel, its offers, and its success rate. Here are the metrics this report shows:
- Funnel Name: Name of the funnel.
- Trigger Count: Number of times a funnel has been triggered
- Success Count: Number of times a Funnel is Successful. A Funnel is considered successful if any of it’s Offer are accepted.
- Offers Viewed: Number of times the offers in the funnel were viewed by the customers.
- Offers Accepted: Number of times the offers in the funnel were accepted by the customers.
- Offers Rejected: Number of times the offers in the funnel were rejected by the customers.
- Offers Pending: Number of times the offers in the funnel were viewed but no action was taken by the customers or they simply closed the browser window and left.
- Conversion Rate: Percentage ratio of Success count vs Trigger Count.
- Total Sales: Total amount of sales of Upsell Offer Items generated by the smart funnel ( including refunds if any ).
5.2.Google Analytics
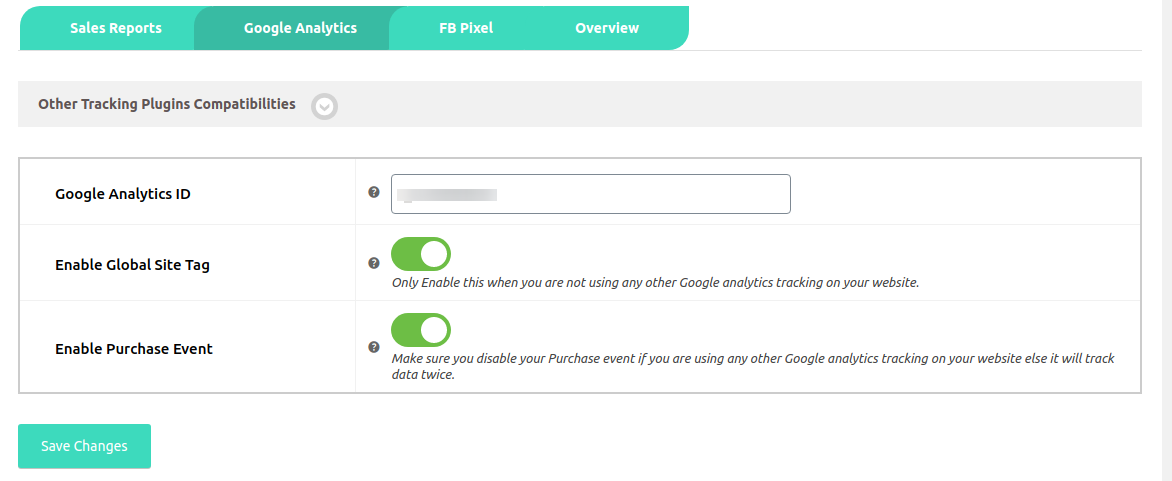
- Google Analytics ID: Enter your Google Analytics tracking ID. You can find it by logging into your Google Analytics account.
- Enable Global Site tag: Add Global Site Tag “gtag.js” to your website. Note: Only Enable this when you are not using any other Google Analytics tracking on your website.
- Enable Purchase Event: This will trigger the Google Analytics purchase event for parent orders and upsells accordingly.
Note: Make sure you disable your Purchase event if you are using any other Google Analytics tracking on your website else it will track data twice. Please check the “Other Tracking Plugins Compatibilities” section by clicking on the arrow beside it.
5.3.FB Pixel
- FB Pixel ID: Enter your Facebook Pixel ID here. You can fetch your Pixel ID from here.
- Enable Pixel Base code: Add Facebook Pixel Base Code to your website. Note: Only Enable this when you are not using any other Facebook Pixel tracking on your website.
- Enable Purchase Event: This will trigger the Facebook Pixel purchase event for parent order and upsells accordingly
Note: Make sure you disable your Purchase event if you are using any other Facebook Pixel tracking on your website else it will track data twice. Please check the “Other Tracking Plugins Compatibilities” section by clicking on the arrow beside it.
6.Plugin Compatibility
With Upsell plugin, you can also use additional plugins for enhanced features:
1. Upsell Order Bump Offer For WooCommerce
The WooCommerce Upsell Plugin is compatible with Upsell Order Bump Offer For WooCommerce Free and Upsell Order Bump Offer For WooCommerce Pro that lets you show upselling and cross-selling offers on the checkout page.
2. Subscriptions For WooCommerce
The WooCommerce Upsell Plugin is compatible with Subscriptions For WooCommerce Free and Subscriptions For WooCommerce Pro that allows creating post-purchase upselling offers on subscription products.
3. Product Bundles
The WooCommerce Upsell Plugin is compatible with WooCommerce Product Bundles Plugin too which is designed to help store owners create outstanding deals by bundling existing simple, variable, and subscription products. It’s a great way to make cross-selling easier in your WooCommerce store.
4. Wallet System for WooCommerce
The WooCommerce One Click Upsell Plugin is compatible with Wallet System for WooCommerce Free and Wallet System for WooCommerce Pro. It shows upsell offers to customers when they use a wallet as a payment method.
5. FOX – Currency Switcher Professional for WooCommerce
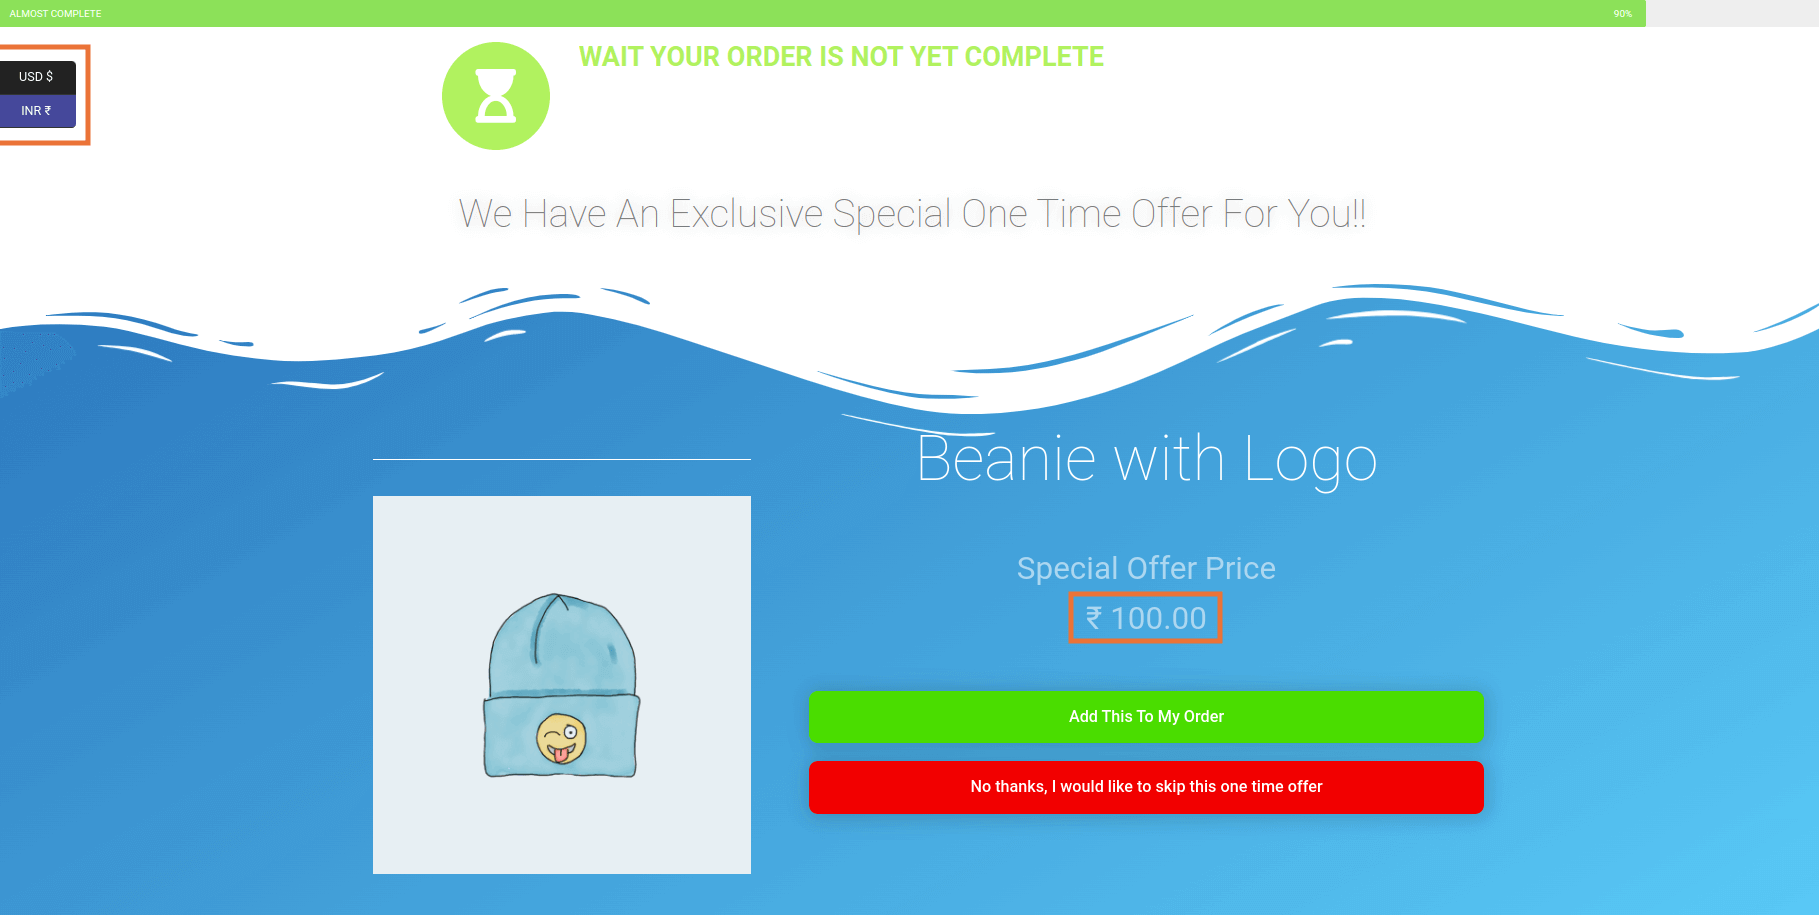
Our upsell WooCommerce Pro plugin is compatible with Currency Switcher for WooCommerce. It allows you to change the currency of your upsell product offers and their shipping prices to any currency type you prefer.
7.Feedback and Suggestions
Didn’t see a feature in the One Click Upsell Funnel For WooCommerce Pro plugin that you think would be useful? We’d love to hear it. Reach out to our Support and we’ll consider adding it to the future release.
8.FAQs
I installed the plugin, created funnels and added the offers too but still, it does not show up on purchasing the funnel targets, why?
If the upsell offers are not showing, make sure:
- You’ve enabled the One Click Upsell funnel plugin. Navigate to Global Settings and enable the plugin if it is disabled.
- Your funnel is not in Sandbox Mode. If it is, edit the funnel and make it Live and Save Changes.
- You are testing for the correct target product or category you’ve set in the funnel.
- The offer page is published.
- You’re making the payment through one of our supported payment gateways. If you make payments through a payment gateway that is not supported by our plugin, the offer will not be displayed.
- Make sure you have selected any one of the following templates or made your own custom template and inserted page link
Is my Payment Gateway compatible with your plugin?
You can see the list of supported payment gateways over our " Product page." But if your required gateway is not there, You can contact our " Support " team for this.
We will check the possibilities and make your gateway compatible with our plugin on your request. There is always a way for everyone.
How can I use Custom Page Shortcodes for BUY NOW and NO THANKS?
For “Buy Now” shortcode: You need to copy this Buy Now → [wps_upsell_yes] and place it at the suitable place on your page. Note: This shortcode only returns the link so it has to be used in the link section. In html use it as href=”[wps_upsell_yes]” of anchor tag.
For “No thanks” shortcode: You need to copy this No Thanks → [wps_upsell_no] and place it at the suitable place on your page. Note: This shortcode only returns the link so it has to be used in the link section. In html use it as href=”[wps_upsell_no]” of anchor tag.
Is there any free version for this plugin?
Yes there is a free version of this plugin available on WordPress. You can visit our free version. And if you like, you can also request for a personal demo for One Click Upsell Funnel For WooCommerce Pro.
Can I design an upsell offer page if i don't have a designer?
Yes you can. Our plugin is compatible with Elementor that lets you customize your upsell offer pages as per your needs. And you don’t need a designer for it. Just drag and drop and style your elements as you need and your page will be ready in minutes.
Is it Stripe Official and Stripe One Click are the same?
No, the Stripe Official and Stripe Once Click are not the same. Stripe Official is a WooCommerce plugin that allows the merchant to accept payments via Stripe whereas, Stripe One Click is a free integration by WP Swings. Both the Stripe Official and Stripe One Click are compatible with the plugin. But we recommend to use official stripe for better results
What are shortcodes & how they are beneficial?
If you haven’t installed Elementor in your WordPress environment, you can customize the upsell offer page using shortcodes. The plugin provides some advanced shortcodes for creating custom offer pages. You can check our documentation for more details.
Why Global Funnel and Smart Offer Upgrade not work at the same time?
The Smart Offer Upgrade works only when it fetches a target product id. On the other hand, the Global Funnel functionality is just the opposite, it does not require a product id to trigger. Thus, this is the reason why Global Funnel and Smart Offer Upgrade do not work together.
Can I show two or more offers at the same time?
Yes, you can show more than one offer with the feature named “Additional Offers” in pro version.
Does the plugin support Stripe official?
Yes, the plugin supports Stripe official for accepting payments.
Can I add additional products to the upsell offer page?
Yes, you can add additional products on the upsell page using the Additional Funnel Offers feature in your funnels. But keep in mind that the additional products will only appear for only the first offer of a funnel.
Can I add custom fields to the upsell offer page?
Yes, you can add custom fields on the upsell page by enabling the Show Form Fields option in your funnels. But keep in mind that the custom fields will only appear for only the first offer of a funnel.
Can I preset a minimum cart amount on which the funnel should trigger?
Yes, you can add a minimum cart amount in your funnels on which the funnel should trigger.
Can I add additional products and custom fields using shortcodes?
You can use the shortcodes [wps_form] and [wps_additional_offers] on the upsell offer page to add additional products and custom fields.


