1.Overview
Watch Points and Rewards For WooCommerce Pro: Demo Video Part 2
Features:
- The merchant can provide the points to their customer at the signing in on the website, Referral Signup, Referral Purchase, Product Assign, Points on Order Total, and Per Currency Spend.
- Redeem those reward points on the Cart subtotal as well as use them to get the membership with the WooCommerce reward points plugin.
- Using the Membership feature you can allow your customers to get a discount on the products.
- Using the feature of the loyalty points and rewards plugin, you can notify the user about their points by Notification Mail.
- Shortcodes for displaying the notification anywhere on the site.
- Points Log for Customer and Merchant.
- Points table for a merchant to update the customers’ loyalty points and rewards for WooCommerce with the remark.
- Customers can apply points on the cart as well as on the checkout page.
3.Installation
1. Automatic Installation
Automatic installation is the easiest option as WordPress handles the file transfers itself and you don’t need to leave your web browser.
The steps are as follows :
(i) Download the zip folder of the plugin Points and Rewards for WooCommerce Pro.
(ii) Once downloaded install the Points and Rewards for WooCommerce Pro plugin by browsing and activating it.
2. Manual Installation
The manual installation of the WooCommerce rewards points plugin is another option. To install the plugin to your WordPress environment. The manual installation method involves downloading our Points and Rewards for WooCommerce Pro Extension and uploading it to your web server via your favorite FTP application.
The steps are as follows :
(i) Kindly, Upload the Points and Rewards for WooCommerce Pro folder to the /wp-content/plugins/ directory.
(ii) Activate the Points and Rewards for WooCommerce Pro plugin through the ‘WooCommerce loyalty Plugins’ menu in WordPress.
The best results can be viewed by using the “WooCommerce” standard theme (Storefront). Any third-party plugin might cause conflict with our plugin.
Note:
Before activating the Points and Rewards for WooCommerce Pro, you should have the Points and Rewards for WooCommerce – WordPress plugin else the plugin will not function.
So, if you don’t already have it, you can download it directly from here:
4. General Settings
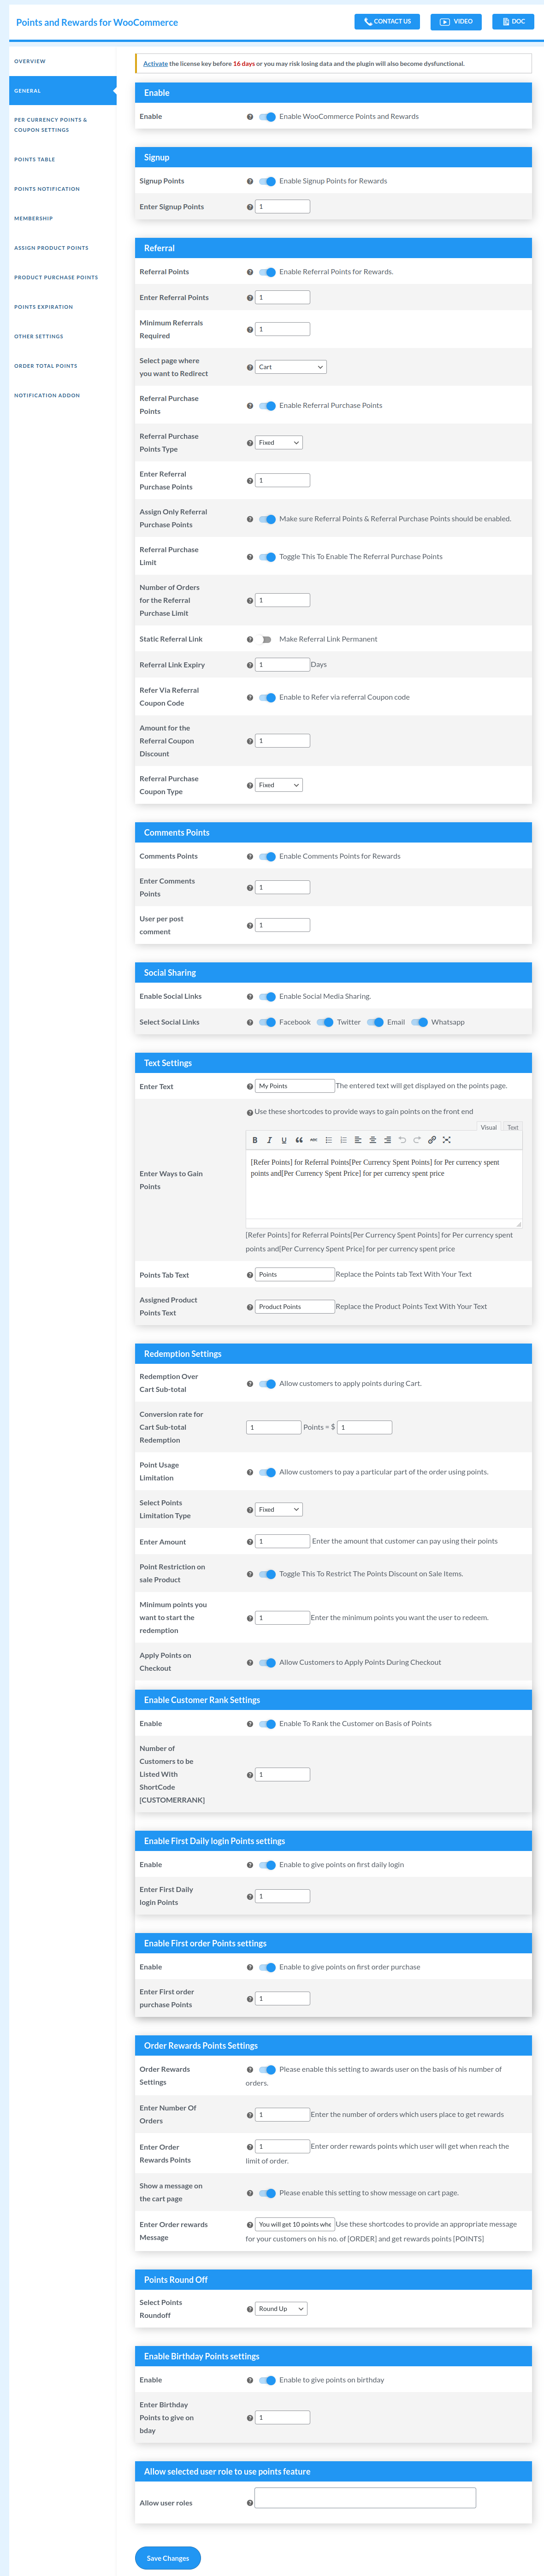
- After the successful installation of the WooCommerce rewards plugin, first of all, kindly enable the plugin.
- Go to the admin panel and click on WooCommerce > Points and Rewards > General Settings.
- Enable the points and Rewards settings by clicking on the checkbox.
- Click on Save Changes.
4.1.Signup Setting
Enable the Signup Points for the user. Through this setting of the WooCommerce reward points plugin when the user signs up on your site then they will get some signup points as a reward.
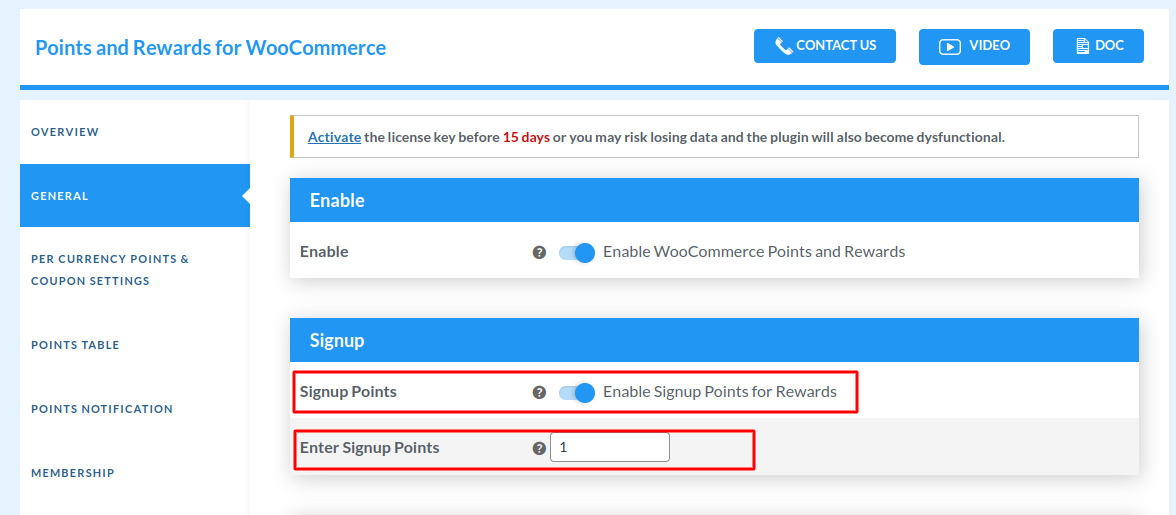
- Kindly, go to the admin panel click on the WooCommerce > Points and Rewards > General Setting.
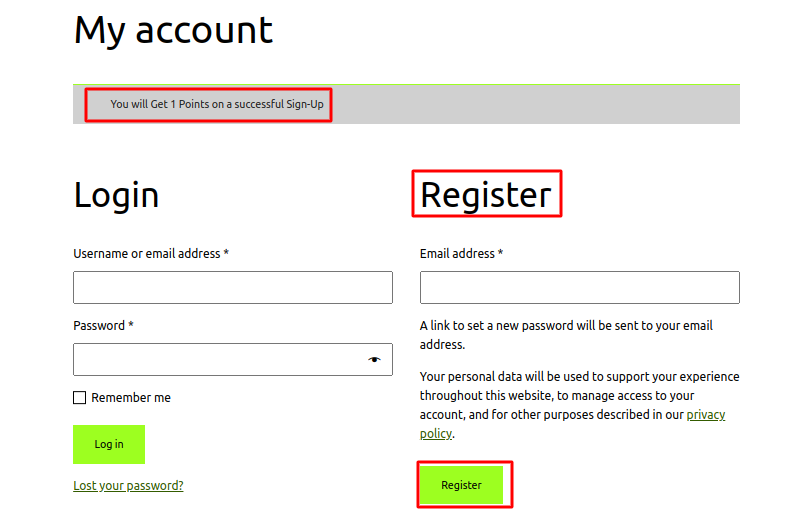
- Enable the Sign-up reward point settings and enter the signup points. A new user will get the signup points whenever they successfully signup on your site.
- And lastly, click on the “Save Changes” button.
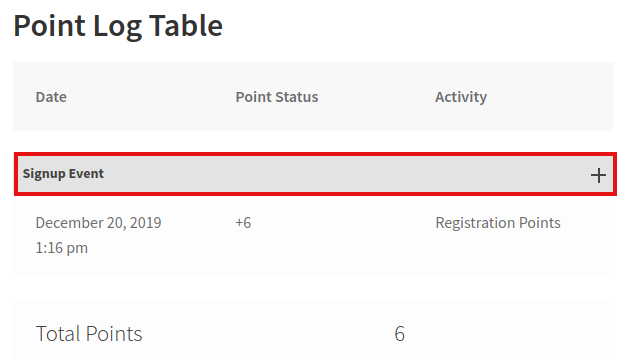
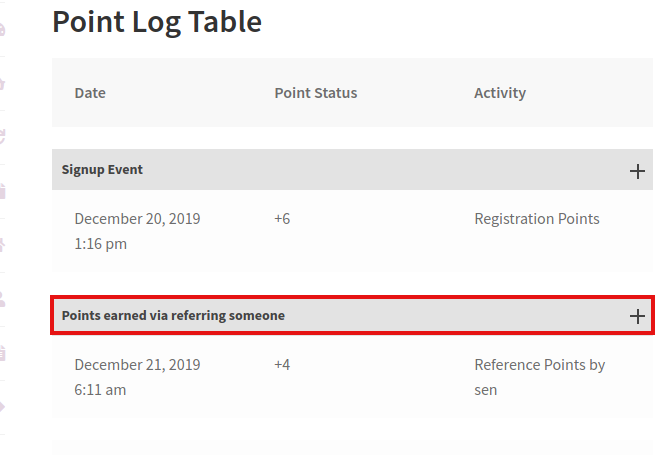
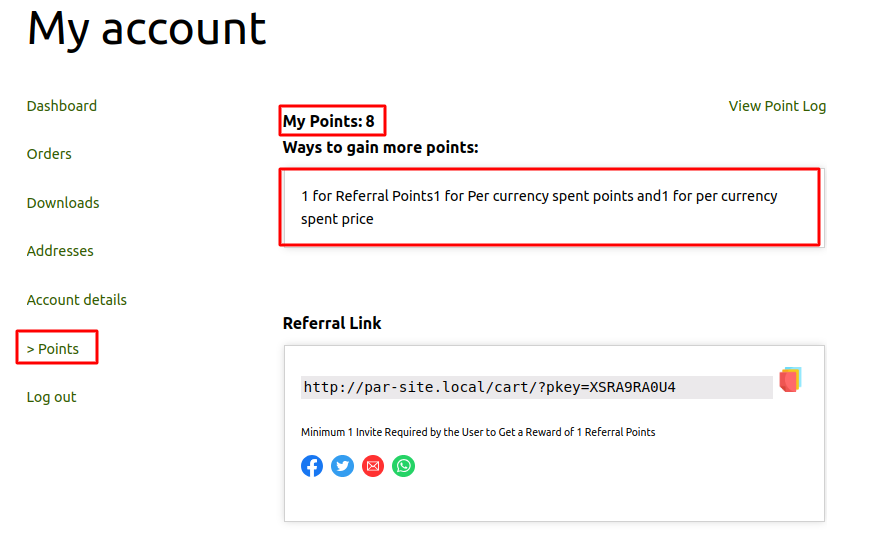
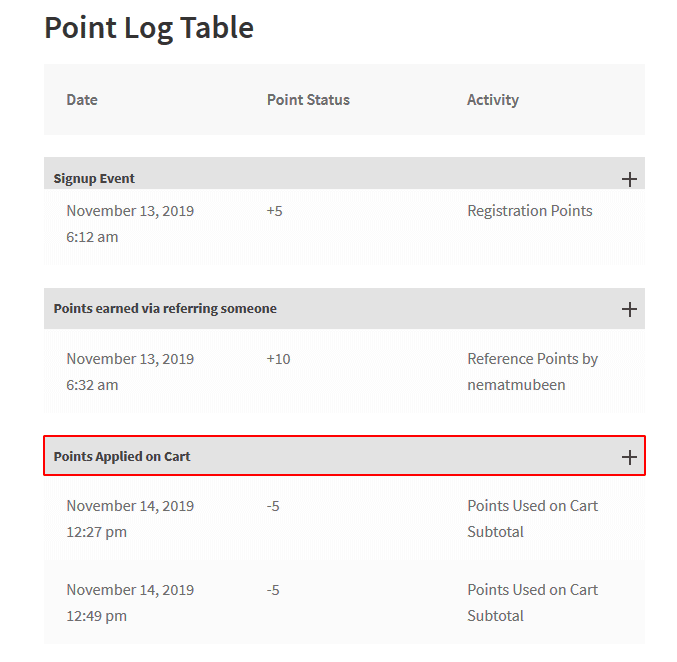
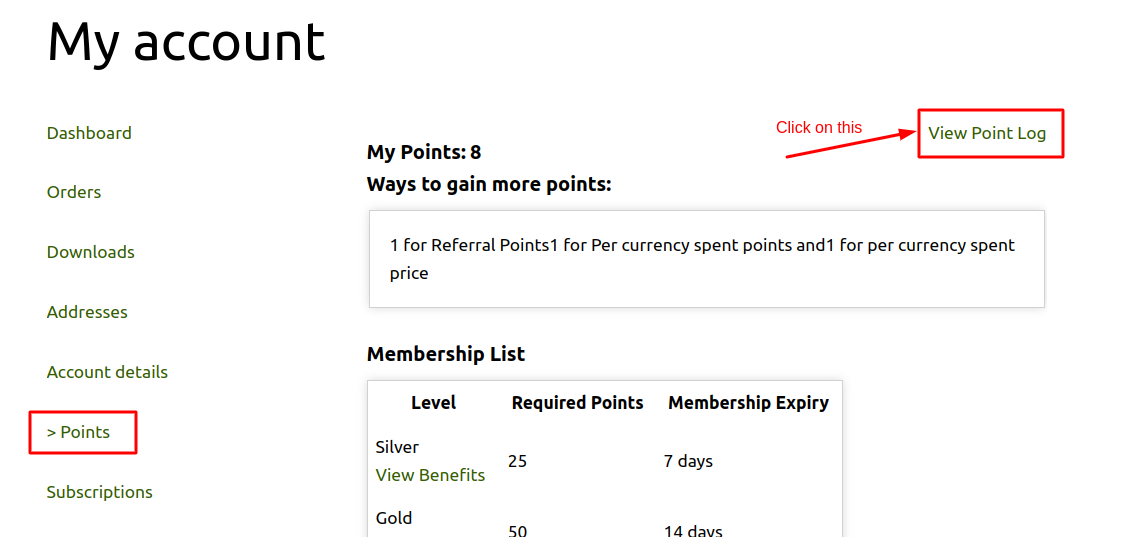
The user can see their Points Log Table through these easy steps:
- Go to My Account Page.
- Click on the “Points” tab from the sidebar.
- And the last click in View Points log link.
4.2.Referral Setting
Enable the Referral Setting for the customers – Through this setting, customers will get loyalty points and rewards for WooCommerce on the referee (the user invited by the customer) purchase
- Go to the admin panel click on the WooCommerce > Points and Rewards > General Setting.
- Kindly, enable the Referral Points settings and enter the Referral Points.
- Click on the “Save Changes” button.
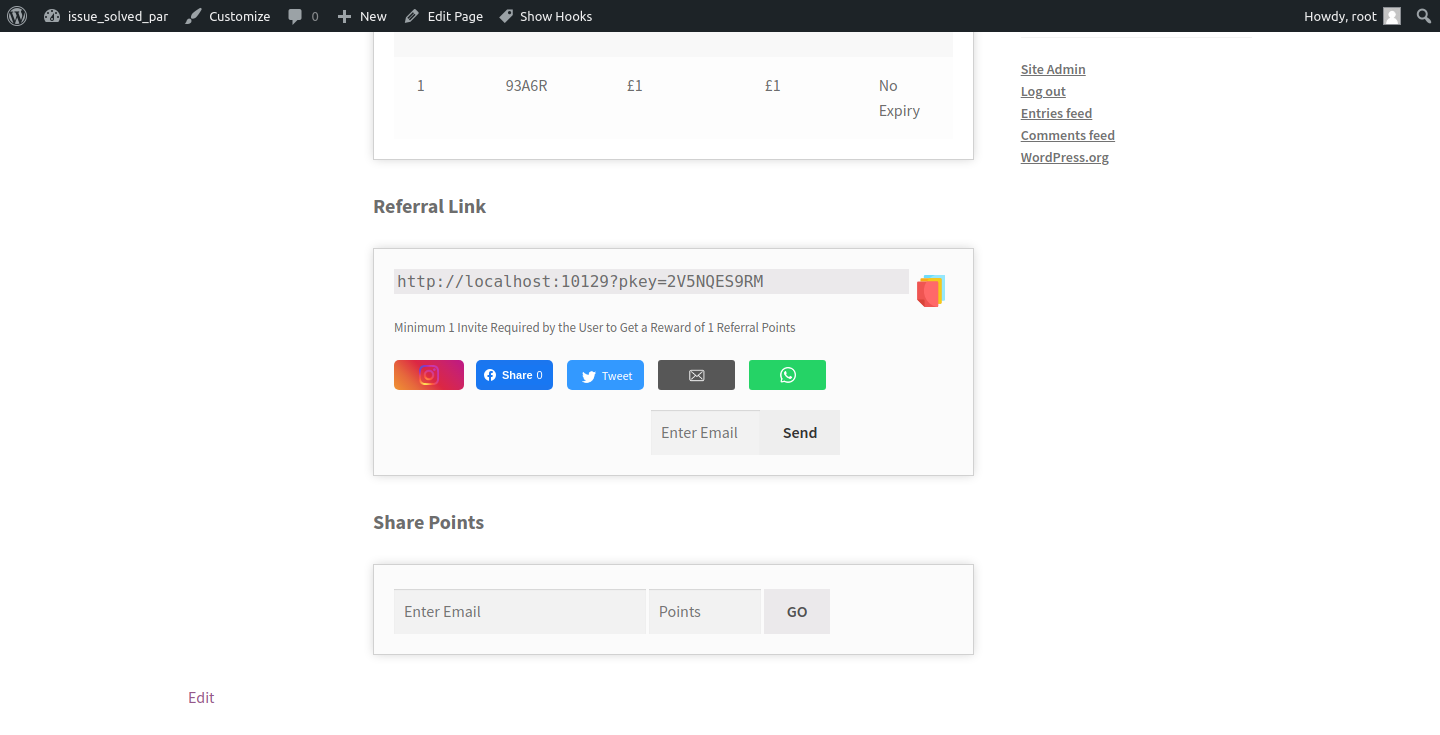
After successfully enabling settings, customers can share the referral link with other users.
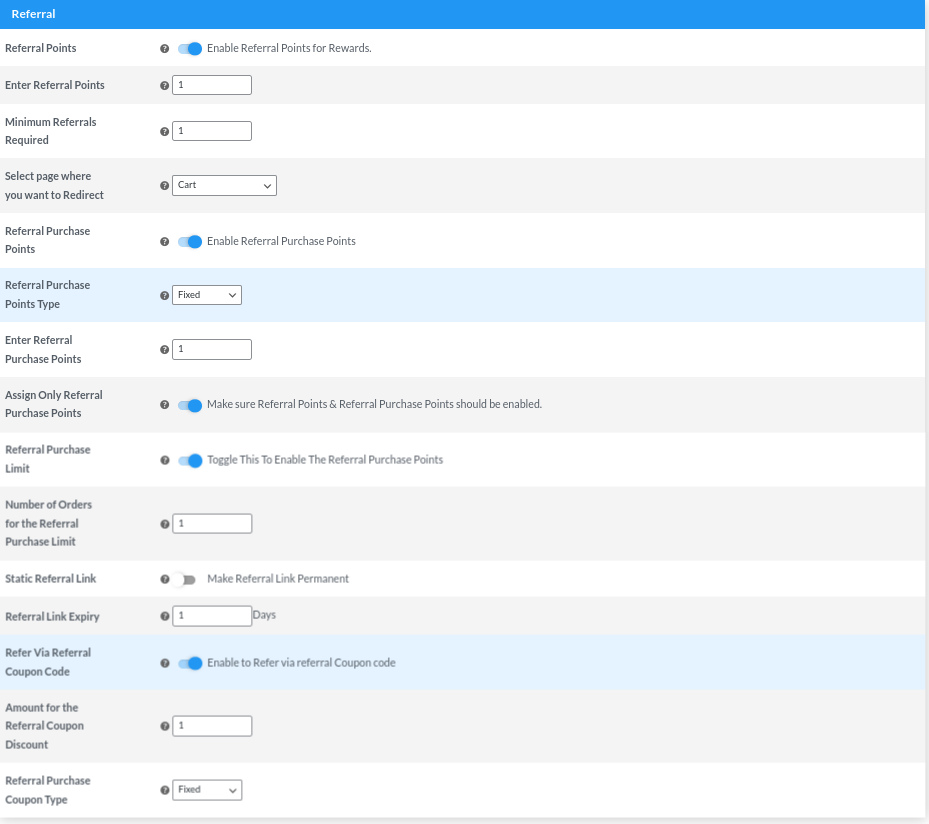
Enable Referral Purchase Point: By selecting this setting the admin can enable the referral purchase point. The admin can also select the points type on referral purchases depending on the order total
For Example: If user A has given User B a referral link to use. User B must use the same referral link to log in. After this USer A will be awarded certain points.
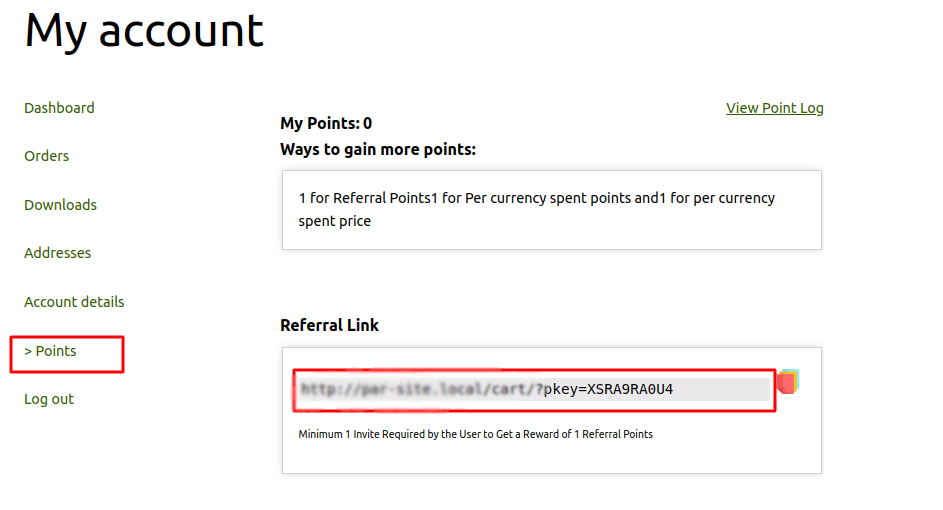
From the My Account Page, they can copy the referral link and share it with other users.
- Enter Referral Points: The admin can select the number of points which he wants to reward the customer with.
- Minimum Referrals Required: The admin can also set a minimum or upper limit to the number of referrals that are required for the customer to win the points.
- Select Page Where You Want To Redirect: Here the user can decide the place where he wants the referral link to redirect. The available options are the Cart Page, Shop Page, My Account Page, or Sample Page.
- Enable Referral Purchase Points: By selecting this setting the admin can enable the referral purchase point. The admin can also select the points type on referral purchases depending on the order total.
- Enter Referral Purchase Points Type: The user can also toggle between the referral purchase point type. The available options are fixed or percentages.
- Enter Referral Purchase Points: You can decide the number of points that the customer will get if people use the referral link to make a purchase.
- Assign Only Referral Purchase Points: The admin can assign “only referral purchase points” settings if they want their customers to earn points only after a purchase is made using the referral link that they’ve shared.
- Enable Referral Purchase Limit: The admin can provide the customer with some upper limit by using this setting of WooCommerce rewards points plugin. For example, Mr. A is a loyal customer of your company and wants to earn points as per this feature. Now, you have set a limit of 3 orders. So, now he will be awarded points only after the successful completion of 3 orders.
- Set the Number of Orders for Referral Purchase Limit: The admin can set the number of orders for the same Referral Purchase Limit. We can take the same example, Mr. A is a loyal customer of your company and wants to earn points as per this feature. Now, you have set a limit of 3 orders. So, now he will be awarded points only after the successful completion of 3 orders.
- Static Referral Link: Enable this setting, if you want to make the referral link permanent for the customers.
- Referral Link Expiry: Select the number of days, after which the referral link will expire.
- Enable to Refer via referral Coupon code: You can enable this setting if you want your customers to refer via referral coupon codes.
- Set the amount for the referral coupon discount: Select the amount for the referral coupon discount.
- Referral Purchase Coupon Type: The admin can choose between fixed or percentage discounts.
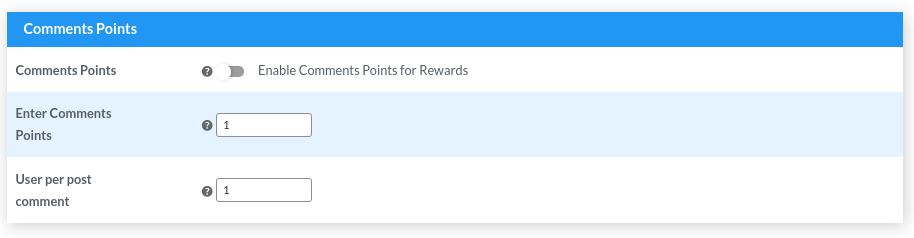
4.3.Comments Points Settings
By enabling this setting of the WooCommerce reward point plugin. The admin can:
- Enable Comments Points: By checking this box you allow your users to earn points on giving their reviews
- Enter Comments Point: Enter the number of points that the user will gain on every successful review.
- User Per Post: This acts to be a limitation to the number of comments that a user can make to earn points.
Note: Points will be awarded only when the comment/review has been approved by Admin.
4.5.Text Settings
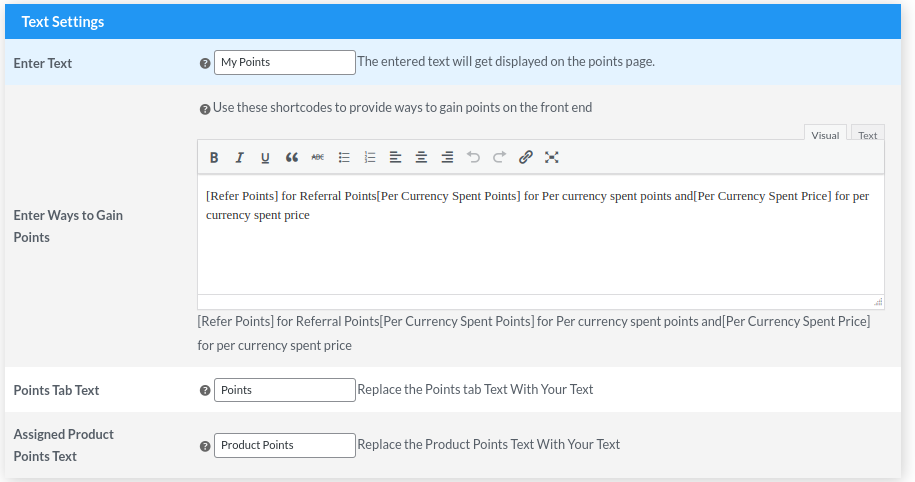
This setting allows the admin to update the text under the My Account > Points tab.
- Go to the admin panel click on the WooCommerce > Points and Rewards > General Setting.
- Go to Text Setting, here the admin can make the changes for the Points page.
- Enter Text: The admin will get a chance to modify the text that depicts the loyalty points and rewards for WooCommerce here. The default text is set to “My Points”.
- Enter Ways to Gain Points: The user can also use shortcodes like [Refer Points] for Referral Points[Per Currency Spent Points] for Per currency spent points and[Per Currency Spent Price] for per currency spent price
- Points Tab Text: This option gives the user a chance to replace the default “Points Tab” text with your text.
- Assigned Product Points Text: This option gives the user a chance to replace the default “Product Point” text with your text.
4.6.Redemption Settings
The admin can enable this setting if they want to allow their customers to redeem their earned points over the Cart page and Checkout page to get the discount.
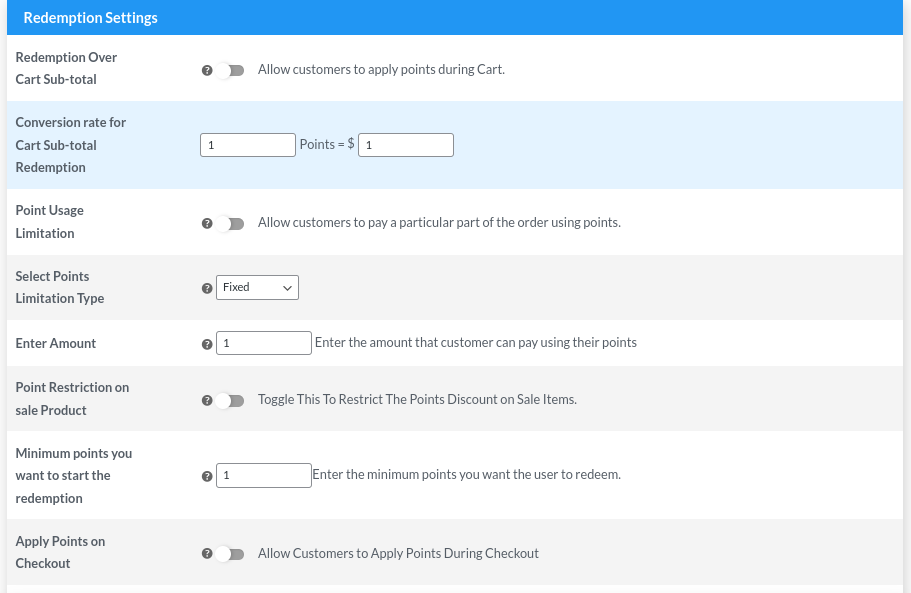
1. Redemption Over Cart Subtotal: Enable this setting if you want to allow your customers to redeem their earned points over the cart Subtotal.
2. Conversion Rate: The customer can redeem their points based on the conversion rate set by the admin. The admin can enter the conversion rate of points redemption. For example, the worth of 10 points is equal to $1.
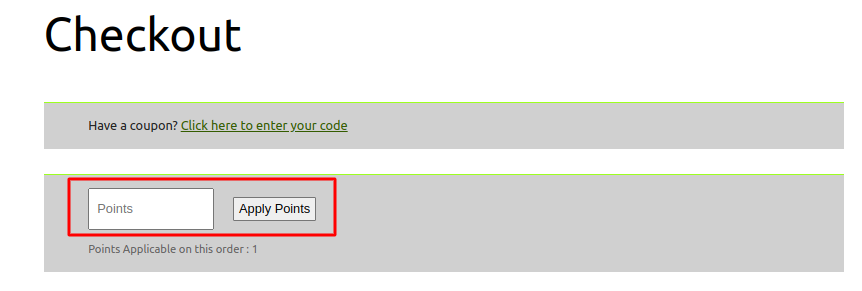
3. Enable “Apply Points” during Checkout: Enable this setting if you want to allow your customers to redeem their earned points over the Checkout page.
4. Enable Point Usage Limitation: This setting restricts the customer to redeem some pre-defined points on the order. Customers can pay a particular part of the order using points.
5. Select Points Limitation Type: Select the type which you want to provide your customer Fixed/Percentage.
6. Enter Amount: Enter the points value that the customer can apply while placing the order. Customers can’t apply more than points from this value.
7. Enable Point Restriction on Sale Product: The admin can enable this option if he wants to restrict the points on any sales products.
8. Enter the Minimum Points you Want to Start Redemption: Here you can the minimum point of redemption.
Note: This setting will work as in proportion with the above limitation type, if you have set it as fixed then please enter the amount (based on your conversion rate) which a user can pay with the help of their points (for example conversion rate: 1$=1P, you want a user can use max 50$, so 50$ will be equivalent to 50P, so the amount will be set as 50).
Note: If you will choose the “select points limitation type” as percentage. Then in the “Enter amount” you have to enter the percentage amount for which you want a customer can use their points.
For Example: if you have set the limitation type as percentage and in enter amount you have set it as 20, then if a user is purchasing a $100 product, he will be applicable to use the amount equivalent to the 20% amount of $100. (Means $20 a user can pay with the help of their points).
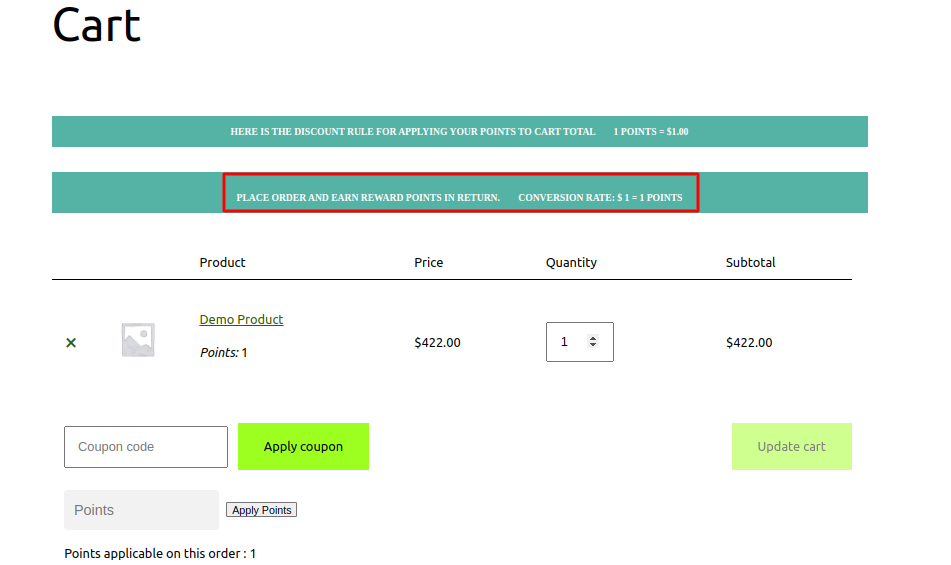
Customers can apply their points over the cart subtotal.

Customers can apply their points over the checkout page.
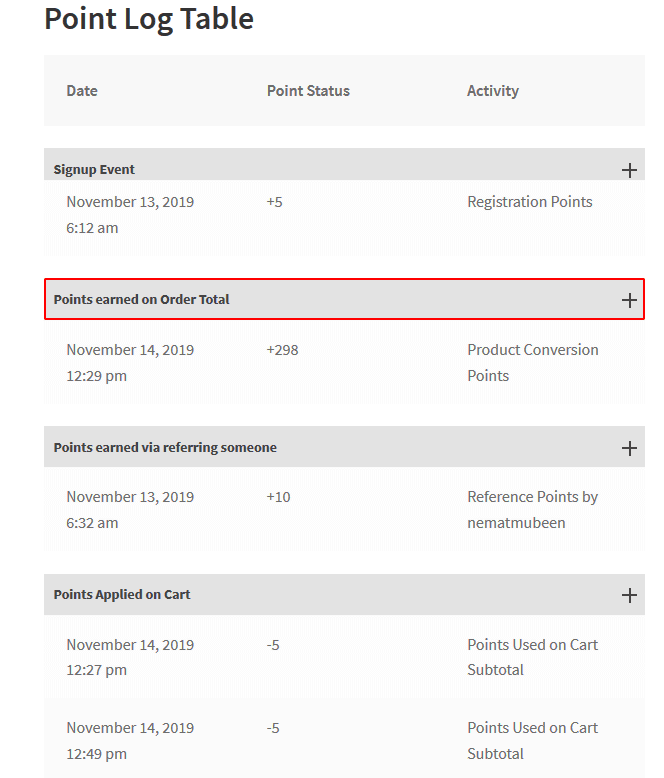
Your customers can see their total points on the “Points Log Table”.
4.7.Enable Customer Rank Setting
The admin can create customer rankings based on the rewards of every customer. Display this ranking on any page with the help of the shortcode provided. To use the customer ranking feature,
- Go to Dashboard > WooCommerce > Points and Rewards > General Settings
- Navigate to the Enable Customer Rank Setting section below the redemption settings.
- Tick the checkbox to enable loyalty point-based ranking on your WooCommerce store.
- Check the box to enable the option,
- Enter the number of customers you want to list as ranks according to their points. Use the shortcode [CUSTOMERRANK] to display this hierarchy on any page.
- Save Changes
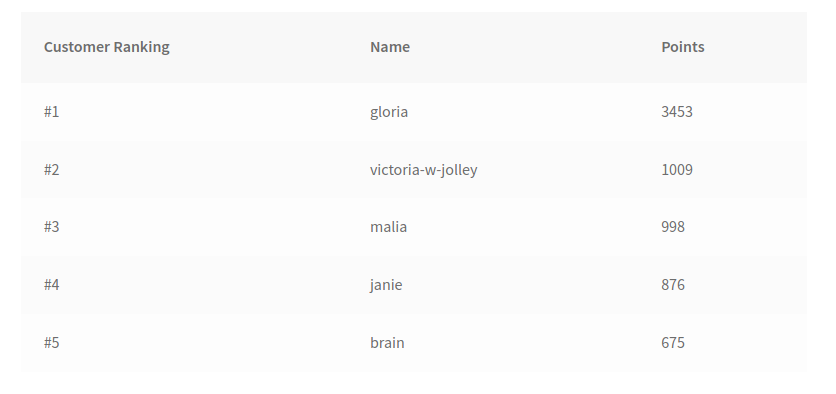
Frontend Customer Ranking Based on Points
The screenshot shows the top 5 customers ranked based on their total points.
4.8.Enable First Daily Login Points Settings
The daily login points feature allows the admin to reward points to customers for the first login of the day. This is done daily. Encourage customers to earn extra points for logging in daily to your WooCommerce store, whether they buy anything or not. To use this feature:
- Kindly, go to Dashboard > WooCommerce > Points and Rewards > General Settings
- Navigate to Enable Daily Login Points Settings under Customer Rank Settings

- Tick the checkbox to reward points on daily logins
- Enter the number of points you want to reward customers in the metabox provided in front of the option Enter First Daily login Points. For example, here 200.
- Save Changes. After enabling this setting the user will get 200 points on every first login of the day.
4.9. Enable First Order Points Settings

Enable first-order point setting for providing points on sign-up of a new user. These points can only be used once by the customer. For enabling the points on first order directly:
- Go to admin dashboard > WooCommerce > Points and Rewards > General Settings
- In the general settings section, navigate to the Enable first-order points settings
- In the ‘Enable first-order points settings,’ the admin can check the provided box to enable the function of offering points on first order.
- Subsequently, the admin can enter the amount he wants to reward the user in the ‘Enter First Order Purchase Points.’ These reward points can only be received once the first order has been placed. ‘Save Changes’ after modifications.
4.10.Order Reward Point Settings
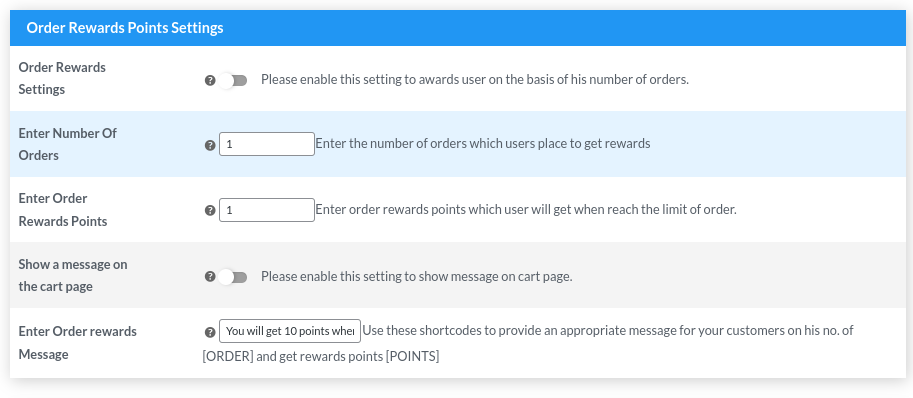
With the WooCommerce reward points system, the admin can select the maximum number of orders for the customers to earn a certain number of points.
For example, if the admin has set the maximum number of orders to 10 and the number of points to 5. Then, the customer will earn 5 points, after successfully ordering 10 times from the website.
- Enable Order Reward Settings: The admin can check this box if, he wants to enable the order reward points settings
- Enter Number of Orders: The admin can also set the maximum number of orders, that the customer would have to order to earn the reward points.
- Enter Order Reward Points: The admin can also set the number of rewards points, that he wants the customers to get after he successfully orders
- Enable to show reward message on the cart page: The admin can “enable” setting to show the rewards notification on the cart page.
- Enter Order Rewards Message: The admin can use this setting to set a message. Use these shortcodes for providing an appropriate message for your customers on his no. of [ORDER] and get rewards points [POINTS].
4.11.Subscription Point Settings
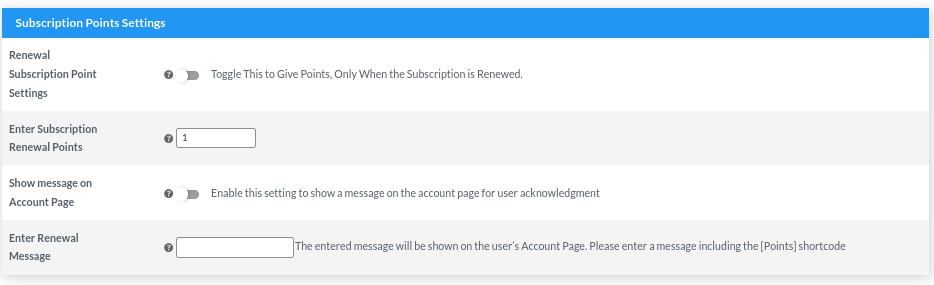
With this compatibility feature, the users get points on subscription products.
For example, if User A has bought a subscription product from your website for the first time, he/she will get points as per the reward system. But now with this compatibility, the user will also get points on renewal of the purchased product.
- Enable Renewal Subscription Point Settings: The admin can check this box if he wants to enable this setting to give reward points when a subscription is renewed.
- Enter Subscription Renewal Points: Here the admin can enter the number of points that he wants the user to be awarded on the renewal of the product.
- Enable to show messages on the Account Page: The user can enable this setting if he/she wants to show the customers a message stating the number of points they will earn.
- Enter Renewal Message: Now, enter the text message here. The entered message will be shown on the user Account Page. Please enter a message including [Points] in this shortcode.
4.12.Points Round Off

The Round off setting helps in rounding up or down the points earned in decimal by the customers. For round off settings:
- Go to admin dashboard > WooCommerce > Points and Rewards > General Settings
- In the general settings section, navigate to the Point Round Off
The admin can select from the Roundup or Round Down setting in the ‘Select Points Round Off‘ option. The roundup will round the points earned to the following higher number, whereas the round-down setting will round the point off to the lower number. ‘Save Changes’ for new settings.
4.13.Enable Birthday Points Settings
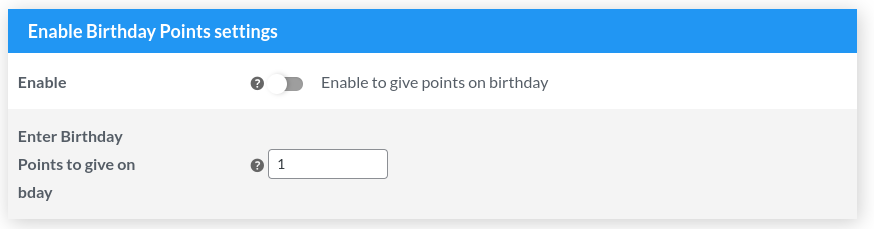
Providing extra reward points on special occasions like birthdays can induce customer loyalty perfectly. For enabling additional points on birthdays:
- Go to admin dashboard > WooCommerce > Points and Rewards > General Settings
- In the general settings section, navigate to the Enable Birthday Points Settings
- Firstly, the admin can tick the checkbox to enable giving points on birthdays.
- After this, the admin needs to set the rewards he wants to provide the users on their birthdays. Also, users are eligible for these birthday points only after their first purchase.
- Finally, press ‘save changes, and the changes will be applied.
Front-end setting:
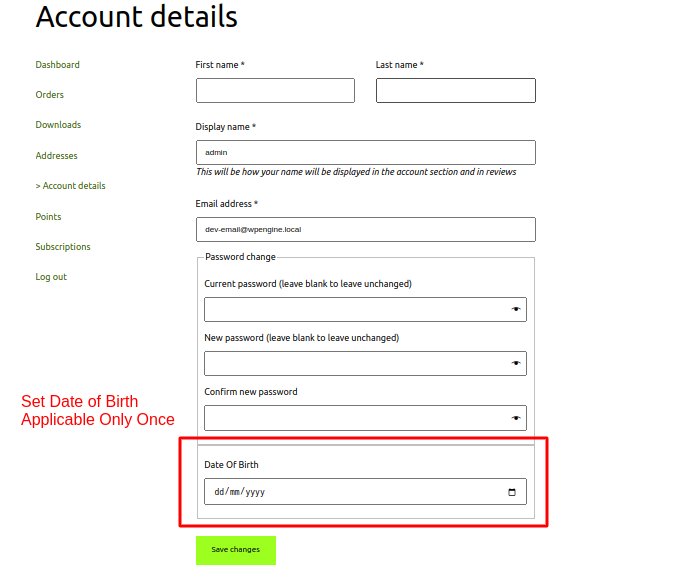
- The date of birth can be set only once.
4.14.Points for selected user role only
Using this feature of the plugin, the admin can assign roles for the users. Further, the admin can allow selected user’s roles to use the points and rewards features of the plugin.
- Allow User Roles: Here the admin can select from the available roles like Shop manager, Administrator, Customer, Editor, Author, Subscriber, and Contributor. The admin can choose a role that is feasible and makes sense for his eCommerce website.

5.Per Currency Points & Coupon Settings
Prevent users from earning extra reward points on a more significant order total and exclude the shipping fees from the points of cart capacity. For excluding points on tax:
- Go to admin dashboard > WooCommerce > Points and Rewards > Per Currency Points & Coupons Settings
- In the Per currency points & coupon settings section, navigate to the ‘Enable per currency points in subtotal.’
Admin can check the box if he wants to allow per currency points on subtotal. If not, the admin can leave it empty. This setting will exclude delivery fees from orders to stop a customer from earning points for delivery fees. Press ‘Save Changes’.
5.1.Earn Points Per Currency Points Settings
Through this setting, you can award points for every amount a user spent on your site, the customers will get the points based on the per currency points conversion whenever the customer spent some amount on the site then they will get some points as a reward.
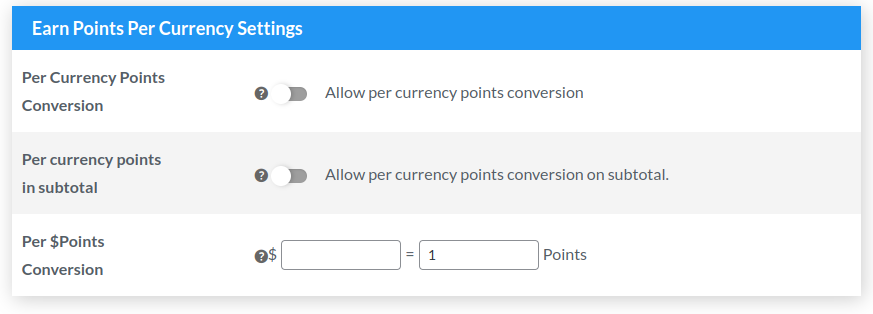
- Enable Per Currency Points Conversion: This setting allows your customers to earn points based on the per-currency points conversion. For example, the customer can earn points for the purchase based on the per-currency points conversion.
- Enable Per currency points in subtotal: The Admins can check the box if they want to allow per currency points on subtotal. If not, the admin can leave it empty. This setting will exclude delivery fees from orders to stop a customer from earning points for delivery fees.
- Per $ Points Conversion: The admin can enter the points for currency conversion. According to the conversion rate, whenever a customer spends a specified amount on the site then they will get some defined points as a reward.
For example: 1$ = 1P and so on…
Customers can see this notification on site.
Customers can see their points from the My Account > Points > Points Log Table page.
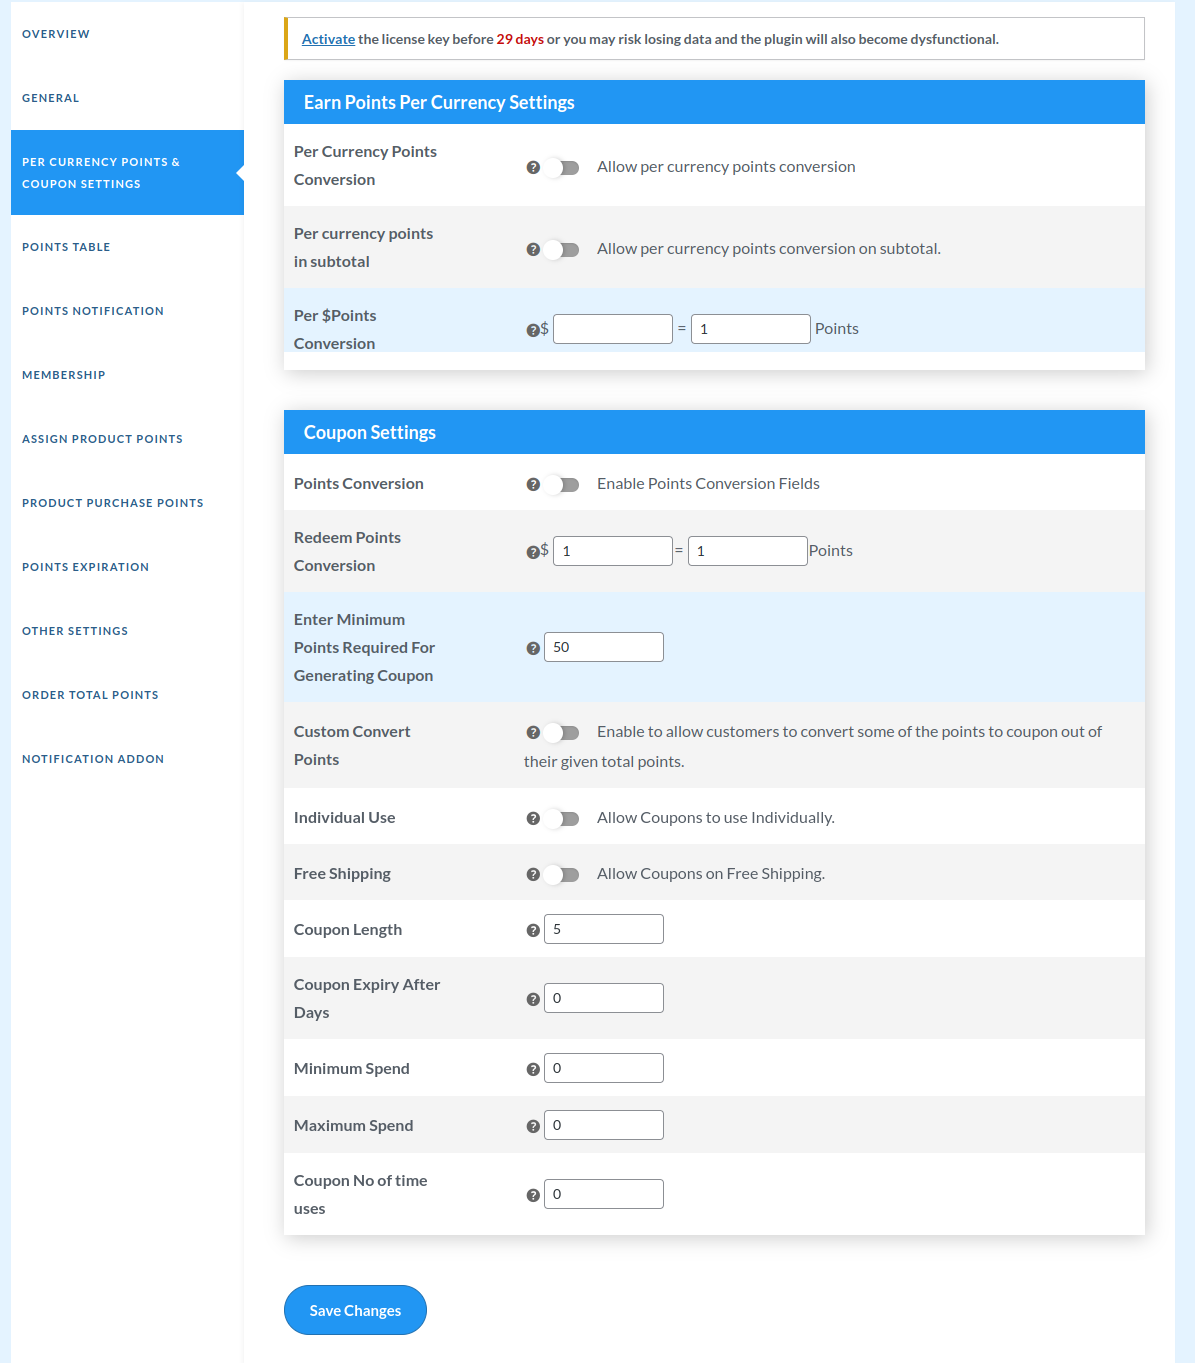
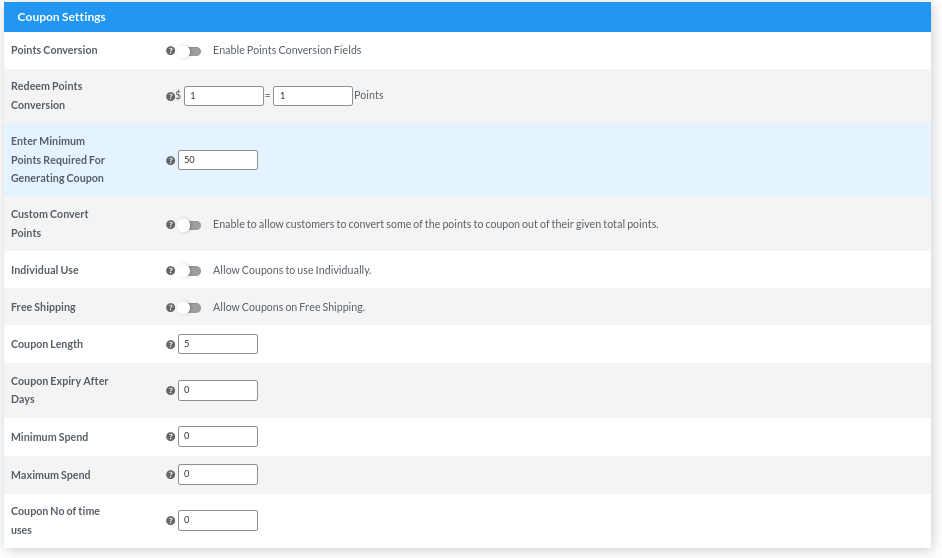
5.2.Coupon Settings
Coupon Settings
For Coupon Settings,
- Go to Dashboard > WooCommerce > Points and Rewards > Per Currency Points & Coupon Settings > Coupon Settings
Under the Coupon Settings, the admin can:
1. Enable Points Conversion
To enable coupon generation functionality for customers, the admin should tick the check box. For that:
- Go to Dashboard > WooCommerce > Points and Rewards > Per Currency Points & Coupon Settings > Coupon Settings > Enable Points Conversion Fields
- Kindly, tick the checkbox to enable points conversion.
- Save changes.
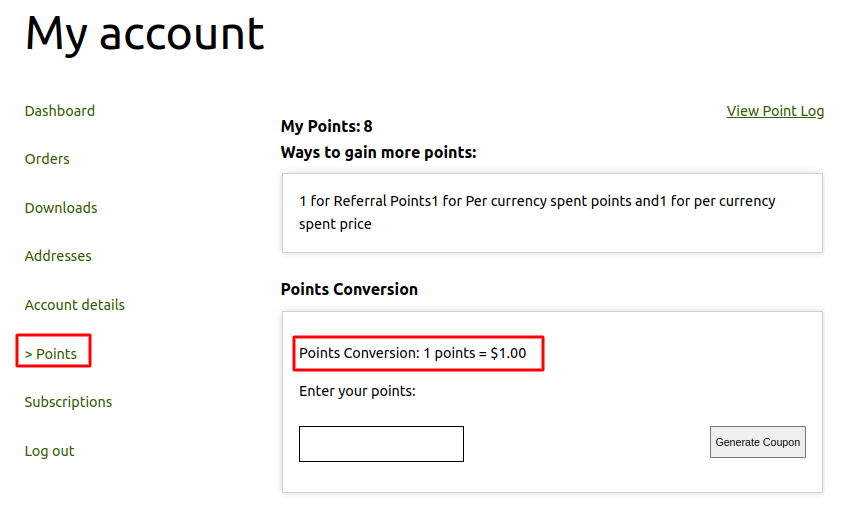
Generate Coupons On Front-end
To check this setting on the front end:
- Go to Dashboard > Pages >All Pages > My Account > Points
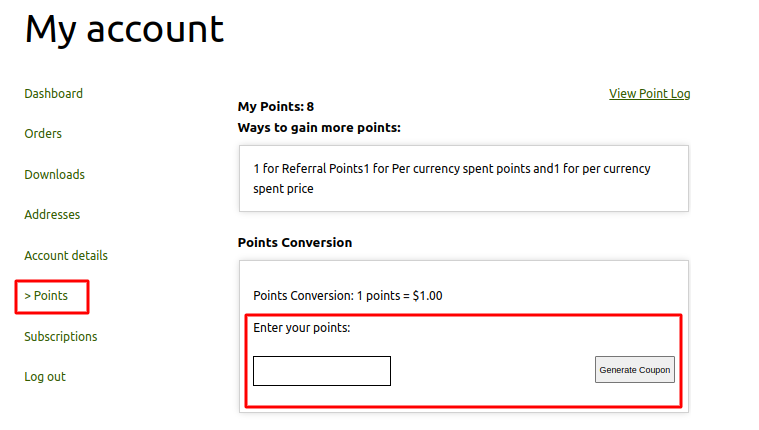
- Under Points Conversion, enter the number of points as per your requirements.
- Click Generate Coupon and the coupon will be generated for further use.
2. Redeem Points Conversion
The admin can enter the redeem points for coupons. For Example: how many points will be equal to what amount when the customer will redeem those points. Say,” 20 points will be equal to $1.”
For that:
- Go to Dashboard > WooCommerce > Points and Rewards > Per Currency Points & Coupon Settings > Coupon Settings > Enable Points Conversion
- Enter points for conversion and amount.
- Save changes.

3. Enter Minimum Points Required For Coupon Generation
In this particular setting, the admin can set the minimum number of points that a user has to earn in order to create a coupon. If a user will be having fewer points than the minimum required one, a user will not be able to redeem their points for coupon.
For that:
- Go to Dashboard > WooCommerce > Points and Rewards > Per Currency Points & Coupon Settings > Coupon Settings > Enter Minimum Points Required For Generating Coupon
- Enter the minimum points required for generating the coupons you want.
- Save changes.
4. Enable Custom Convert Point
If this setting is enabled, the customers will be able to convert some points from the total points they have into coupons. Hence converting custom points to coupons out of their total points.
For that:
- Go to Dashboard > WooCommerce > Points and Rewards > Per Currency Points & Coupon Settings > Coupon Settings
- Tick the checkbox for custom convert points.
- Save changes.
5. Individual Use
Admin can use this setting to allow coupons to be used individually. The customers will not be able to use the coupon in conjunction with any other coupon.
For that:
- Go to Dashboard > WooCommerce > Points and Rewards > Per Currency Points & Coupon Settings > Coupon Settings > Individual Use
- Tick the checkbox for individual use.
- Save changes.
6. Free Shipping
The admin can enable this setting if he wants the created coupon to grant free shipping. A free shipping method must be enabled in your shipping zone and be set to require “a valid free shipping coupon” (see the “Free Shipping Requires” setting).
For that:
- Go to Dashboard > WooCommerce > Points and Rewards > Per Currency Points & Coupon Settings > Coupon Settings > Free Shipping
- Tick the free shipping option.
- Save Changes.
7. Coupon Length
Admin can set coupon length excluding the prefix. The minimum length is set to 5.
- Go to Dashboard > WooCommerce > Points and Rewards > Per Currency Points & Coupon Settings > Coupon Settings > Coupon Length
- Enter a number for coupon length.
- Save changes.
8. Coupon Expiry After Days
The admins can also set the coupon validity period.
- Go to Dashboard > WooCommerce > Points and Rewards > Per Currency Points & Coupon Settings > Coupon Settings > Coupon Expiry After Days.
- Enter the number of days after which the Coupon will expire. Keep value “1” for one-day expiry when the order is completed. Keep value “0” for no expiry.
- Save Changes.
FrontEnd Coupon Expiry:
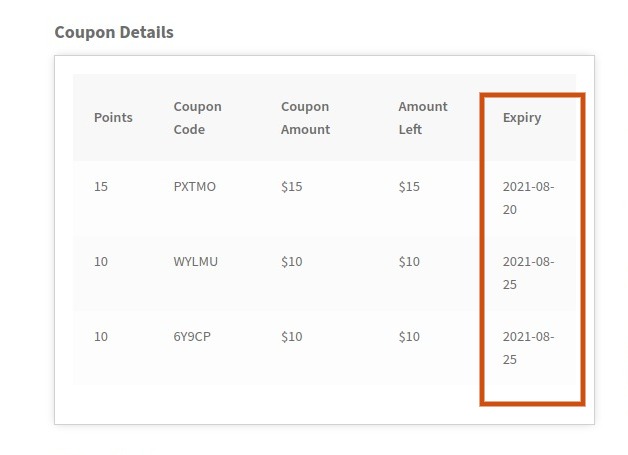
Under the Coupon details, expiry dates are mentioned that can be checked by the user.
9. Minimum Spend
This field allows you to set the minimum amount that the users can spend (subtotal, including taxes) allowed to use the coupon.
- Go to Dashboard > WooCommerce > Points and Rewards > Per Currency Points & Coupon Settings > Coupon Settings > Minimum Spend
- Enter the amount for the minimum spent. Keep value “0” for no limit.
- Save Changes.
10. Maximum Spend
This field allows you to set the maximum amount spent (subtotal, including taxes) allowed when using the Coupon. Keep value “0” for no limit.
- Go to Dashboard > WooCommerce >Points and Rewards > Per Currency Points & Coupon Settings > Coupon Settings > Maximum Spend
- Enter the amount for maximum spent.
- Save Changes.
11. Coupons Number Of Times Uses
Admin can set how many times the coupons can be used before they become void. Keep value “0” for no limit. For that:
- Go to Dashboard > WooCommerce > Points and Rewards > Per Currency Points & Coupon Settings > Coupon Settings > Coupon Number Of Times Uses.
- Enter a number (you want to allow customers to use coupons that many times)
- Save Changes
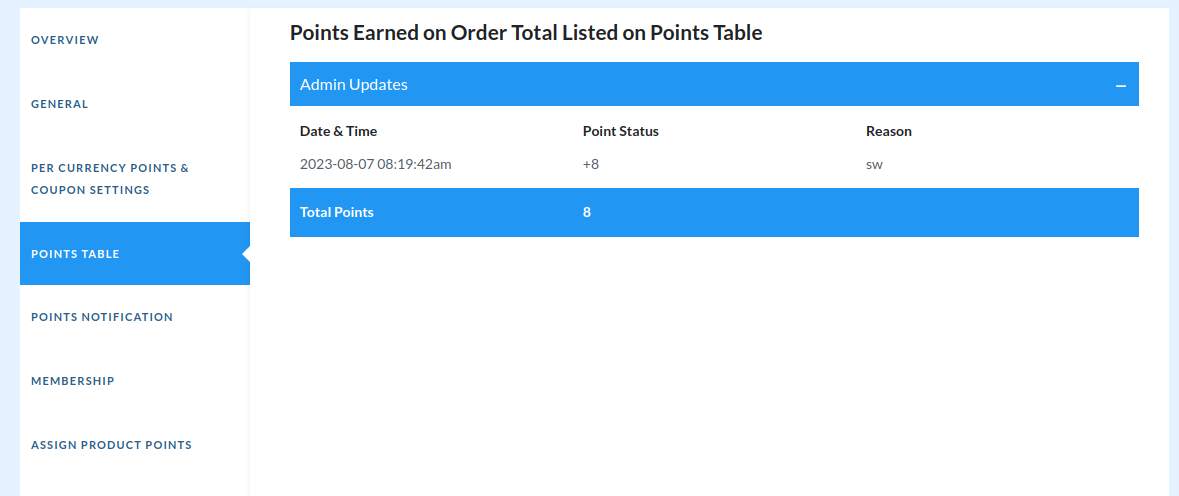
6.Points Table
This setting allows the admin to view the points log of any user and apply the action to add/deduct the points with the specific remark.
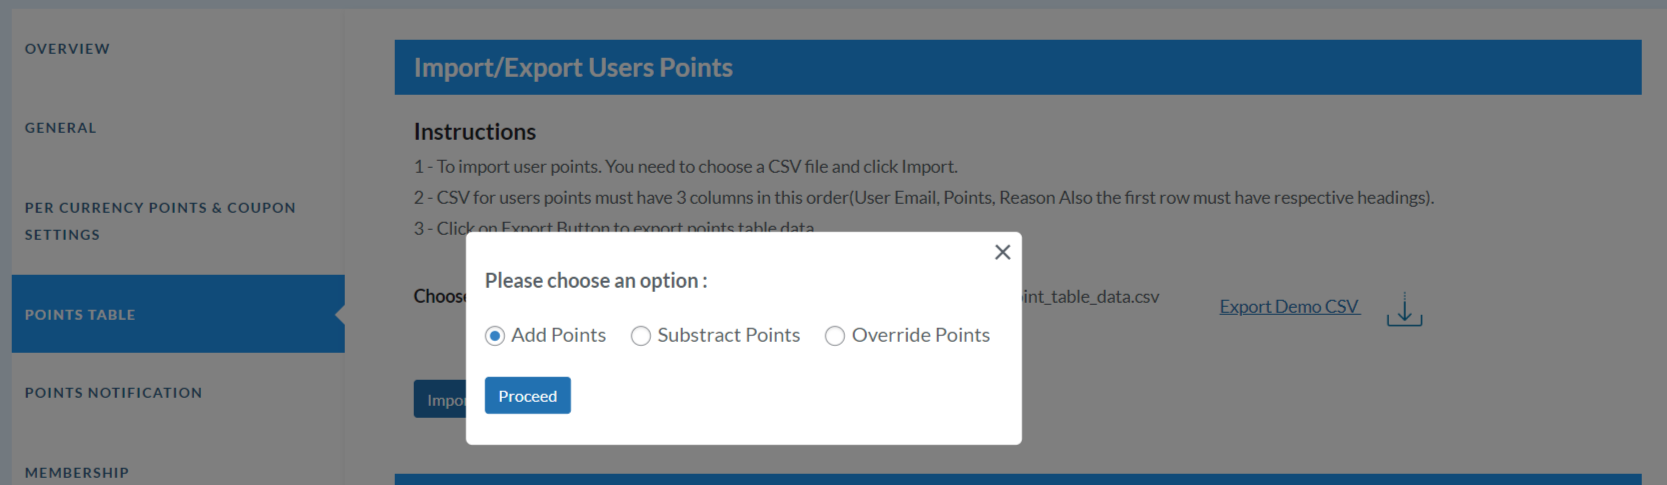
Import User Points: You can also update user points using CSV. You have to enter User Emails, Points, Reason in a specific format in the CSV and then you can import. Now Customer previous points are get replaced with the new points.
Export Points Table: This feature gives the admin the chance to export the points table by simply clicking on the export. After clicking on the button. You’ll see that the CSV file is automatically downloaded to your system.

Click on the “View Points Log”, admin can easily view the full report of the points log.
6.1.Reset customer points log
The plugin smartly prepares a detailed log for the admin to view the points earned by the customers. After redeeming the points, the log detail becomes meaningless which the admin requires to delete.
This feature adds a reset button for the admin to reset the customer points log detail, saving a lot of time and effort.
6.2.Assign Points on Previous Orders
With the WooCommerce Rewards points plugin, the merchants get a chance to assign points on previous orders. For example, before installing the points and rewards plugin, there might be a lot of orders that customers might be involved with. This setting enables the merchants to assign points to those orders.
Just enter the number of points that you want assign on the previous orders, and click on the “Assign Points” button
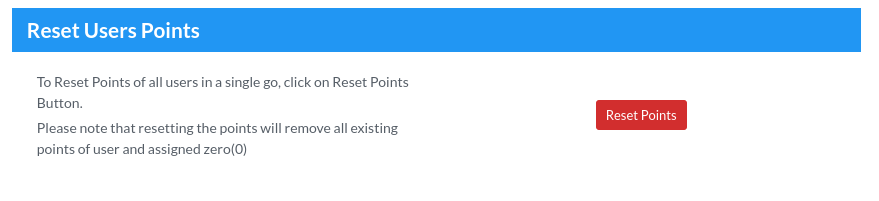
6.3.Reset User Points
The users can consider this With the WooCommerce Rewards and Points, the admins can now very conveniently “reset the user points” with just a single click.

6.4.Option to Restict Users On Bulk
The admin can utilise this setting to restrict the users from getting the benefits of any features that might enable them to earn and further redeem the earned points and rewards. The catch here is that the admin can restrict users in bulk, and restrict them in one go. By applying “bulk actions”.
6.5.Option To Adjust Points
7.Points Notification Settings
Through this setting, you can notify your users about their points through email. You can easily customize that subject and description of the email according to necessity.
You can notify your users through the notifications like Custom Point Notification, Signup Points Notification, Product Purchase Points Notification, Order Amount Points Notification, Referral Points Notification, Upgrade Membership Level Notification, Product Purchase Points Notification, Deduct Assigned Points Notification, Points On Cart Subtotal, Points On Order Total Range.

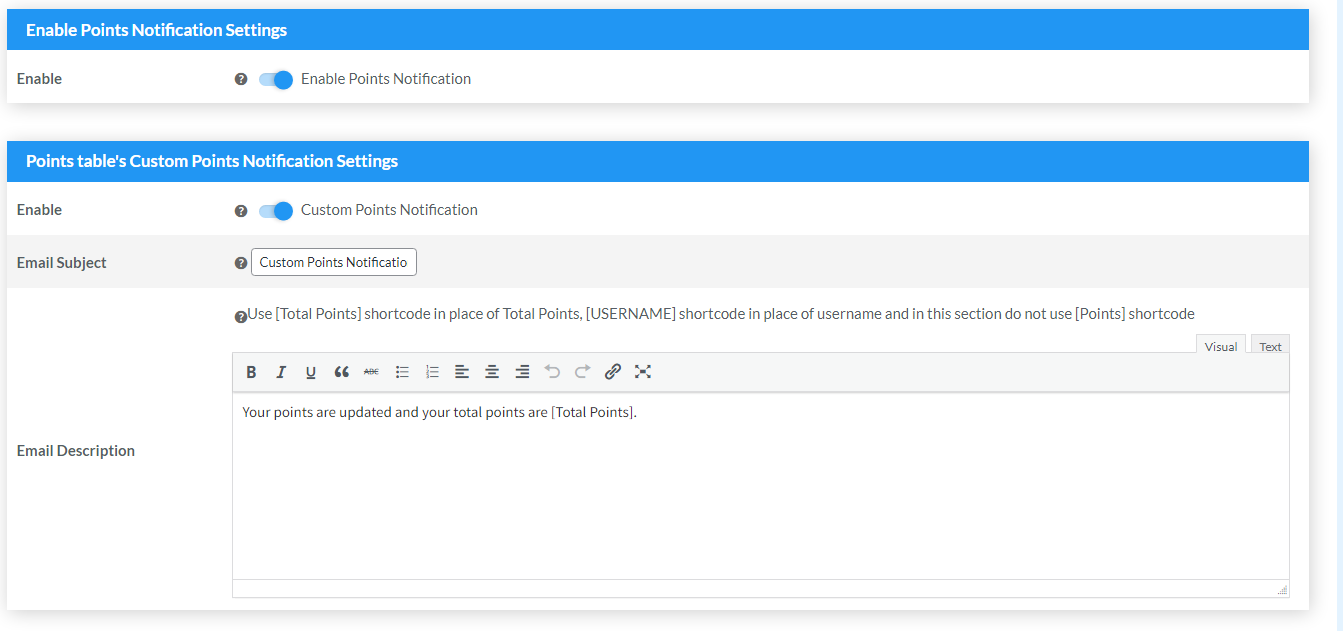
7.1.Points table's Custom Points Notification Settings
Sending emails to notify customers about their points has turned more advanced. Now, the plugin settings let the admin send well-curated emails rather than simple text emails.
Admin can set header and footer, and even design the body of the email emphasizing the purpose better.
To enable this feature the admin can, tick mark the enable option.
7.2.Notifications Settings
Under the Points Notification settings, a list of email settings for the admin allows him to enable or disable email notifications for several activities. The steps are as follows:
- Go to admin dashboard > WooCommerce > Points and Rewards > Points Notifications
- In the ‘Points Notification’ section, navigate to the notification section admin wants to alter
The following notification modification options are available:
1. Signup Points Notification Settings
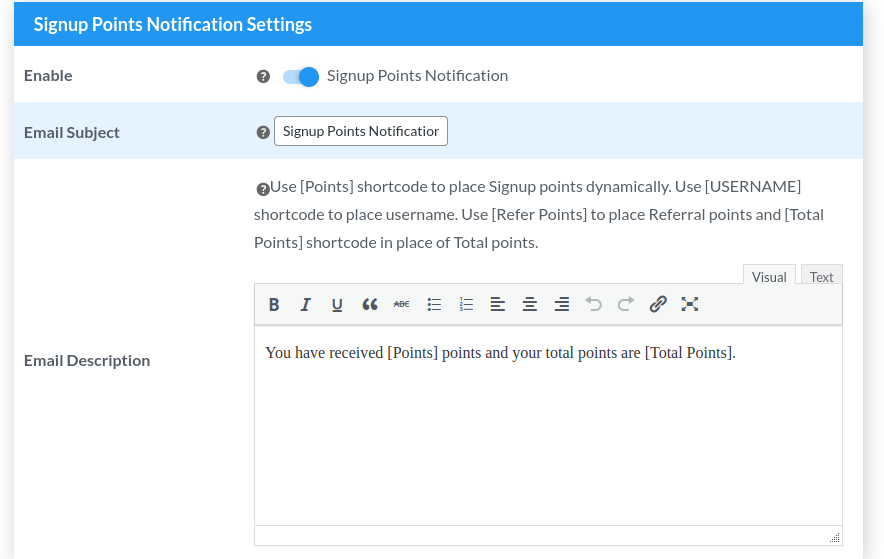
- Enable: The user can enable this setting to proceed.
- Email Subject: You can use this section to customize the subject of your mail. The default text of “Sign Up Point Notification “is already mentioned in the text box.
- Email Description: The user can utilize this setting to customize the text of the email description. They can also use shortcodes like [Points] shortcode in place of Product Purchase Points [USERNAME] shortcode in place of username [Refer Points] in place of Referral points [Per Currency Spent Points] in place of Per Currency spent points and [Total Points] shortcode in place of Total Points.
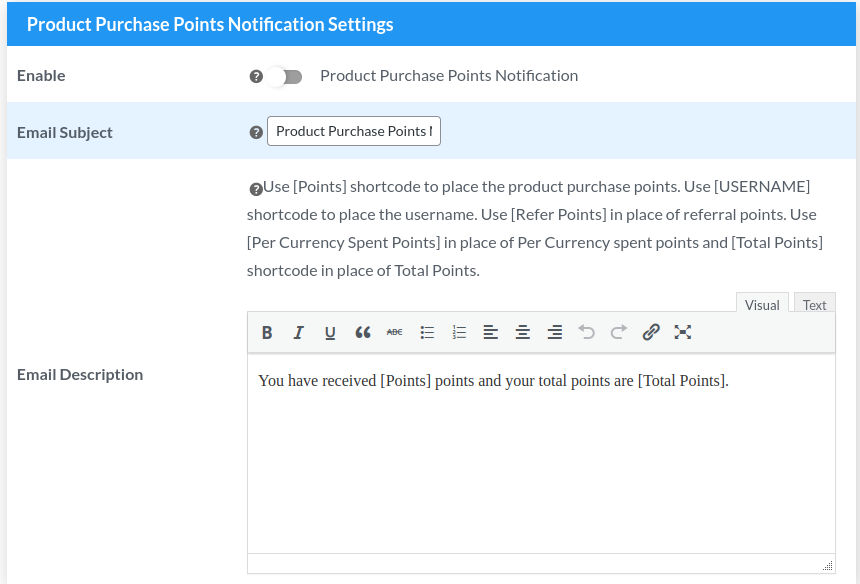
2. Product Purchase Points Notification Settings
-
- Enable: The user can enable this setting to proceed.
- Email Subject: You can use this section to customize the subject of your mail. The default text of “Product Purchase Point“is already mentioned in the text box.
- Email Description: The user can utilize this setting to customize the text of the email description. They can also use shortcodes like [Points] shortcode in place of Product Purchase Points [USERNAME] shortcode in place of username [Refer Points] in place of Referral points [Per Currency Spent Points] in place of Per Currency spent points and [Total Points] shortcode in place of Total Points.
3. Order Amount Points Notification Settings(Per ₹ Spent Points)
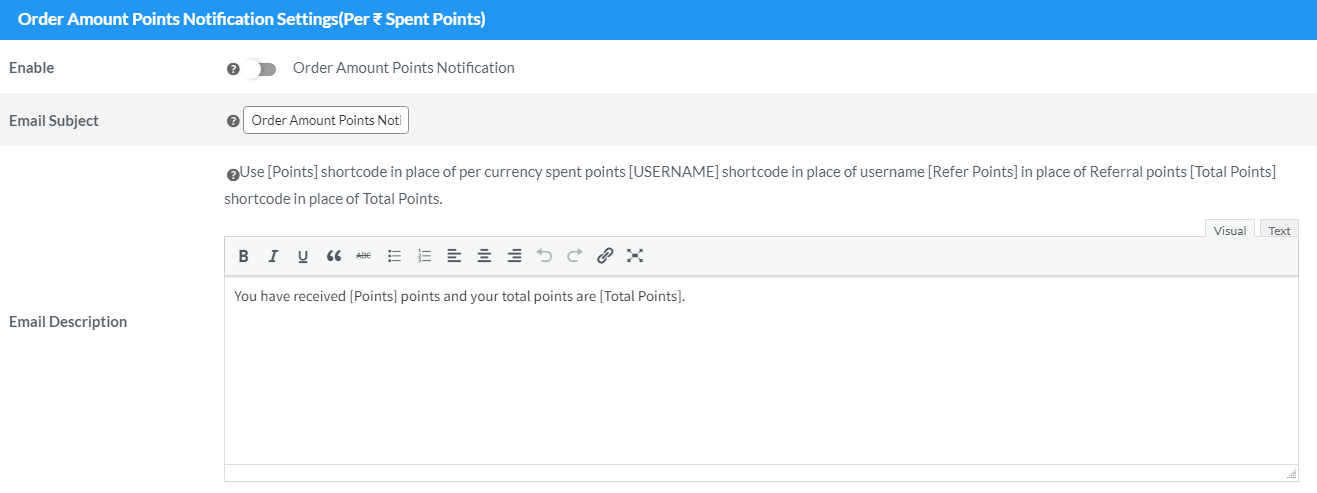
- Enable: The user can enable this setting to proceed.
- Email Subject: You can use this section to customize the subject of your mail. The default text of “Order Amount Point Notification“is already mentioned in the text box.
- Email Description: The user can utilize this setting to customize the text of the email description. They can also use shortcodes like [Points] shortcode in place of per currency spent points [USERNAME] shortcode in place of username [Refer Points] in place of Referral points [Total Points] shortcode in place of Total Points. .
4. Comment Points Notification Settings
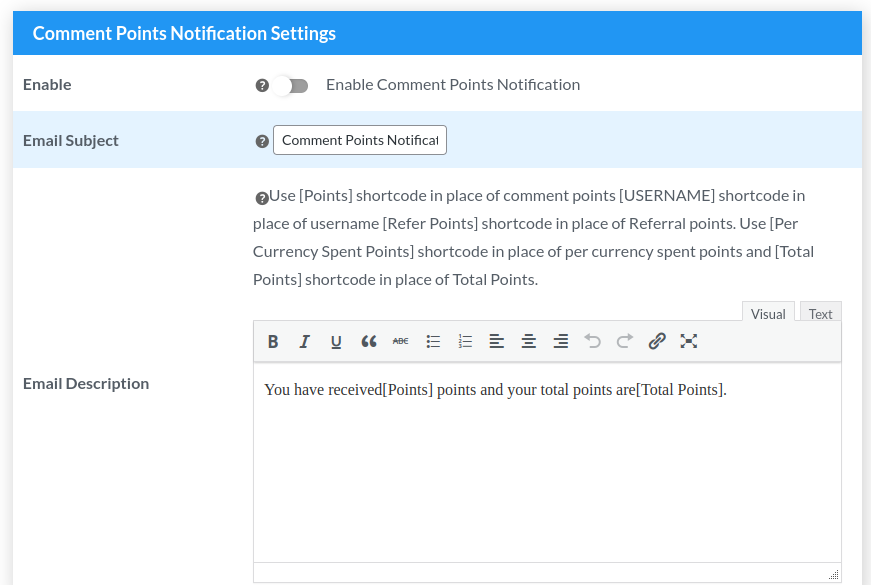
- Enable: The user can enable this setting to proceed.
- Email Subject: You can use this section to customize the subject of your mail. The default text of “Comment Point Notification“is already mentioned in the text box.
- Email Description: The user can utilize this setting to customize the text of the email description. They can also use shortcodes like [Points] shortcode in place of Referral Purchase Points [Refer Points] in place of Referral points [Per Currency Spent Points] in place of Per Currency spent points and [Total Points] shortcode in place of Total Points.
5. Referral Purchase Points Notification Settings
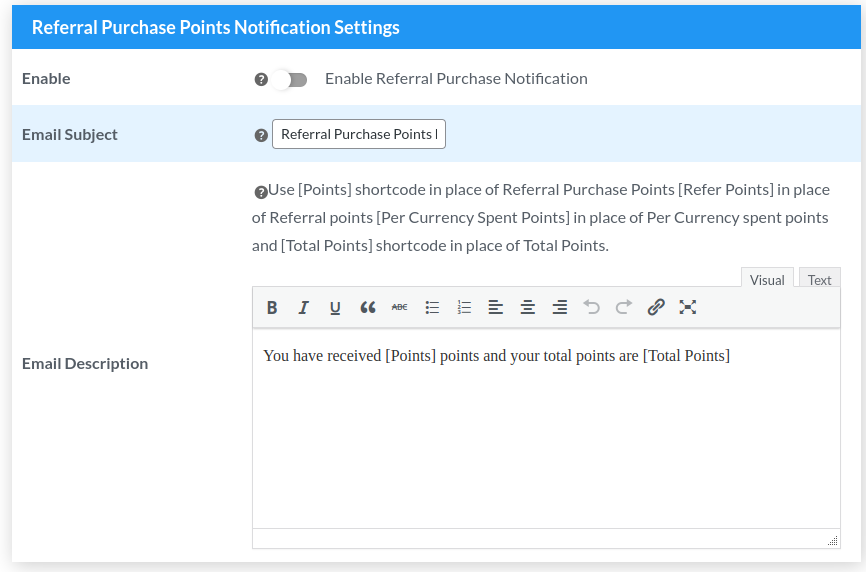
- Enable: The user can enable this setting to proceed.
- Email Subject: You can use this section to customize the subject of your mail. The default text of “Referral Purchase Point Notification“is already mentioned in the text box.
- Email Description: The user can utilize this setting to customize the text of the email description. They can also use shortcodes like [Points] shortcode in place of Referral Purchase Points [Refer Points] in place of Referral points [Per Currency Spent Points] in place of Per Currency spent points and [Total Points] shortcode in place of Total Points.
6. Deduct ‘Per Currency Spent’ Point Notification
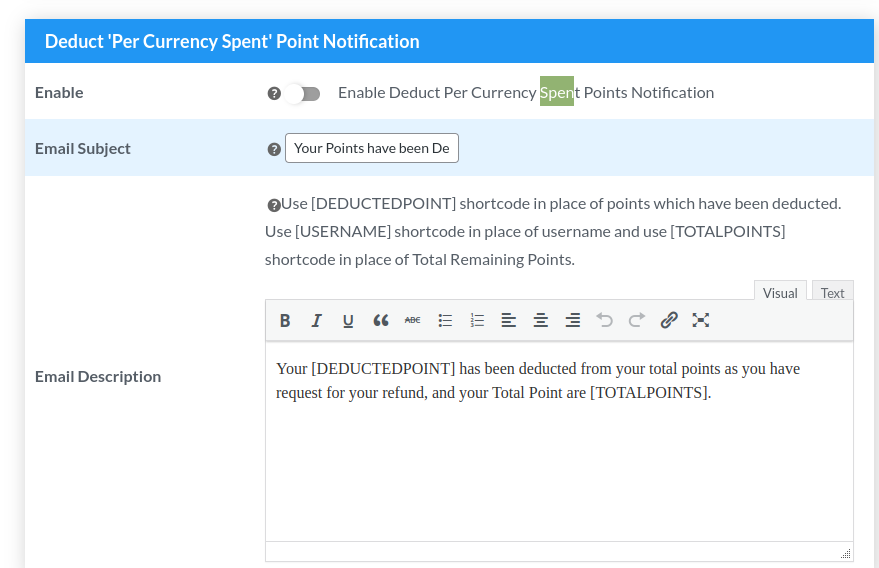
- Enable: The user can enable this setting to proceed.
- Email Subject: You can use this section to customize the subject of your mail. The default text of “Your Points have been deducted“is already mentioned in the text box.
- Email Description: The user can utilize this setting to customize the text of the email description. They can also use shortcodes like [DEDUCTEDPOINT] shortcode in place of points which has been deducted [USERNAME] shortcode in place of username [TOTALPOINTS] shortcode in place of Total Remaining Points.
7. Point Sharing Notification
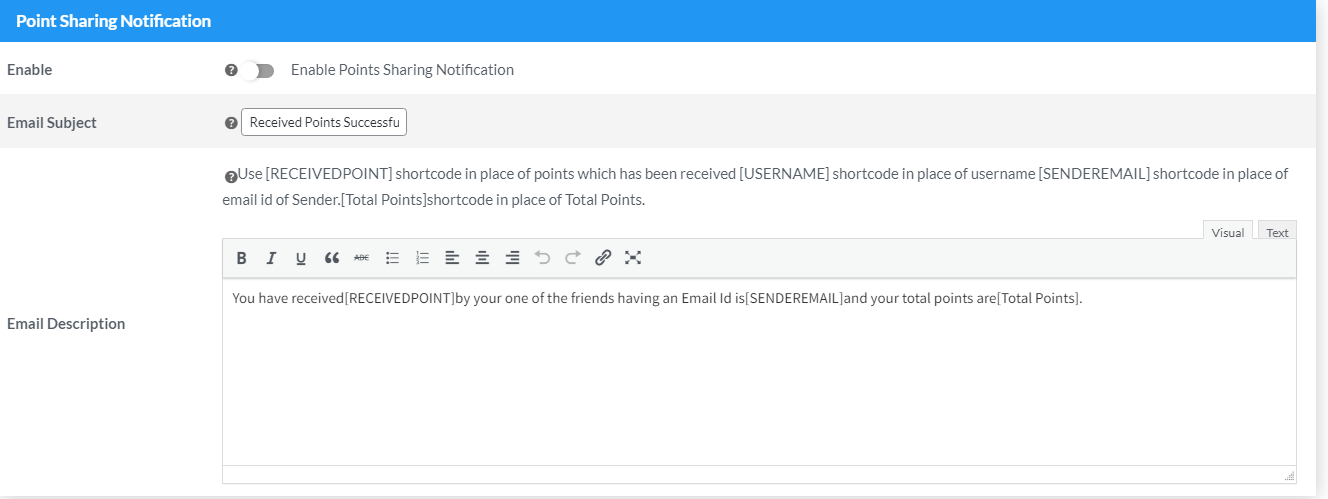
- Enable: The user can enable this setting to proceed.
- Email Subject: You can use this section to customize the subject of your mail. The default text of “Received Points Successfully!!“is already mentioned in the text box.
- Email Description: The user can utilize this setting to customize the text of the email description. They can also use shortcodes like [Total Points] shortcode in place of Total Points, [USERNAME] shortcode in place of a username, and in this section do not use [Points] shortcode.
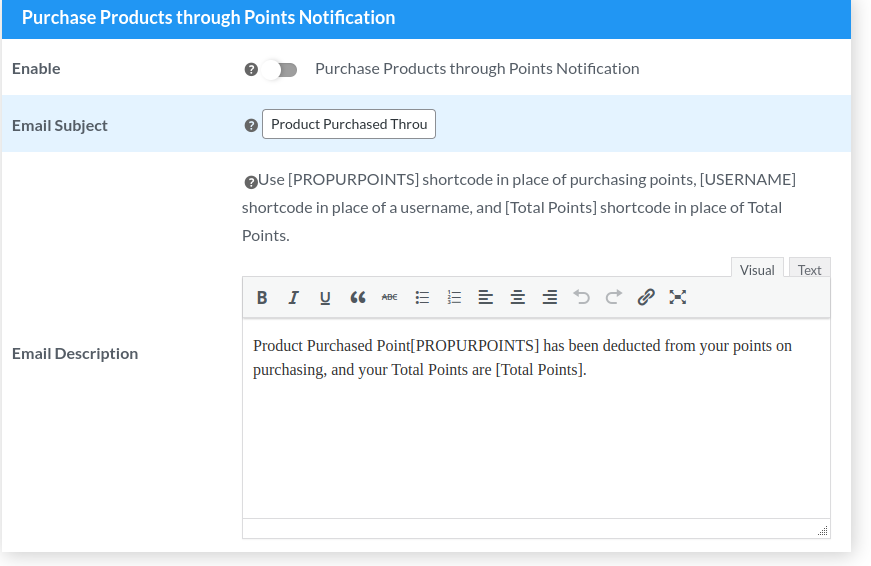
8. Purchase Products through Points Notification
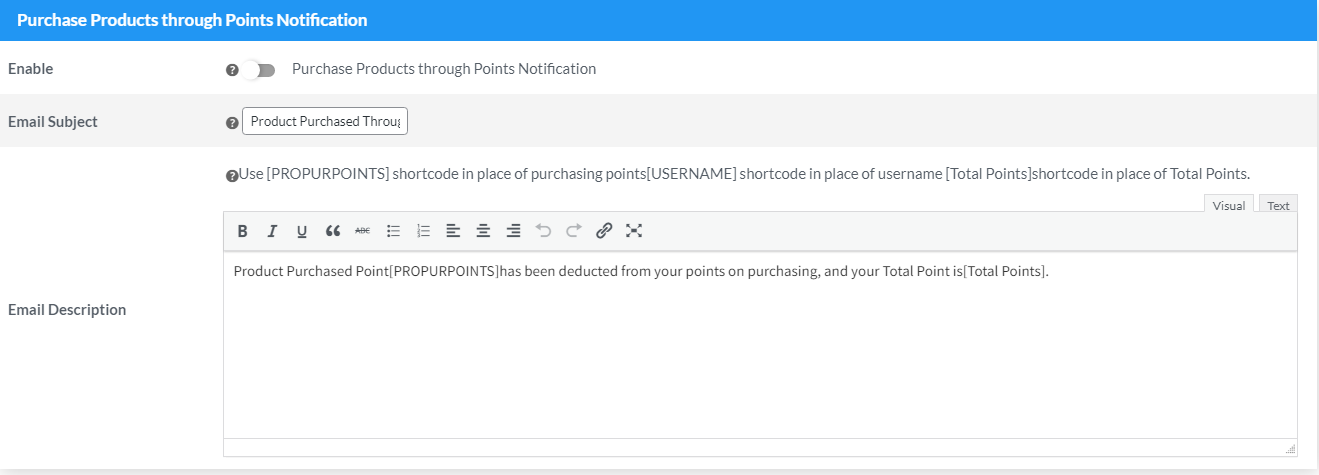
- Enable: The user can enable this setting to proceed.
- Email Subject: You can use this section to customize the subject of your mail. The default text of “Product Purchase Through Point Notification“ is already mentioned in the text box.
- Email Description: The user can utilize this setting to customize the text of the email description. They can also use shortcodes like [PROPURPOINTS] shortcode in place of purchasing points[USERNAME] shortcode in place of username [Total Points]shortcode in place of Total Points.
9. Return ‘Product Purchase through Point’ Notification
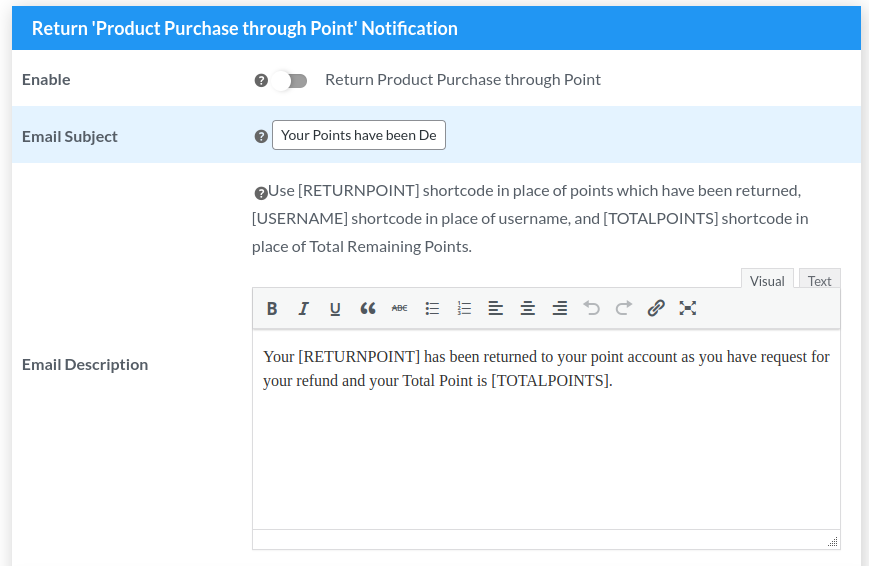
- Enable: The user can enable this setting to proceed.
- Email Subject: You can use this section to customize the subject of your mail. The default “Order Amount Point Notification“text is already mentioned in the text box.
- Email Description: The user can utilize this setting to customize the text of the email description. They can also use shortcodes like [RETURNPOINT] shortcode in place of points which has been returned [USERNAME] shortcode in place of username [TOTALPOINTS] shortcode in place of Total Remaining Points.
10. Referral Points Notification Settings
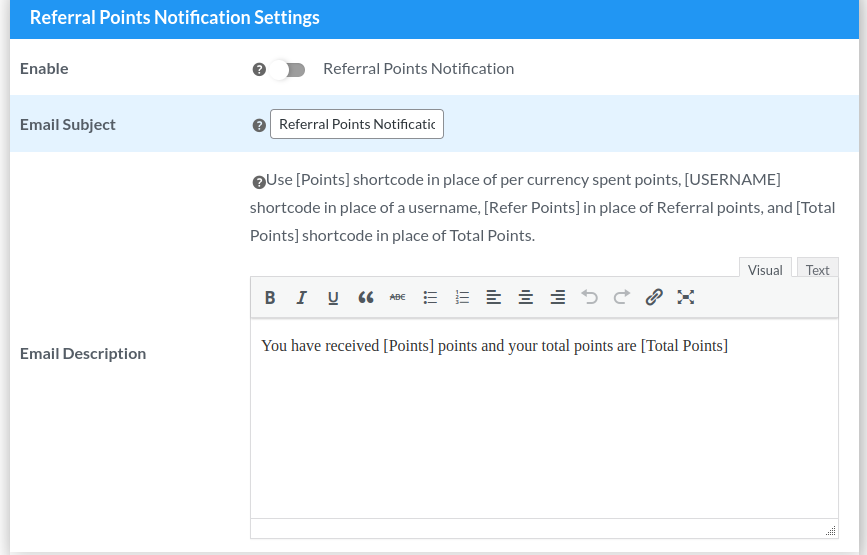
- Enable: The user can enable this setting to proceed.
- Email Subject: You can use this section to customize the subject of your mail. The default text of “Referral Point Notification“is already mentioned in the text box.
- Email Description: The user can utilize this setting to customize the text of the email description. They can also use shortcodes like [Points] shortcode in place of per currency spent points [USERNAME] shortcode in place of username [Refer Points] in place of Referral points [Total Points] shortcode in place of Total Points.
11. Upgrade Membership Level Notification
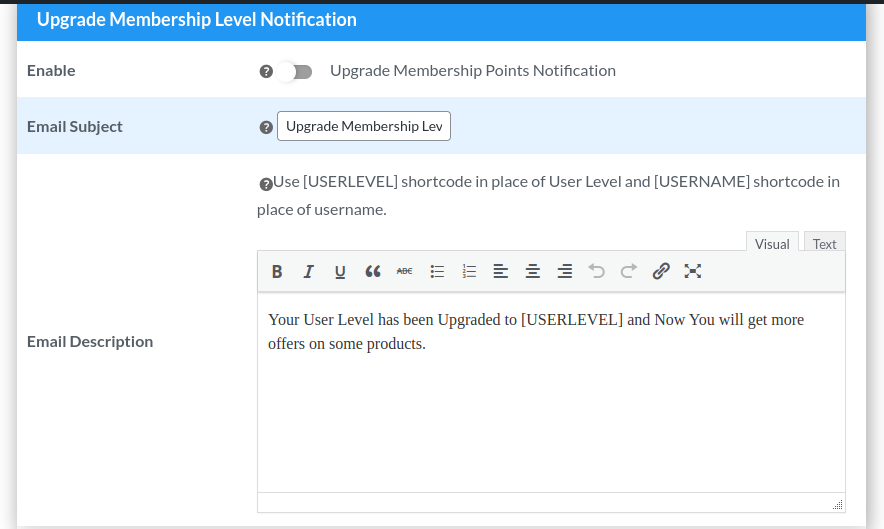
- Enable: The user can enable this setting to proceed.
- Email Subject: You can use this section to customize the subject of your mail. The default text of “Upgrade Membership Notification“is already mentioned in the text box.
- Email Description: The user can utilize this setting to customize the text of the email description. They can also use shortcodes like [Total Points] shortcode in place of Total Points, [USERNAME] shortcode in place of a username, and in this section do not use [Points] shortcode.
12. Deduct Assigned Point Notification
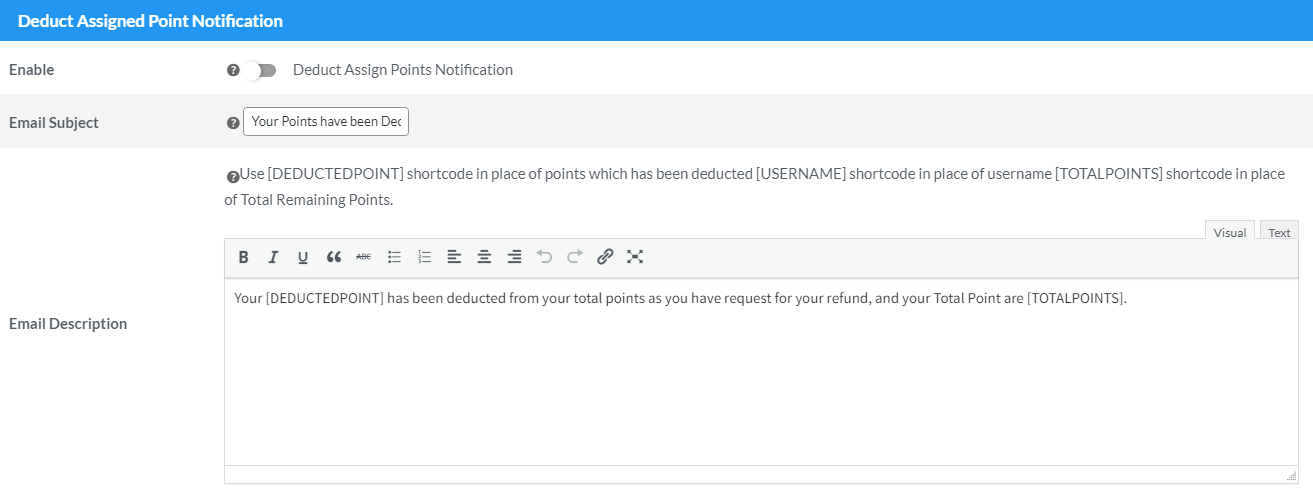
- Enable: The user can enable this setting to proceed.
- Email Subject: You can use this section to customize the subject of your mail. The default text of “Your points have been deducted“ is already mentioned in the text box.
- Email Description: The user can utilize this setting to customize the text of the email description. They can also use shortcodes like [DEDUCTEDPOINT] shortcode in place of points which has been deducted [USERNAME] shortcode in place of username [TOTALPOINTS] shortcode in place of Total Remaining Points.
13. Points On Cart Sub-Total
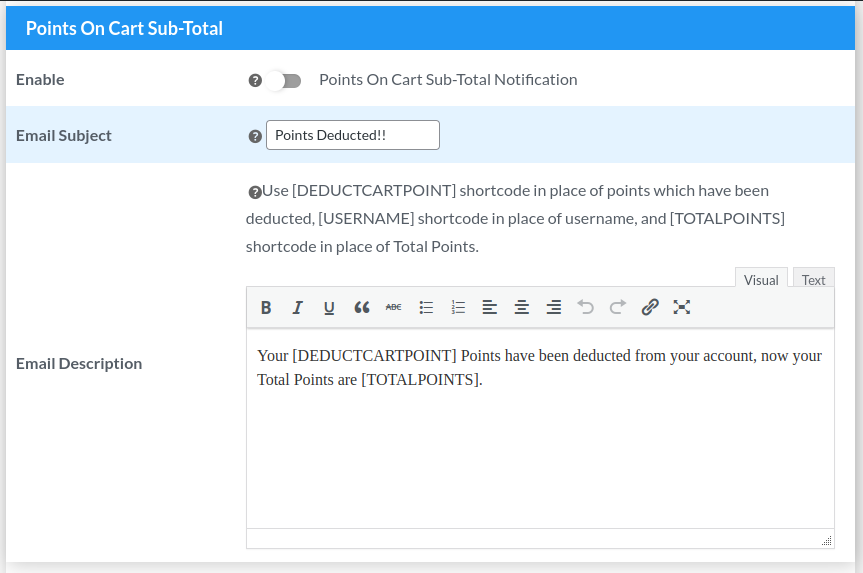
- Enable: The user can enable this setting to proceed.
- Email Subject: You can use this section to customize the subject of your mail. The default text of “Points Deducted !!!“ is already mentioned in the text box.
- Email Description: The user can utilize this setting to customize the text of the email description. They can also use shortcodes like [DEDUCTCARTPOINT] shortcode in place of points which has been deducted [USERNAME] shortcode in place of username [TOTALPOINTS] shortcode in place of Total Points.
14. Points On Order Total Range
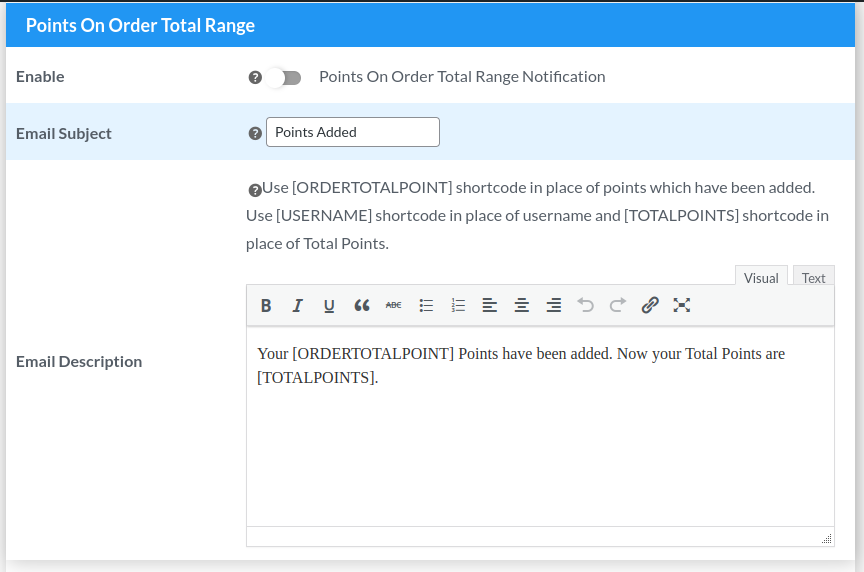
- Enable: The user can enable this setting to proceed.
- Email Subject: You can use this section to customize the subject of your mail. The default text of “Points Added“ is already mentioned in the text box.
- Email Description: The user can utilize this setting to customize the text of the email description. They can also use shortcodes like [ORDERTOTALPOINTS] shortcode in place of Total Points, [USERNAME] shortcode in place of a username, and [TOTAL POINT] shortcode in place of Total Point.
15. Points Only on First Order Notification Settings
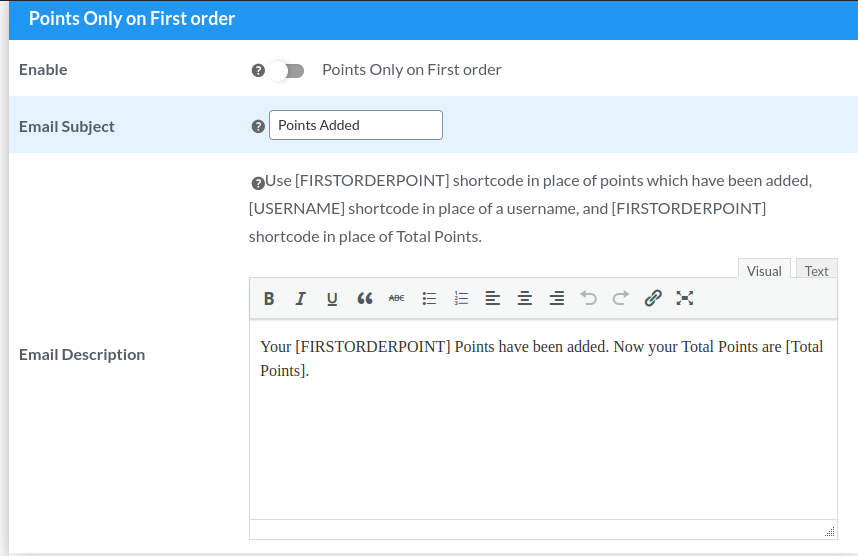
*Please Note: The point on the first order will be awarded when the order status has been completed*
- Enable: The user can enable this setting to proceed.
- Email Subject: You can use this section to customize the subject of your mail. The default text of “Points Added“ is already mentioned in the text box.
- Email Description: The user can utilize this setting to customize the text of the email description. They can also use shortcodes like [FIRSTORDERPOINT] shortcode in place of points which has been added, [USERNAME] shortcode in place of a username, [FIRSTORDERPOINT] shortcode in the place of Total Point.
Do not forget to click ‘Save Changes.’
16. Points Only on Bday Notification
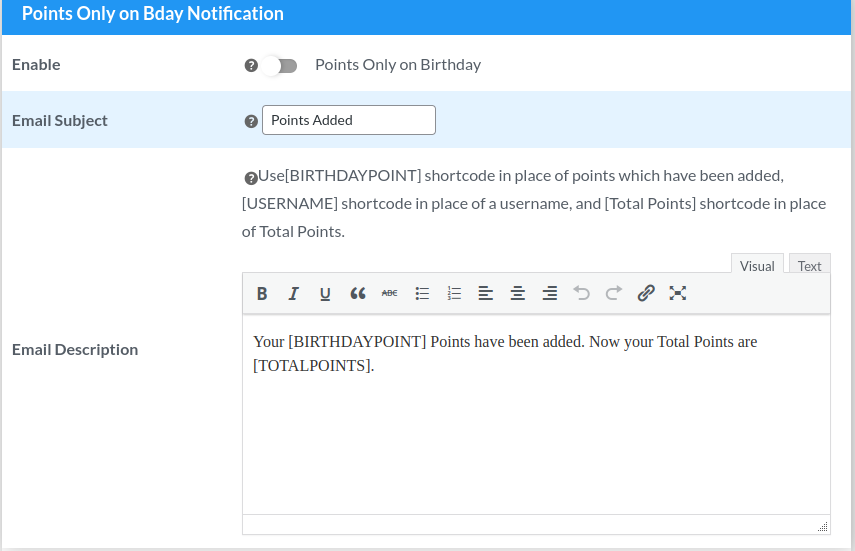
- Enable: The user can enable this setting to proceed.
- Email Subject: You can use this section to customize the subject of your mail. The default text of “Your points have been deducted“ is already mentioned in the text box.
- Email Description: The user can utilize this setting to customize the text of the email description. They can also use shortcodes like [BIRTHDAY POINT] shortcode in place which has been added, [USERNAME] shortcode in place of a username, and [TOTAL POINTS] shortcode in place of Total Points.
17. Points Only on First Daily Login
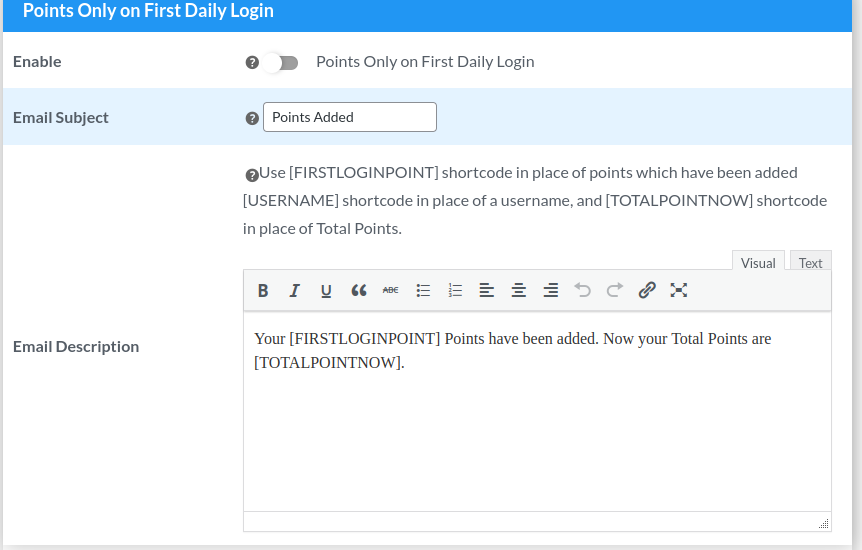
- Enable: The user can enable this setting to proceed.
- Email Subject: You can use this section to customize the subject of your mail. The default text of “Your points have been deducted“ is already mentioned in the text box.
- Email Description: The user can utilize this setting to customize the text of the email description. They can also use shortcodes like [BIRTHDAY POINT] shortcode in place which has been added, [USERNAME] shortcode in place of a username, and [TOTAL POINTS] shortcode in place of Total Points.
7.3.Mail Template for Email Referral
For allowing users to modify email of referral coupon code template steps are as follows:
- Go to admin dashboard > WooCommerce > Points and Rewards > Points Notifications
- In the ‘Points Notification’ section, navigate to the ‘Mail template for Email referral section’
- Admin can modify the email template accordingly.
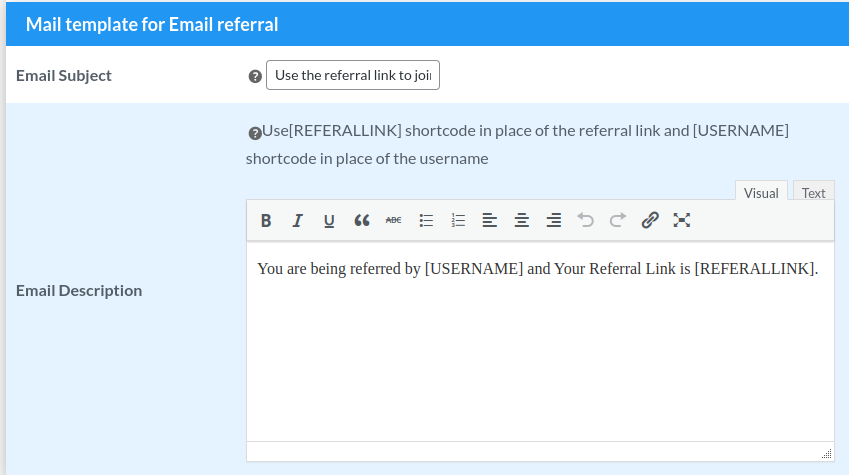
Press ‘Save Changes’ and the changes will be updated.
Front-end screenshot of the email input box:
2.Mail Notification for Coupon Referral
- Enable: The user can enable this setting to proceed.
- Email Subject: You can use this section to customize the subject of your mail. The default text of “Your points have been deducted“ is already mentioned in the text box.
- Email Description: The user can utilize this setting to customize the text of the email description. They can also use shortcodes like [COUPONCODE] shortcode in place of coupon code[POINTS] shortcode in place of points.
8.Enable Membership
This feature allows your customers to get the membership level by the required points and keep the benefits on the selected categories or products fulfilled by that level.

You can create the level for the membership by the following steps:
- Kindly, enable Membership: Enable Membership setting.
- Exclude Sales Products: Exclude sale products from the membership benefits.
- Create Membership
- Enter Level: Enter the name of the membership.
- Enter Points: Enter the number of points to get the membership.
- Expiration Period: Enter the expiration period of the membership.
- Select Product Category: Select product categories on which membership discount will be applied.
- Select Product: Select the products from the categories on which the membership discount will be applied.
- Enter Discount: Set the value that will be applied as the percentage discount amount on the memberships’ products and categories.
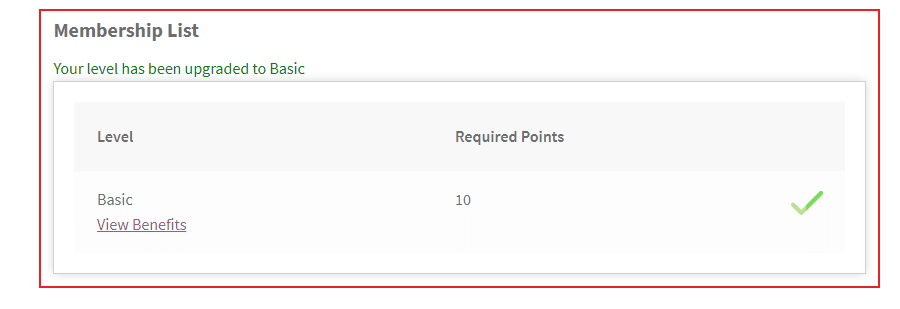
After successfully created the membership level, your customer can view the benefits of membership level by clicking on the “View Benefits” button.
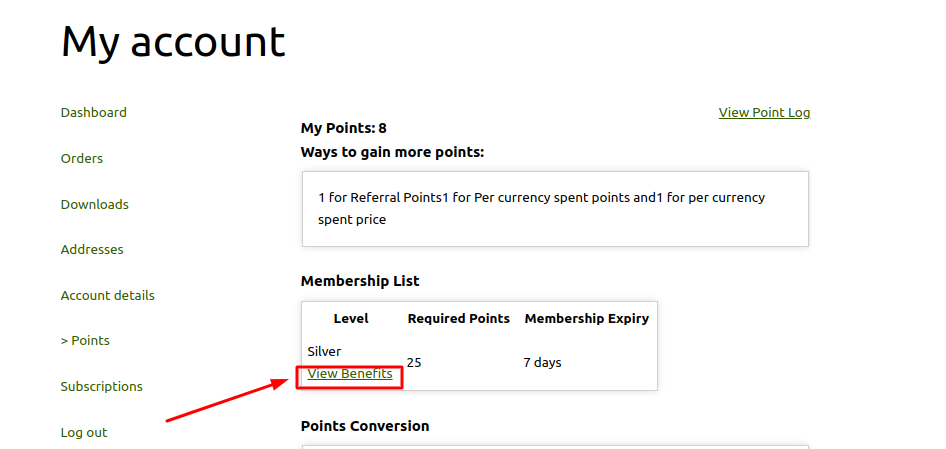
Click on the link customer can view the benefits of the membership level.
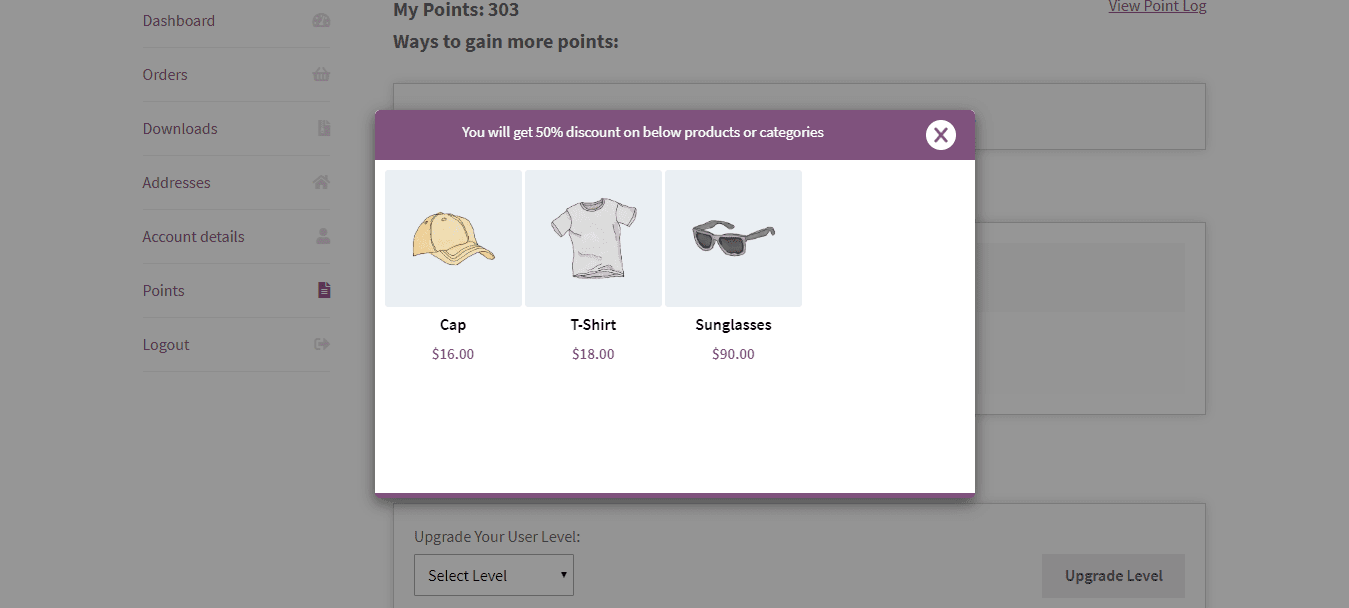
By clicking on the “Upgrade Level” button, your customer can get the membership benefits easily.
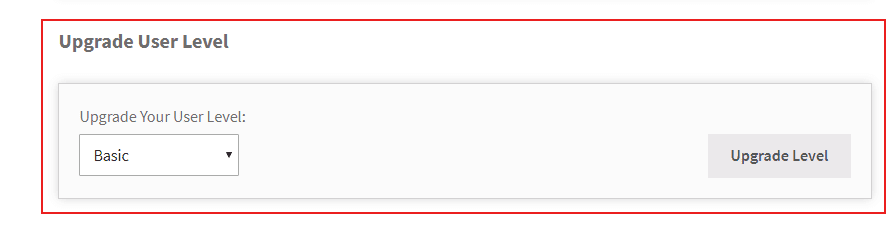
Now you can see your upgraded membership.
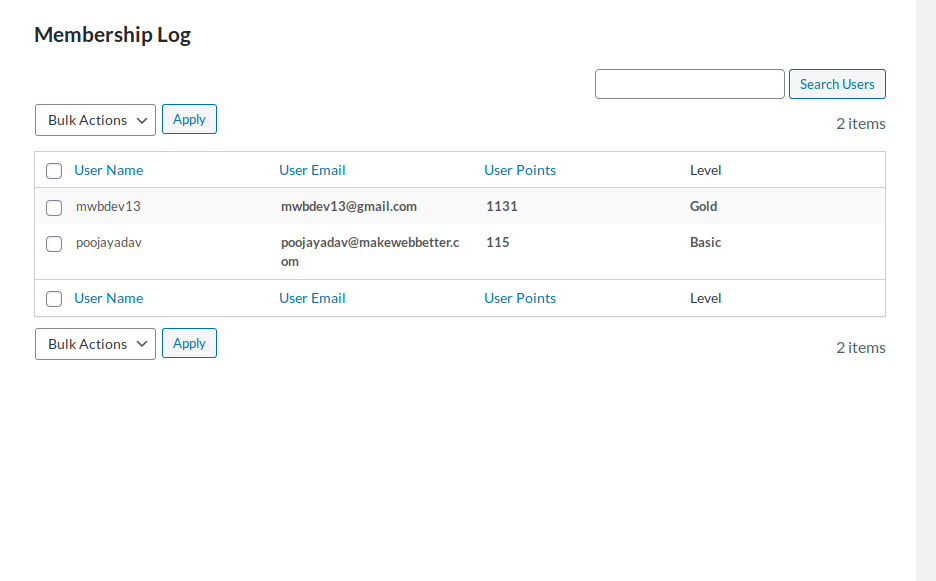
Membership Log: By clicking on the ‘Membership log link’ the admin can view the details of all members.
9.Assign Product Points
This setting allows you to assign points to the products in three ways.
- Globally
- Category wise
- Per Product-wise
- Display Assign Points on Shop Page
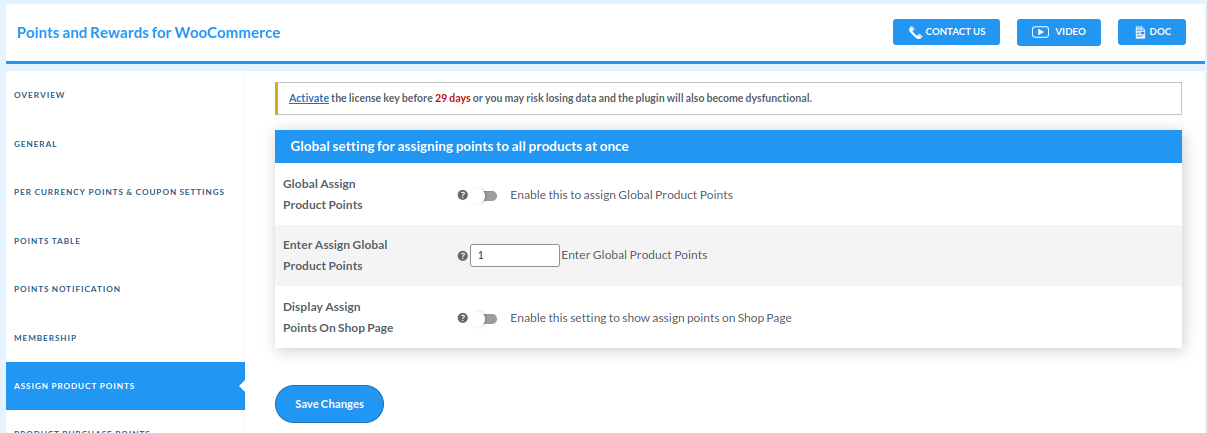
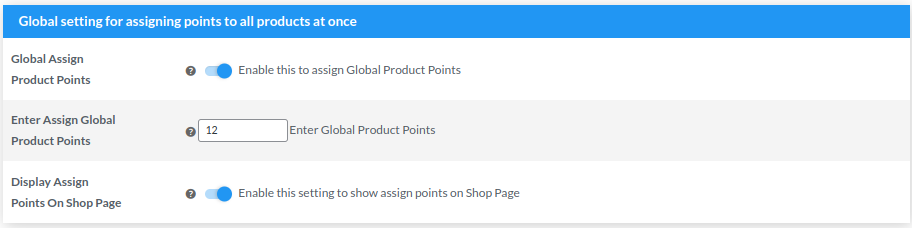
9.1.Global Setting
Through this setting, you can assign equal points on each product at once by the global setting.
Enable this setting if you want to assign the same points on all the products and enter the points which you want to assign for all products.
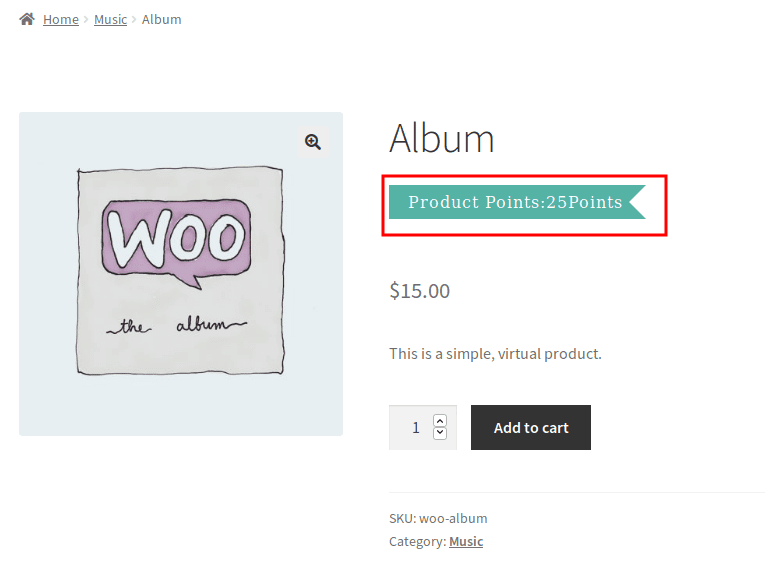
Your customer can see the assigned points on the single page of the product.
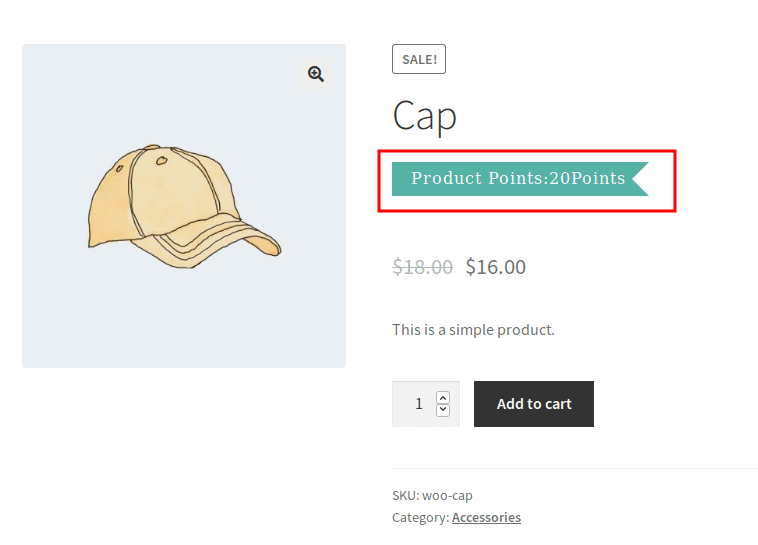
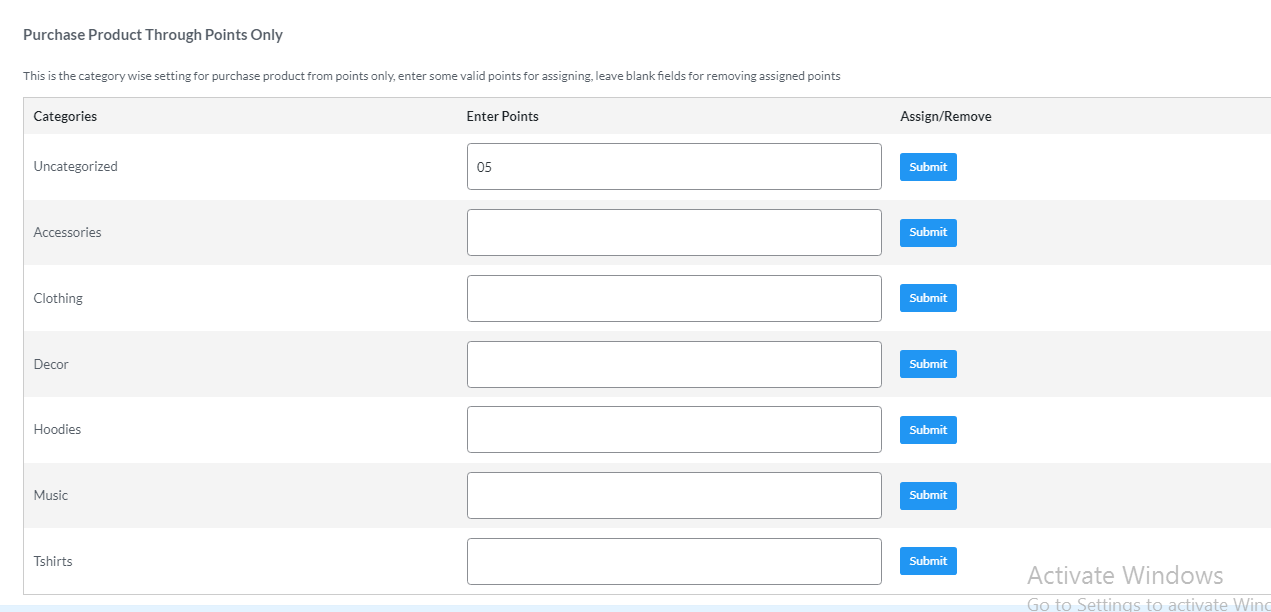
9.2.Category wise Setting
This is the category-wise setting for assigning the points to the product. The admins can enter some valid points for assigning or leave blank fields for removing assigned points and click on the “Submit” button.
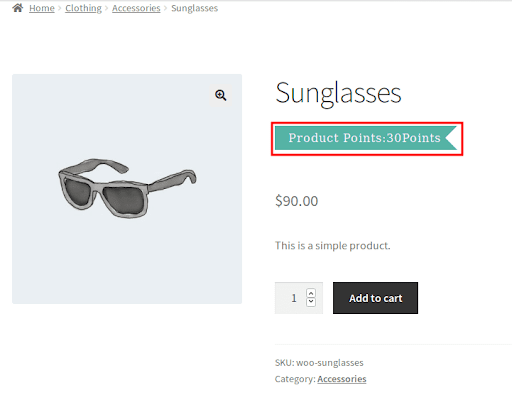
Your customer can see those assigned points on the single page of the product.
9.3.Per Product wise Setting
This setting for assigning points Per product-wise. Go to the “Products” and click on the edit page of the selected product.
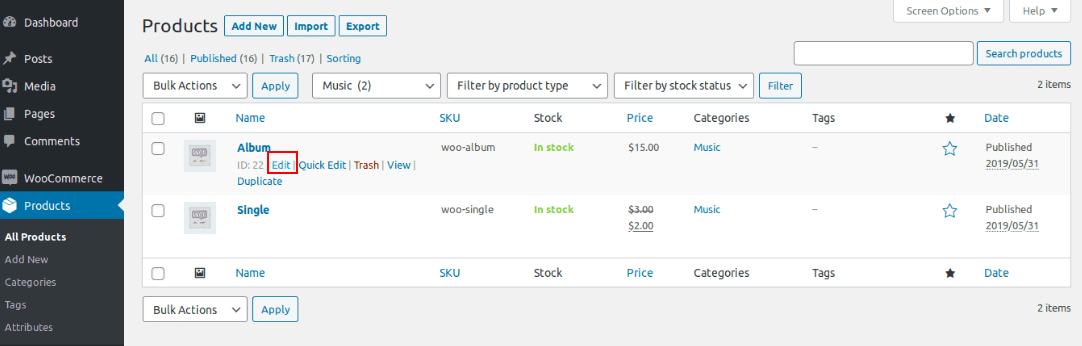
Click on the “Points and Reward” setting. Enable the setting and enter some valid numbers for assigning points.
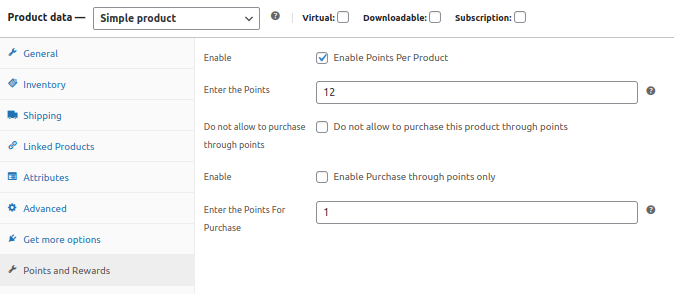
Your customer can see the assigned points on the single page of the product.
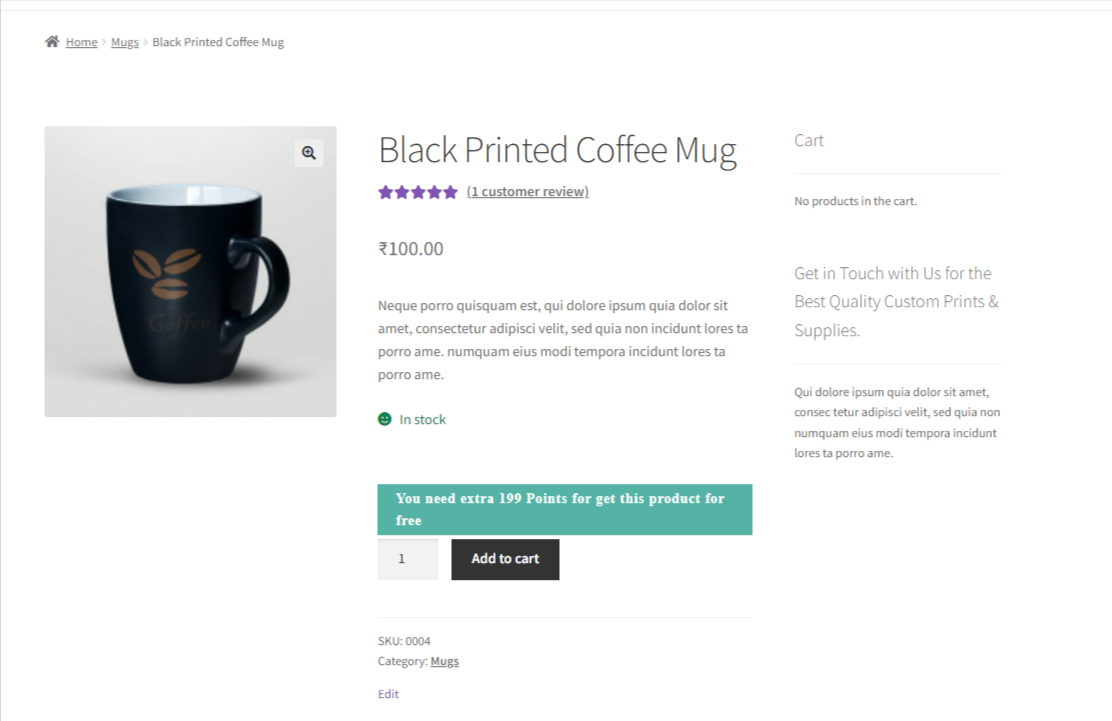
10.Product Purchase Through Points
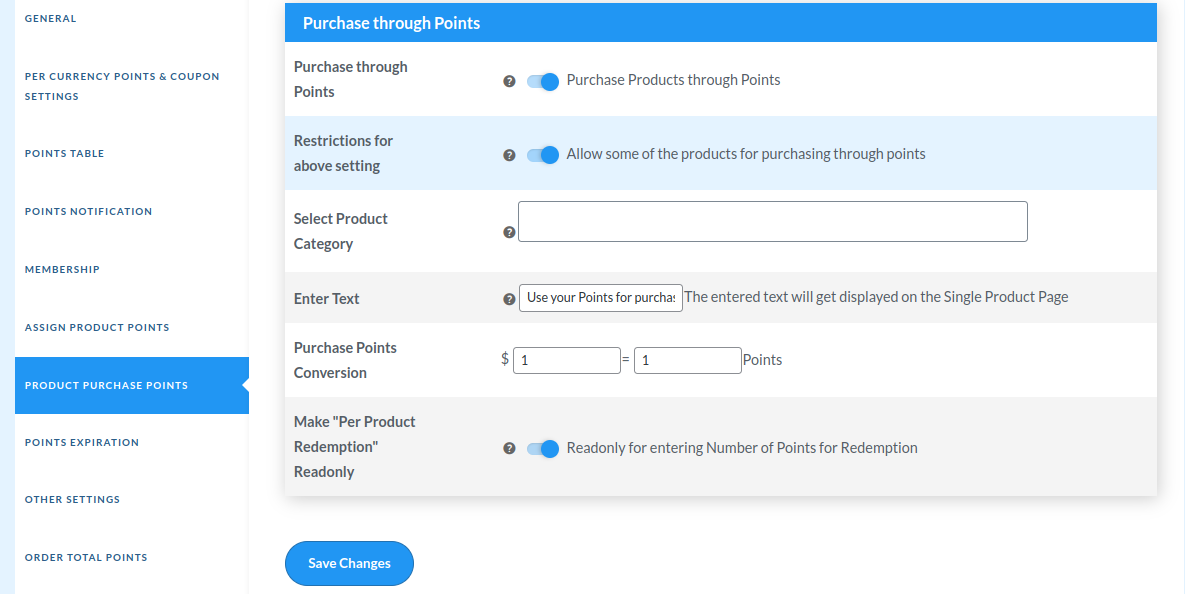
Through the Product Purchase Points setting, the admin can buy products only by the points.
Enable Purchase through Points: Check this box to enable purchasing products through points.
Enable Restrictions for the above setting: Check this box if you only want to allow some of the products for purchasing through points not all.
Select Product Category: Select the category in which you want to allow customers to purchase the product through points.
Enter Text: The entered text will be displayed on the Single Product Page
Make “Per Product Redemption” Readonly: Check this box if you want to make the redemption box read-only(where the end-user can enter the number of points they want to redeem).
Assign Points to the particular category and click on the submit button.
From this setting, you can set the number of points on the basis of the category wise. Admin can set the points which will be applicable to all the products which will be under that specific category.
11.Points Expiration Notification
In this section, you can set the Expiration Period of the customer’s points and send the Notification Mail as a reminder of the expiration of points.
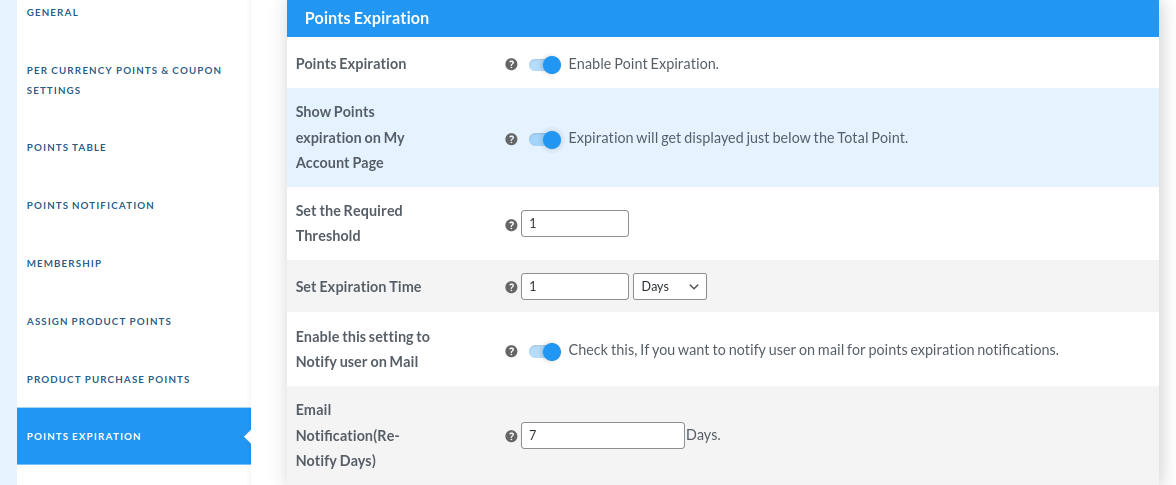
1. Enable Points Expiration: Enable this checkbox if you want to set the expiration time period of rewarded points for your customers.
2. Show Points expiration on My Account Page: Enable this setting if you want to show the expiration time period of points on my account page.
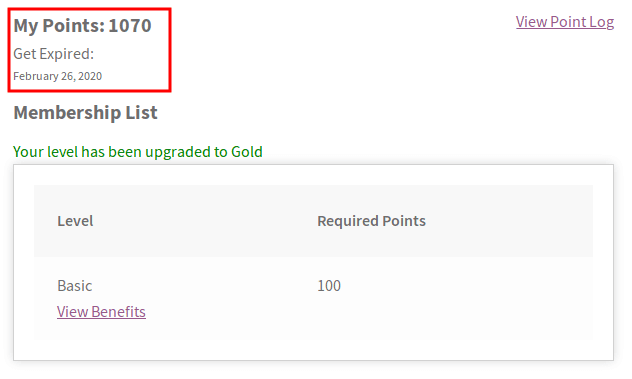
- Set the Required Threshold: Set the threshold for rewarded point expiration, the expiration period will be calculated when the threshold will be reached.
- Set Expiration Time: Set the maximum time limit for points expiration. After this time limit points need to expire. It will be calculated after the above threshold time.
- Enable This Setting To Notify User On Mail: The admin can enable this setting if he wants to “enable or disable” the expiration mail feature. After disabling this setting your customers won’t receive the “points expiration” emails.
- Email Notification (Re-Notify Days): Set the number of days before the mail will get sent out to re-notify the customer for points expiration.
12.Others Setting
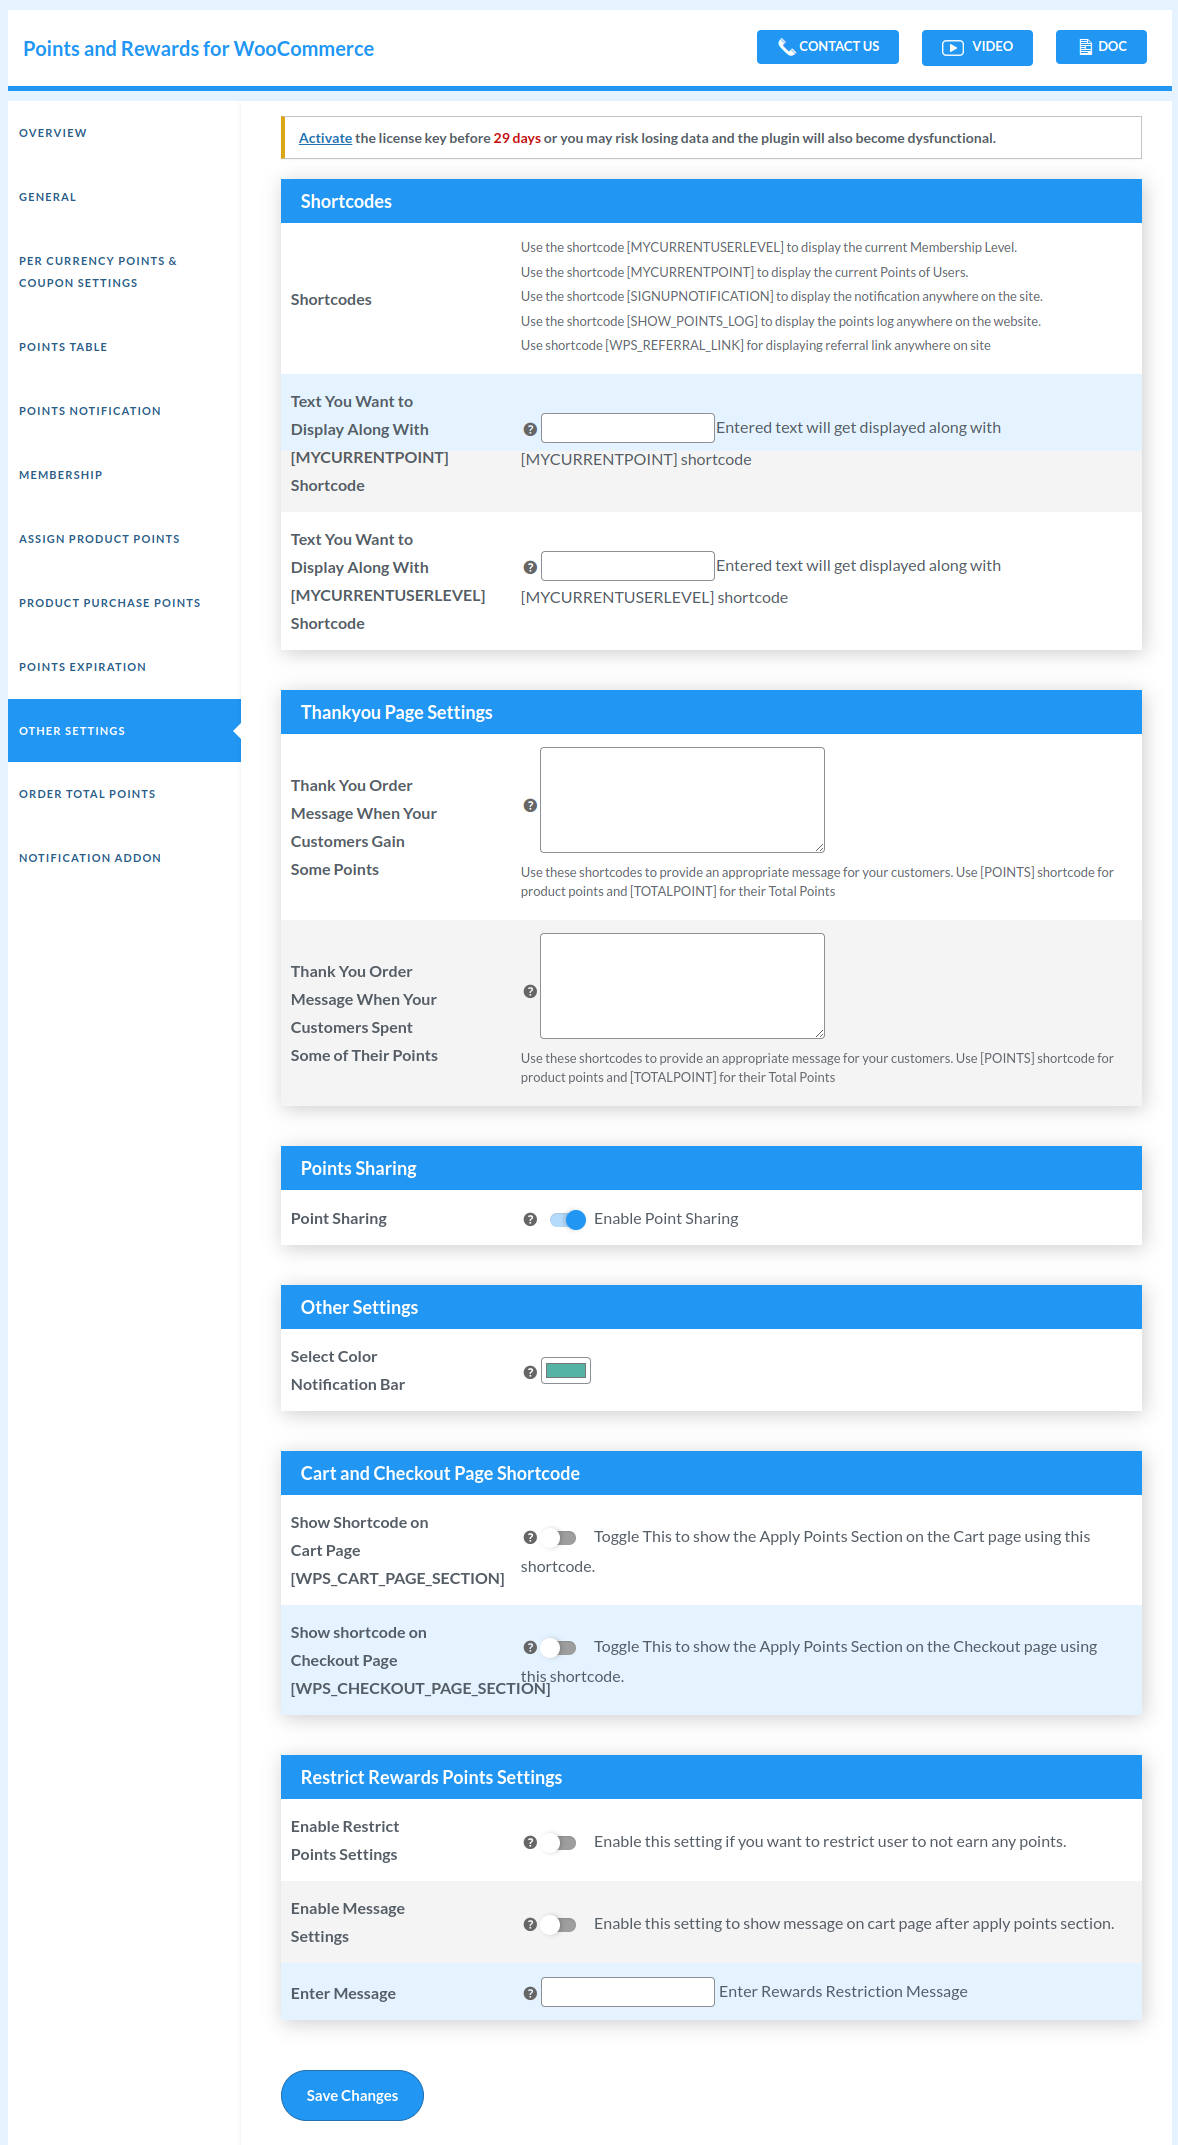
12.1.Use of Shortcodes
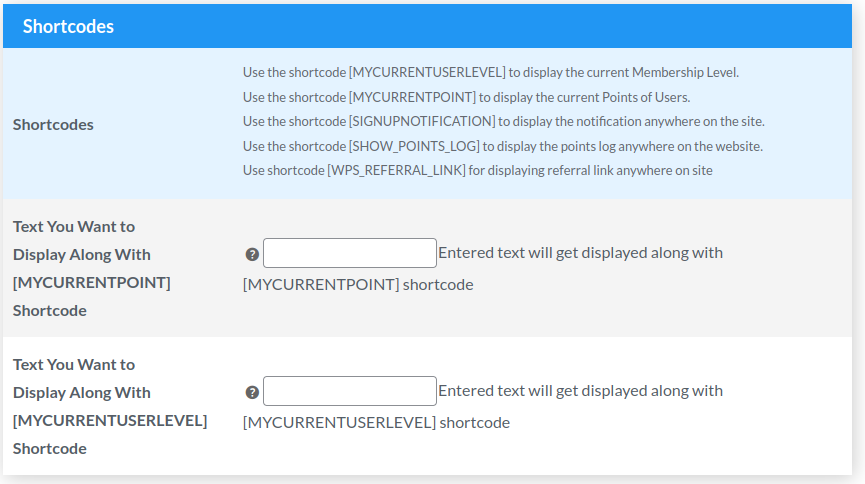
Shortcodes: Shortcodes allow the admin to quickly display values such as current membership level, current points of a user, notification info, and referral link, at needed places simply using these shortcodes.
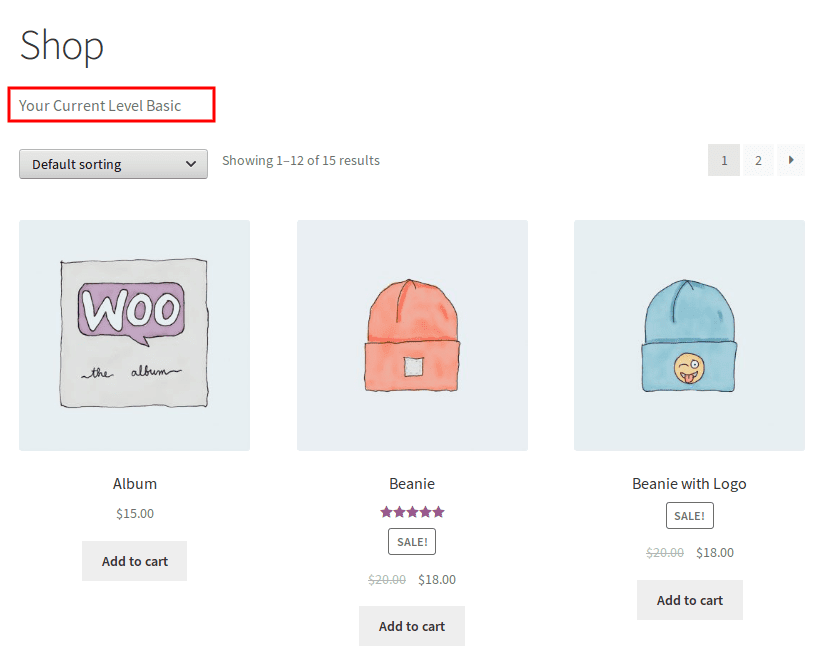
[MYCURRENTUSERLEVEL]: This shortcode use for displaying the current Membership Level of Users.
For example, If you want to show the current Membership Level for the customers on the shop page.
The admins can simply go to the “Shop page” paste the Shortcode of Membership Level and click on the update button. The current Membership Level of the customer will get displayed along with the tex
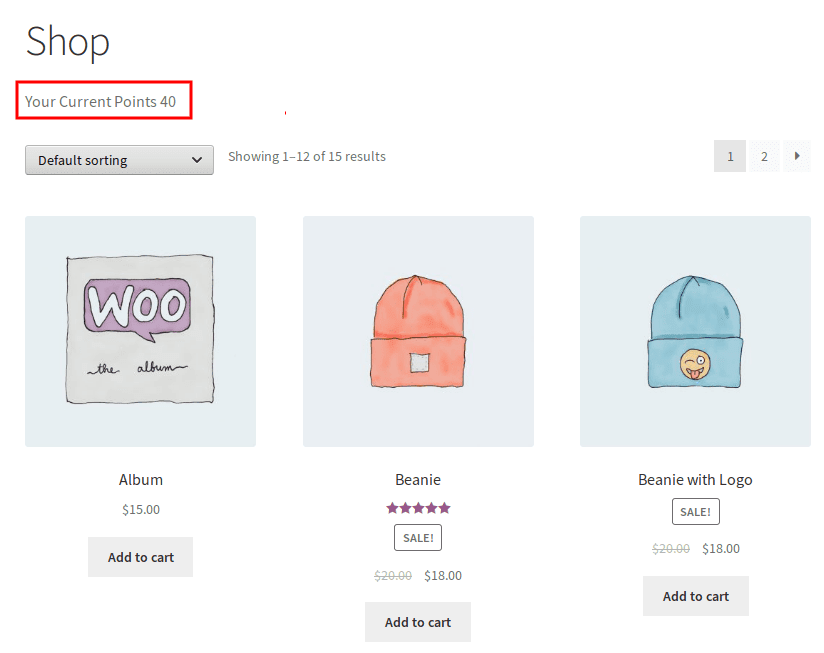
Enter text for Current Points: Entered text will get displayed along with [MYCURRENTPOINT] shortcode.
Use the shortcode [wpr_referral_link] for displaying referral link anywhere on site.
[MYCURRENTPOINT]: This shortcode use for displaying current Points of Users.
For example, If you want to show the customer’s current points on the shop page.
Simple Go to the “Shop page” paste the Shortcode of current points and click on the update button. The current points of the customer will display with the text.
Enter text for Current User Level: Entered text will get displayed along with [MYCURRENTUSERLEVEL] shortcode.
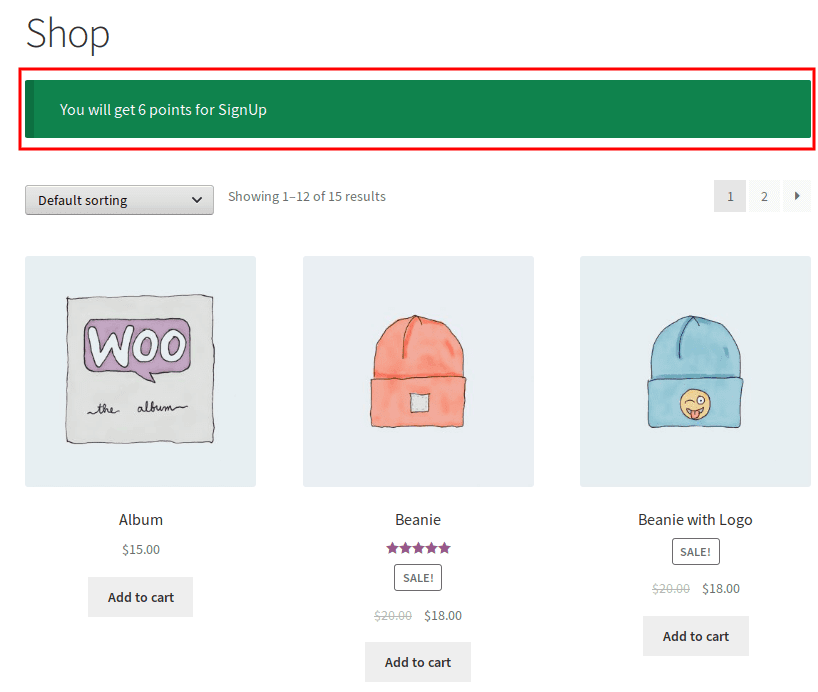
[SIGNUPNOTIFICATION]: This shortcode use for displaying signup notifications anyplace on site.
For example, If you want to show the signup notification on the shop page.
Simple Go to the “Shop page” paste the Shortcode of sign up notification and the most important thing is that the signup point feature must be enabled from the “General Setting”.
[SHOW_POINTS_LOG]: Use this shortcode to display your “Points Log” in any page of your store.
[WPS_REFERRAL_LINK]: Use this shortcode for displaying the referral link anywhere on the site.
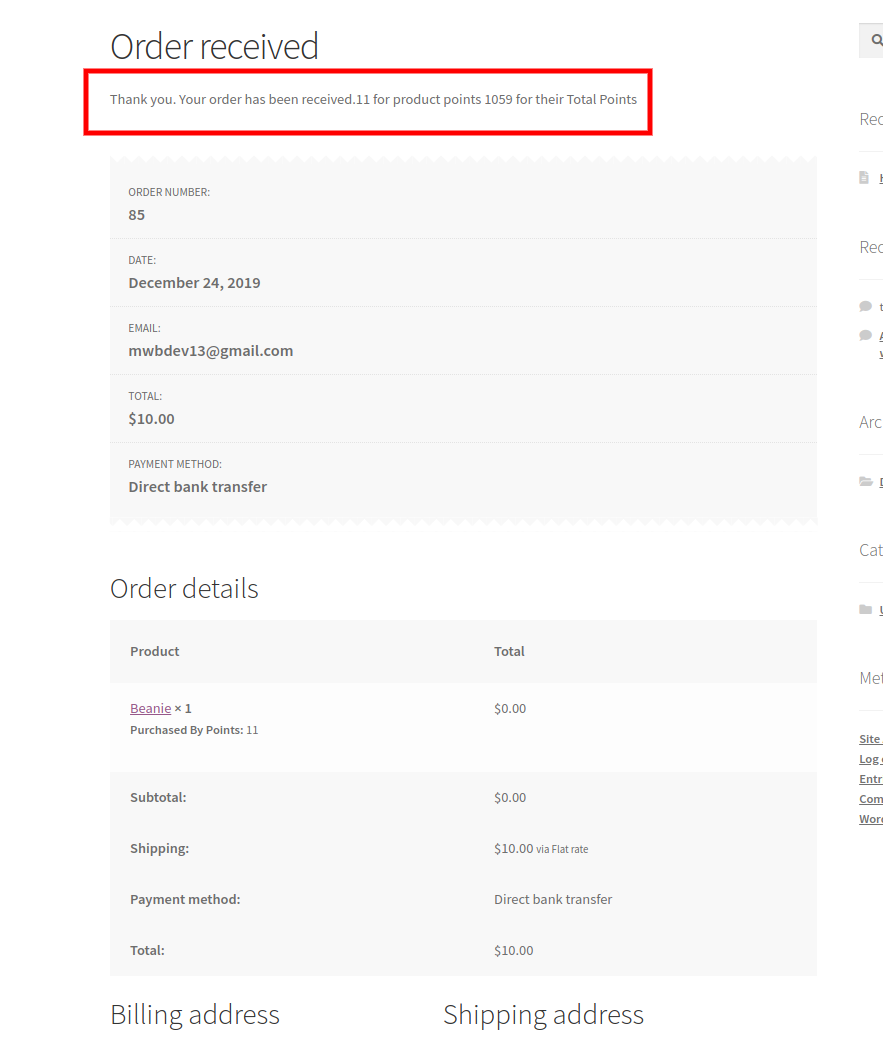
12.2.Shortcodes for Thank You Page
These shortcodes for providing an appropriate message for your customers for their Total Points when they gain or spend points on the checkout page.
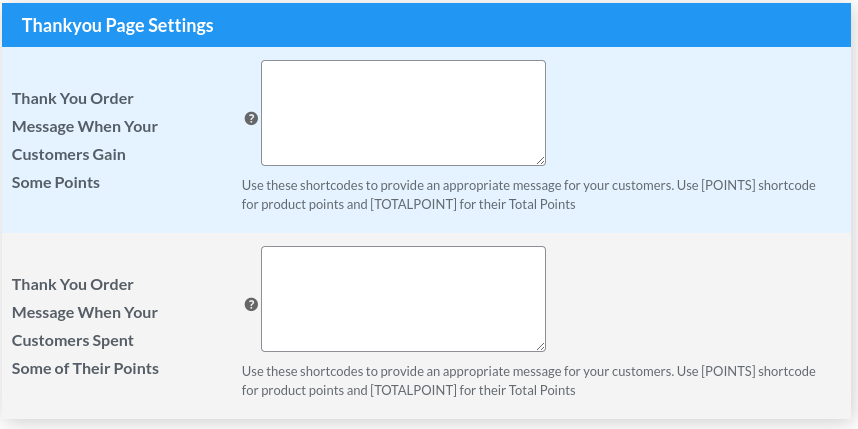
Notification When Your Customer Gain Points After Checkout:
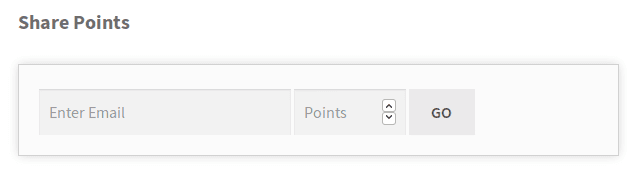
12.3.Point Sharing
Enable this setting if you want to allow your customers to share some points from their account with any other user.

After enabling the setting your customer can share your points with other users by simply clicking on “GO”.
12.4.Select Color Notification Bar
Here you can select a color for the notification bar.

12.5.Shortcode for Cart Page and Checkout Page
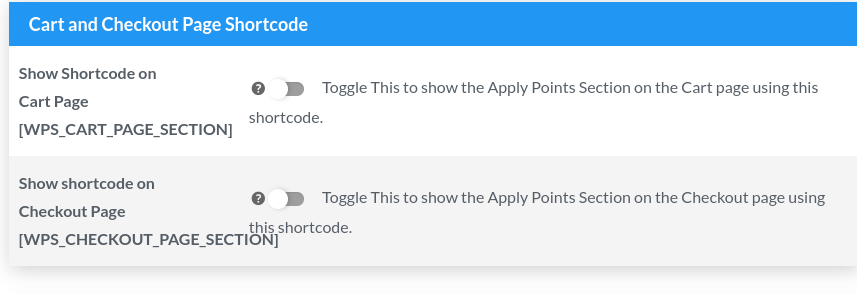
[Wps_Cart_Page_Section]: This shortcode is used to enable the “Apply points” section on the cart page.
For example: If you want to allow the “apply points” section on the cart page. Simply enable the “enable to show the shortcode on cart page” settings.
[Wps_Checkout_Page_Section]: This shortcode is used to enable the “Apply points” section on the checkout page.
For example: If you want to allow the “apply points” section on the cart page. Simply enable the “enable to show the shortcode on checkout page” settings.
12.6.Restrict Reward Points Settings
With this feature of the WooCommerce loyalty program plugin, merchants can restrict customers from earning reward points on the purchase of products, that the customers have bought by redeeming their existing reward points.
Now, when the customer orders a product by using points, he will be shown a message (if the admin has enabled the message settings), stating “You will not get any reward points” or whatever custom message the admin chooses to show.
For example, Mr. A has 250 reward points that he wants to use to purchase a hoodie. Now, when he redeems these points (i.e. 250 reward points), he will not get any points on the successful purchase of that particular product.
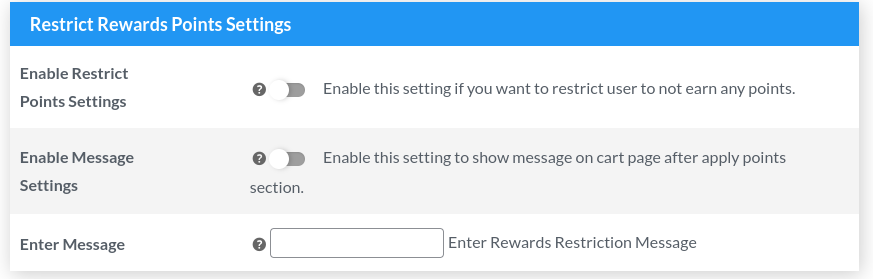
- Enable Restrict Points Settings: The admin can enable this setting to restrict users from earning points.
- Enable Message Settings: The admin can enable this setting if he wants to show a custom message to his customers about the points restriction.
- Enter Message: Admins can enter a custom acknowledgement message, that they want show the customers on the cart page after they “apply points”
12.7.Display Total Earning Points
Admins have the option to display the total earnings of customers on their end. By utilizing this feature of WooCommerce points and rewards, you can keep your customers informed about your reward points.
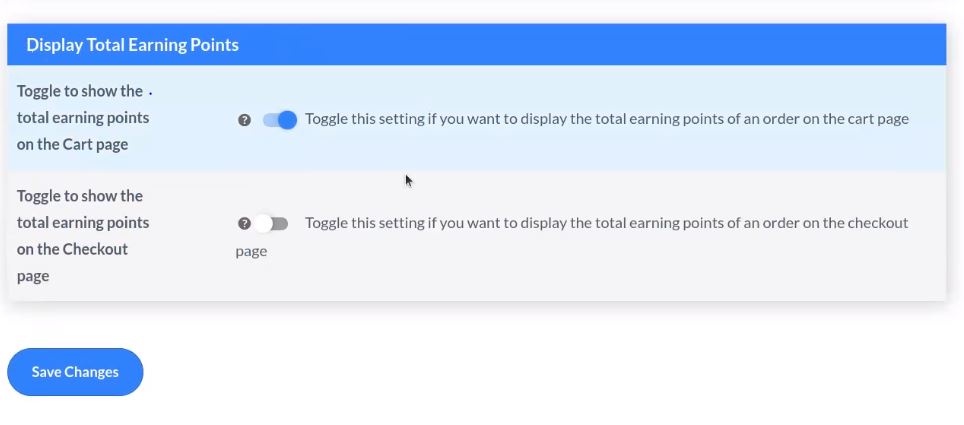
- Toggle to show the total earning points on the Cart Page: Enable this setting, if you want your customers to be in a position to see their total earnings across your WooCommerce store on the Cart Page.
- Toggle to show the total earning points on the Checkout Page: Enable this setting, if you want your customers to be in a position to see their total earnings across your WooCommerce store on the Checkout Page.
Frontend Representation,

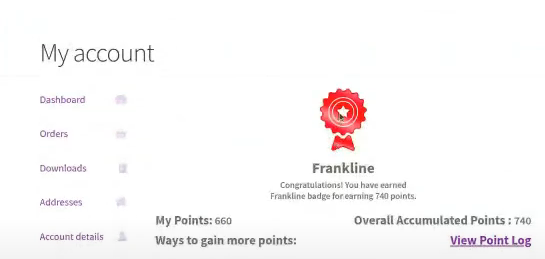
12.8.Point Tab Layout Setting
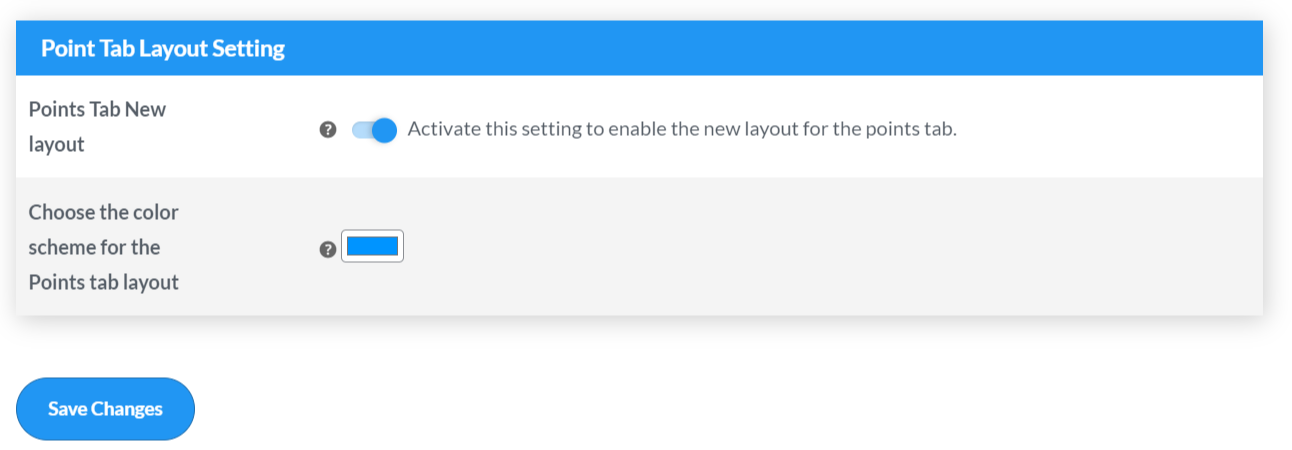
The admins can also dynamically change the color of the “Account Page”. The overview of this page is changed, after utilizing this feature the admin gets the chance to decide whether he wants to show the enhanced version of the page.
- Points Tab New Layout: Enable this setting if you don’t want your customers to see the old existing layout of the accounts section.
- Choose the color scheme for the Points tab layout: Admins also gets a chance to choose the color schemes, this is reflected in the frontend.
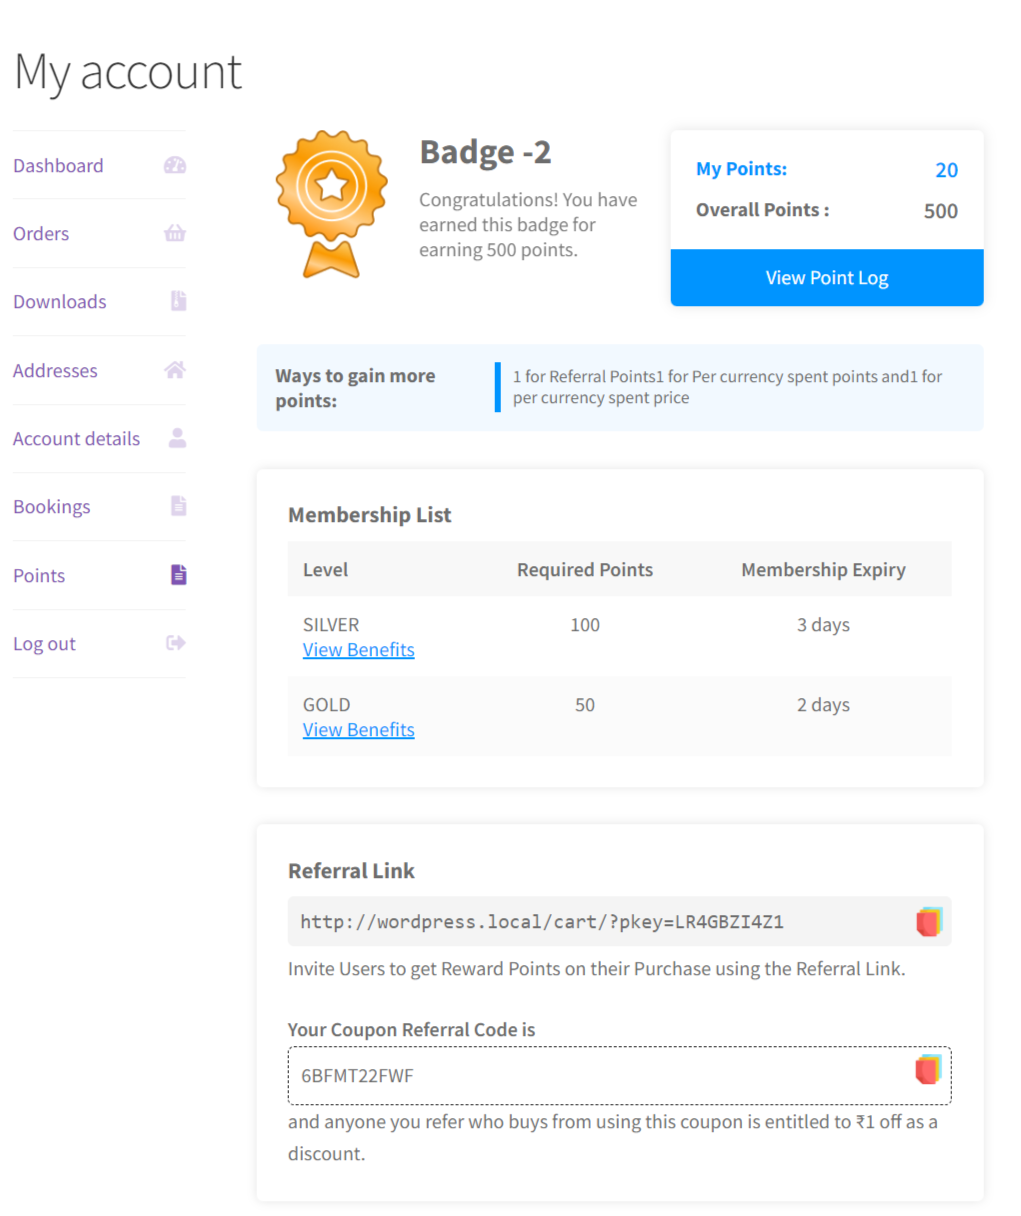
Frontend Representation
13.Order Total Points
To enable the ‘Order Total Points’ setting first you have to click on the checkbox to enable the setting and then set the points within the order amount range and the last click on the ‘Save Changes’ button to save the settings.
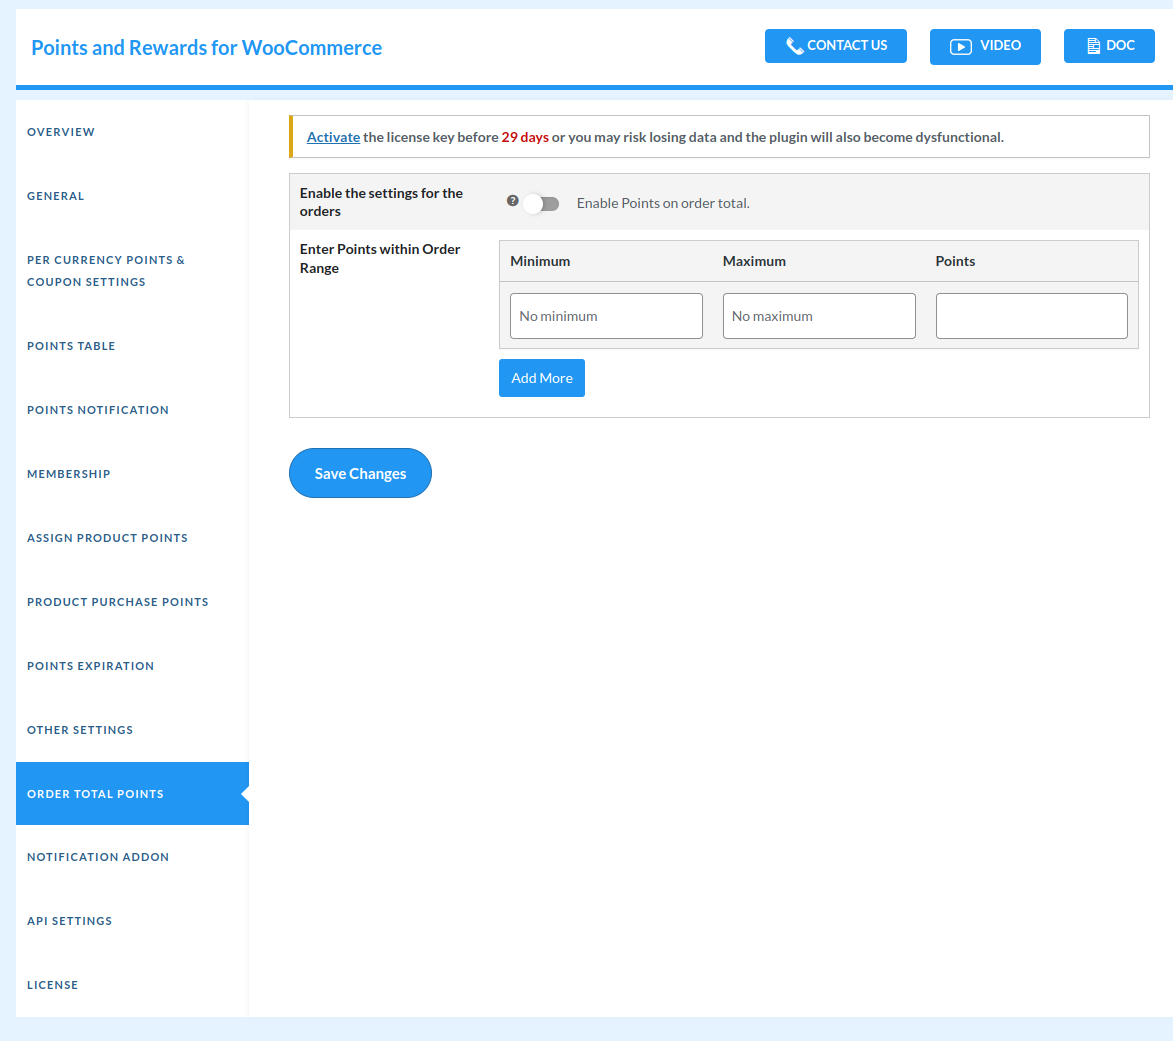
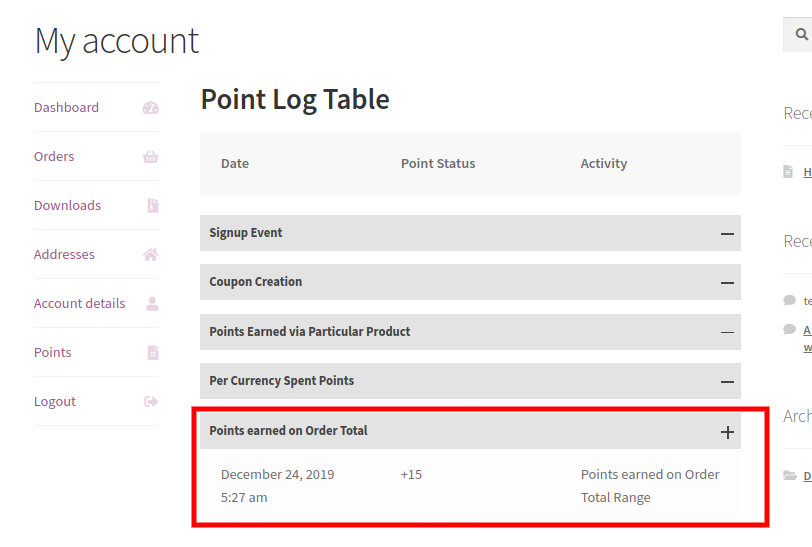
After successfully completed the order, your customers will get the points according to the order range and they can view their points from the My Account page.
To view the detailed description of the points go to the My Account > Points Tab > and then click on the ViewPoints Log link, here you can see the detailed description of points.
14.User Notification Addon
Users’ notification addon adds additional features to the Points and Rewards for WooCommerce Pro plugin. With this addon, registered as well as guest users receive a notification on points updates; informing how many points they have earned as well as the ways to earn more points.
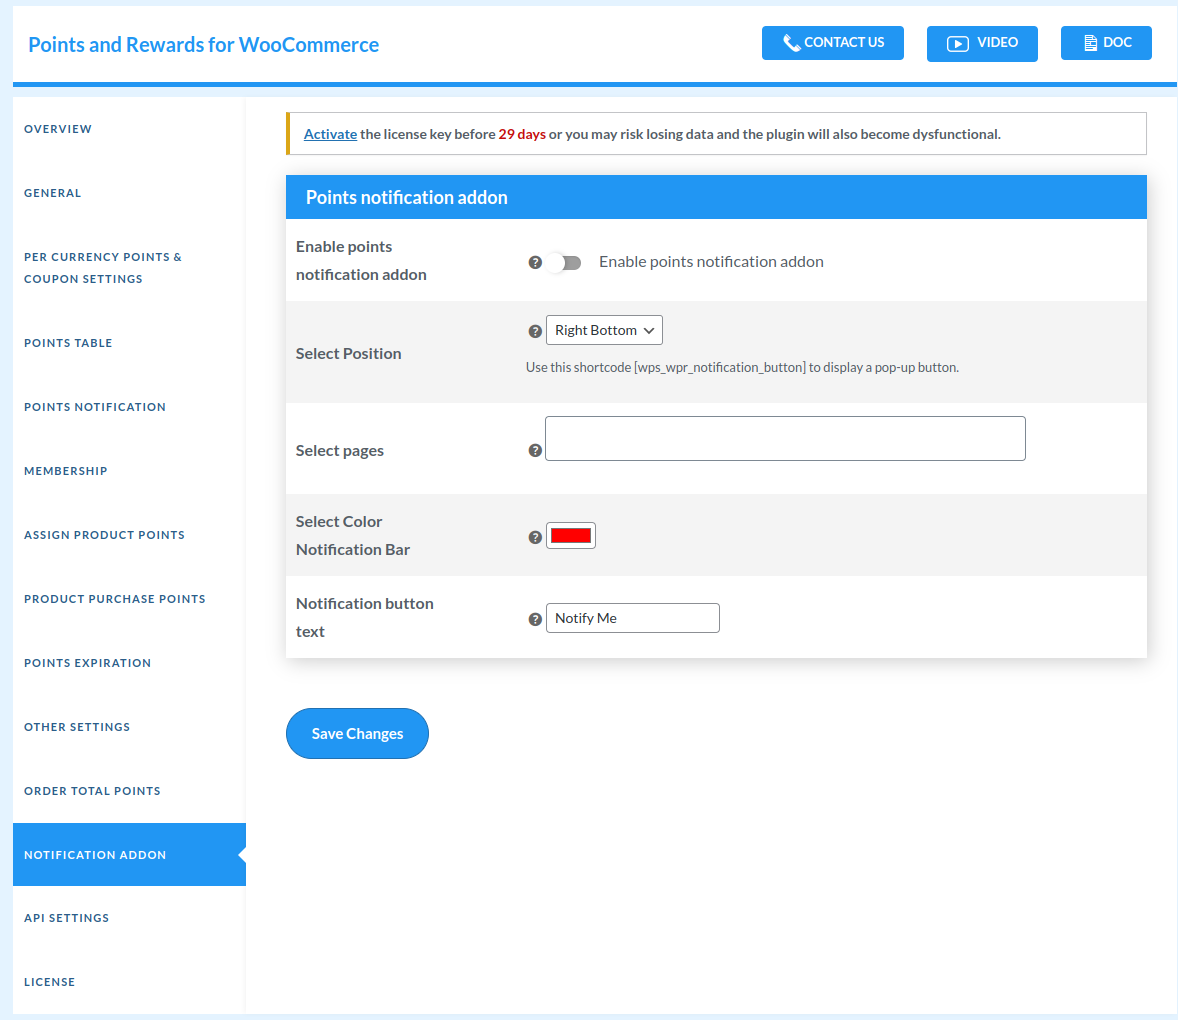
- Enable Points Notification addon: The user can check or enable this setting to allow the customers to use the points notification addon.
- Select Position: Choose whether you want to display the notification button from the available options which are left, right, or want to use a shortcode. If you choose the shortcode option, then use [wps_wpr_notification_button] to display a pop-up button. Note: This will only work on the page where you use the code. Also, if select the shortcode option, then the “select pages” option will not work, plus you can not change the position of the button.
- Select Page: Select the page where you want to present the button. Leave the section blank, if you want to present it on all the pages.
- Select Colour Bar: You can also select the color of the notification bar.
- Notification Button Text: The admin can choose the text that he wants to show on the button. The default text that can be used is “NOTIFY ME”.
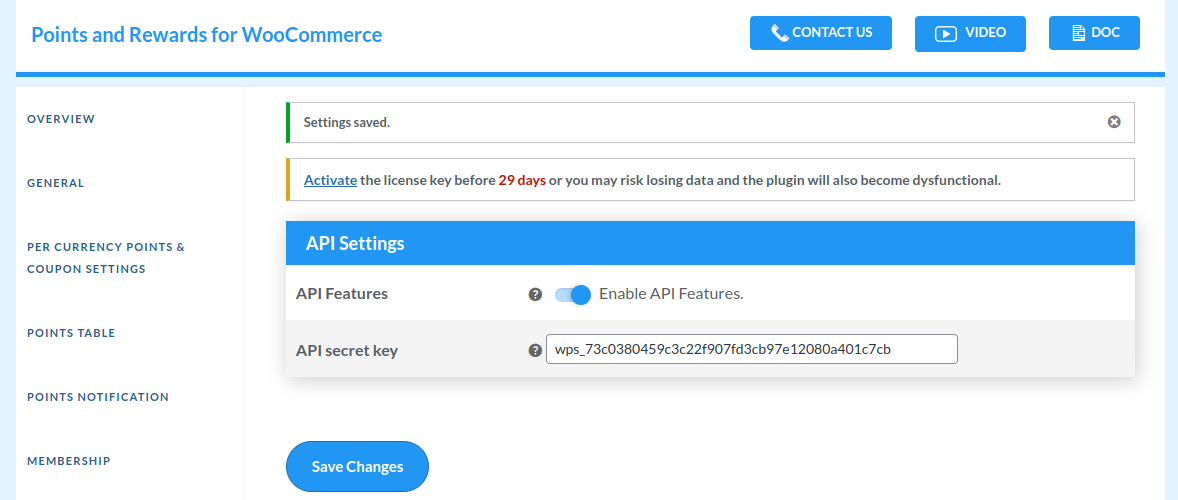
15.API Settings
The admin has access to API settings for combining Points and Rewards with other applications. Via API settings, the admin can get all of the user’s information. The API is used to retrieve a user’s total points and referral ties, monitor loyalty points, manage users and view their point log data.
The admins will now also see all the details of the present APIs: the endpoints, the parameters for the endpoints, and the response for the parameters, all the details will now be shown to the admins

16.API Implementation
Enable API Feature
1.Kindly, go to WooCommerce->Points and Rewards->API SETTINGS
2.Then Click on the ‘Generate Secret Key’ button. and secret key will generate.
1. Get Total Points and referral link.
This API is used to get total points and referral link of user.
HTTP Request.
POST /wp-json/wpr/wps-get-points/user
curl -X POST https://example.com/wp-json/wpr/wps-get-points/user
-u “consumer_secret: <points and rewards secret key>”
-d ‘{
“user_id”: “<wordpress user id>”,
}’
JSON response example:
{
“data“: {
“user_id“: 4,
“total_points“: 9991,
“referal_link“: “https://example.com?pkey=Y6O9C06XZ1″
},
“status“: “success”,
“code“: 200
}
2. Get Points log details.
This API is used to get user points log details.
HTTP Request.
POST /wp-json/wpr/wps-get-points/user/log
curl -X POST https://example.com/wp-json/wpr/wps-get-points/user/log
-u “consumer_secret: <points and rewards secret key>”
-d ‘{
“user_id”: “<wordpress user id>”,
}’
JSON response example:
{
“data”: {
“user_id”: 4,
“membership_level”: “basic”,
“points_log”: {
“signup_event_points_log”: [
{
“points”: 1,
“date”: “2020-12-13 11:52:30pm”
}
],
“coupon_creation_points_log”: [
{
“points”: -75,
“date”: “2020-12-10 09:41:25am”
},
{
“points”: -10,
“date”: “2020-12-12 05:19:59am”
},
{
“points”: -10,
“date”: “2020-12-12 05:20:01am”
}
],
“points_earn_via_partiular_product_points_log”: [
{
“points”: 1,
“date”: “2020-12-11 05:38:03am”
},
{
“points”: 1,
“date”: “2020-12-11 05:40:02am”
},
{
“points”: 1,
“date”: “2020-12-14 02:26:10am”
}
],
“points_earn_via_per_currency_conversion_points_log”: [
{
“points”: 17,
“date”: “2020-12-11 05:40:02am”
},
{
“points”: 0,
“date”: “2020-12-14 02:26:10am”
}
],
“points_earn_on_order_total_points_log”: [
{
“points”: 10,
“date”: “2020-12-11 05:38:03am”
},
{
“points”: 10,
“date”: “2020-12-11 05:40:02am”
}
],
“cancel_order_points_log”: [
{
“points”: -10,
“date”: “2020-12-14 02:14:44am”
},
{
“points”: 0,
“date”: “2020-12-14 02:26:20am”
}
],
“membership_points_log”: [
{
“points”: -10,
“date”: “2020-12-10 08:01:26am”
}
],
“product_purchase_through_points_log”: [
{
“points”: -17,
“date”: “2020-12-14 02:23:43am”
}
],
“return_request_products_points_log”: [
{
“points”: 17,
“date”: “2020-12-14 02:26:20am”
}
],
“applied_on_cart_points_log”: [
{
“points”: -2,
“date”: “2020-12-11 05:38:34am”
}
],
“deduct_pre_currency_spent_on_cancel_order_points_log”: [
{
“points”: -17,
“date”: “2020-12-14 02:14:44am”
},
{
“points”: -0,
“date”: “2020-12-14 02:26:20am”
}
],
“deduct_assign_product_points_on_cancel_order_points_log”: [
{
“points”: -1,
“date”: “2020-12-14 02:14:44am”
},
{
“points”: -1,
“date”: “2020-12-14 02:26:20am”
}
],
“sender_point_details_log”: [
{
“points”: 5,
“date”: “2020-12-10 08:03:31am”,
“shared_to_user”: “testuser”
},
{
“points”: 10,
“date”: “2020-12-10 08:04:33am”,
“shared_to_user”: “test”
}
],
“receiver_point_details_log”: [
{
“points”: 5,
“date”: “2020-12-10 08:03:31am”,
“received_by_user”: “testuser”
}
],
“updated_by_admin_points_log”: [
{
“points”: “100”,
“date”: “2020-12-10 08:01:12am”,
“sign”: “+”,
“reason”: “test”
},
{
“points”: “10000”,
“date”: “2020-12-12 05:19:47am”,
“sign”: “+”,
“reason”: “test”
}
],
“referral_sign_up_points_log”: [
{
“points”: 1,
“date”: “2020-12-13 11:52:30pm”,
“refered_user”: “test12”
}
],
“referral_product_purchase_points_log”: [
{
“points”: 1,
“date”: “2020-12-13 11:54:14pm”,
“refered_user”: “test12”
}
]
},
“coupon_log”: [
{
“SUHPN”: {
“points”: 75,
“coupon_code”: “SUHPN”,
“coupon_amount”: “75”,
“left_amount”: “75”,
“expiry_date”: “No Expiry”,
“currency”: “USD”
}
},
{
“TR6G1”: {
“points”: “10”,
“coupon_code”: “TR6G1”,
“coupon_amount”: “10”,
“left_amount”: “10”,
“expiry_date”: “No Expiry”,
“currency”: “USD”
}
},
{
“JUWGM”: {
“points”: “10”,
“coupon_code”: “JUWGM”,
“coupon_amount”: “10”,
“left_amount”: “10”,
“expiry_date”: “No Expiry”,
“currency”: “USD”
}
}
]
},
“status”: “success”,
“code”: 200
}
3. How to get points of a user:
You can get the points of the user by using this endpoint:
POST /wp-json/wpr/wps-get-points/user/log
curl -X POST http://woocommerce.local/wp-json/wpr/wps-get-points/user/
Make sure you are using the below parameters or make sure to use the below parameters:
‘user_id’ :
‘consumer_secret’ :
4. How to remove points of a user via API:
You can remove the points of the user by using this endpoint:
POST /wp-json/wpr/wps-remove-par-points/user/log
curl -X POST http://woocommerce.local/wp-json/wpr/wps-remove-par-points/user/
Make sure you are using the below parameters or make sure to use the below parameters:
‘user_id’ :
‘points’ :
‘reason’ :
‘consumer_secret’ :
5. How to add points via API:
You can add the points of the user by using this endpoint:
POST /wp-json/wpr/wps-add-par-points/user/
curl -X POST http://woocommerce.local/wp-json/wpr/wps-add-par-points/user/
Make sure you are using the below parameters or make sure to use the below parameters:
‘user_id’ :
‘points’ :
‘reason’ :
‘consumer_secret’ :
- How to check the individual user membership level:
You can check the individual user membership level by using this endpoint:
Post /wp-json/wpr/wps-get-user-level/user
curl -X POST http://woocommerce.local/wp-json/wpr/wps-get-user-level/user
Make sure you are using the below parameters or make sure to use the below parameters:
‘user_id’:
‘consumer_secret’:
- How to check the membership details:
You can check the membership details by using this endpoint:
Post /wp-json/wpr/wps-membership-details/user
curl -X POST http://woocommerce.local/wp-json/wpr/wps-membership-details/user
Make sure you are using the below parameters or make sure to use the below parameters:
‘consumer_secret’:
- How to upgrade the membership level:
You can now upgrade the membership level by using this endpoint:
Post /wp-json/wpr/wps-update-member-level/user
curl -X POST http://woocommerce.local/wp-json/wpr/wps-update-member-level/user
Make sure you are using the below parameters or make sure to use the below parameters:
‘user_id’:
‘member_name’:
‘consumer_secret’:
Note: ‘consumer_secret’ key can be found under the API settings from the plugin settings, please refer to the below screenshot:
17. Gamification Settings
The WooCommerce rewards plugin now enables merchants to make their websites more engaging and interesting with gamification settings. After enabling the settings your customers will get a chance to spin the “win-wheel” and earn rewards. The settings of this feature are completely dynamic. The merchants will be able to fully customize the win-wheel. Admins take the reins! Tailor your win-wheel down to the last detail: choose positions, colors, and segments, and set the points for each section. Craft an experience that’s uniquely yours. Decide whether customers can spin freely or implement cooldown periods. Keep the engagement level just right for your audience.
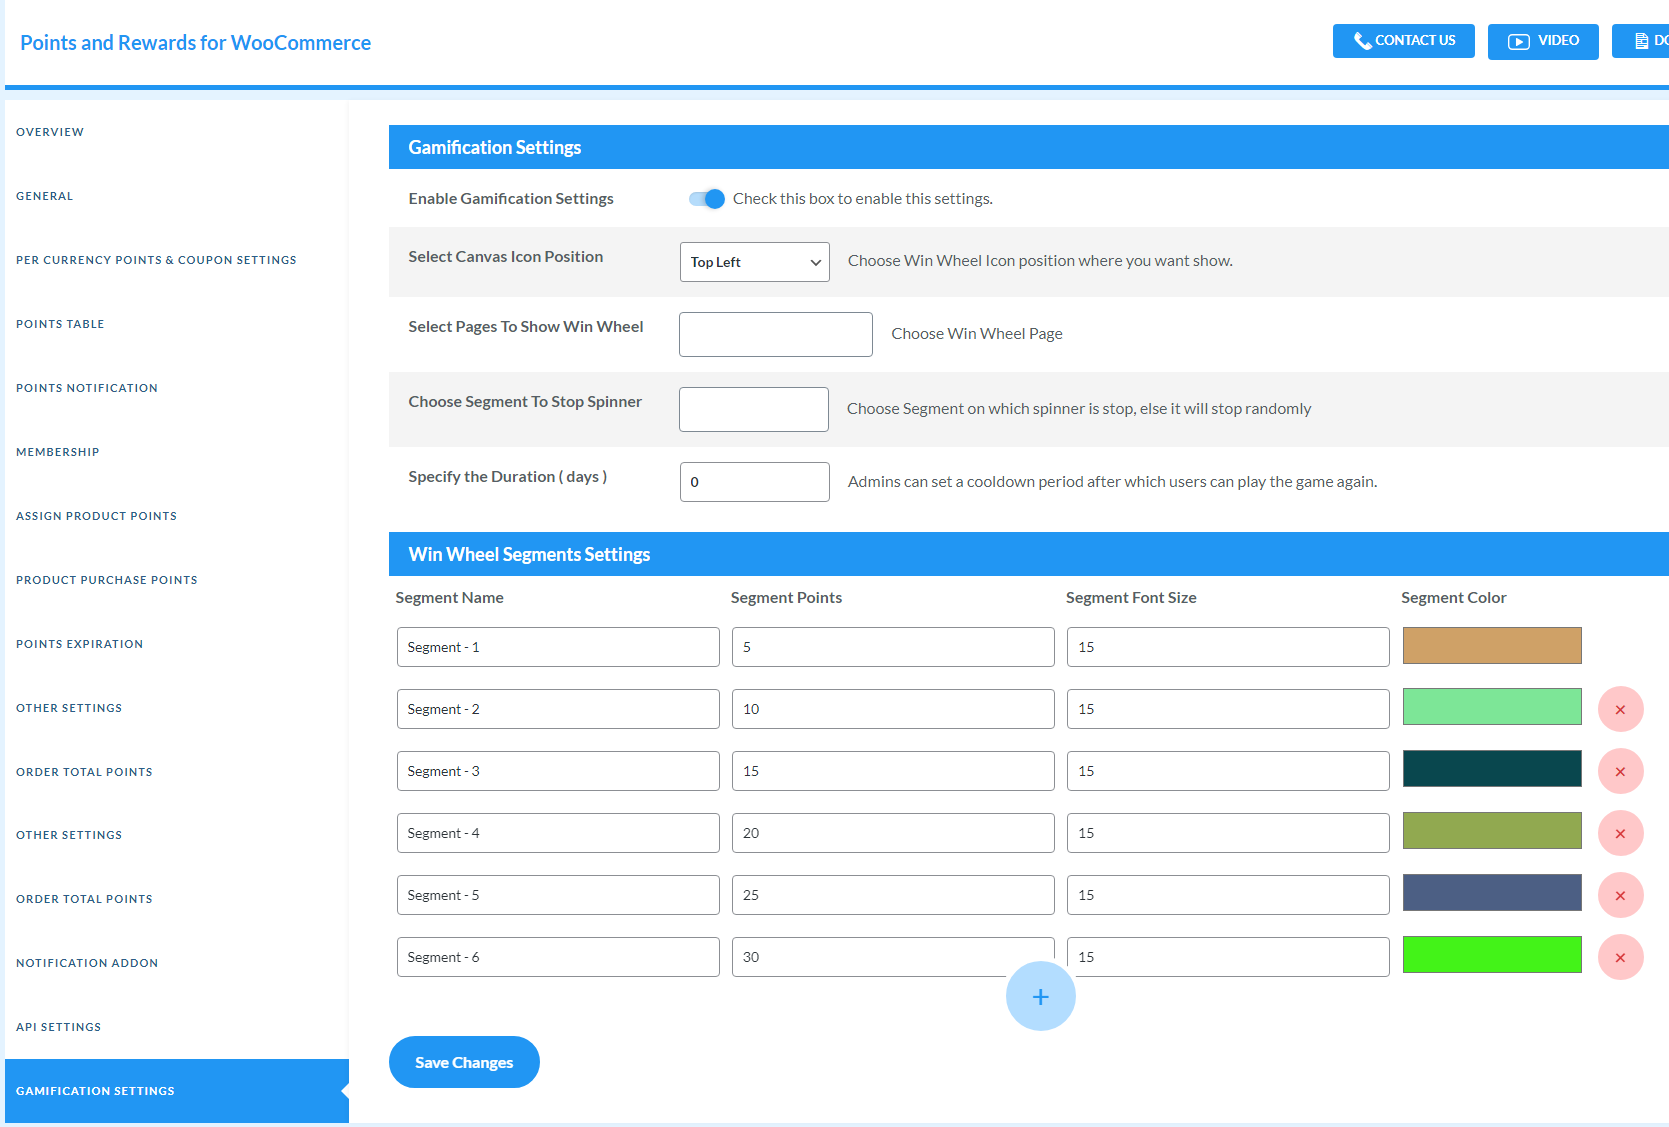
Gamification Settings,
- Enable Gamification Settings: The admins can enable the settings if they want to enable this feature for their customers.
- Select Canvas Icon Positions: Merchants also gets the liberty to select the positioning of the “win-wheel”.
- Select Pages to Show Win Wheel: By utilizing this setting, the admin can select the pages where he wants to showcase the win-wheel.
- Choose the Segment to Stop Spinner: Here the admin can select a particular segment where he wants to stop the spinner. If he leaves the field blank, in that case, the spinner can stop randomly on any segment.
- Specify the Duration (days): The admins can also specify a certain number of days or a cooldown period. This is how this works, you’re the admin, and the number of days for the cooldown period that you have specified is “5 days”. So, now when a customer comes to your website and spins the wheel. He will be in a position to “claim the rewards points” after claiming the same. The win-wheel will completely disappear for the customer. After the duration of 5 days, they’ll be in a position to spin the wheel again.
Win-Wheel Segments Settings,
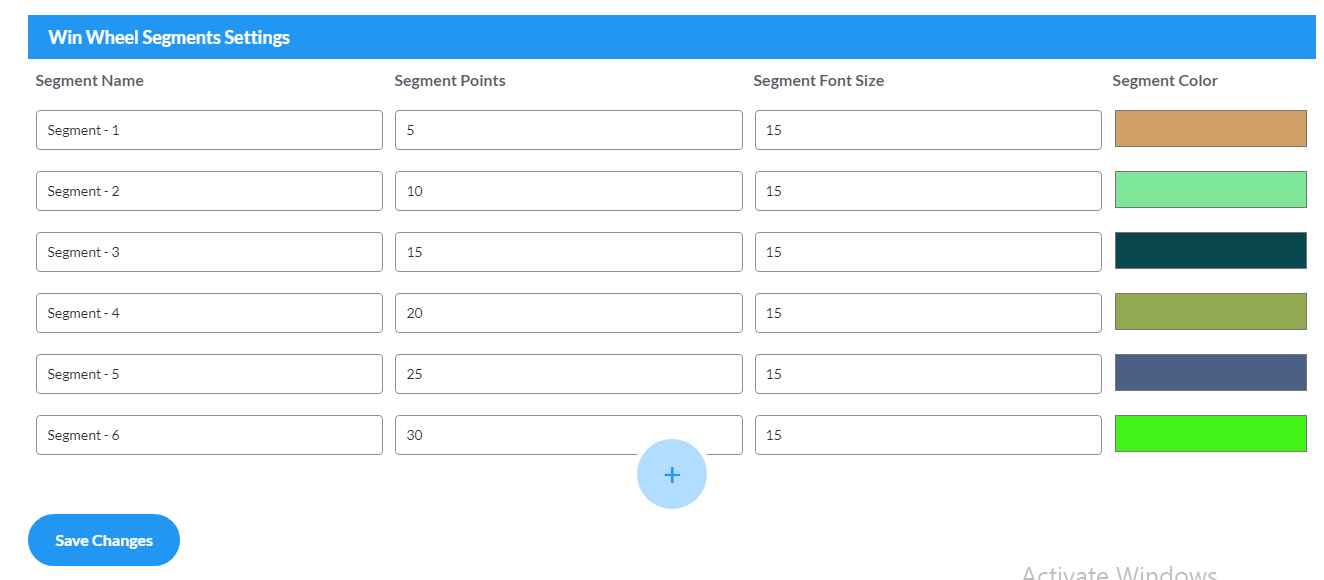
- Segment Name: The admins can also change the name of these segments from this section.
- Segment Points: From this section, the admin can choose the number of points, that he wants the customers to earn.
- Segment Font Size: The admins can select the font size for the name of the segments that will appear on the win-wheel.
- Segment Color: The colors of these segments can also be changed as per the requirements of your store.
(NOTE: The minimum number of segments that the admin will have to select is 6, and the maximum number of segments that he can add in the wheel is 12)
18.User Level & Badge
The points and Rewards plugin enables merchants to possess the authority to establish precise threshold levels that customers must attain to unlock distinct user levels. This provides you with the capability to set attainable milestones that are in sync with your business objectives.
This feature empowers you to craft a structured and highly motivating journey for your customers. The admins have full control over their position and level names. They can also set the milestone threshold for customers to reach their desired level with ease, and reward point values that the customers will get. Plus, we understand the importance of aesthetics. Merchants can easily customize badge images to align with their brand.
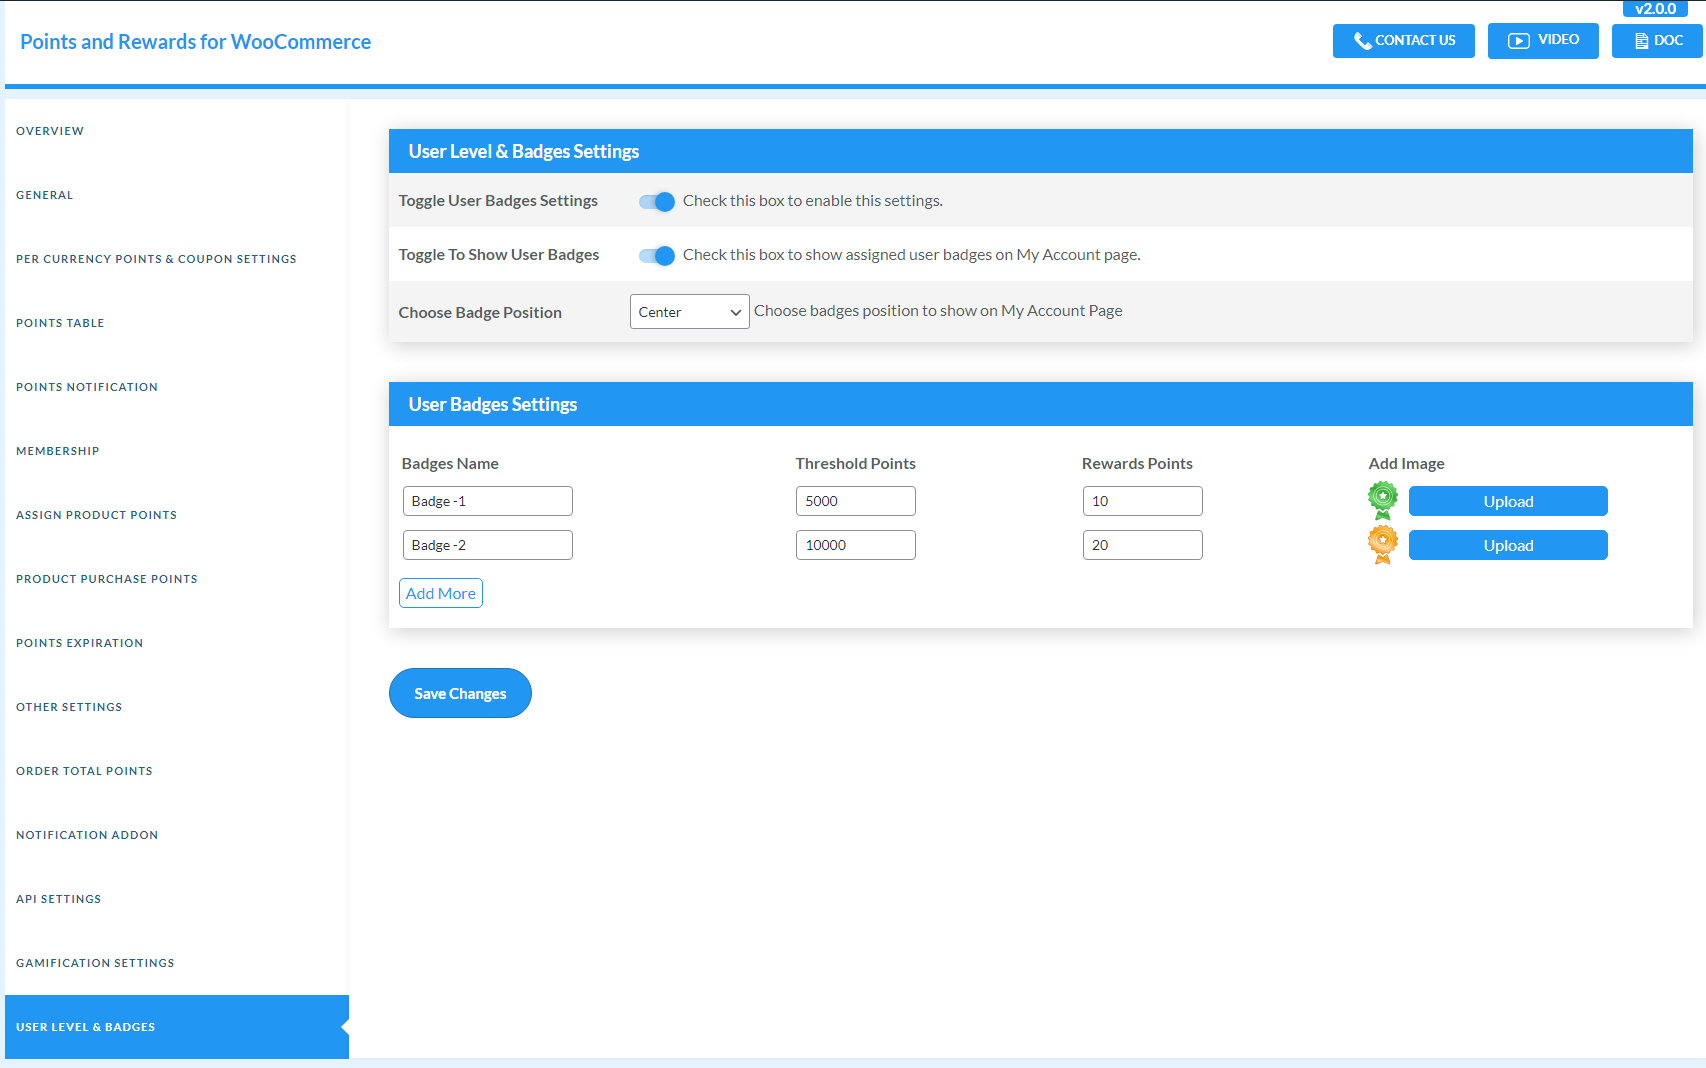
User Level & Badges Settings,
- Toggle User Badges Settings: The admins can check this box, to enable this setting
- Toggle To Show User Badges: After enabling this setting, the user badges will be visible on the “My Account” Page.
- Choose Badge Position: Merchants can also choose the position of these badges on the “My Account page”.
User Badges Settings,
- Badges Name: The admin can customize the name of these badges as per the threshold points.
- Threshold Points: Enter the threshold reward points that the customer must earn to receive the designated user badge and reward points.
- Reward Points: Merchants can enter the number of reward points that the customer will earn if he/she reaches a certain user level
- Add Image: There is a default image pre-assigned for the User Levels, but if the admin wants he can customize the image as well, by adding a different image from his system.
Frontend Screenshot (The User Level & Badge Feature in Action),
19.Validation, Notices, and WooCommerce Points and Rewards Log
The validity of points for single-use has been taken care of. The users can use the coupon once—no more conflict between referral link and coupon code. The referee cannot use the generated code for himself. The backend will now accept no negative values. Admin can set points Per currency value for WooCommerce reward points redemption.
20.Sorting of WooCommerce Points and Rewards Table
The Points and Rewards for WooCommerce log table sort ideally in ascending or descending order of the users’ points. The admin sets the order in the setting, and the total identified hierarchy appears in the log table in the desired order.
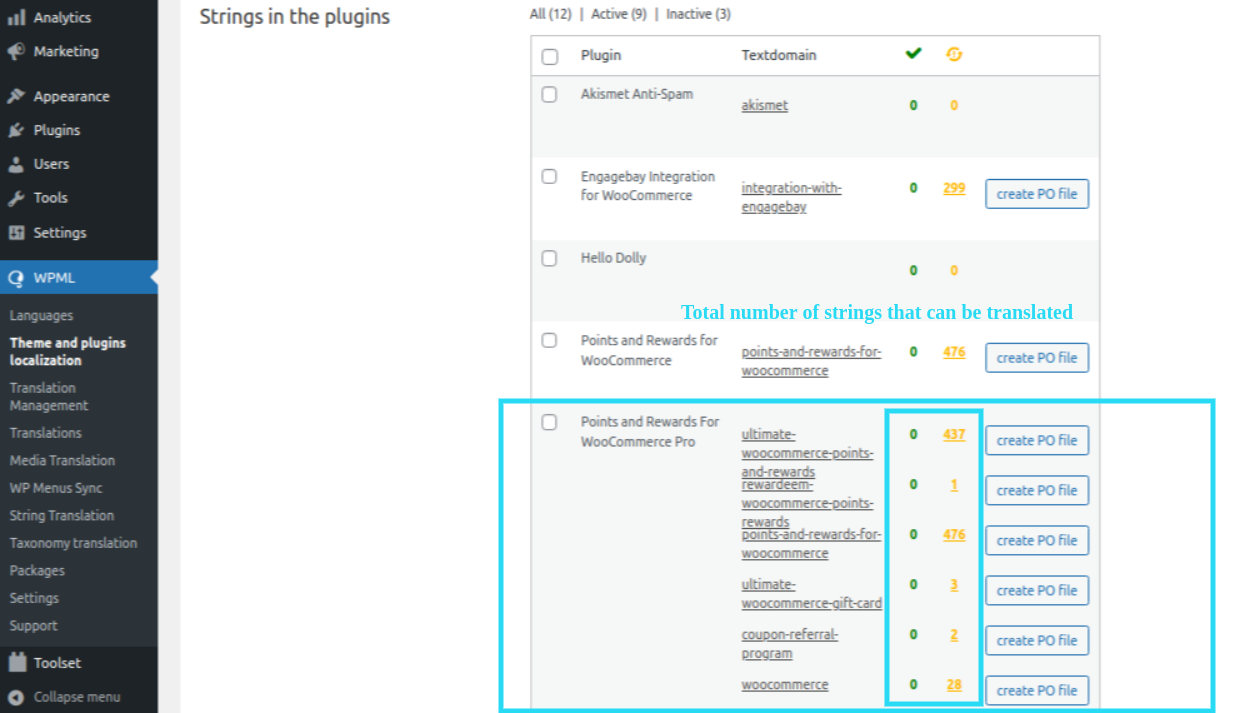
21.WPML Compatibility
The Points and Rewards for WooCommerce Pro plugin is compatible with the WordPress Multilingual (WPML) plugin for localization of the Points and Rewards for WooCommerce Pro plugin strings.
To translate the Points and Rewards plugin, you need to extract all the plugins’ strings. Follow these steps:
- Go to WordPress Dashboard > WPML > Themes Plugins Localization
- Navigate to the ‘Strings in the Plugins’ section
- Select Points and Rewards for WooCommerce Pro from the list of plugins
- On the bottom of the page, Click ‘ Scan selected plugins for strings

For translating the strings into a different language click on the number of strings present next to the plugin.
You’ll be redirected to a page where all the strings of the plugin are listed and you can translate each string from here.
On visiting this page you can manually select a string for translation by clicking on the “+” button next to each string in a row.
A popup will occur in which you can write the translation of the string.
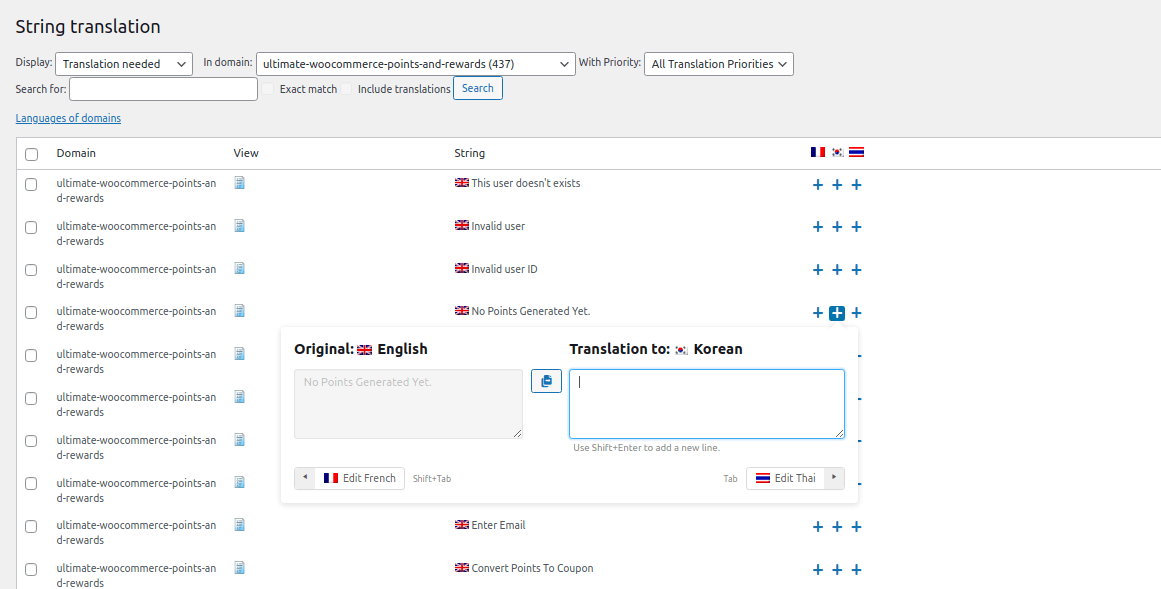
Once you’ve written the translation it will be automatically saved and when the customer chooses a different language they’ll see the translated version of the string.

22.Compatible with Currency Switcher for WooCommerce
The Points and Rewards for WooCommerce plugin is compatible with the Currency Switcher for WooCommerce plugin.
The WOOCS plugin allows you to change your website’s working currency.
To change the currency of the wallet system, Install and activate the Currency Switcher plugin. And follow the instructions:
- Go to WooCommerce > Settings > Currencies.
- Select any of the listed currencies.
- Click on the Save Changes button.
Afterward, all transactions will take place in the currency you choose.
23.Wallet System Compatibility
Point and Reward WooCommerce plugin is compatible with the Wallet system for WooCommerce [Free] and Wallet System for WooCommerce Pro plugin. This compatibility allows you to convert your earned points into wallet credit based on a certain conversion rate. The admin can set points conversion into wallet credit he wants to allow. For example, 20 points equals 2 wallet credits. Customers can later use this wallet credit for purchase in the store.
24.Compatibility with the Ultimate Gift Cards For WooCommerce Free and Gift Cards For WooCommerce Pro
The WooCommerce loyalty points plugin is compatible with the Ultimate Gift Cards For WooCommerce Free and Gift Cards For WooCommerce Pro that allows customers to earn extra points on the purchase of gift card products.
25.Feedback and Suggestions
Don’t see a feature in Point and Rewards for WooCommerce plugin that you think would be useful?
We’d love to hear it: Reach out to our Support query and we’ll consider adding it in a future release.
26.FAQs
Can I display assigned points on the shop page?
Yes, you can display the assigned points on the shop page.
For this: Go to assign product points > Enable display assign points on the shop page. After enabling it you can see the assigned product points on the shop page.
Is there any setting from where a user shares his point to another user/person?
For this, you have to go
At Backend:-Go to the plugin setting > Other setting tab > On Point Sharing section > Enable Point Sharing
At Frontend:-My Account page > Points Tab > Point sharing section > Enter email id > Enter Points > Click on the Go button
Can I restrict the usage of the Rewards points?
Yes. You can do this by going to General Settings of the plugin. In the General settings, you’ll find a section named Redemption Settings. In Redemption settings, click on the Enable Point Usage Limitation checkbox.
After enabling the checkbox, set the type of limitation, i.e,
1) Percentage,
2) Fixed.
Now enter the amount customers can pay using their points. After entering the amount, click on Save Changes
Can a customer upgrade his membership level?
Yes. After collecting the required number of points, the customer can upgrade his membership level.
Is it possible that the customer can transfer their points to another?
Yes. Under the My Account > Points tab, the customer can enter the email of the user and the number of points he wants to share and click on the Share button to transfer the points.
Can we set the expiration date of the points when points reach their limits?
Yes. Through the Points Expiration setting, you can set the Expiration limit of the points. In the Points Expiration setting, click on the Enable Points Expiration checkbox. Then set the required threshold and expiration period. After this, enter the number of days you want your customers to notify before, for the points expiration. Add your points expiration message and click on Save Changes.
Can Admin assign the points for categories?
Yes, From the Assign Product Points, admin can assign a different number of points for every different category. In the Assign Product Points setting, all your store categories will be listed. Enter the number of points you want to assign to each category and click on Submit in the end.
Is there a setting in your plugin where a customer redeems his points as a coupon?
Yes. From the Per Currency Points & Coupon Settings, you get a Coupon Settings section. From that section, you can allow customers to convert points into coupons. Just click on the Enable Points Conversion checkbox. Enter all the required details and click on Save Changes.
Can we set the number of referrals after that referrer gets the point?
The referee will get the referral points when a fixed number of customers register using his referral link.
4.4.Social Sharing Setting
The users can enable this setting to allow their customers to share the referral link to other users through social media channels.
After successfully enabling the setting, your customers can share referral links to other users on social media platforms.