
1.Overview
Watch: How to Setup dvance Shipment Tracking?
Key Features of Track Orders For WooCommerce:
- Display icons instead of text for order statuses in the order table.
- Allow tracking orders using the order ID only.
- Support for third-party tracking services like FedEx, USPS, Canada Post, etc.
- Ability to export orders as CSV files.
- Send email notifications for order status updates.
- Provide tracking information with Google Maps integration.
- Custom Order Status: Allow users to create and use their own custom order statuses.
- Four new tracking templates for different visual options.
- Shortcodes to create an Order Tracking page and a Tracking Form.
- Popup box for customers to easily track their orders.
- Integration with the 17track.net tracking service.
- Custom order status options for bulk actions.
- Multiple shipping services using company names and URLs.
- Notify customers with payment links for pending payment orders.
2.How to Download The Order Tracker Plugin?
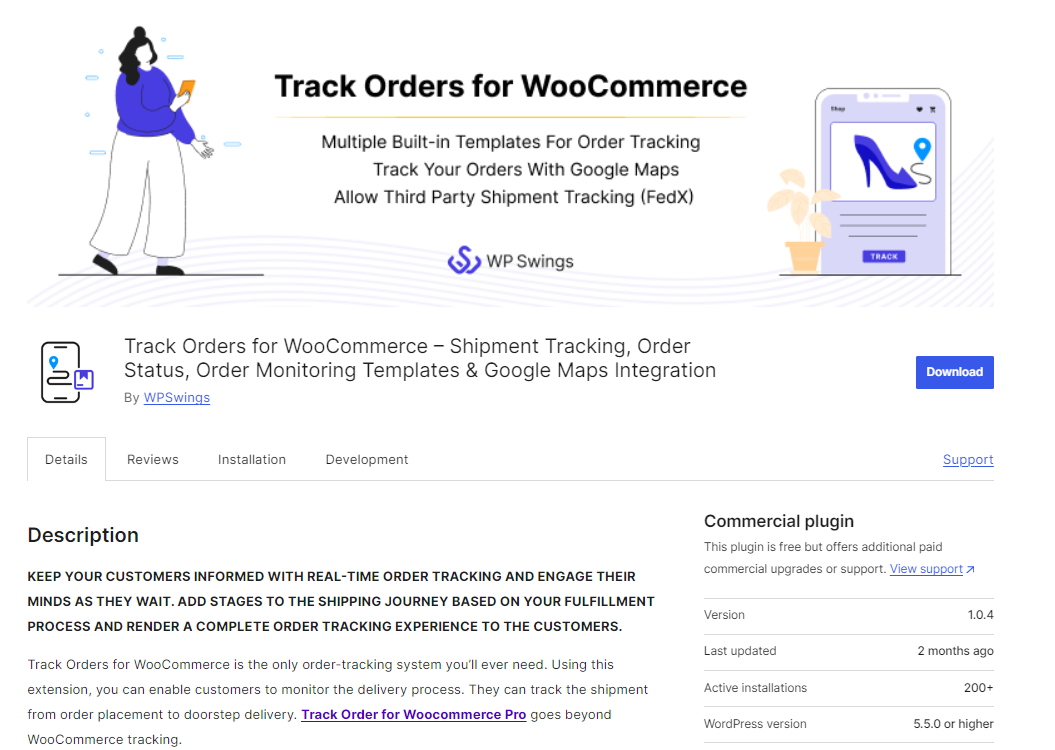
To Download the Org Version of the plugin:-
navigate to the WordPress page of Track Orders for WooCommerce, and click on the Download button.
To download the premium order tracker plugin that you purchased please follow the below steps:- Premium
- Go To https://wpswings.com/my-account
- Visit Orders Section
There you will get a License code and a Premium purchased plugin zip file Download and use it on your website by activating it
Note: You need to have both Free and Pro plugins in order to use them smoothly
3.Installation
Let’s See how you can download and install both the free and pro version of the Order Tracker plugin
3.1.Order Tracker [FREE]
Automatic Installation:
Automatic installation is the easiest option handled by WordPress.
Follow these steps for the installation:
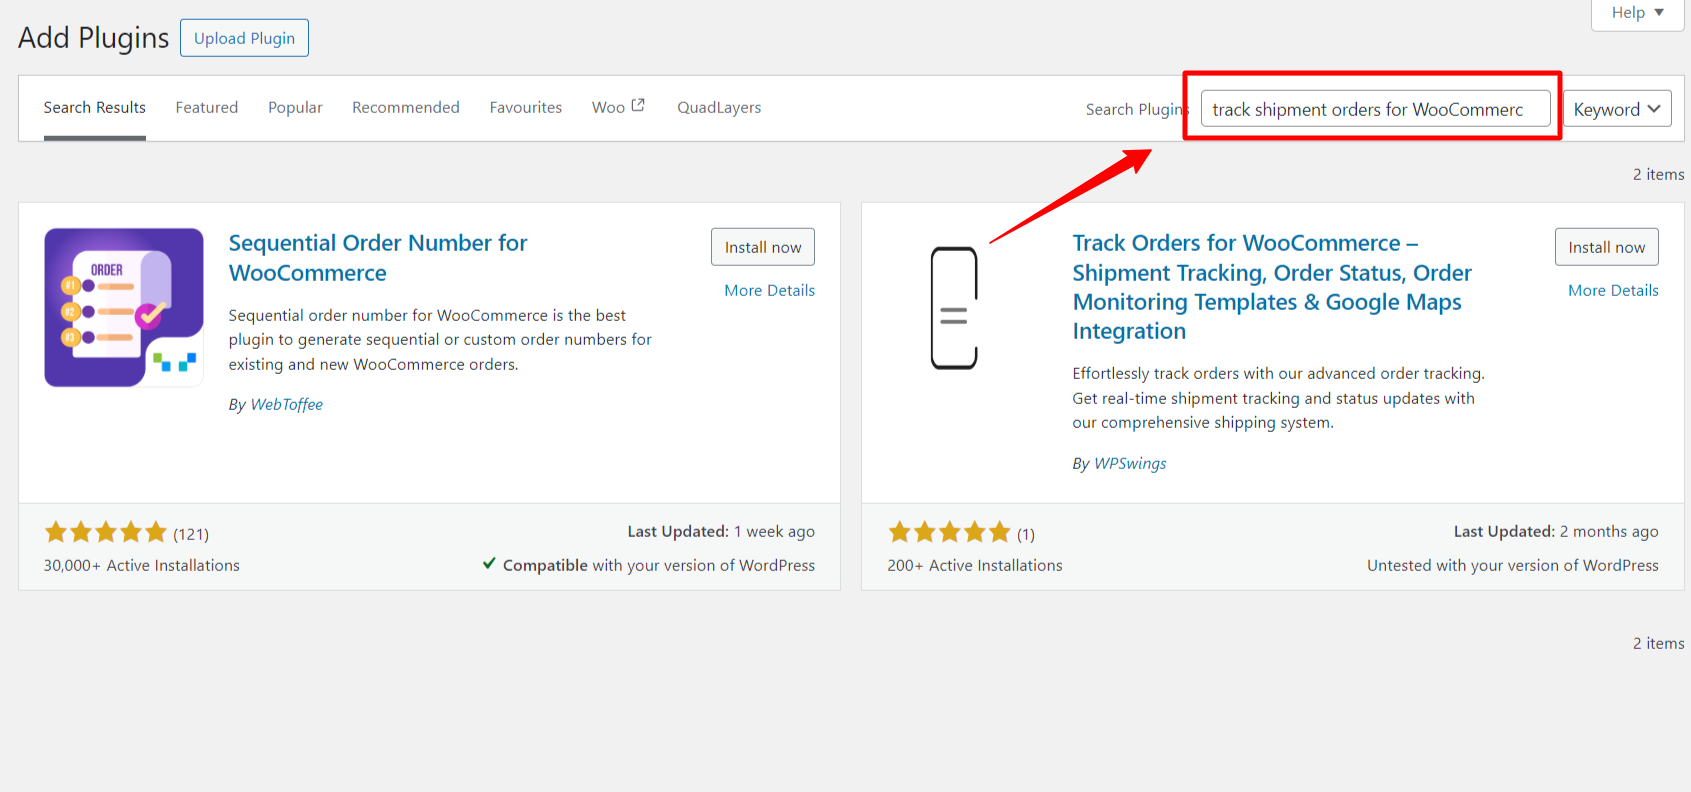
1) Go to the Admin panel navigate to the sidebar click on the ‘Plugins’ menu > ‘Add New’.
2) On the ‘Add Plugins’ page go to the search bar and type ‘Track Orders For WooCommerce’.
Once you find ‘Track Orders For WooCommerce’ by WP Swings, you can view the details about it such as the points release, rating, and description. One can install it, simply by clicking “Install Now”
Manual Installation:
The manual installation of the plugin is another option to install the plugin in the seller’s WordPress environment.
The manual installation method involves downloading our ‘ WooCommerce Order Tracking Extension’ and uploading it to the web server via their favorite FTP application.
The steps for manual installation are as follows:
1) Upload the ‘Track Order for WooCommerce’ folder to the /WP-content/plugins/ directory.
2) Activate the WooCommerce Order Tracking plugin through the ‘Plugins’ menu in WordPress.
The best results can be viewed by using the “WooCommerce” standard theme (Storefront). Any third-party plugin might cause conflict with our plugin.
3.2.Order Tracker [PRO]
Automatic Installation:
Automatic installation is the easiest option as WordPress handles the file transfers itself and you don’t need to leave your web browser.

The steps are as follows :
1) Download the zip folder of the plugin Track Orders For WooCommerce Pro from My Account > Orders > Click on view > Scroll down and download the plugin zip file
2) Once downloaded, install the Track Orders For WooCommerce Pro plugin by browsing and activating it.
Note: Visit the Login page to create your account before completing your purchase.
Manual Installation:
The manual installation of the WooCommerce Order Tracking plugin is another option. To install the plugin to your WordPress environment.
The manual installation method involves downloading our Track Orders For WooCommerce Pro Extension and uploading it to your web server via your favorite FTP application.
The steps are as follows :
(i) Kindly, upload the Track Orders for WooCommerce Pro folder to the /wp-content/plugins/ directory.
(ii) Activate the Track Orders for WooCommerce Pro plugin through the ‘Plugins’ menu in WordPress.
Note: Before activating the Track Orders For Woocommerce Pro, you should have the Track Orders For WooCommerce – WordPress plugin otherwise, the plugin will not function.
So, if you don’t already have it, you can download it directly from here:
3.3.License Activation
After Purchasing the premium version navigate to My Account > Orders > Your Order. There you’ll find the License Key.
If you want to benefit from all the premium features and automatic updates and access the support platform to receive help from our staff. In that case, it’s necessary to activate the license.
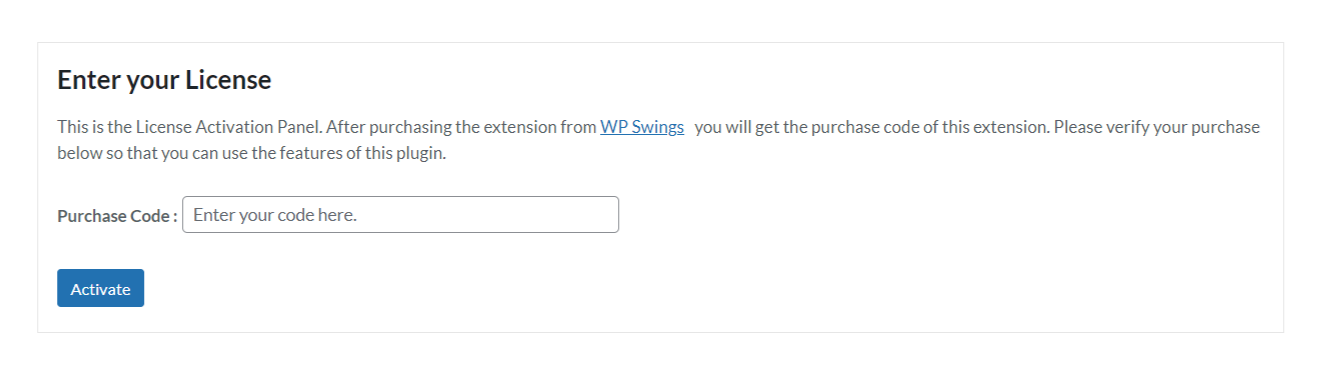
To do so, you have to navigate to the “License” tab, here you can enter the “License Key”, and click on the “Activate” button. Customers are supposed to receive these in their mail when they purchase the premium plugin.
You can also find the license activation code in the My Accounts > Order section
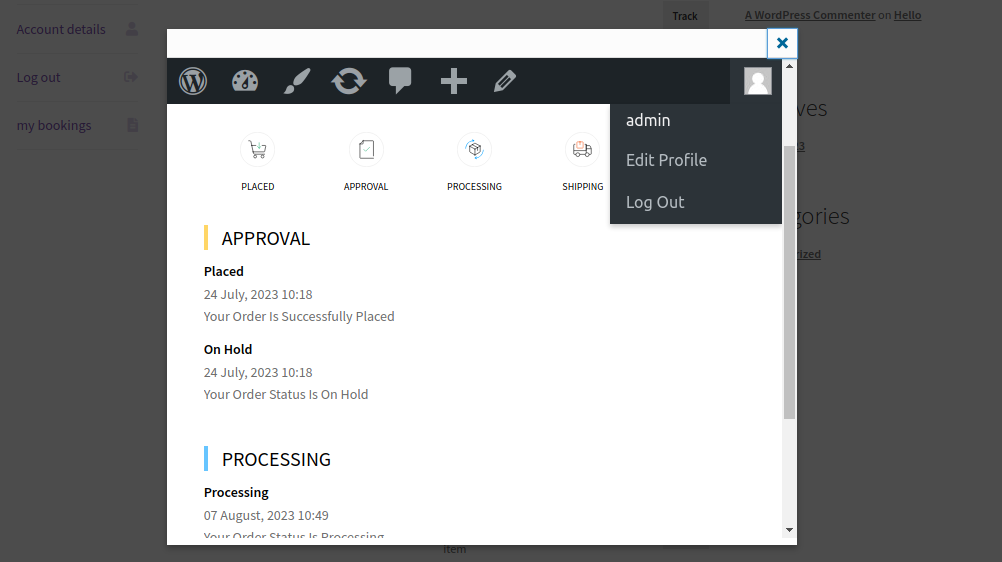
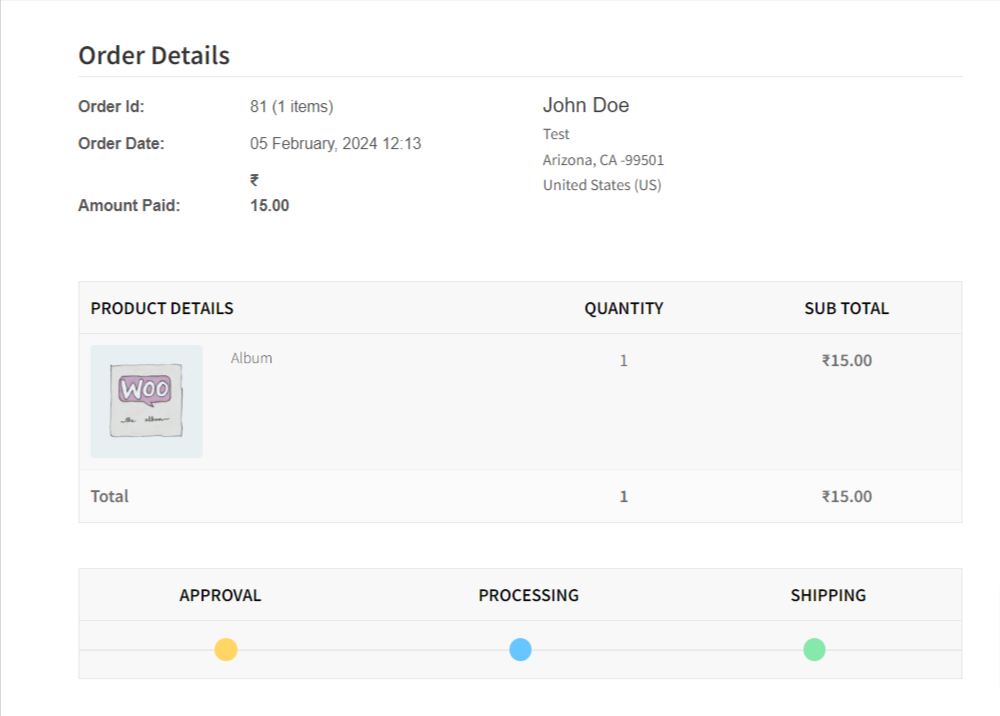
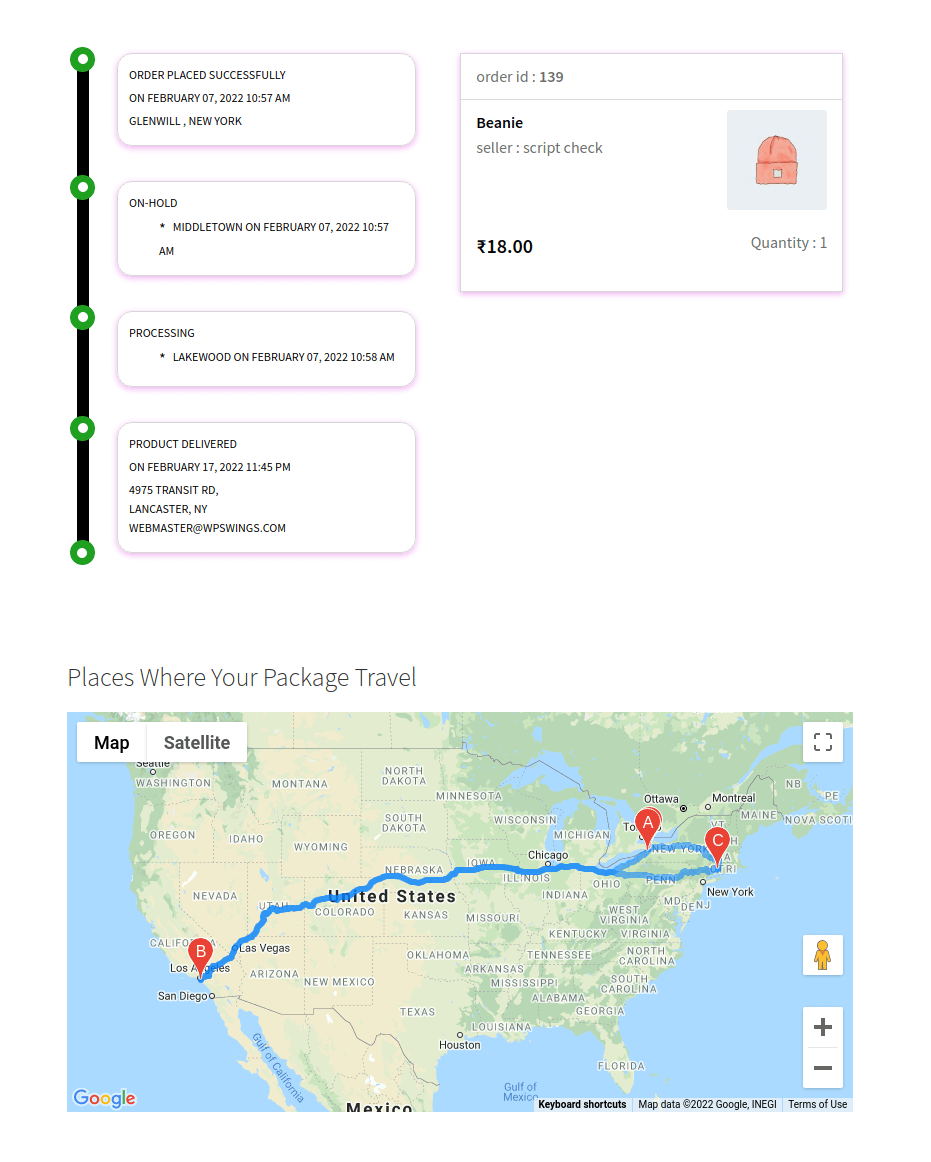
4.How Customers Can Track Orders
Customers have to navigate to the My Account > Order Section and click on the Track Orders button to view the shipping progress.
The Track Orders has two sections; one for showing order details and another for tracking progress.
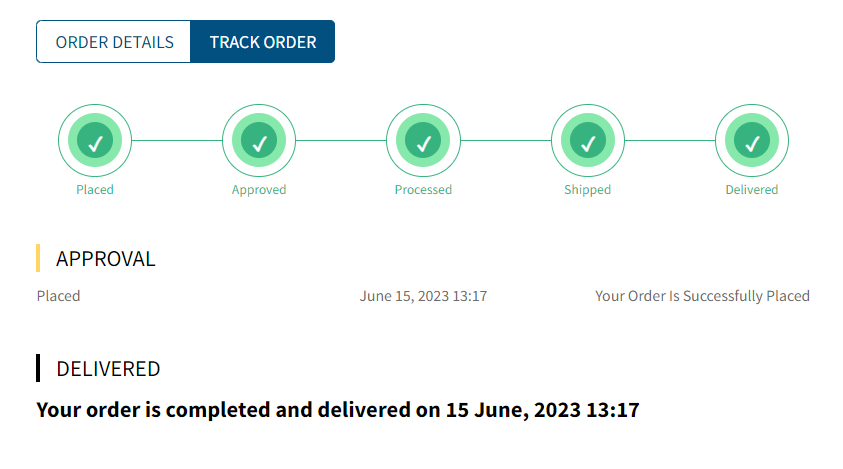
Following a successful order, the tracking process will mirror the given example. Even in situations involving returns or reversals, customers retain the ability to retrieve order tracking details.
5.General Setting
Here, the admin can customize all the general settings for the plugin
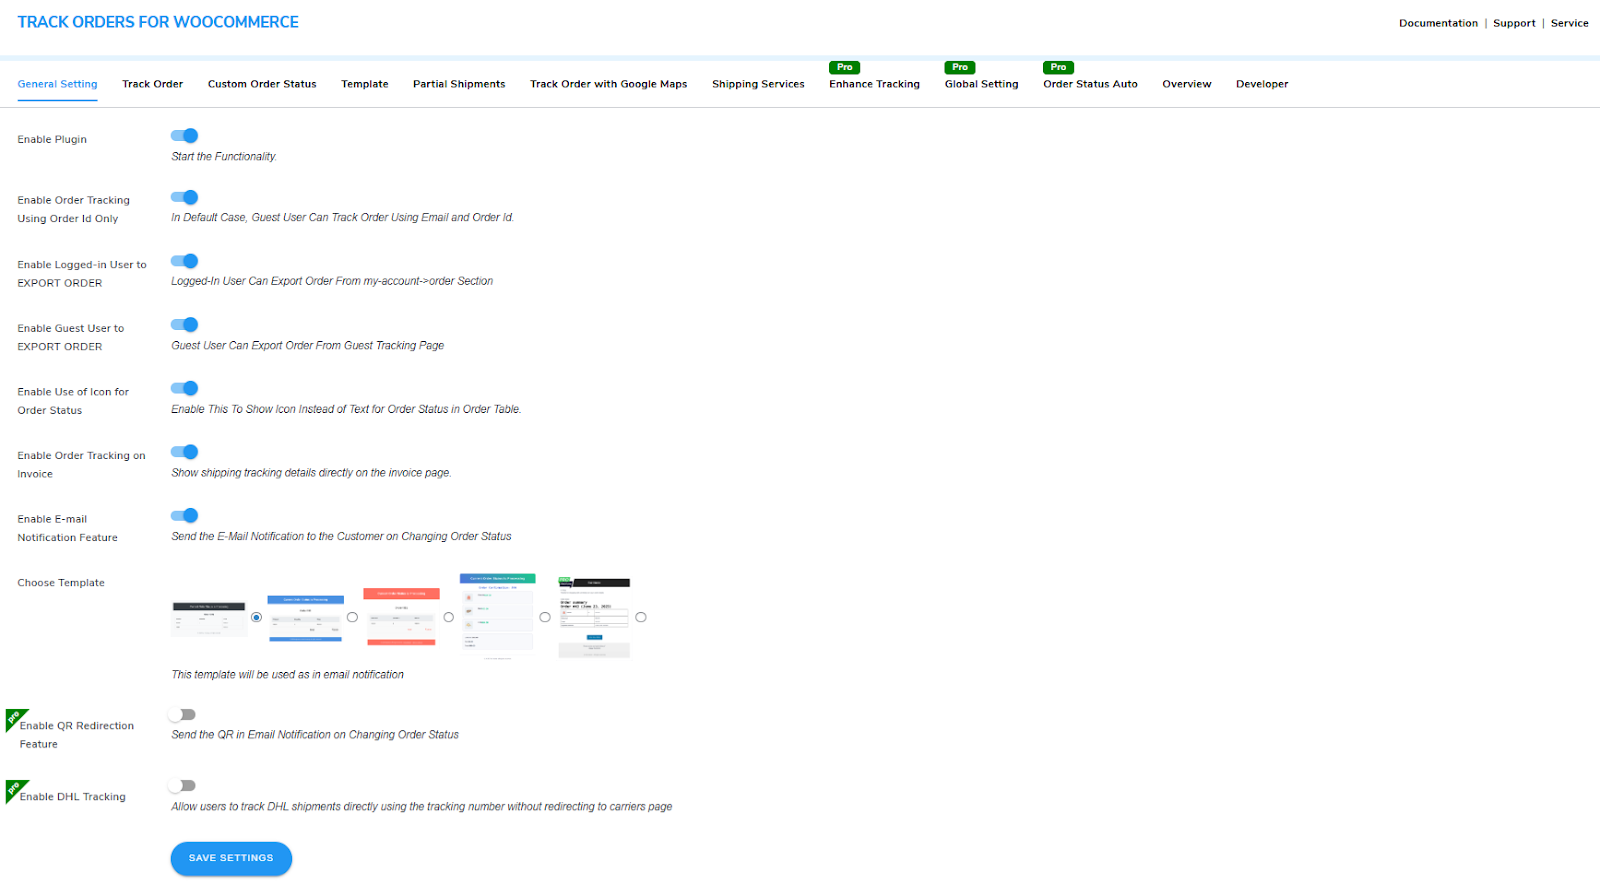
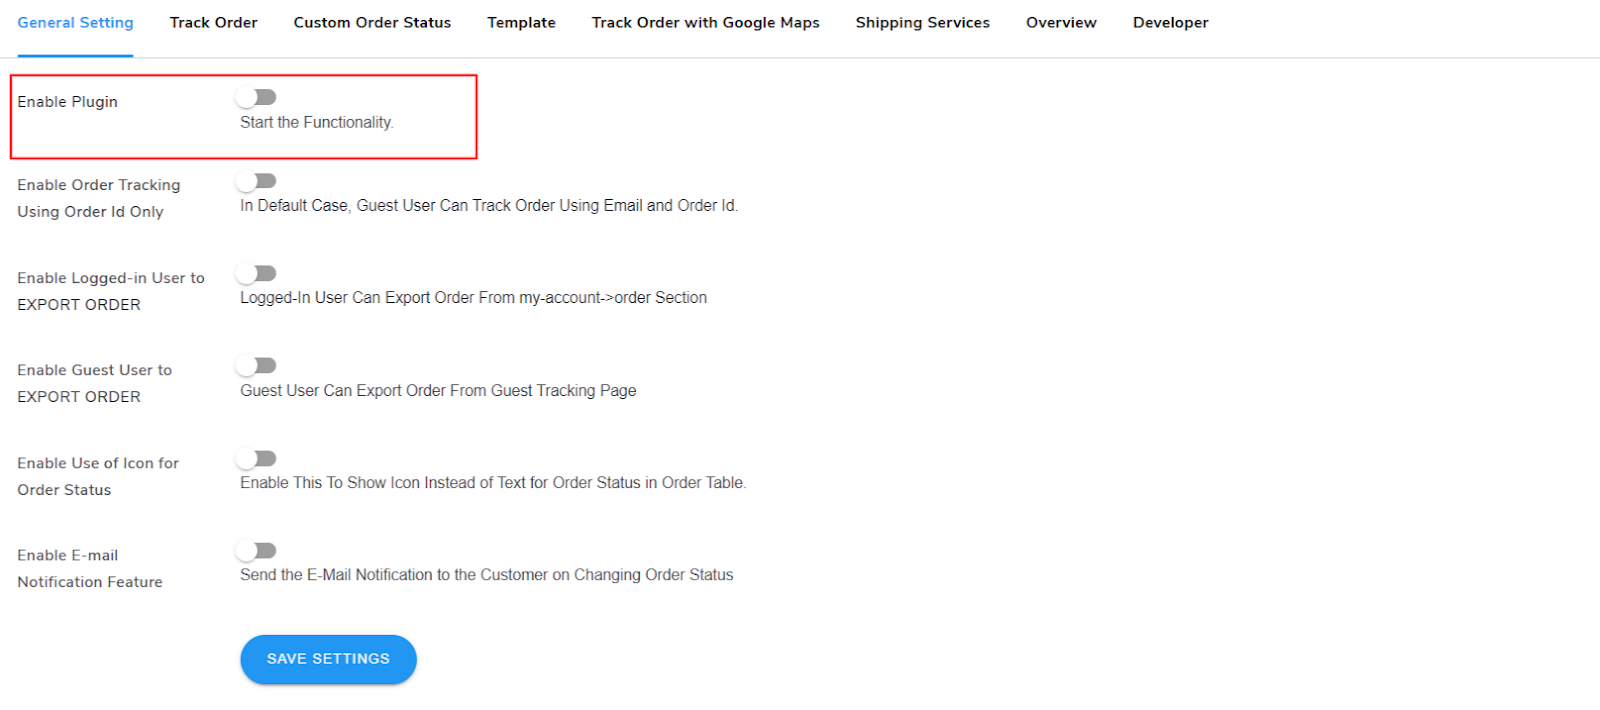
1) Enabling the Plugin:
After activating the plugin, you need to enable it to start using its features. You can do this by toggling the Enable Plugin option in the General Settings section. This ensures that the plugin is fully operational and ready to be configured according to your needs.
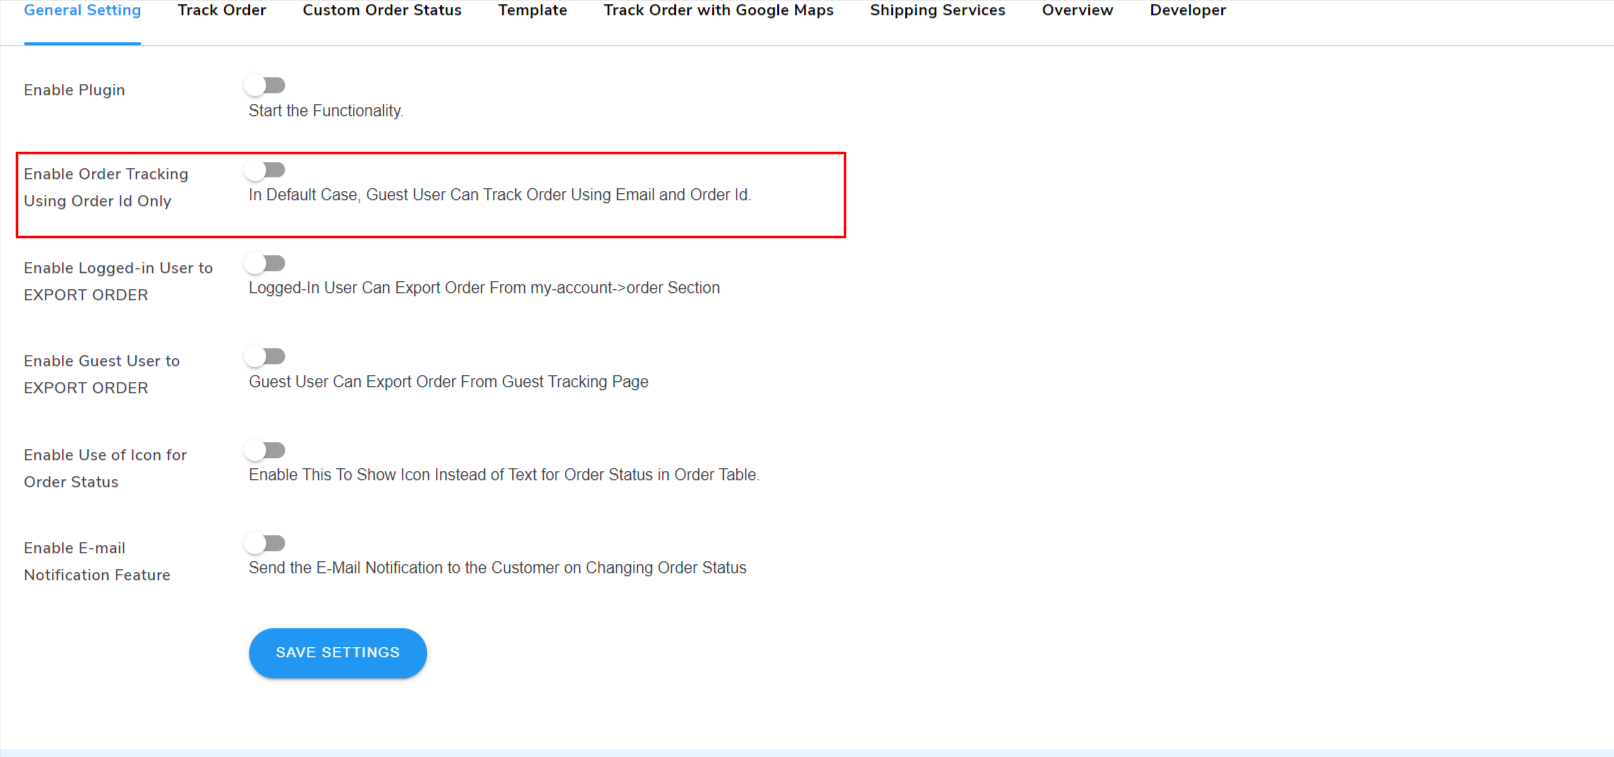
2) Order Tracking Using Order ID:
Enable the Order Tracking Using Order ID setting to allow customers to track their orders using just the order ID. This simplifies the tracking process by requiring only the order ID, making it easier for customers to access their order status.
3) Allowing users to export Orders:
To enable logged-in users to export all their orders, simply toggle the Allow Users to Export Orders setting. This feature provides users with the ability to download and save their order history directly from their account.
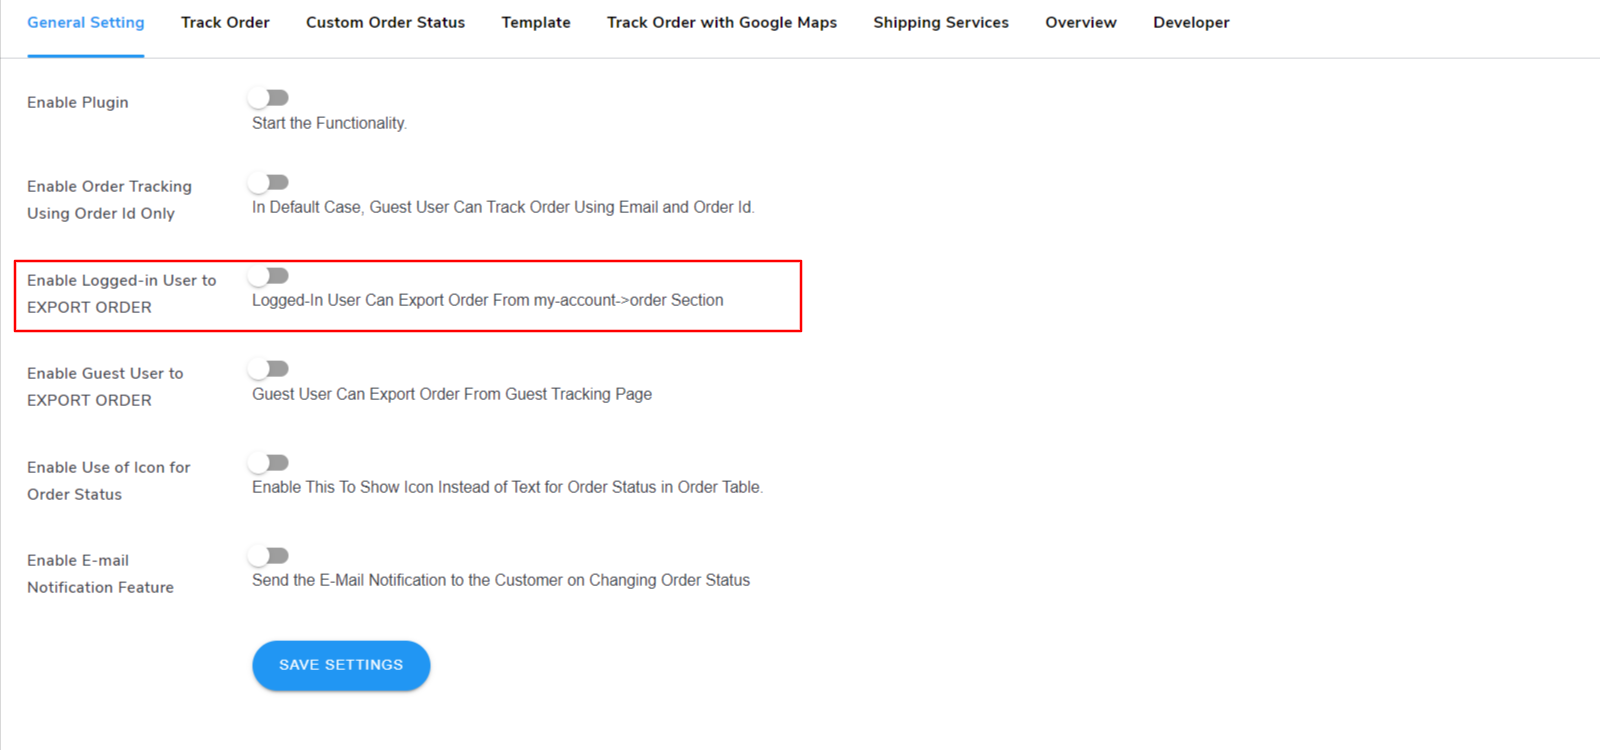
Users can conveniently export all their orders from the “My Account” section.
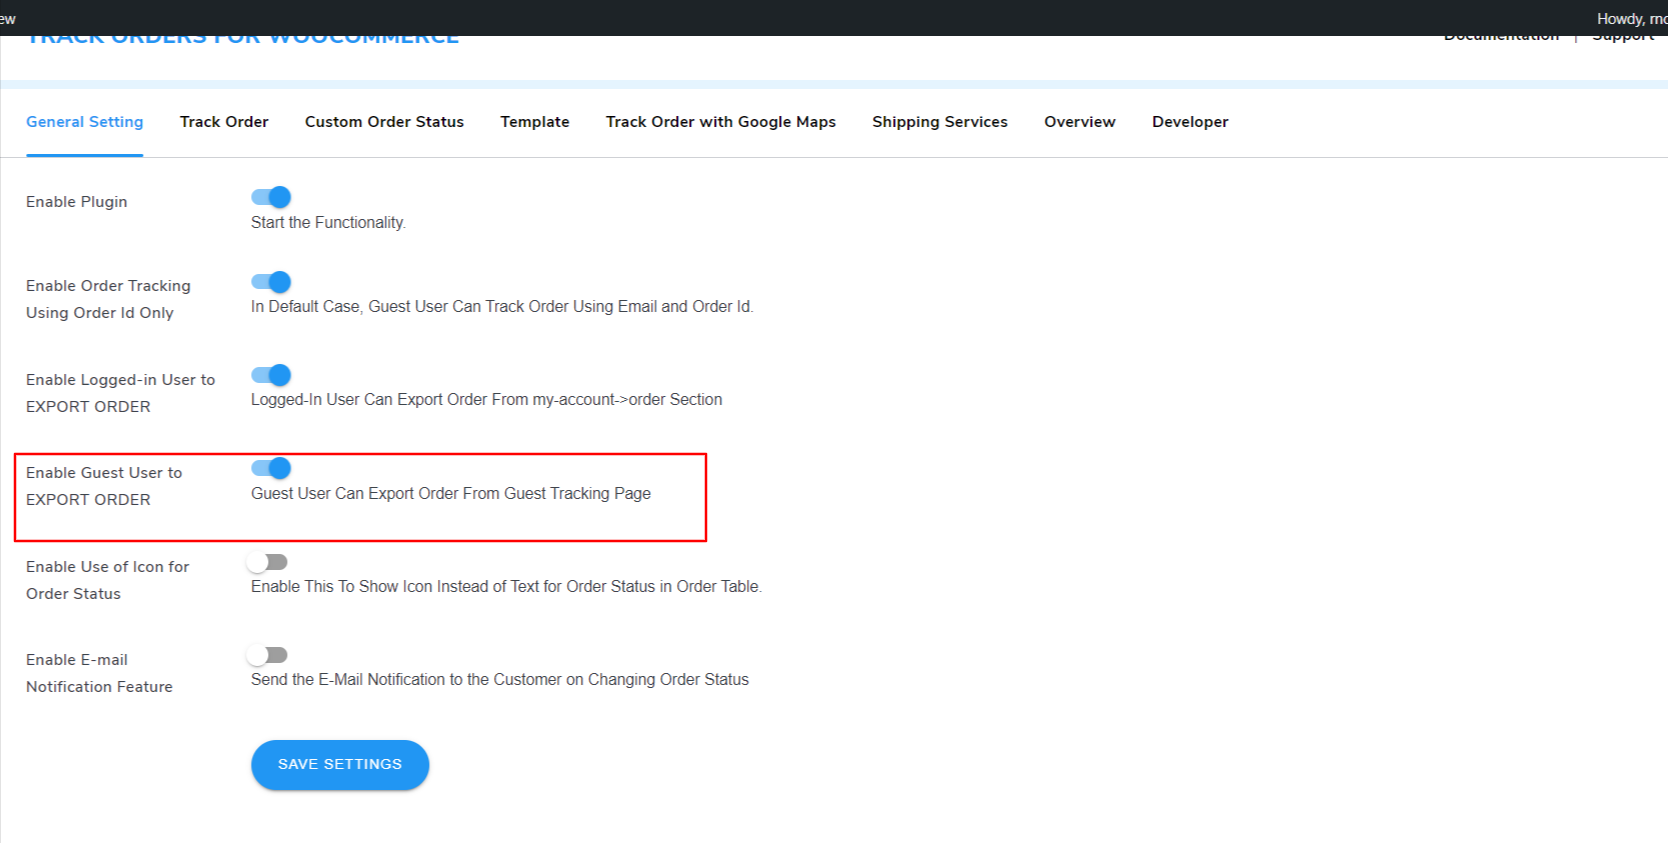
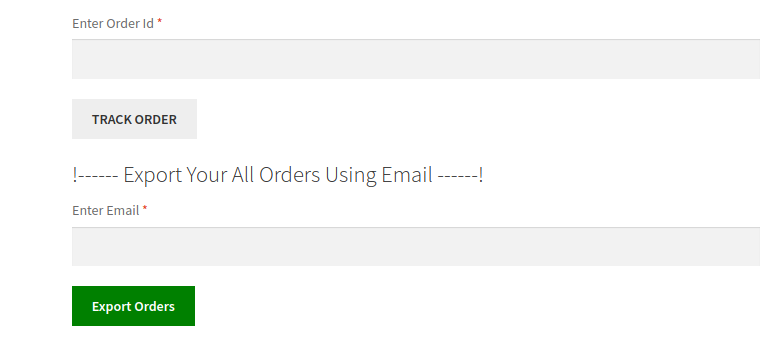
4) Allow Guest Users to Export Orders:
To enable guest users to export their orders without logging in, toggle the Allow Users to Export Orders (Guest Users) setting. This feature makes it convenient for guest users to download and save their order details without the need for an account.
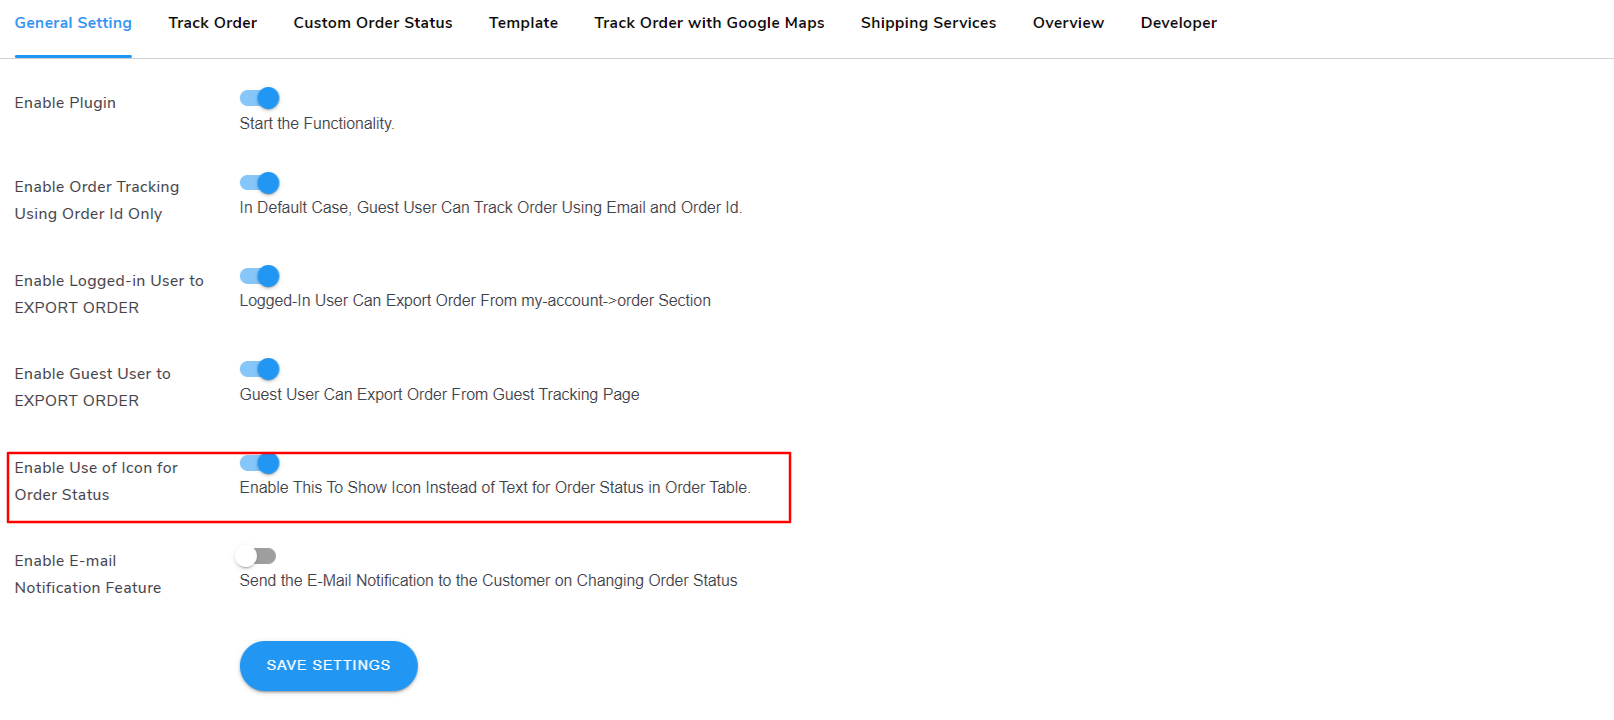
5) Use Icon Instead of Text for Order Status:
Enable the Use Icon Instead of Text setting to display an icon in place of regular text for the order status in the order table. This option provides a visual representation of the order status, making it easier for users to quickly identify the status of their orders.
6) Enable Order Delay Notification
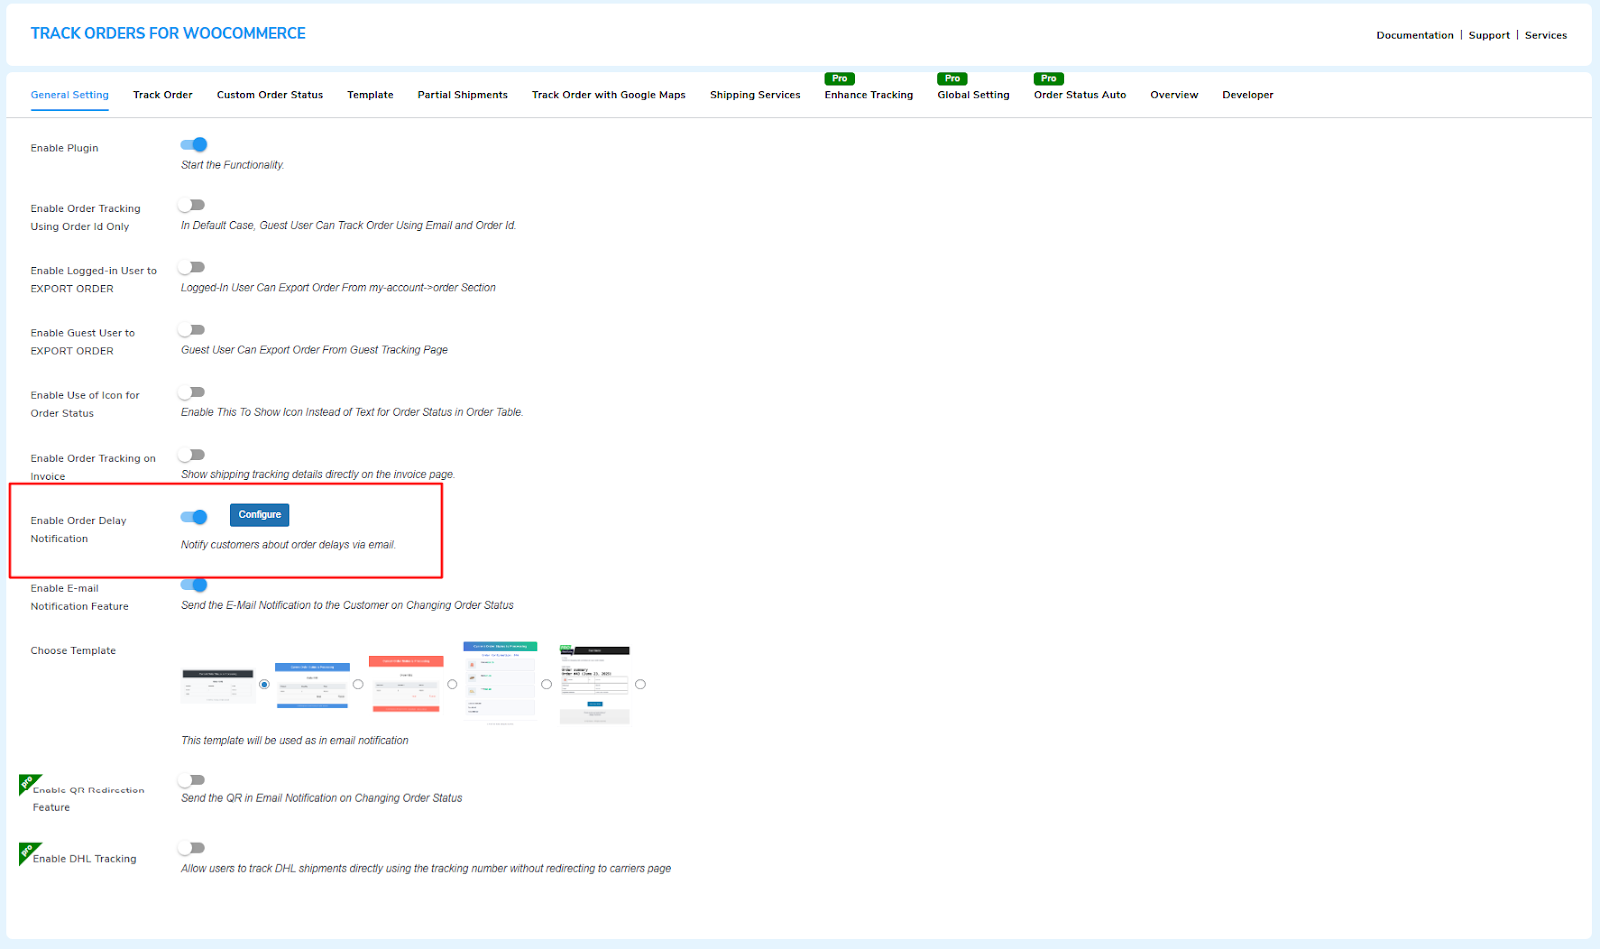
After enabling this feature, a Configure button will appear. Click on the Configure button a popup will appear to manage the delay notification settings.
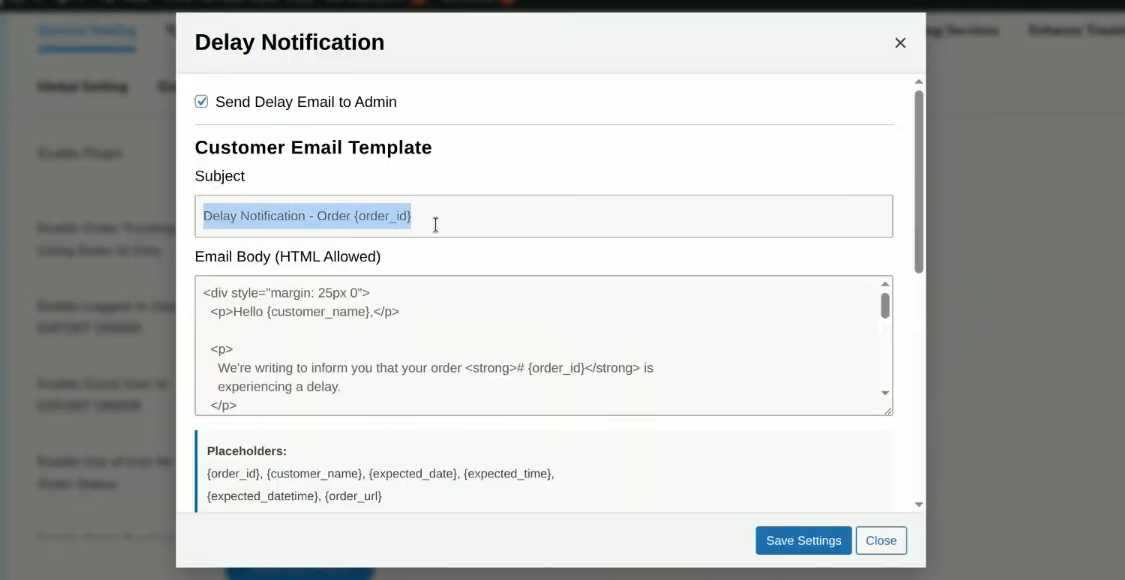
Using this feature, you can automatically send delay notification emails to customers when their deliveries are running late for any reason.
The delay notification email is sent automatically when the admin increases the delivery date for the order from the WooCommerce Orders section.
You can:
- Enable or disable the delay notification emails as needed.
- Customize the email template according to your store’s requirements. Use dynamic shortcodes such as:
- {Order ID}
- {Customer Name}
- {Expected Delivery Date}
- Choose whether to send the delay notification email to the admin along with the customer.
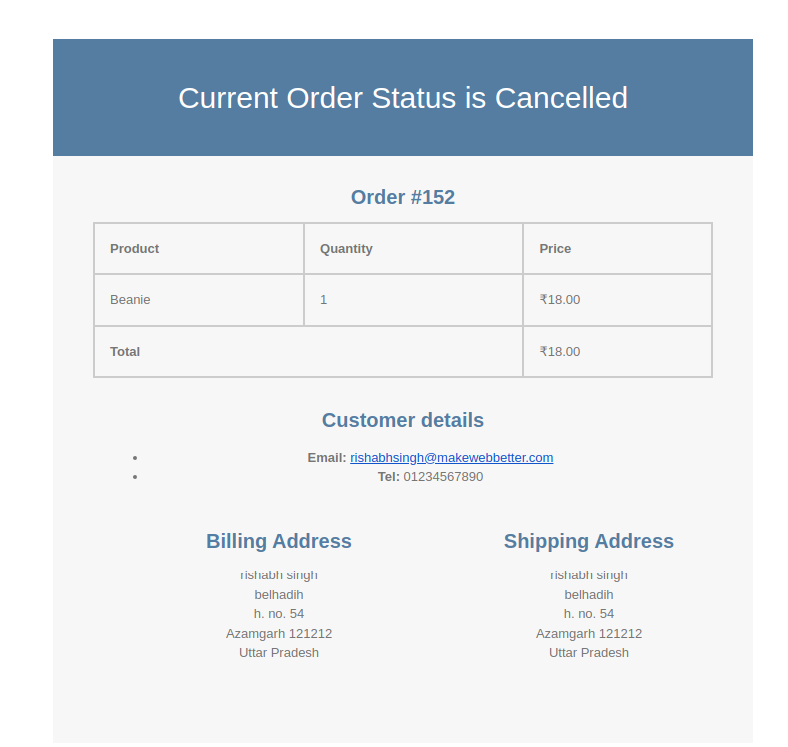
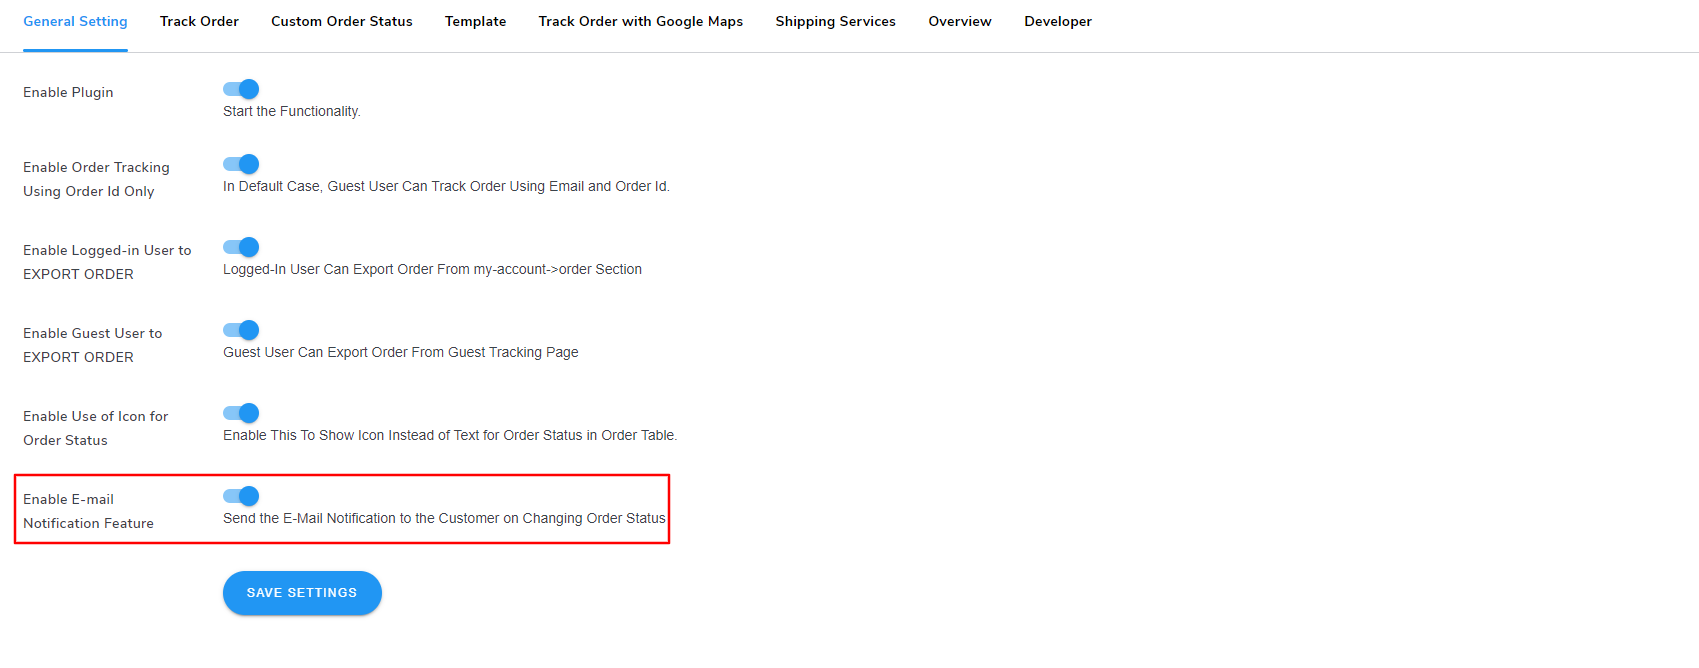
7) Send Email Notifications for Order Status Change:
Enable the Send Email Notifications setting to automatically send email notifications to users whenever their order status changes. This feature keeps users informed and up-to-date with the progress of their orders, enhancing their overall experience.
Front End Representation:
Backend Representations:
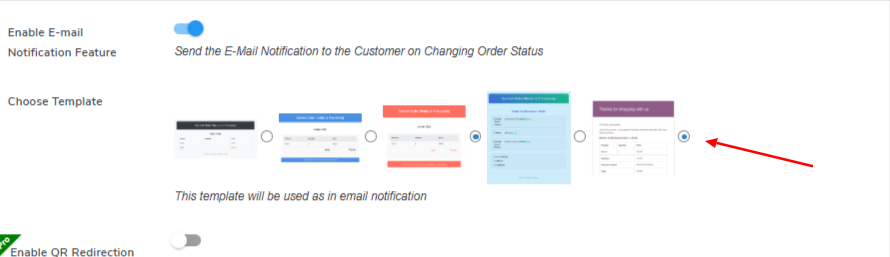
8) Email Notifications Templates:
With the Pro version of the plugin, you can access multiple email notification templates and select the one that best aligns with your brand identity.

9) Custom Email Builder: Premium
We have introduced a custom email template builder to customize your email notification template. To utilize this option, select the last email template and save the setting.
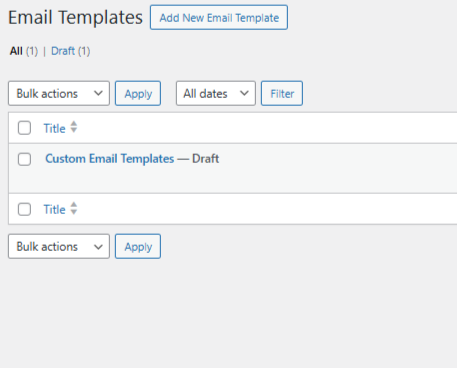
Once you have selected the template and saved the settings. Navigate to Woocommerce > All Email Templates
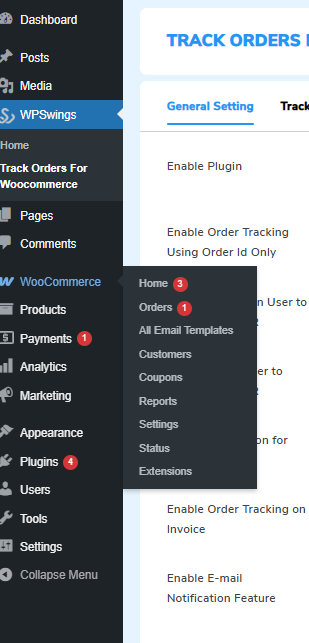
There, you can create a new custom template or customize the existing template for email notifications
Inside the template section, you get an email builder with multiple types of elements that you can customize and arrange accordingly to create an email that suits your brand in the best way possible.
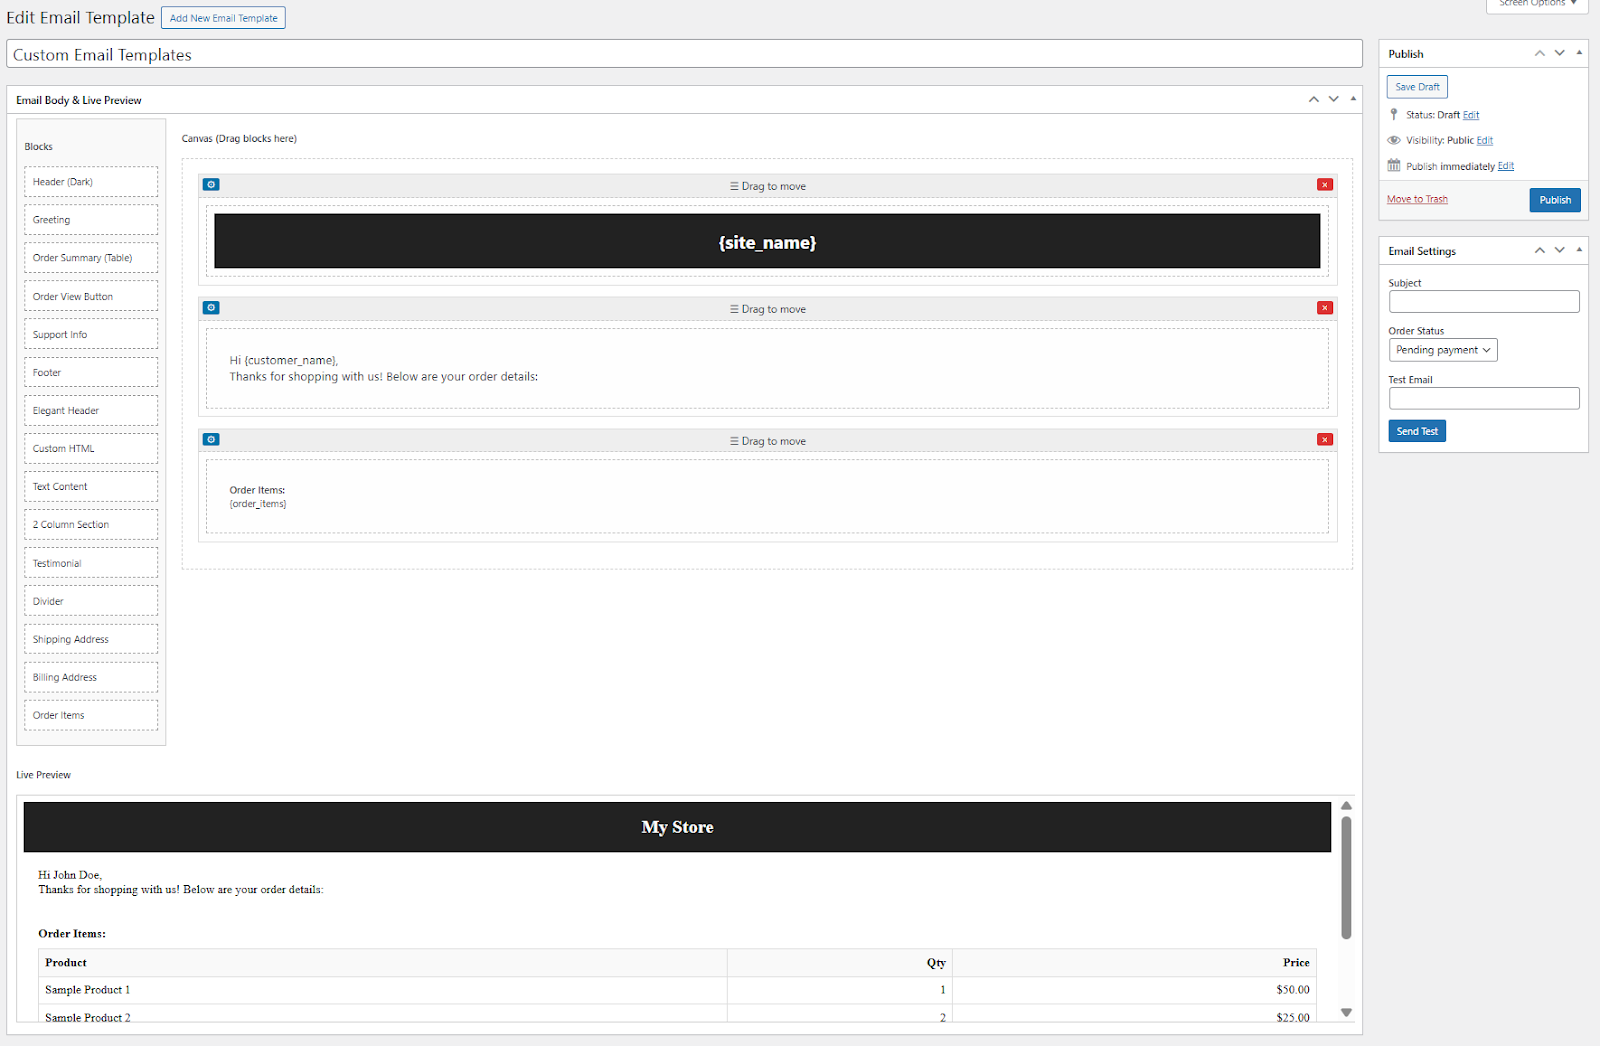
On the bottom, you can see a live preview of how this email template will look, plus on the right side, you have the option to test this template by sending a test email.
10) Enable QR Redirection Feature: Premium
Enable the QR Redirection Feature to share a QR code along with the email notifications. This QR code, when scanned, will redirect the user directly to the tracking page, providing a quick and convenient way for users to access their order status.

11) Enable the DHL Tracking: Premium
Enable this option if you want to integrate the DHL Tracking into your website; you’ll
Need the DHL API key, which you can grab from here
Paste the API key in the box, customize your template color, template text color, and upload your tracking logo, and save the settings.
![]()
To use this DHL tracking feature, open any order from WooCommerce Orders, and enter your DHL tracking code.
![]()
And then on the right section click on update. After updation your users will see a DHL Tracking button on their orders section under My Account.
![]()
They can click on it to see the DHL tracking template with all the details
![]()
6.Track Order
In the Track Order Section, the admin can enable the order tracking, and select and create custom order status if required.
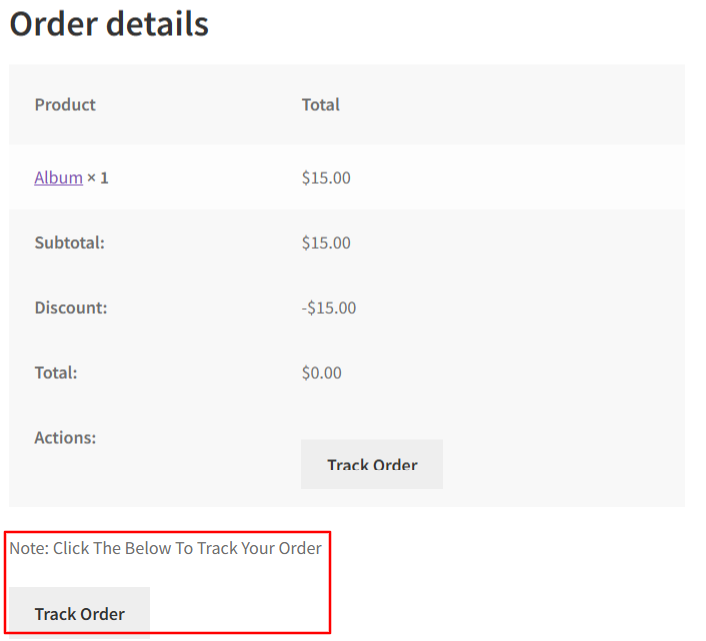
Enable Track Orders Button Below Order Details
Toggle this option to show the track order button right below the order details, so users can directly track their order just after placing it.
Enter Track Order Text Below Order Details
Here you can customize the text you want to how below the track order button
Enter Track Order Note Below Order Details
Here, you can customize the note to inform the user about the button function
Enabling Custom Order Status
In the Track Order section, you have the option to enable Custom Order Status to tailor customer order statuses beyond the default options like Approval, Processing, and Shipping. This feature allows you to create and manage additional custom statuses that better fit your specific order workflow.
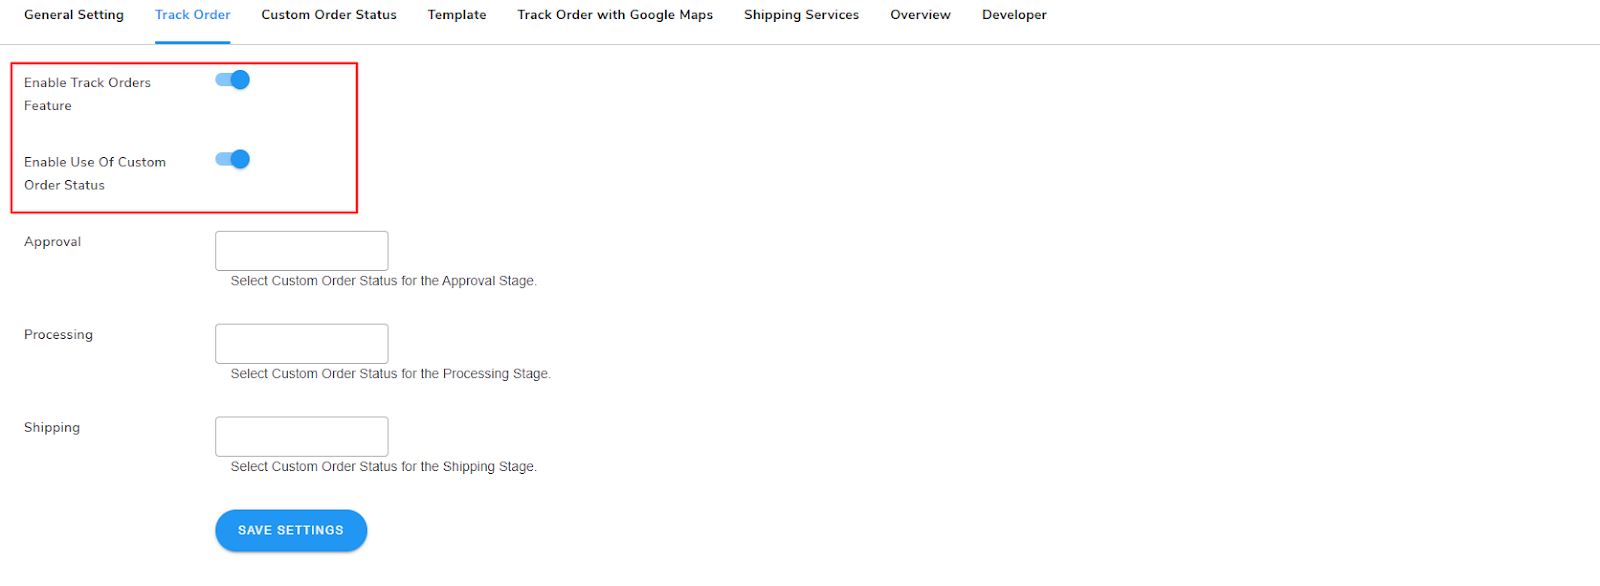
Enabling the Use of Custom Order Status
Toggle the Enable the Use of Custom Order Status option to add and utilize custom order statuses for various stages of the WooCommerce delivery process.
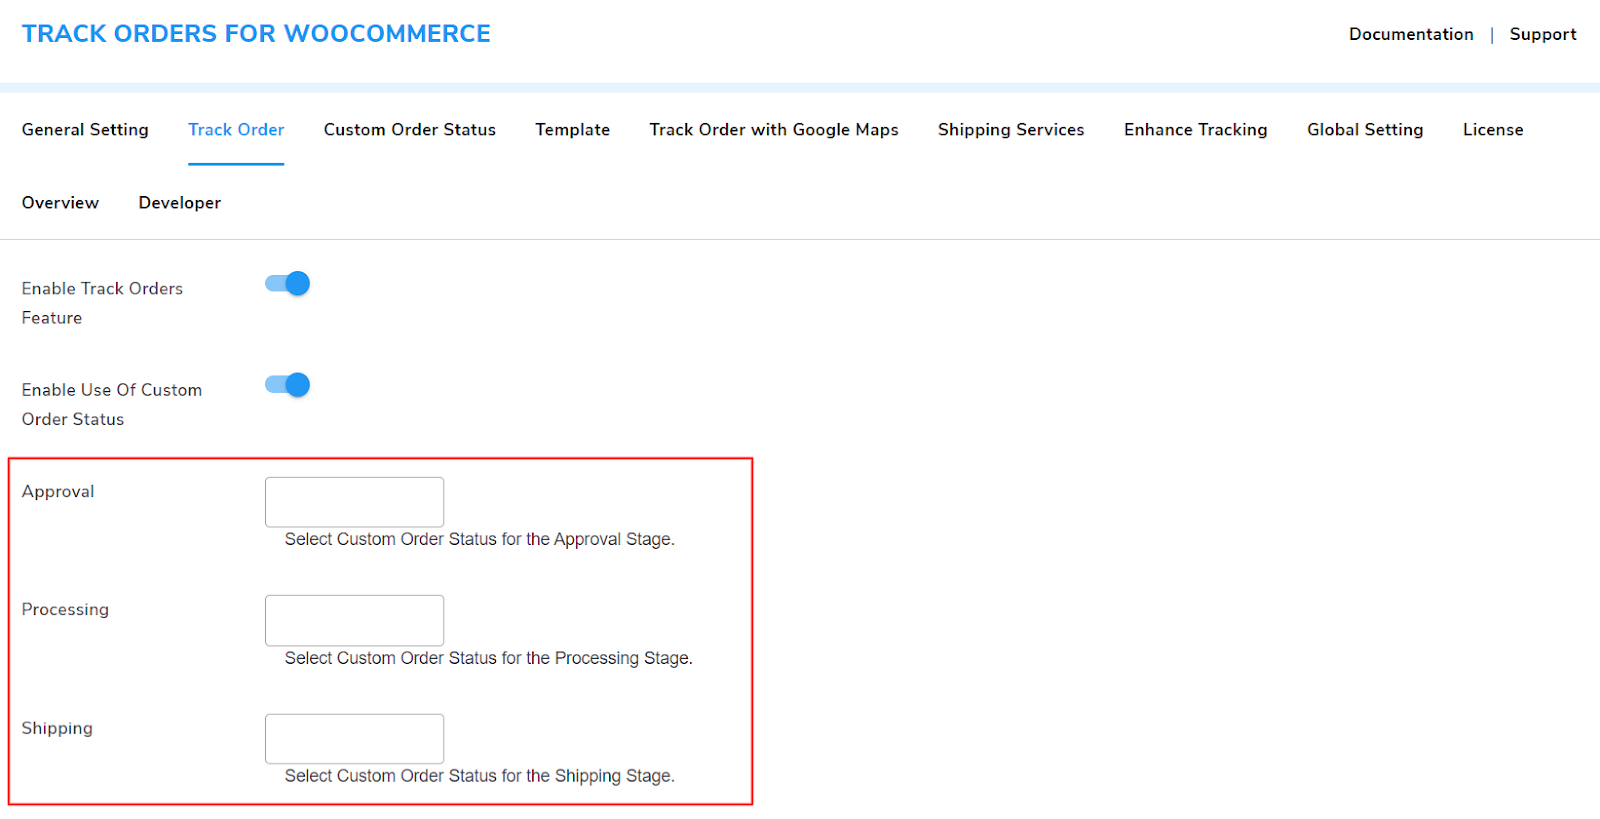
There are three order statuses:
- Approval Stage: During this phase, the administrator designates an order status that signifies the order is pending approval.
- Processing Stage: In the “Processing” step, you have the option to choose an order status that indicates the order is currently being prepared for shipping, offering customers reassurance about the progress.
- Shipping Stage: When the order reaches the “Shipping” stage, you can opt for the appropriate order status to show that the order is now in transit for delivery.
Click on the corresponding drop-down and select the order statuses for each stage.
Click on the Save Settings button.
Set relevant order statuses for every stage to elevate the WooCommerce shipping tracking experience for your customers.
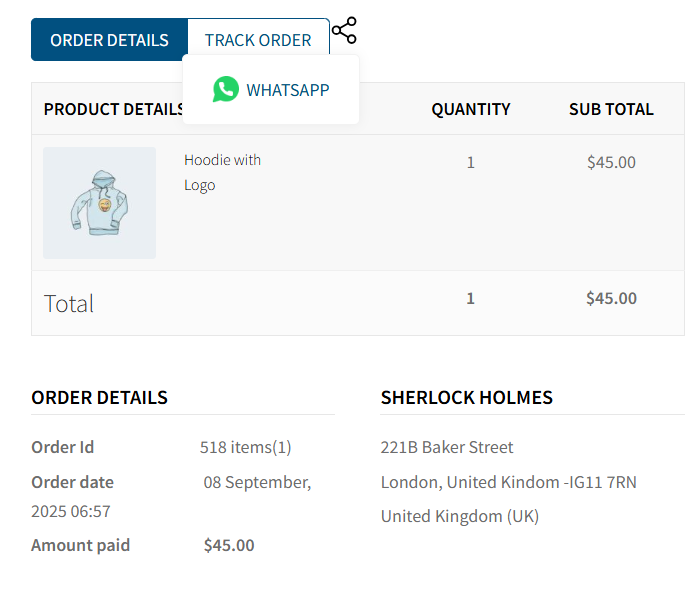
Enable WhatsApp Feature

You can toggle this option to allow users to share the tracking information via WhatsApp, in case they are ordering for someone else, or just want to share the details
Enabling The Multi-Carrier Tracking
Enable this option to allow your customers to track their packages directly on your site using third-party carriers. With support for 1,000+ carriers, customers simply need to:
- Enter their tracking ID
- Select the carrier
Click on Search
They will then see detailed order information instantly.
To use this feature, you’ll need a Tracking More API key, which you can obtain here. Once you have the key, paste it in the field below to activate the service.
![]()
After setup, you can display the tracking form anywhere on your site using this shortcode [WPS_MUTIPLE_CARRIER_TRACKING_FORM]
![]()
Enabling the “Track Your Order” Popup: Premium
Activate the Track Your Order functionality within a pop-up box by enabling this setting. This feature allows customers to conveniently monitor the progress and status of their orders directly through a designated pop-up interface, enhancing their user experience by providing quick and easy access to order tracking.
Customers can interact with this popup by using the track order button located in the Orders tab of the My Account section.
Enabling Shortcode to Create a WooCommerce Order Tracking Page: Premium
Activate the Shortcode to Create WooCommerce Order Tracking Page feature by using the shortcode [wps_create_tracking_page] This shortcode allows you to easily add an Order Tracking page anywhere on your WooCommerce store, providing a dedicated space for customers to track their orders.
It fulfills two objectives: for logged-in users, it will display their “My Account” page; for guests, it will showcase a tracking form. These track-order shortcodes ensure a seamless experience for both types of users.
Enabling Shortcode to Show Track Order Form: Premium
Activate the Shortcode to Show Track Order Form feature by using the shortcode [wps_track_order_form]. This versatile shortcode allows you to implement a Track Order Form anywhere on your site, making it accessible to both logged-in users and guest users for convenient order tracking.
Enabling the Option to Send a Payment Link on Pending Status: Premium
Enable the toggle button for Send Pay Link on Pending Status to automatically send a payment link when an order is in a “Pending” status. This feature sends an email notification to customers with a link that allows them to proceed with payment for orders awaiting confirmation, facilitating a smoother payment process.

Lastly, save your settings to finalize your changes. Our WooCommerce tracking plugin helps you simplify your order delivery steps, improving customer satisfaction with proper product tracking.
Enabling the Option to Send a Payment Link on Changing Order Status: Premium
Enable the toggle button for Send Pay Link on Changing Order Status to automatically send a payment link whenever the order status changes. This feature ensures that customers receive a payment link in response to updates in their order status, streamlining the payment process as orders progress through different stages.
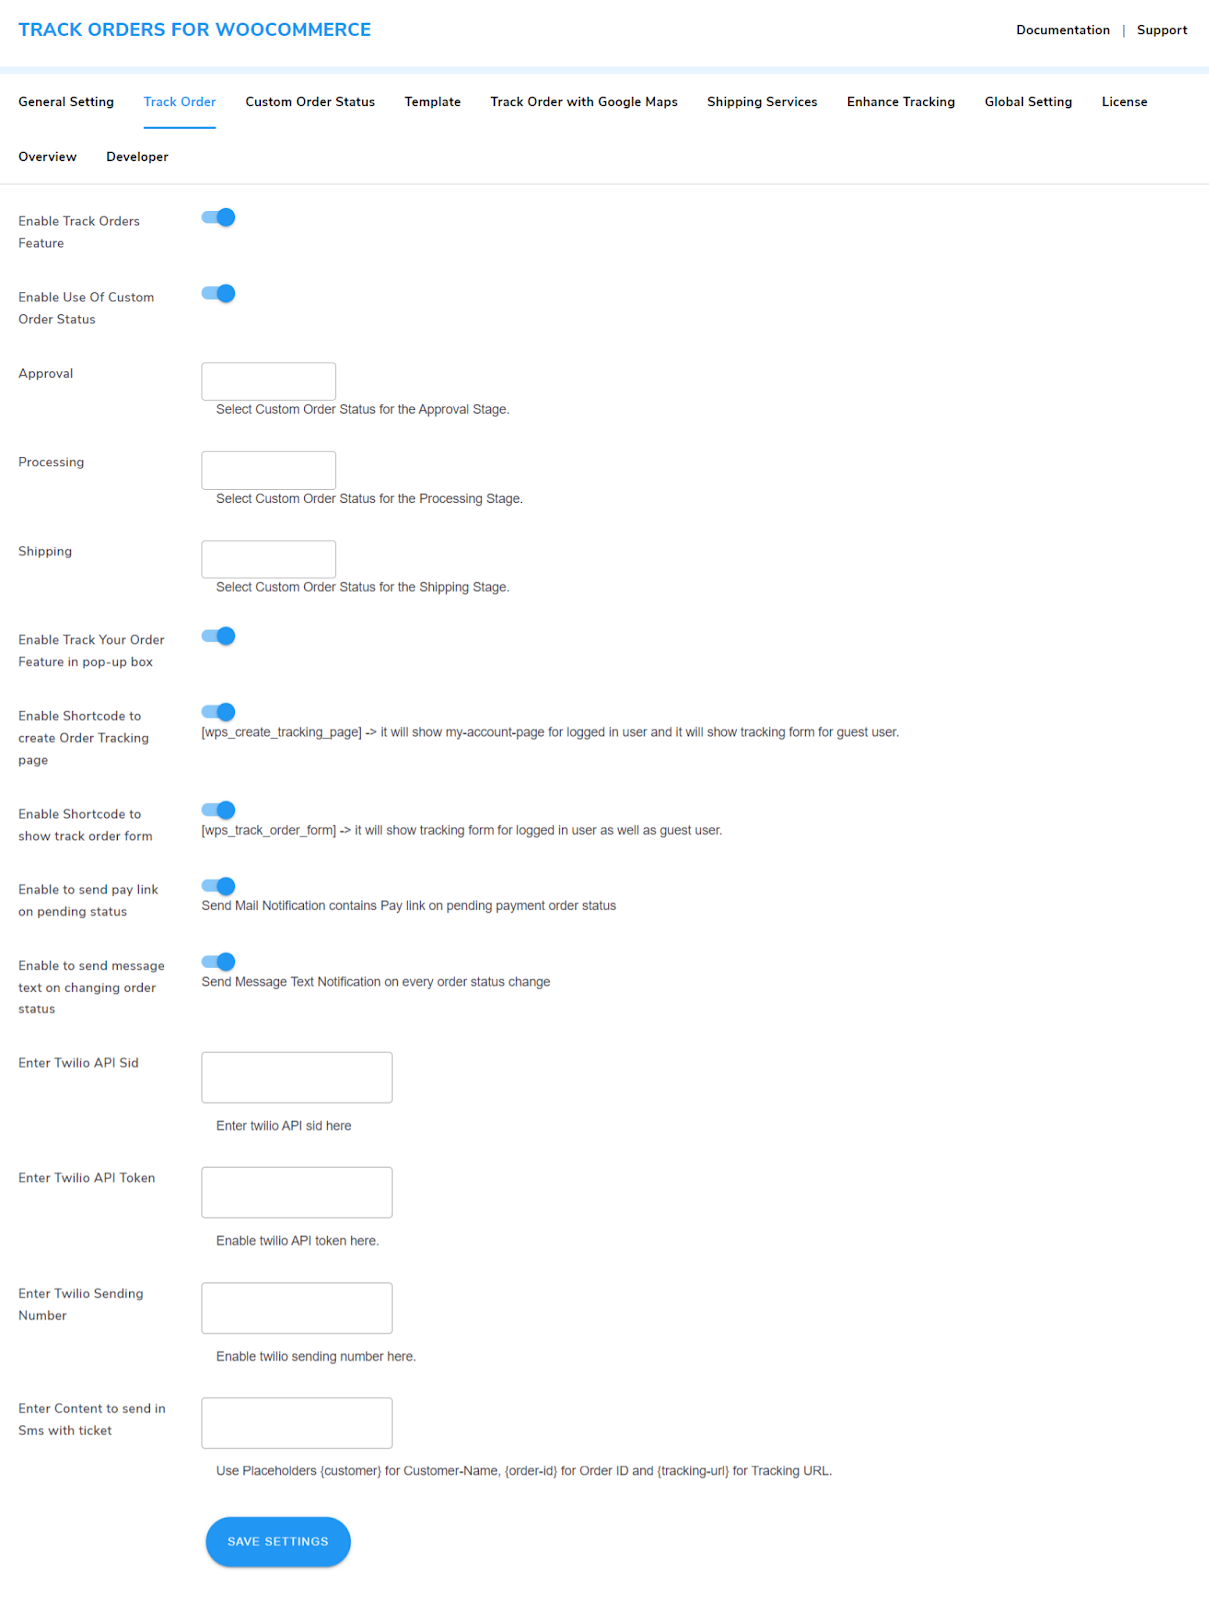
7.Twilio Sms Integration
In the Premium version of Track Order For WooCommerce You can connect your Twilio account to send custom messages to users
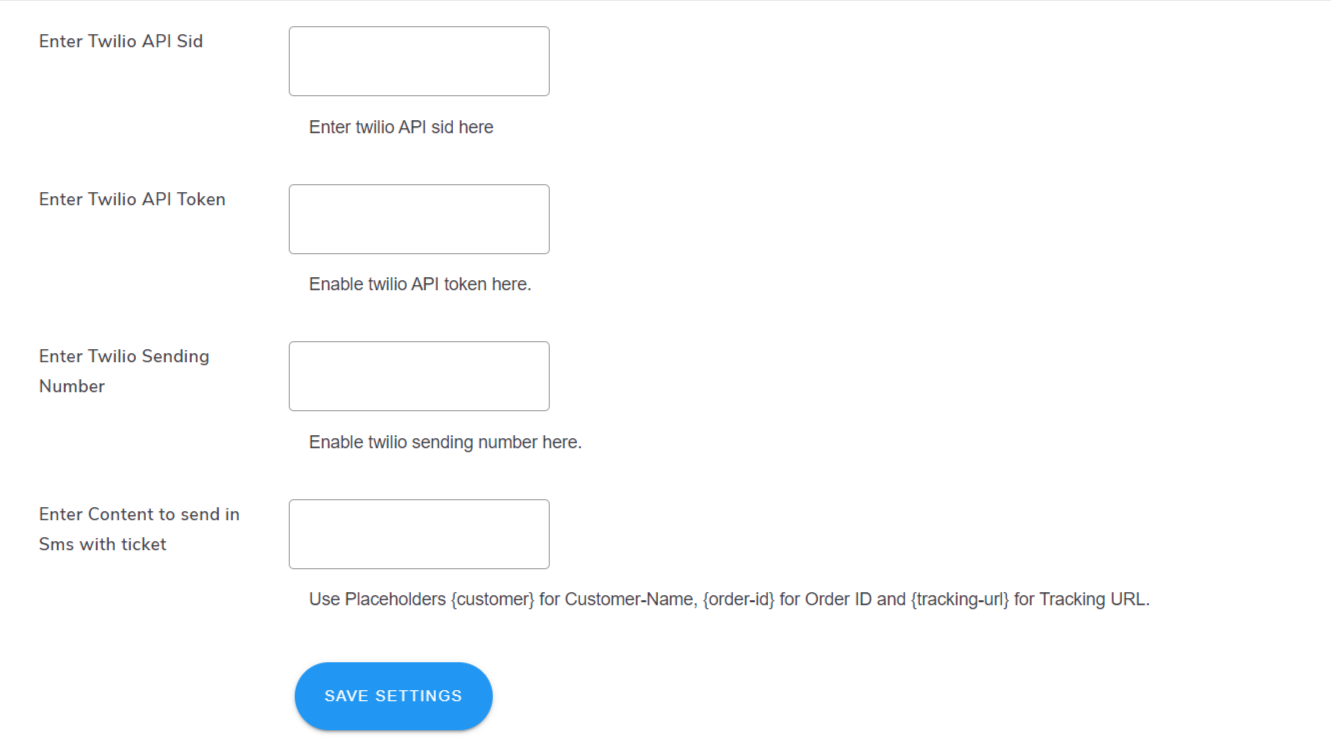
Navigate to the Track Orders Tab, and fill in the mentioned fields
Twilio API SID: Enter Your Twilio API SID which you can get after creating your account on Twilio
Twilio API Token: Enter Your Twilio API Token
Twilio Sending Number: Enter Your Twilio Sending number which you can obtain from your Twilio account
Enter Message: Here you can enter a content message that you want to send to your customers.
Plus, you can also use placeholders like {customer}, {order-id} and {tracking-url} to to fill the values dynamically
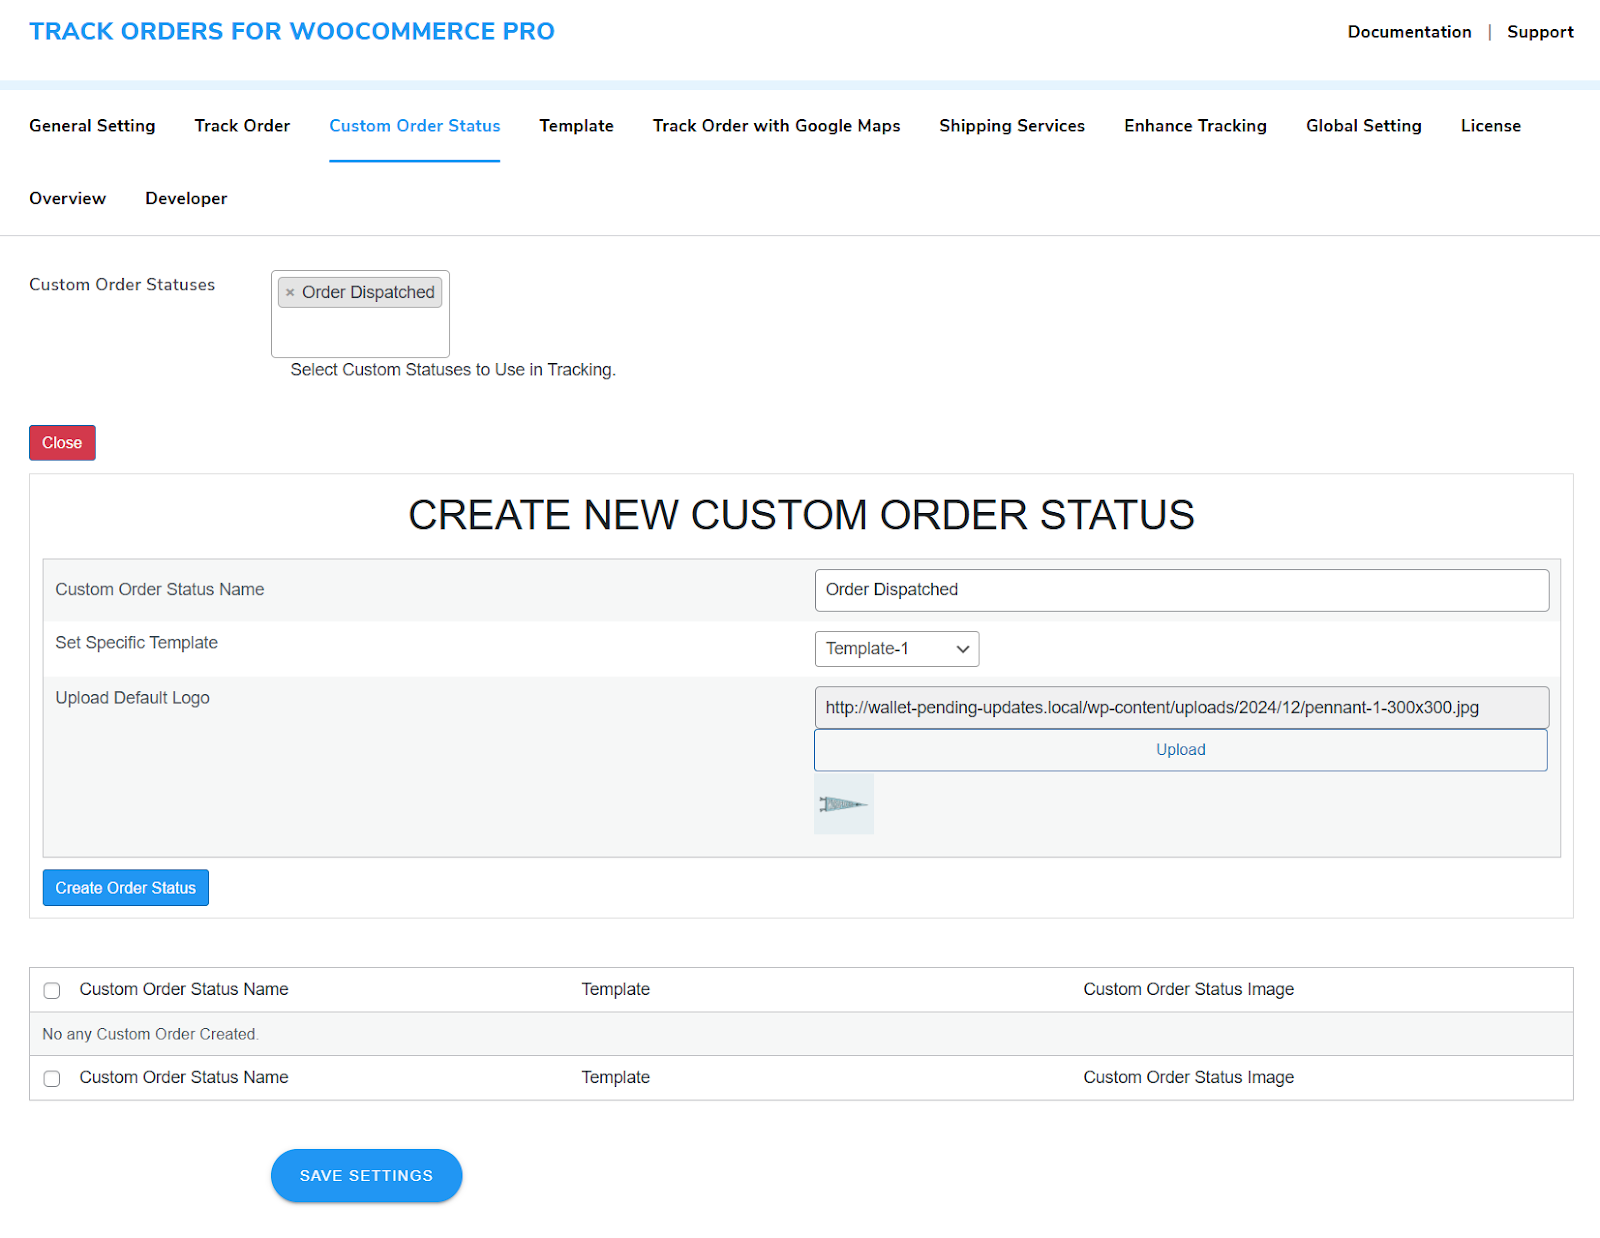
8.Custom Order Status
You can introduce sub-stages relevant to your order delivery process in our WordPress Tracking Plugin
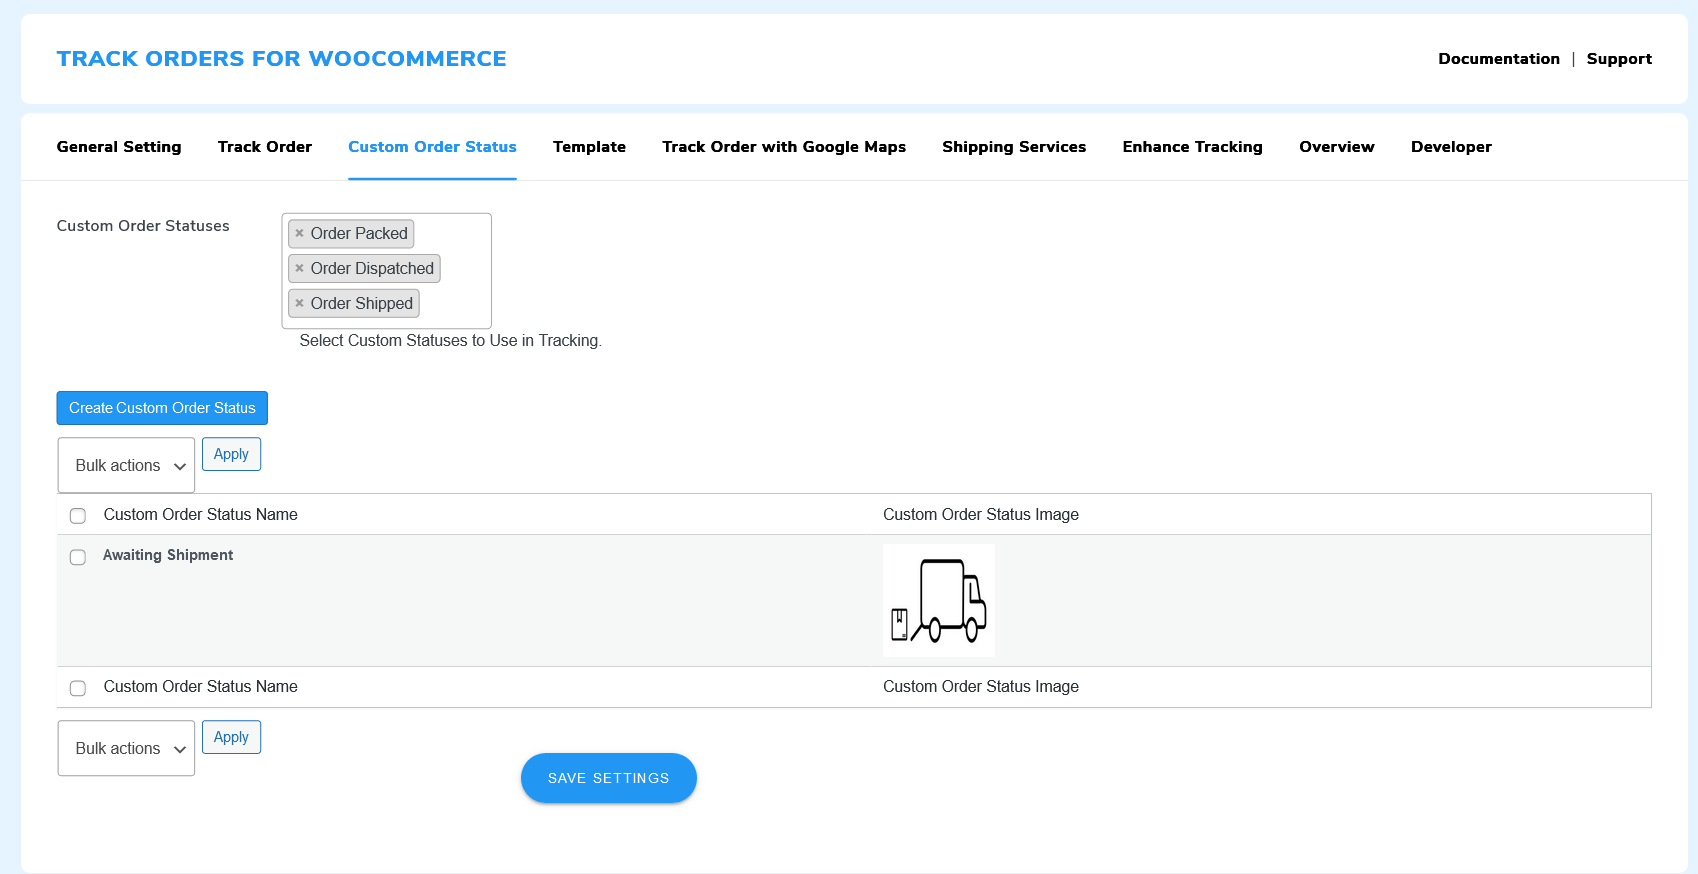
Reminder: The order fulfillment process is broken down into segments, such as approval, processing, and shipping. Order statuses, on the other hand, show the specific developments made throughout each of these order-processing steps.
To create custom WooCommerce shipping status, follow these steps:
- Click on the Create Order Status button.
- Insert an order status name and default image of the order status.
- Select the template to show on the custom order status
- Click the Save Settings button.
 To add your created Custom Order Statuses:
- Click on the Custom Order Statuses dropdown.
- Type or scroll down and select the order status you want.
- Finally, click on the Save Settings button.
9.Multiple Shipping Templates
With Track Orders for WooCommerce, you gain access to multiple template options. You can select any of these templates to display to your users.
9.1.WooCommerce Shipping Templates - [Free]
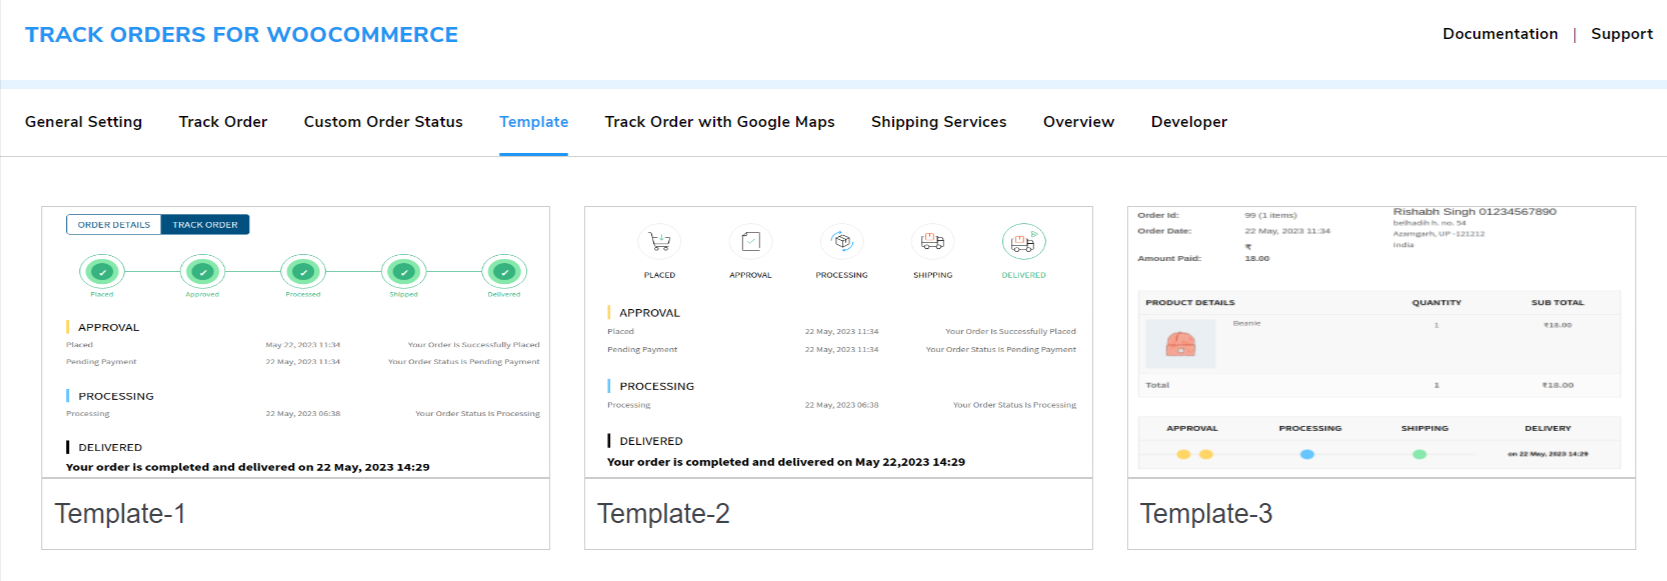
Users will be shown a new template like this below –
9.2. WooCommerce Shipping Templates
With The Pro version of the Track Orders Plugin, You get 4 additional templates along with the 3 templates in the free version
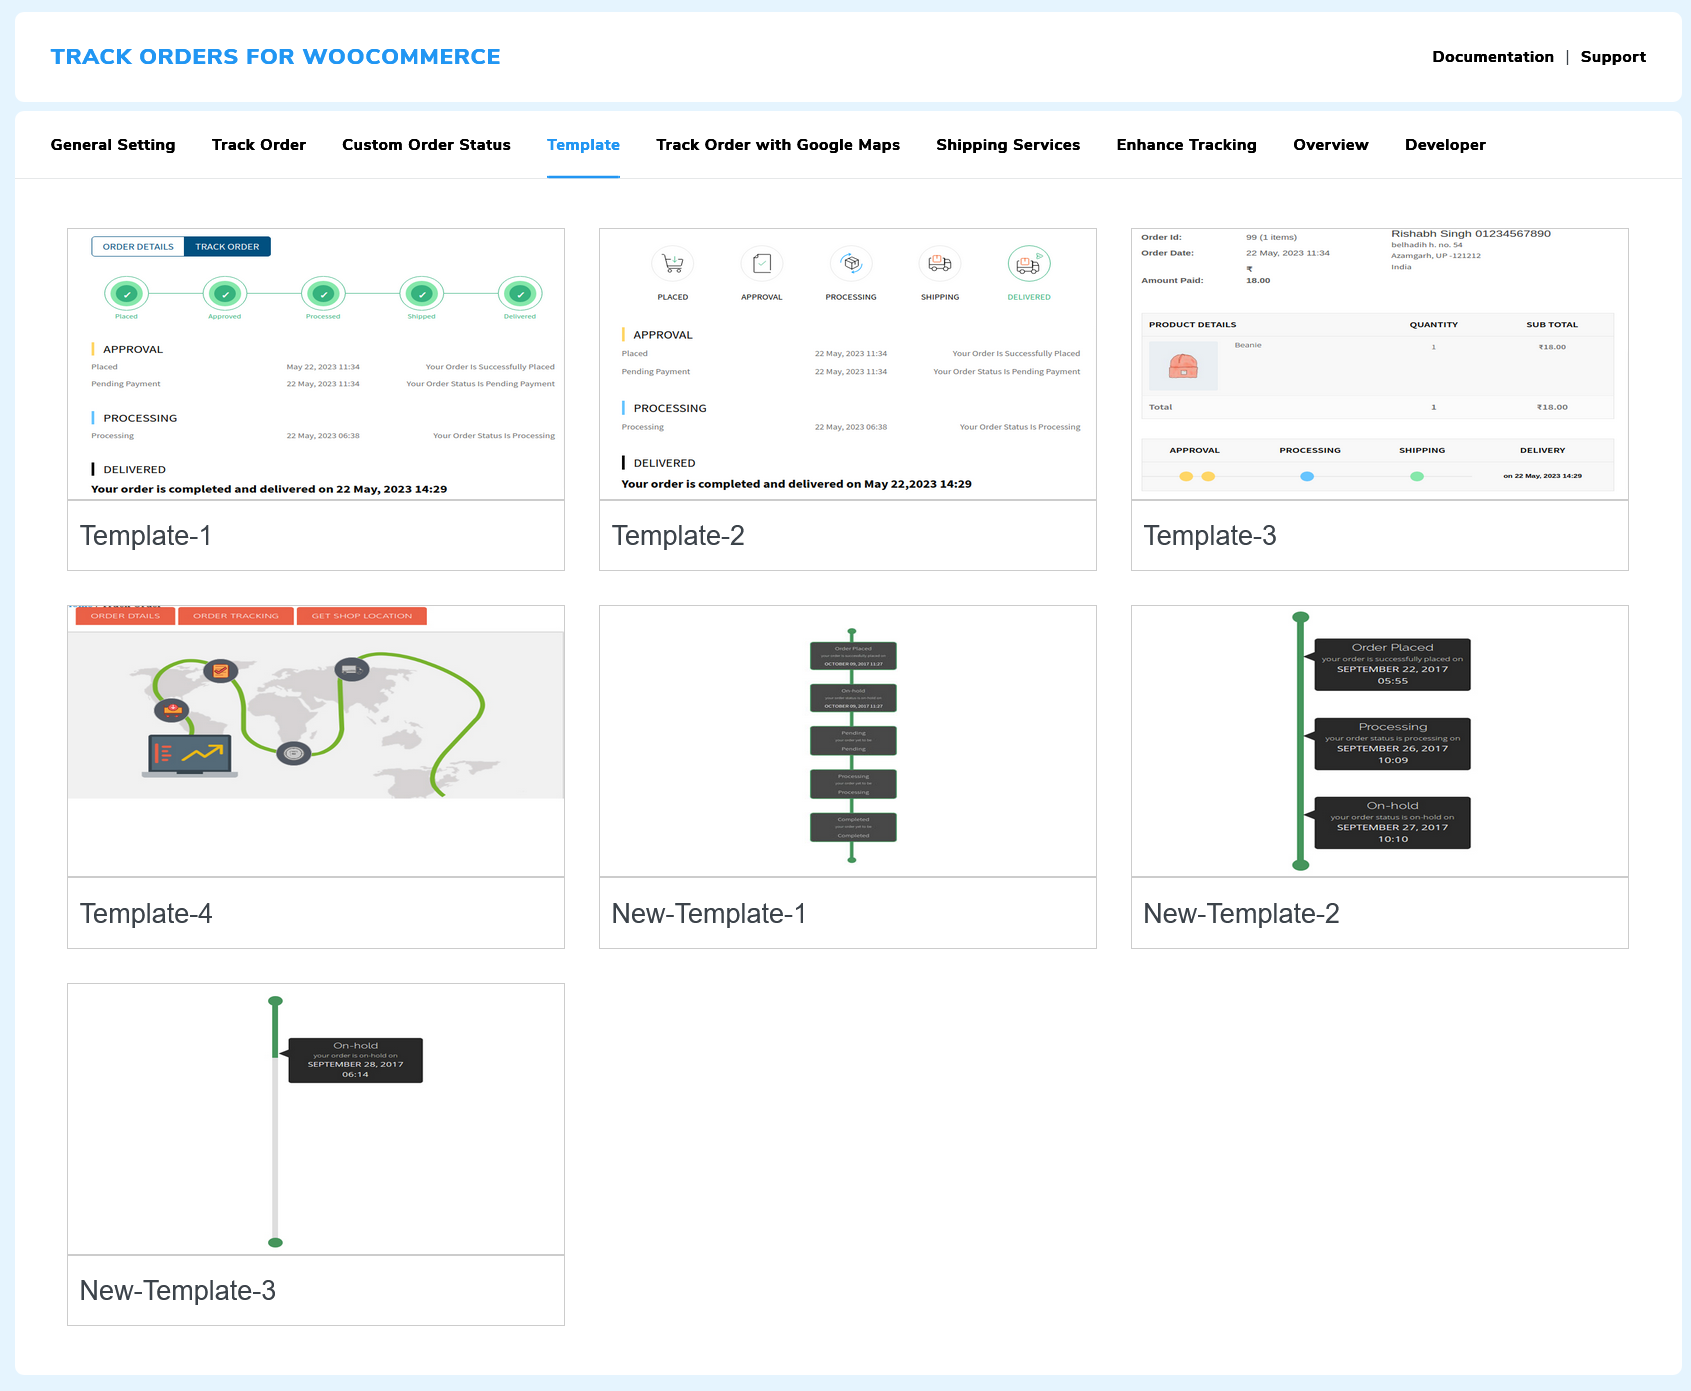
To apply a template, just click the Activate button. If you’re curious about the appearance of the WooCommerce track and trace templates, you can simply press the Preview button.
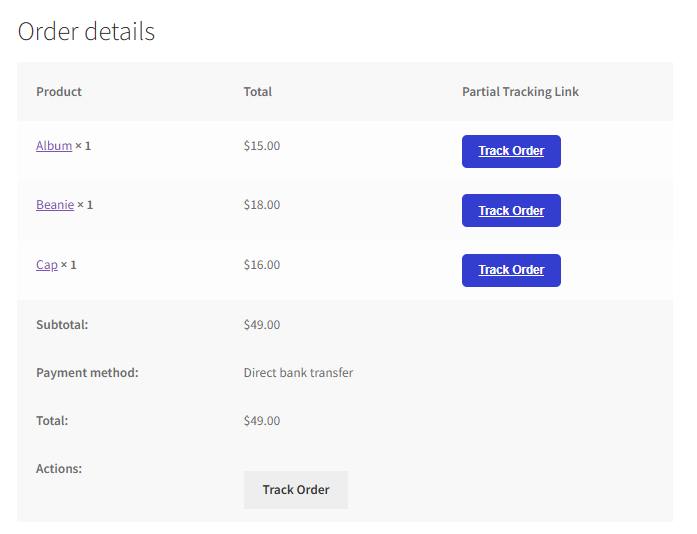
10.Partial Shipment Tracking
We have introduced a Partial Shipment Tracking feature. This allows store owners to manage and track orders that are shipped in multiple parts. Customers will now be able to see separate tracking buttons for each shipment when they place multiple items in a single order.
As an admin, you gain more flexibility in handling split deliveries. You can update the parent order status from the backend, mark it as partially shipped, and even set child orders to auto-complete once the parent order is marked completed.
10.1.Settings Overview
The partial shipment feature can be customized from the settings panel, as shown in the screenshot. Below is a detailed explanation of each option:
![]()
-
Enable Partial Shipment Feature
- Toggle this option to activate the partial shipment functionality.
- Once enabled, you can manage split shipments within a single order and track them individually.
-
Auto Complete Partial Order
- When enabled, the system will automatically mark child (partial) orders as completed once the parent order is completed.
- This helps automate order management and ensures consistency across related shipments.
-
Create the “Partially Shipped” Order Status
- Enabling this option registers a new custom order status called Partially Shipped.
- This status can be assigned to orders that are only partially fulfilled, allowing both the admin and customers to clearly identify the shipment state.
10.2.Example Workflow
- A customer places an order containing 3 products.
- The admin ships 2 products first and marks the order as Partially Shipped.
- Customers can track the shipped items separately while waiting for the remaining product, as shown in the screenshot below.
- Once the last product is shipped, the admin marks the parent order as completed.
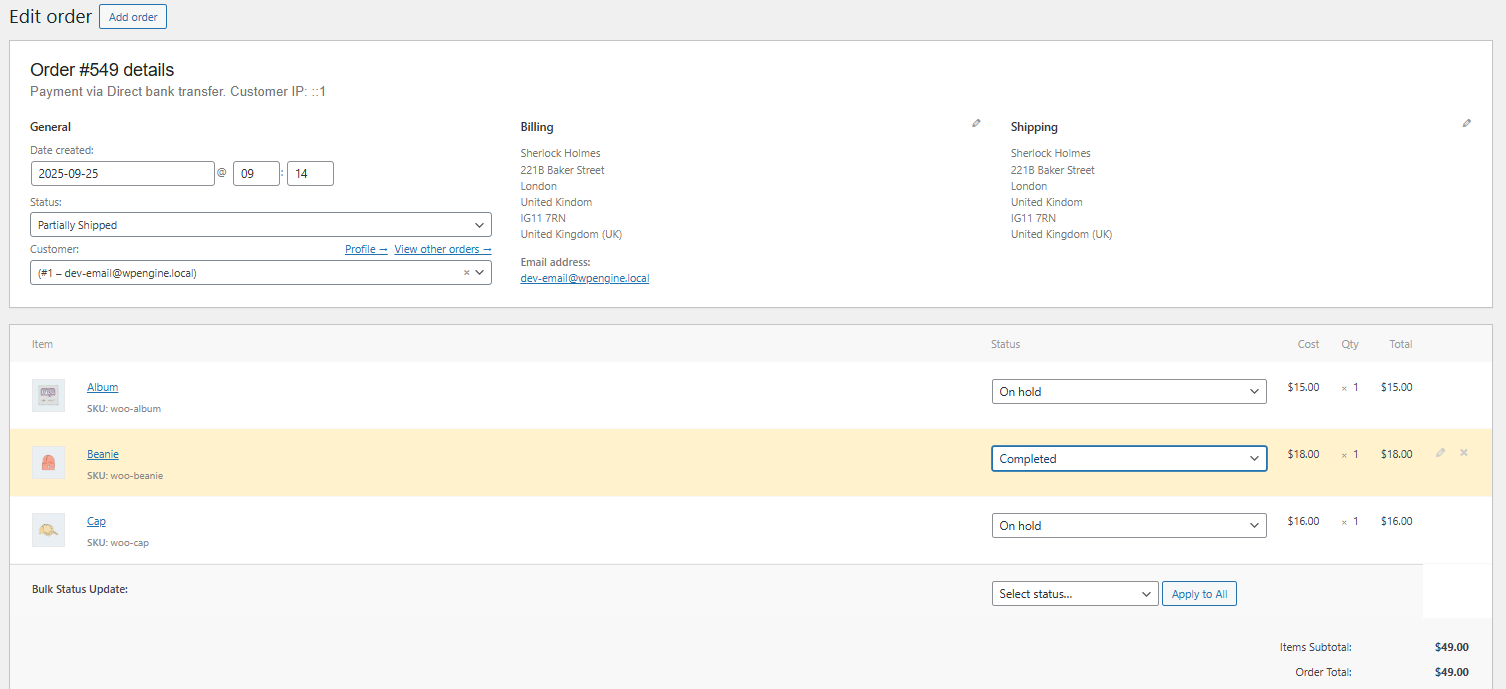
- If the Auto Complete Partial Order option is enabled, all child orders (partial shipments) are automatically updated to completed.
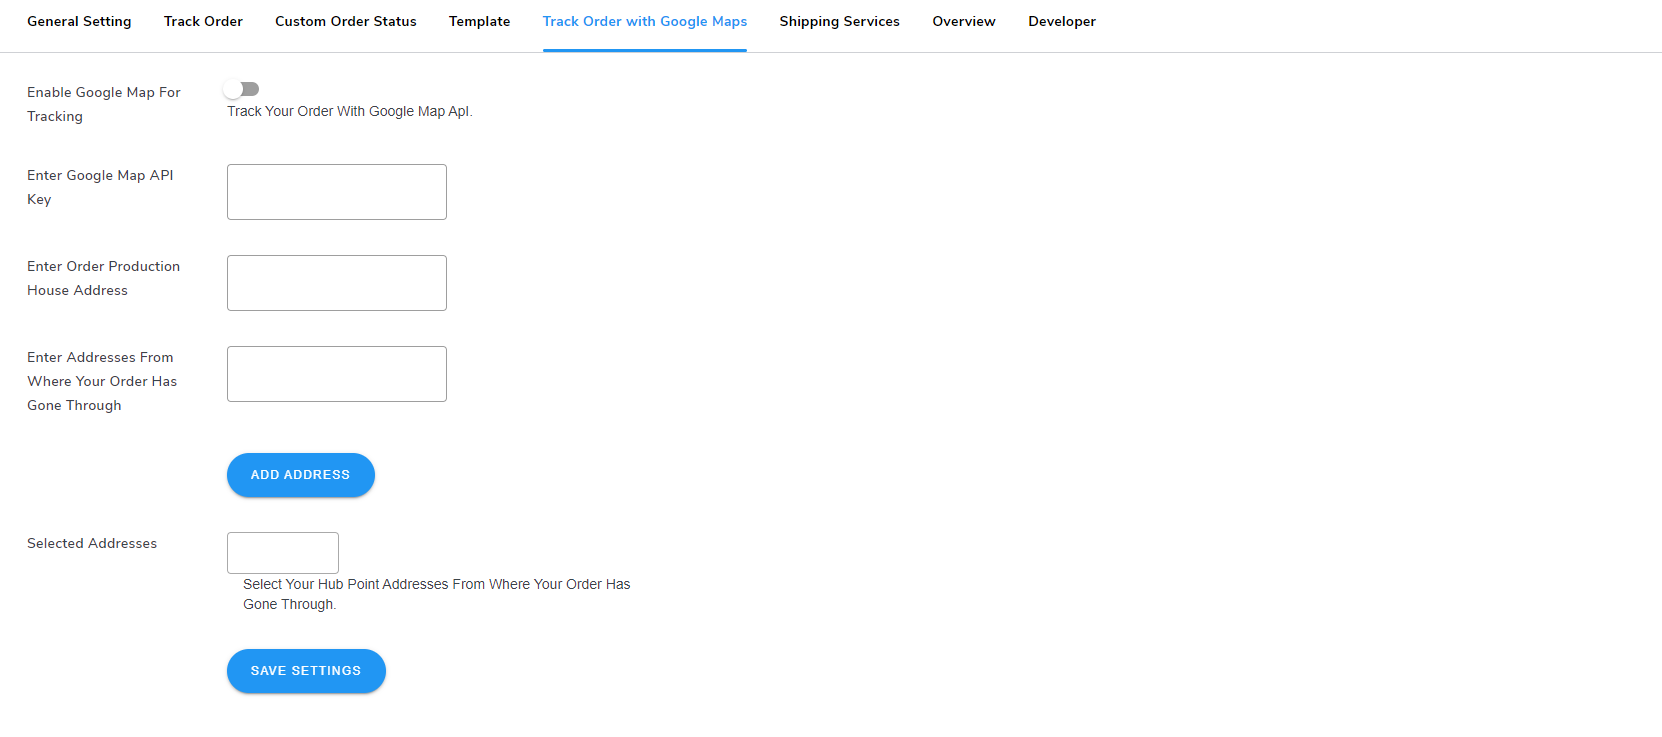
11.Track Order With Google Maps
The Track Order With Google Maps feature is a reliable addition to your product tracking service as it enables customers to monitor their orders in real-time through seamless integration with the Google Maps API.
Important Tip: Keep your Google Maps API Key secure and avoid sharing it publicly.
Enabling Google Maps for Order Tracking: Activate the toggle to enable integration between WooCommerce Order Tracker and Google Maps.
Google Maps API Key: Use a valid Google Maps API Key. If not, follow Google’s instructions to generate one. Simply grab your API key from developers.google.com and add it.
Enter Order Production House Address: Type the location of your order’s production facility, which will serve as the starting point for tracking the order’s journey.
Enter the Addresses of Order Transit Locations: As your order moves through various places, you can include each address to monitor its journey precisely.
Click on the “ADD ADDRESS” button and enter the address of the transit location one by one.
Finally, click the Save Settings button.
Customers can track their orders from the Order section on the My Account Page.
12.Shipping Services
The delivery tracking plugin allows seamless integration of third-party tracking APIs to enhance order tracking capabilities.
12.1.FedX Integration
The delivery tracking plugin allows seamless integration of third-party tracking APIs to enhance order tracking capabilities. Follow the steps below to enable FedEx Shipment Tracking API and set up the necessary credentials.
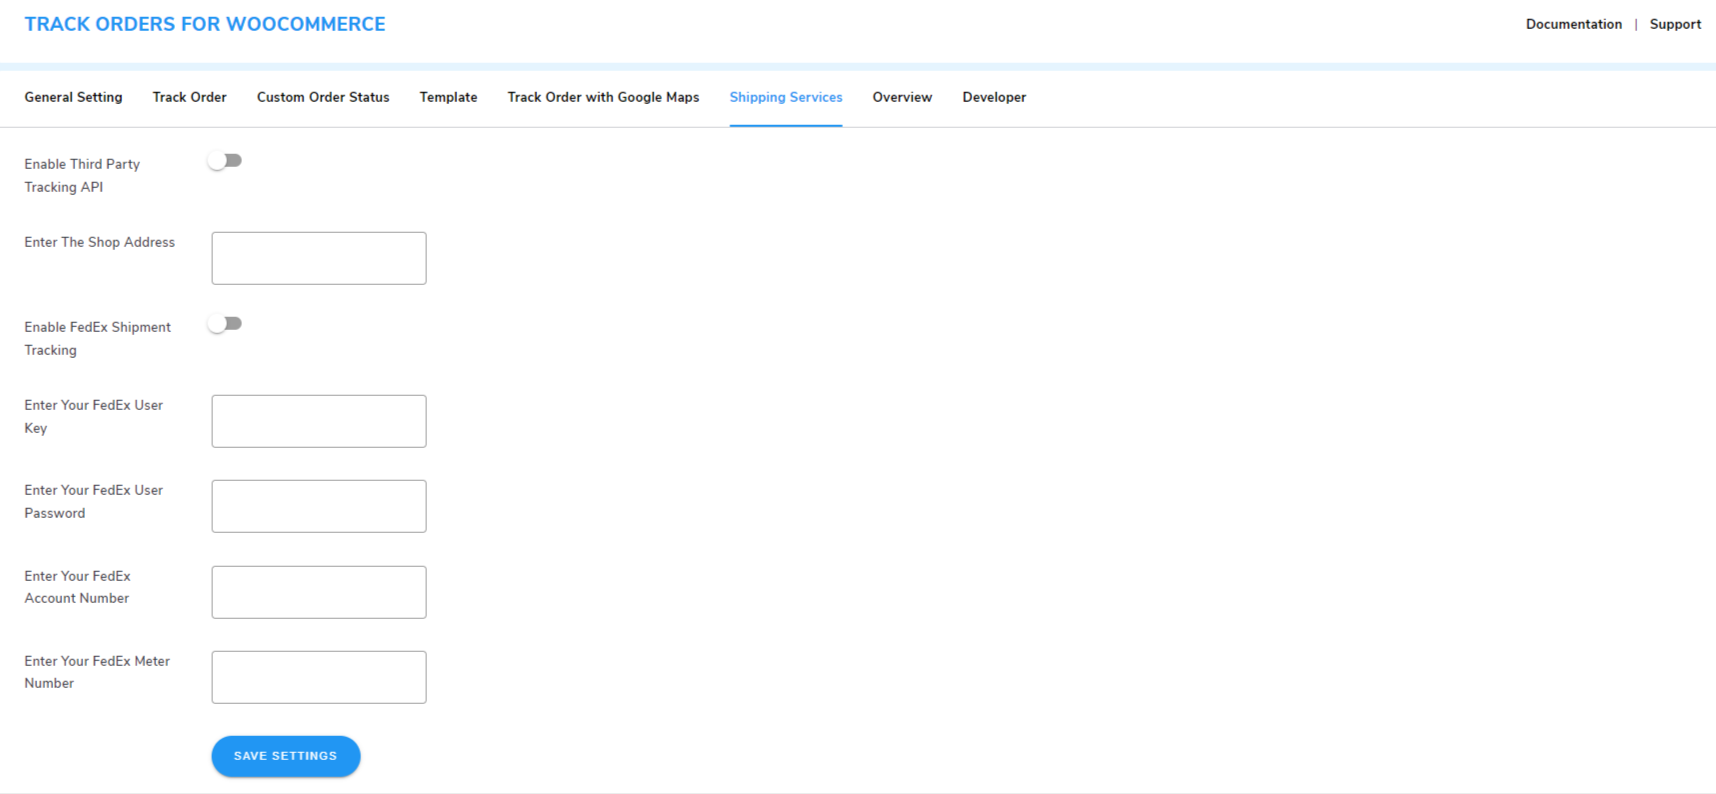
Enable Third-Party Tracking API: Active thirty-party tracking by enabling the toggle.
Enter the Shop Address: Put in the physical address of the location from which your shipment will depart.
Enable FedEx Shipment Tracking: Enable the toggle to use FedEx Shipment Tracking API.
Enter Your FedEx User Key: Provide your FedEx User Key in the specified field. To get the key, you need to have a FedEx developer account.
Enter Your FedEx User Password: Fill in the password of your FedEx developer account. Provide Your FedEx Account Number.
Enter the unique account number assigned to your FedEx account.
Enter your FedEx Meter Number: FedEx uses the meter number to permit your shipping meter and pull your negotiated shipping rates.
Customers will discover a tracking link or choice in their order confirmation email or within their user account.
By selecting the tracking link, customers can access the current status and whereabouts of their FedEx shipment in real-time.
13.Order API
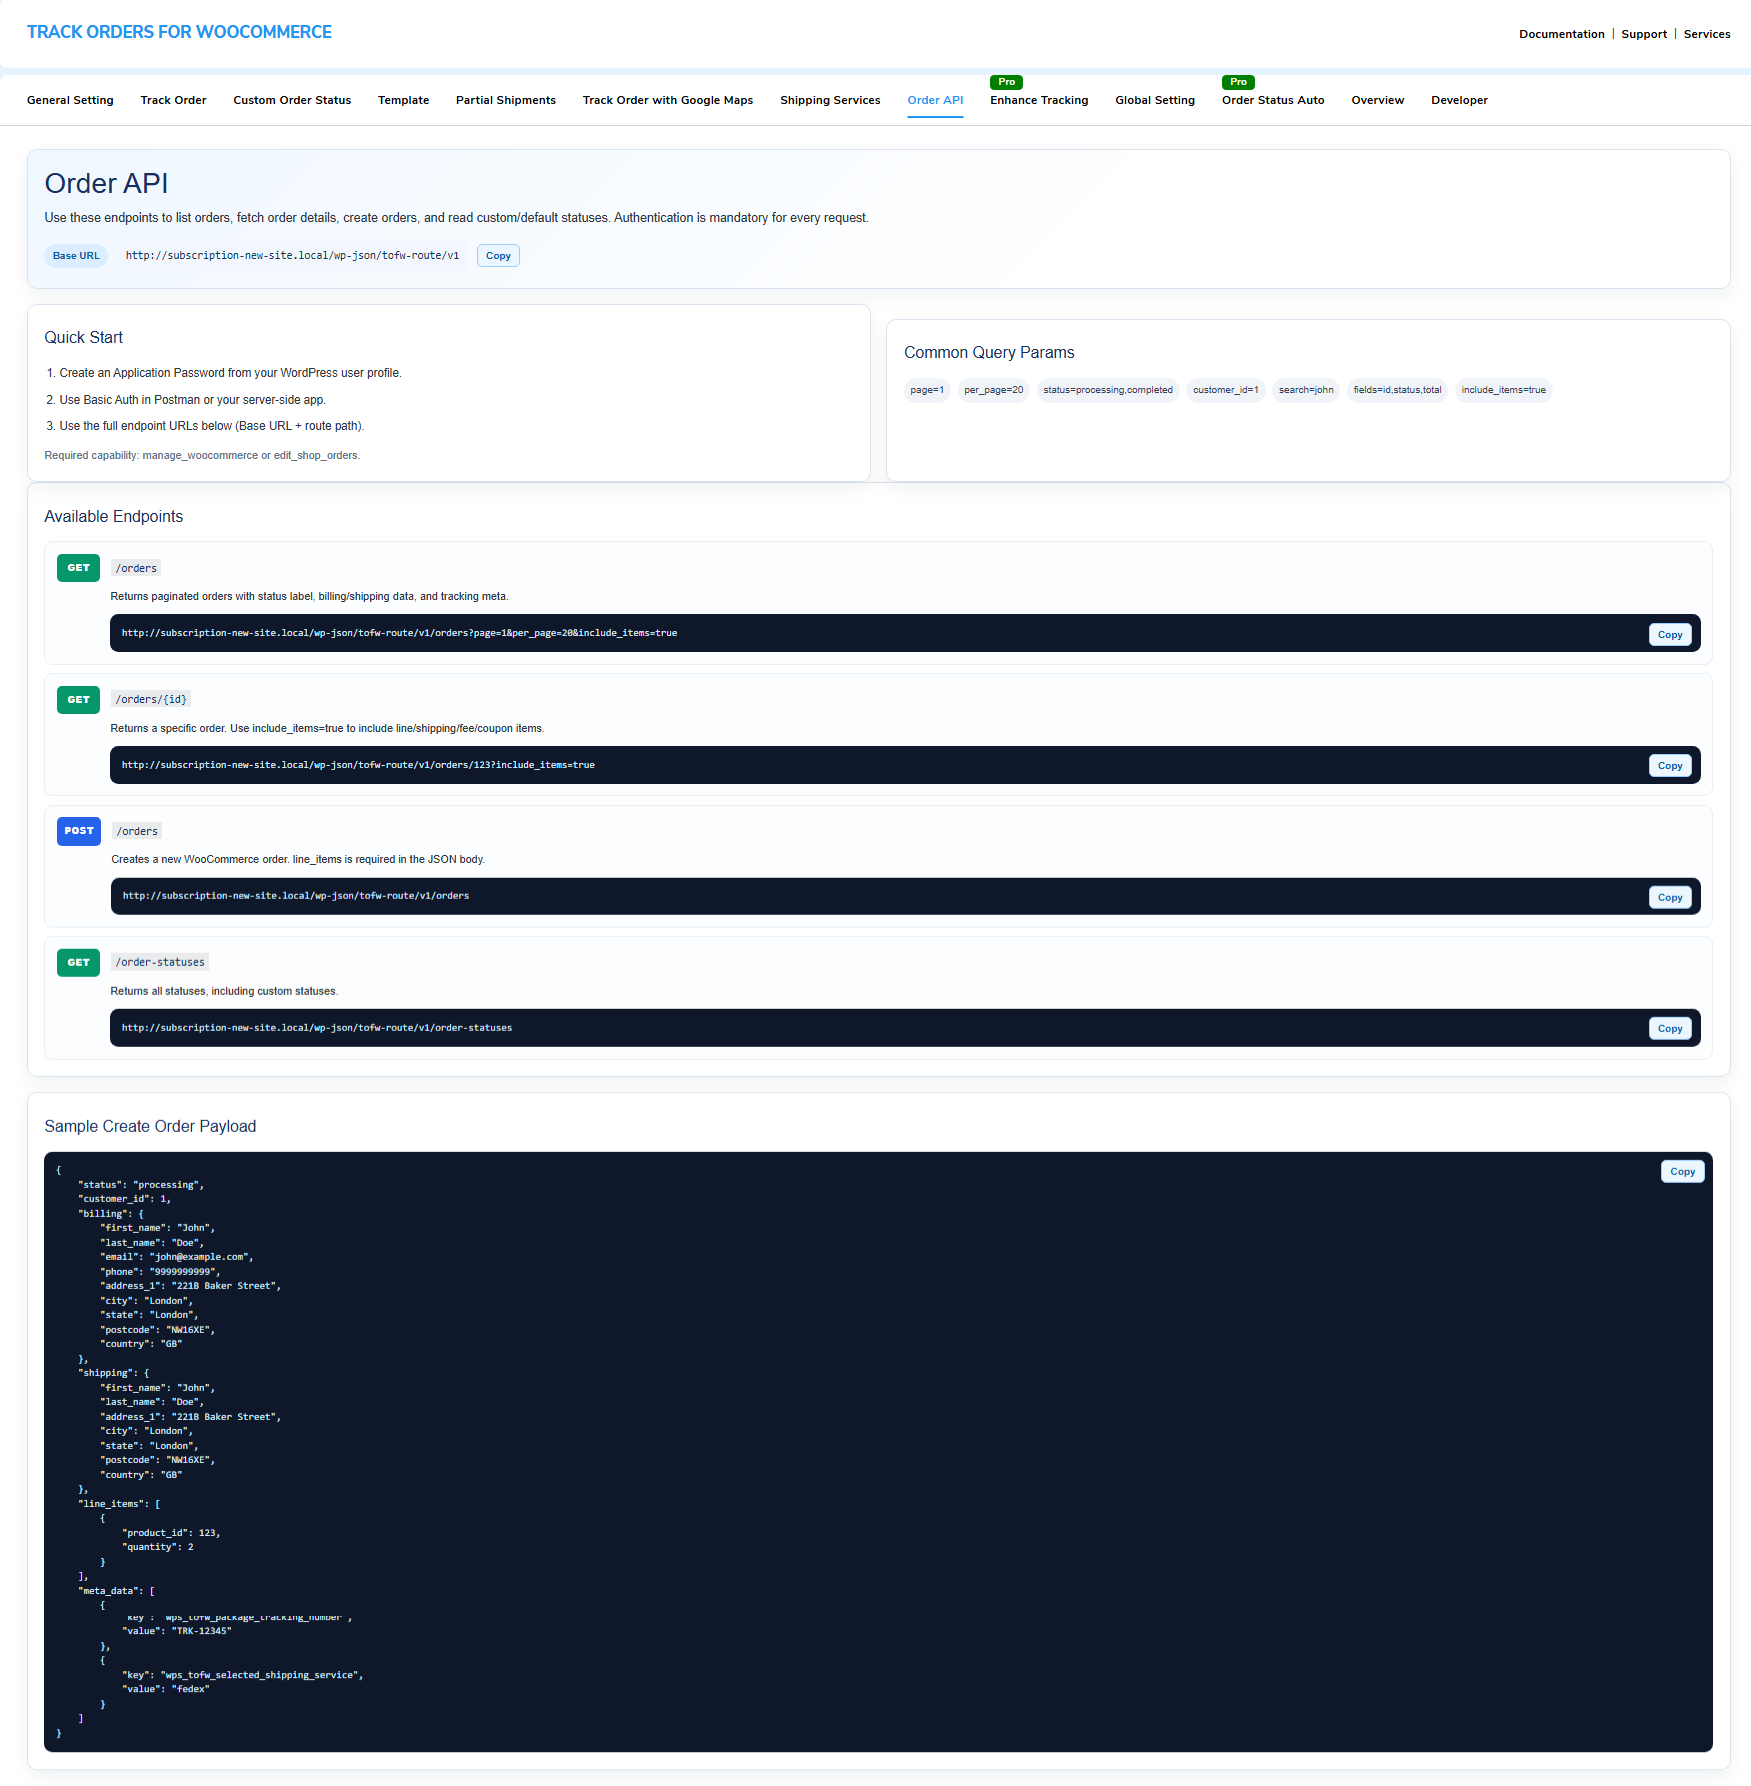
Our WooCommerce Order Tracking plugin comes with a powerful Order API that makes it easy to connect your store with third-party applications.
To get started, you first need to create an Application Password from your WordPress user profile.
Go to the left-hand menu in your WordPress dashboard, click on Users, and then select Profile. Scroll down to the Application Passwords section, where you can generate a new password.
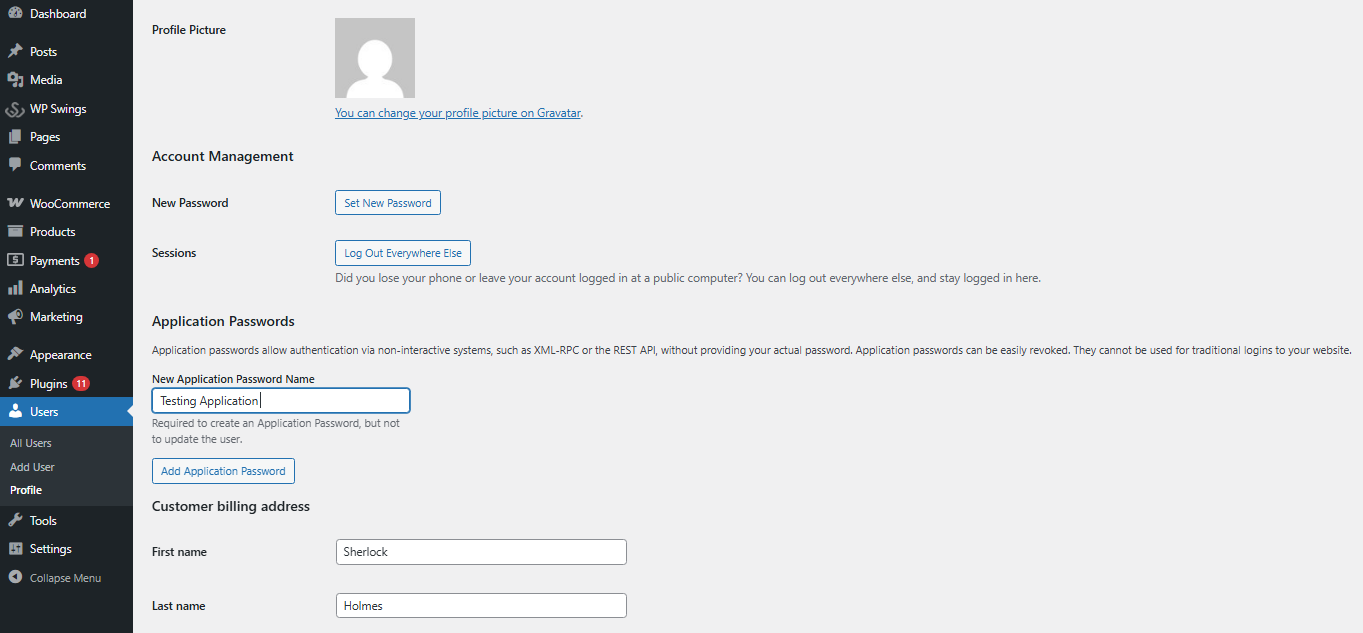
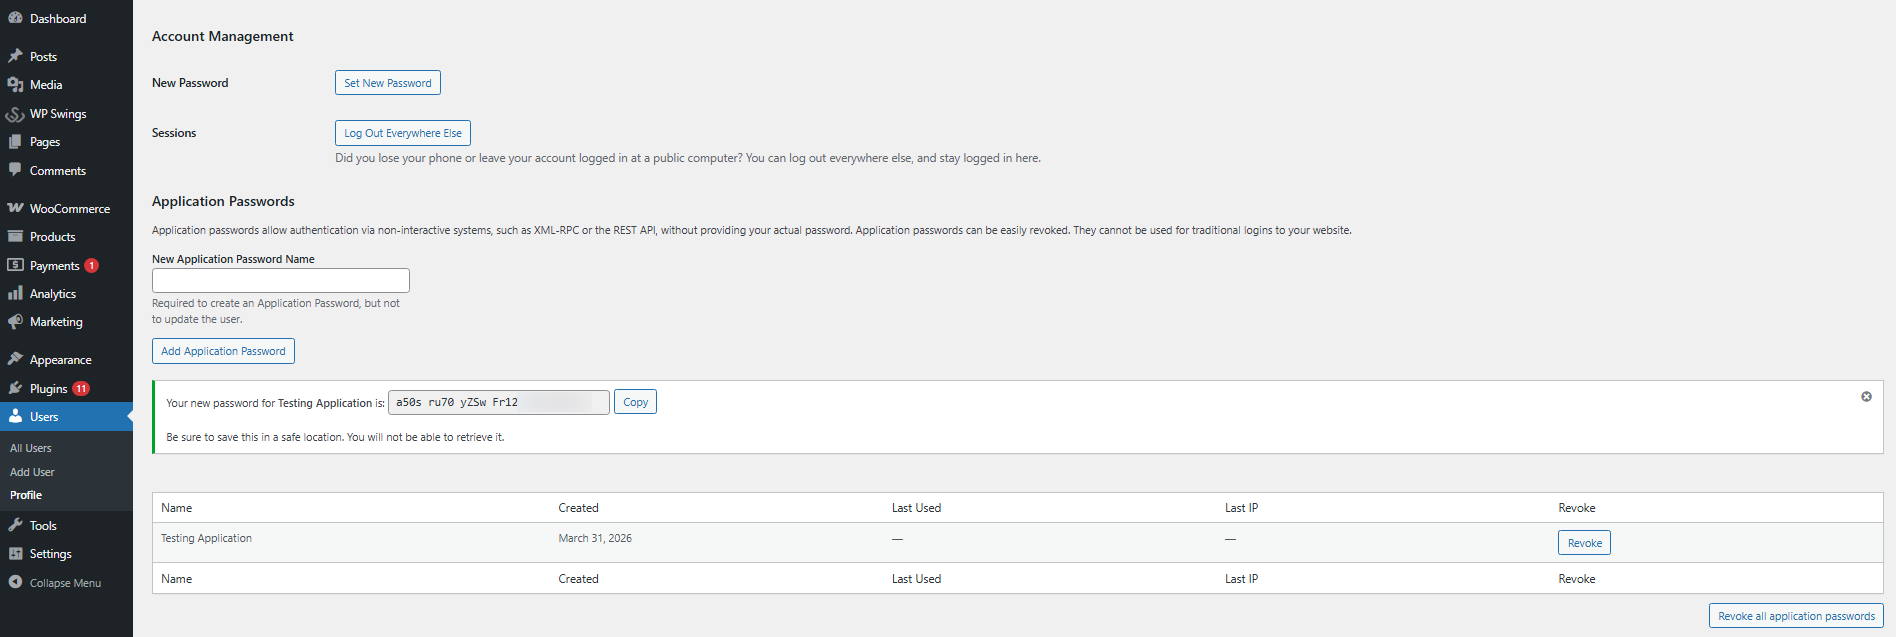
Enter a name for your new application password, then click on Add New Application Password. Once created, the password will be displayed on the screen, make sure to copy and save it securely, as you won’t be able to view it again later.
Once you have the application password, you can use Basic Authentication in Postman or within your server-side application.
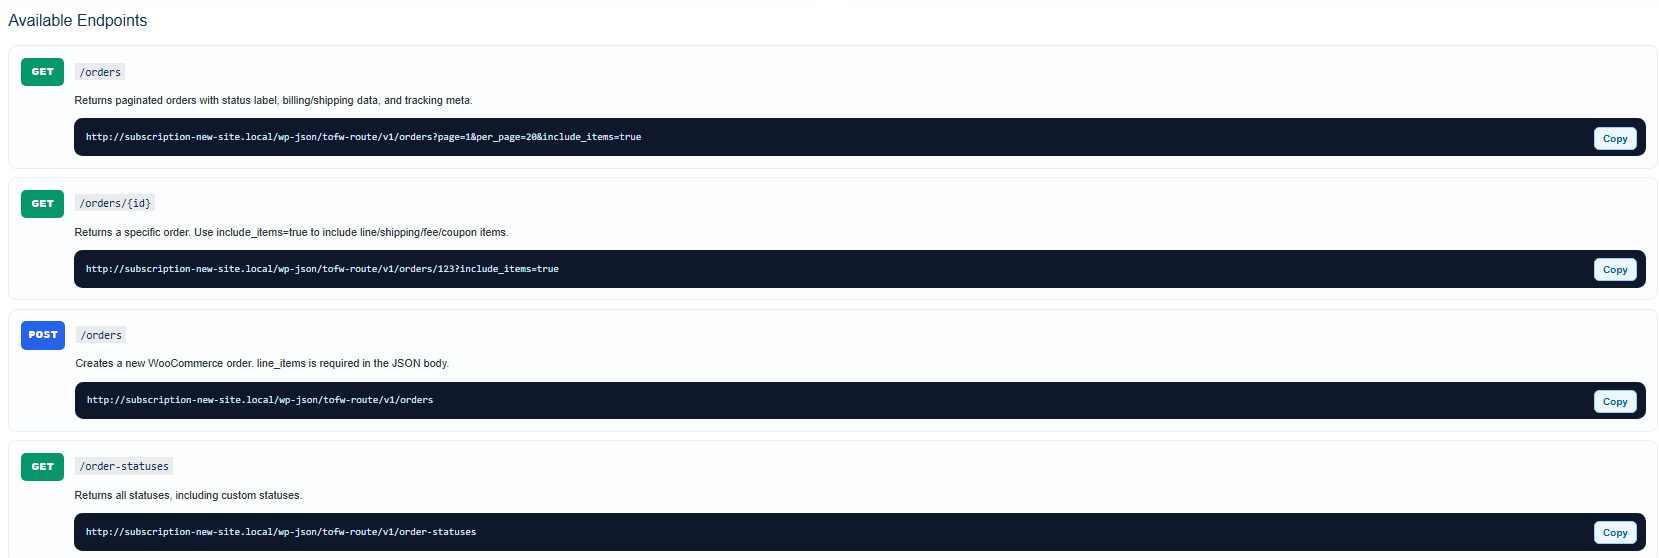
Use the complete endpoint URLs (base URL + route path), as shown in the screenshot, to perform the required operations.
14.Enhance Tracking
The Enhance Tracking tab contains options for multiple shipment tracking companies. Moreover, it allows you to introduce as many order-tracking options for your customers as you want.
![]()
Enhance Tracking: Click on the toggle button to allow advanced tracking options.
Select the Shipping Companies You Want: The available options for shipping companies include DHL, USPS, UPS, IMEX, InTrac, and many more, as we are now supporting more than 200+ carriers.
To select a tracking provider, simply click their checkbox.
Add a Shipment Tracking Company: Enter the name of the shipping company and their tracking page URL and click on the add button to add a new shipment tracking provider.
Lastly, save your changes.
To use these carriers, open any order from the WooCommerce Orders section.
![]()
On the top right section, choose your courier company from the options you have selected before, and enter your tracking number.
Finally, update the order.
Now you customer will see the tracking number on their orders page, and they can click on the number to track their order from the carriers webpage.
![]()
15.Global Settings
The Global Settings Tab allows you to customize your order tracking pages using custom CSS and Javascript
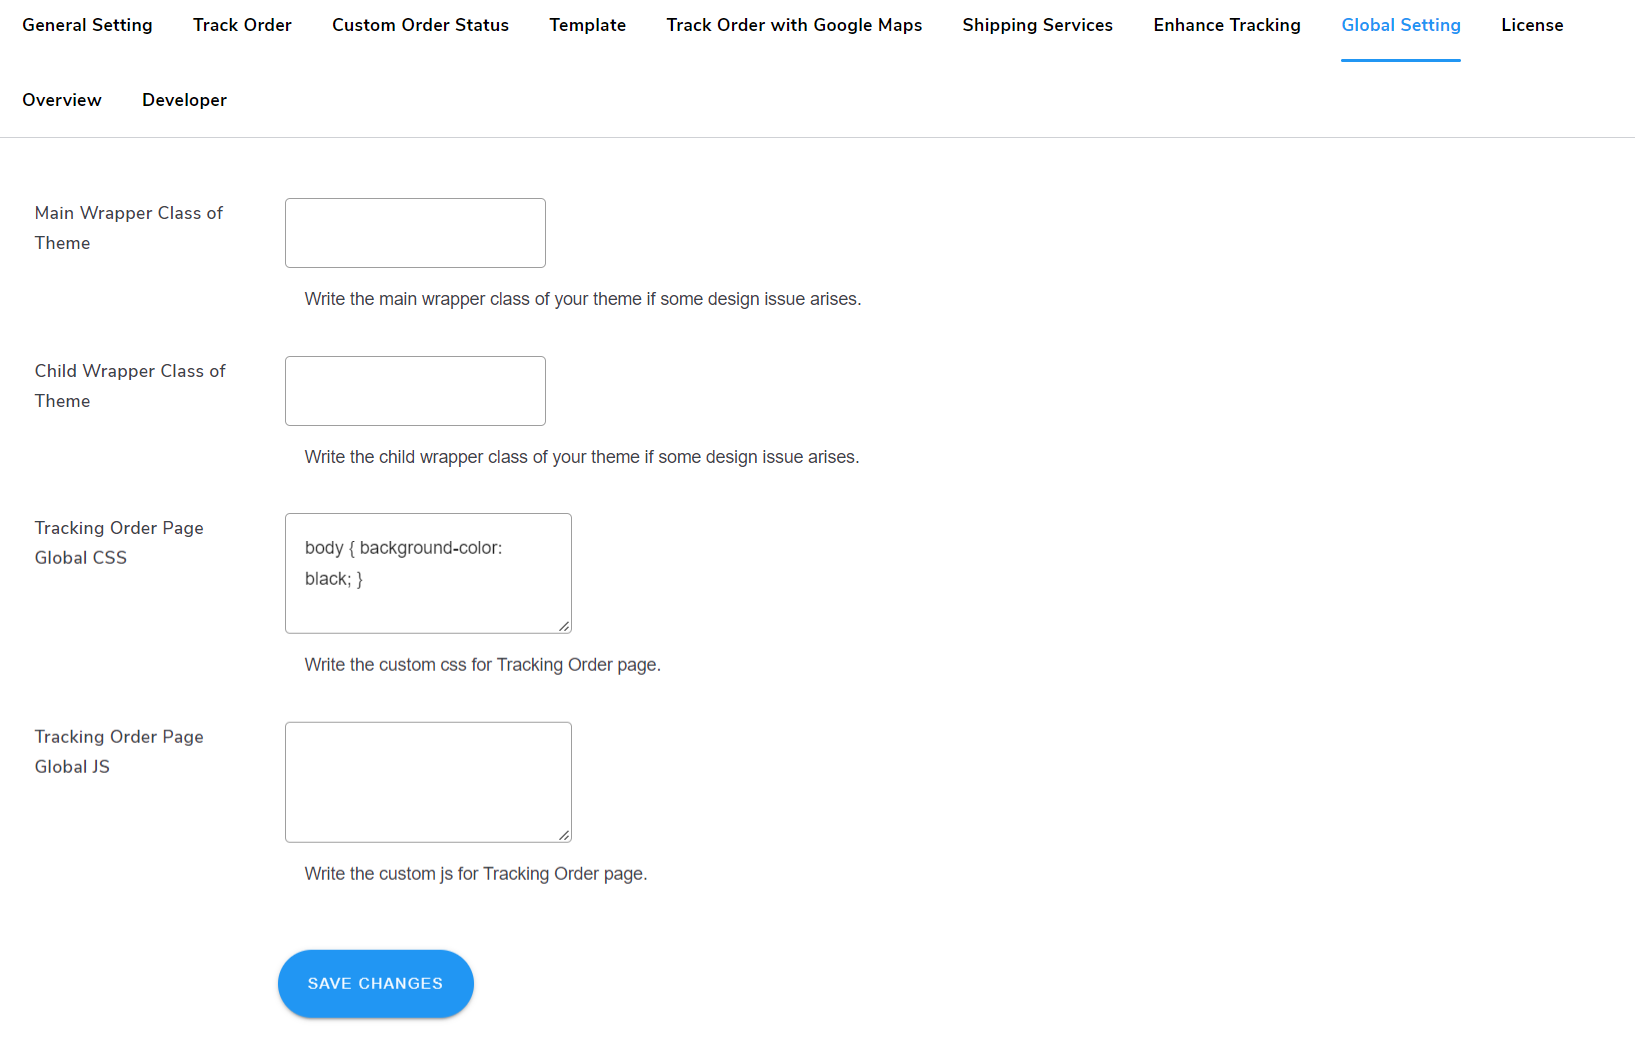
Main Wrapper Class of Theme: Here you have to mention the main wrapper class of your theme, For example, .wps_main_class
Child Wrapper Class of Theme: Here you have to mention the main wrapper class of your theme, For example, .wps_child_class
Tracking Order Page Global CSS: Here you can write your CSS code and it’ll reflect on the Tracking Order page
Tracking Order Page Global JS: Here you can write your custom javascript code to customize the behavior of the Tracking Order Page.
16. Auto Update Order Status
Auto Update Order Status feature allows you to automate the transition of order statuses based on predefined conditions.
This simplifies WooCommerce order management by automatically updating statuses after a specified delay.
Navigate to the plugin settings and open the Auto Update Order Status tab.
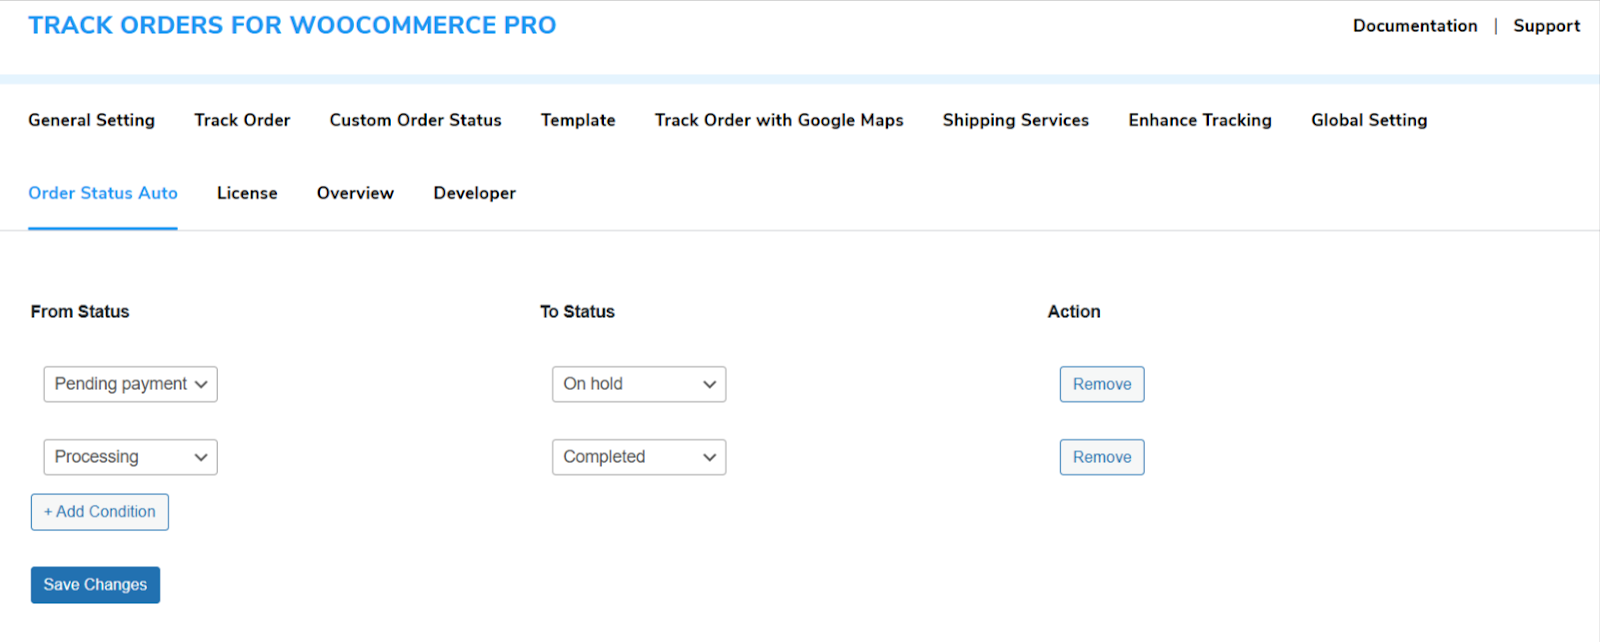
Add a new condition by specifying:
- Initial Status: The current order status that triggers the automation (e.g., “Processing”).
- Target Status: The status to which the order will transition (e.g., “Completed”).
Save and Activate:
- Save Changes.
The system will then monitor orders and transition their statuses 2 minutes after entering the specified initial status.
17.Compatibility
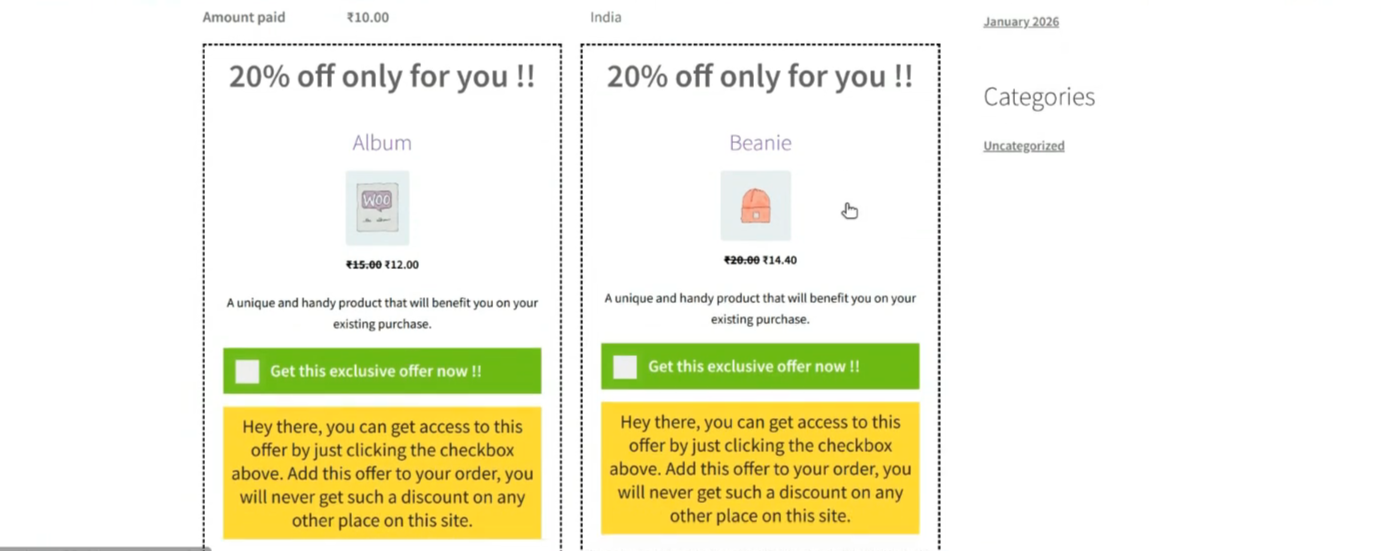
1. Upsell Funnel Builder:
Order Tracking plugin is compatible with the Upsell Funnel Builder. Once enabled, upsell offers can be shown on the order tracking page, allowing product suggestions to be presented alongside order status details.
Once you have installed the funnel builder plugin, a setting will appear on the track order plugin in the global setting section.
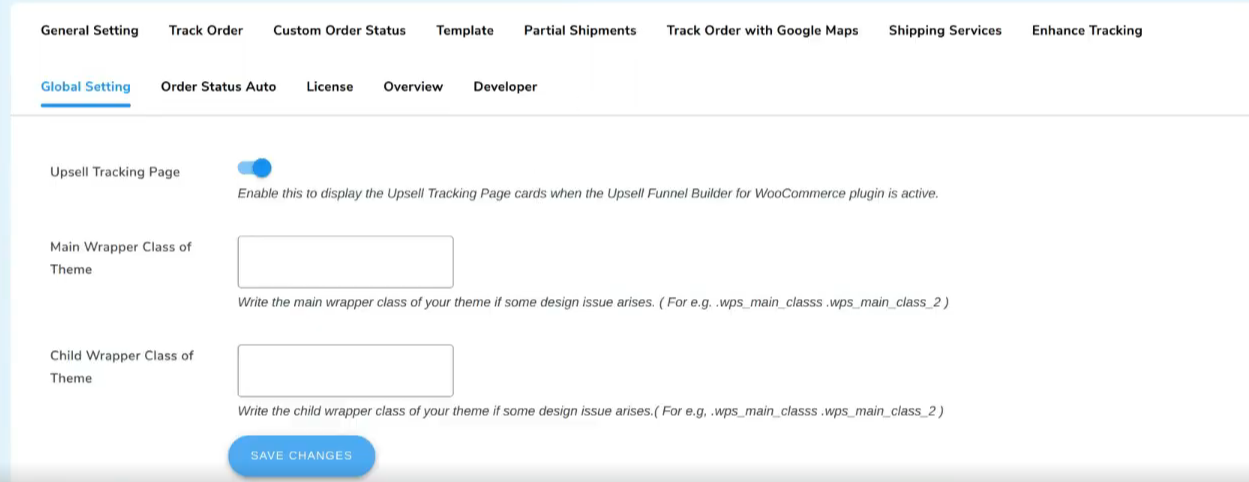
Enable it to show upsell offers to order tracking page.
18.Theme Compatibility
Our Order Tracking plugin is compatible with a wide range of WordPress themes, making it suitable for any website.
- Flatsome – Multi-Purpose Responsive WooCommerce Theme
- Visual Composer – Free WordPress Website Builder
- Elementor – Create, Manage, and Host your Website
- WC Vendors – A Modern WordPress Theme
- DIVI Theme – The Ultimate WordPress Theme
Want some other theme compatibility? Contact Us
19.FAQ’s
How does the WooCommerce Order Tracker Plugin used as shipment tracking with FedEx?
If you are using FedEx shipping services to deliver the package to your customers, and you want to provide the status of the package to your customers. Don’t worry, WooCommerce order tracker provides an easy way simply go to WooCommerce-> settings-> track your order-> enable api-> enable the check box for FedEx API and enter your details.
Do these order status update manually or automatic?
In WooCommerce, when an order is placed, you have to change the order status manually but if you are using a third-party integration then there is no need to change the order status manually because the status will change automatically by the shipping services company.
How does the WooCommerce Order Tracker Plugin used as shipment tracking with Canada Post?
If you are using Canada Post shipping services to deliver the package to your customers, and you want to provide the status of the package to your customers. Don’t worry, WooCommerce order tracker provides an easy way simply go to WooCommerce->settings->track your order->enable api-> enable the check box for Canada post API and enter your details.