
1.Overview
The Wallet System for WooCommerce Pro allows your registered customers to use a digital wallet on your WooCommerce store. Customers can pay for your products and services using their wallet balance.
Note: The Wallet System for WooCommerce PRO will ONLY work if you have installed its free version:Wallet System for WooCommerce plugin.
With this plugin, you can add or remove funds from customers’ wallets in bulk, view & download wallet transaction history, and send email notifications to customers.
2.Key features of WooCommerce Wallet System:
The Wallet System for WooCommerce’s Key Features Are Presented Below:
2.1.Free Version:
- Wallet Top-Up By Customers
- Customers Can Recharge the Wallets of Other Users
- Customers have the option to either transfer or withdraw the funds in their wallet
- Wallet Recharge By Admin
- Wallet Transaction History
- Wallet as a WooCommerce Payment Option
- Wallet as Discount Option
- Notifications for Customers
- Compatible with Subscriptions for WooCommerce and Subscriptions for WooCommerce Pro plugin.
- Compatible with Gift Card for WooCommerce Pro and Ultimate Gift Card for WooCommerce.
- Compatible with WPML.
- compatible with RMA Return Refund & Exchange For WooCommerce Pro.
- Compatible With Currency Switcher for WooCommerce.
- And Many More…
3.How to Download The Wallet Plugin?
To download the premium wallet plugin that you purchased please follow the below steps:-
- Go To https://wpswings.com/my-account.
- Visit Orders Section.
There you will get a License code and a Premium purchased plugin zip file Download and use it on your website by activating it.
Note: You need to have both Free and Pro plugins in order to use them smoothly.
4.Installation
To install the plugin, you can use either of these methods.
4.1. Wallet System [FREE]
Automatic Installation:
Automatic installation is the easiest option handled by WordPress.
Follow these steps for the installation:
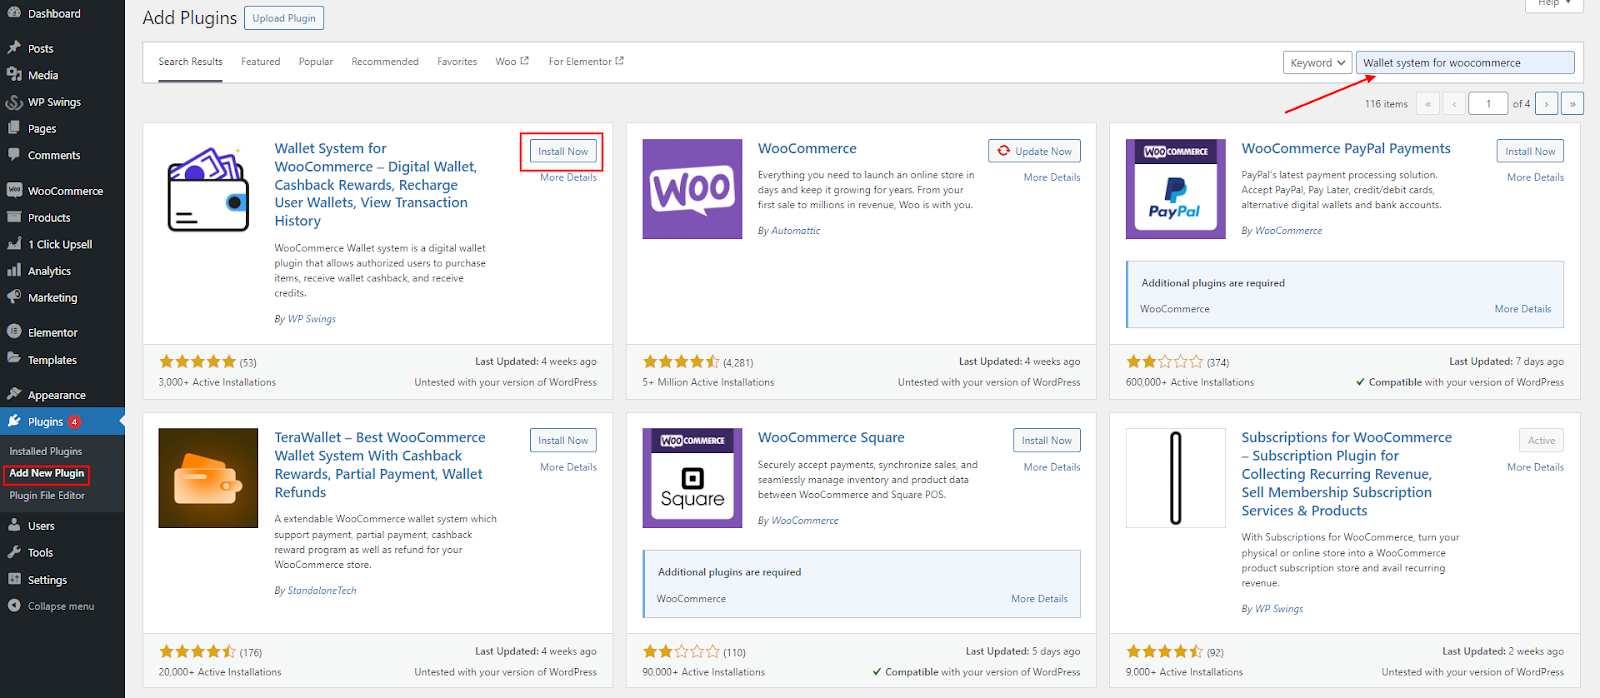
1) Go to the Admin panel navigate to the sidebar click on the ‘Plugins’ menu > ‘Add New’.
2) On the ‘Add Plugins’ page go to the search bar and type ‘Wallet System for WooCommerce’.
Once you find ‘Wallet System for WooCommerce’ by WP Swings, you can view the details about it such as the points release, rating, and description. One can install it, simply by clicking “Install Now”
Manual Installation:
The manual installation of the plugin is another option to install the plugin in the seller’s WordPress environment.
The manual installation method involves downloading our ‘ WooCommerce Wallet Extension’ and uploading it to the web server via their favorite FTP application.
The steps for manual installation are as follows:
1) Upload the ‘Wallet System for WooCommerce’ folder to the /WP-content/plugins/ directory.
2) Activate the WooCommerce Wallet plugin through the ‘Plugins’ menu in WordPress.
The best results can be viewed by using the “WooCommerce” standard theme (Storefront). Any third-party plugin might cause conflict with our plugin.
4.2. Wallet System [PRO]
Automatic Installation:
Automatic installation is the easiest option as WordPress handles the file transfers itself and you don’t need to leave your web browser.
The steps are as follows :
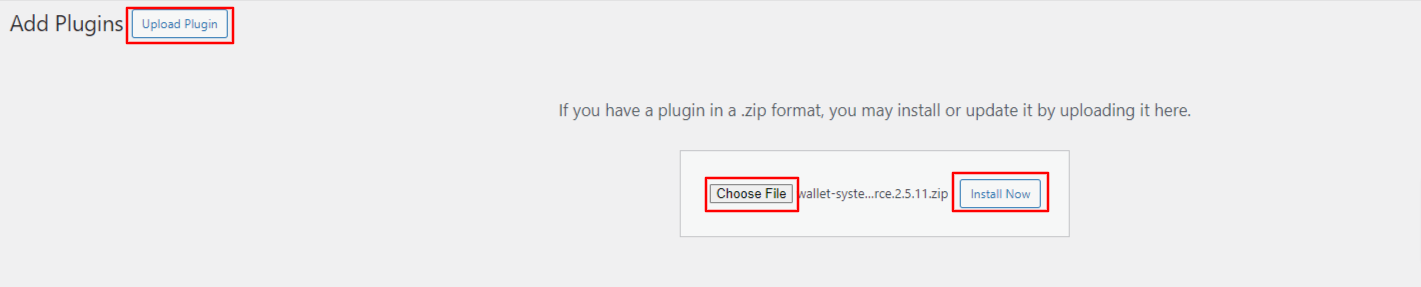
1) Download the zip folder of the plugin Wallet System for WooCommerce Pro from My Account > Orders > Click on view > Scroll down and download the plugin zip file.
2) Once downloaded, install the Wallet System for WooCommerce Pro plugin by browsing and activating it.
Note: Visit the Login page to create your account before completing your purchase.
Manual Installation:
The manual installation of the WooCommerce Wallet System plugin is another option. To install the plugin to your WordPress environment.
The manual installation method involves downloading our Wallet System for WooCommerce Pro Extension and uploading it to your web server via your favorite FTP application.
The steps are as follows :
(i) Kindly, upload the Wallet System for WooCommerce Pro folder to the /wp-content/plugins/ directory.
(ii) Activate the Wallet System for WooCommerce Pro plugin through the WooCommerce wallet ‘Plugins’ menu in WordPress.
Note: Before activating the Wallet System For Woocommerce Pro, you should have the Wallet System For WooCommerce – WordPress plugin otherwise, the plugin will not function.
So, if you don’t already have it, you can download it directly from here:
4.3.License Activation
After Purchasing the premium version navigate to My Account > Orders > Your Order. There you’ll find the License Key.
If you want to benefit from all the premium features and automatic updates and access the support platform to receive help from our staff. In that case, it’s necessary to activate the license.
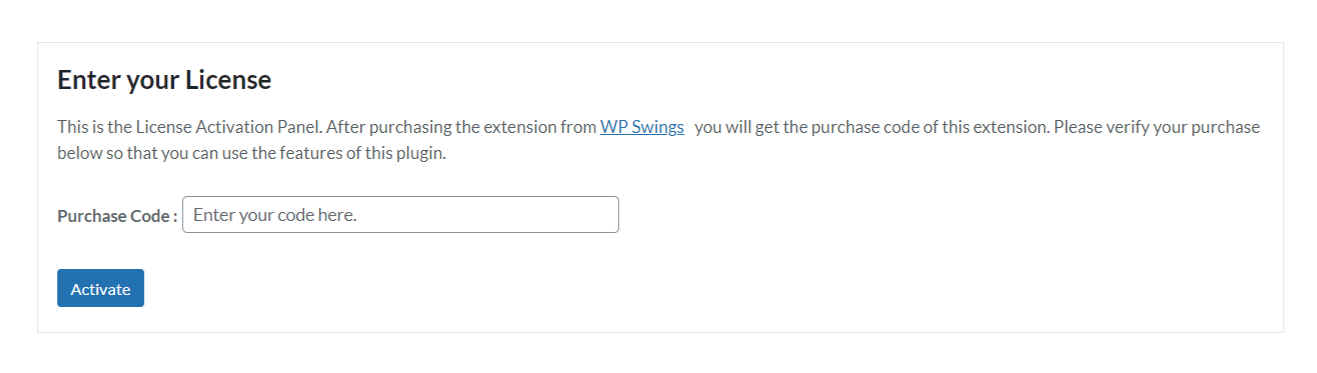
To do so, you have to navigate to the “License” tab, here you can enter the “License Key”, and click on the “Activate” button. Customers are supposed to receive these in their mail when they purchase the premium plugin.
You can also find the license activation code in the My Accounts > Order section
5.General Settings
After the successful installation and activation of the Wallet System for the WooCommerce plugin, the admin can perform the following actions in the general settings:
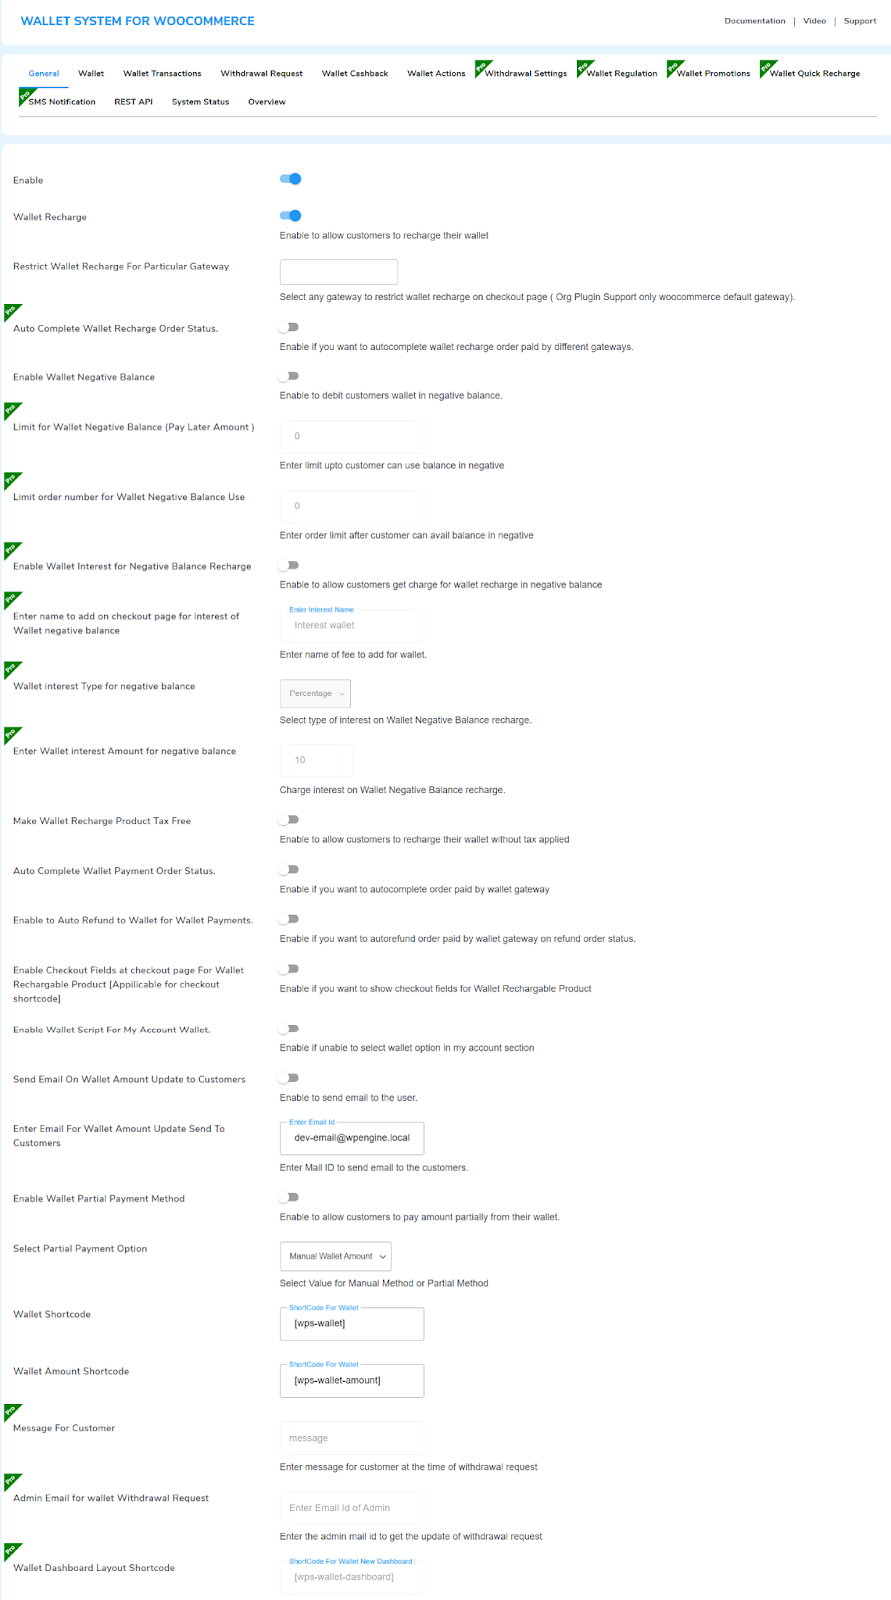
5.1 Enable The Wallet Plugin
Click on the toggle to Enable the Wallet System for WooCommerce plugin.
Note: Admin has to add some money in their wallet to enable the Wallet Payment method from WooCommerce > Settings > Payment.
Note: Admin must add some money to their wallet to enable the Wallet Payment method from WooCommerce > Settings > Payment.
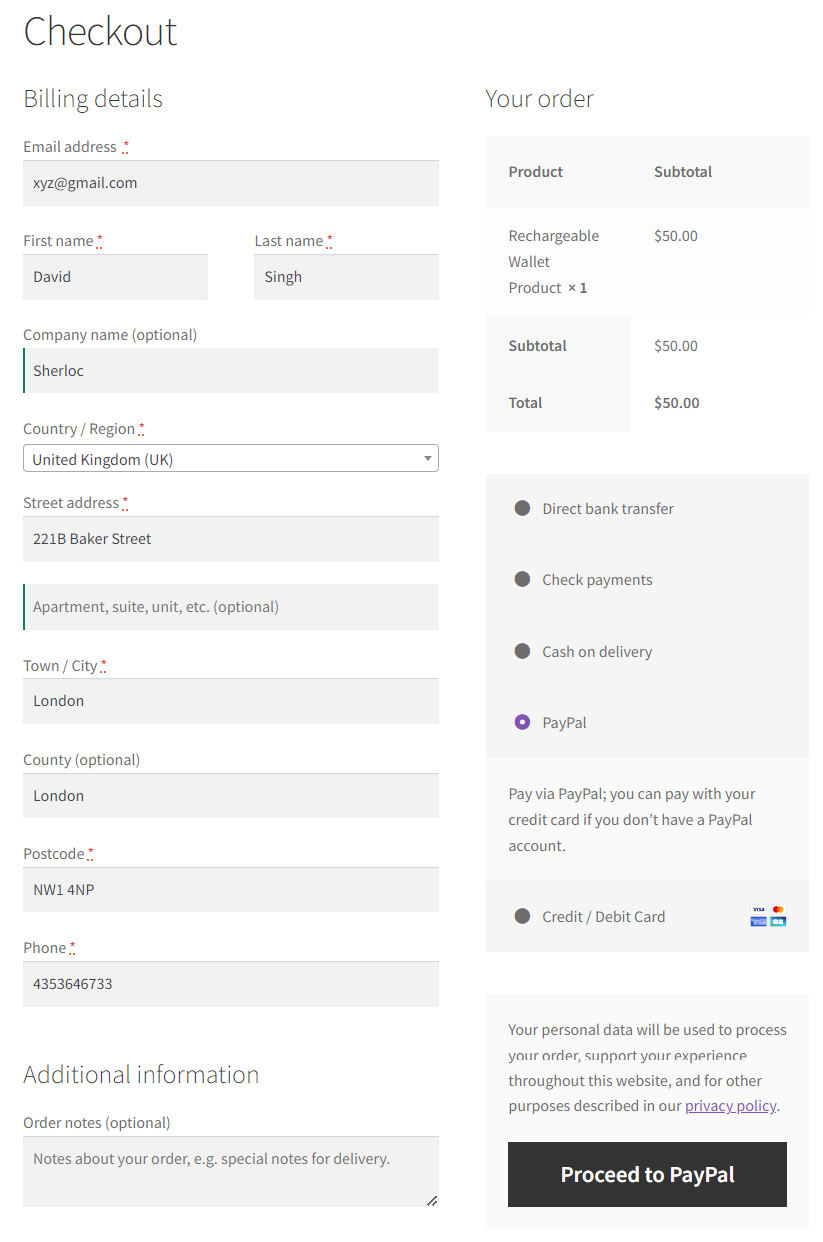
5.2 Digital WooCommerce Wallet Recharge
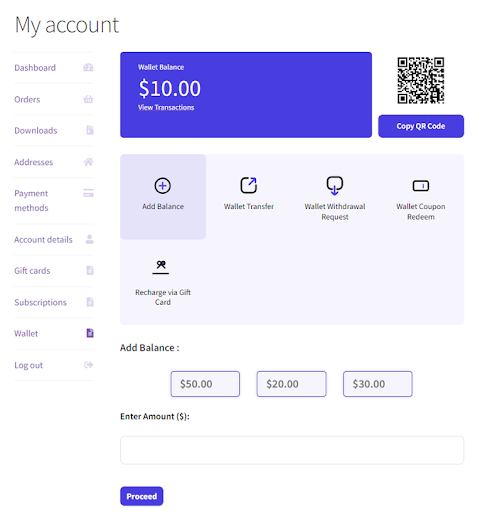
Click on the Wallet Recharge toggle to allow customers to recharge their wallets using the payment methods available on your WooCommerce.
After Enabling this Feature your customer will get an “Add Balance” Option in their My Account >> Wallet Section which they can use to recharge their wallet.
Frontend Representation:
5.3 Restrict Wallet Recharge for Particular Gateway
You can select payment gateways that you want to be restricted in wallet recharge, gateways include Direct Bank Transfer, Cash On Delivery and Check Payments.
![]()
After choosing the gateway it’ll be restricted for recharge, and will not show to users on recharge orders.
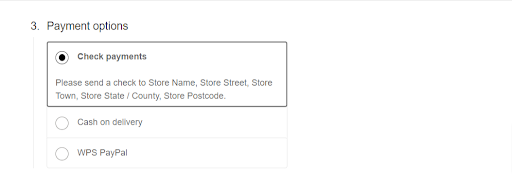
Note: The org version only supports the default WooCommerce payment gateways and for all gateways, you need to upgrade to the Pro version of the plugin.
5.4 Wallet Recharge Status Auto UpdatePremium
You can enable this setting in the General Tab and below you can choose the order status once the recharge order gets to that status it’ll be autocompleted without your need to manually process them.
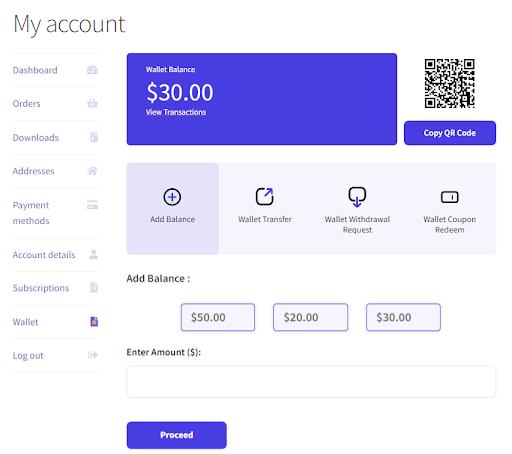
 In the below example, you can see a user has done a $20 recharge and once the order status got into the processing stage, it automatically got completed and the balance has been updated in the wallet.
![]()
The balance has been updated in the wallet.
Frontend Representation:
Note: Orders for wallet recharge made prior to HPOS Compatibility and plugin version 2.5.0 will be displayed under the wallet recharge order section here. However, any orders placed After the 2.5.0 version will be listed in the WooCommerce order section.
5.5 Enable Wallet Negative Balance
Navigate to the General Tab and Toggle the button to enable negative wallet support. After enabling this setting you can also credit a negative amount in the customer’s wallet.
For a Detailed Process of Wallet Negative Balance Move to the Negative Balance Section
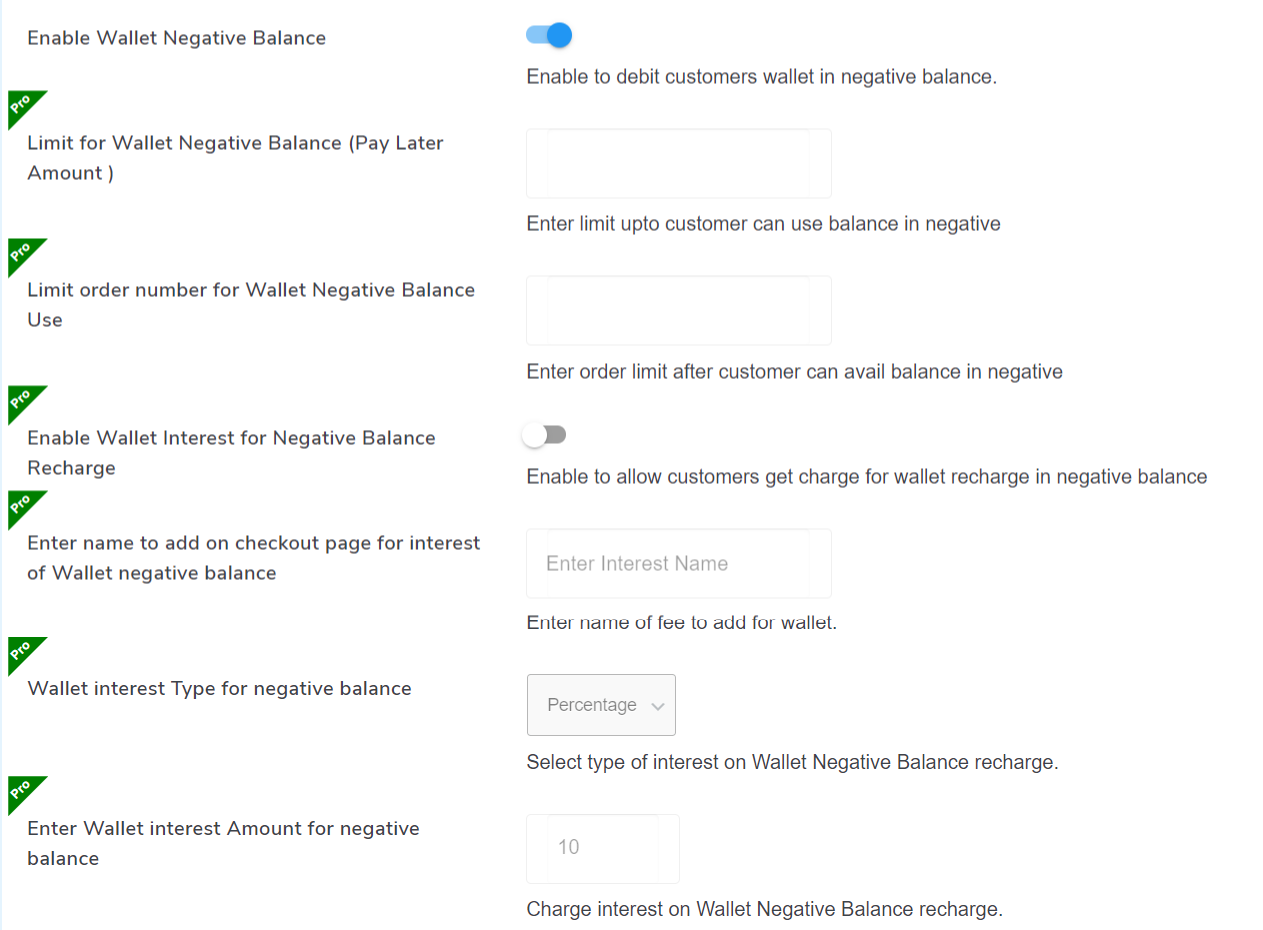
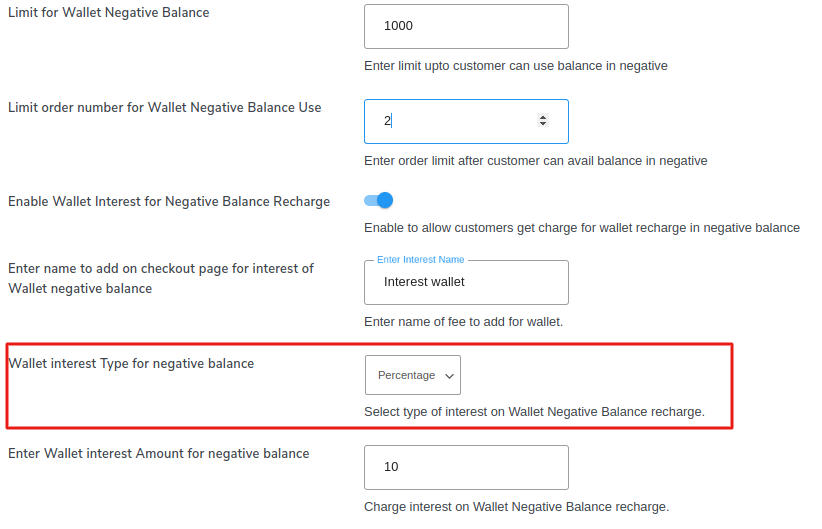
5.6 Limit for Wallet Negative Balance (Pay Later Amount) Premium
In this Tab, you can set the maximum amount limit customers can avail the balance in negative.

5.7 Limit order number for Wallet Negative Balance UsePremium
You can restrict new users from using the negative balance based on their order quantity. In simple terms, users will not be able to avail balance in negative until they have reached a predetermined order limit.
5.8 Enable Wallet Interest for Negative Balance RechargePremium
You can Enable this setting to charge interest on negative wallet amounts during wallet recharge.
5.9 Enter name to add on checkout page for interest of Wallet negative balancePremium
Here you can write your interest name to be shown on the checkout page.
5.10 Wallet interest Type for negative balancePremium
Here you can select the type of interest it can be in percentage or a fixed amount.
5.11 Enter Wallet interest Amount for negative balancePremium
Here you can enter the interest amount to charge on wallet recharge.
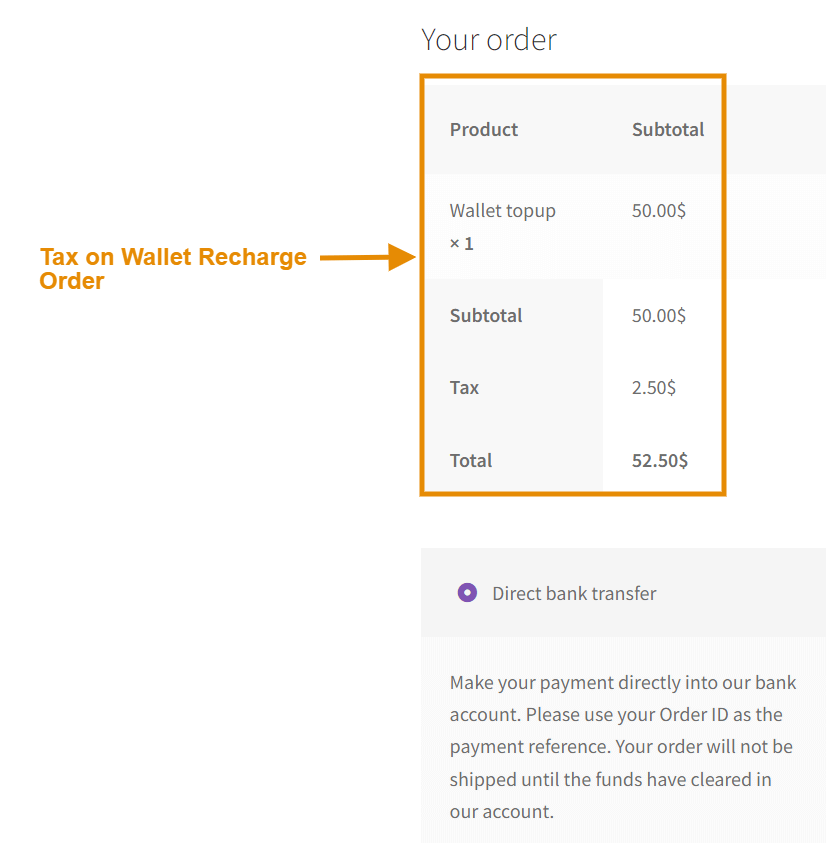
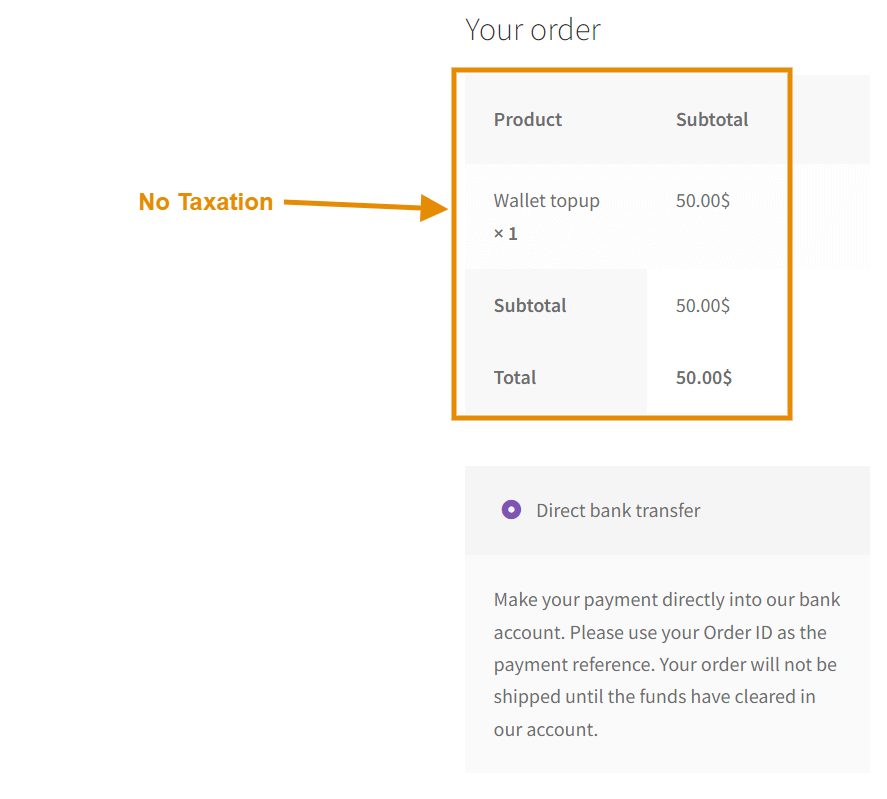
5.12 Make Wallet Recharge Product Tax-Free
You can enable the toggle button if you wish to make the wallet recharge product tax-free for users. The recharge product will be taxed like other orders if you turn off this feature.
Frontend Representation:
When the recharge order is taxed:
After enabling the tax-free feature:
5.13 Auto Complete Wallet Payment Order Status
You can enable the autocomplete option for orders where the wallet is used as a payment method.
In the below example, you can see that the customer has purchased along sleeve tee using a wallet as a payment method.
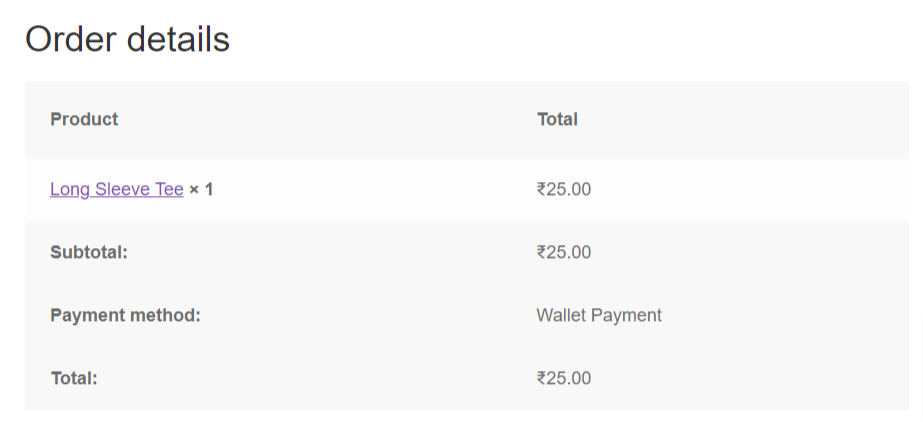 And the order is autocompleted.
![]()
5.14 Enable Checkout Fields at the checkout page For Wallet Rechargeable Products [Applicable for checkout shortcode]
By default, the checkout fields are hidden during the wallet recharge checkout process. But you can enable the toggle button to show checkout fields during the top-up order placement.
Frontend Representation:
5.15 Enable Wallet Script For My Account Wallet
This feature is specifically for those users who are unable to select the wallet option in the “My Account” section. If your users face such issues, please enable this option.
5.16 Send Email On Wallet Amount Update to Customers
Enable the toggle button to let customers receive an email notification every time their wallet amount is updated.
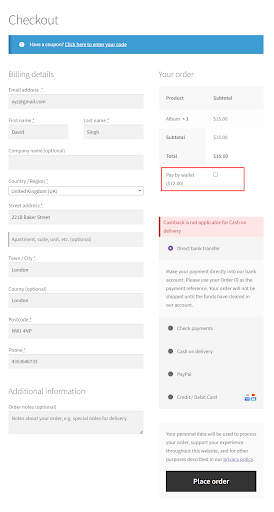
5.17 Enable Wallet Partial Payment Method
Click on the toggle button to allow the partial payment method for all users.
5.18 Select Partial Payment Option
When the wallet balance is lower than the order total, customers will be able to use it to deposit partial payments.
There are two options available:
- Manual Wallet Amount: Select this option to allow customers to flexibly choose any amount for partial payment.
- Total Wallet Payment: If you select this option, then wallet users will be able to pay their total wallet balance as a partial payment.
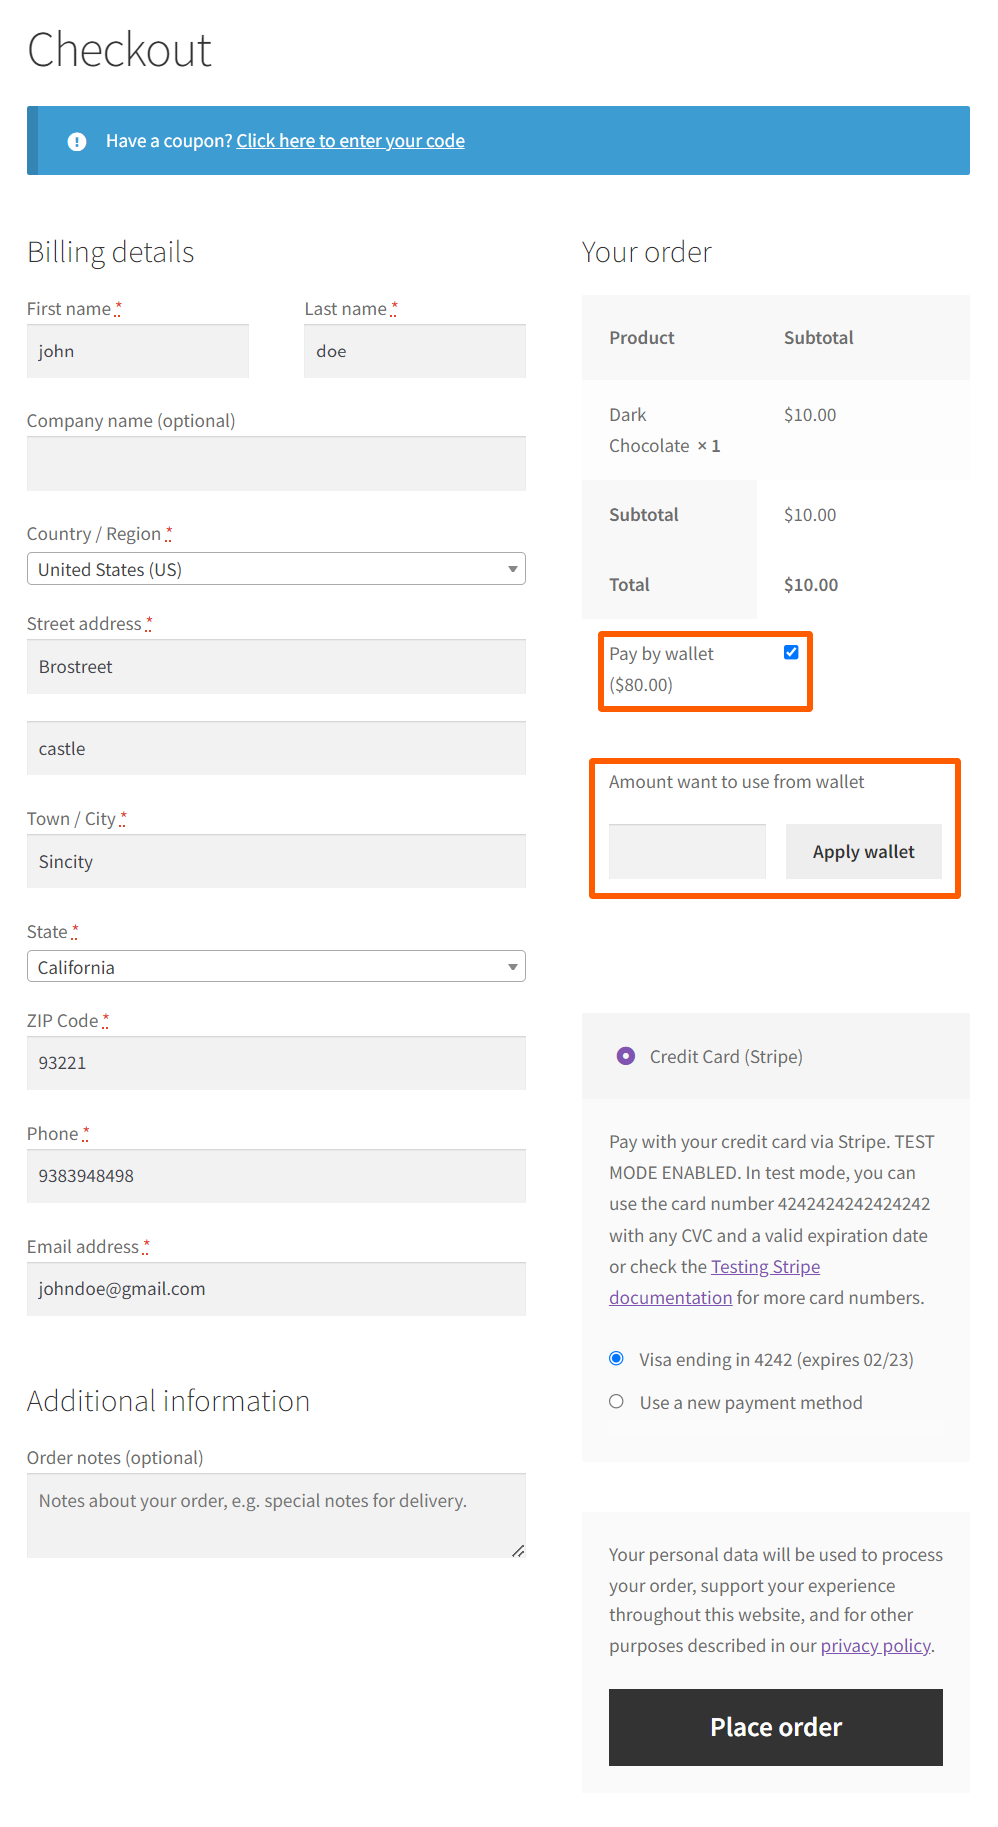
Below you can see an example of the Manual Wallet Amount where the wallet balance is lower than the order total but can choose a partial amount to pay from the wallet.
Frontend Representation:

Below is another example of the Total Wallet Payment where also the wallet balance is lower than the order total but the user can pay the whole amount in his wallet as a partial payment.
5.19 Wallet Shortcode
You can use the shortcode [wps-wallet] code to display the user’s wallet along with the QR generator anywhere in your store.
To add a wallet section anywhere on your store, follow these steps:
1. Navigate to your website’s Dashboard.
2. Go to Pages and select Add New Page.
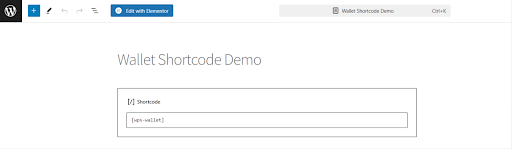 3. Create a new page, insert a shortcode block, and paste your shortcode there.
4. Save the page.
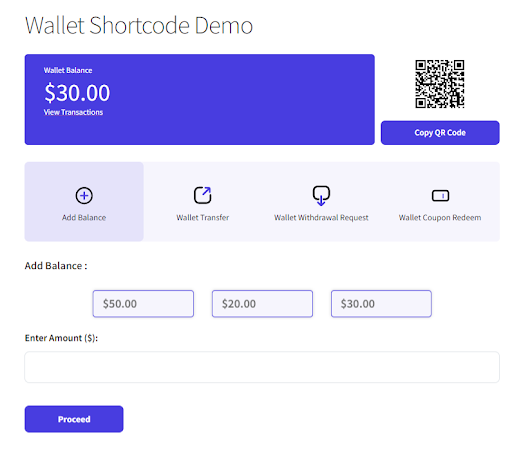
Your wallet section will now be displayed on the newly created page using the shortcode.
Frontend Representation:
5.20 Wallet Amount Shortcode
Show users their WooCommerce wallet balance anywhere in your store using this shortcode [wps-wallet-amount].
You can follow the same process as shown above to create a page using shortcode.
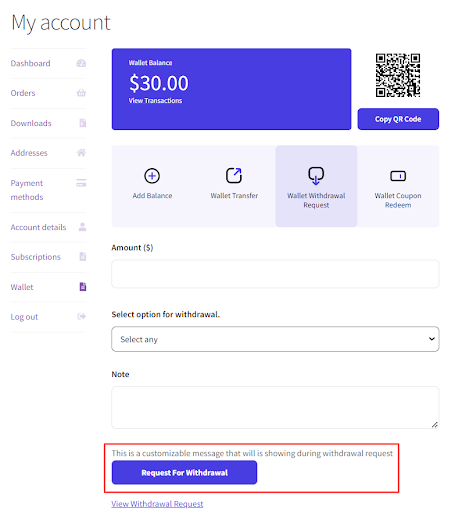
5.21 Message For CustomerPremium
Add a customized message under the Notes field of the withdrawal request form.
You can see in the frontend section, how it’ll show to your users when they’ll opt for withdrawal
Frontend Representation:
5.22 Admin Email for wallet Withdrawal RequestPremium
Enter the email address on which you want to receive the wallet withdrawal request emails. At last, click on Save Settings to save the changes you have made.
6.Wallet Tab
Wallet Settings allow you to add and remove customers’ wallet balances in bulk or individually and view the wallet user list.
The Wallet settings tab contains the following settings:
- Edit The Wallet of All Users at Once
- Import Wallet Balance from a CSV File
- The Wallet User List
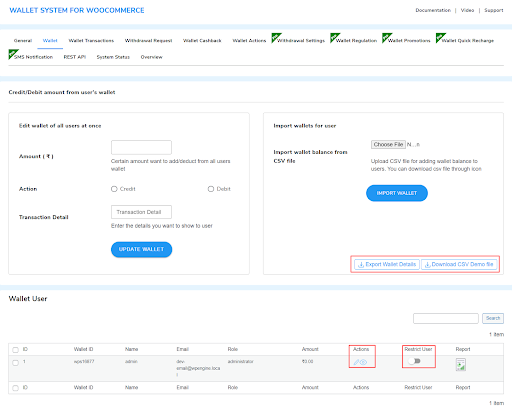
6.1. Edit Wallet of All Users at Once
Using this setting, you can credit or debit the Wallet amount of all users in bulk. Follow these steps to edit the Wallet of all users once:
- Go to Wallet > Edit Wallet of All Users At Once.
- In the Amount box, enter the amount you want to debit/credit.
- Choose the Action: Debit or Credit.
- Then, click Update Wallet.
Note: The amount entered in the Amount box should always be a whole number. No fractions or decimal numbers are allowed.
6.2. Selective Bulk Edit of Wallet Balance
You can selectively edit the balance of n number of users from the Wallet User list with the following steps:
- Go to the Wallet User table.
- Click on the checkbox located before the user ID.
- Go to the “Edit the Wallet of All Users at Once” section and enter the credit/debit value.
- Lastly, click on Update to selectively bulk update.
6.3. Import Wallets for Users
You can download wallet user balance details in a CSV file using the Export Wallet Details button. Also, You can edit the wallet balance of your users individually or in bulk by importing a CSV file. Follow these steps to import the wallet balance from a CSV file:
- Go to the Wallet setting tab.
- Click on the Download CSV Demo File button from the Import Wallets for Users section.
- Open the file and edit the wallet balance and define the type of transaction (credit or debit)
- Come back to the Wallet tab. Click on the browse button, select the modified CSV file, and Upload it.
- And click on Import Wallet.
6.4. Wallet User List
In the section, you can view the wallet users list, edit the wallet amount individually, and see the wallet transaction history.
Follow these steps to edit the wallet amount individually:
- Go to the Wallet tab.
- To update the wallet amount, use the search bar above the wallet user table to find a particular user or select the user from the wallet user table.
- From the Actions column, click on the edit icon.
- The edit wallet amount popup will appear.
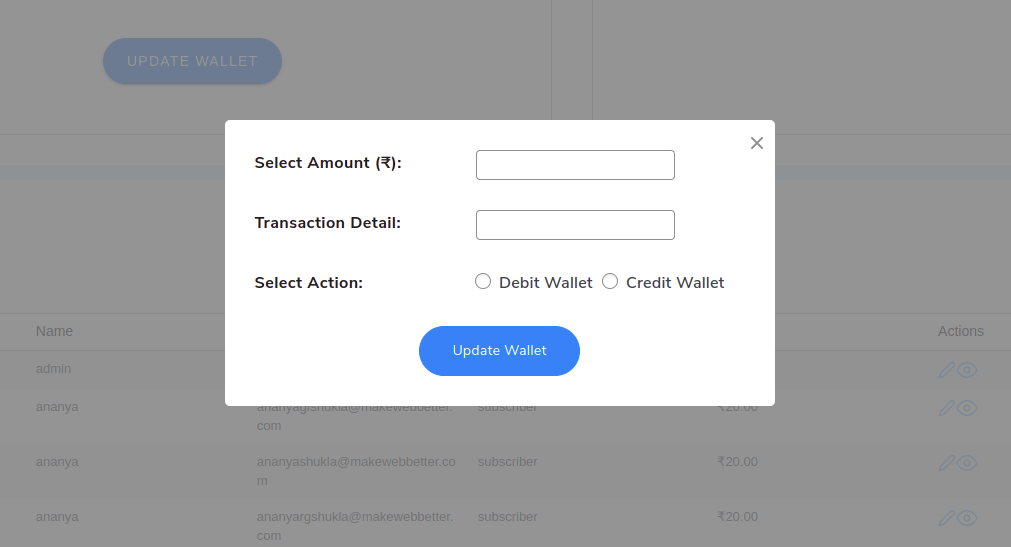
- Enter the amount in the Amount box and mention the transaction detail.
- Select the Debit or Credit option.
- Lastly, click on the Update Wallet button to implement your changes.
Follow these steps to view the wallet transactions history:
- From the Actions column of any user, click on the View icon.
- It will display the Wallet transactions of the user.
From the search bar located above the wallet transaction table, you can filter the list by keywords and date range.
6.5 Restrict Wallet User
The admin has the ability to restrict a specific wallet user from using the Add Balance, Wallet Transfer, and Wallet Withdrawal Request features at once, ensuring secure online payments.
6.6. Restrict WordPress Wallet Plugin UserPremium
In the premium version of the plugin you get the additional restriction options for your users, the wallet system allows the admin to restrict any user from using the wallet features.
You can restrict any user from using the following features: Add Balance, Wallet Transfer, Wallet Coupon Redeem, and Wallet Withdrawal Request.
You can block the wallet features separately for any user. Or implement a specific configuration of feature restrictions for all users.
Note: By default, all users are unrestricted.
For example, you may restrict user ‘A’ from only using the Add balance and Wallet Transaction feature. You can apply this restriction globally for all wallet users.
The users can only use the remaining balance to purchase your products and services.
To do this, go to the wallet user list table and click on the edit icon from the ‘Restrict User’ column.

Then, select the features you want to restrict for the user. Or apply the same restriction globally by enabling the ‘Apply for All Users’ toggle button. At last, click on the Restrict Wallet button to implement the changes.
Note: By default, all users are unrestricted.
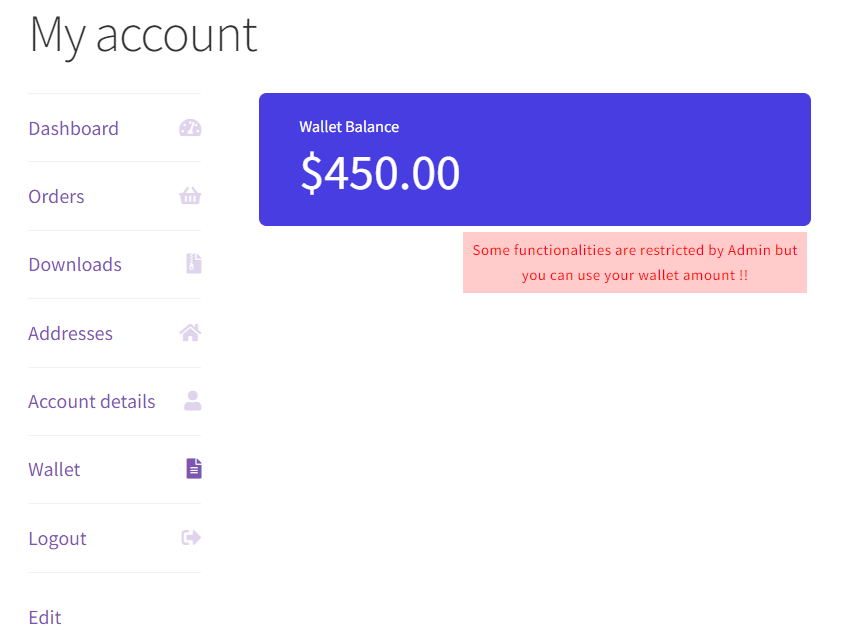
Frontend Representation:
Before Wallet Restriction:

After Wallet Restriction:
7.WooCommerce Wallet Transactions
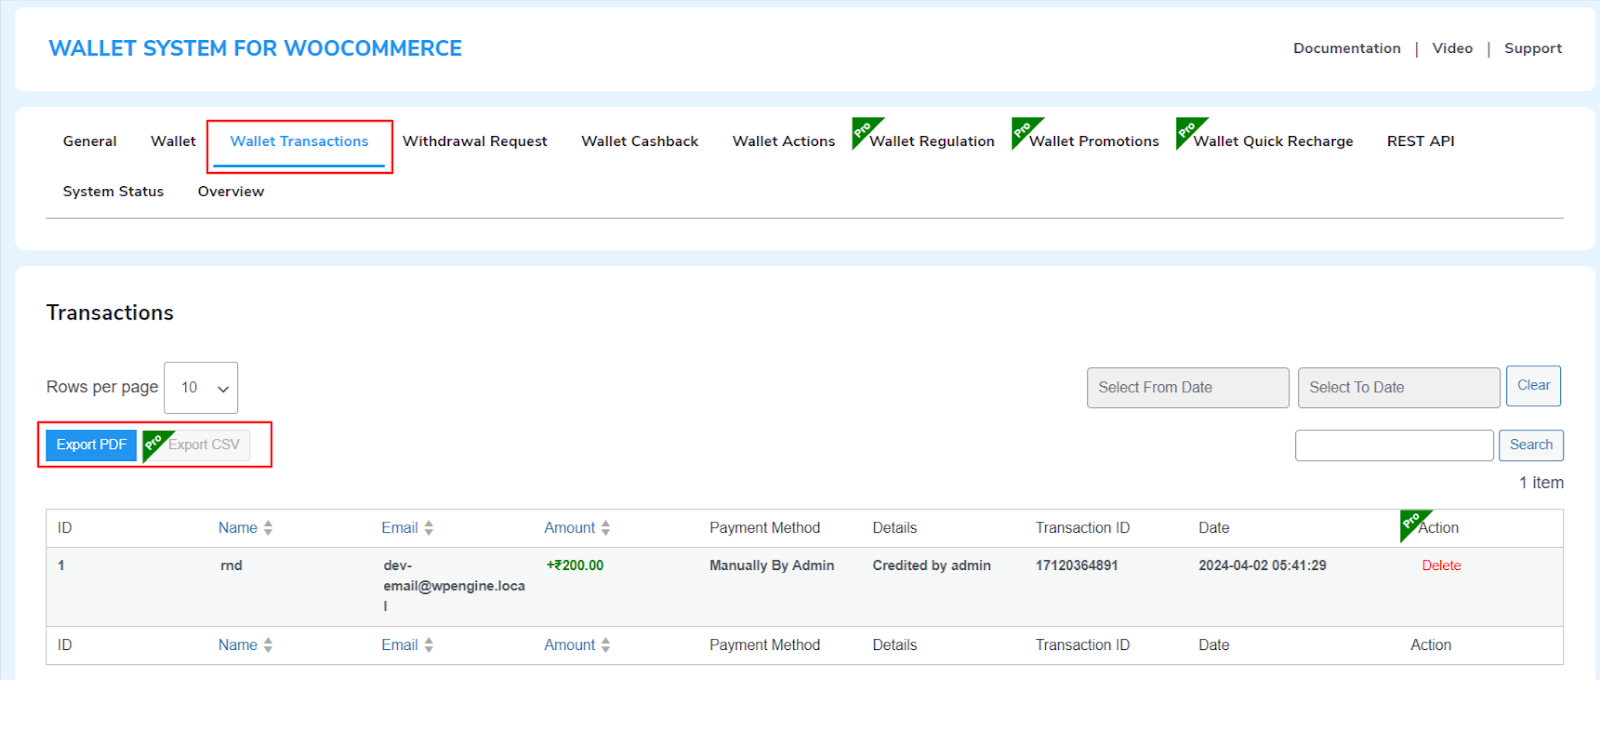
The Wallet Transaction tab shows the list of the transactions made by your customers and edits (credits and debits) you have made into the customers’ wallet accounts. Also, the Export Pdf button lets you download the transaction table in a PDF file.
You can filter this transaction list from the search bar using a Keyword and Date range.
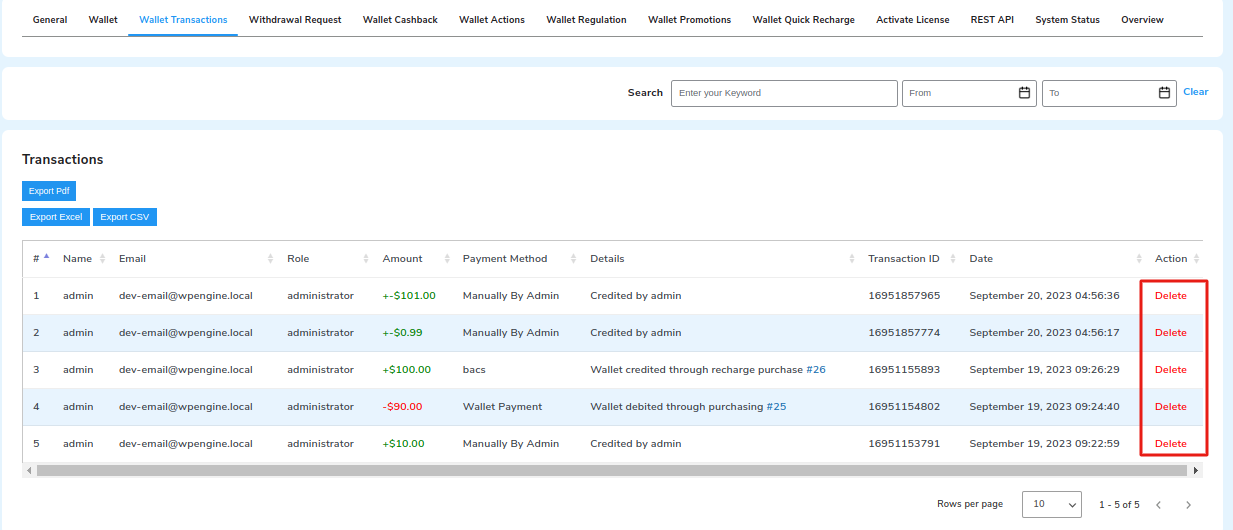
7.1.Delete User’s Transactions
Admin can manually delete user’s transactions from the transaction table.
7.2.Export Transactions Details in PDF
You can export the transaction details in a PDF file for better understanding.
7.3.Export Transactions Details in CSV
Admin can export the transaction details in a CSV file to integrate it with a third-party system.
8. Withdrawal Request
The Wallet System for WooCommerce allows your customers to file a withdrawal request to withdraw money from their wallet account. You can view and manage these withdrawal requests from the Withdrawal Request tab.
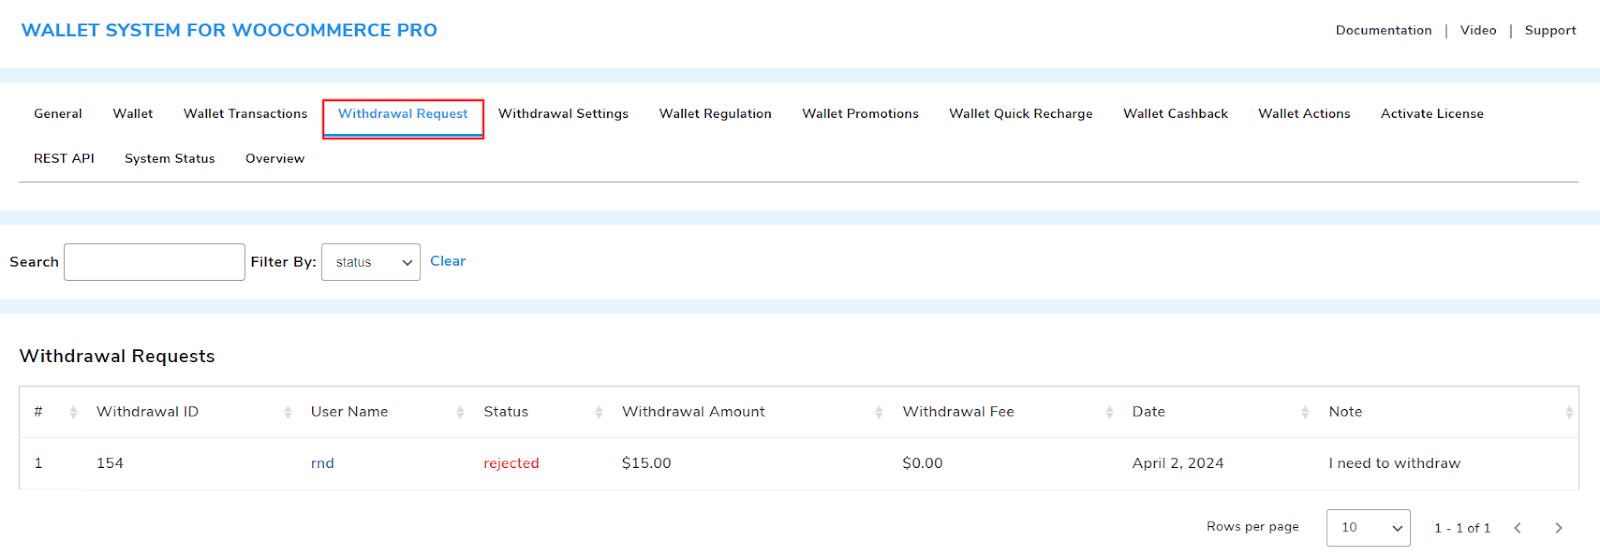
You can filter the withdrawal requests list by keywords and request status. The table also shows the ‘Username’ column that contains the name of the users linked to their profiles. You can click on any name to view the user profile.
Now, there are three withdrawal request statuses in the Filter By dropdown:
- Approved
- Pending
- Rejected
Note: You have to address and resolve each withdrawal request manually.
9.Withdrawal Settings
This setting allows your customers to withdraw funds via PayPal. To initiate a withdrawal, customers simply submit a request and provide their registered PayPal email address.
The admin can then approve or deny these requests. Upon approval, the funds will automatically be transferred to the customer’s PayPal account.
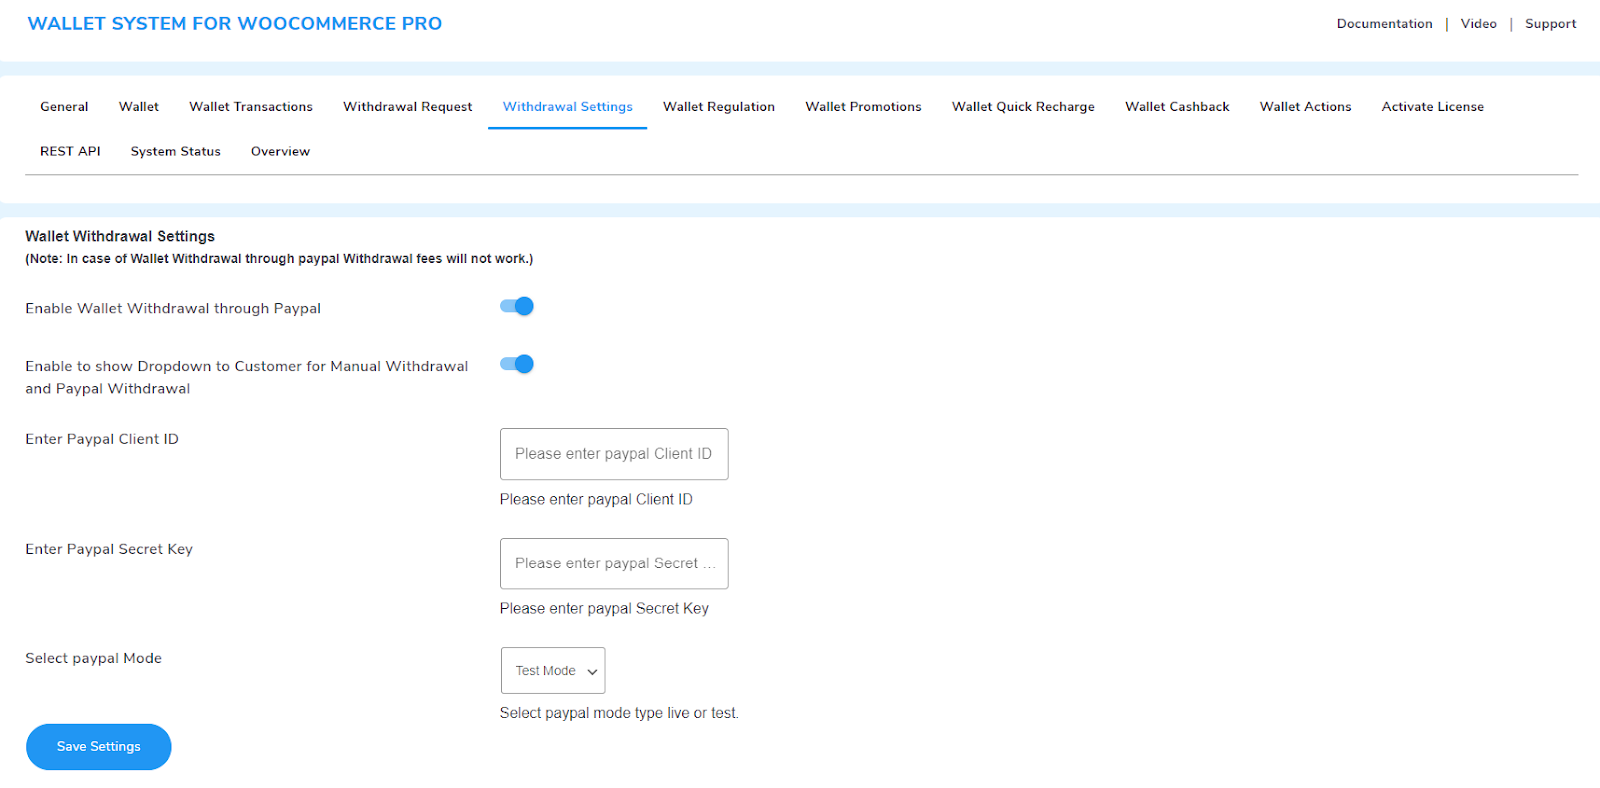
Note: In the case of Wallet Withdrawal through PayPal, Withdrawal fees will not work.
Enable Wallet Withdrawal through Paypal: Toggle this option to enable this setting.
Enable to show Dropdown: Toggle this option show to the Manual Withdrawal and PayPal Withdrawal Dropdown.

Enter PayPal Client ID: Here you have to enter your PayPal Client ID
Enter PayPal Secret Key: Here you have to enter your PayPal Secret Key
Select PayPal Mode: You’ll get two options here Test Mode and Live, Test mode helps you to test this functionality and once you are done testing, you can switch to live mode.
You can attain your Client ID and Secret Key for Test mode and Live mode from your PayPal account.
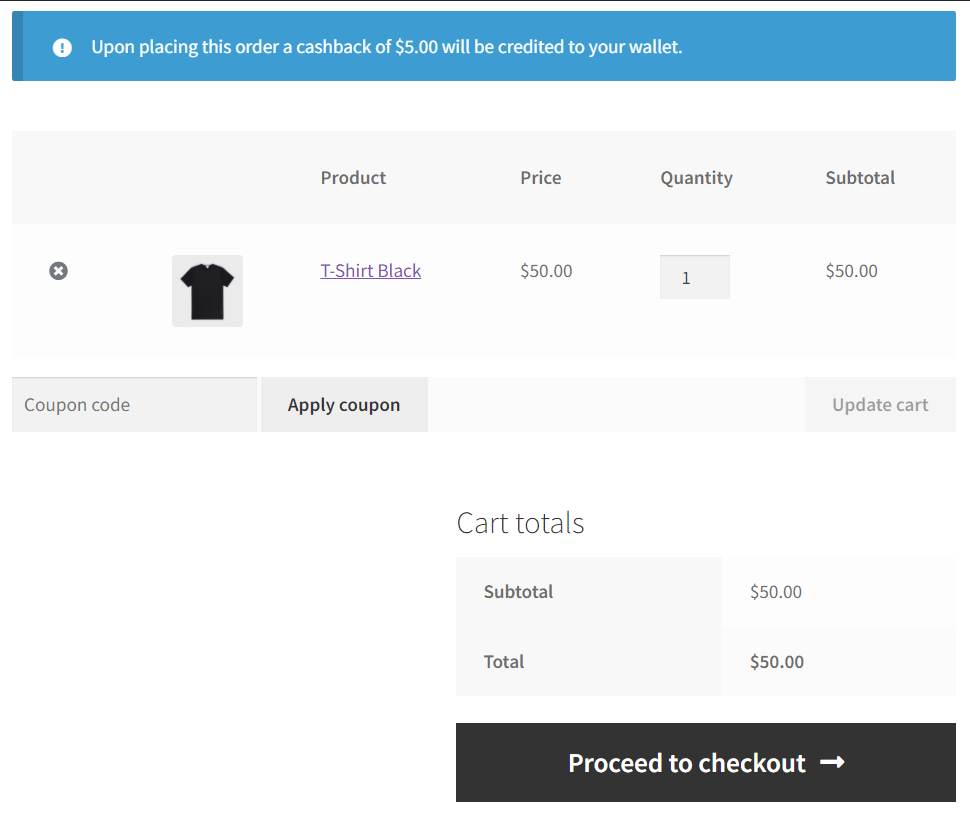
10.Wallet Cashback
The wallet system works like a cashback reward system and allows the admin to send cashback rewards directly into the users’ wallets irrespective of the payment method used.

Go to the WP Swings > Wallet System > Wallet Cashback tab to set up the wallet cashback functionality:
10.1. Enable Wallet CashBack
Enable this toggle to use the wallet cashback feature.
10.2. Process Wallet CashBack
In this dropdown, you can select the order statuses at which the cashback will be sent to the users’ wallets. The dropdown consists of the following statuses:
- Complete
- Processing
- On Hold
- Payment Pending
10.3. Wallet Cashback Rule
The wallet cashback rule dropdown allows the admin to determine if the cashback offer will be available Cart-Wise or Category-Wise.
Cart-Wise Rule: If this option is selected, then the wallet cashback will be rewarded based on the order total on the cart page

Here is how the cart discount works in the front end.
Frontend Representation:
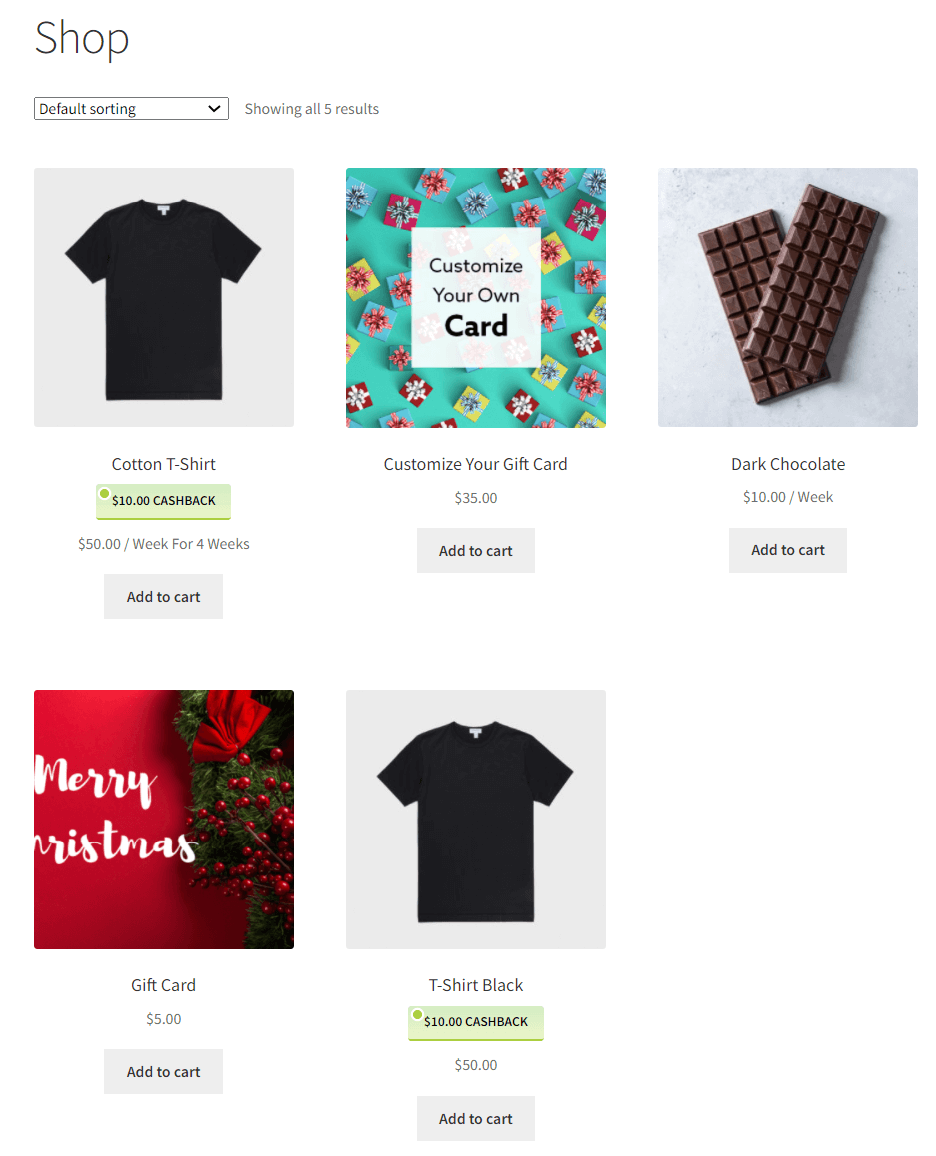
 Category-Wise: When you select the Category-Wise cashback rule, you will get the option to select the product categories in which you want to offer the wallet cashback.
Per Category-Wise Settings: You can configure the Wallet Cashback feature individually for every category. These settings will override the configuration of the categories added under the global cashback rule.
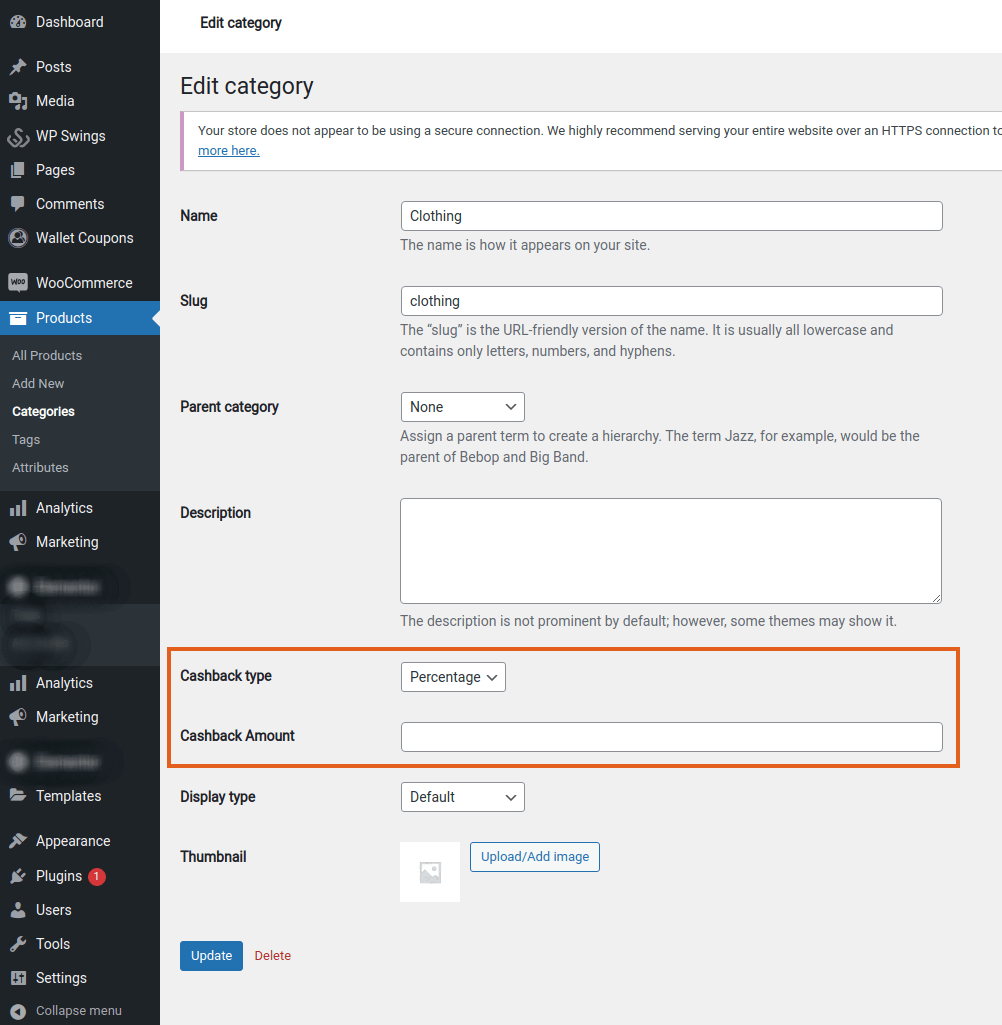
Note: The only pre-condition to configure the per-category cashback settings is to select the category-wise cashback rule.
Afterward, follow these steps:
1. From the Admin menu, Go to the Product > Categories section.
2. Set the Cashback Type as Fixed or Percentage.
3. Set the Cashback Amount.
4. Then, click on Update.
Case 1: If there are multiple items of the same category in the cart, then the customer will receive wallet cashback on each product until the maximum cashback amount is reached.
Case 2: If there are multiple products of different categories, then the customer will receive wallet cashback on the individual product of each category.
Here is how it appears on the shop page:
10.4. Wallet Cashback Type
The Wallet system offers two types of cashback: Percentage and Fixed.
10.5. Enter Wallet Cashback Amount
In this section, you can enter the value for the selected wallet cashback type.
10.6. Minimum Cart Amount
You can decide the minimum cart amount on which customers will be able to earn wallet cashback.
10.7. Maximum Wallet Cashback Amount
You can set a maximum amount for wallet cashback. It will limit the cashback reward to the set limit. For example, if the customer purchases a $1000 product that has a 10% cashback offer on it, then instead of receiving $100, they will receive the maximum wallet cashback set by you.
Note: The Minimum and maximum cashback options will only work if the cashback type is in percentage
Frontend Representation:
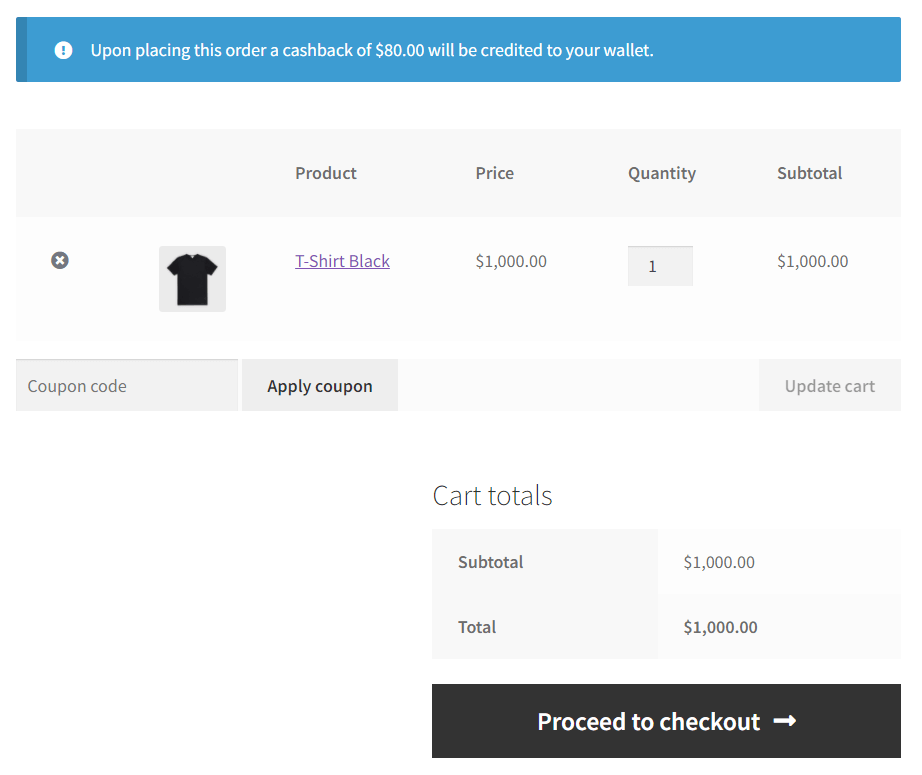
If the maximum amount is $80, then the customer will get that amount irrespective of the cashback value.
10.8. Restrict Wallet Cashback For Particular Gateway
You can restrict or limit the use of any payment gateway(s) for earning cashback rewards. For example, if the COD and bank transfer are restricted for availing of cashback on products or categories, users will not receive cashback.

10.9 Cashback based on User Roles
Toggle this option if you want to give cashback to specific users based on their user roles.
 10.10 Select User role for cashback
In this section, choose single or multiple user roles to give cashback, only the selected user roles will receive cashback.
10.11 Cashback on Wallet RechargePremium
Toggle this option if you want to give cashback when users recharge their wallet.
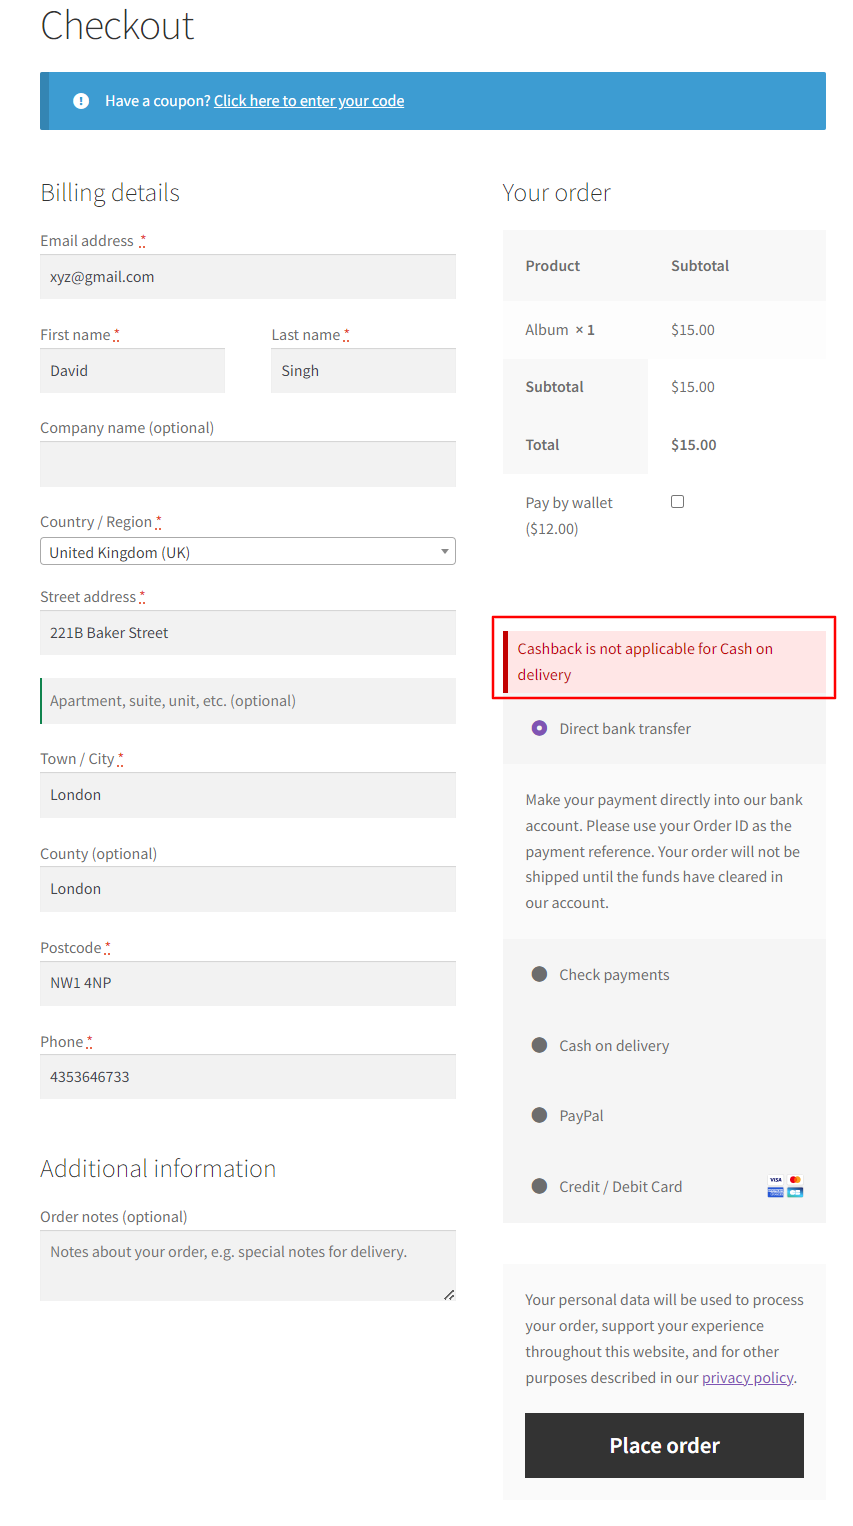
10.12 Show Gateway Restriction Message at Checkout PagePremium
You can show a notification to all wallet users to remind them of the skipped payment gateways. So, they can only choose your preferred payment methods for availing cash back rewards.

For example, if you’ve chosen to restrict cashback on cash on delivery orders, here is how it’ll show on the checkout page
Frontend Representation:
10.13 Hide Wallet Cashback Message at Cart PagePremium
The WooCommerce wallet shows a cashback message on the cart page notifying users of the rewards they’ll receive. You can disable the toggle button to hide the cashback message.
10.14 Hide Wallet Cashback Message at Checkout PagePremium
You can click on the toggle button to hide the wallet cashback message from wallet users on the checkout page.
11.WooCommerce Wallet Actions
The Wallet System plugin allows the admin to establish a WooCommerce credit system and top-up a subscription. Under this reward system, you can let customers earn wallet credit on daily login, signup, and product review comments. Also, you can make it compulsory for your users to add money to their wallets on a weekly or daily basis.

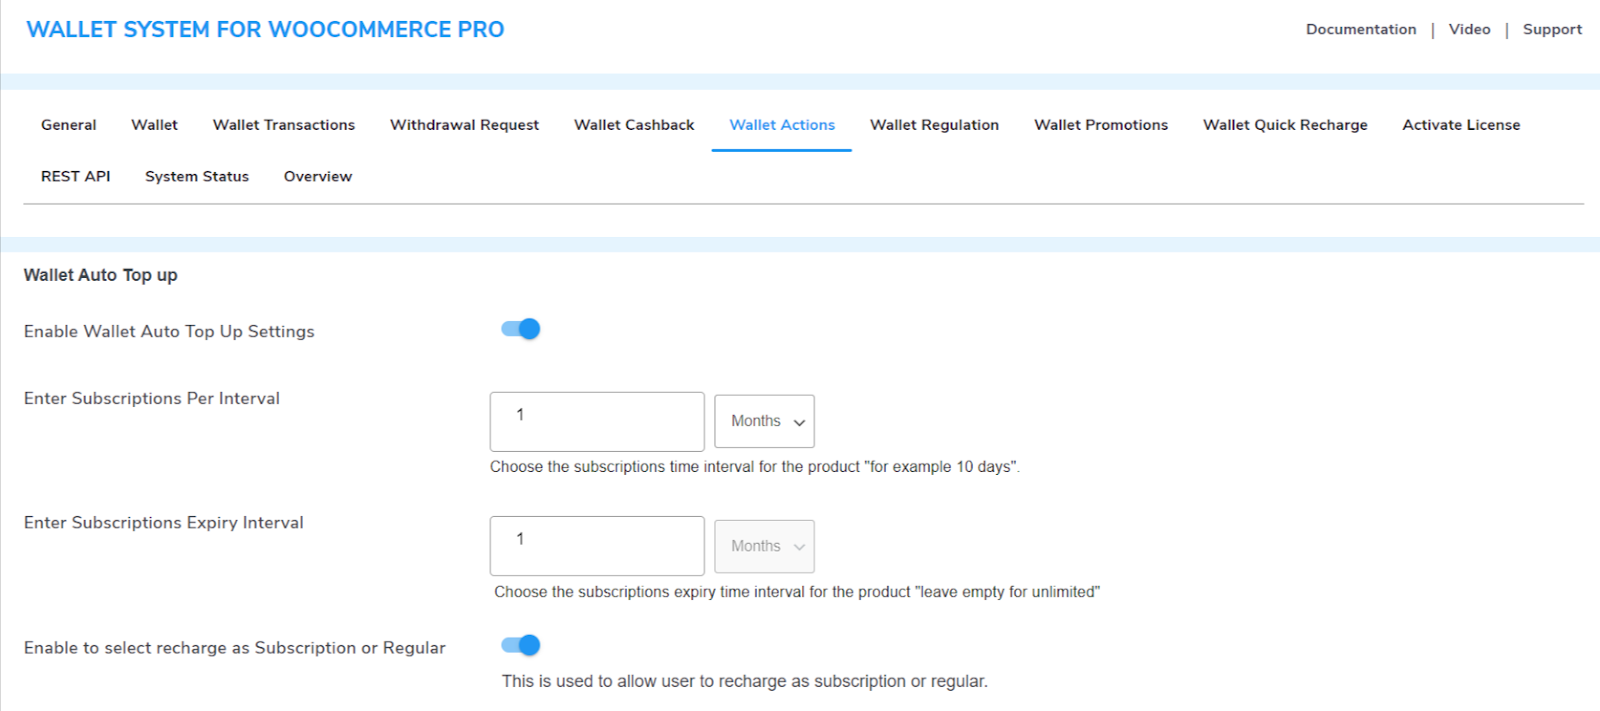
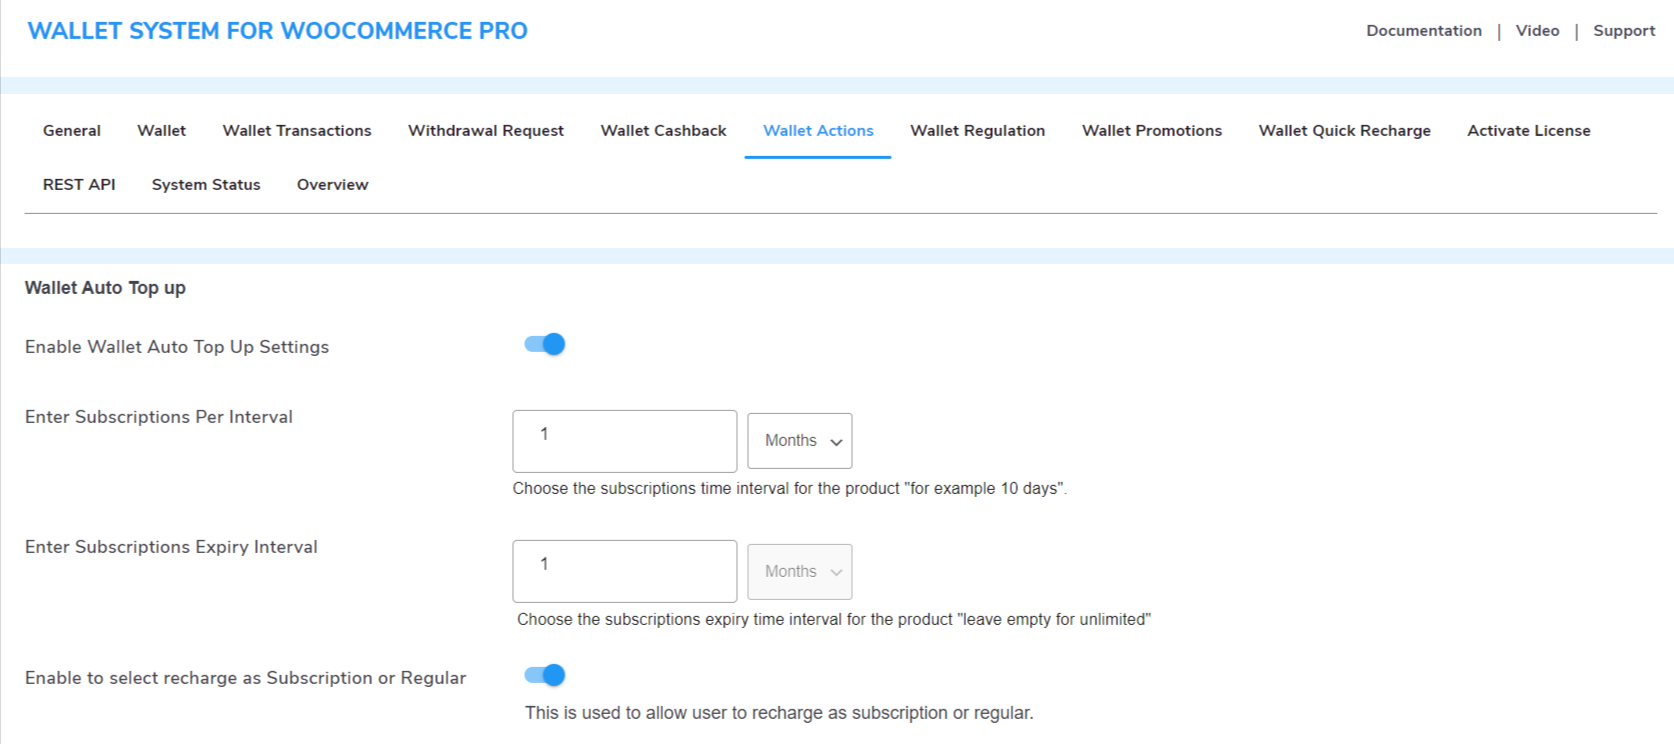
11.1. Wallet Auto Top-up
Enable Wallet Auto Top-up Settings: Enable this toggle button to implement the auto top-up feature. Afterward, customers can’t use the regular recharge options. They can only set the amount of periodic auto top-up after recharging their wallets.
To enable this feature, you must install the Subscription for WooCommerce Plugin.
Enter Subscription Per Interval: Enter the number of auto recharges in the subscription plan. The top-up can be daily, weekly, monthly, or yearly.
Enter Subscription Expiry Interval: Enter the subscription duration (daily, weekly, monthly, or yearly). It sets the number of times the auto top-up reoccurs. For example, if you select 5 days for 10 weeks, then auto recharge will take place for 5 days every week until the plan expires.
You can leave this textbox empty to set up unlimited intervals.
Note: After you set up a top-up subscription, customers will have to recharge their wallets to set the auto top-up amount.
You can leave this textbox empty to set up unlimited intervals.
Frontend Representation:
Note: After you set up a top-up subscription, customers will have to recharge their wallets to set the auto top-up amount.
11.2.Payment Gateway Charge for Wallet
You can Charge Payment Gateway fees for wallet recharge to do so, follow the below steps
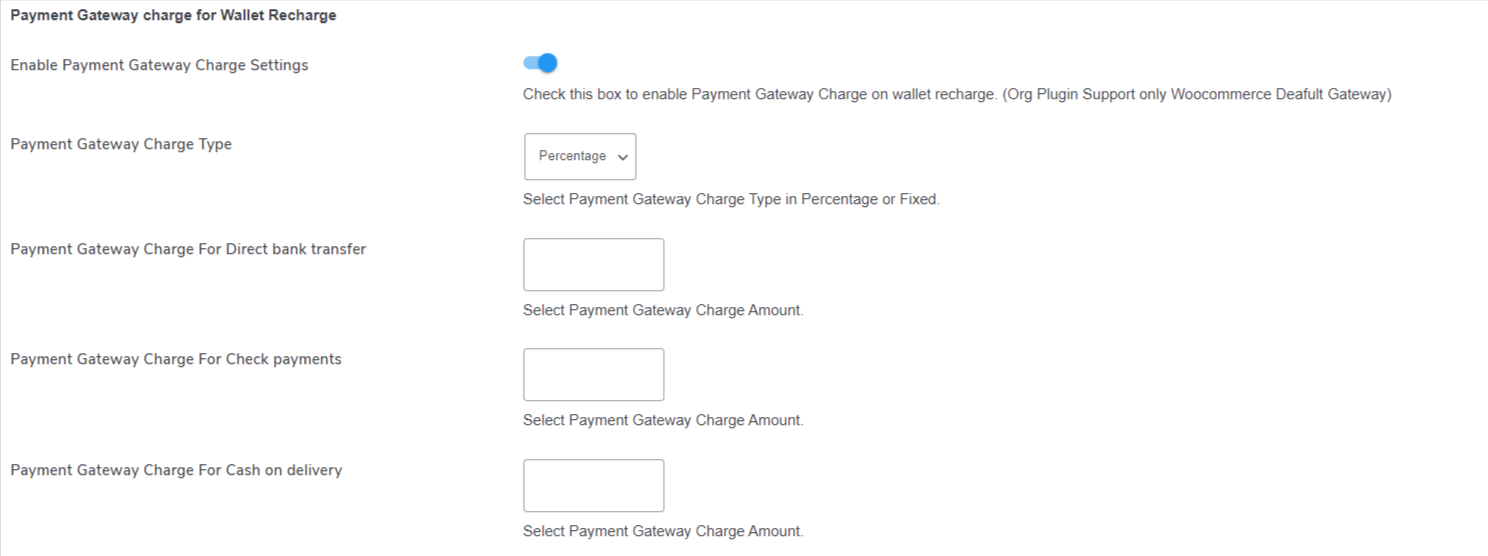
Enable Payment Gateway Charge: Toggle this to enable the setting.
Payment Gateway Charge Type: Choose Between Percentage or Fixed amount.
Payment Gateway Charge for Direct bank transfer: Enter the amount to charge when payment is made via direct bank transfer.
Payment Gateway Charge for check payments: Here you can enter the amount to charge when payment is made via check payments.
Payment Gateway Charge for cash on delivery: Enter the amount to charge when payment is made via Cash on delivery.
Note: The org version only supports the default WooCommerce payment gateways and for all gateways, you need to upgrade to the Pro version of the plugin.
11.3.Credit Amount On User Daily Visit
Enable Daily Visit Settings: Enable this toggle to start the daily visit rewards.
Enter Daily Visit Amount: Enter the amount you want to offer to wallet users on their daily visits.
Note: By default, A user can only get the daily visit credit after a period of 24 hours.
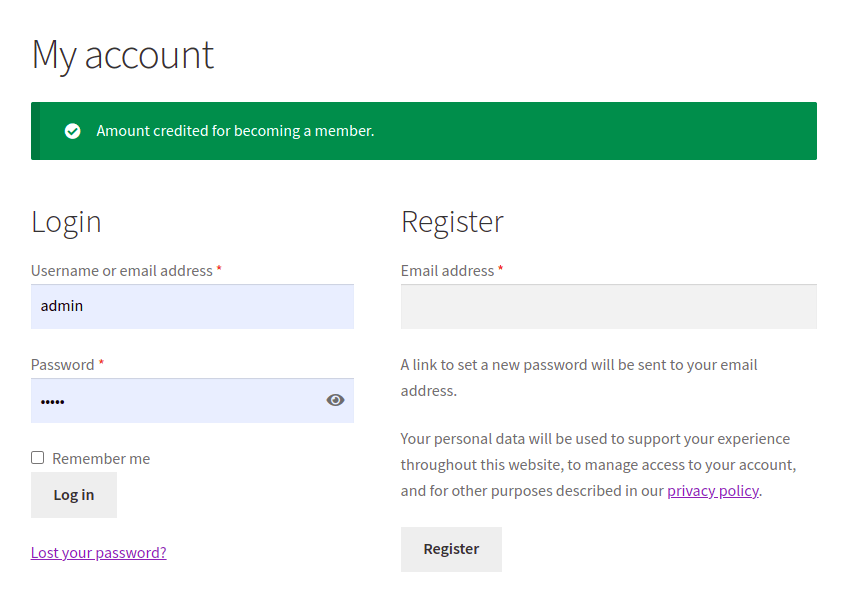
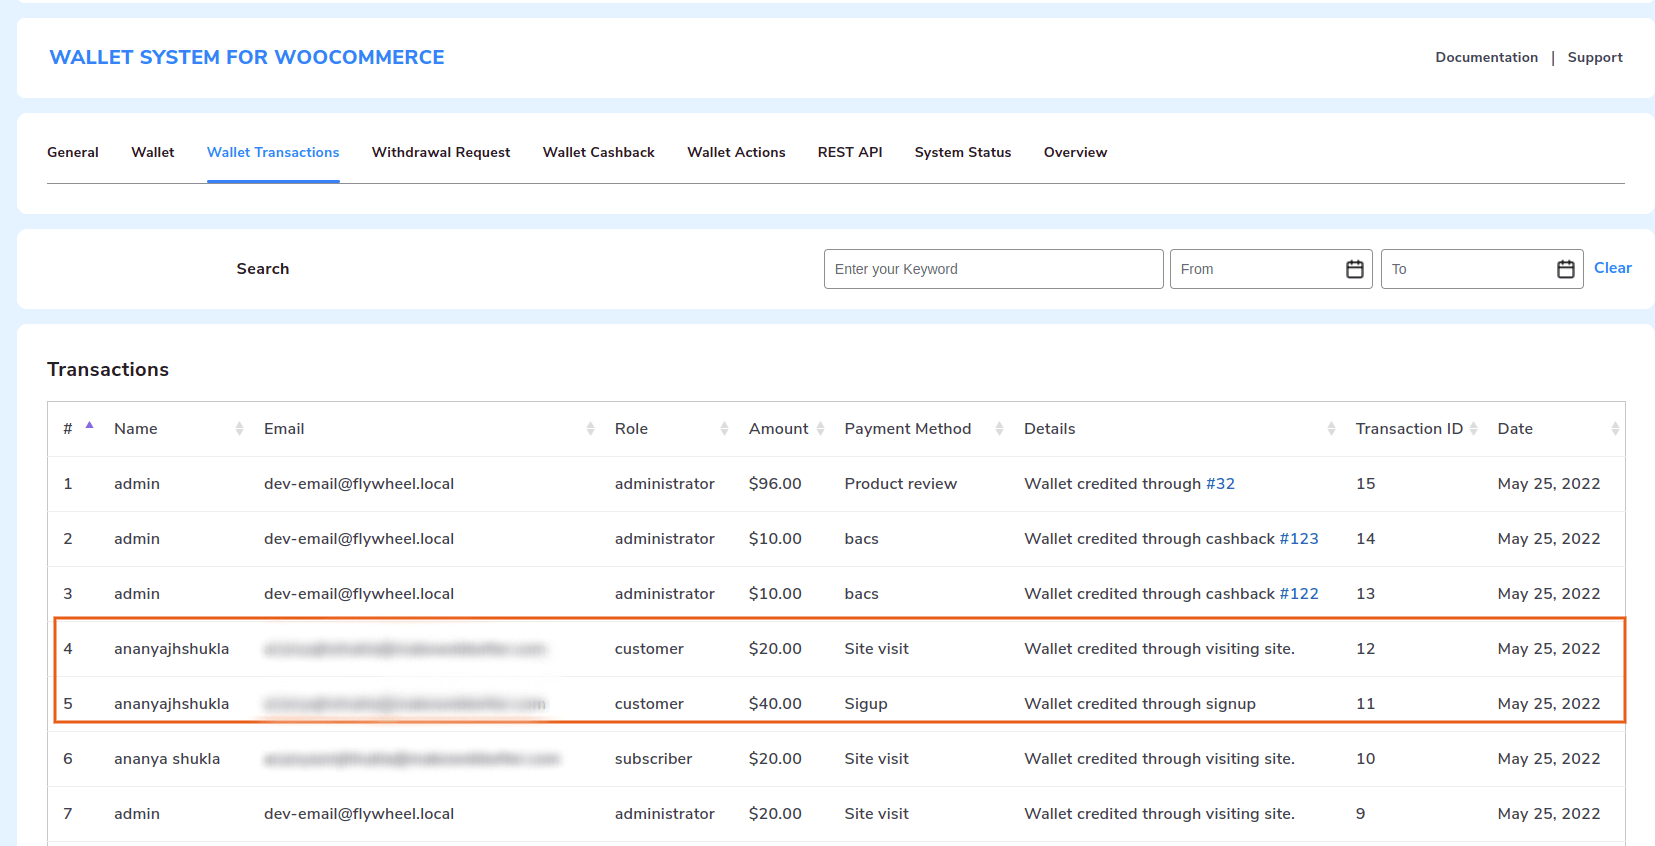
11.4.Credit Amount On New User Registration
Enable Signup Settings: Click on this toggle button to allow the user to earn credit on wallet registration.
Enter Signup Amount: Enter the amount you want the users to receive as a reward on signup
Enter Signup Description: Enter the text that will appear to users upon earning signup credit.
Frontend Representation:
11.5.Credit Amount On Comment
Enable Comments Settings: Click on this toggle to enable customers to earn rewards for submitting reviews on single product pages.
Enter Comments Amount: You can determine the amount your customers will earn per product review.
User Per Post Comment: Enter the number of reviews a particular wallet user is allowed to submit on any product.
Enter Comment Description: You can add custom comment label text to inform your registered users about the reward on product review submission.
After configuring the WooCommerce customer credit settings, click on the Save Changes button.
The transactions made for rewarding credits to the users will be reflected in the Wallet Transactions tabs.
11.6.Customize Your Wallet Rechargeable Product
The wallet top-up order placement is similar to conventional products. It is also a rechargeable product that can be customized as per your needs.

Click on the Click Here button to edit the Wallet Rechargeable product. Similar to other product customization, you can change the wallet product’s title, tax class, images, and more.
Finally, click on the Update button to implement your changes.
11.7.Wallet Withdrawal Fee Settings
You can charge wallet withdrawal fees from customers. This fee will be deducted the moment the customer successfully places the withdrawal request from the front-end panel. To do this, follow these steps:
- Enable Wallet Withdrawal Extra Fee Settings toggle button.
- Select Withdrawal Fee Type. (Percentage or Fixed)
- Enter the value for the selected fee type.
- Then, click on Save Settings.
Frontend Representation:
11.8.Wallet Transfer Fee Settings
By default wallet fund transfers are free. But you can charge a transfer fee from the customers, which will be deducted automatically after they successfully transfer funds to any user. Follow the instructions to set this fee:
- Enable the Wallet transfer Extra Fee Settings toggle button.
- Select the Wallet Transfer Fee Type (Fixed or Percentage)
- Enter the Fee For Wallet Transfer Process.
- Click on Save Settings.
11.9.Credit Amount On Refer A Friend and Multilevel Referral
The wallet system expands your user base by offering rewards to users upon bringing new users via referral links. Customers can generate unique referral coupons that offer discounts to unregistered users.
When the referred user redeems the coupon, they receive the discount, and the referring customer earns a referral reward.
Admins can configure both the discount value and the referral reward amount from here.
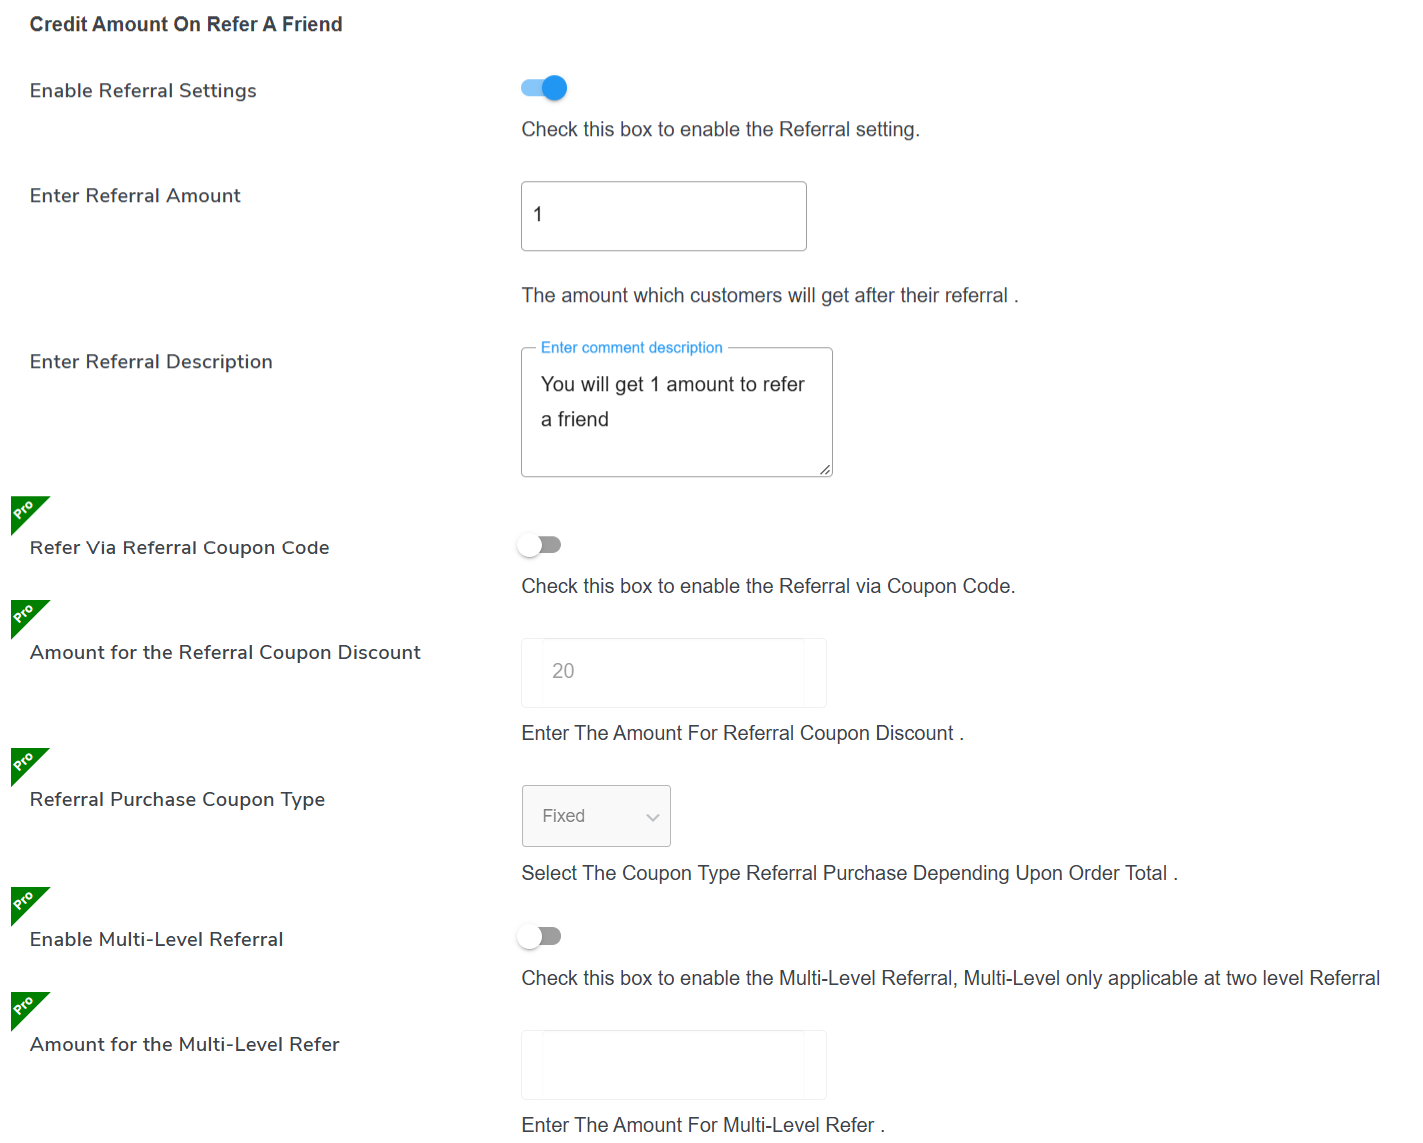
Enable Referral Settings:
Toggle This Option to Enable the Referral Functionality
Enter Referral Amount:
Here you can set the referral amount customers will earn after referring another user.
Enter Referral Description:
Enter The Description which will inform the user about the referral details
Refer Via Referral Coupon Code :Premium
Here you can enable the option to refer users via coupon code.
Amount For Referral Discount :Premium
Here you can set the discount for the referral coupon
Coupon Type :Premium
Select the coupon discount type Fixed or Percentage
Enable Multi-Level Referral : Premium
Toggle This Option to enable the multi-level referral feature.
Amount For Multi-Level Referral : Premium
Here you can set the amount the user will get on the second level of referral.
Here’s how the Wallet System’s Multi-Level Referral Feature works:
When User A refers User B, User A earns a referral reward for that direct referral. If User B goes on to refer User C, User B receives a referral reward for their direct referral, and User A also gets a small bonus for this indirect referral made by B.
Frontend Representation:

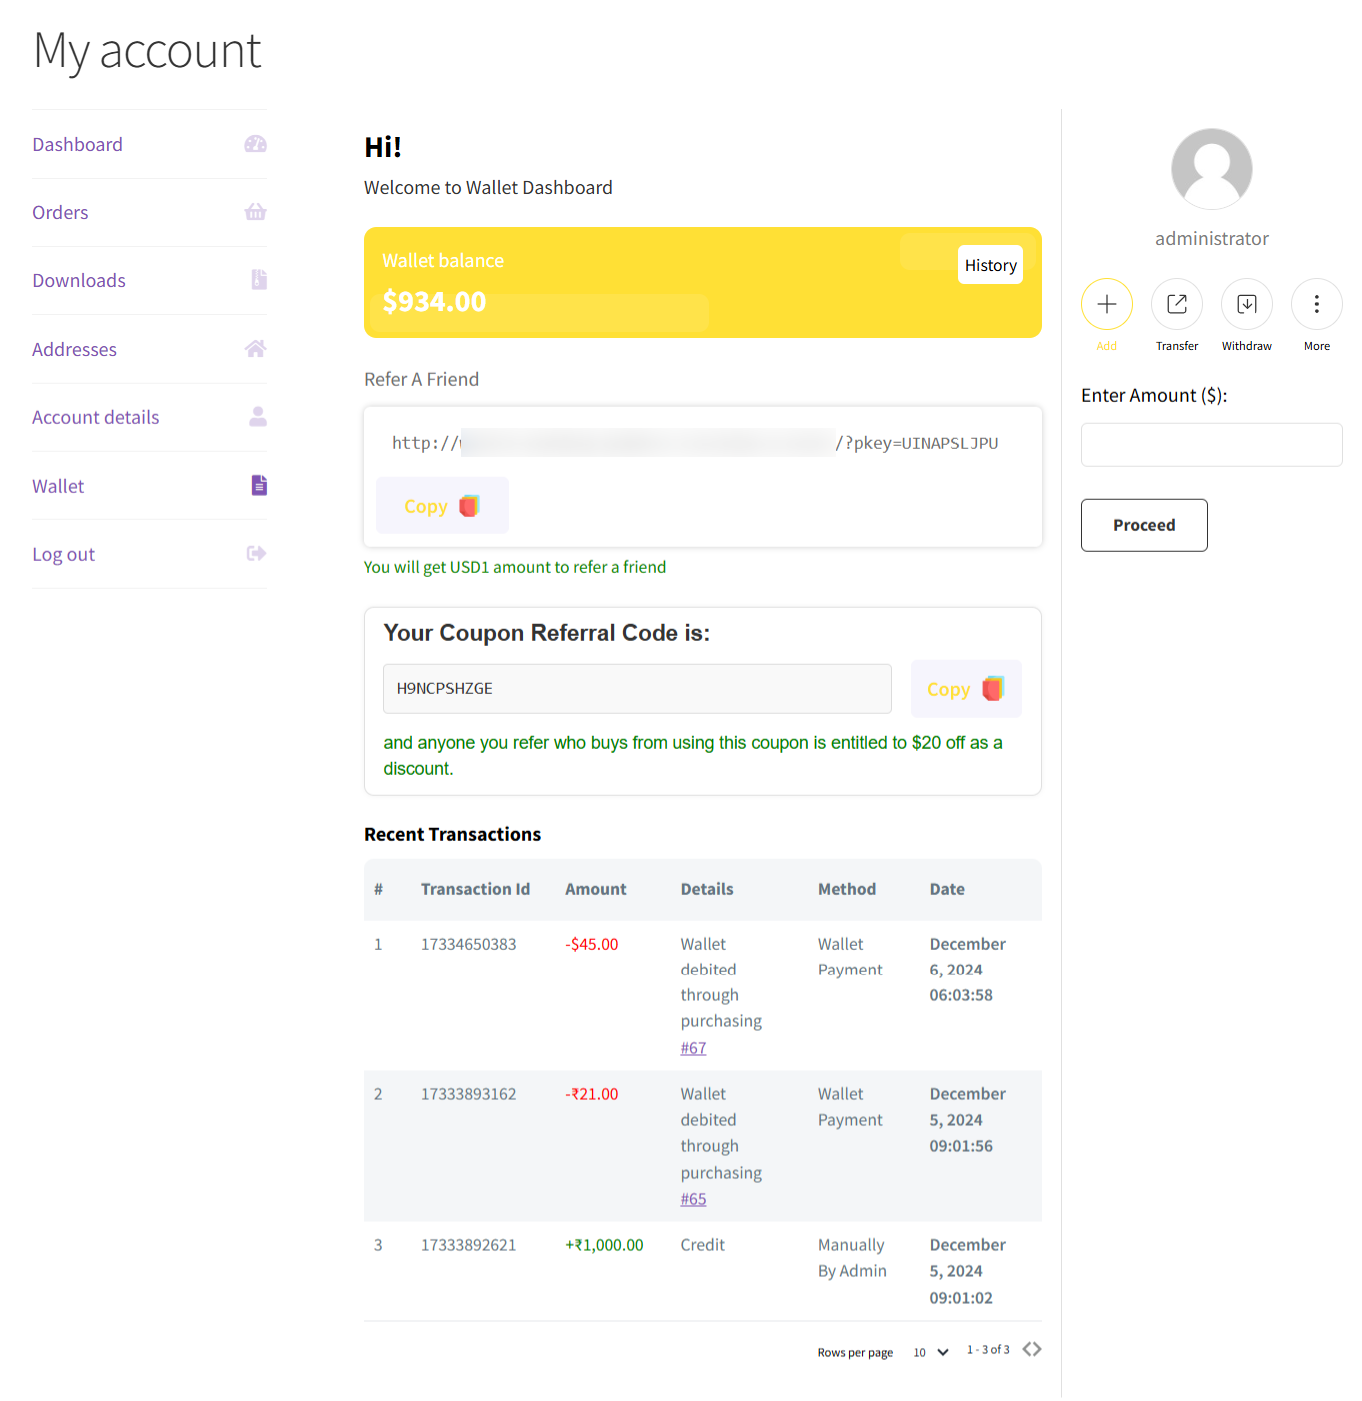
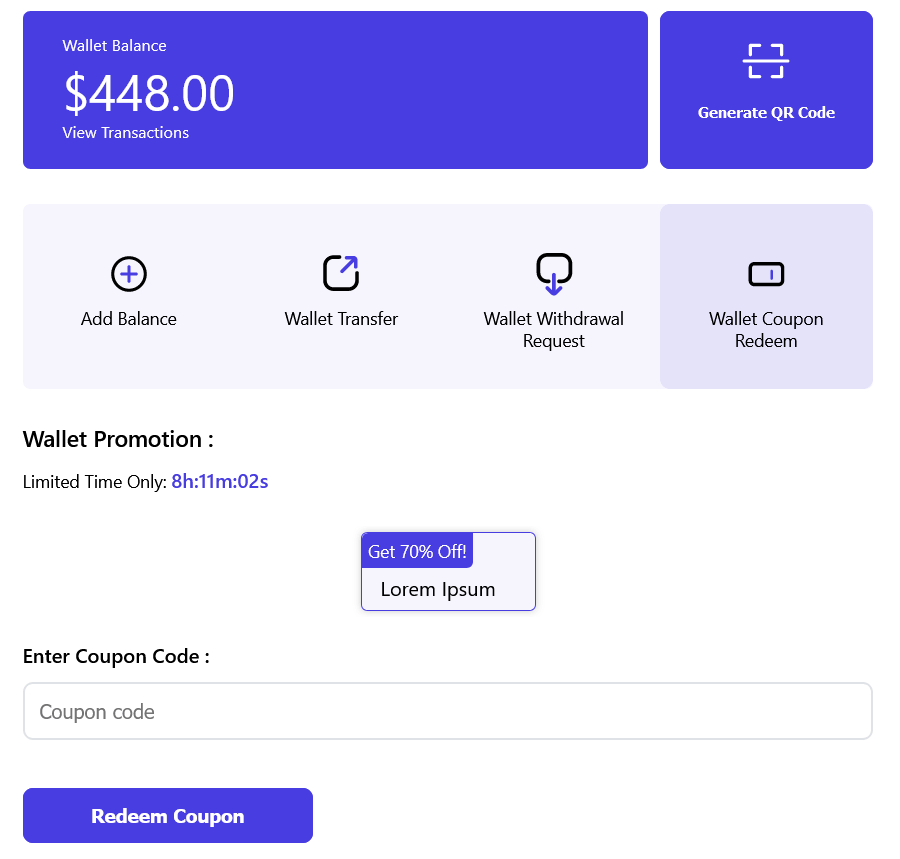
11.10.Wallet Layout Settings
Wallet Dashboard layout allows users to easily view their wallet balance, cashback earned, transaction history, account details, and all the information available in the previous layout.
You can enable the new layout from the settings and have the option to customize its color scheme to align with their store’s theme.
Alternatively, you can also choose to stick with the old default layout if preferred.

Frontend Representation of New Layout:
11.11.Wallet Instant Discount
Enable to Give Instant Discount on Wallet Payment Method: Toggle this Option to enable this feature and give instant discount on wallet payment, which will be added to the total cart value.
Wallet Discount Type:Premium
Set the wallet discount type fixed or percentage.
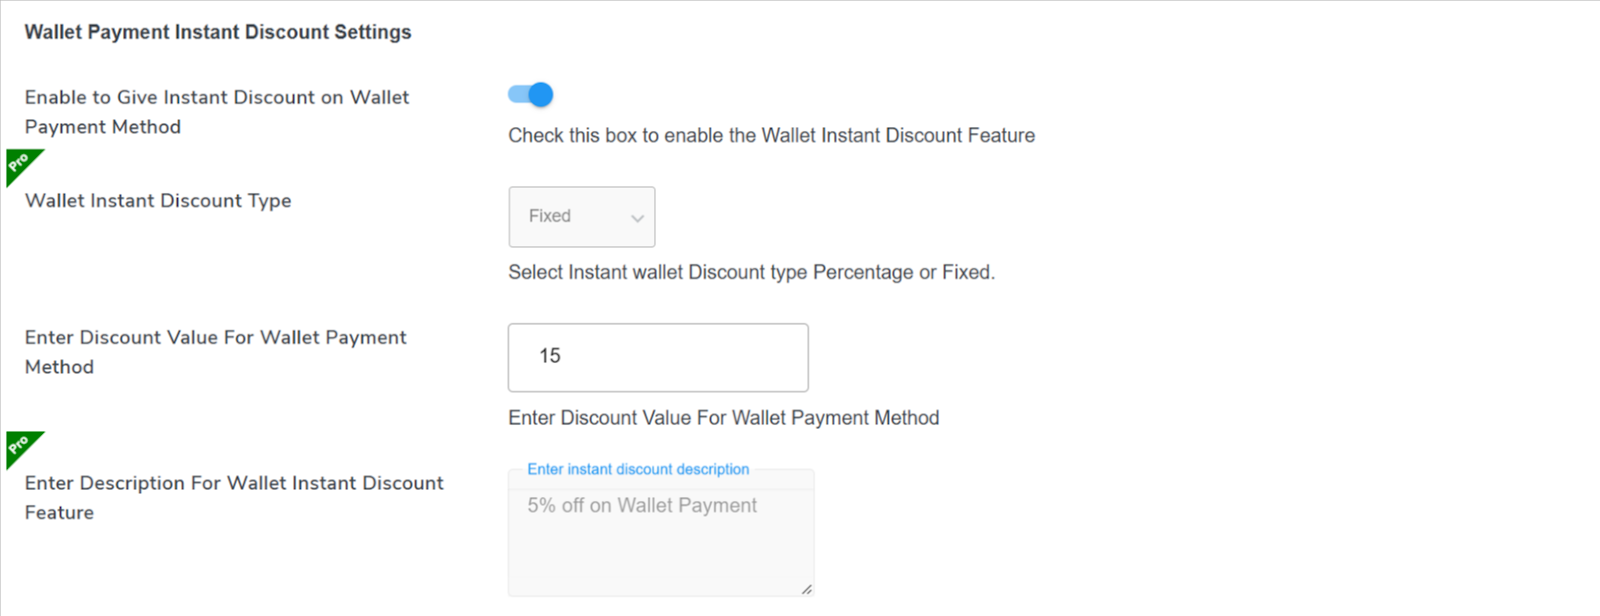
Enter Discount Value: Here You can enter the discount amount
Instant Discount Description:Premium
Here you can add a description for the instant discount to be shown on the checkout page.
Enter Discount Value: Here You can enter the discount amount
Instant Discount Description:Premium
Here you can add a description for the instant discount to be shown on the checkout page.
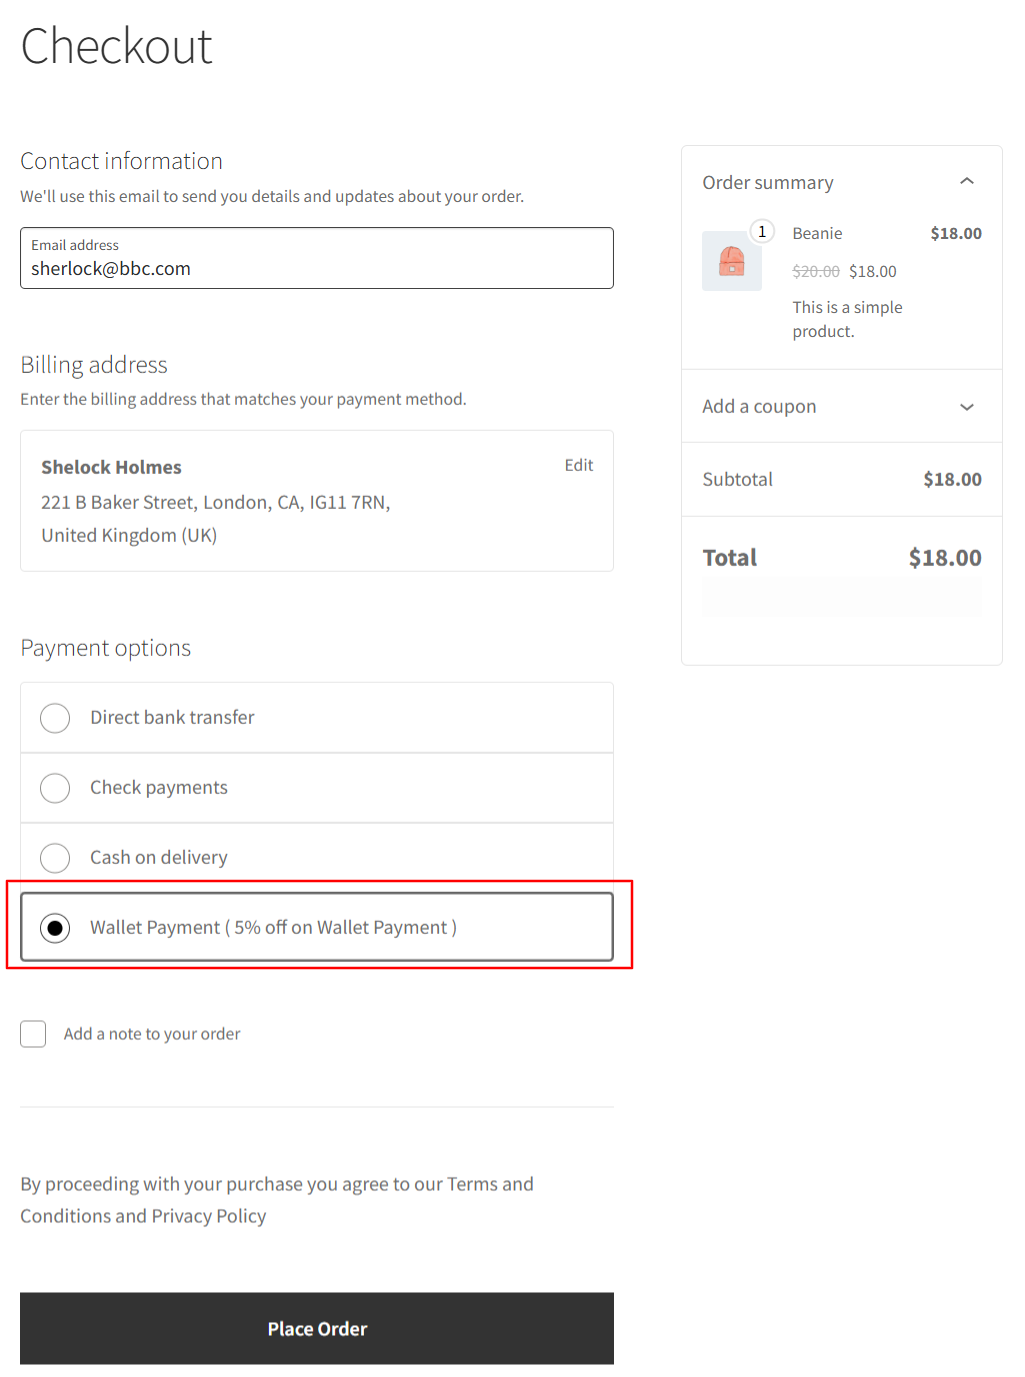
Frontend Representation:
11.12.Notify Users on Low Balance
- Enable This to Notify Customers of Low Wallet Balance: Enable this feature by toggling the option on. When activated, it allows you to automatically send email alerts to your users whenever their wallet balance falls below a specific amount that you define.
- Enter the Minimum Wallet Amount: Here, you can set the wallet amount. When the user’s balance falls below the specified limit, they will receive an email prompting them to recharge their balance, as shown in the screenshot below.

12.WooCommerce Wallet Regulations
You can set lower and upper limits for various transactional functionalities and control the wallet for WooCommerce according to your preferences.
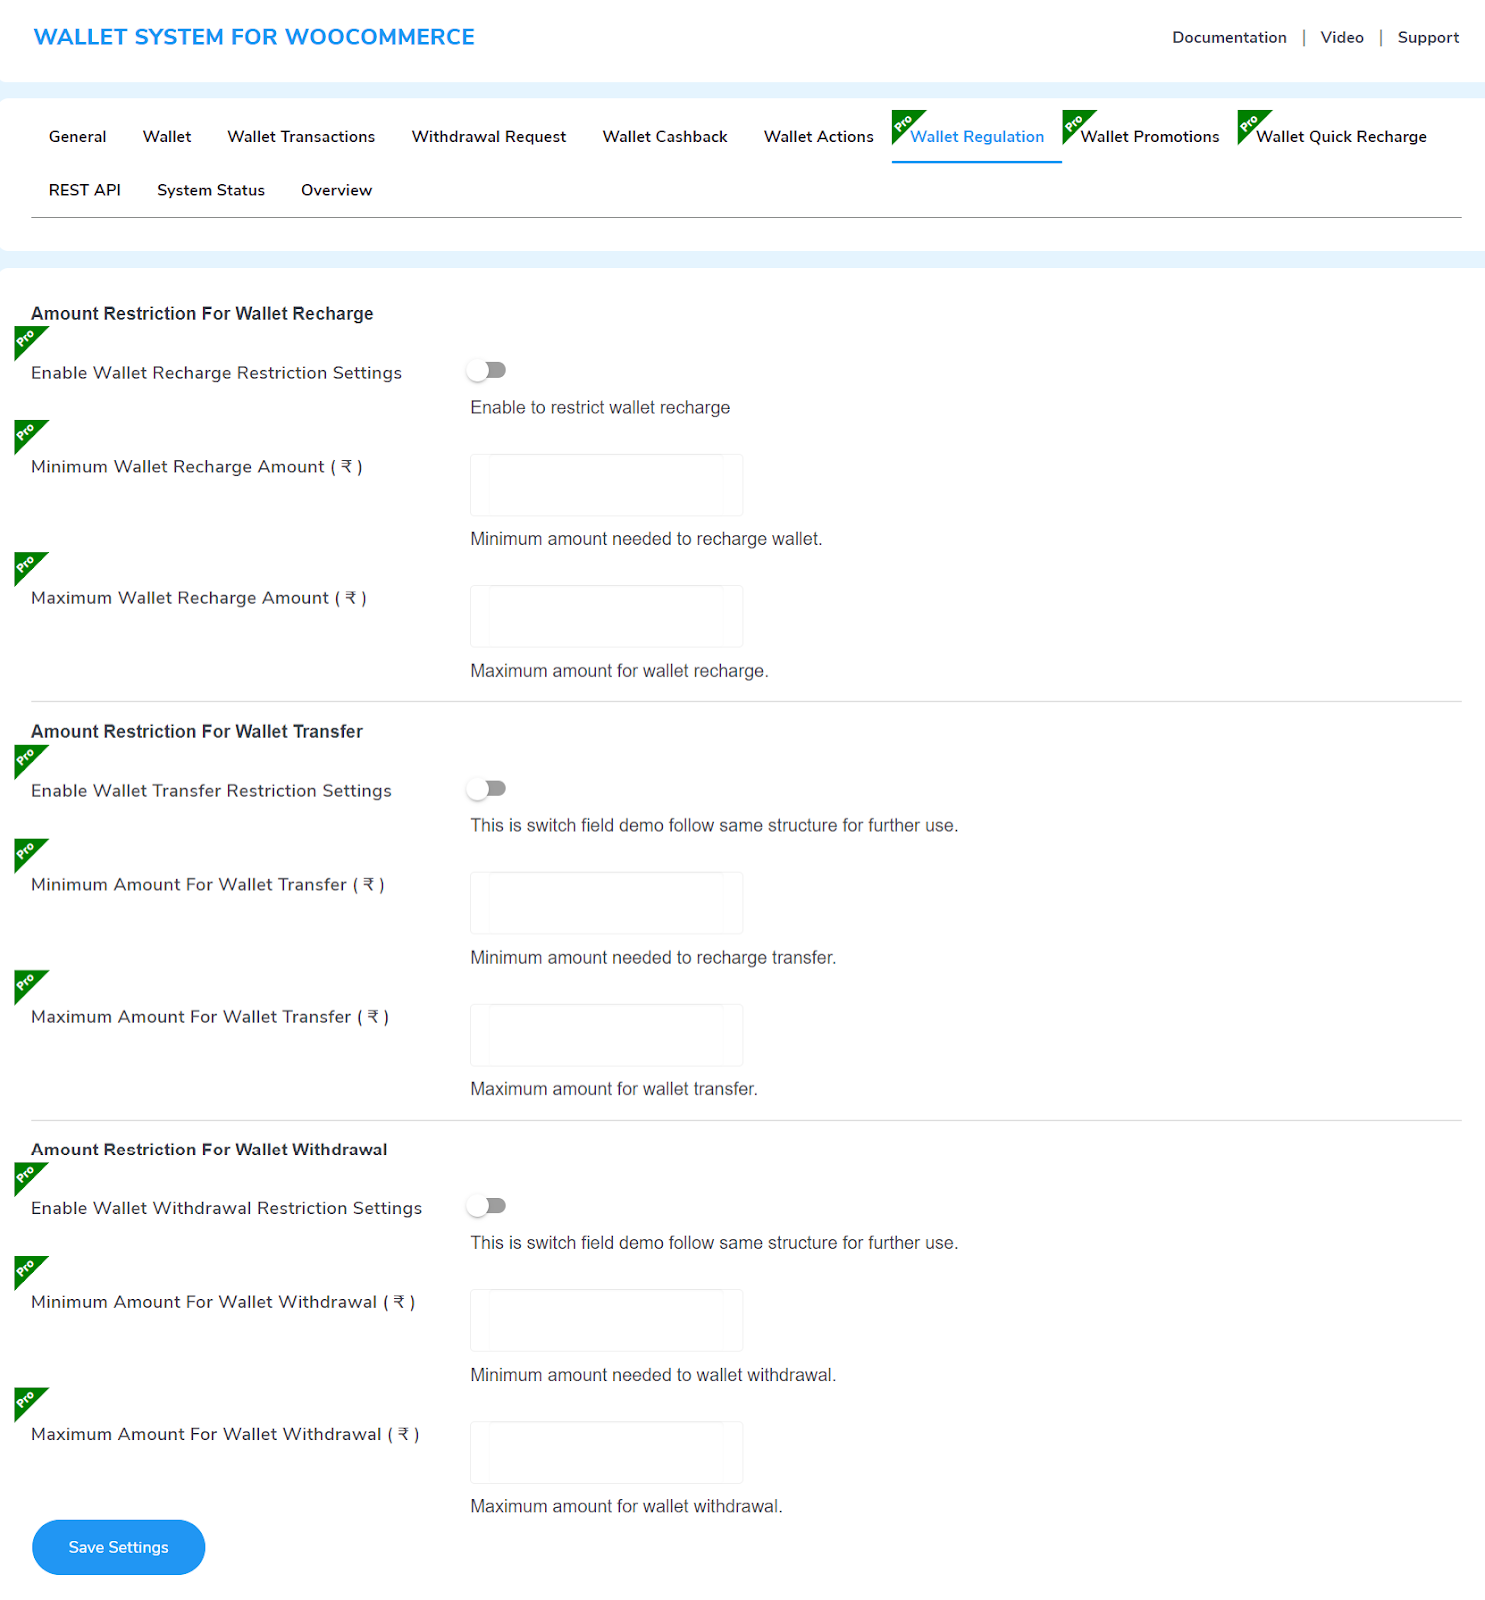
11.1. Amount Restriction For Wallet Recharge
Regulate the wallet recharge by setting a top and bottom limit. To do this, follow these steps:
- Enable the Wallet Recharge Restriction toggle
- Enter the Minimum and Minimum Wallet Recharge Amount
- Lastly, click Save Settings.
11.2. Amount Restriction For Wallet Transfer
Control the amount your customers can transfer between themselves with these steps:
- Enable the Wallet Transfer Restriction toggle
- Enter the Maximum and Minimum Amount for Wallet Transfer
- Save your settings.
11.3. Amount Restriction For Wallet Withdrawal
Define how much money customers can request to withdraw from their WooCommerce wallets.
- Enable Wallet Withdrawal Restriction settings.
- Set the Maximum and Minimum Amount for Wallet Withdrawal.
- Finally, save your settings.
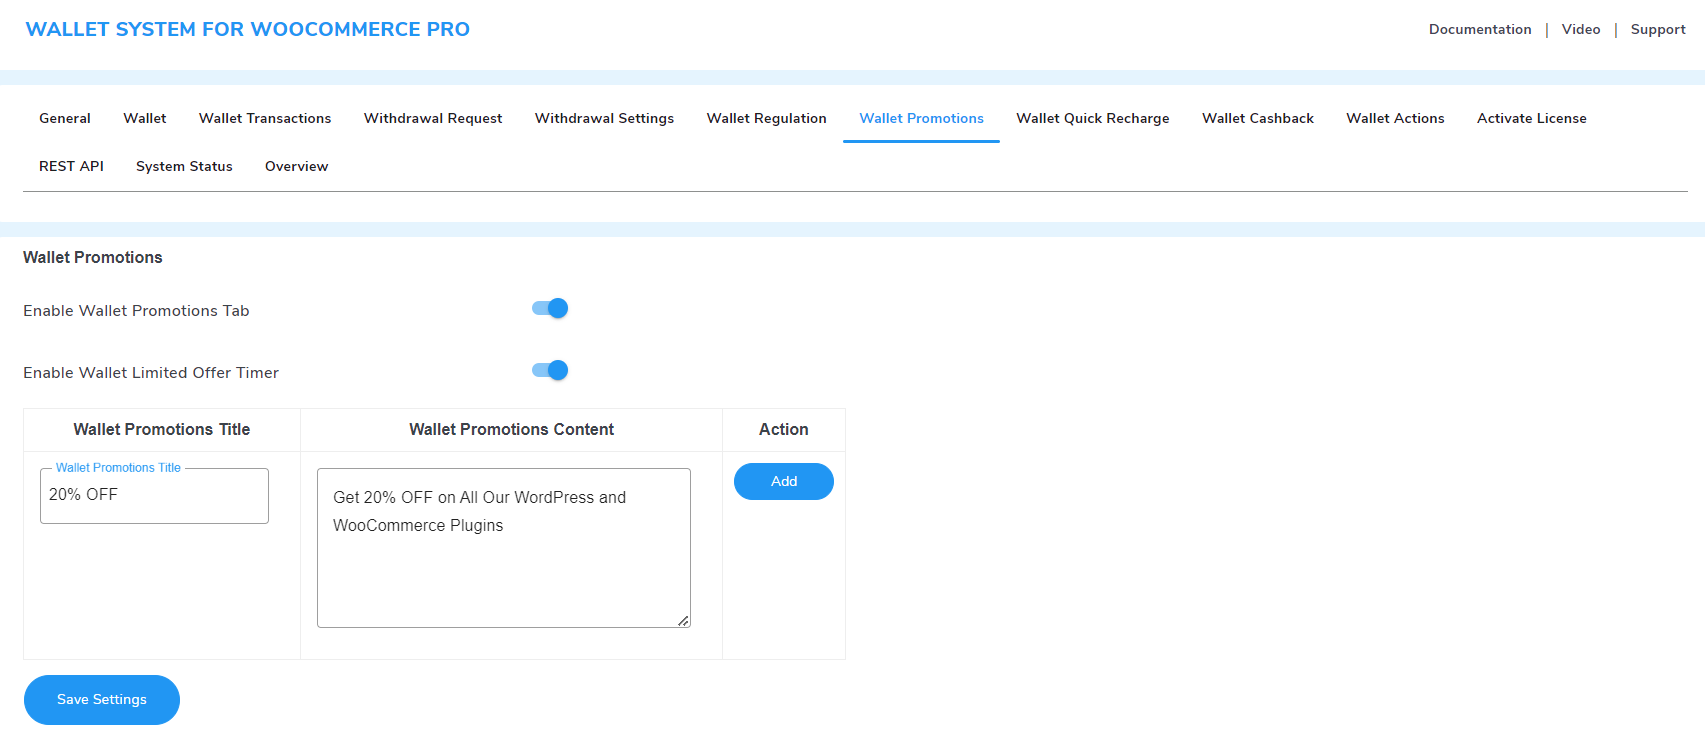
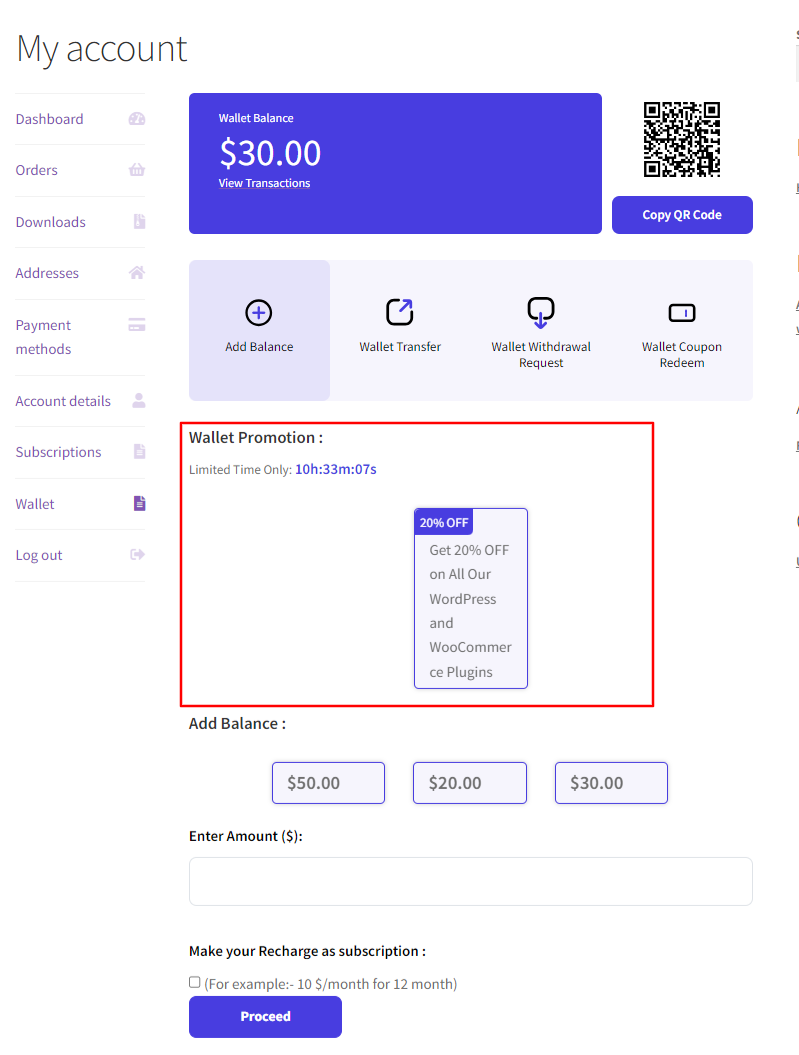
13.WooCommerce Wallet Promotions
Wallet for WooCommerce has promotional features to let you advertise attractive offers, deals, & discounts to wallet users and hype them to spend more money. To do this, follow these steps:
Frontend Representation:
12.1. Enable Wallet Promotions:
Click on this toggle button to enable the wallet promotional features.
12.2. Enable Wallet Limited Time Offer:
Enable this setting to add a countdown timer to your wallet offer and create urgency for users.
12.3. Wallet Promotions Title:
Enter a suitable title for your promotional offer to attract customer attention.
12.4. Wallet Promotions Content:
Enter the promotion offer message, click on add, and save your settings. That’s how your offer will look to users on their wallet panel.
Note: These offer cards are only used for display. There is no automation for customers to directly avail the benefits. So, they have to manually fulfill the conditions of the deal.
14.SMS Notifications For Wallet Credit And Debit
This feature keeps your customers updated in real-time with SMS alerts every time their wallet is credited or debited using our Wallet System plugin.

For this feature to work, you’ll need to integrate Twilio. Toggle this feature to turn it on, and paste your Twilio account SID, Auth Token, and Phone in the respective fields.
You can generate these details from here
15.Wallet Quick Recharge
Create and display one or many Quick Recharge buttons for the users to recharge their wallets with the pre-defined top-up values.
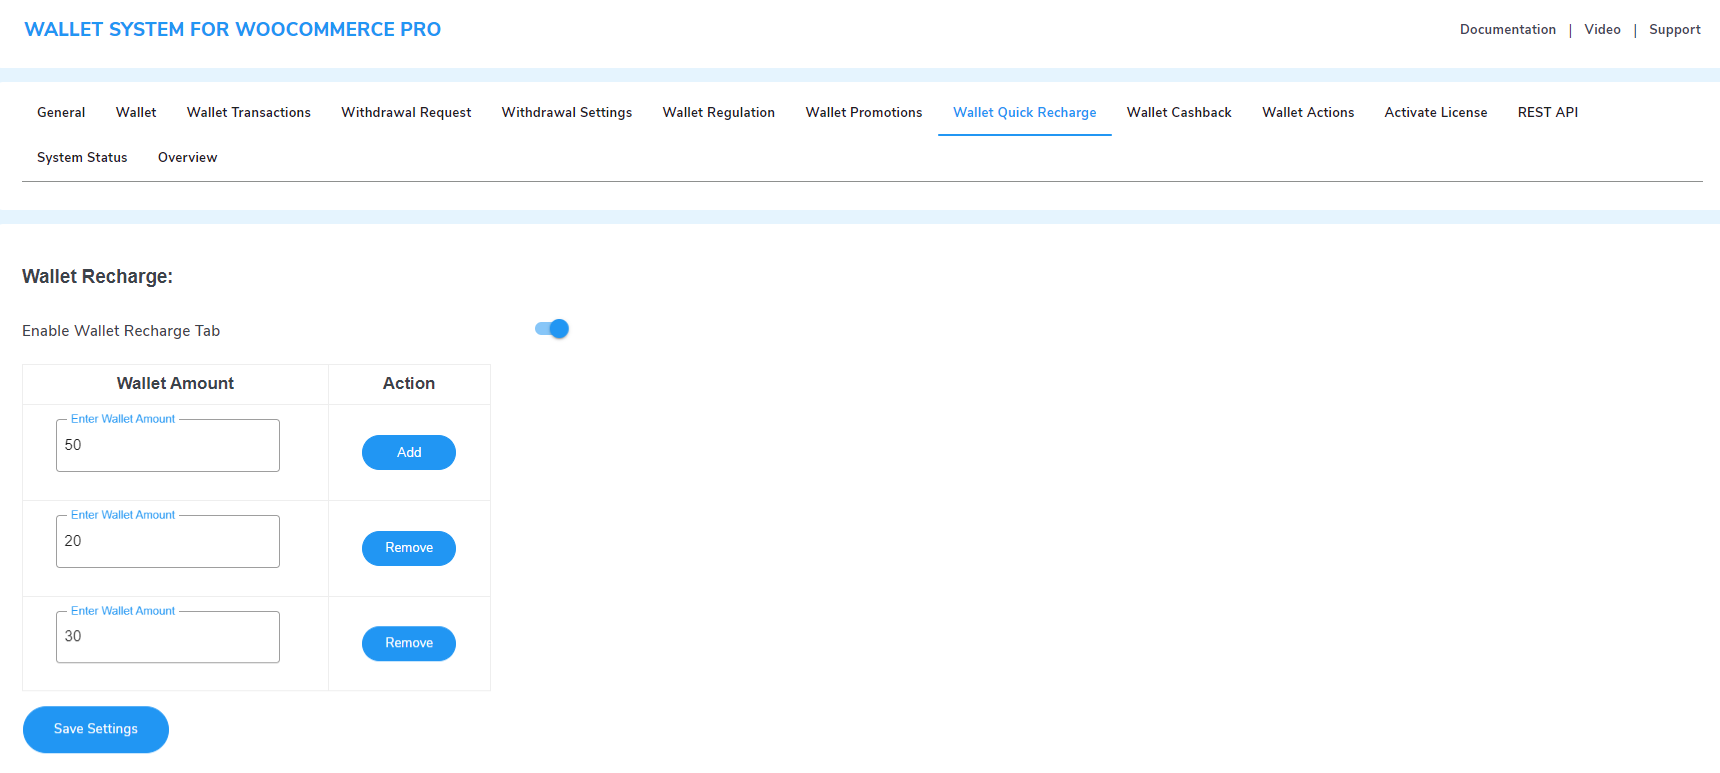
- Enable the Wallet Quick Recharge
- Enter the rechargeable amount and click Save Settings.
- Now, if you want to give more than one quick recharge option, click on the Add button.
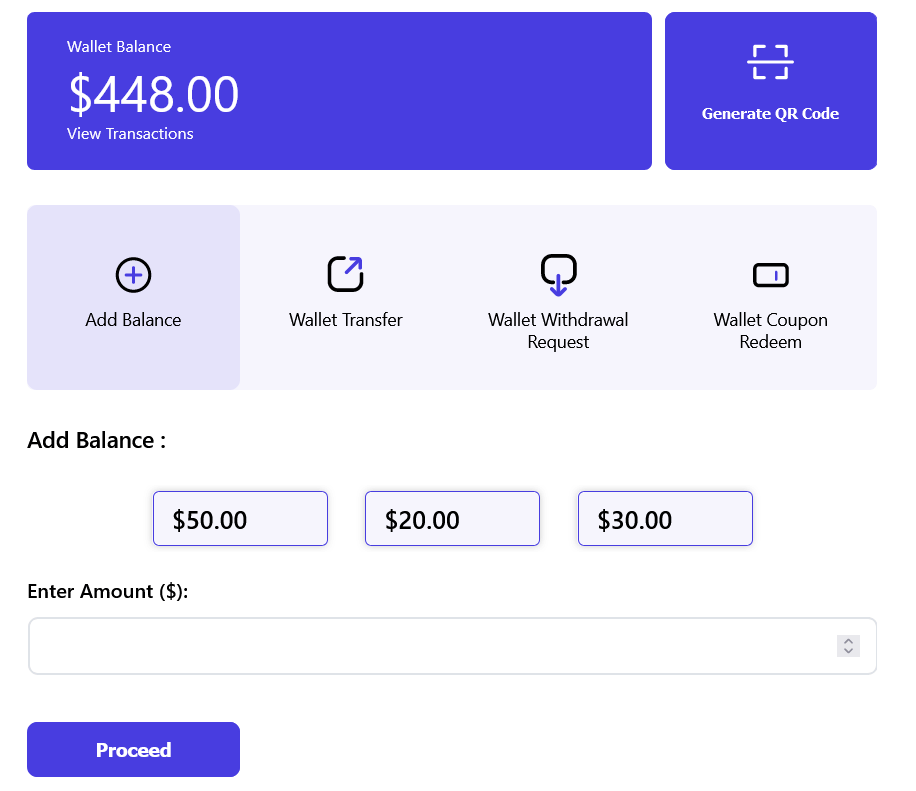
When your users click on any of these recharge buttons, the wallet recharge order will be initiated. They can place their orders to top-up the wallets.
16.WooCommerce Wallet Rest API
REST API allows external apps to view and manage wallets. Access is granted only to those with valid API keys.
You can generate API keys for the Wallet System for WooCommerce plugin and use it to connect with other applications. Follow these steps to get the API Keys:
- Go to the Rest API tab.
- Click on the Generate API Key button.
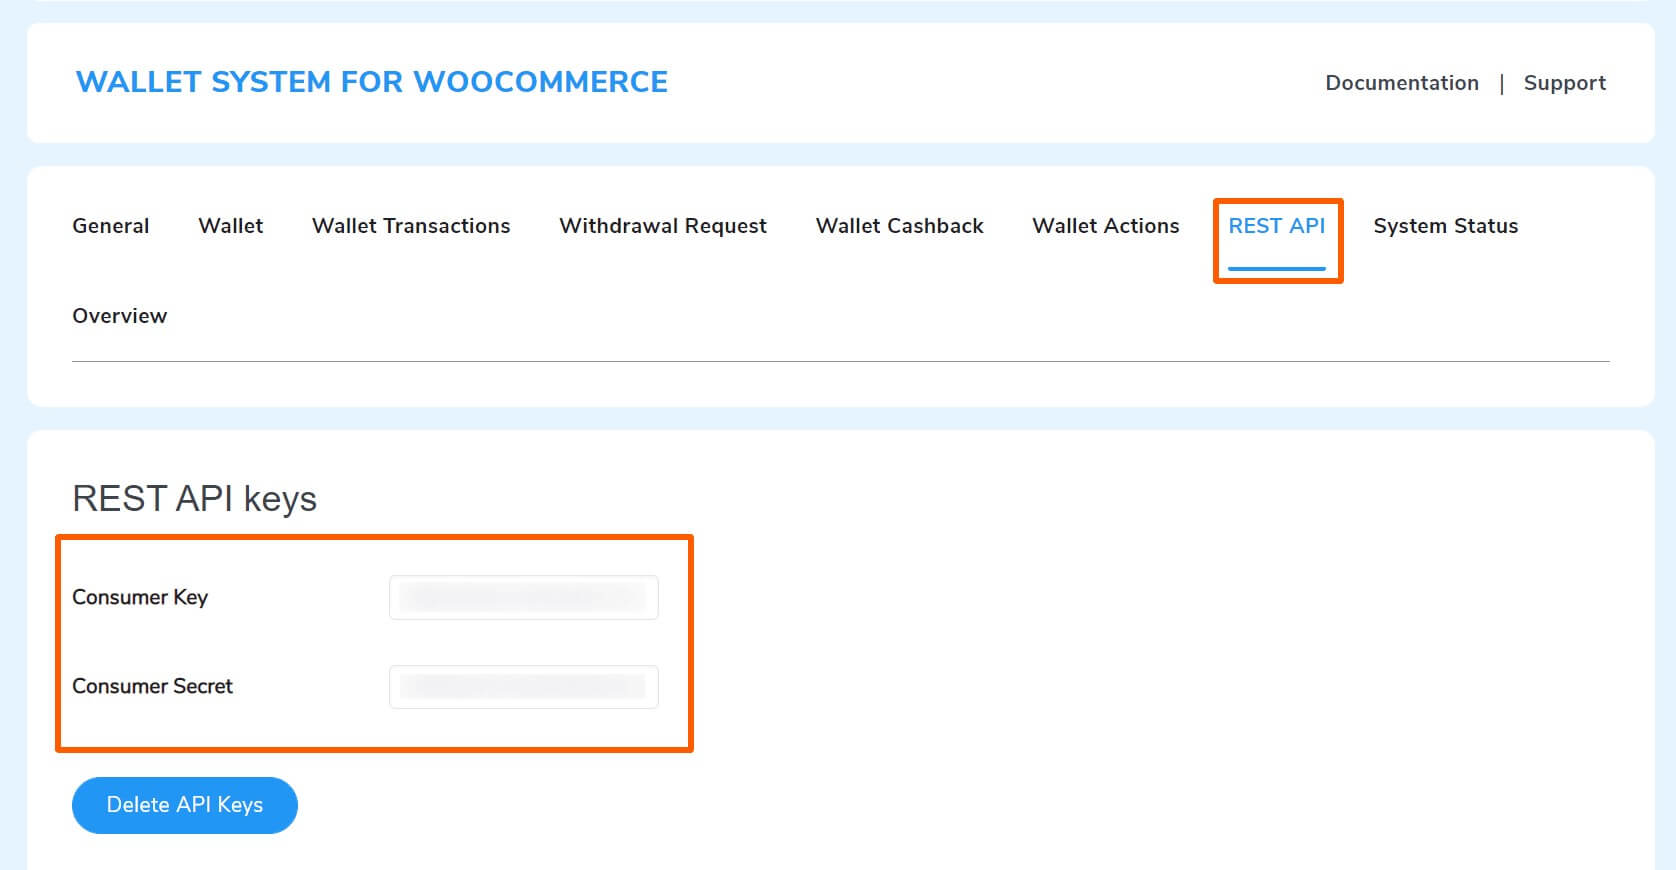
It will generate the Consumer Key and Consumer Secret Key. There is an option to Delete API Keys.
The generated API Keys allow you to manage the following functions:
- Authentication
- Retrieve Users
- Retrieve particular user wallet amount
- Retrieve particular user wallet transactions
- Update wallet of users
REST API details
Base Url for accessing customer wallet: {home_url}/wp-json/wsfw-route/v1/wallet/
1. Authentication
For authentication, you need Consumer Key consumer_key and Consumer Secret consumer_secret keys. Response on wrong API details:
{
“code”: “rest_forbidden”,
“message”: “Sorry, your key details are incorrect.”,
“data”: {
“status”: 401
}
}
2. Retrieve Wallet Of All Users
Retrieves the wallet of all the users with their details. The HTTP request is:
GET {home_url}/wp-json/wsfw-route/v1/wallet/users?consumer_key=XXXX&consumer_secret=XXXX where <id> is an user id of user.
Example: http://tester2.local/wp-json/wsfw-route/v1/wallet/users?consumer_key=XXXX&consumer_secret=XXXX
JSON response example:
[
{
“user_id”: 1,
“user_name”: “root”,
“user_email”: “[email protected]”,
“user_role”: “administrator”,
“wallet_balance”: “160.2”
},
{
“user_id”: 2,
“user_name”: “Demo”,
“user_email”: “[email protected]”,
“user_role”: “customer”,
“wallet_balance”: “225”
}
]
3. Retrieve particular user wallet amount
Retrieves the wallet balance of an existing user. The HTTP request is:
GET {home_url}/wp-json/wsfw-route/v1/wallet/<id>?consumer_key=XXXX&consumer_secret=XXXX where <id> is an user id of user.
Example:
http://tester2.local/wp-json/wsfw-route/v1/wallet/1?consumer_key=XXXX&consumer_secret=XXXX
JSON response example:
“23.34”
4. Retrieve particular user wallet transactions
Retrieves all transactions related to the wallet of the user. The HTTP request is:
GET {home_url}/wp-json/wsfw-route/v1/wallet/transactions/<id>?consumer_key=XXXX&consumer_secret=XXXX where <id> is an user id of user.
Example: http://tester2.local/wp-json/wsfw-route/v1/wallet/transactions/1?consumer_key=XXXX&consumer_secret=XXXX
JSON response example:
[
{
“Id”: “90”,
“user_id”: “1”,
“amount”: “22”,
“transaction_type”: “Debited by admin”,
“payment_method”: “Manually By Admin”,
“transaction_id”: “”,
“note”: “”,
“date”: “2021-04-22 20:16:23”
},
{
“Id”: “94”,
“user_id”: “1”,
“amount”: “12”,
“transaction_type”: “Wallet credited through purchase #159”,
“payment_method”: “bacs”,
“transaction_id”: “159”,
“note”: “”,
“date”: “2021-04-22 21:35:47”
}
]
5. Update wallet of the User
This allows you to update the (credit/debit) wallet of the particular user. The HTTP request is:
PUT {home_url}/wp-json/wsfw-route/v1/wallet/<id> where <id> is an user id of user.
Required Headers
Content-Type: application/JSON
Example: http://tester2.local/wp-json/wsfw-route/v1/wallet/1
JSON Parameters:
{
“amount”:”100″,
“action”:”credit/debit”,
“consumer_key”:”XXXXX”,
“consumer_secret”:”XXXXX”,
“transaction_detail”:”test”
}
JSON Response:
{
“response” : “success”,
“balance” : “487”,
“transaction_id” : 156
}
17.Wallet Coupons
Our WooCommerce wallet system enables merchants to create wallet coupons that customers can redeem to add balance to their accounts.
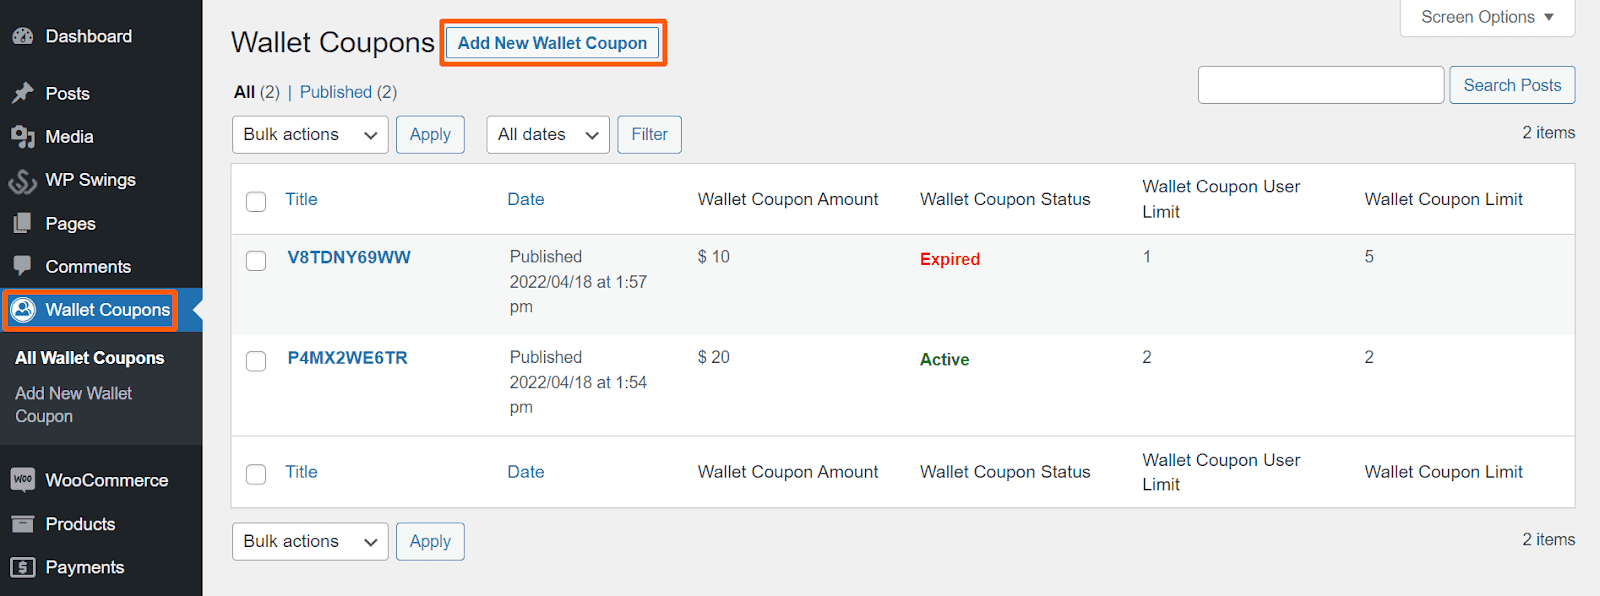
Follow these steps to create wallet coupons:
- Go to the Wallet Coupons section from the admin menu.
- Click on Add New Wallet Coupon and start creating your coupon.
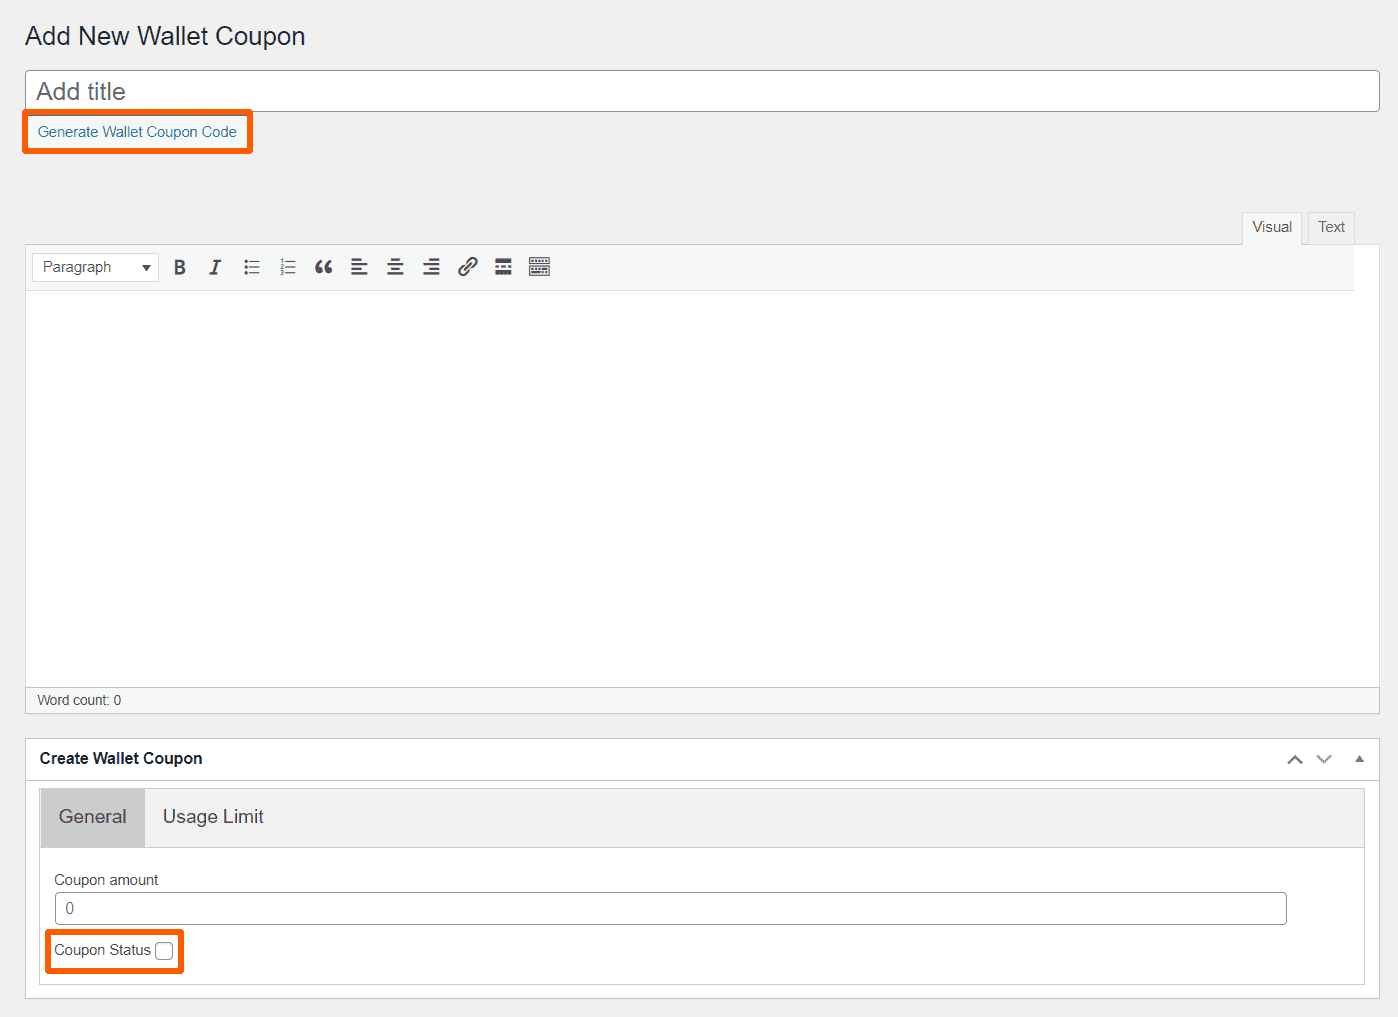
- Under the Add Title textbox, click on Generate Wallet Coupon Code to automatically generate the coupon code.
- You can also add a custom wallet coupon code.
- Enter Coupon Description.
- Scroll down to the Create Wallet Coupon section and add the Coupon Amount in the General tab.
- Then, check the Coupon Status checkbox to activate the coupon
- Now, move to the Usage Limit tab.
- Here, you can set the Usage limit per coupon and the Usage limit per user.
- Next, click on Publish. And you are done.
You can send these wallet coupons to your leads and customers through your preferred communication channels.
Note: Usage limit per coupon is defined as the number of times a coupon can be redeemed.
Usage limit per user is the number of users who can redeem a coupon.
For example, If the Usage limit per coupon is 4 and the Usage limit per user is 2, then both users can redeem the coupon in any combination but only four times in total.
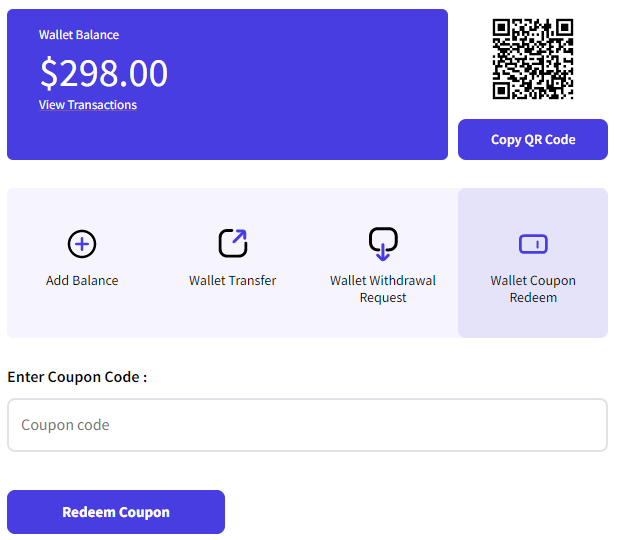
The user has to go to My Account > Wallet > Wallet Coupon Redeem, enter the coupon code, and click on Redeem Coupon.
18.Wallet Recharge Orders
After the wallet plugin activation, the Wallet Recharge Orders list is added as a sub-menu in the WooCommerce section. It allows you to view and manage the top-ups made by customers into their wallets. You can filter the recharge order list according to the order status.
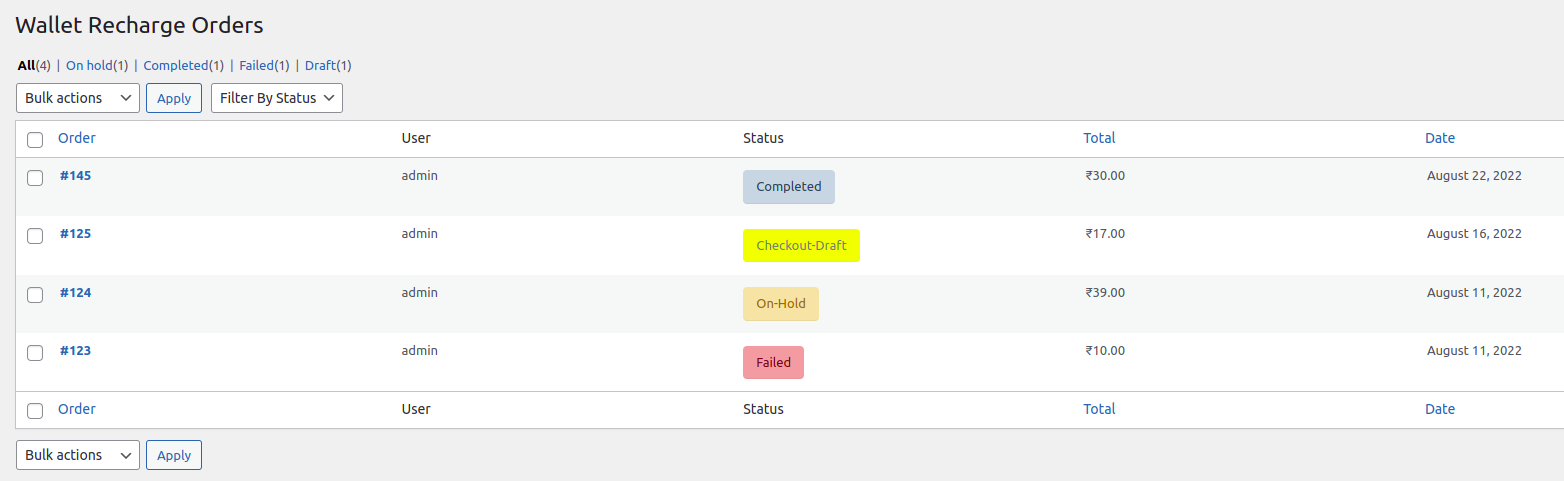
Note: Orders for wallet recharge made prior to HPOS Compatibility and plugin version 2.5.0 will be displayed under the wallet recharge order section. However, any orders placed After the 2.5.0 version will be listed in the WooCommerce order section.
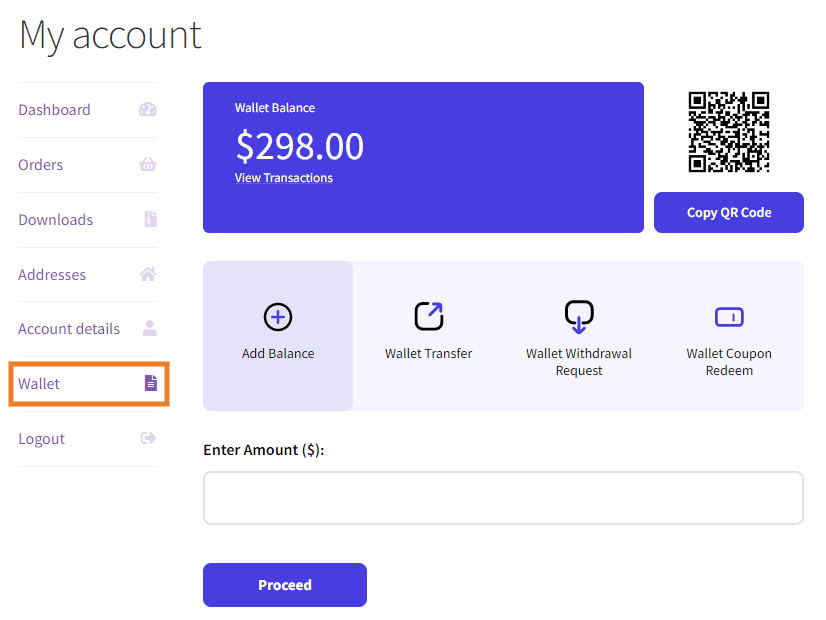
19.Wallet System for WooCommerce Front-End
This plugin adds the Wallet tab in the WooCommerce account of your customer. To access the Wallet, your customers have to go to My account > Wallet.
The wallet tab contains the following features:
- Wallet Balance Display
- Add Balance
- Transfer
- Wallet Withdrawal Request
- Transaction History
19.1.Wallet QR Code
The users can generate and share QR codes for their wallets. An individual user can scan the wallet QR code of other users and recharge or transfer money into their wallets. They have to click on the Generate QR Code button and copy the QR code to share it.
Note: The wallet users can use the generated QR codes to recharge their wallets. But they can’t transfer money to themselves.
Frontend Representation:
19.2.Add Balance
Your customers can recharge their wallets with the available payment methods on your WooCommerce store.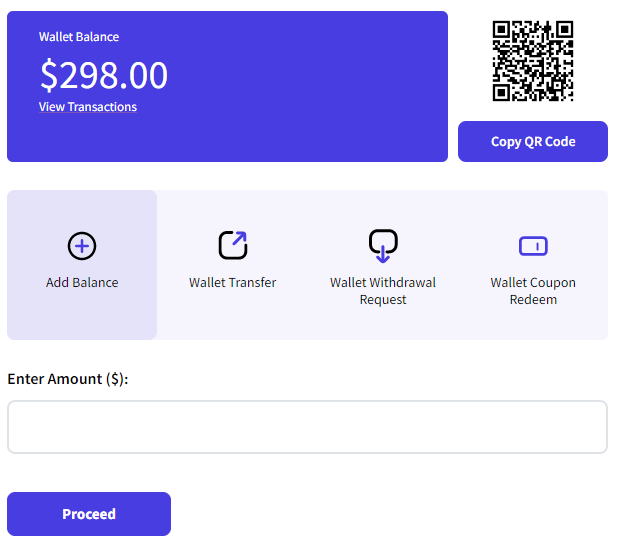
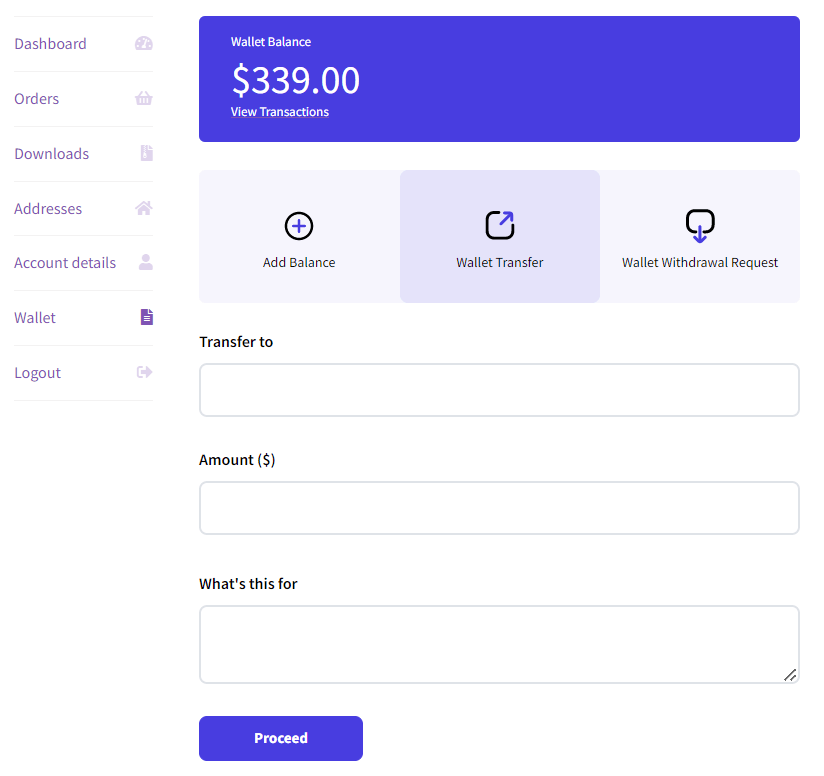
19.3.Wallet Transfer
Customers can transfer their wallet amounts to other wallet users on your WooCommerce store. Customers have to enter the email address of the receiver, and amount, and state the reason for transferring the amount.
Frontend Representation:
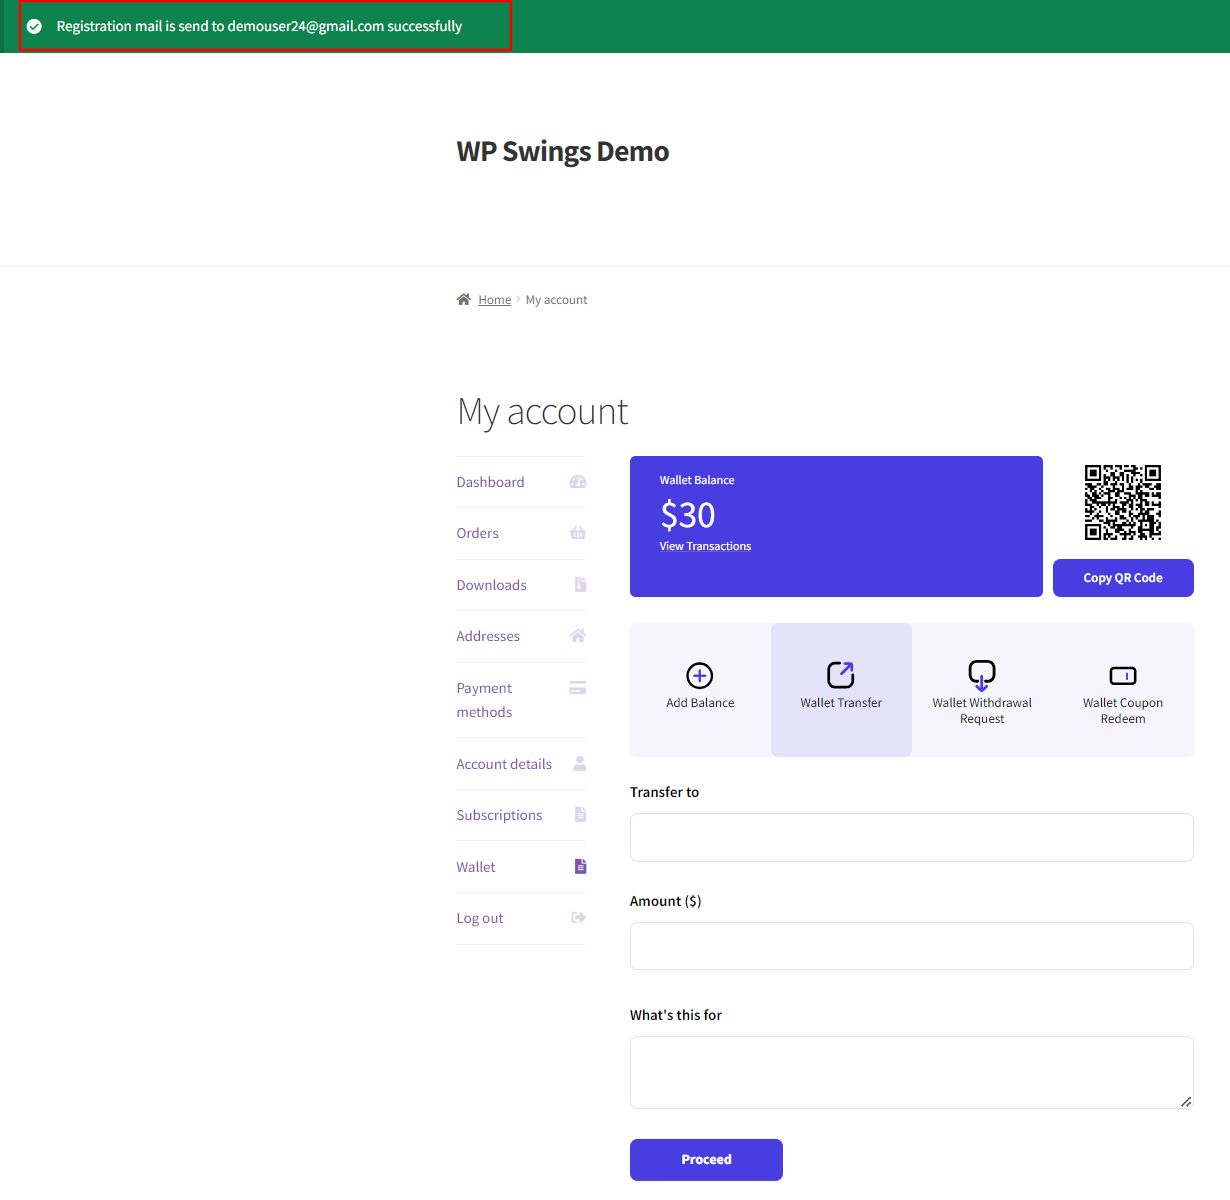
19.4.Send Invitation to Users
Using this setting, wallet users can also invite their friends/family to join the wallet system. If the email address entered in the ‘Transfer to’ field doesn’t exist, users will get the option to send an invitation to the email address.
Frontend Representation:
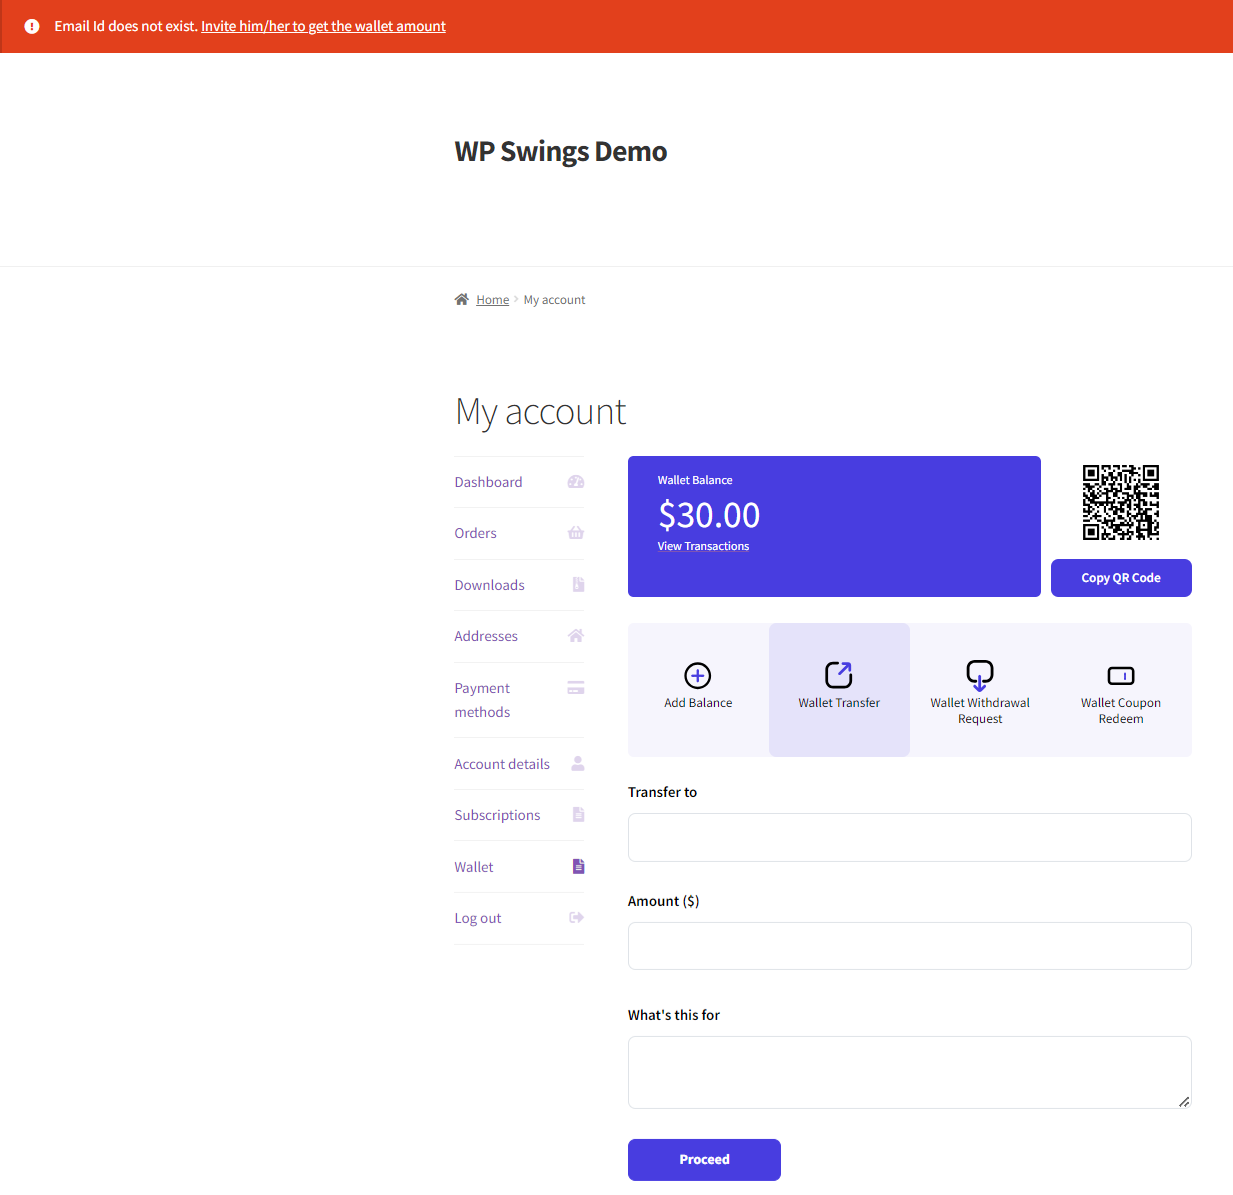
- Click on the ‘Invite him/her to get the wallet amount’.
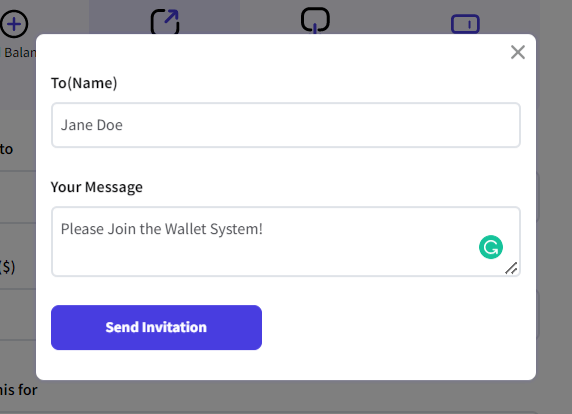
- Fill out the name and enter your message.
- Then, click on Send Invitation
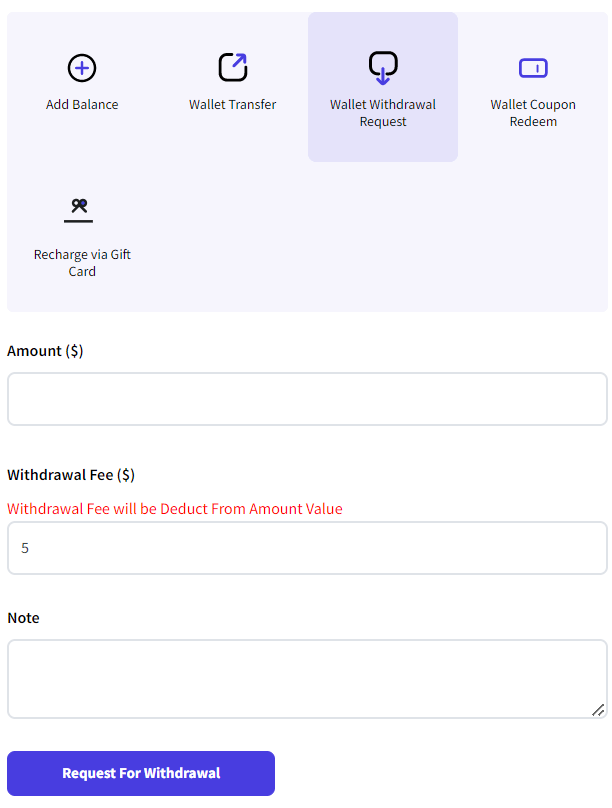
19.5.Wallet Withdrawal Request
Frontend Representation:

Note: All fields are mandatory.
19.6.Redeem Wallet Coupons
The customers can use this section to redeem the wallet coupons generated by the merchant. The balance will be updated immediately after wallet coupon redemption.
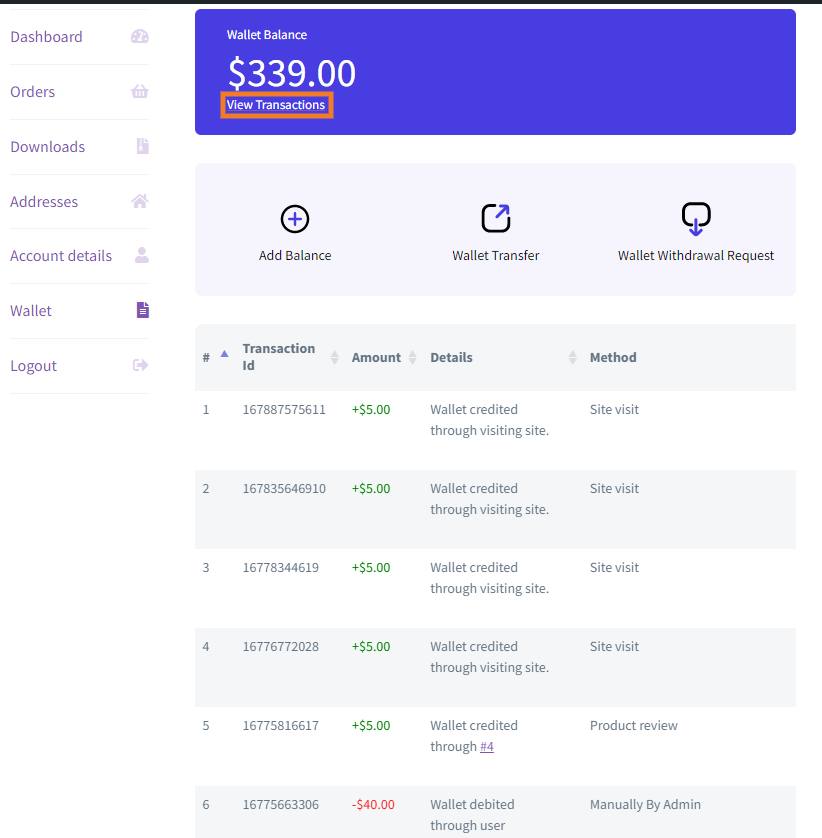
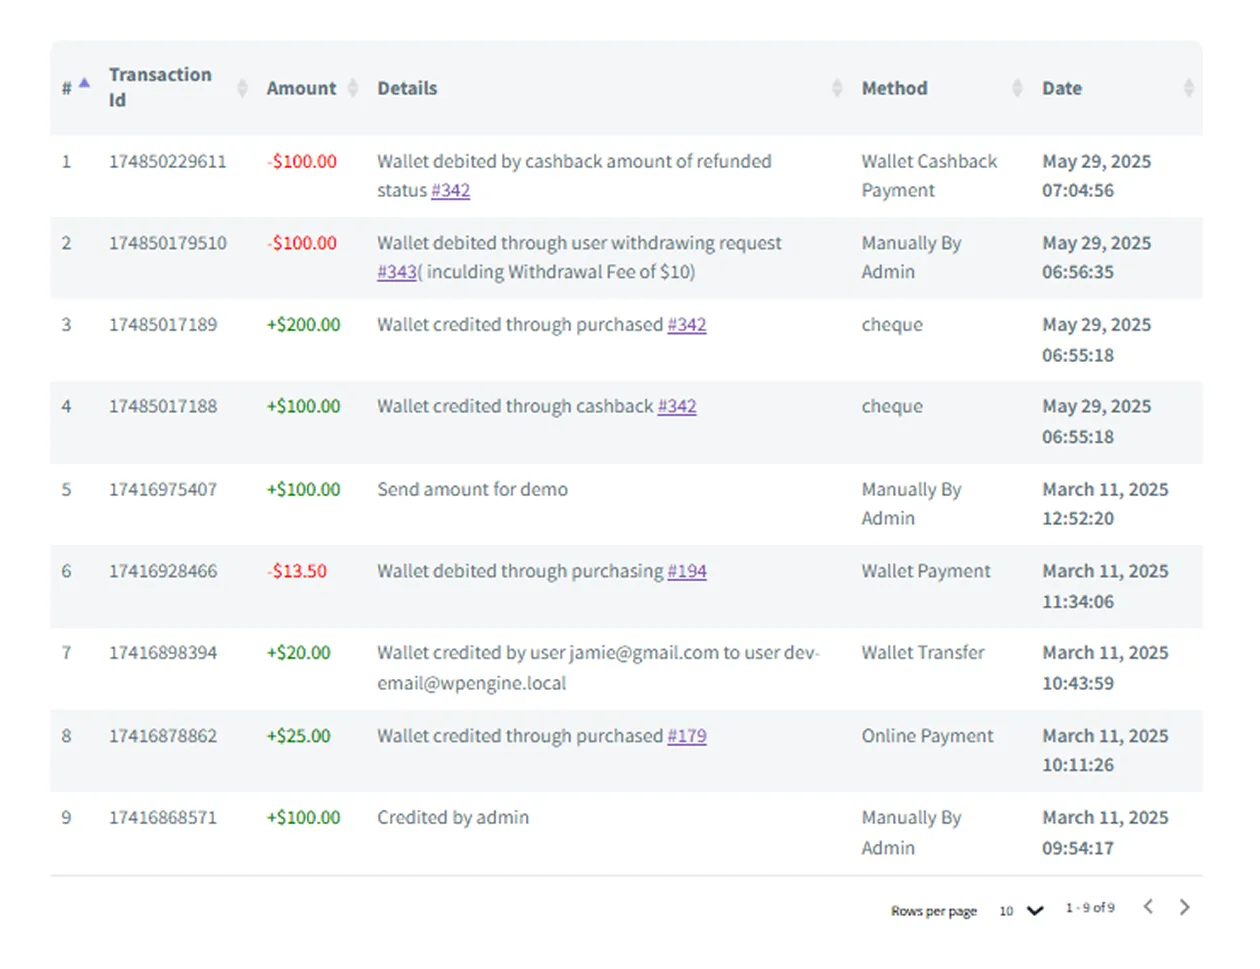
19.7.Wallet Transactions
This section allows your customers to know their wallet transaction history. The transaction list contains entries for wallet recharge, debit, credit, transfer, and withdrawal, and the email address of both the debtor and creditor.
Frontend Representation:
Note: All fields are mandatory
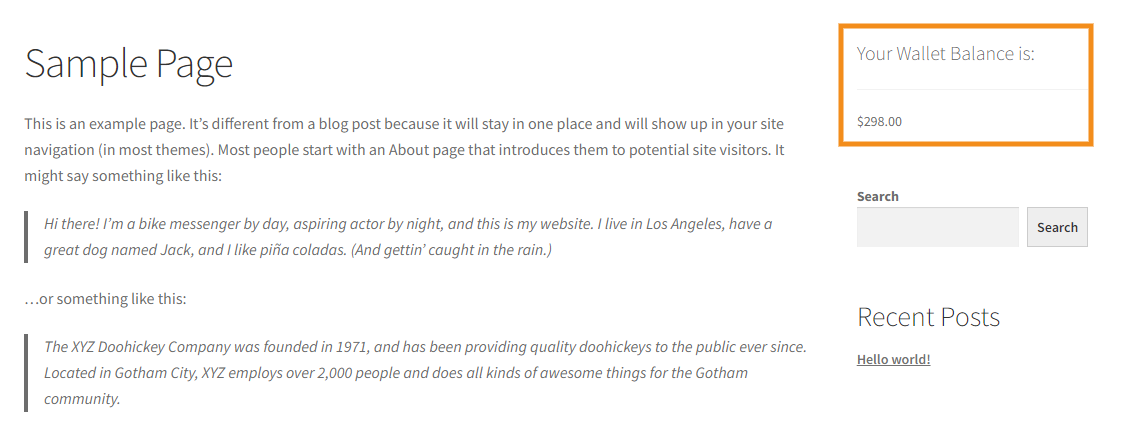
19.8.Wallet Balance Widget
In the sidebar section, wallet users will always be able to see their wallet balance.
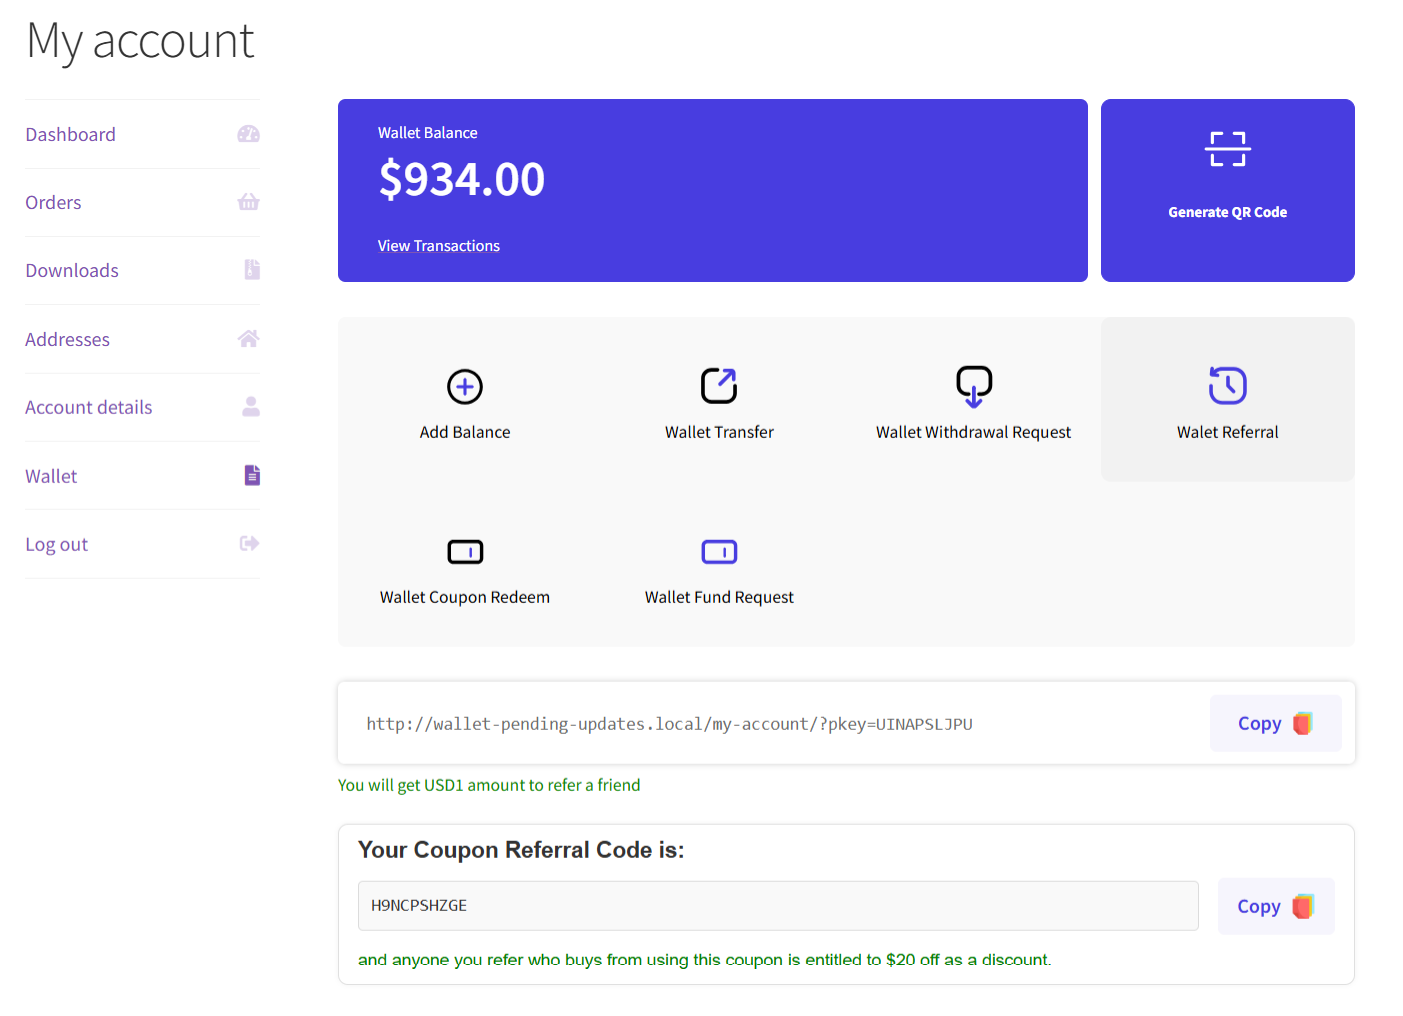
19.9.Wallet Referral
Customers can generate unique referral coupons that provide discounts to unregistered users. When the referred user applies the coupon, they receive the discount, and the referring customer earns a referral reward. You can manage and configure the discount amount and referral reward directly from the backend settings. Refer to the Point 9.9.
Note: Creating Coupon Referral is available only in the premium version of the plugin.
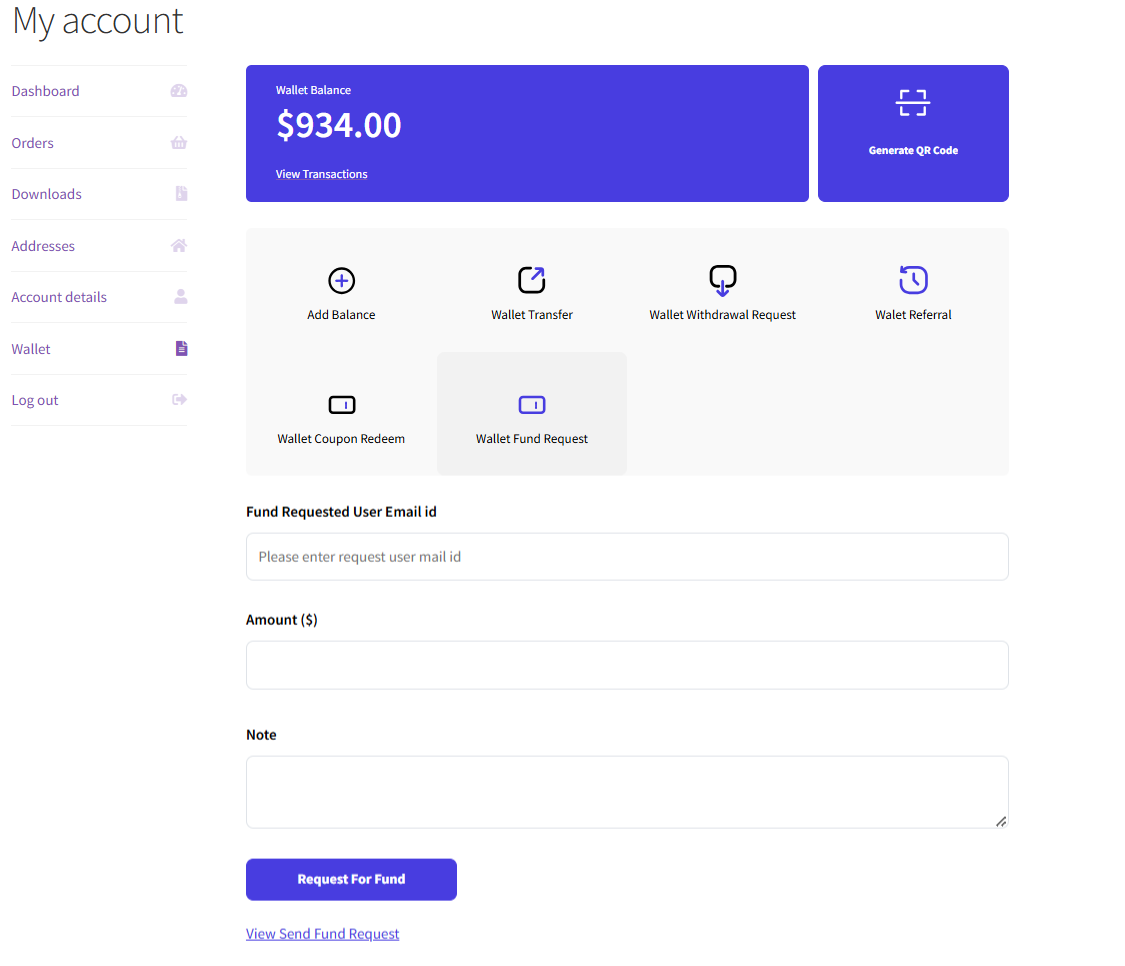
19.10.Wallet Fund Request
Customers can request funds from other users by entering their email in the Wallet Fund Request tab. The other user will receive a request and can choose to accept or reject it. This makes it easy to transfer funds between users within the wallet system.
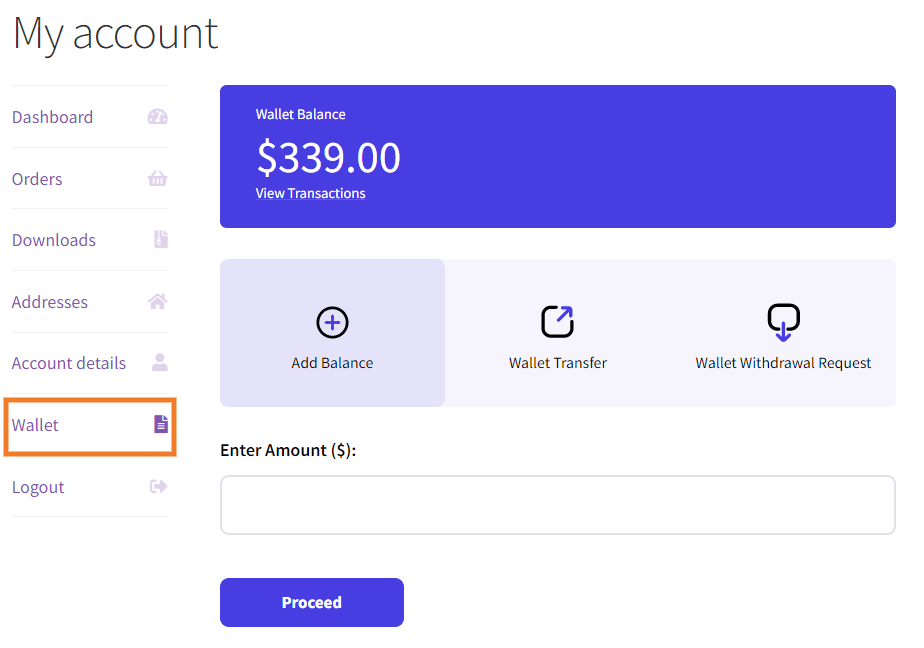
19.11.Wallet Balance Display
In the Wallet tab, your customers will always be able to see their current wallet balance.
Add Balance
Your customers can recharge their wallets with the available payment methods on your WooCommerce store.
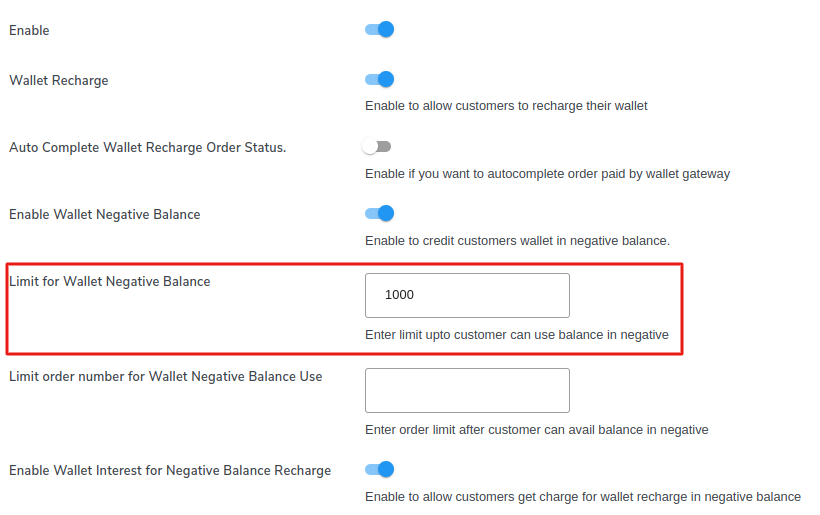
20.Negative Wallet Amount
Enable Wallet Negative Balance: Navigate to the General Tab and Toggle this button to enable negative wallet support. After enabling this setting you can also credit a negative amount in the customer’s wallet.
Limit for Negative Balance:Premium
In this Tab, you can set the maximum amount limit customers can avail the balance in negative.
 Frontend Representation:
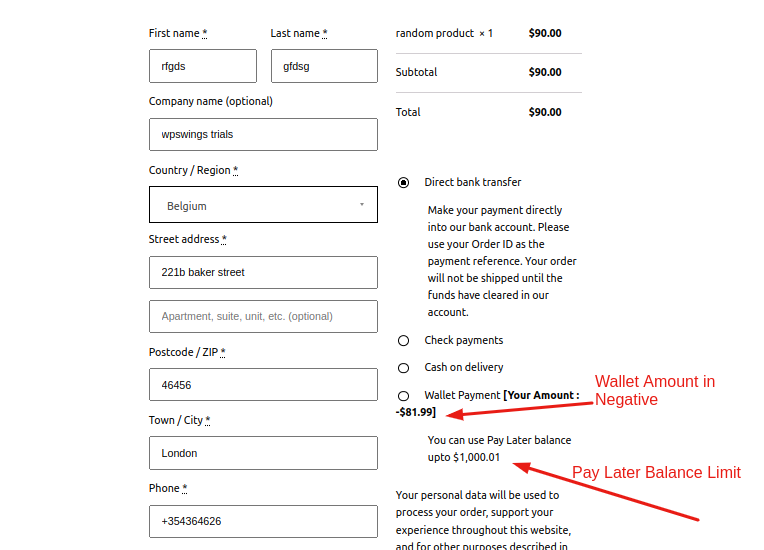
Limit Order Number for Wallet Negative Balance Use:Premium
You can restrict new users from using the negative balance based on their order quantity. In simple terms, users will not be able to avail balance in negative until they have reached a predetermined order limit.
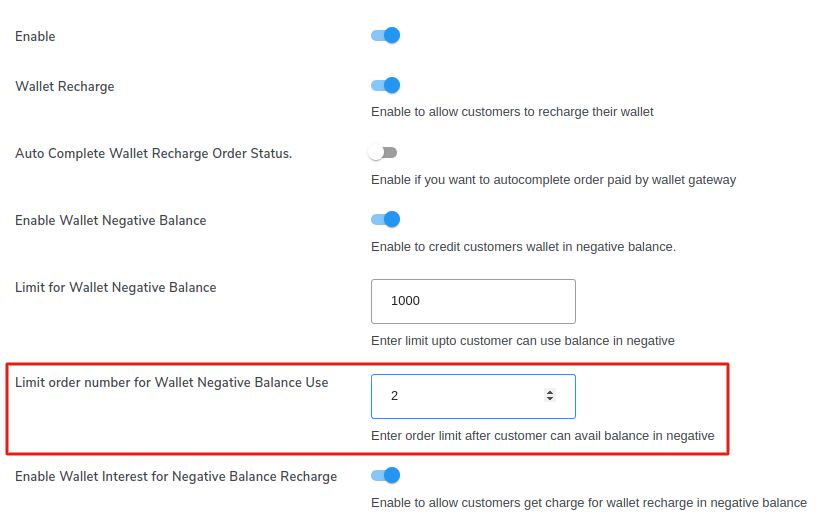
As you can see in the above image the order limit is 2 so, users will not be able to avail negative balance until the two orders are completed.
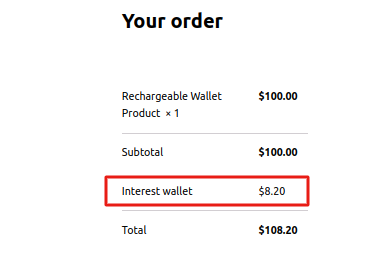
Enable Wallet Interest on Negative Balance Recharge:Premium
You can Enable this setting to charge interest on negative wallet amounts during wallet recharge.
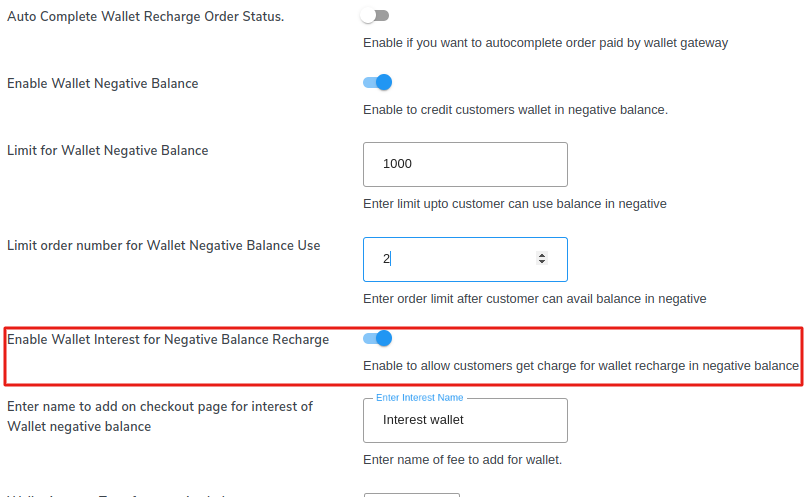
Enter Interest Name:Premium
Here you can write your interest name to be shown on the checkout page.
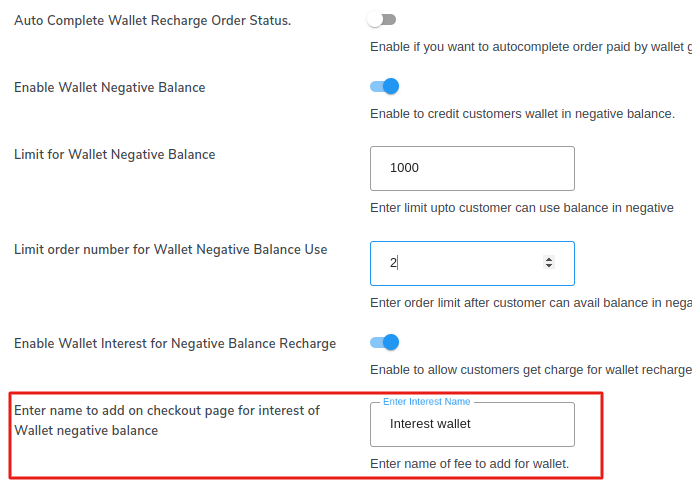
Wallet Interest Type for Negative Balance:Premium
Here you can select the type of interest it can be in percentage or a fixed amount.
 Enter Wallet Interest Amount for Negative Balance:Premium
Here you can enter the interest amount to charge on wallet recharge.

This is how it will show on frontend.
21.Refund Amount Directly To User’s Wallet
Using our Wallet System plugin, you can quickly refund a customer’s order amount straight to their wallet. It gives them faster access to their money and encourages repeat purchases using their wallet balance

You don’t need to enable any extra settings for this feature. As long as the Wallet System plugin is active, you’ll see the option to refund directly to the customer’s wallet in the Orders section when processing a refund.
22.Cashback Adjustment On Refund and Cancellation
Cashback management is now hassle-free. When an order is canceled or refunded, the system automatically deducts the given cashback from the customer’s wallet.
You don’t have to enable or disable any option to utilize this feature; no extra effort required from your end.
23.Compatible with Currency Switcher for WooCommerce
The Wallet system is compatible with the Currency Switcher for WooCommerce plugin, which allows you to change the operational currency of your website. You can change the currency of the wallet system with this compatibility.
To do this, Install and activate the Currency Switcher plugin.
- Go to WooCommerce > Settings > Currencies.
- Select any of the listed currencies.
- Click on the Save Changes button.
Afterward, all wallet transactions will take place in the currency you choose.
Note: Both the WOOCS free and pro version plugin are compatible with our digital Wallet plugin.
24.Compatible with Ultimate Gift Card for WooCommerce
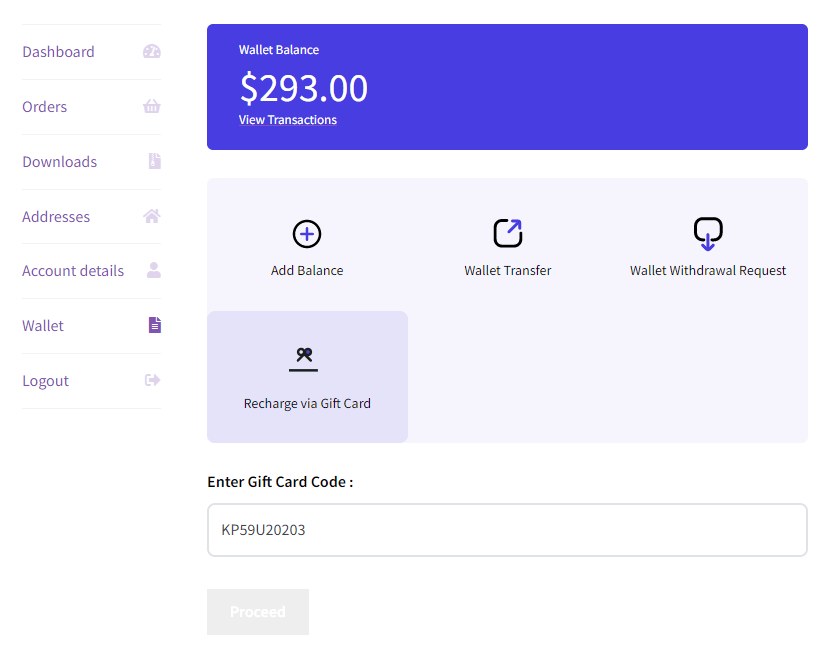
The Woo Wallet Plugin is compatible with Gift Cards for WooCommerce Pro and Ultimate Gift Card for WooCommerce.
This compatibility allows users to redeem gift card coupons to recharge their wallets. After the gift card plugin is activated, the Recharge via Gift Card option is added to the wallet frontend panel.
Users can enter coupon codes, and click on the proceed button, and the complete card b
25.WPML Compatibility
The Wallet System For WooCommerce is made compatible with the WordPress Multilingual (WPML) plugin for localization of the wallet system plugin’s strings.
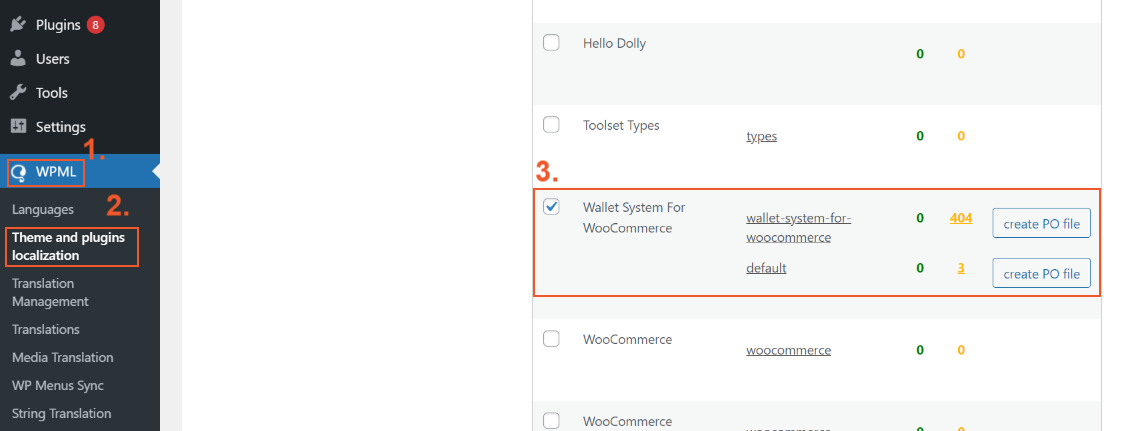
For translating the plugin the first step is to extract all the strings of the plugin and it can be done with the help of the following steps:
- From your WordPress Admin Panel, visit WPML → Themes and Plugins Localization.
- Now scroll down to the Strings in the plugins section.
- Lastly, select the Wallet System For WooCommerce plugin from the list of plugins.
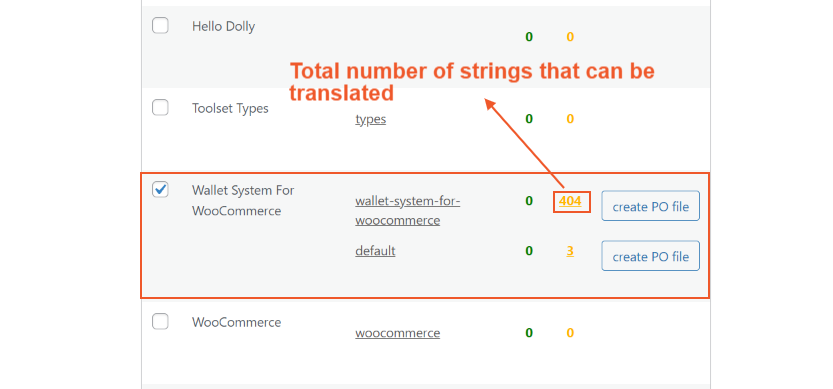
To translate the strings into the language of your choice press the Translate Strings button present next to the plugin.
You’ll be redirected to a page where all the strings of the plugin are listed and you can translate each string from here.
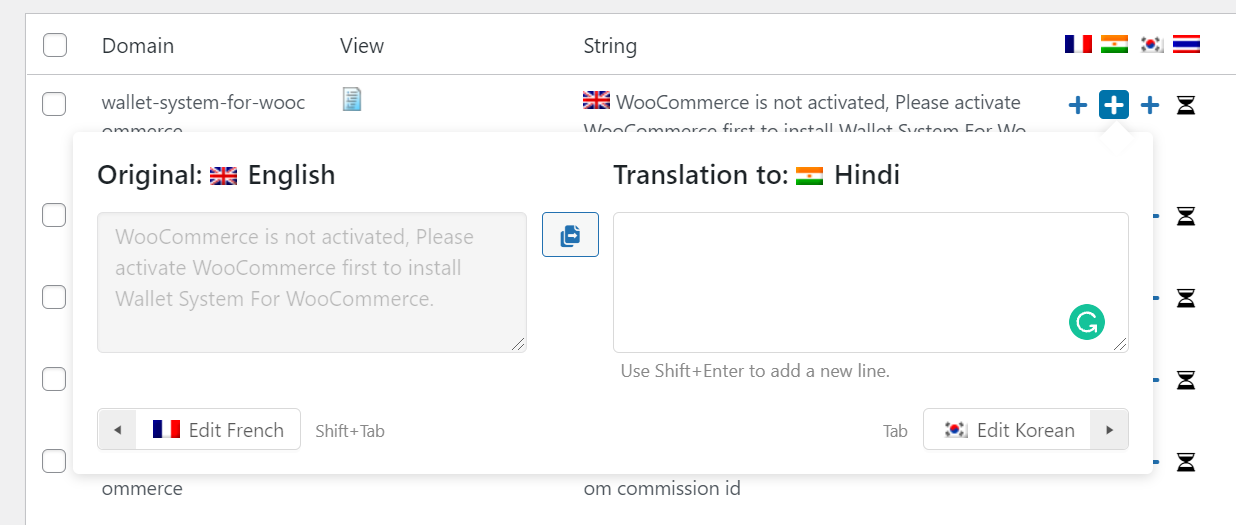
Upon visiting this page you can manually select a string for translation by clicking on the “+” button next to each string in a row.
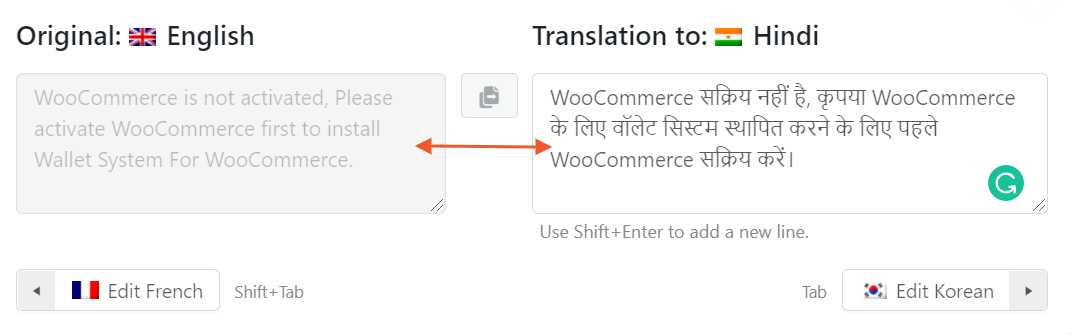
A popup will occur in which you can write the translation of the string.
Once you’ve written the translation it will be automatically saved and when the customer chooses a different language they’ll see the translated version of the string.
26.Multivendor Marketplace Solution for WooCommerce Compatibility
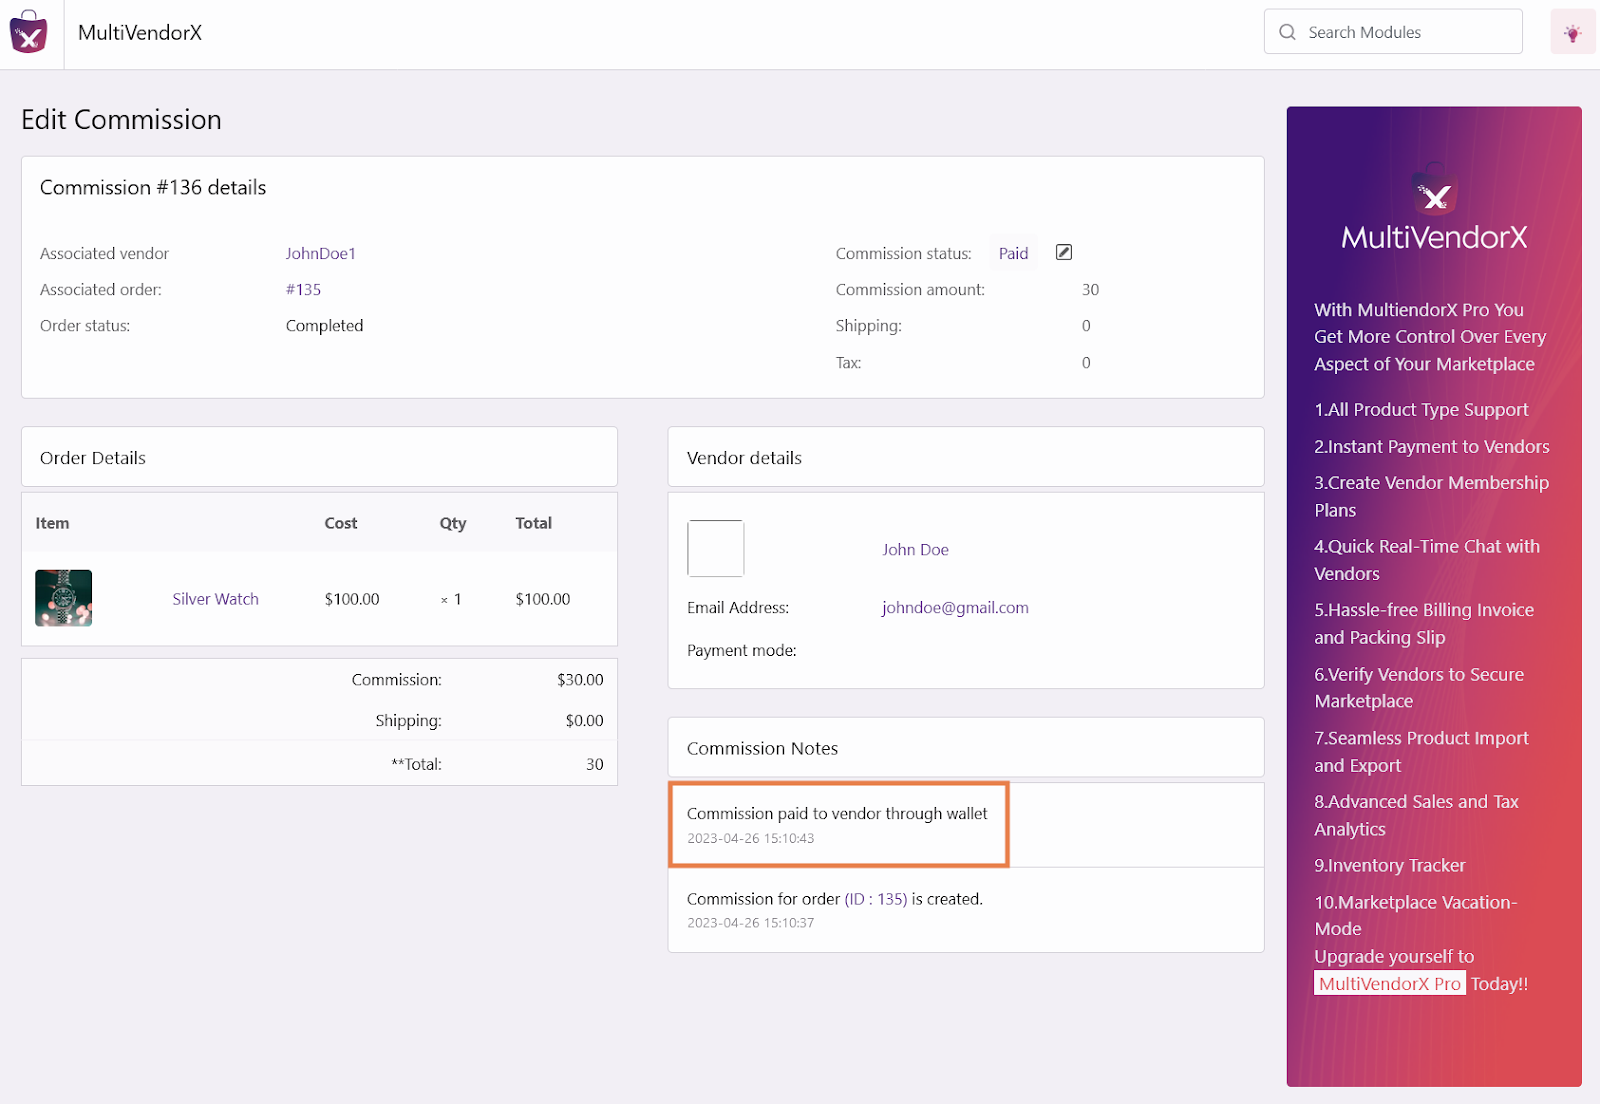
Multivendor Marketplace Solution for WooCommerce allows you to create an online marketplace on your wooCommerce store. It is compatible with the Wallet System for WooCommerce.
The wallet system is added as one of the payment methods to automatically send commissions to your vendors’ wallets on the sale of their goods. Follow these steps to configure the wallet payment method:
- from the Admin menu, go to Go to MultiVendorX>> Settings > Commissions.
- Select Vendor Commission and set a percentage or fixed value for it.
- Next, go to MultiVendorX > Vendors.
- Click on any of the listed vendors and open the Payment tab.
- From the Choose Payment Method dropdown, select Wallet.
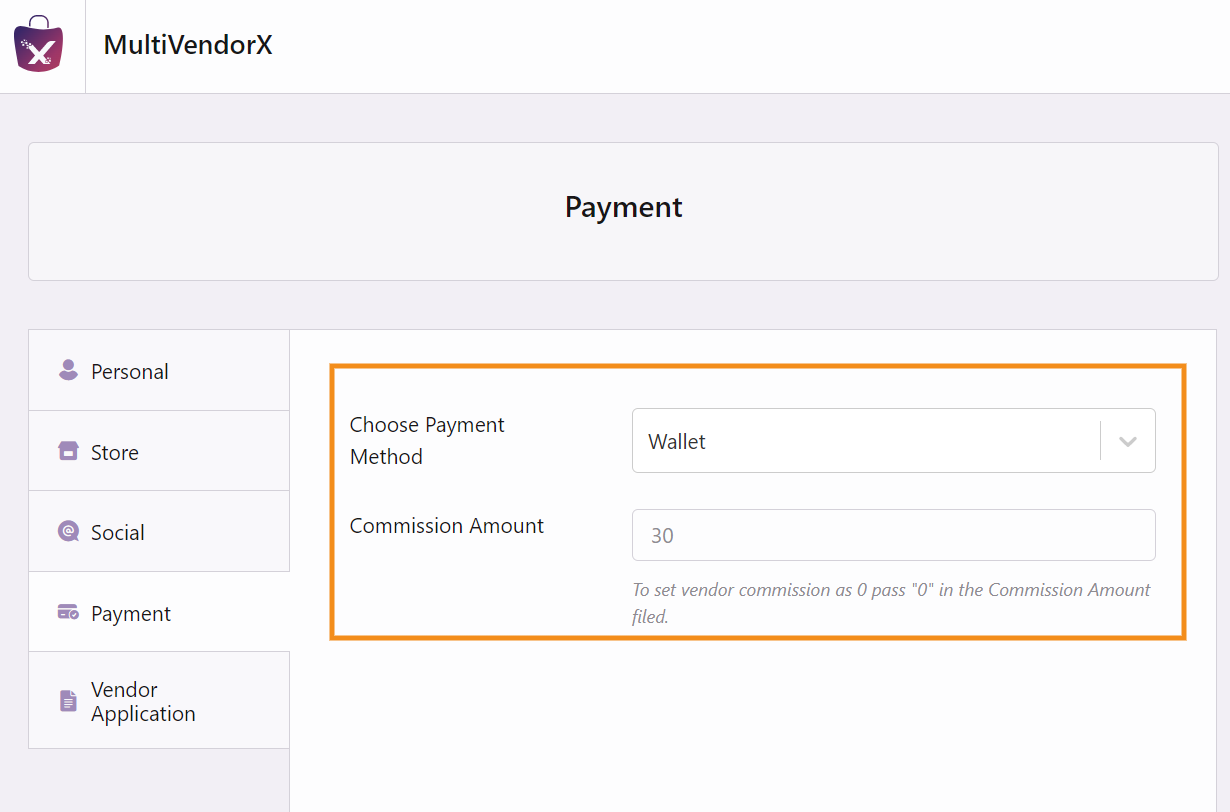
- Lastly, click on Save Changes.
Note: The vendors’ commission will be transferred automatically to their wallets irrespective of the payment method used by their customers.
27.RMA Return Refund & Exchange for WooCommerce Pro Compatibility
The Wallet System for WooCommerce is compatible with RMA Return Refund & Exchange for WooCommerce Pro. In this compatibility, the users can request the refund amount to be transferred directly to their wallets.
Note: For the RMA Pro plugin to work, you need to install the RMA Return Refund & Exchange for WooCommerce free version.
Configuring RMA Settings
After the successful installation, go to the WP Swings > Return Refund Exchange for WooCommerce > General Settings. And enable the following settings:
- Enable Refund
- Enable Order Message
- Enable Exchange
- Enable Cancel
- Enable Wallet
Then go to the Wallet tab, and enable the following settings:
Enable To Use Wallet System For WooCommerce Plugin: After enabling this feature, all the wallet amounts will be transferred to Wallet System for WooCommerce.
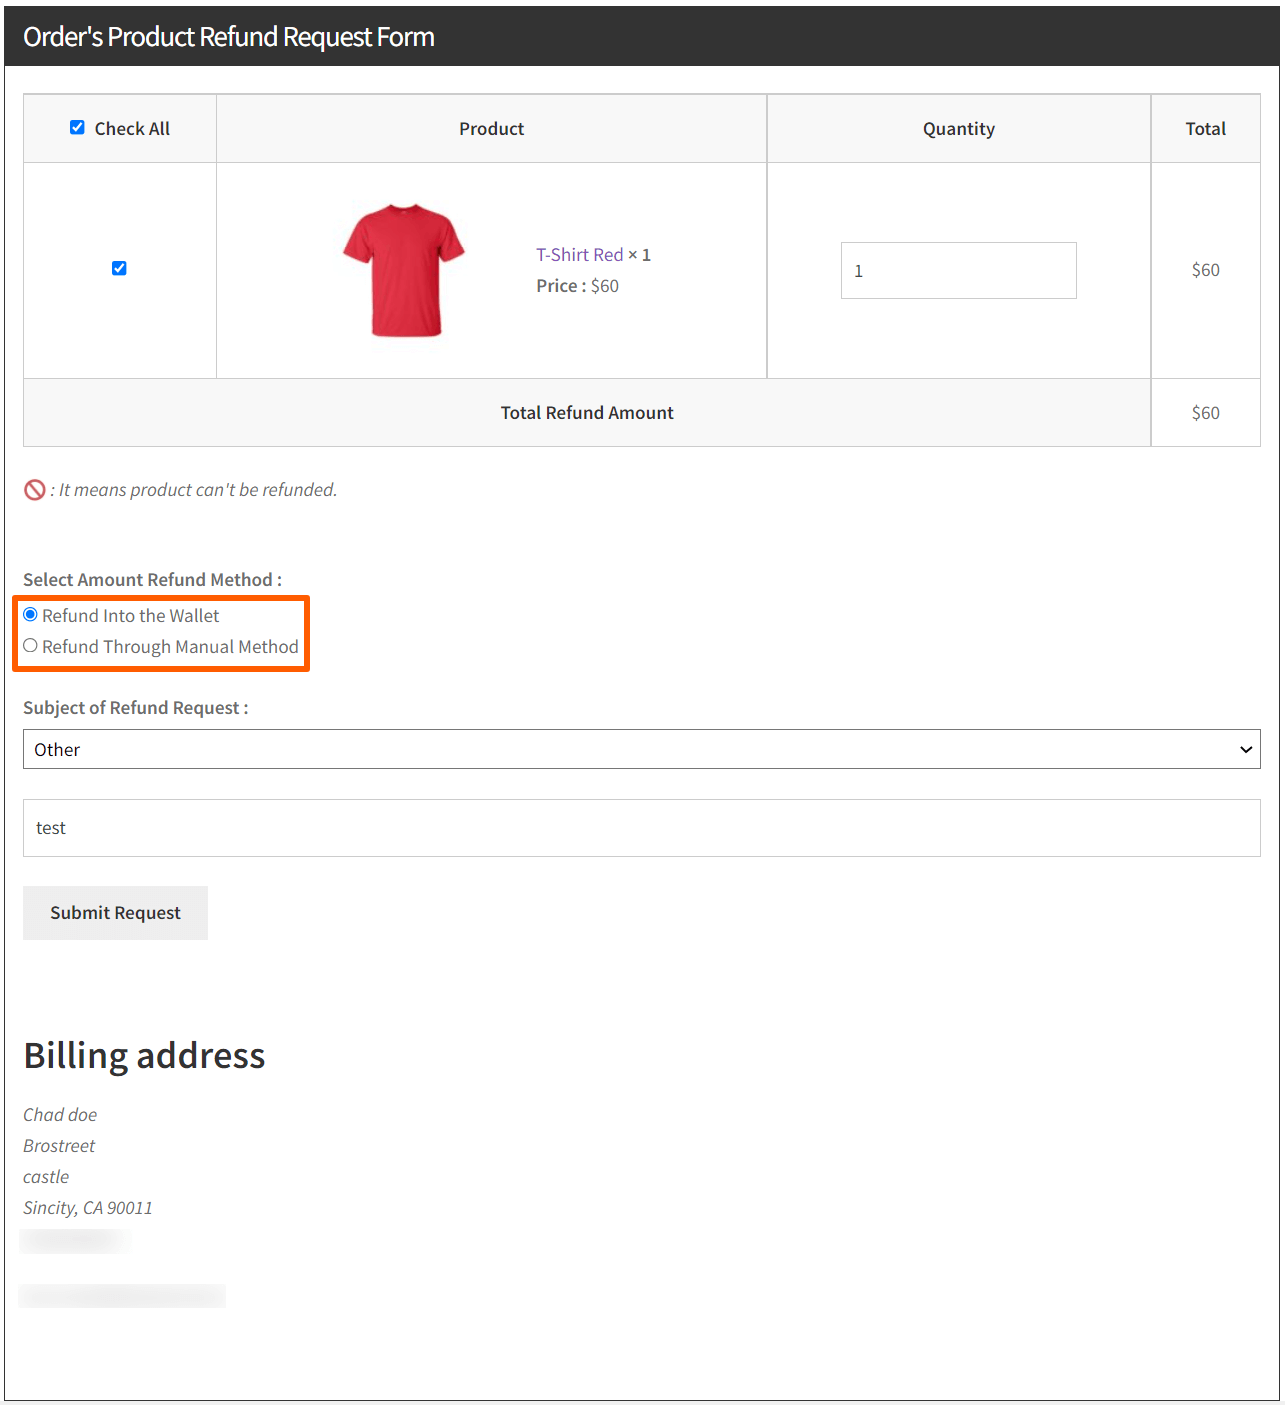
Enable To Select Refund Method For The Customer: You can allow customers to select the refund method while submitting the refund request.
Here’s how this compatibility works:
Step 1: Customer places the refund request.
Step 2: Go to WooCommerce > Orders and click on the refund request.
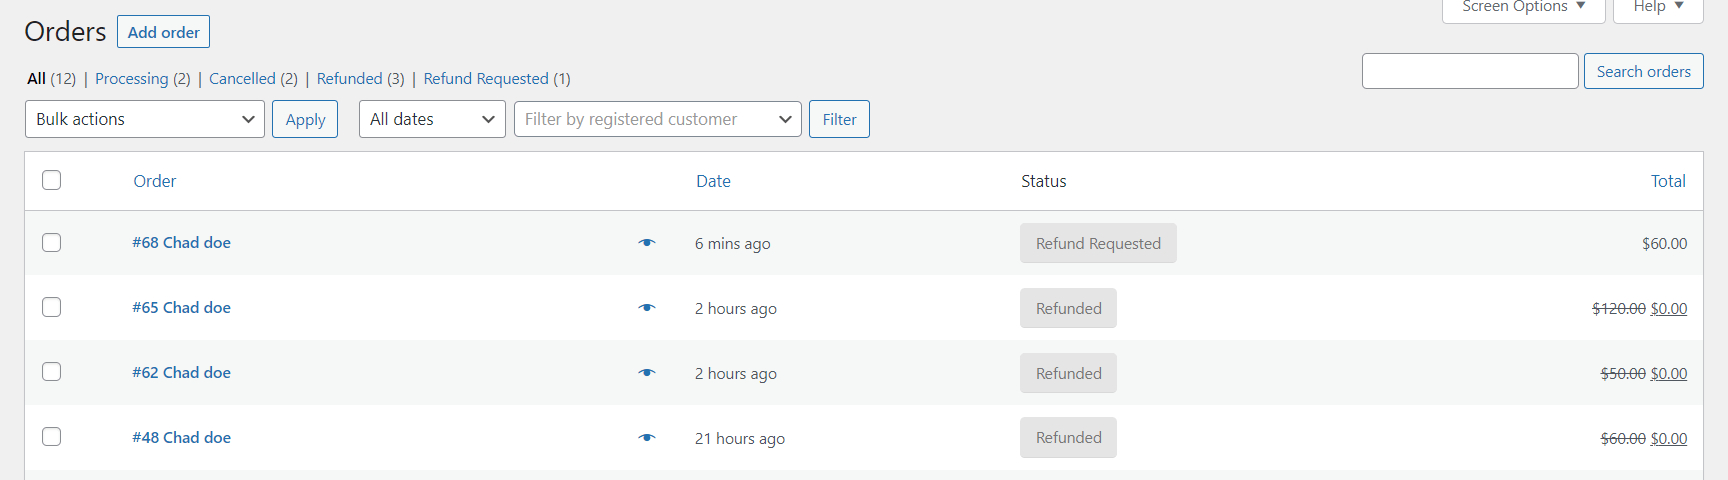
Step 3: Open the refund request, scroll down to the Refund Requested Product section and click on the ‘Accept Request’ button.
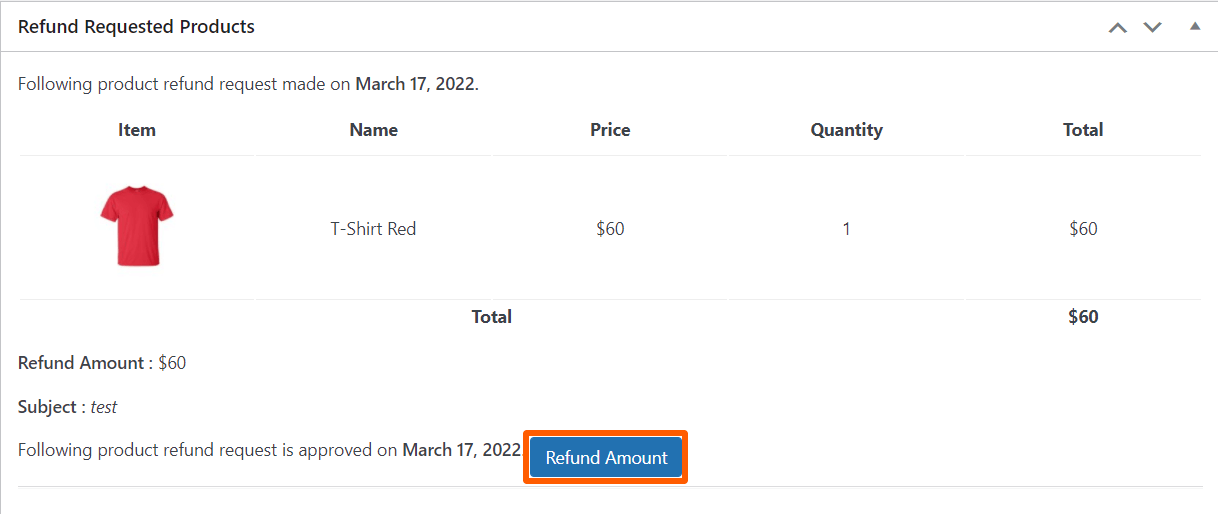
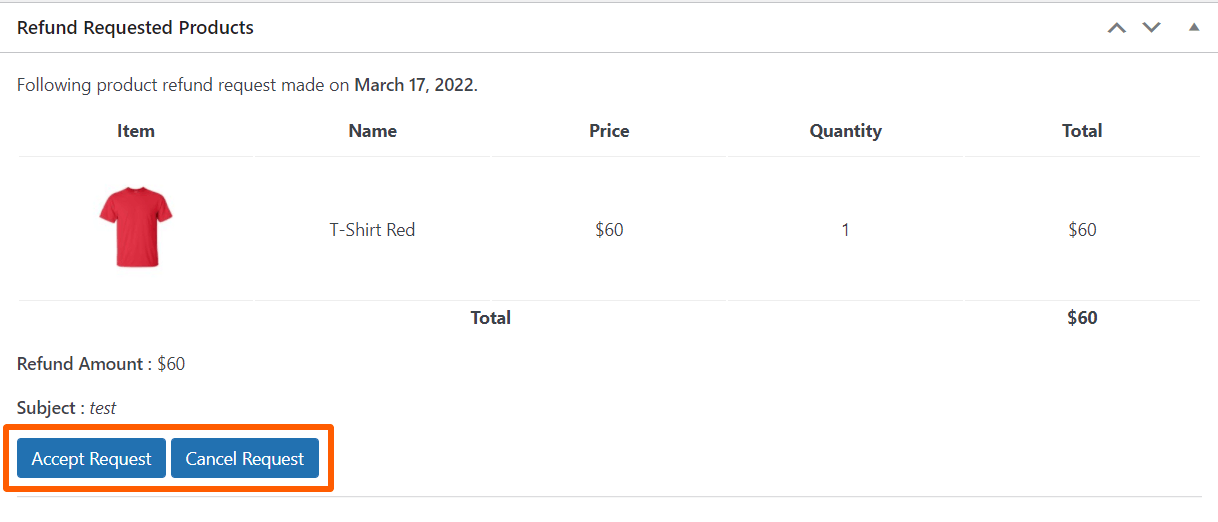 Then, click on the ‘Refund Amount’ button. The refund amount will be sent to the customer’s wallet.
28.Subscription for WooCommerce Compatibility
The Wallet System for WooCommerce is compatible with Subscriptions For WooCommerce and Subscriptions for WooCommerce Pro.
Subscription for WooCommerce Pro allows you to create and sell subscription products and ensure recurring revenue. With this compatibility, the users can use their wallet balance to purchase subscription products.
The basic requirement is installing and activating the Subscription for WooCommerce Pro and creating a subscription product.
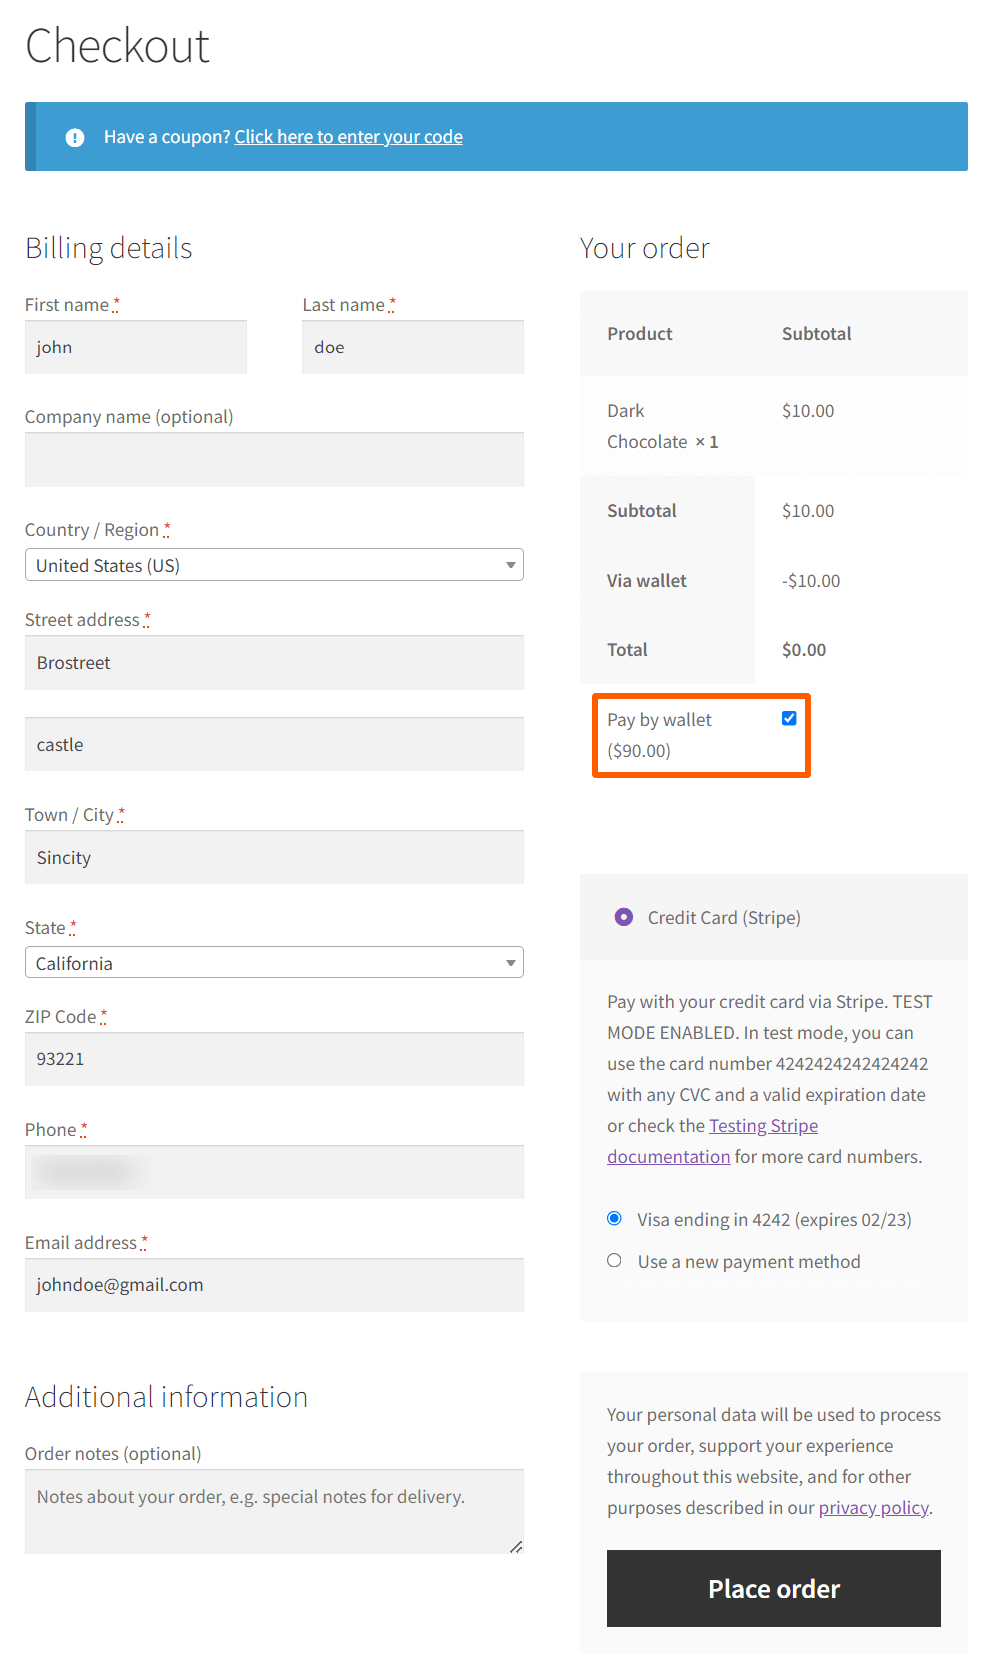
24.1 Partial Payment
Customers can use the Wallet partial payment feature to pay for subscriptions.

- From the Admin menu, go to WP Swings > Wallet System.
- Select the Partial Payment Option: Total Wallet Amount or Manual Wallet Amount.
- Click on the Enable To Use Wallet Amount On Renewal Order.
- Select the Appy Amount Type (Percentage/Fix).
- Then, enter the amount/percentage to be deducted from the wallet during order renewal.
- At last, click on Save Settings.
Here is how it appears on the checkout page for the Total Wallet Amount option
 24.2 Wallet Auto Top-up
 Enable Wallet Auto Top-Up:
Toggle button to implement the auto top-up feature. Afterward, customers can set the amount of periodic auto top-up after recharging their wallets.
Enter Subscription per interval:
Enter the number of auto recharges in the subscription plan. The top-up can be daily, weekly, monthly, or yearly.
Enter Subscription expiry interval:
Enter the subscription duration (daily, weekly, monthly, or yearly). It sets the number of times the auto top-up reoccurs. For example, if you select 5 days for 10 weeks, then auto recharge will take place for 5 days every week until the plan expires.
You can leave this textbox empty to set up unlimited intervals.
Note: After you set up a top-up subscription, customers will have to recharge their wallets to set the auto top-up amount.
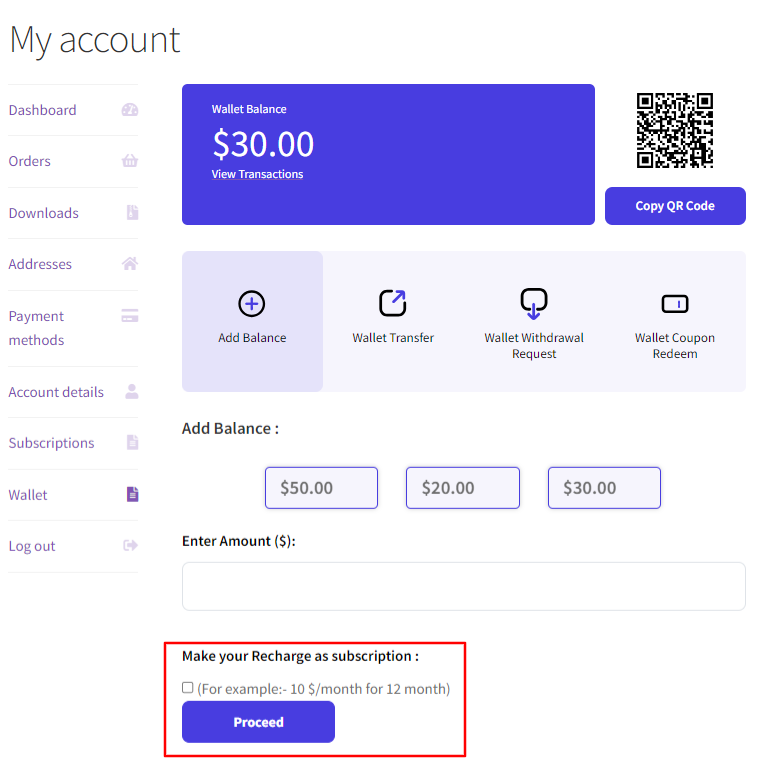
Enable to Select Recharge as Subscription or Regular:Premium
Enable this to show the option on the frontend, if the user wants to start a subscription for recharge or not.
Frontend Representation:
Frontend Representation:

29.Compatibility WooCommerce HPOS
Wallet system is compatible with WooCommerce High-Performance Order Storage (HPOS) is an easy-to-understand solid database structure allowing you to use an alternative storage mechanism for your order tables it’s based on WooCommerce CRUD design to ensure the smooth workflow of your WooCommerce Store.
For more information, refer to the WooCommerce HPOS Documentation.
30.Feedback and Suggestions
Don’t see a feature in the Wallet System for WooCommerce plugin that you think would be useful?
We’d love to hear it: Reach out to our Support query and we’ll consider adding it in a future release.
31.FAQs
How will the customer recharge their wallets?
Yes, the customers can recharge their wallets from their WooCommerce accounts. Just go to the My-account page > Wallet > Add balance.
Can the admin refund the order value on the customers’ wallets?
Yes, the Admin can enable the Refund to the Wallet setting from the General tab.
Is there functionality to notify customers about the updated wallet amount?
Yes, the admin can enable the wallet update notification from the General tab. They’ve to click the toggle to enable the ‘Send email on Wallet Amount Update to Customers’ option.
Can the admin update the wallet amount of all the users in bulk?
Yes, the admin can add the (credit/debit)wallet of all users in one go.
Can the admin update the wallet amount of users individually?
Yes, the admin can update the wallet amount individually.
- Go to the Wallet tab.
- To update the wallet amount, use the search bar above the wallet user table to find a particular user or select the user from the wallet user table.
- From the Actions column, click on the edit icon.
- The edit wallet amount popup will appear.
- Enter the amount in the Amount box and select the Debit or Credit option.
- Click on the Update Wallet button to implement your changes.
Can the admin see all the wallet transactions of their users?
Yes, the admin can view all wallet transitions of their users in the Wallet Transactions tab.
Can a customer share their wallet amount with another person?
Yes, they have to go to the My-account page > Wallet, select the beneficiary, and then click on transfer.
Can a customer request withdrawal for an amount from the wallet?
Yes, customers can request the admin for the withdrawal of the wallet amount. The customers have to provide their bank details like account no, account name, and bank code. Or they can also give their PayPal details (PayPal Email).
How do I add any custom feature to the Wallet System for WooCommerce plugin?
To add any custom feature, you can get in touch with our developers and raise a request for customization.