1.Overview
Welcome to the manual of one of the most reliable PDF plugins for WordPress. Use the PDF Generator for WP Pro plugin to converts all the posts, pages, blogs, and products on your website into PDF files. It enables easy brand name dispersal through various channels in offline mode as well.
Users can download these PDF files or view them in a new tab. The admin can authorize users to receive the PDF files at their email addresses. Using the plugin, you can also add PDF files in posts or pages of your WordPress site.
It improves user convenience as it helps them save valuable content and access it at their chosen time. It frees users from having to visit the website again and again for a piece of information. To summarize, downloading blog posts as PDFs will be a cakewalk!
Features:
- Export your PDF logs into CSV for better data analysis.
- You can choose to display the functionality to either registered users or guest users or both.
- Generate PDF invoices on product purchases and send them to users automatically.
- Customize the PDF invoice & pay slips information such as company details, logo, color, and more.
- Using the latest update of the plugin, you can add woo attributes to the generated PDF files from your live product pages.
- You can now restrict the display of the ‘download PDF’ icon based on the user roles using the latest version of the PDF creator plugin.
- Add names for bulk and single PDF download button.
- Enable WhatsApp sharing of WordPress PDFs.
- Select name for invoice as Invoice orderID, Invoice ID, or custom
- A recent update in the PDF Generator plugin allows you to export your posts, pages, and products in bulk in your desired custom template.
- This plugin lets you set the page height and width as per your choice. Simply select the page size from the dropdown menu and then choose the custom page size.
- PDF plugin also allows you to add scannable QR Codes to your generated PDF files using the shortcode provided by the plugin. You can add it to your header, body, or footer layout depending on your needs.
- PDF plugin brings to the footer customization features that will allow you to update the post name, post date, and author name.
- You can now add a change page no format in the footer settings. It allows you to set the page number with the total page count in your PDF file, and you can also set the page number position in the footer of the PDF file.
- WordPress PDF plugin now allows you to add more than one image in a row in your generated PDF files. Please note that it is advised to have not more than 3 images in a row to have a better view of the generated PDF files.
- The latest version of this PDF plugin also allows you to add more than one meta field in a row.
- We have solved for images to appear in the generated PDF files instead of Image IDs in this PDF plugin update.
- PDF Generator plugin allows you to control the nomenclature of the PDF file and lets you choose if you want to display categories or tags.
- You can place the icon for specific post types using advanced settings. Custom PDF Generator also allows you to place the icon appropriately on your WordPress site.
- You can customize the header, footer, and body settings to suit your company’s needs.
- Exclusive features like RTL support, watermark image settings are also available in the pro plugin.
- You can also upload your ready-to-use PDF posters or files to be directly accessed by registered or guest users.
- You can add a short description in the body settings of your PDF file by using PDF snippets for creating your custom templates.
- The plugin allows you to add a current date to your generated PDF file and you can add this in the body setting of your custom templates.
3.Installation
2.1. Automatic Installation
Automatic installation is the easiest option to install a WordPress PDF generator, as WordPress handles the file transfers itself and you don’t need to leave your web browser.
In order to install the purchased plugin automatically, use these steps:
- After completing your PDF plugin purchase go to My Account. [Use this link https://wpswings.com/my-account/downloads/ to review your account].
- From My Account go to the Download section. [Here you can easily find all your purchased plugins].
- Click on the Download button present across your purchased plugin to download your extension.
- Now log in to your WordPress Dashboard.
- From the sidebar click on Plugins.
- Click on Add New and then upload your purchased WordPress PDF Generator plugin.
- Click the Browse button. Choose your downloaded plugin’s .zip file, and click on Install.
- Now click on the Activate link.
- You’re all set to use your PDF Generator plugin and take benefit from it!
Note: To create your account before completing your purchase visit the Login Page
2.2. Manual Installation
The manual installation of this PDF plugin for WordPress is another option to connect the plugin to your WordPress environment. This method involves downloading our WordPress PDF Generator extension and uploading it to your webserver via your favourite FTP application.
The steps are as follows:
- Upload the WordPress PDF Generator folder to the/wp-content/plugins directory.
- Activate the WordPress PDF through the ‘Plugins’ menu in WordPress.
Note:
Before activating the WordPress PDF Generator, you should have the PDF Generator for WordPress plugin else the plugin will not function.
So, if you don’t already have it, you can download it directly from here:
Download Zip
4.General Settings
To use the PDF plugin, you need to activate the plugin functionalities by turning on the toggle switch in General Settings.
- In the admin panel, click on WP Swings→ PDF Generator for WP→ General Settings.
- Activate the PDF generator plugin by turning on the toggle switch.
- Tick the checkbox Include Categories to display categories in the PDF file for a post on your WordPress site.
- Tick the checkbox Include Tag to display tags in the PDF file for a post on your WordPress site.
- Tick the checkboxes to Display Post Date and Display Author Name respectively if necessary.
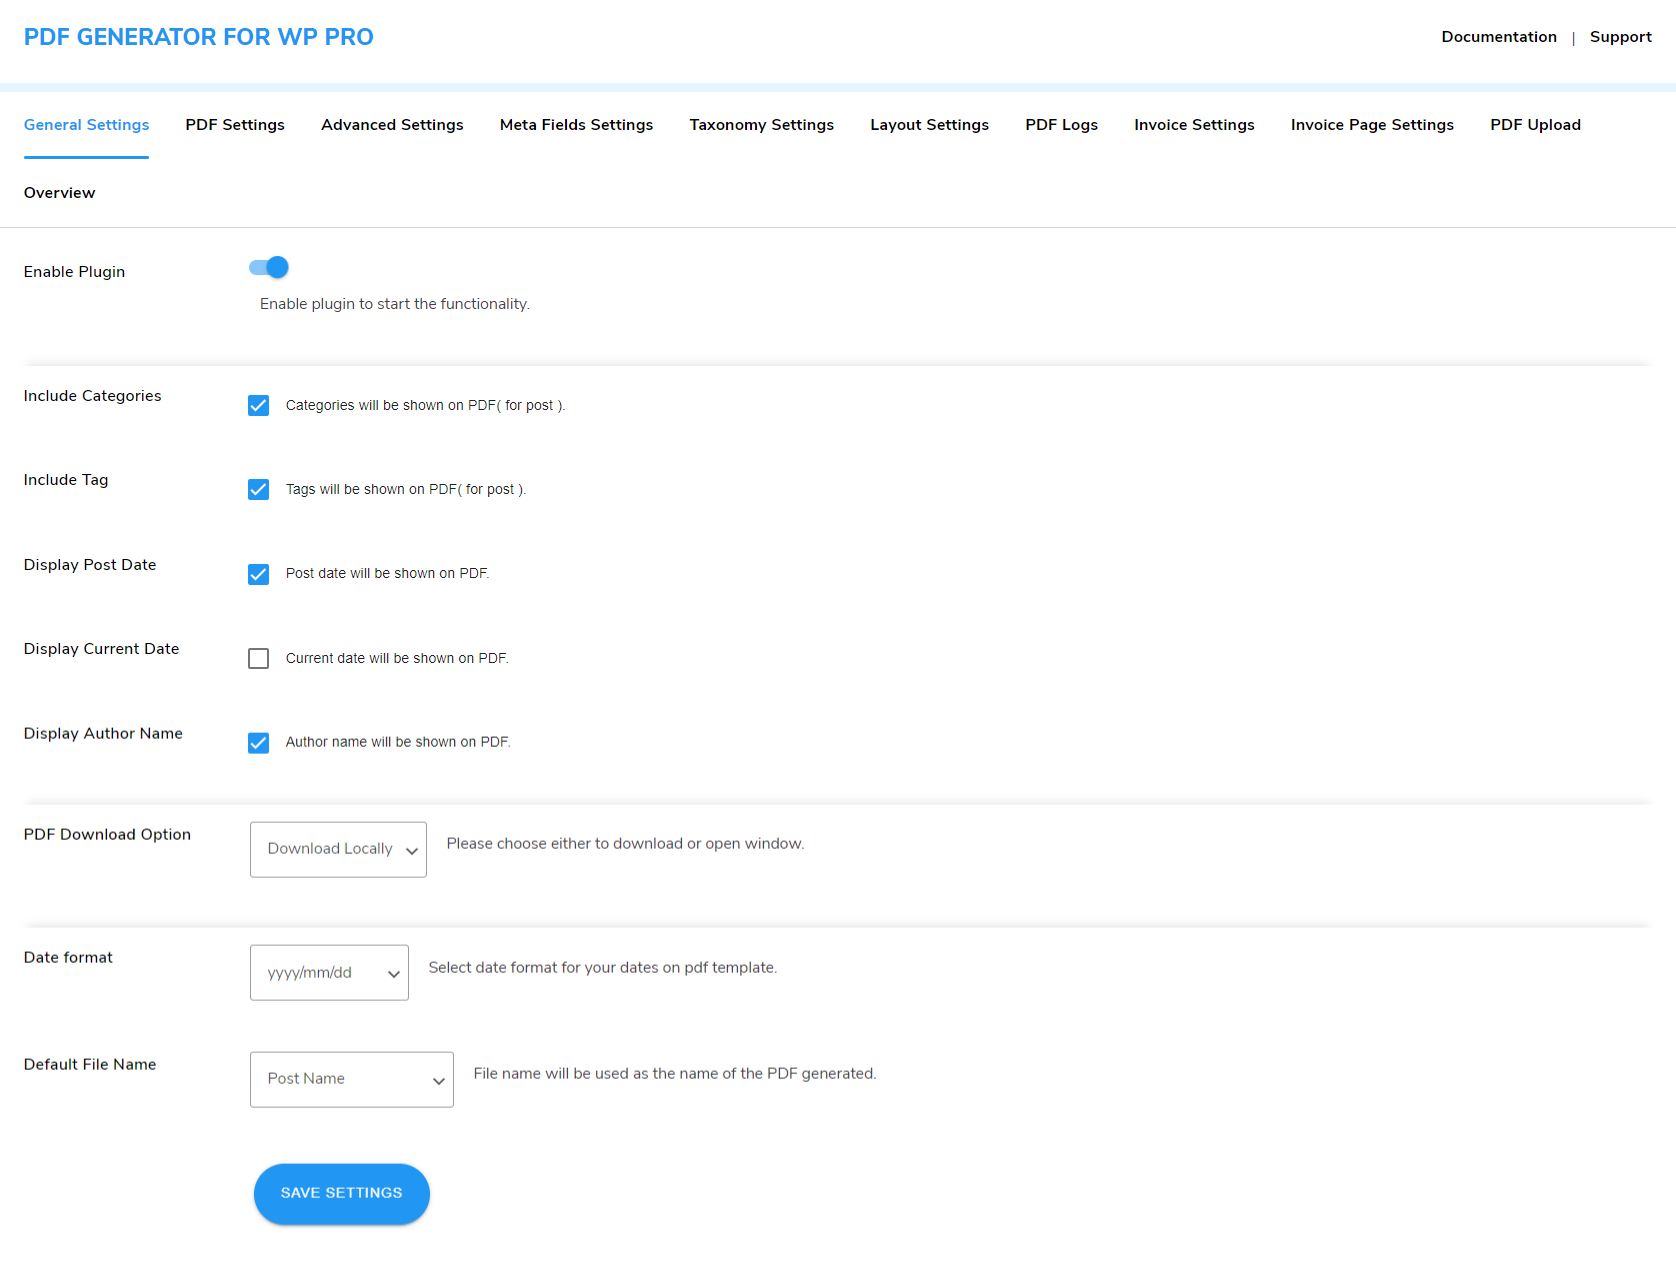
- You can choose to allow the users to download the generated PDF files either locally or open a new window.
- You can predefine the name of the generated PDF file by choosing one of the options- Post Name, Document_Product Id, or Custom from the Default File Name option. If you want to set a custom name, choose Custom from the dropdown menu and enter the custom file name of your choice in the space provided.
- Date Format, You can also choose the date format for your dates on the pdf template.
- Click on Save Setting to save your choices.

5.PDF Settings
PDF Settings will allow you to predefine settings for Header, Body, and Footer content. You can also apply exclusive features such as RTL support, and set watermark text and colour. Follow the listed steps to save your details:
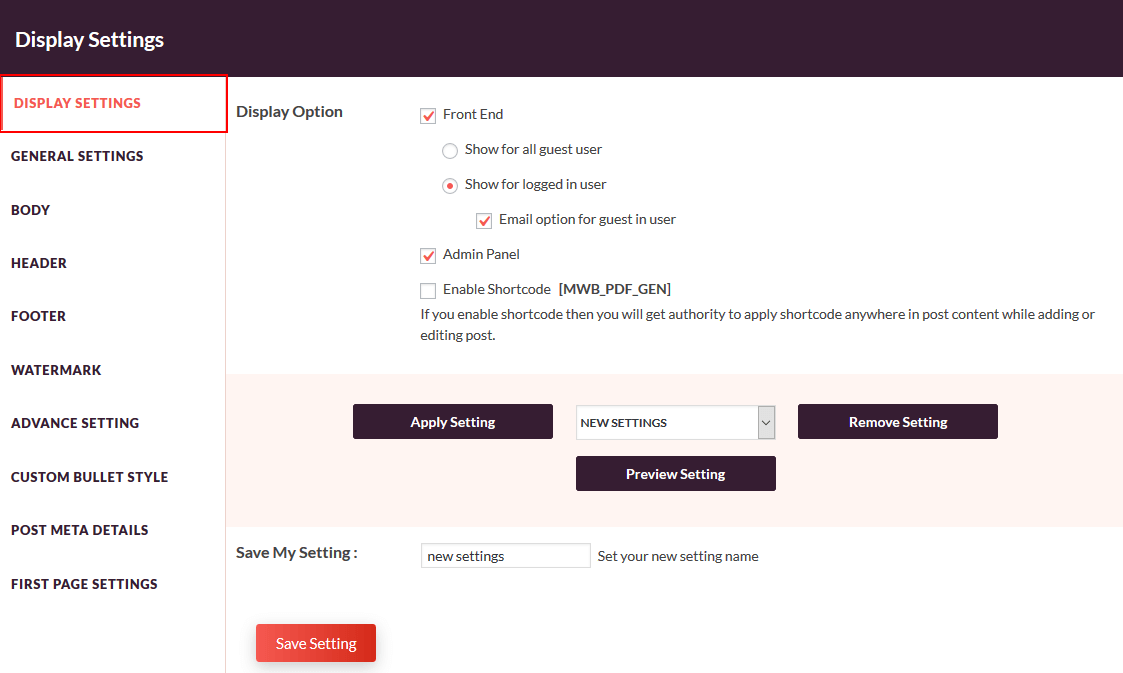
5.1.Icon Display
- Go to WP Swings→ PDF Generator For WP→PDF Settings→ Icon Display.
- To allow the registered/logged-in users to download PDFs, turn on the toggle switch for Logged in Users. To allow the guest users to download PDF files, turn on the toggle switch for the Guest.
- To Enable Bulk Download, turn on the respective toggle switch.
- To Enable the Print Option, turn on the respective toggle switch
- Choose from the dropdown menu to allow access to generated PDF files for Direct download or Email User for the registered users. Choose from the dropdown menu to allow access to generated PDF files for Direct download or Email Guest for guest users.
- Place the PDF generator icon appropriately by choosing the right option from the Show Pdf Icon dropdown menu. The available options to place the icon on the frontend are- Before Content, After Content, Before Add to Cart Form, Before Product Meta Start, After Add to Cart Form, After Single Product Summary, Before Single Product Summary, After Single Product, Before Single Product, After Share Button.
- Set the alignment of the PDF generator icon once you have placed it right. You can choose Left, Center, and Right alignment from the PDF Icon Alignment dropdown menu.
- Upload the icon of your choice by clicking on the Upload Icon button from the Choose Single Download Pdf Icon setting.
- Enable The PDF Template Color Option to customize the color of your pdf templates.
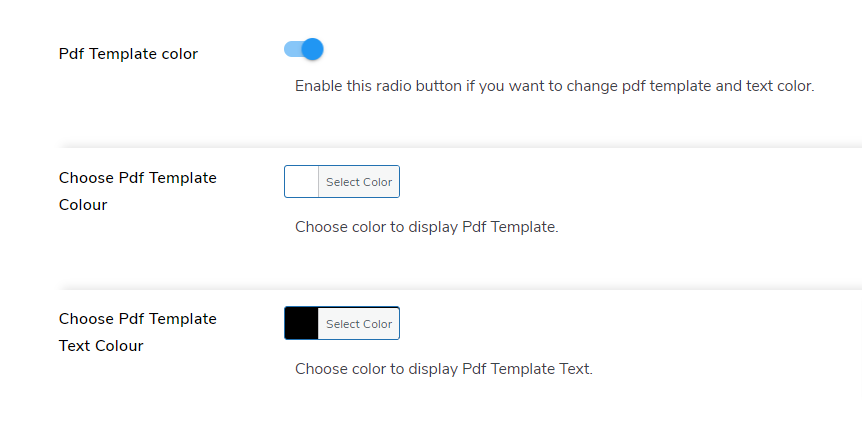
- You can the color for your pdf templates in the Choose Pdf Template Colour section
- You can choose the pdf template text colors in the Choose Pdf Template Text Colour section
- Enable the WhatsApp Sharing Icon to allow users to share your single and bulk PDF files on WhatsApp.
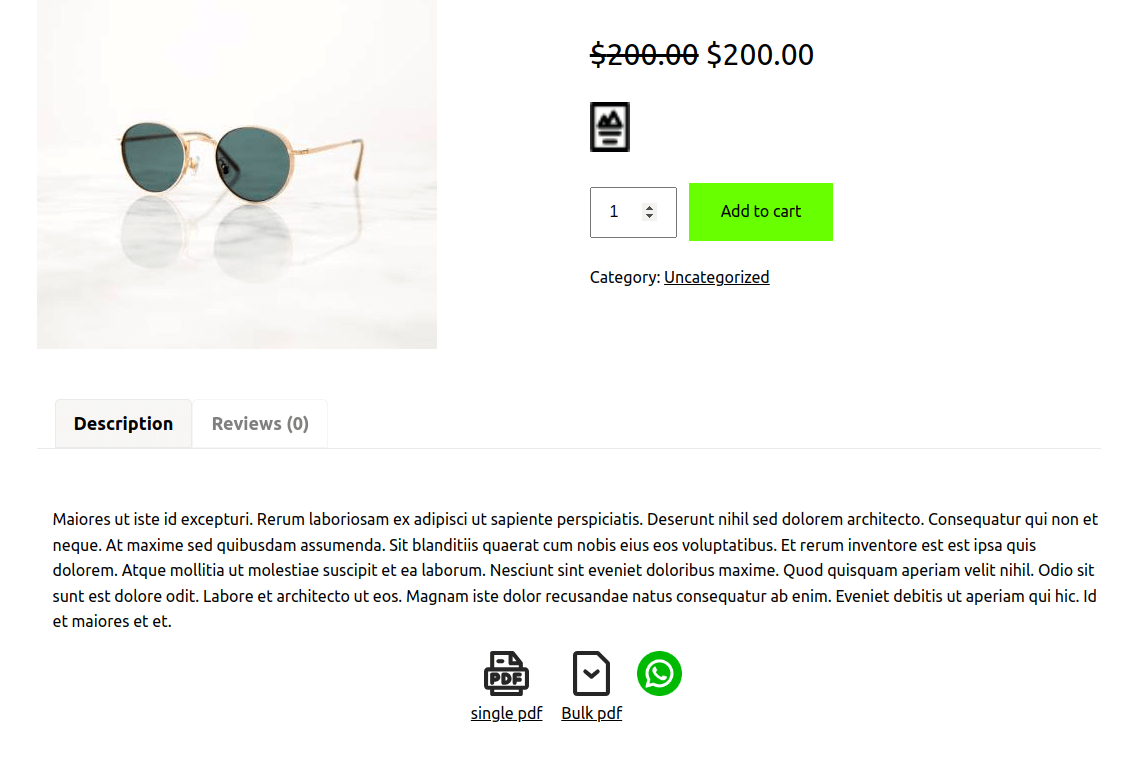
- Upload the icon of your choice by clicking on the Upload Icon button from the Choose Bulk Download Pdf Icon setting
- Set a custom name for the bulk PDF download icon in the textbox.
- Enter the name for the single PDF download icon in the textbox.
- Predefine the icon size by mentioning the width and height of the same in pixels in the Icon Size setting.
- Upload the icon of your choice by clicking on the Upload Icon button from the Choose Single Download Pdf Icon setting.
- Upload the icon of your choice by clicking on the Upload Icon button from the Choose Bulk Download Pdf Icon setting.
- Predefine the icon size by mentioning the width and height of the same in pixels in the Icon Size setting.

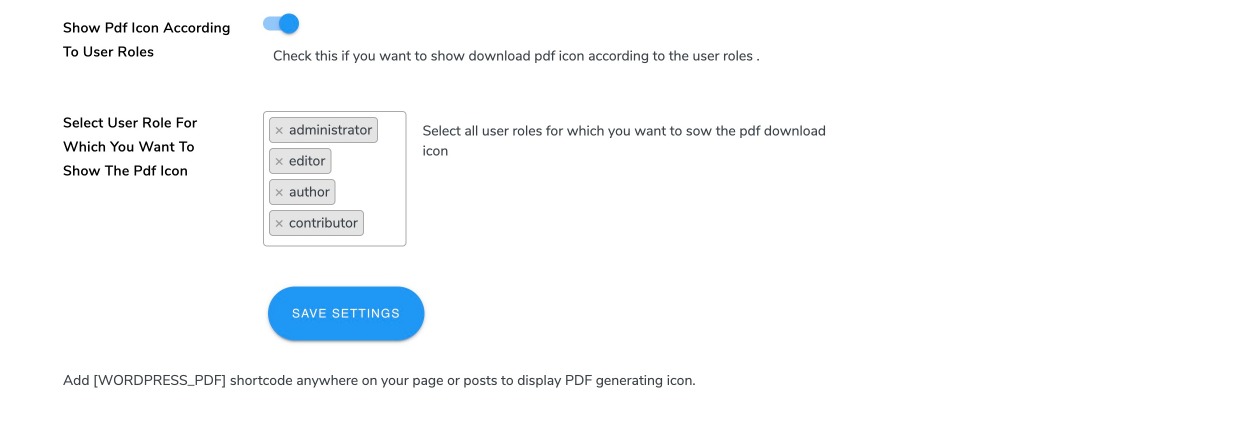
- Turn on the toggle button to Show Pdf Icon According to User Roles. This will restrict other roles from viewing the option to generate PDF files.
- In the setting to Select User Role For Which You Want To Show The Pdf Icon, you can choose various options from the dropdown menu given in the setting.
- Finally, click on the SAVE SETTINGS button to save your changes.
- Use the shortcode [WORDPRESS_PDF] anywhere on your post, page or product to display the PDF icon.
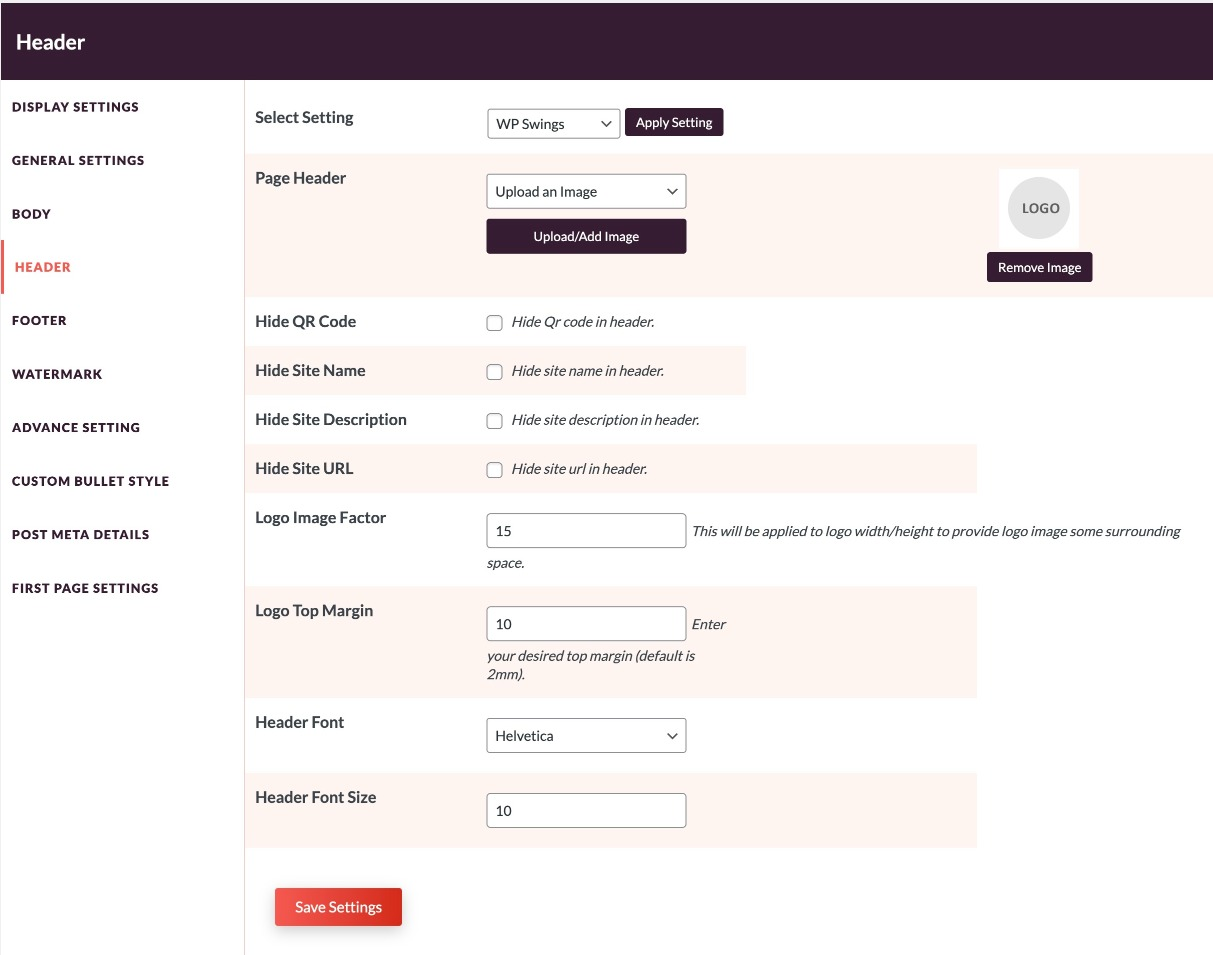
5.2.Header Settings
-
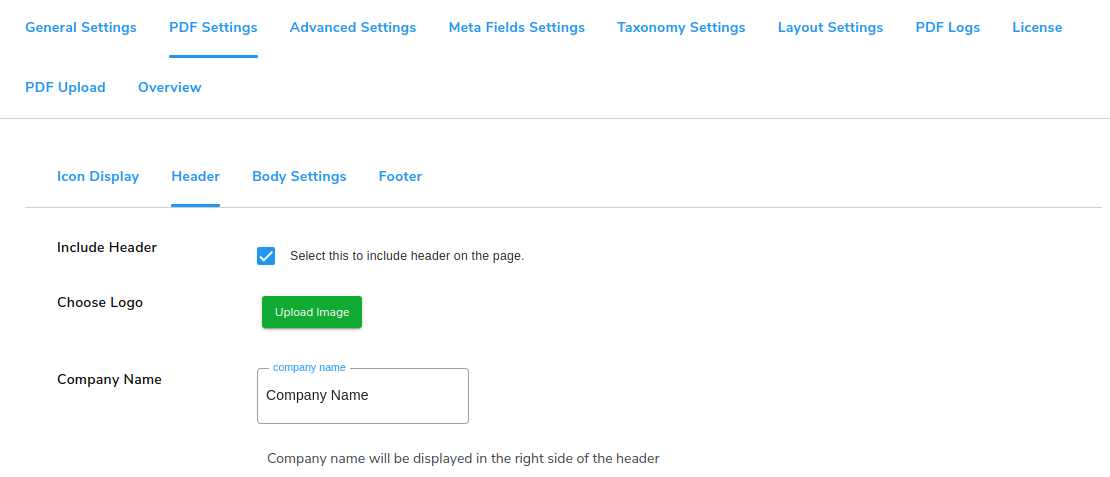
- Go to WP Swings→ PDF Generator for WP→PDF Settings→Header to predefine the header settings for generating PDF files.
- Tick the checkbox to Include the Header in the generated PDF.
- Click on the Upload Image button in the Choose logo setting to upload your company logo.
- Enter the Logo Size in given field.
- Enter the Company Name in the given field.
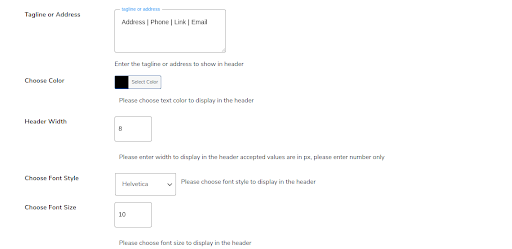
- Enter your tagline, address, or relevant information in the Tagline or address field.
- Select the text color in8 the header from the Choose color setting.
- Enter the Header Width in pixels for text padding.
- Choose the font style from the given dropdown menu for the header text.
- Choose font size in the respective setting for the header text.
- You can set the Header Top Placement. The greater the value in the Header Top more will be the header length down from the top.
- Click on Save Settings

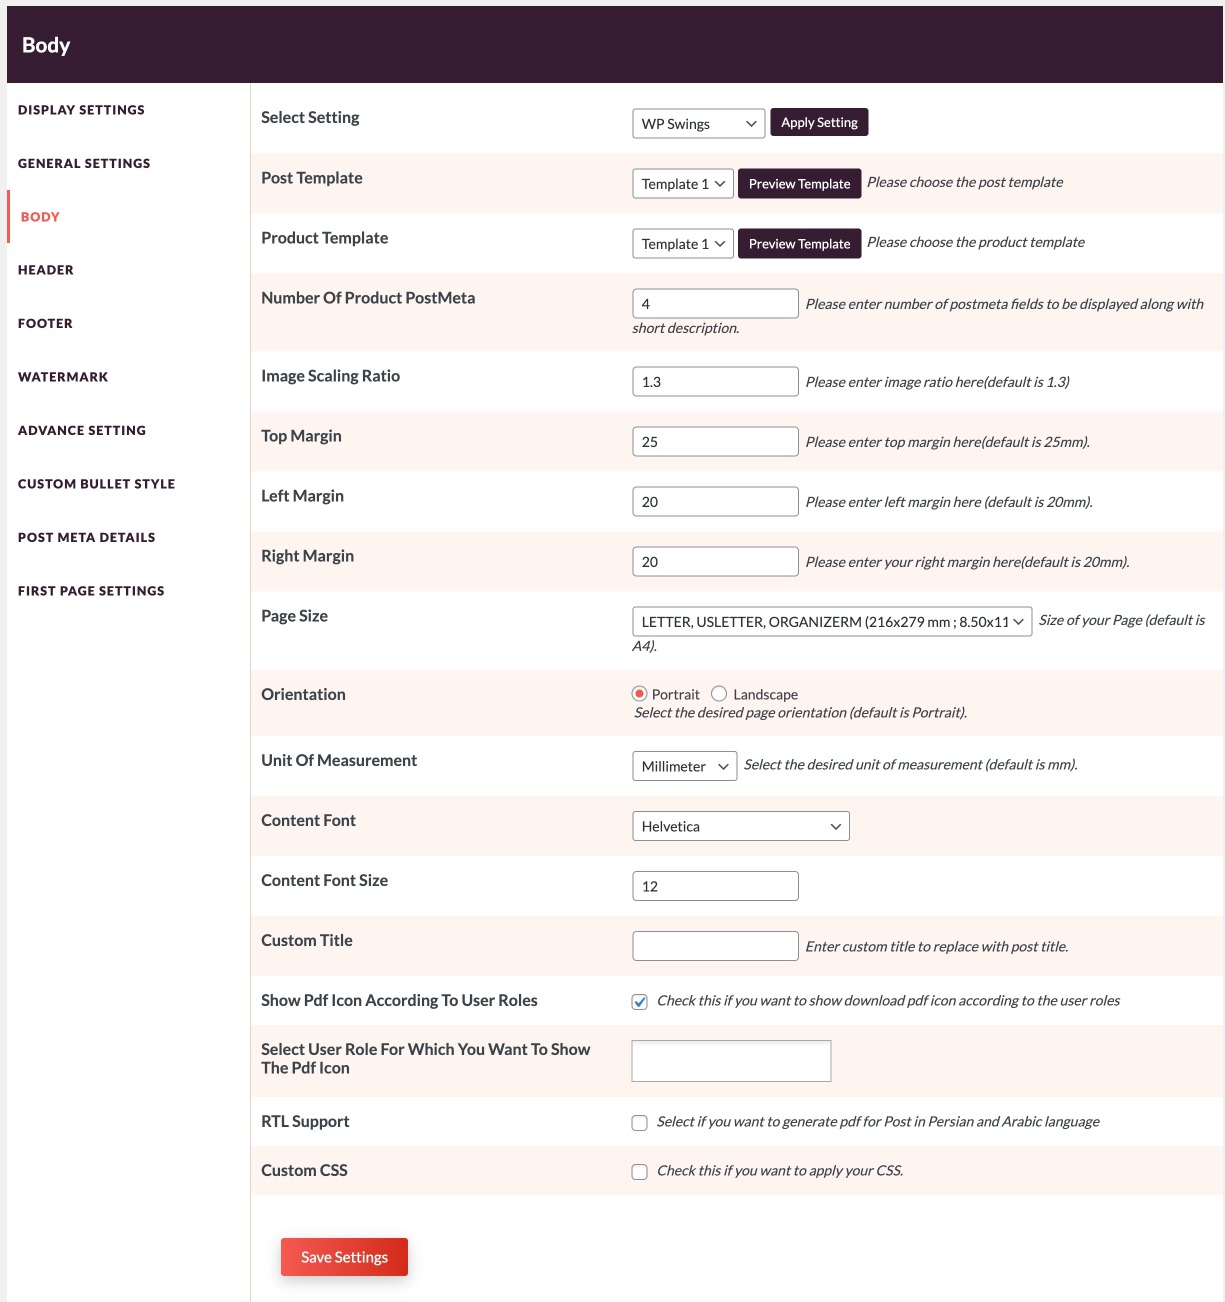
5.3.Body Settings
- Go to WP Swings→ PDF Generator for WP→PDF Settings→Body Settings to predefine the body settings for generating PDF files.
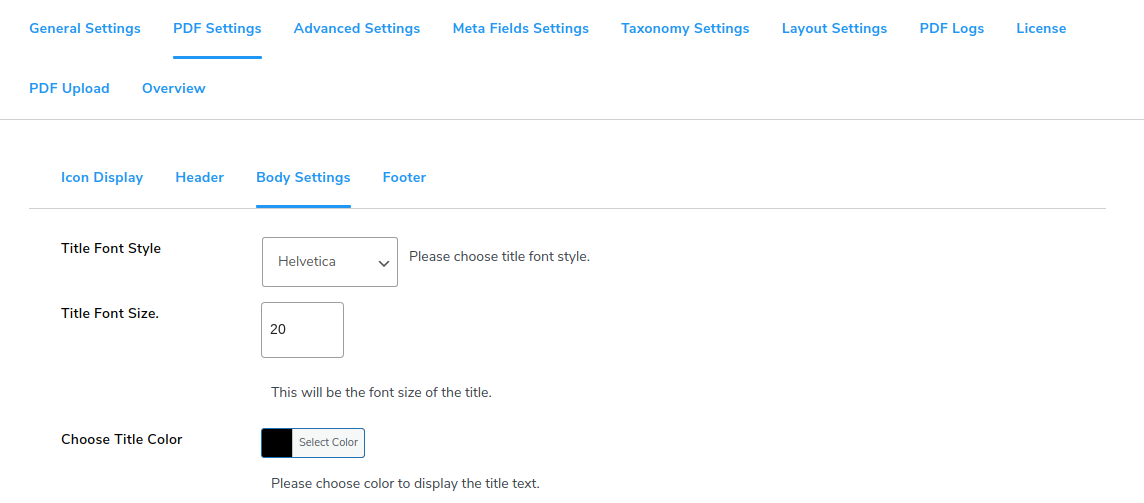
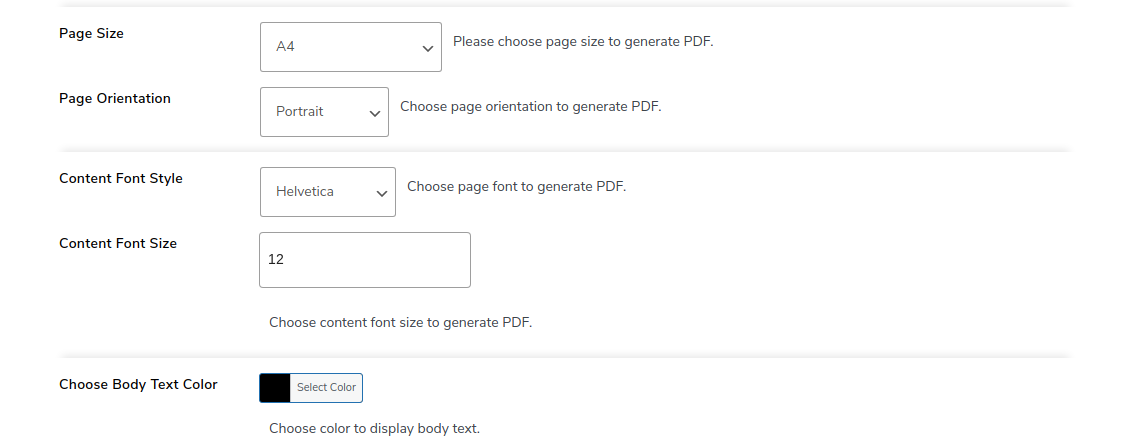
- For the title of the PDF body, you can select the Title Font Style from the given dropdown options. Enter the size of the title in the Title Font Size setting and choose the text color for the title from the given color palette in the Choose Title color setting.
- Select the Page Size from the given dropdown menu. You get to choose from two options- Landscape or Portrait for the Page Orientation.
- Now you can set the page height and width according to your choice. Select the Page Size from the dropdown menu and then choose Custom Page Size.
- For the content in the PDF body, you can choose the Font Style, Font Size, and Body Text Color similar to the title settings in the PDF body.
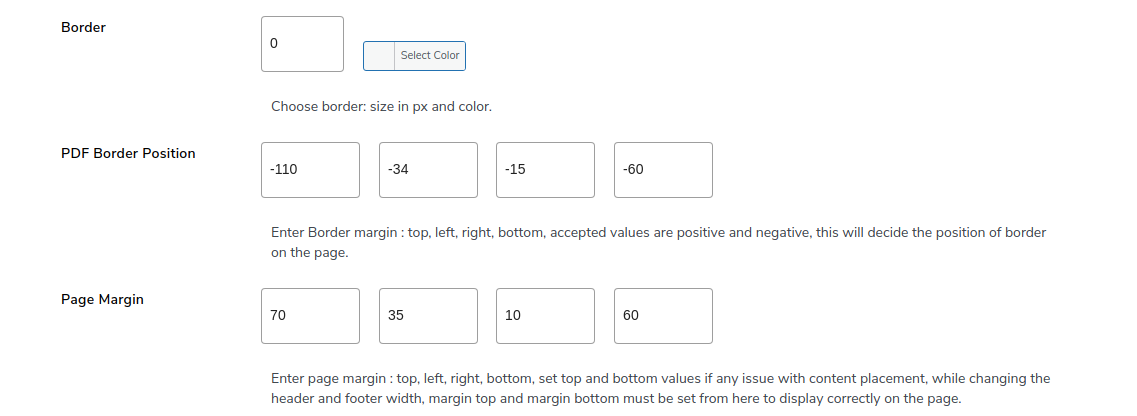
- Border Settings: Select the border size in pixels and the border color. Enter the values for PDF Border Position to set the border position. Enter the values for Page Margin to provide padding and the right placement of PDF content.
- Enable advanced features like RTL support for Arabic and Hebrew languages by ticking the respective checkbox.
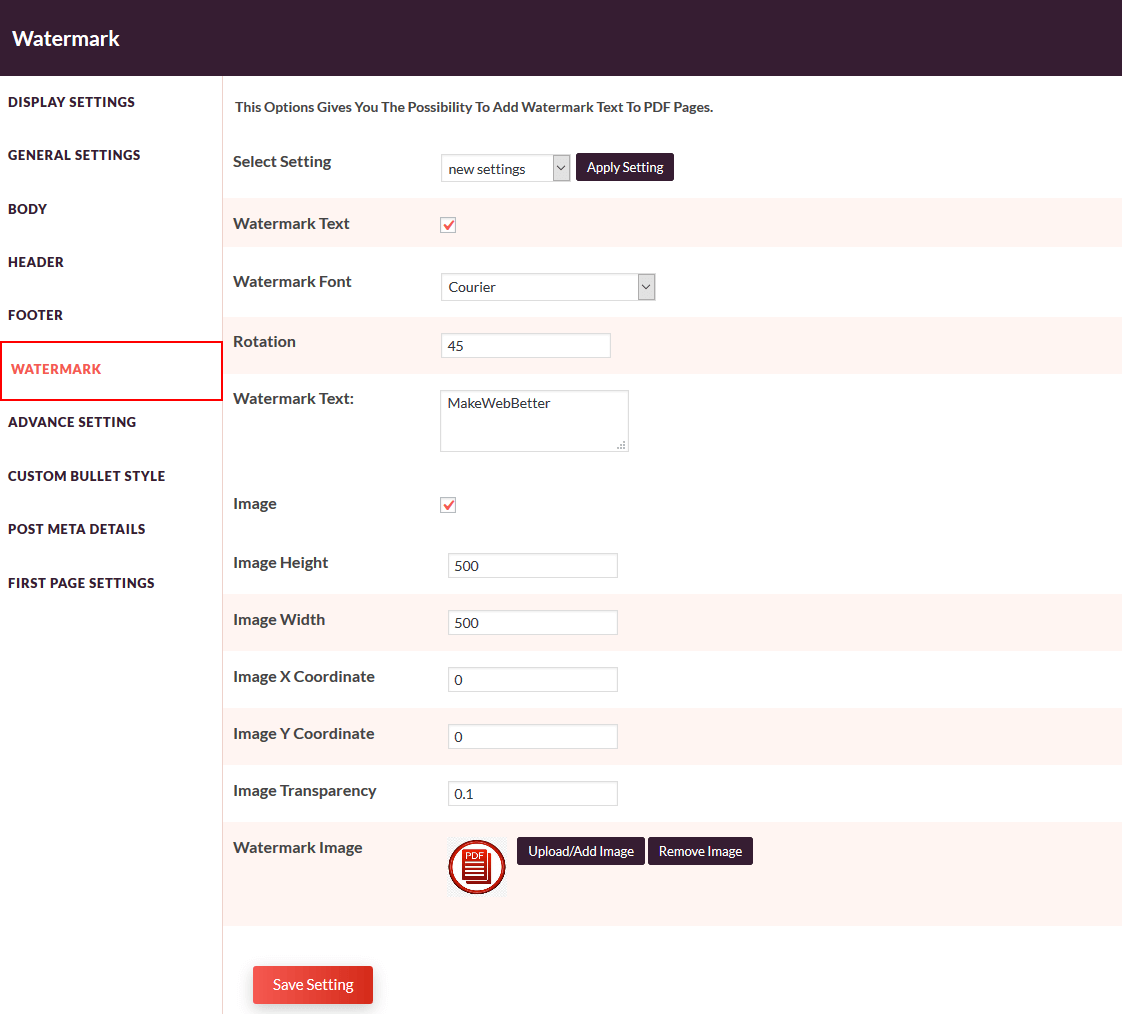
- Enable the watermark by ticking the checkbox for Add Watermark Text. Enter the Watermark Text in the given box and choose the color of the watermark from the color palette.

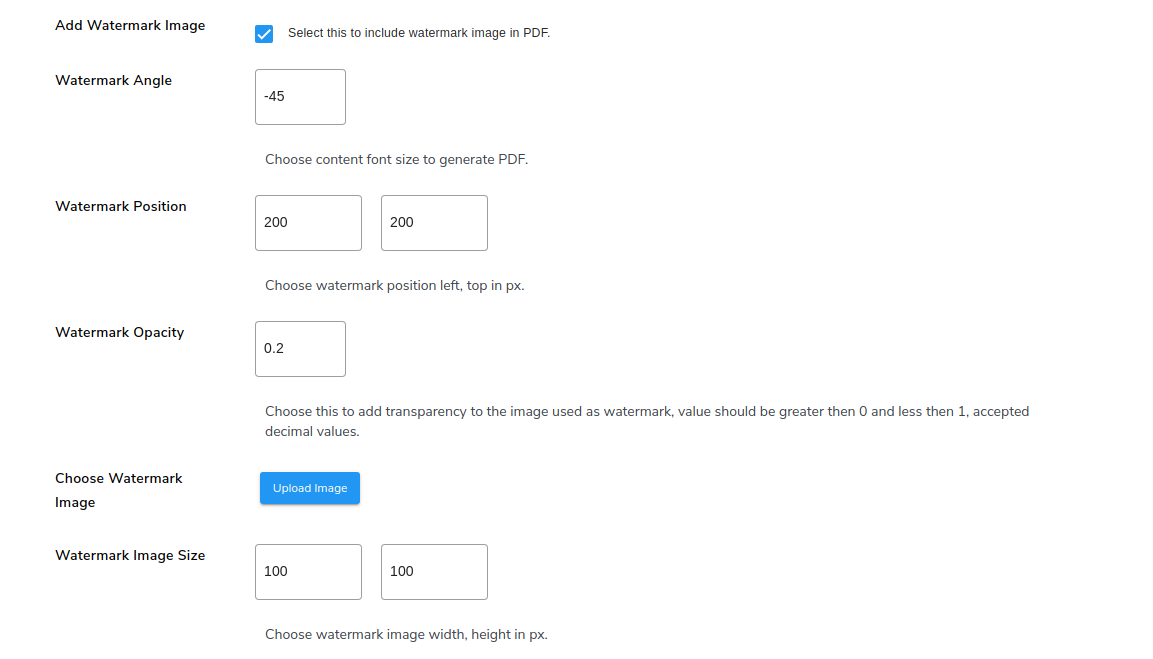
- Click on the checkbox to Add Watermark Image if you wish to use.
- Enter the Watermark Angle in the corresponding space provided. The negative sign is to depict the rotation of the watermark image to the specific angle (say, 45 degrees) in the anti-clockwise direction
- Set the Watermark Position from left and top in pixels.
- Set the Watermark Opacity to make the image look visible enough but not too intrusive. The opacity can be written in decimal form varying between 0 and 1. A best practice is to set it less than 0.3.
- Upload the Image for the watermark in the Choose Watermark Image setting.
- Choose the templates for generating PDF files for page and posts from the dropdown menu for the Page template and Post template respectively.
- You can also add custom CSS for any HTML element using the blank space provided with the Custom CSS heading.
- If you wish to display images row-wise, tick the checkbox for the setting: Show images row wise (Template 1).
- Tick the checkbox to allow displaying the meta fields in your PDF body in a row.
- You can define the number of columns under the Select Number of columns setting. Choose the number of columns you need in a row for your meta fields.
- Click on the Save Settings button to save your entries.

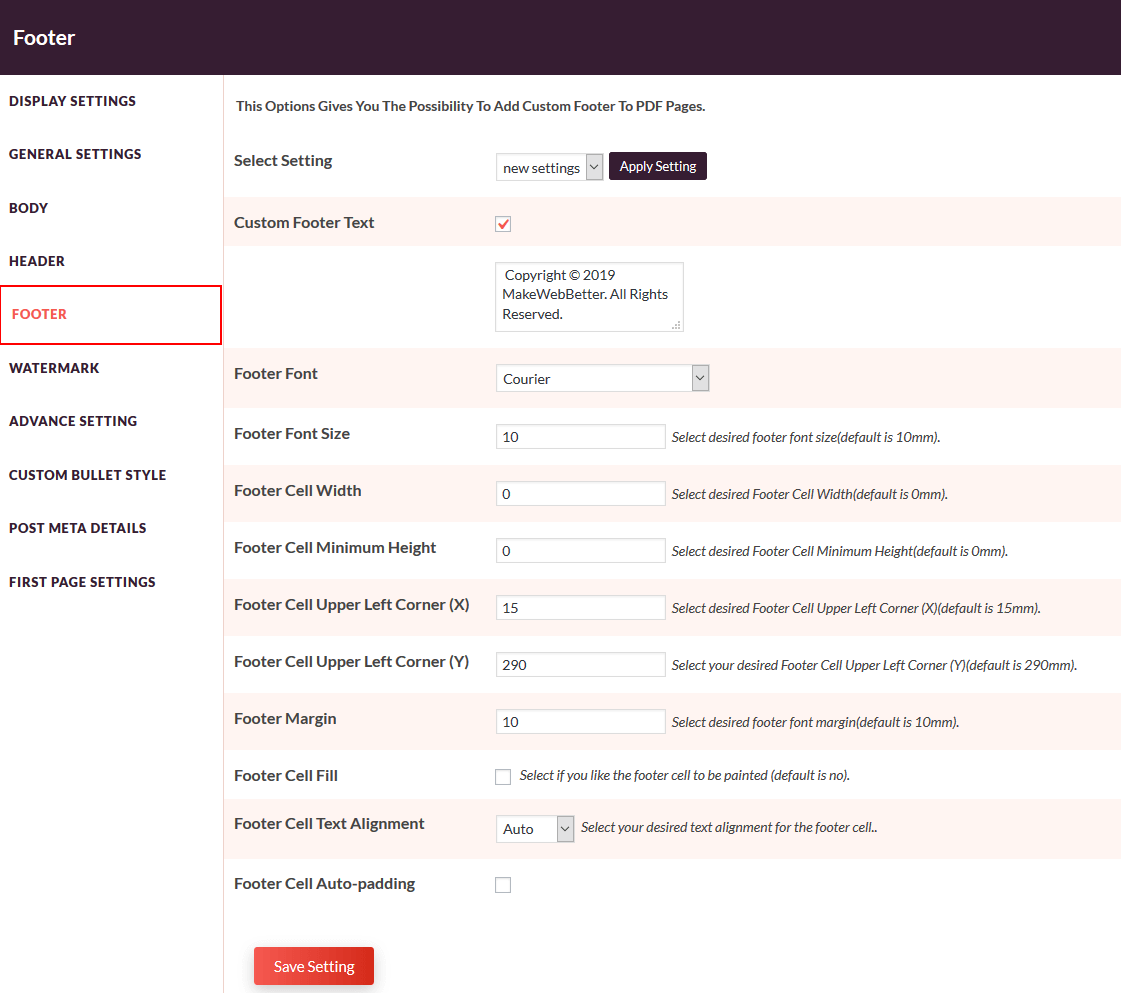
5.4.Footer Settings
- Go to WP Swings→ PDF Generator for WP→PDF Settings→Footer Settings to predefine the footer settings for generating PDF files.
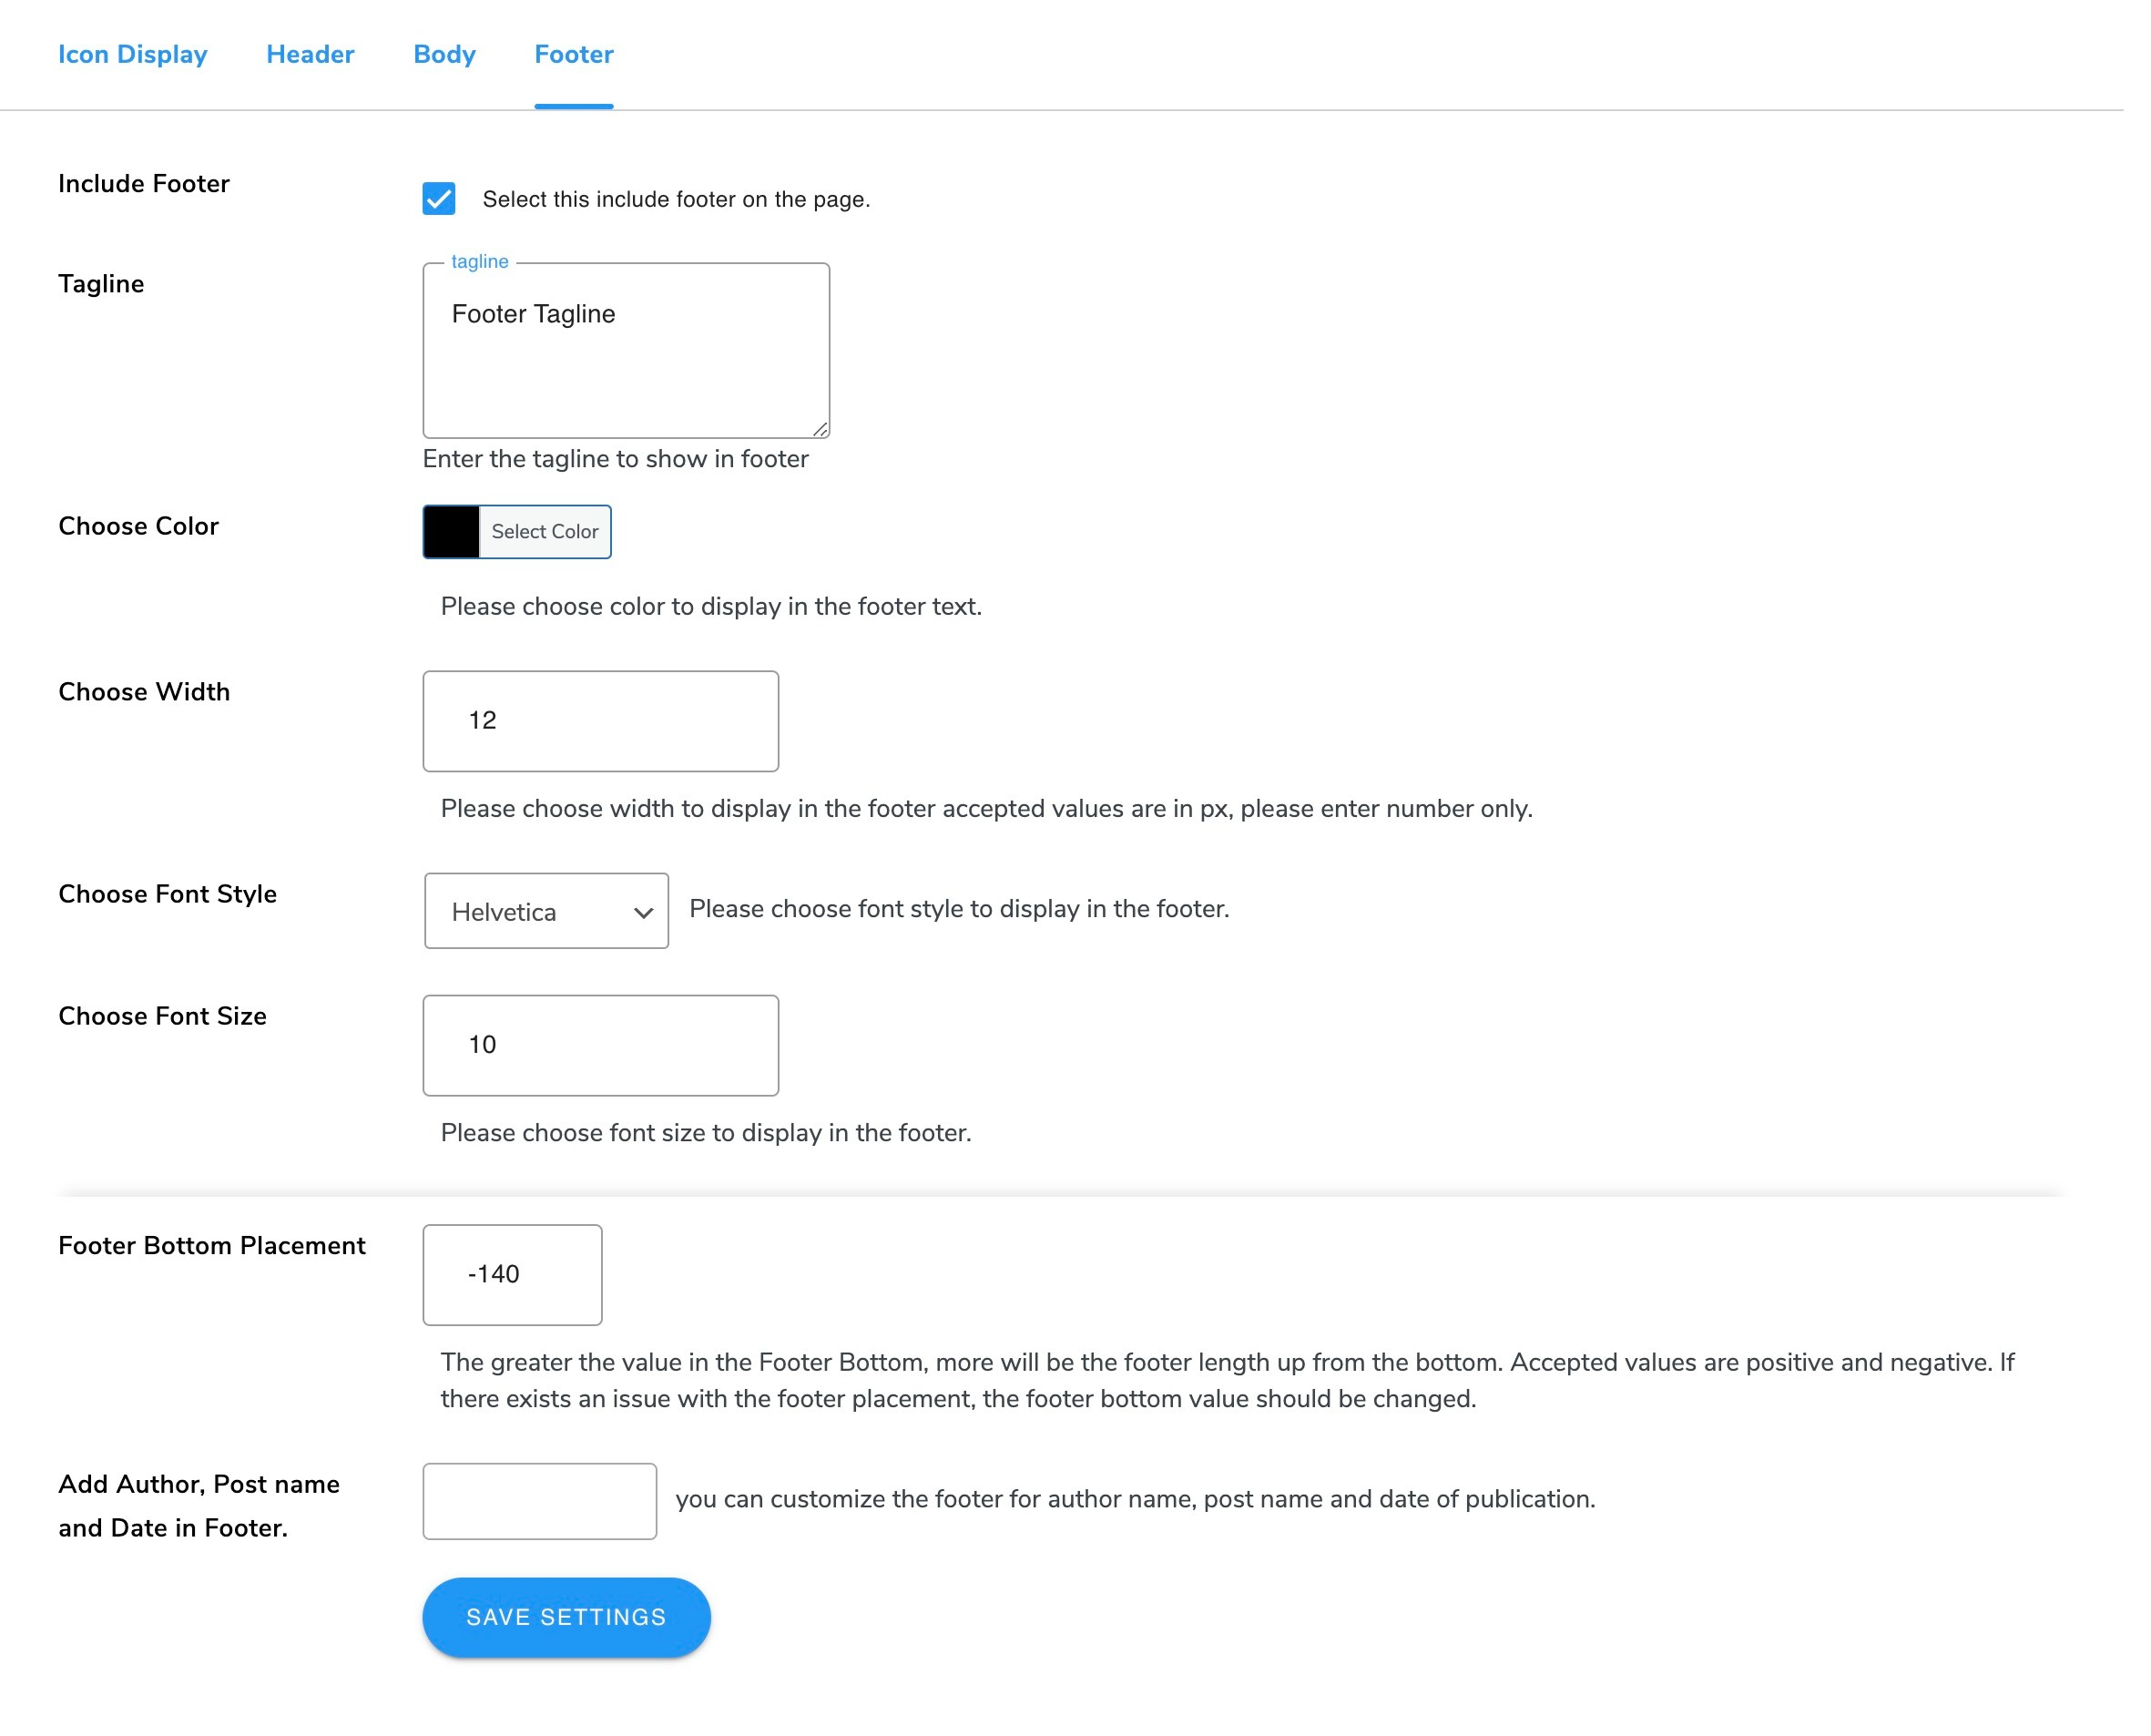
- Tick the checkbox to Include Footer in the generated PDF.
- Enter the footer Tagline in the given field.
- Choose the font color for the footer text from the color palette in Choose Color option.
- Enter the footer width in pixels for display in the Choose Width option to provide padding.
- Choose Font Style and Choose Font Size by selecting the values in the respective fields.
- Set the Footer Bottom Placement. The greater the value in the footer bottom field, the more will be the footer length up from the bottom.
- Use the blank space to add the author name, post name, and post date in the footer settings.
- Enable the checkbox to add a Change Page No Format in the footer settings. It will let you set the page number with the total page count in your PDF file, and you can even set the Page Number Position in the footer of the PDF file.
- Click on the Save Settings button to save your entries.
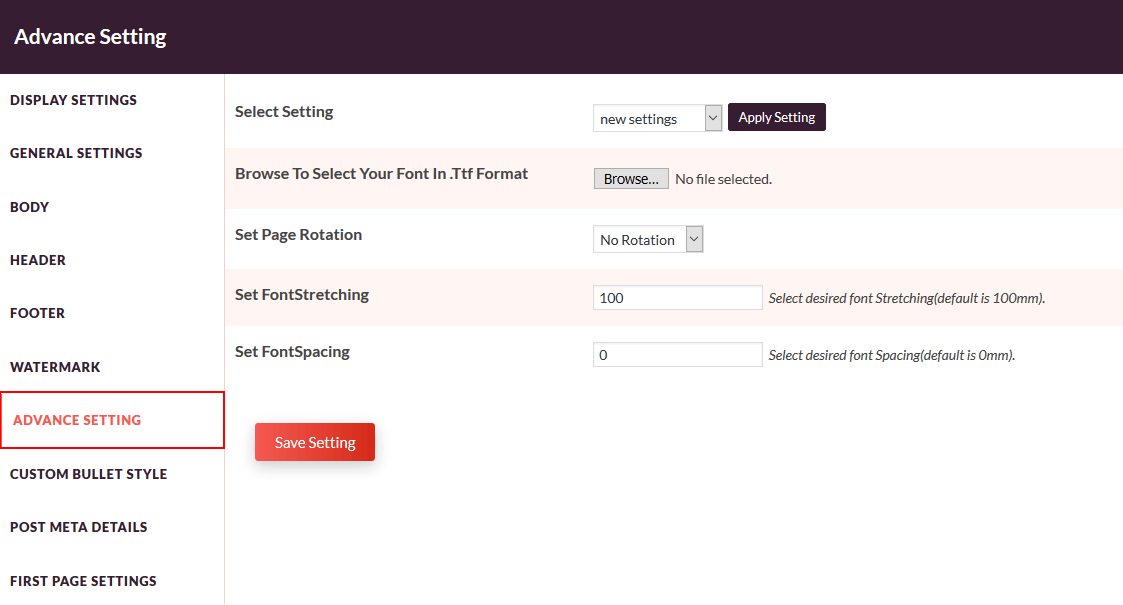
6.Advanced Settings
- Go to WP Swings→ PDF Generator for WP→Advanced Settings.
- Enter in the provided space to show the ‘generate PDF’ icon for selected post types such as post, page, and /or product.
- Click on Choose file to add the custom .ttf font file in the Upload Custom Font File setting. This font will appear in all the dropdown lists of fonts.
- Click on the Reset Setting button to set all the settings to default.
- Click on the Save Settings button to save your choices.
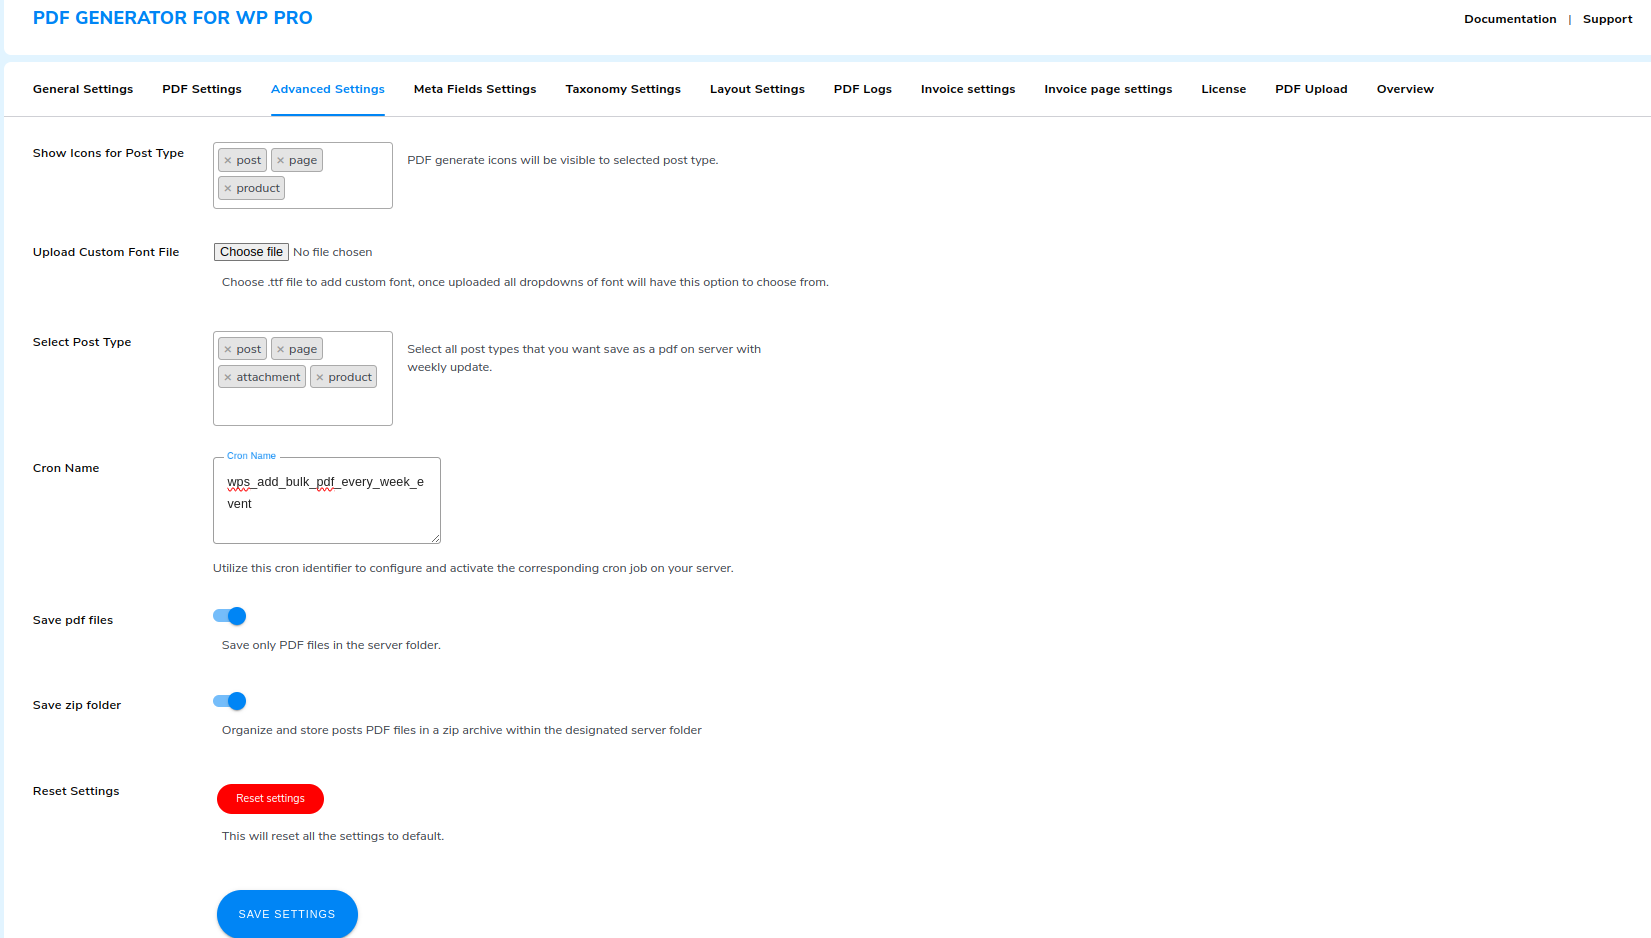
7.Automate PDF Generation Using Cronjob
You can automate your PDF generation process and generate PDFs in bulk using a cron job.
- Navigate to the WPSwings→ PDF Generator for Wp→ Advanced Settings.
- Select Post Types: Select the post types you want to convert to PDF.
- Cron Name: Set the cronjob on your server.
- Save PDF file: Enable this option to store all PDF files in bulk.
- Save Zip Folder: Enable this option to save all PDF files created via cron in a zip folder.
Note: The cron job is designed to automatically convert published posts of selected types into PDF format. In the event of a post being deleted or unpublished, the corresponding generated PDF will also be removed. Similarly, any modifications made to a post will be reflected and updated in the converted PDF files.
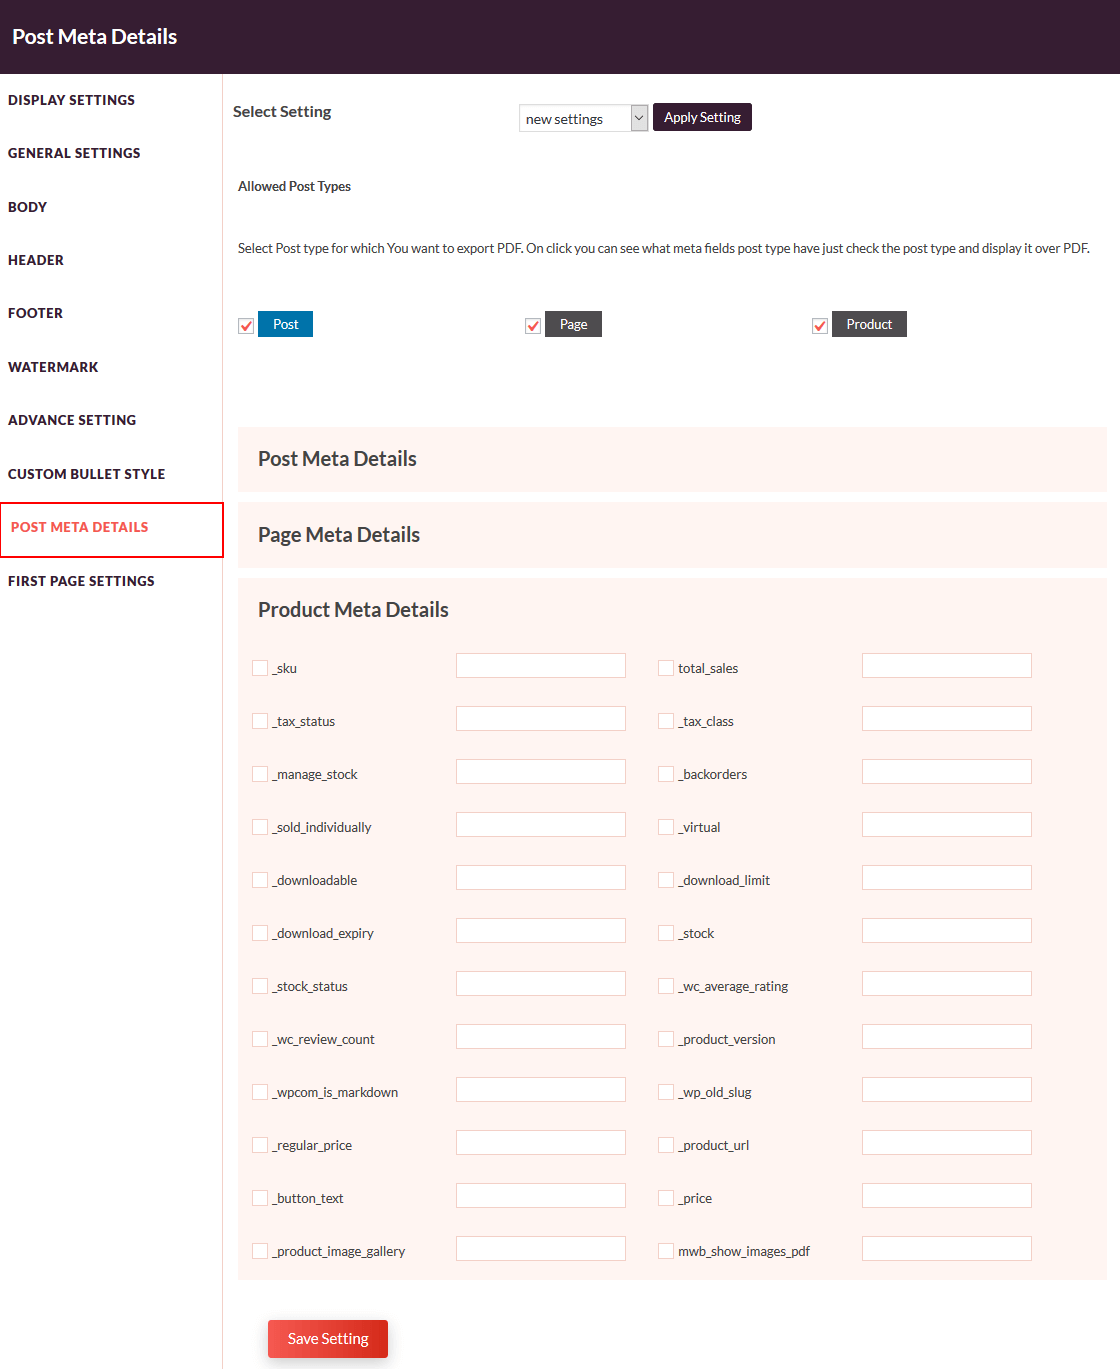
8.Meta Fields Settings
- Go to WP Swings→ PDF Generator for WP→Meta Fields Settings.
- Allow displaying meta fields separately for posts, pages, and products by clicking on the respective checkboxes- Show Meta Fields for post, Show Meta Fields for page, Show Meta Fields for the product.
- If your gallery image is different from your product image gallery then you can mention the gallery image name in the box and enable the setting by clicking on Show Product Gallery Image.
- Click on the Save Settings button.
- You can place the meta fields in the page layout as per your choice using the shortcodes. Click on the COPY button alongside the given shortcode.
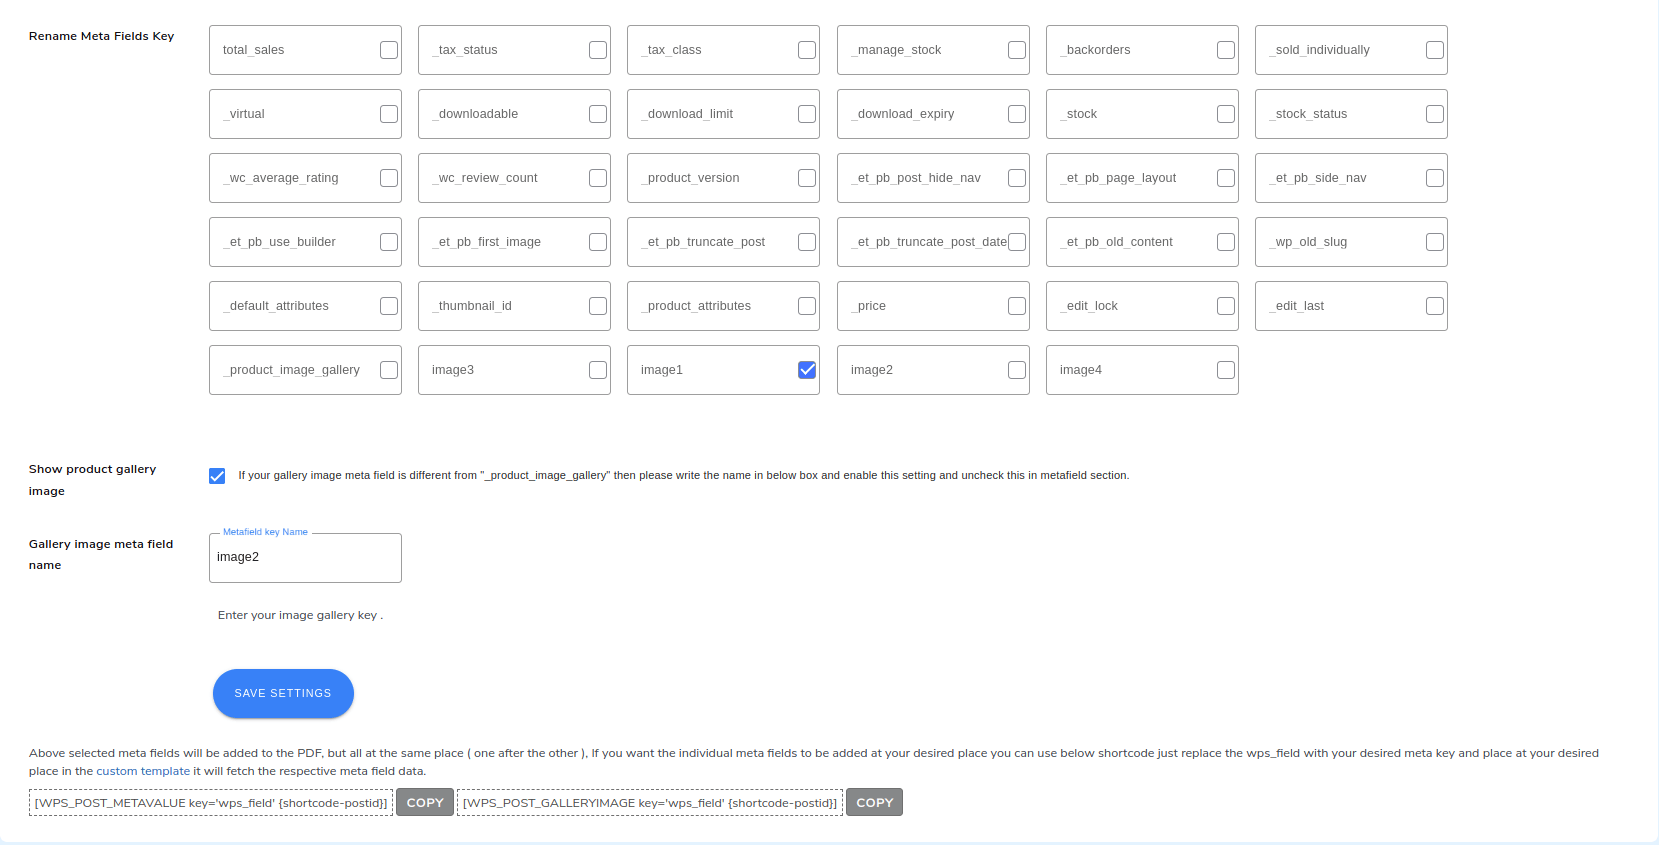
- Now, go to WP Swings→ PDF Generator for Wp → Layout Settings→ Internal Page.
- Click on Create Template or select header, body, or footer to open the Gutenberg editor to add the meta fields in desired sections.
- Place the block in the Gutenberg editor as per your choice.
- Search and select the shortcode snippet and paste the copied shortcode (step 4) in the space provided. Replace ‘mwb_field’ with the respective meta field shortcode provided. For example, if you wish to place the price meta field, replace ‘mwb_field’ with ‘_price’
- Click on Update to update the page layout.
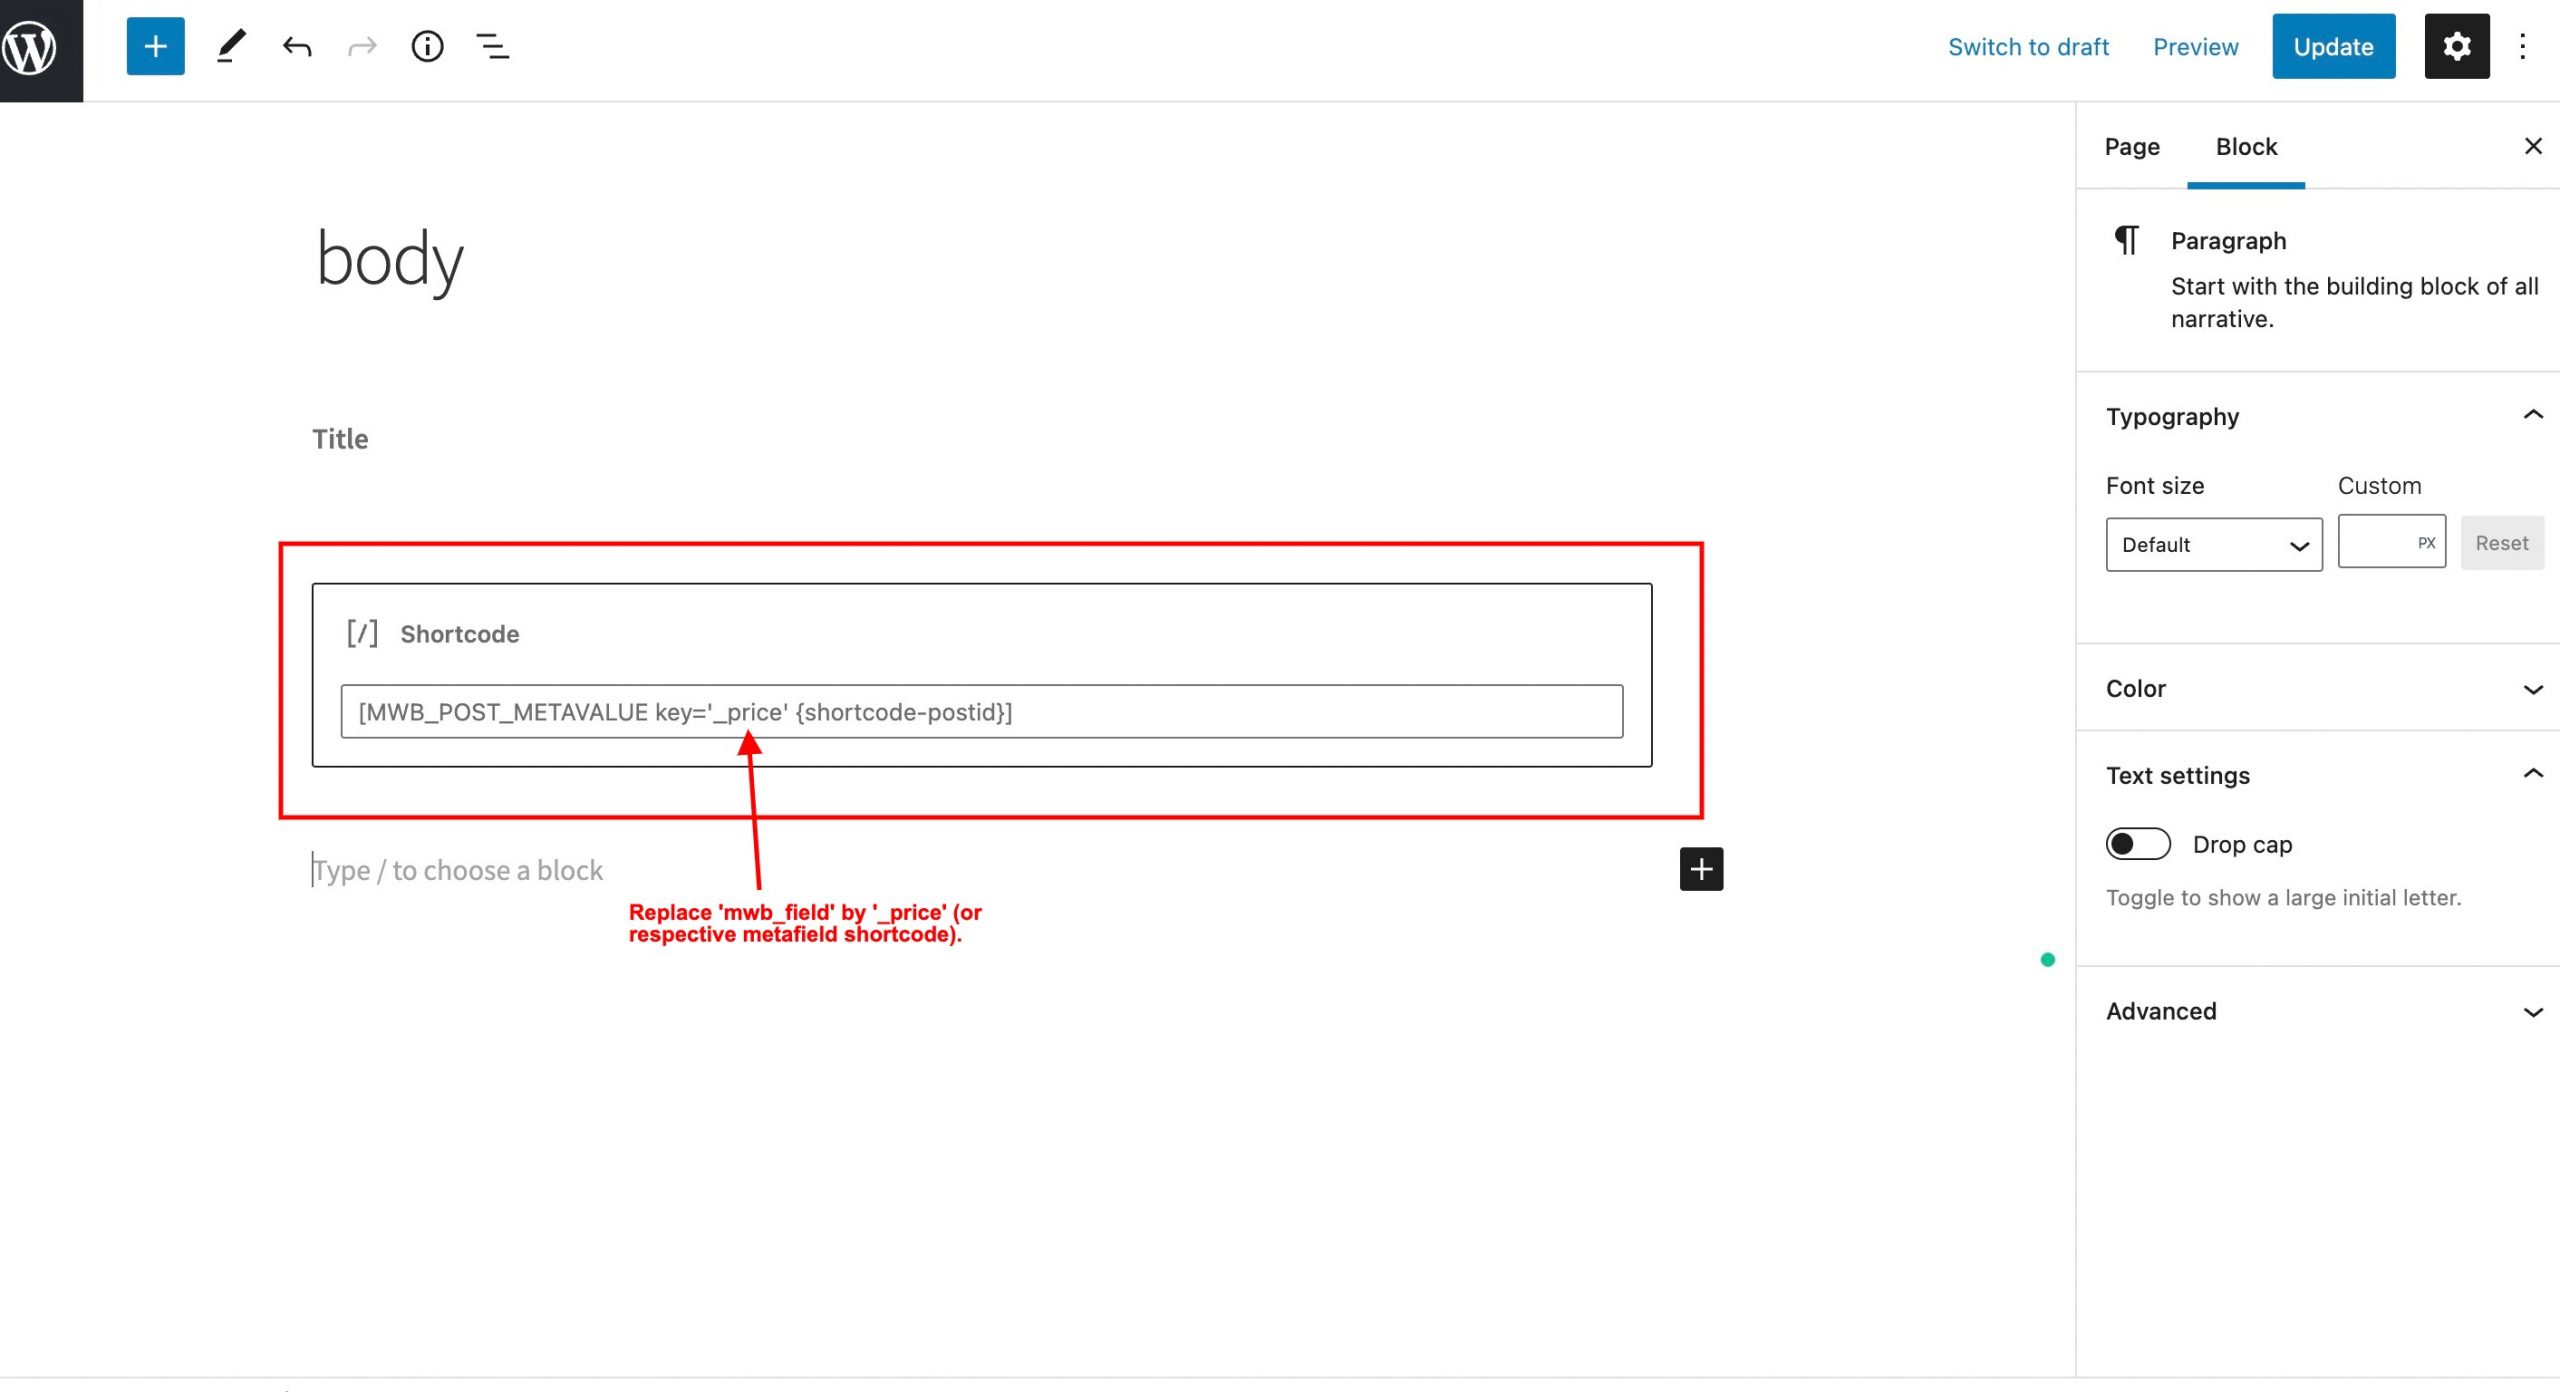
- This will allow you to place the meta fields conveniently anywhere on the page.
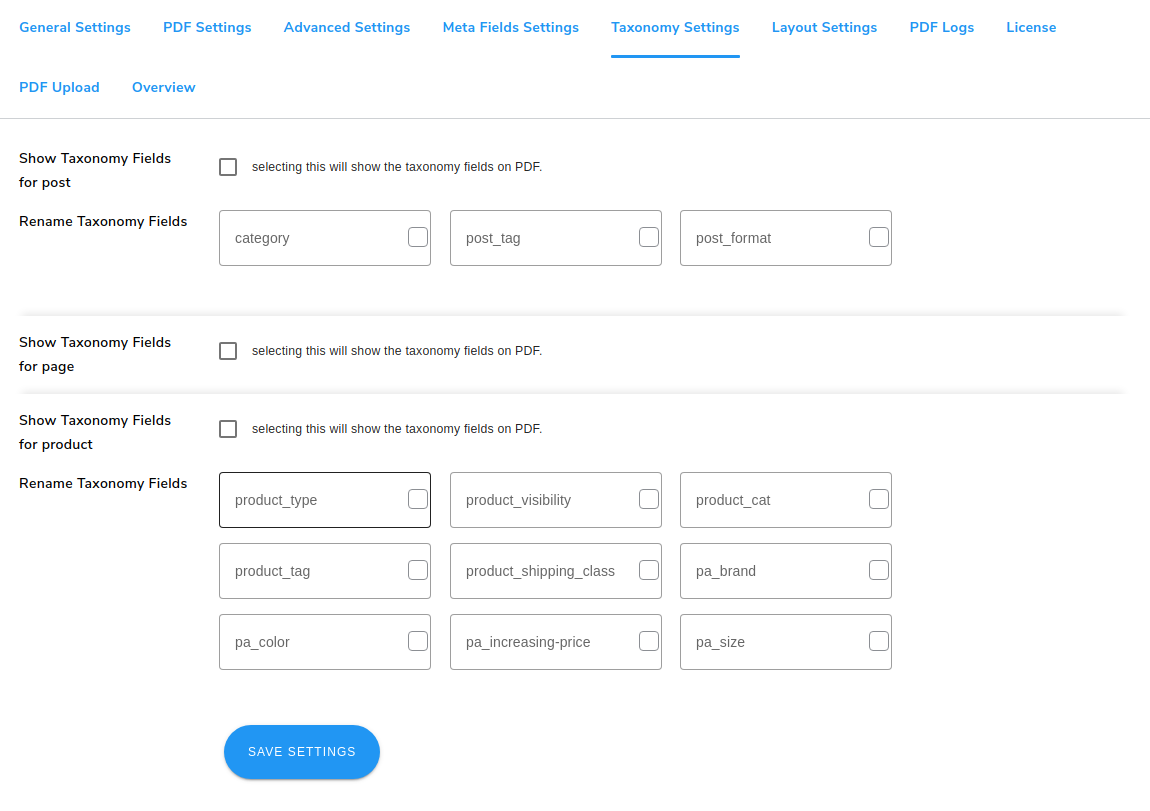
9.Taxonomy Settings
- Go to WP Swings→ PDF Generator for WP→Taxonomy Settings.
- Allow displaying meta fields separately for posts, pages, and products by clicking on the respective checkboxes- Show Taxonomy Fields for the post, Show Taxonomy Fields for page, Show Taxonomy Fields for the product.
- Tick or Rename Taxonomy Fields Key that you want to display in the generated PDF files for posts and products in the corresponding spaces provided.
- Click on the Save Settings button to save your choices.
10.Layout Settings
Define the cover page settings and internal page settings separately in the layout.
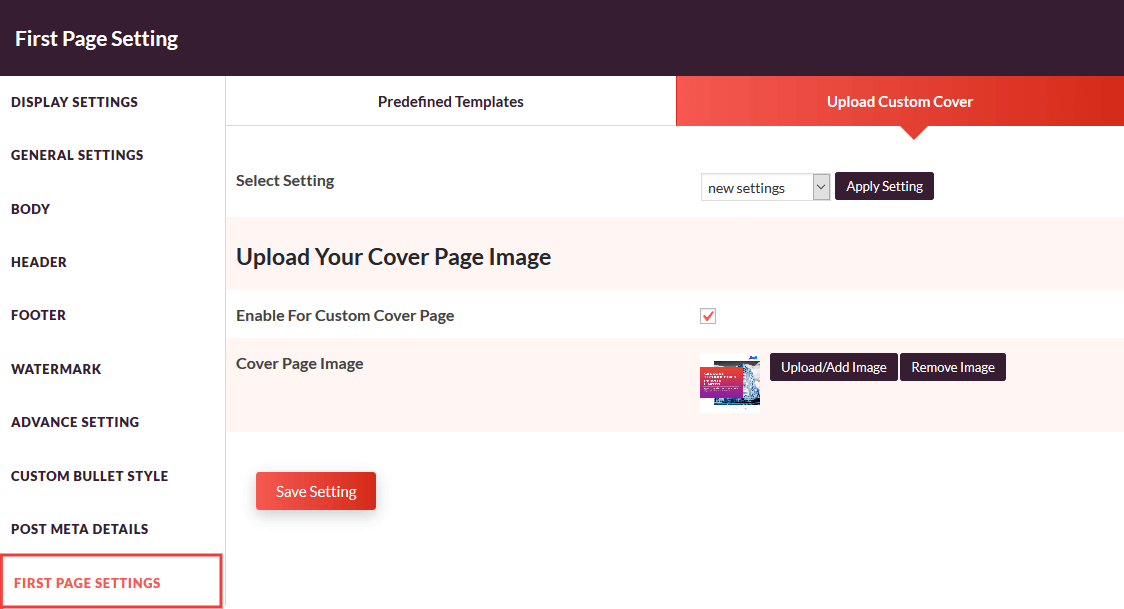
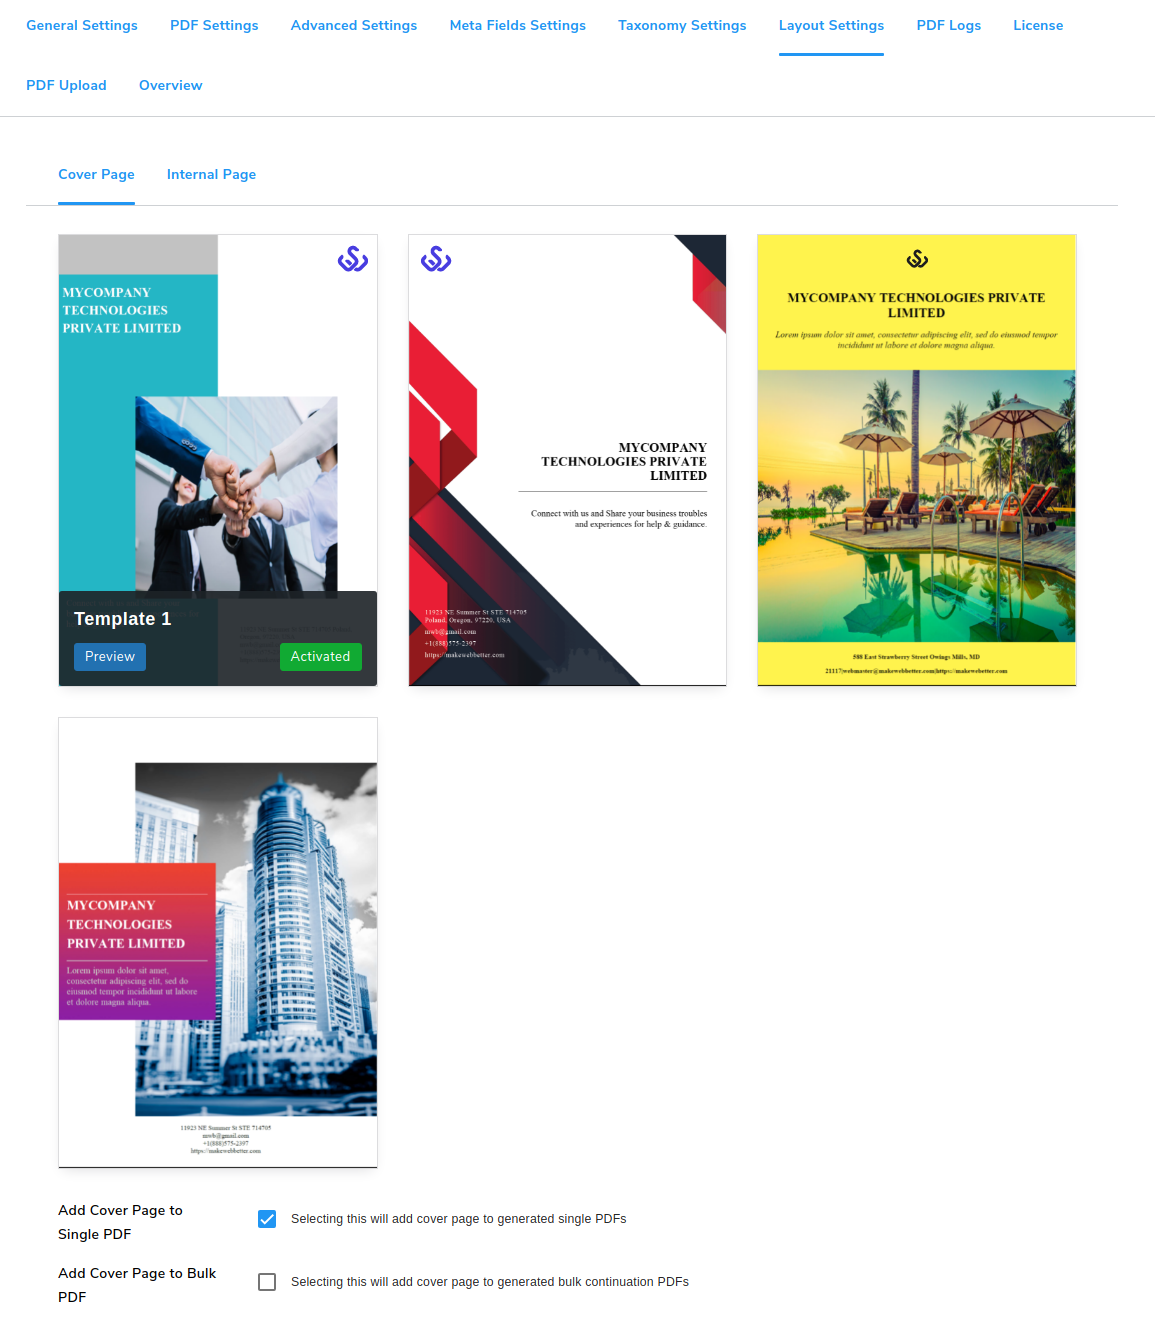
10.1.Cover Page
- Go to WP Swings→ PDF Generator for WP→Layout Settings→ Cover Page.
- Choose from the 4 templates provided here for the cover page of your single or bulk PDF files. You can Preview the template and then Activate the cover page.
- Tick the checkbox if you want to Add a Cover Page to a Single PDF.
- Tick the checkbox if you want to Add a Cover Page to a Bulk PDF.
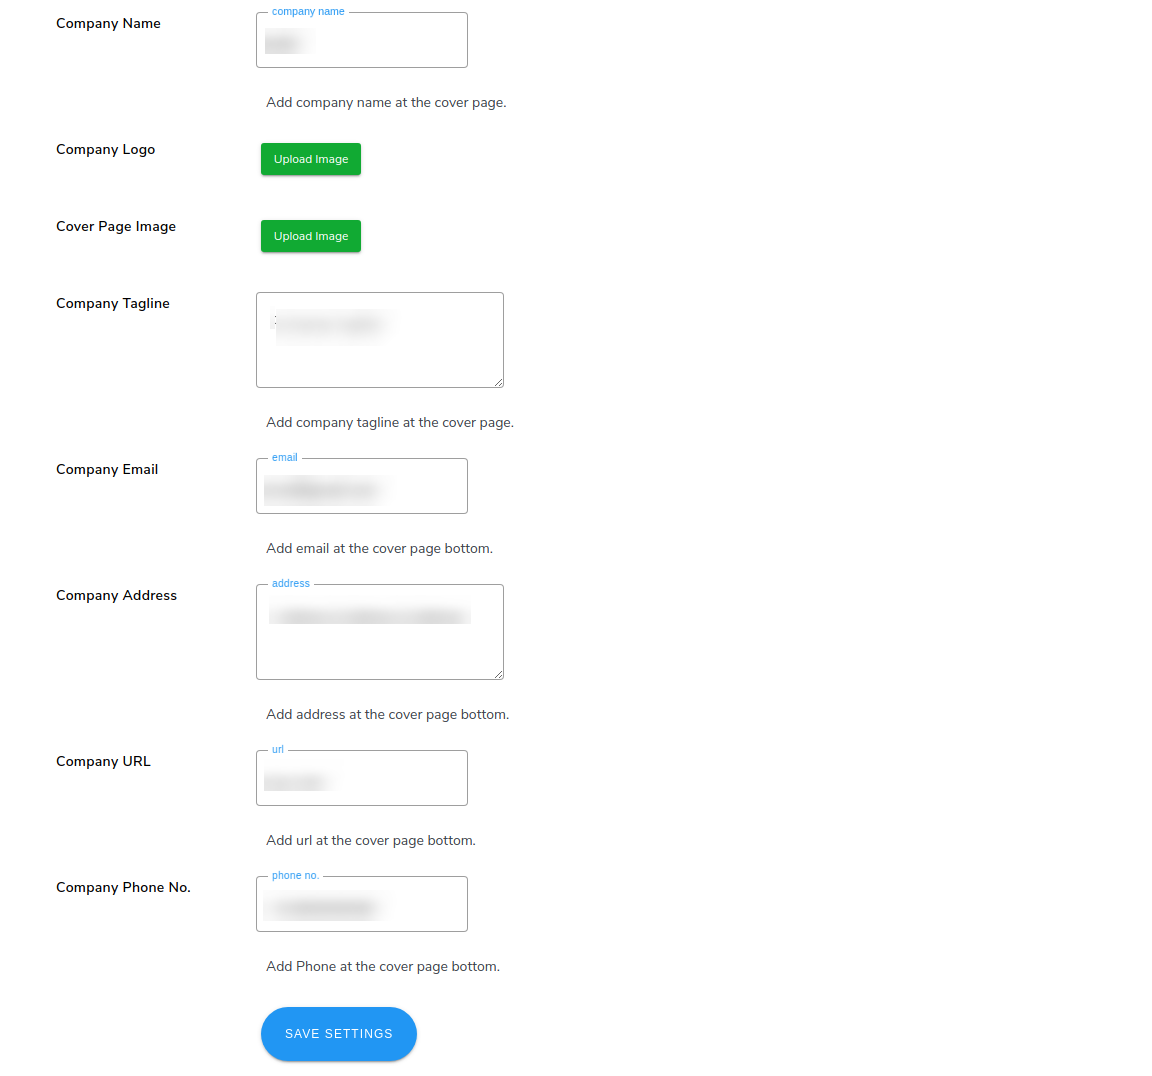
- Add Company Name in the corresponding space provided.
- Upload Image to add Company Logo.
- Upload Image to add Cover Page Image.
- Mention details of the company in the respective fields such as Company Tagline, Company Email, Company Address, Company URL, Company Phone No to display these details on your cover page.
- Click on the Save Settings button.
10.2.Internal Page
- Go to WP Swings→ PDF Generator for WP→Layout Settings→ Internal Page.
- Click on the Create Template button to create custom templates.
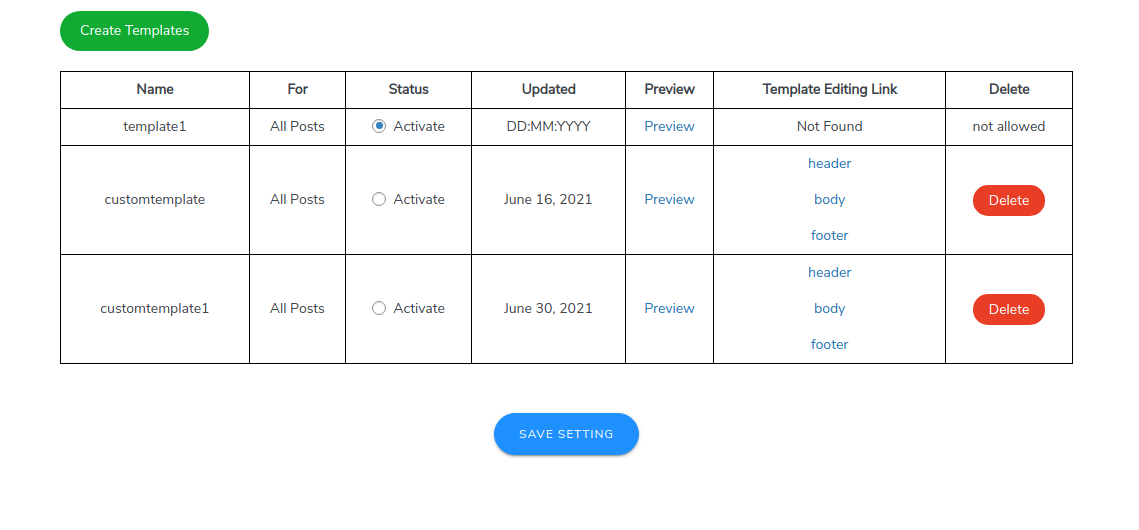
- This will add three pages, each for header, body, and footer with default layouts. You can edit them by clicking on the header, body, and footer links respectively.
- It will redirect you to the editor, you can add snippets from the PDF Snippets block, which is provided in the block section of the Gutenberg editor, and choose accordingly.
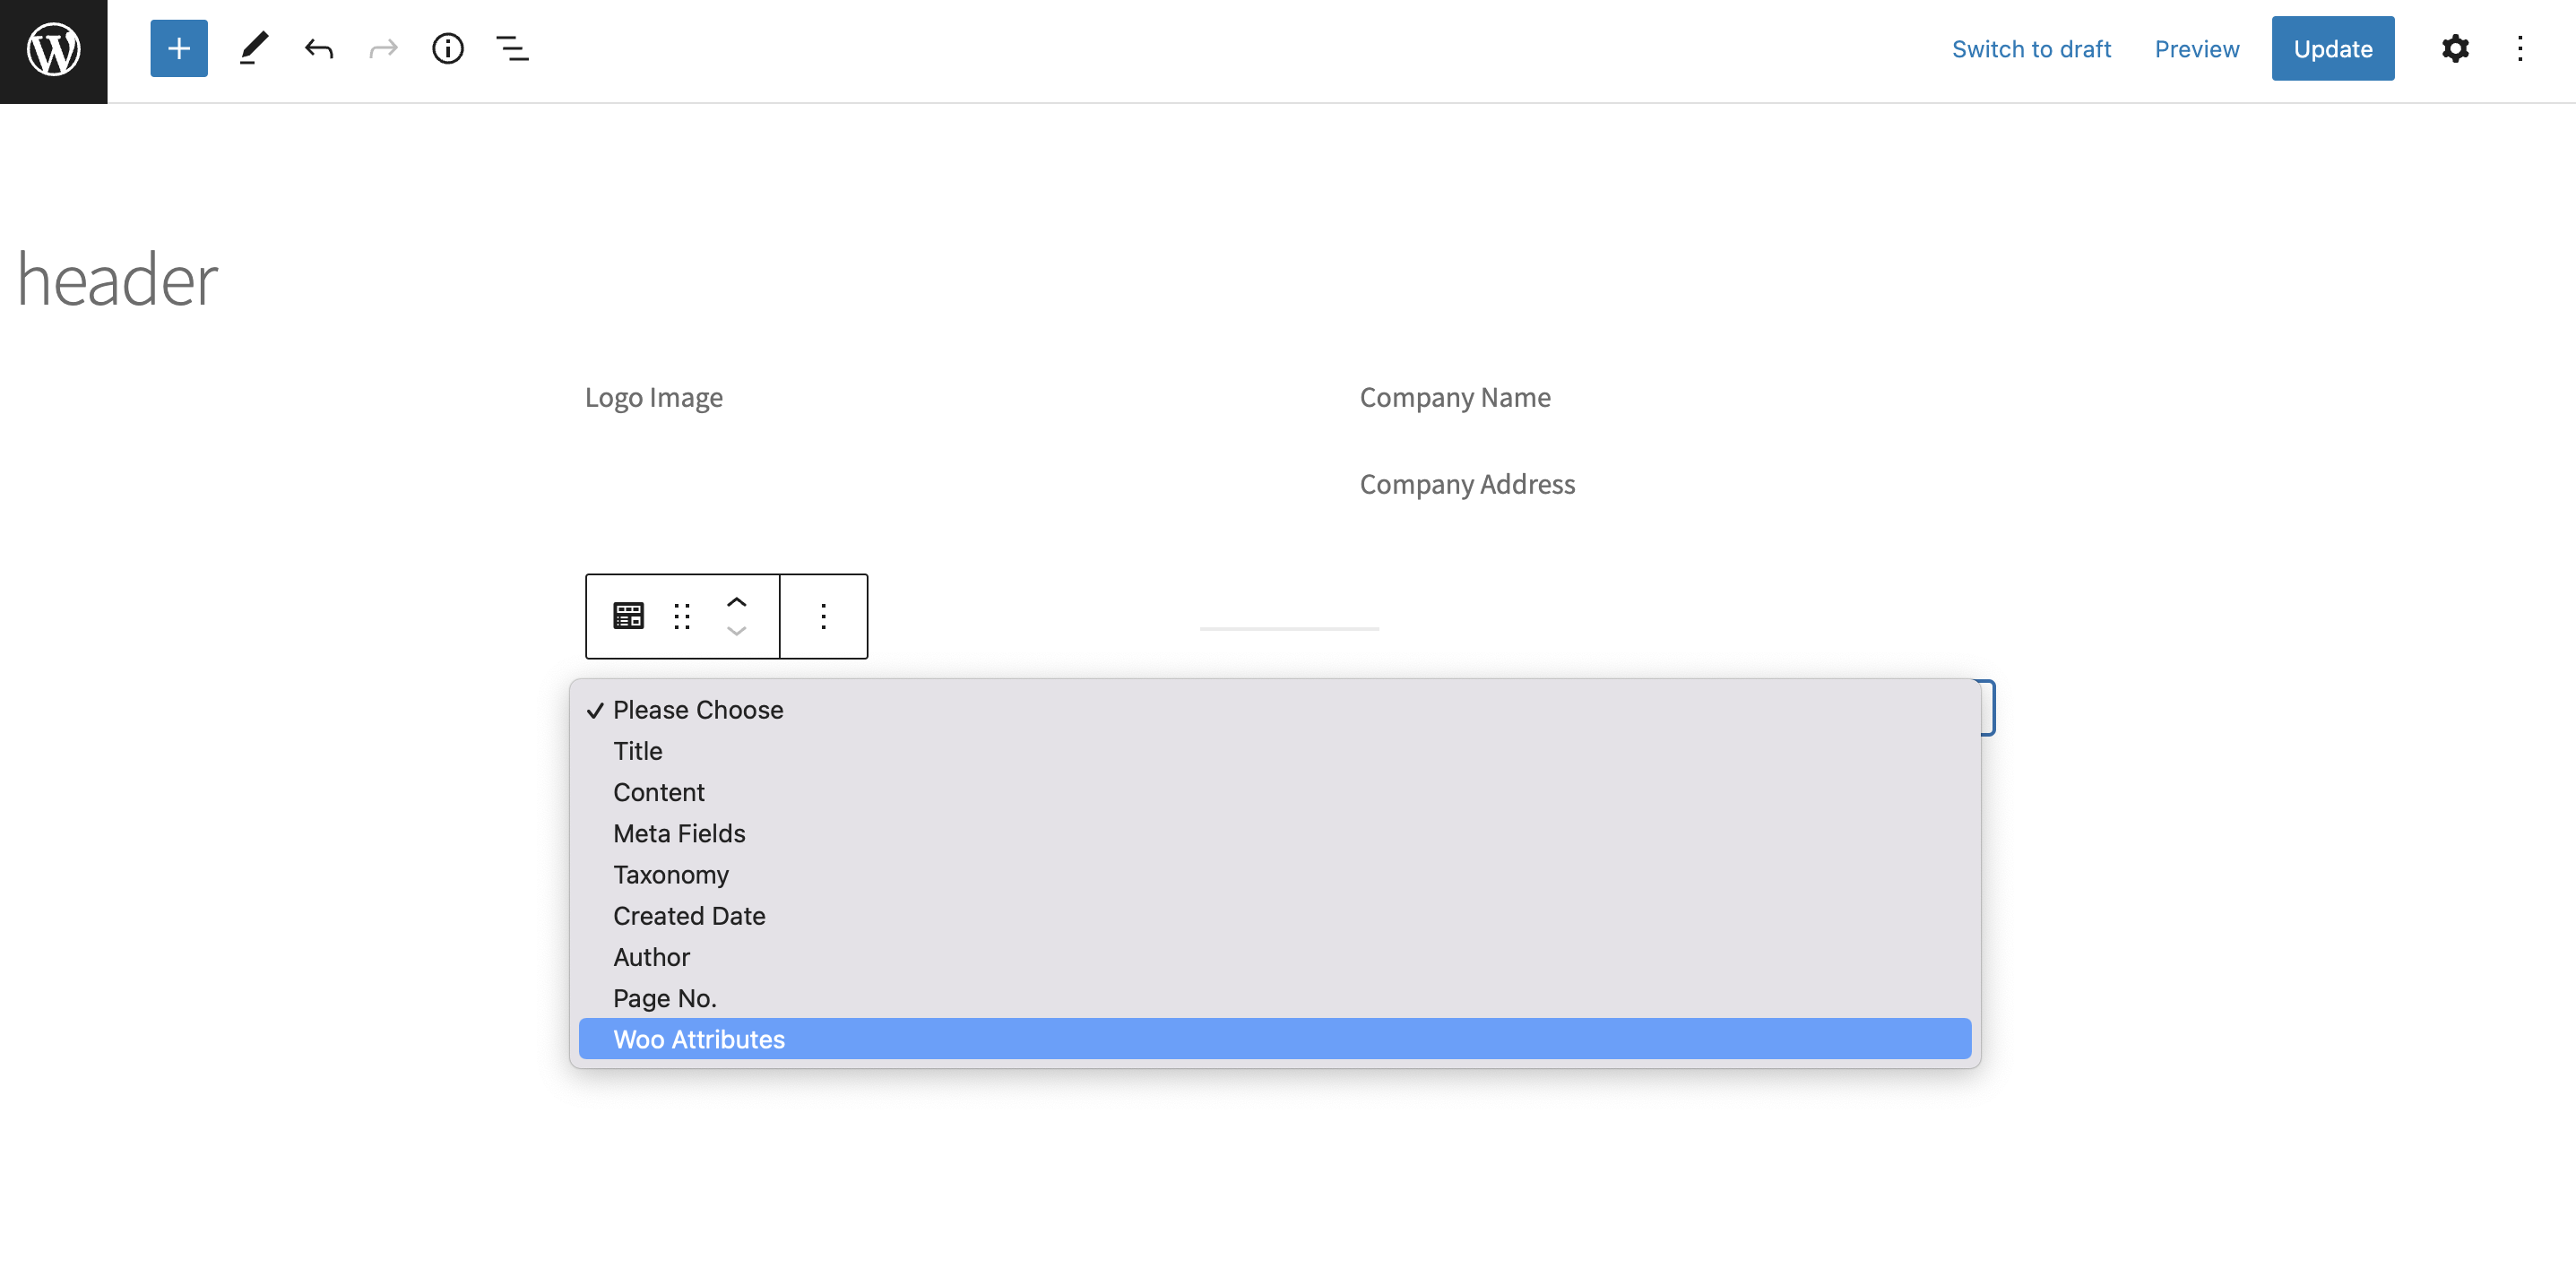
The example is displayed below.
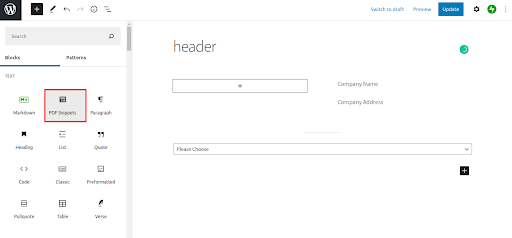
- Customize the layout by selecting the desired fields in the added PDF Snippets from the given dropdown menu as shown below. In the latest update of the plugin, you can also add the woo attributes for the generated PDF files of your plugin.
-
- Use the shortcode given in the plugin—[QR_CODE] at your desired space in the header, footer, or body layout as per your need.
- Click on the Update button to save your edited layout.
- You can add a Short Description in the body of your generated PDF file by using PDF snippets for creating your custom templates.
- Add a Current Date to your generated PDF file as your per requirement in the given PDF snippets dropdown menu. You can add this in the body of your custom templates.
- After customizing the layout, click on the Save Setting button.
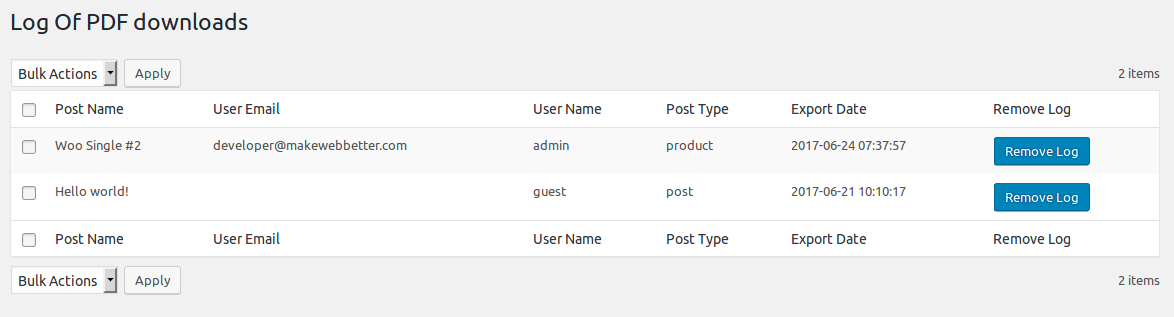
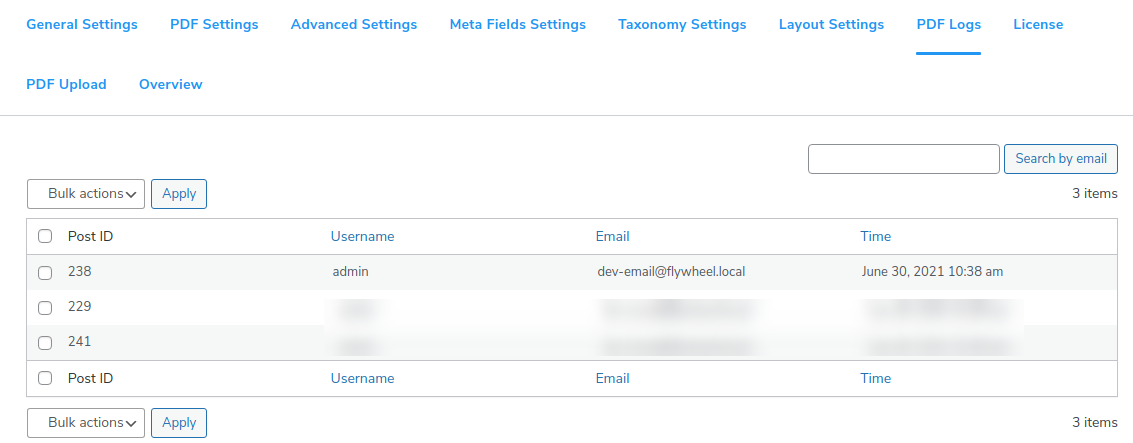
11.PDF Logs
- Go to WP Swings→ PDF Generator for WP→PDF Logs.
- Keep a track of the download PDF files along with crucial details such as Username, Email, and Time.
- If you wish to delete the log in bulk, select the entries and choose delete from the Bulk actions. Then, click on the Apply button.
12.WooCommerce Invoice Settings
You can generate invoices for purchase products and allow users to download it. These invoices will be automatically added to the email order confirmation email.
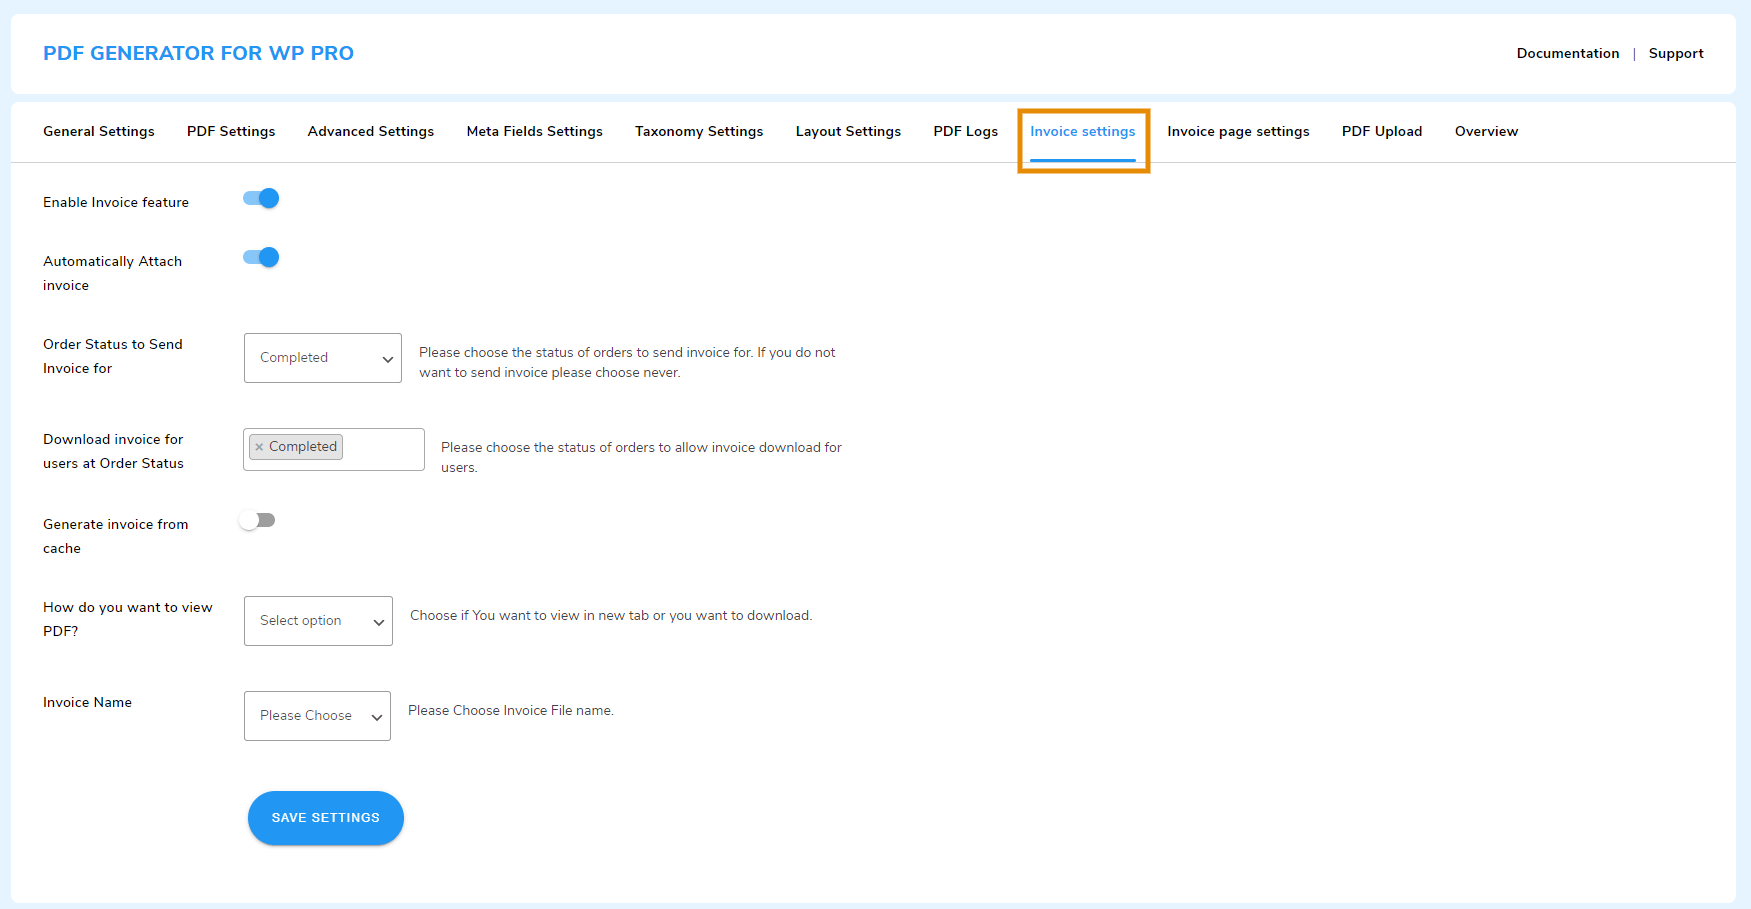
To setup your WordPress PDF invoice, go to the WP Swings→ PDF Generator for Wp→ Invoice Settings and follow these instructions:
- Enable Invoice Feature: Enable this toggle button to activate the PDF invoice feature.
- Automatically Attach Invoice: Turn on the toggle button to let the generated invoices to be automatically attached to the emails.
- Order Status to Send Invoices for: From this dropdown, select the order status at which the PDF invoices will be automatically sent to customers.
- Download Invoice for Users at Order Status: You can specify at which order status the customers will be able to download their order invoice post-purchase. If you don’t want them to download it, select “Never”.
- Generate Invoice From Cache: Turn on this toggle button to generate an invoice from the cache. It will fetch all the relevant product details from the cache and generate a formal invoice for you & your customers.
- How Do You Want To View PDF?: You can select how customers view their PDF invoices. There are two view types to choose from: Thank You page and the Open in a new tab.
- Invoice Name: The PDF Generator Pro plugin allows you to define a naming system for the downloadable PDF invoice files. The unique file name will be shown to both customers and administrators.
-
- Invoice Order ID: Selecting this option will name the invoice files using the Order ID of the corresponding purchase.
- Invoice ID: Choosing this option will name the invoice files using a unique Invoice ID.
- Custom: The Custom option allows you to create a personalized naming convention for your invoice files. Enter a combination of text or dynamic variables or both to create a custom format that suits your requirements.
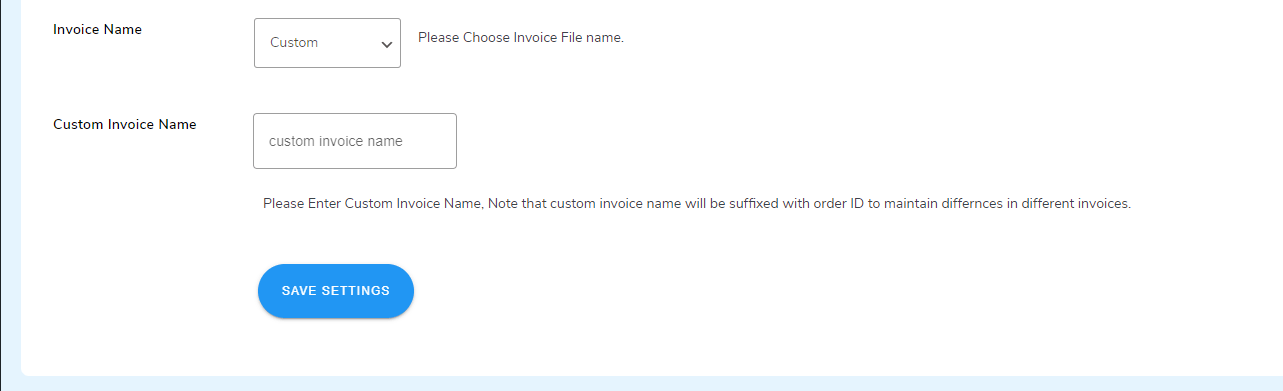
To create a unique name, the Order ID will be clubbed with your custom file name. You can verify them by downloading any invoice.
Finally, click on the Save button to implement the changes.
13.PDF Page Setting
The WordPress PDF page settings allow you to customize the WooCommerce PDF invoice you are generating for your customers. You can make the following changes:
- Company Details: You can enter the company information that is required on the invoice. It includes: Name, Address, City, State, Pin, Phone, and Email.
-
Invoice Number: Enter the custom prefix and suffix to make a unique invoice number for your business.
- Invoice Number Renew Date: You can set a date (month and day) after which the invoice number will be renewed.
- Disclaimer: You can enter your disclaimer or any note for your customers in this textbox. It will be displayed on the PDF invoice.
-
Color: Color customization of invoice is possible with the WordPress PDF plugin. Click on the color picker and choose the color you like.
-
Choose Company Logo: Click on the upload logo button and upload the logo of your brand from the WordPress gallery or your device.
-
Add Logo on Invoice: Enable this toggle button to display your uploaded logo on your PDF invoices.
- Choose Template: Our PDF Generator plugin has two templates for invoices. Click on the template you’d like for your invoices. And you are done.
Lastly, after making all the customizations, click on the Save Settings button.
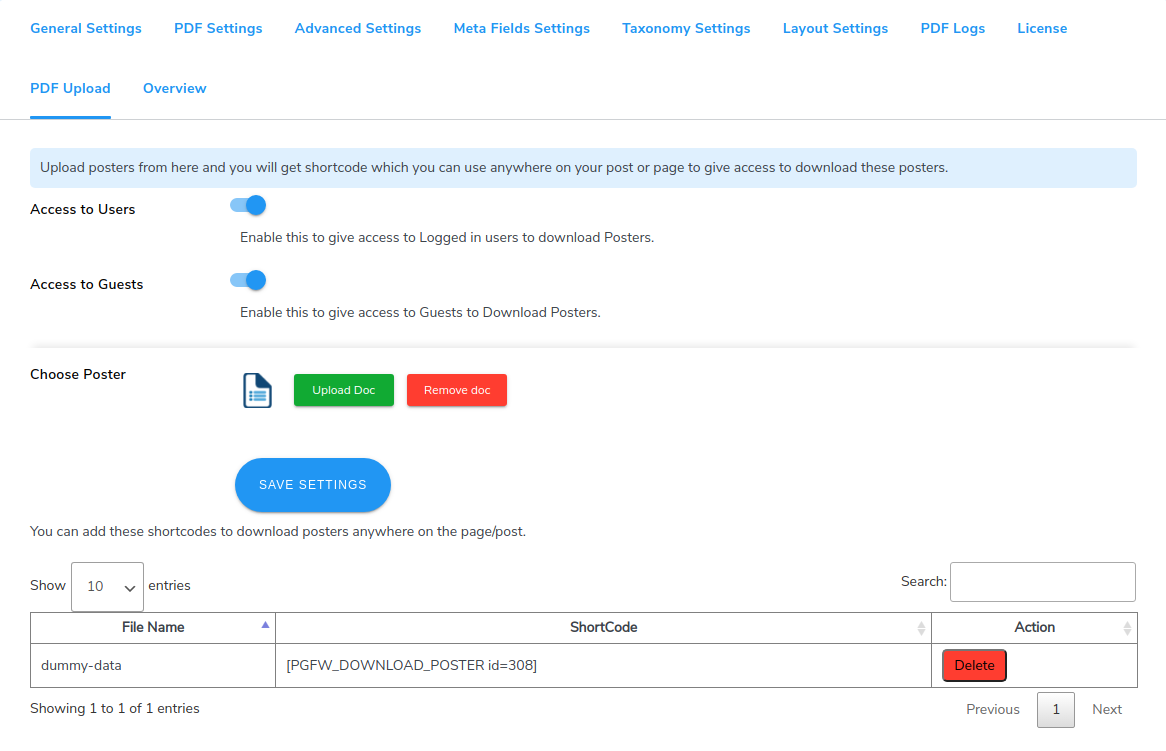
14.PDF Upload
- Go to WP Swings→ PDF Generator for WP→PDF Upload.
- Turn on the toggle to give Access to Users to allow registered or logged in users to download your uploaded document.
- Turn on the toggle to give Access to Guests to allow guest users to download your uploaded document.
- Click on the Upload Doc button to upload your own PDF file or poster in the Choose Poster settings.
- Click on the Save Settings button.
- A shortcode will be generated for your uploaded document. You can place it anywhere on your page or post to allow access to your document to the users. Hence, using this PDF plugin, you can easily generate or embed PDF files.
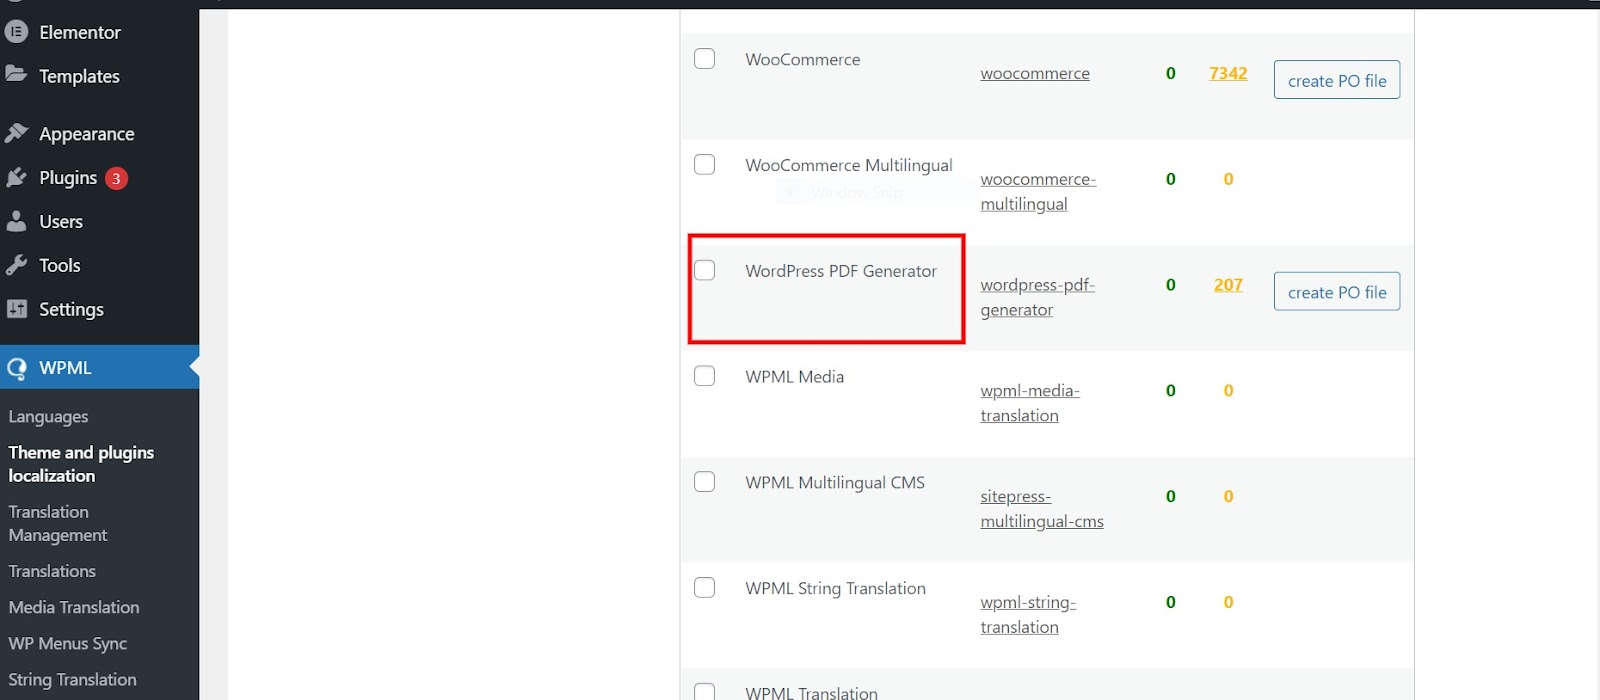
15.WPML Compatibility
WordPress PDF Generator is now compatible with the WPML plugin. To be able to use it, use follow the steps below:
- In your WordPress dashboard, go to WPML→ Themes and Plugins Localisation.
- Now, scroll down to the Strings in the plugins section.
- Lastly, select the WordPress PDF Generator plugin from the given list of plugins.
- To translate the strings into the language of your choice press the Translate Strings button present next to the wp post to PDF plugin plugin.
- You’ll be redirected to a page where all the strings of the PDF plugin are listed and you can translate each string from here.
- Upon visiting this page you can manually select a string for translation by clicking on the “+” button next to each string in a row. You can write the translation of the string in the space provided.
- Once you’ve written the translation it will be automatically saved and when the customer chooses a different language they’ll see the translated version of the string.
16.WooCommerce HPOS Compatibility
PDF Generator PRO is compatible with High Performance Order Storage (HPOS) Which uses WooCommerce CRUD design to store order data in custom tables to optimize order queries and ensure the smooth workflow of your WooCommerce store.
To Enable HPOS Follow these steps:
Firstly, make sure your WooCommerce version is updated with the latest 8.0. After that navigate to WooCommerce > Settings > Advanced > Features and choose the High Performance Order Storage option for orders.
For more information, refer to the WooCommerce HPOS Documentation
17.Other Settings
You can also export PDF files from live pages, products, and posts from the backend itself using WP PDF Generator.
Go to the live Post, Product, or Page. Click on the Export pdf button. There you have, your generated PDF file.


18.Feedback And Suggestions
If you have a suggestion or any idea you’d like to see in the plugin,we’d love to hear about it.Reach out to our support and we’ll consider adding it to the future release.
19.FAQs
Is The PDF Generator Plugin Compatible With The Divi Theme?
Yes, our plugin is compatible with Divi themes and is also compatible with CPT UI, ACF, WPbakery.
Can We Edit The Front/First Page Of The PDF By Itself?
Yes, you can edit the front page for this go to the plugin setting>Pdf first page setting>custom template here you can edit your template accordingly.
Does PDF Generator Plugin Support Post Meta Date On PDF?
Yes, It supports post metadata for this you have to go to plugin setting>Meta Field Settings. Select all your post meta fields which you want to display in your PDF for the post type.