1.Overview
Features:
- Export your PDF logs into CSV for better data analysis.
- You can choose to display the functionality to either registered users or guest users or both.
- Generate PDF invoices on product purchases and send them to users automatically.
- Customize the PDF invoice & pay slips information such as company details, logo, color, and more.
- Using the latest update of the plugin, you can add woo attributes to the generated PDF files from your live product pages.
- You can now restrict the display of the ‘download PDF’ icon based on the user roles using the latest version of the PDF creator plugin.
- Add names for bulk and single PDF download button.
- Enable WhatsApp sharing of WordPress PDFs.
- Select name for invoice as Invoice orderID, Invoice ID, or custom
- A recent update in the PDF Generator plugin allows you to export your posts, pages, and products in bulk in your desired custom template.
- This plugin lets you set the page height and width as per your choice. Simply select the page size from the dropdown menu and then choose the custom page size.
- PDF plugin also allows you to add scannable QR Codes to your generated PDF files using the shortcode provided by the plugin. You can add it to your header, body, or footer layout depending on your needs.
- PDF plugin brings to the footer customization features that will allow you to update the post name, post date, and author name.
- You can now add a change page no format in the footer settings. It allows you to set the page number with the total page count in your PDF file, and you can also set the page number position in the footer of the PDF file.
- WordPress PDF plugin now allows you to add more than one image in a row in your generated PDF files. Please note that it is advised to have not more than 3 images in a row to have a better view of the generated PDF files.
2.How to Download The PDF Generator Plugin?
To download the premium PDF Generator Plugin that you purchased please follow the below steps:-
- Go To https://wpswings.com/my-account
- Visit Orders Section
There you will get a License code and a Premium purchased plugin zip file Download and use it on your website by activating it.
Note: You need to have both Free and Pro plugins in order to use them smoothly
3.Installation
Let’s See how you can download and install both the free and pro version of the PDF Generator plugin.
3.1.Ultimate PDF Generator
Automatic Installation:
Automatic installation is the easiest option handled by WordPress.
Follow these steps for the installation:
1) Go to the Admin panel navigate to the sidebar click on the ‘Plugins’ menu > ‘Add New’.
2) On the ‘Add Plugins’ page go to the search bar and type ‘PDF Generator for WordPress’.
Once you find ‘PDF Generator For WordPress’ by WP Swings, you can view the details about it such as the points release, rating, and description. One can install it, simply by clicking “Install Now”.
Manual Installation:
The manual installation of the plugin is another option to install the plugin in the seller’s WordPress environment.
The manual installation method involves downloading our ‘ WordPress PDF Plugin and uploading it to the web server via their favorite FTP application.
The steps for manual installation are as follows:
1) Upload the ‘PDF Generator For WordPress’ folder to the /WP-content/plugins/ directory.
2) Activate the PDF Generator For WordPress plugin through the ‘Plugins’ menu in WordPress.
**The best results can be viewed by using the “WooCommerce” standard theme (Storefront). Any third-party plugin might cause conflict with our plugin.**
3.2.WordPress PDF Generator
Automatic Installation:
Automatic installation is the easiest option as WordPress handles the file transfers itself and you don’t need to leave your web browser.
The steps are as follows :
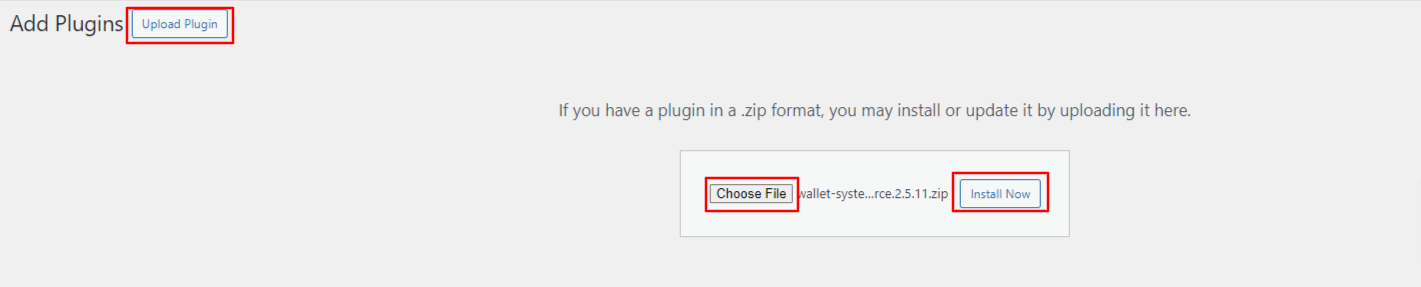
1) Download the zip folder of the plugin PDF Generator for WordPress from My Account > Orders > Click on view > Scroll down and download the plugin zip file
2) Once downloaded, install the PDF Generator for WordPress Pro plugin by browsing and activating it.
Note: Visit the Login page to create your account before completing your purchase.
Manual Installation:
The manual installation of the WordPress PDF Generator plugin is another option. To install the plugin to your WordPress environment.
The manual installation method involves downloading our PDF Generator For WordPress PRO Extension and uploading it to your web server via your favorite FTP application.
The steps are as follows :
(i) Kindly, upload the PDF Generator For WordPress PRO folder to the /wp-content/plugins/ directory.
(ii) Activate the PDF Generator For WordPress PRO plugin through the ‘Plugins’ menu in WordPress.
Note: Before activating the PDF Generator For WordPress PRO, you should have the WordPress PDF Generator – Free Version otherwise, the plugin will not function.
So, if you don’t already have it, you can download it directly from here :
3.3.License Activation
After Purchasing the premium version navigate to My Account > Orders > Your Order. There you’ll find the License Key.
If you want to benefit from all the premium features and automatic updates and access the support platform to receive help from our staff. In that case, it’s necessary to activate the license.
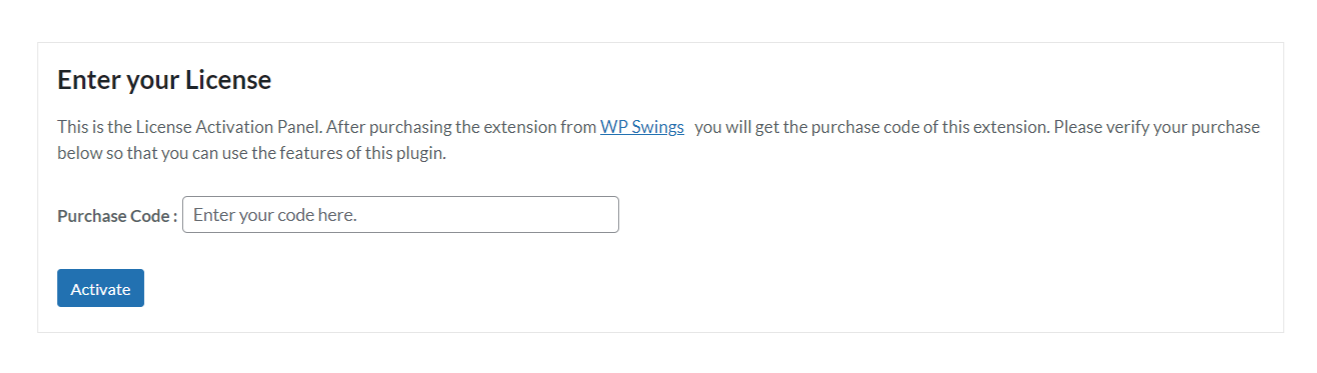
To do so, you have to navigate to the “License” tab, here you can enter the “License Key”, and click on the “Activate” button. Customers are supposed to receive these in their mail when they purchase the premium plugin.
You can also find the license activation code in the My Accounts > Order section
4.General Settings
To use the PDF plugin, you need to activate the plugin functionalities by turning on the toggle switch in General Settings
- In the admin panel, click on WP Swings→ PDF Generator for WP→ General Settings.
- Activate the PDF generator plugin by turning on the toggle switch.
- Tick the checkbox Include Categories to display categories in the PDF file for a post on your WordPress site.
- Tick the checkbox Include Tag to display tags in the PDF file for a post on your WordPress site.
- Tick the checkboxes to Display Post Date and Display Author Name respectively if necessary.
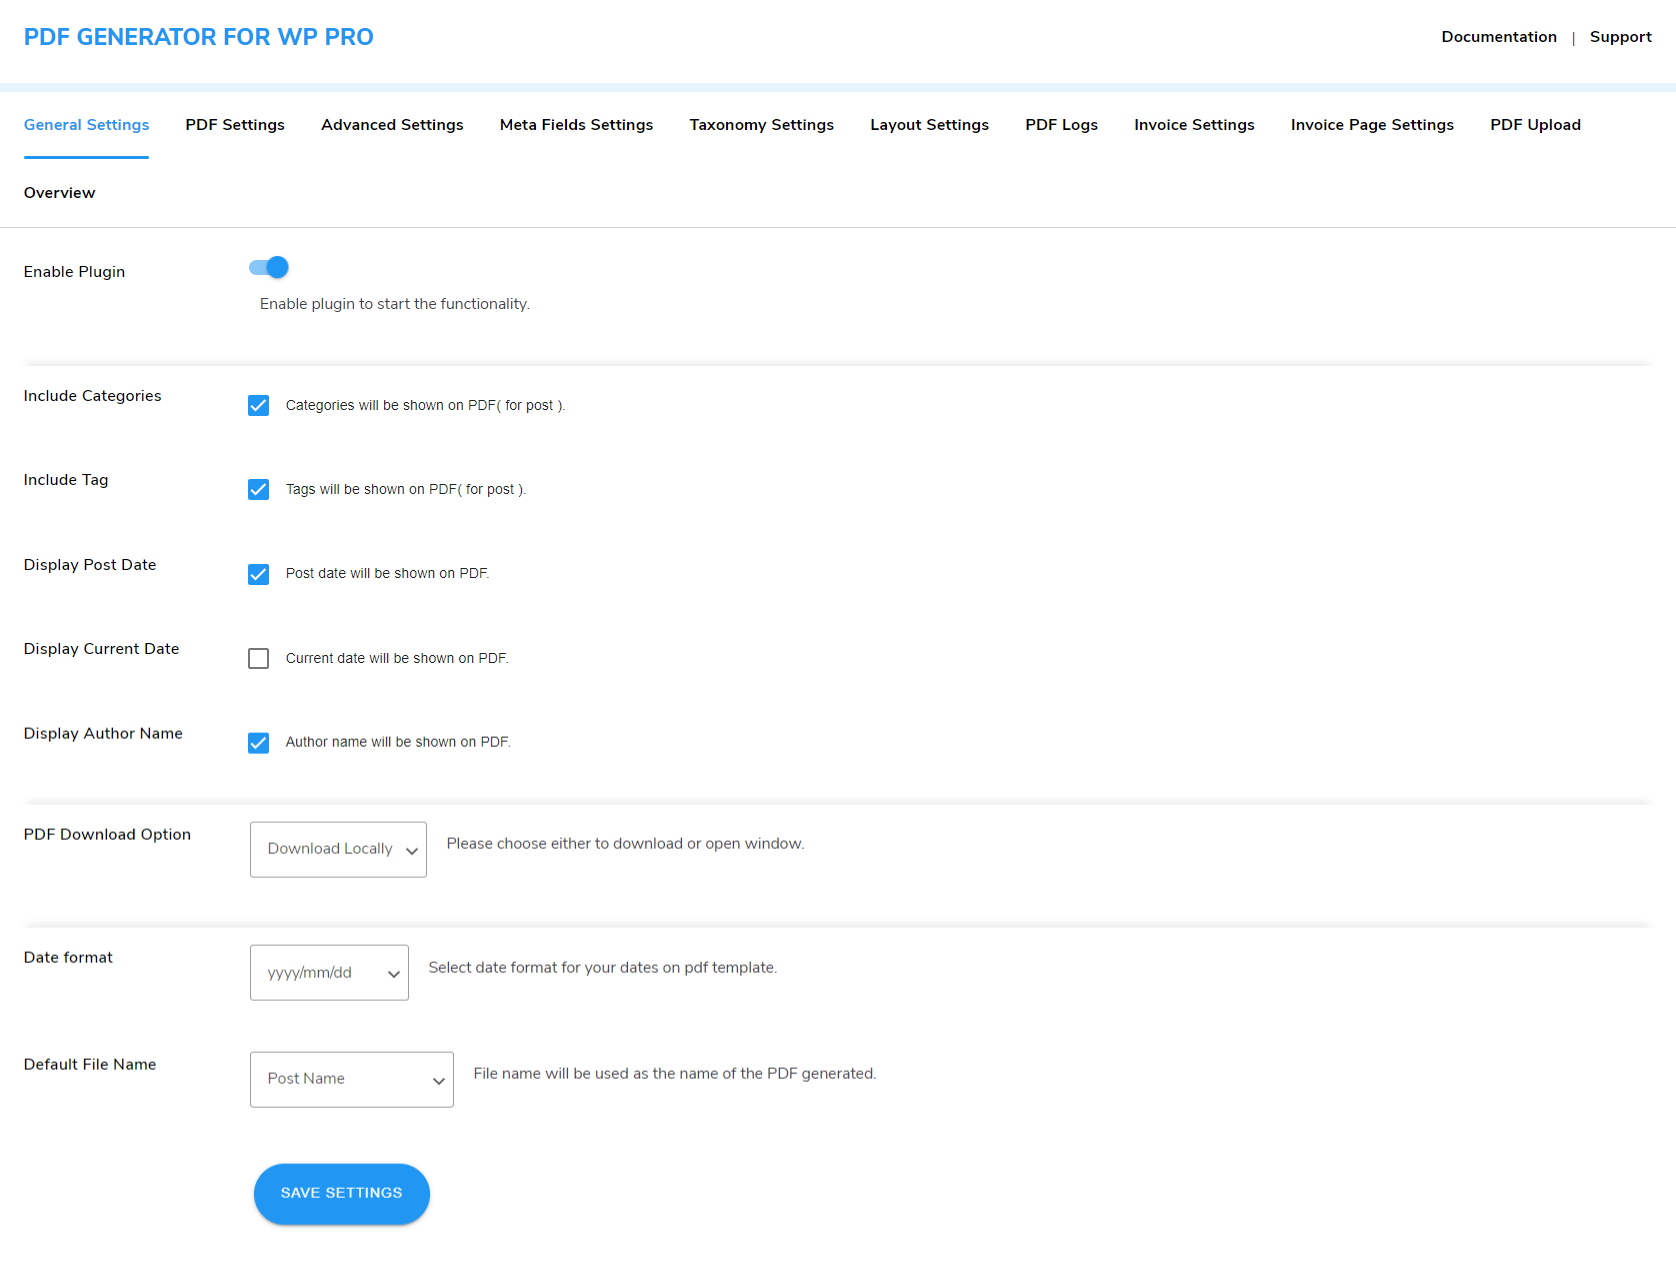
- You can choose to allow the users to download the generated PDF files either locally or open a new window.
- You can predefine the name of the generated PDF file by choosing one of the options- Post Name, Document_Product Id, or Custom from the Default File Name option. If you want to set a custom name, choose Custom from the dropdown menu and enter the custom file name of your choice in the space provided.
- Date Format, You can also choose the date format for your dates on the pdf template.
- Click on Save Setting to save your choices.
5.PDF Setting
PDF Settings will allow you to predefine settings for Header, Body, and Footer content. You can also apply exclusive features such as RTL support, and set watermark text and colour Follow the listed steps to save your details:
5.1.Icon Display
Accessing the PDF Settings
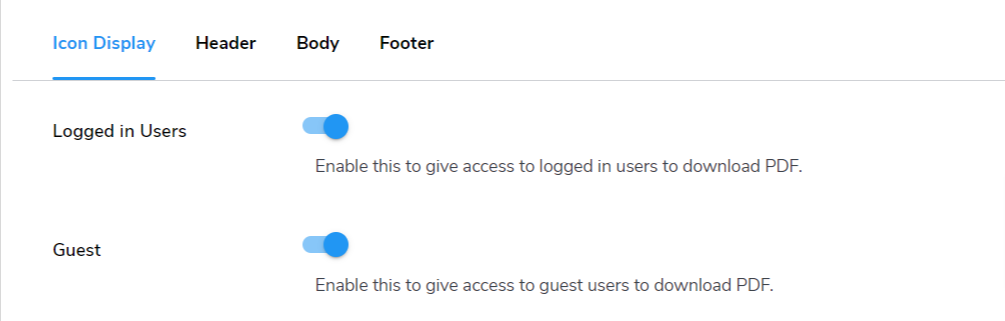
To begin, navigate to WP Swings → PDF Generator For WP → PDF Settings → Icon Display. This section allows you to configure the display and accessibility of PDF files on your WooCommerce store.
Allowing Registered Users to Download PDFs
To enable registered or logged-in users to download PDFs, simply turn on the toggle switch labeled Logged in Users. This will allow your registered users to access and download the PDF files generated on your site.
Allowing Guest Users to Download PDFs
If you want to provide guest users with the ability to download PDFs, activate the toggle switch for Guest. This option ensures that even non-registered users can download PDF files from your store.
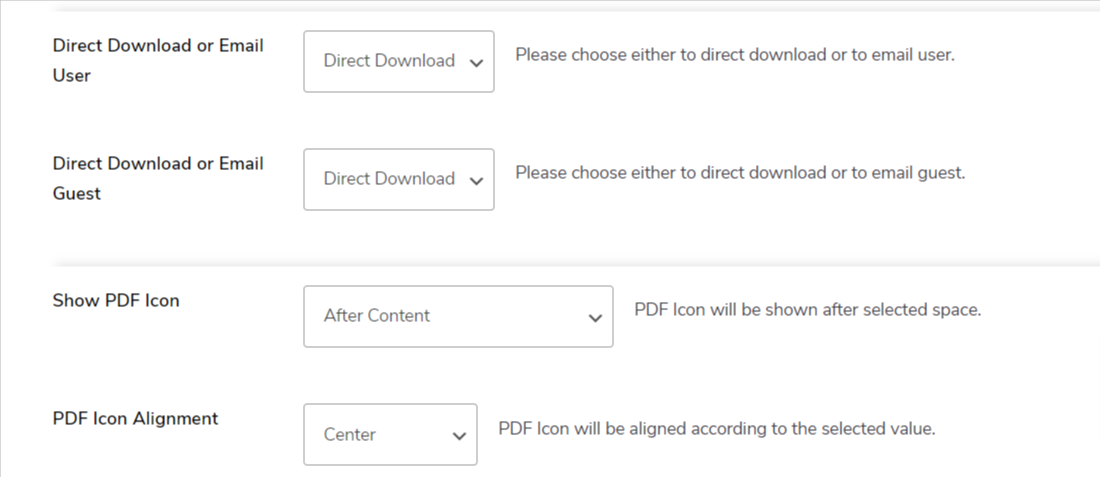
Choosing Access Method for Registered Users
You can customize how registered users receive their PDF files by choosing from the dropdown menu under Access Method for Registered Users. The available options are Direct Download or Email User, allowing you to select the most appropriate method for your audience.
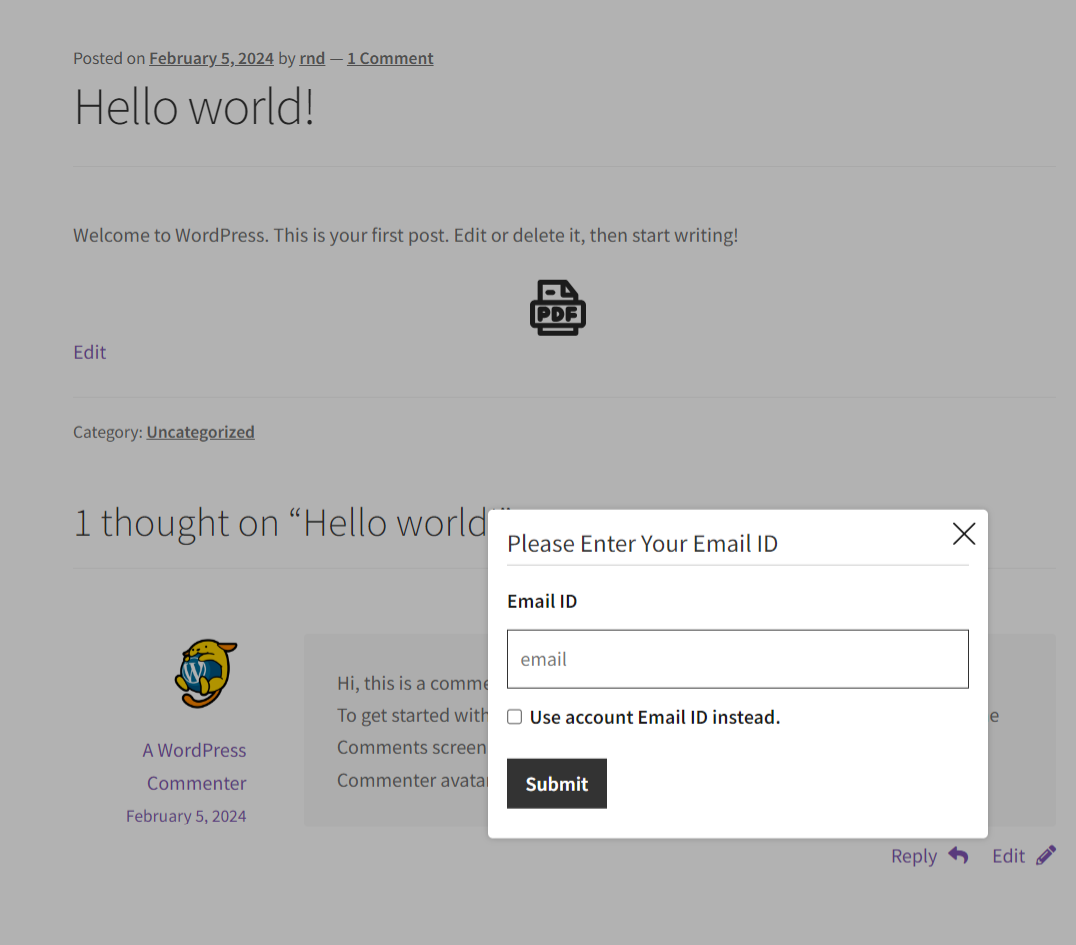
If the “Email User” option is selected, a pop-up will appear prompting the user to enter their email address. Once they provide their email, they can download the PDF, as illustrated in the screenshot below.
Choosing Access Method for Guest Users
Similarly, for guest users, you can select the preferred method of PDF file access from the dropdown menu under Access Method for Guest Users. The choices available are Direct Download or Email Guest, ensuring flexibility in how guest users receive their PDFs.
Positioning the PDF Generator Icon
The position of the PDF generator icon on your website’s frontend can be easily adjusted. You can choose from the Show PDF Icon dropdown menu to place the icon in a location that best suits your site layout. The available positions are Before Content, After Content, Before Add to Cart Form, Before Product Meta Start, After Add to Cart Form, After Single Product Summary, Before Single Product Summary, After Single Product, Before Single Product, and After Share Button.
Setting the Alignment of the PDF Generator Icon
Once you have positioned the PDF generator icon, you can further refine its placement by setting the alignment. The PDF Icon Alignment dropdown menu provides options for Left, Center, and Right alignment, allowing you to match the icon’s positioning with the overall design of your site.
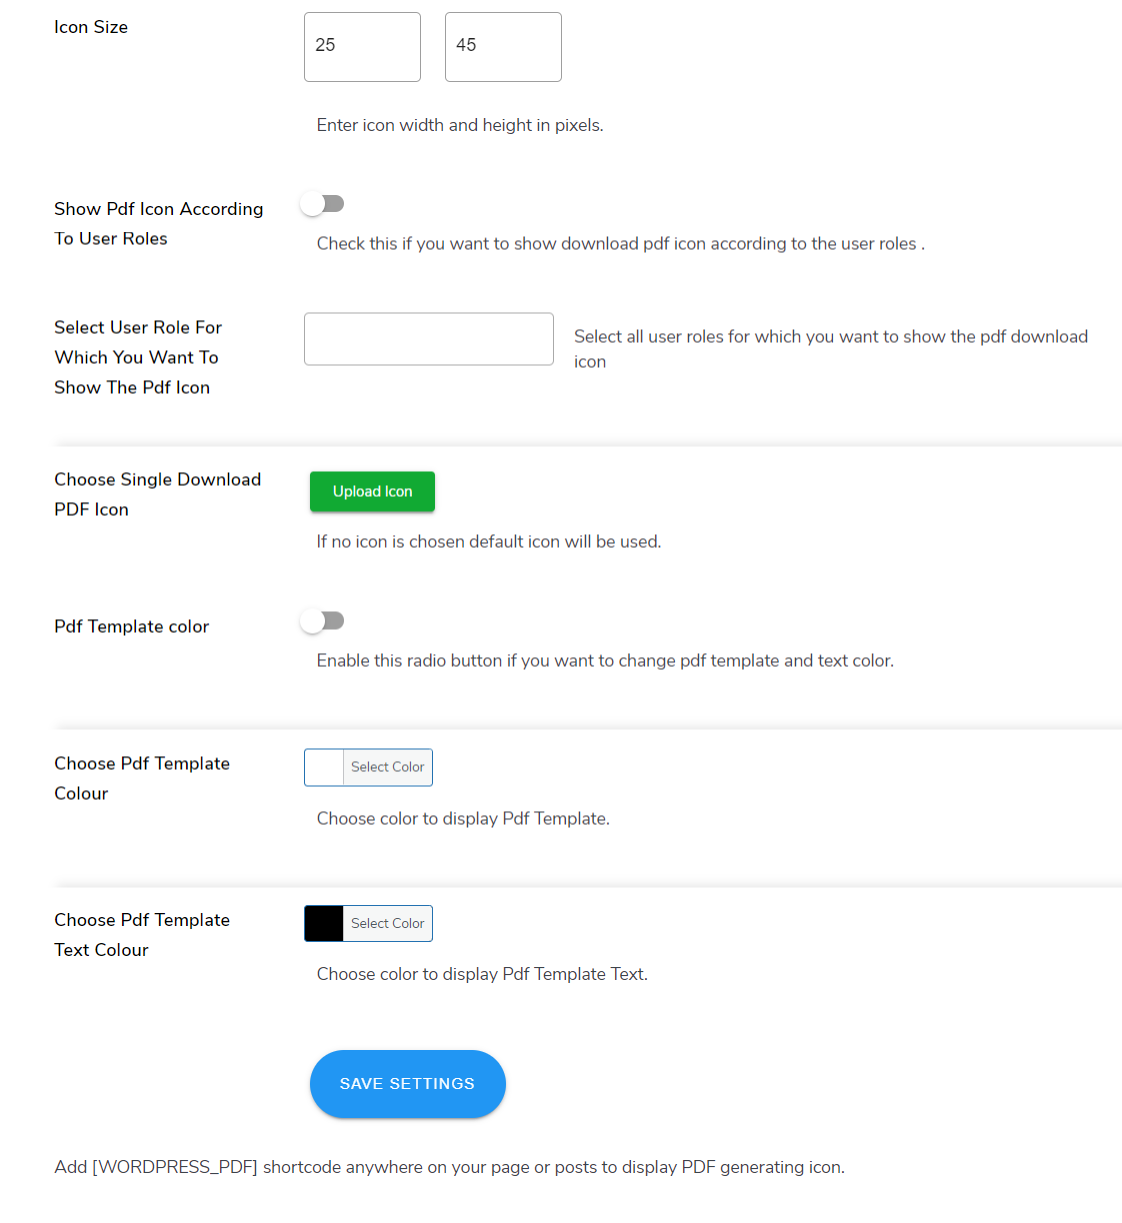
Predefining the Icon Size
To ensure consistency in the appearance of the PDF generator icon, you can predefine its size by setting the width and height in pixels in the Icon Size setting. This allows you to control the exact dimensions of the icon, ensuring it fits seamlessly with your site’s design.
Restricting PDF Icon Display Based on User Roles
If you want to limit the visibility of the PDF generation option to specific user roles, you can turn on the toggle button for Show PDF Icon According to User Roles. This setting restricts other roles from accessing or even viewing the option to generate PDF files, giving you control over who can use this feature on your site.
Icon Display Pro Feature Premium
The Icon Display settings in the premium version include all the features from the free version, plus the following additional features:
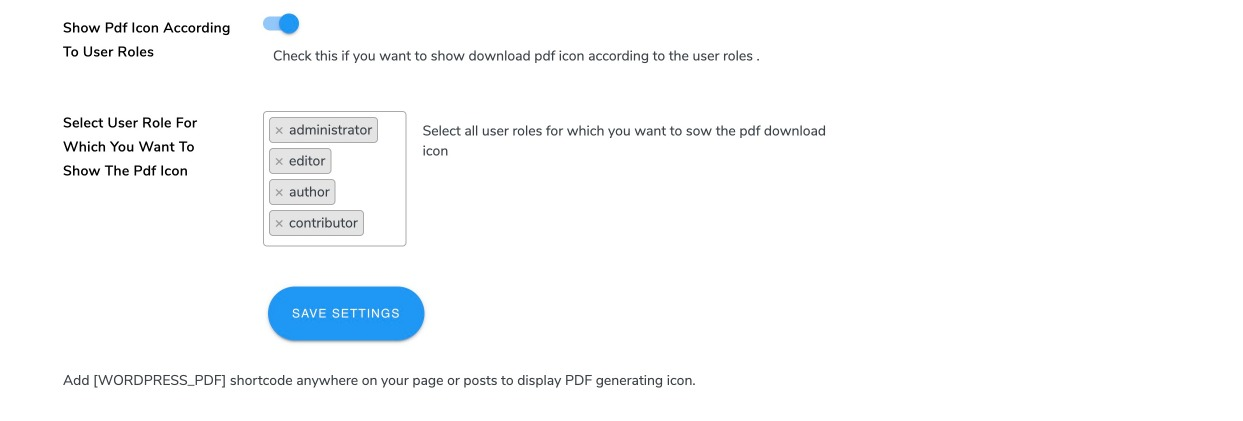
Selecting User Roles for PDF Icon Visibility
In the Select User Role For Which You Want To Show The PDF Icon setting, you can choose from various options in the dropdown menu. This allows you to specify which user roles should have access to view and use the PDF generation icon, tailoring the functionality to meet your needs.
Uploading a Custom PDF Icon
To upload a custom icon for your PDF generation feature, click on the Upload Icon button within the Choose Single Download PDF Icon setting. This option allows you to select and upload an icon that best fits your site’s branding and design preferences.
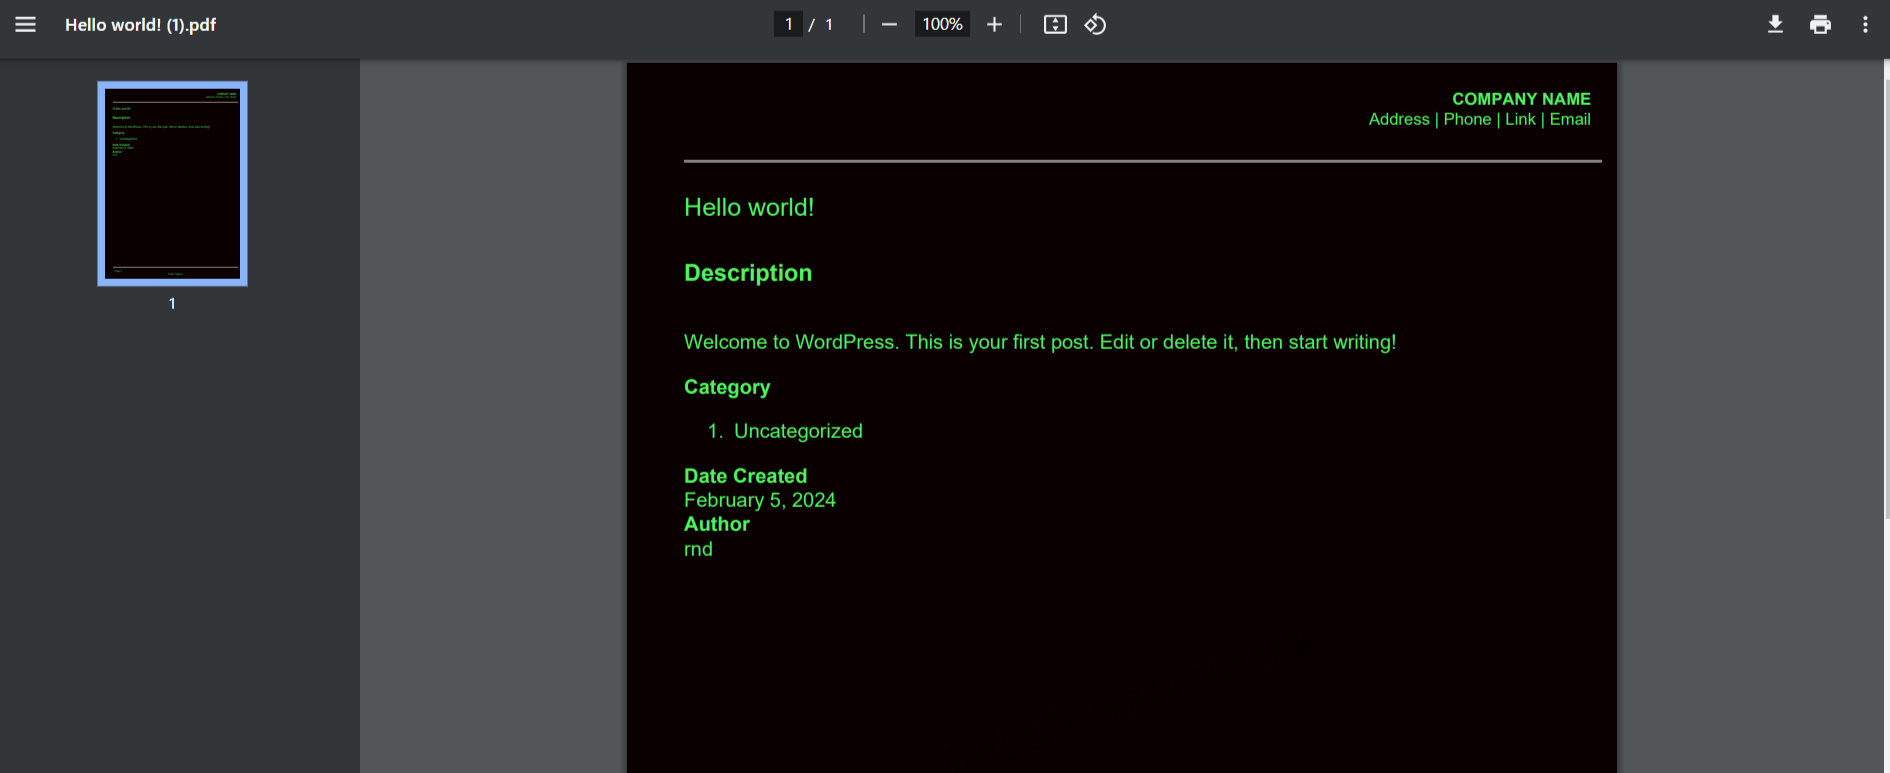
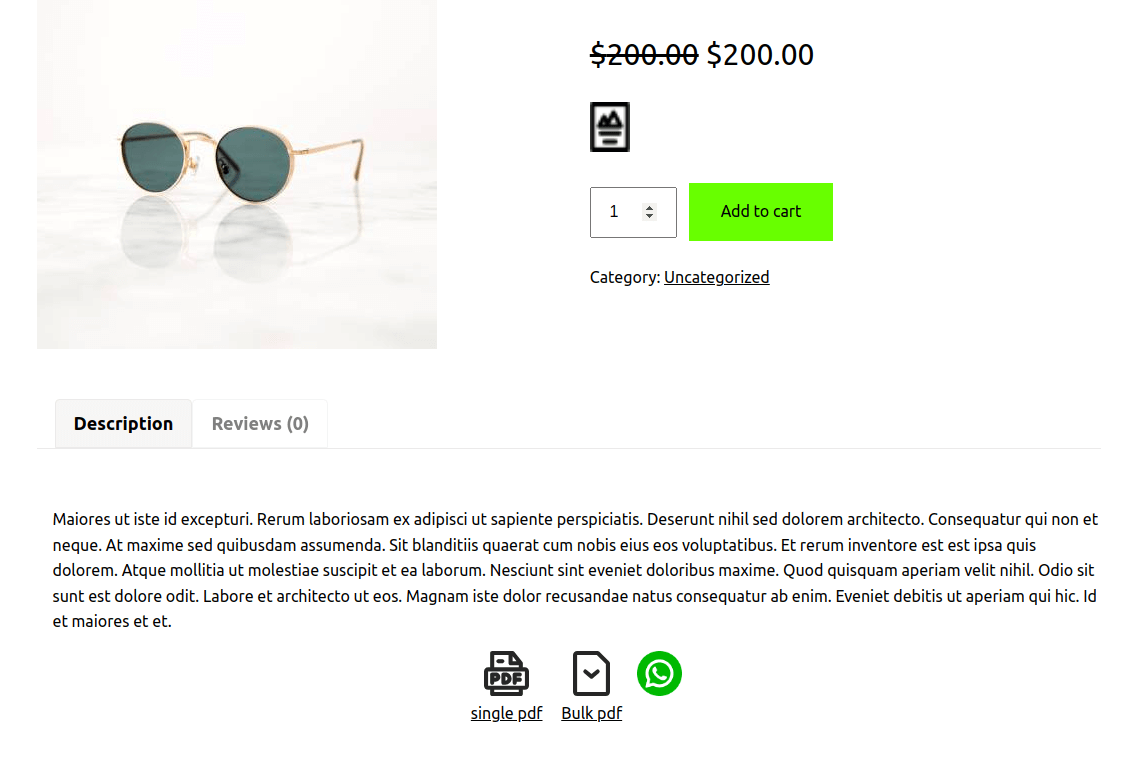
Frontend Representation:

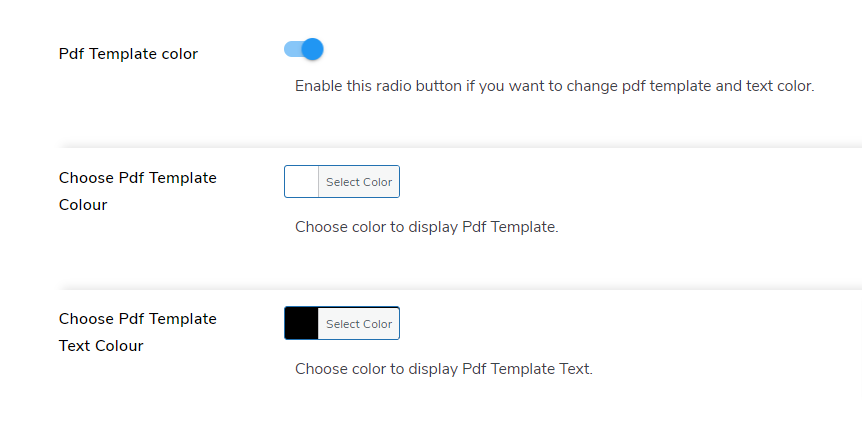
Customizing PDF Template Colors
To personalize the appearance of your PDF templates, enable the PDF Template Color Option. This feature lets you customize the color scheme of your PDF templates, making them align with your brand’s visual identity.
Choosing PDF Template Colors
In the Choose PDF Template Colour section, you can select the color for the background and other elements of your PDF templates. This customization option ensures that the color of your PDF templates complements your overall design.
Selecting PDF Template Text Colors
In the Choose PDF Template Text Colour section, you can choose the text colors for your PDF templates. This setting allows you to match the text color with your brand’s color scheme or the design of your PDF templates.
Customized PDF Template Text and Color:
Finally, click on the SAVE SETTINGS button to save your changes.
Use the shortcode [WORDPRESS_PDF] anywhere on your post, page or product to display the PDF icon.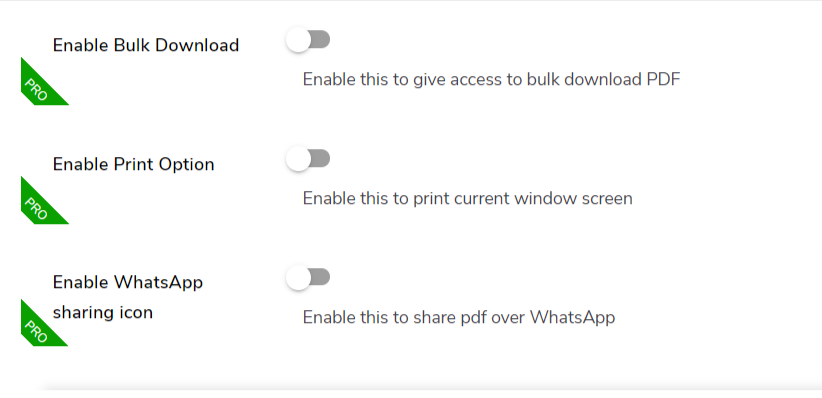
Enabling Bulk Download Premium
To allow users to download multiple PDF files at once, turn on the toggle switch for Bulk Download. This feature is available in the Pro version and facilitates the bulk download of PDF files, enhancing user convenience.
Enabling the Print Option Premium
To give users the ability to print PDF files directly, activate the toggle switch for the Print Option. This setting is also part of the Pro version and provides a straightforward way for users to print both single and bulk PDF files.
Enabling WhatsApp Sharing Premium
To enable users to share your single and bulk PDF files via WhatsApp, turn on the toggle switch for the WhatsApp Sharing Icon.
Uploading a Custom Bulk Download PDF Icon Premium
To personalize the appearance of the bulk download feature, click on the Upload Icon button within the Choose Bulk Download PDF Icon setting. This allows you to select and upload an icon of your choice, ensuring it matches your site’s design and branding.
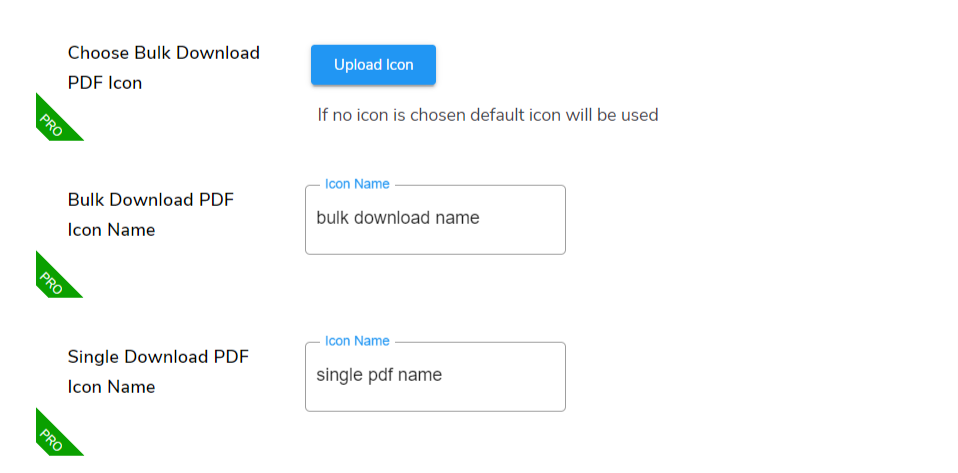
Setting a Custom Name for the Bulk PDF Download Icon Premium
To personalize the bulk PDF download icon, enter a custom name in the textbox provided under the Bulk PDF Download Icon setting..
Naming the Single PDF Download Icon Premium
Similarly, enter a custom name for the Single PDF Download Icon in the designated textbox.
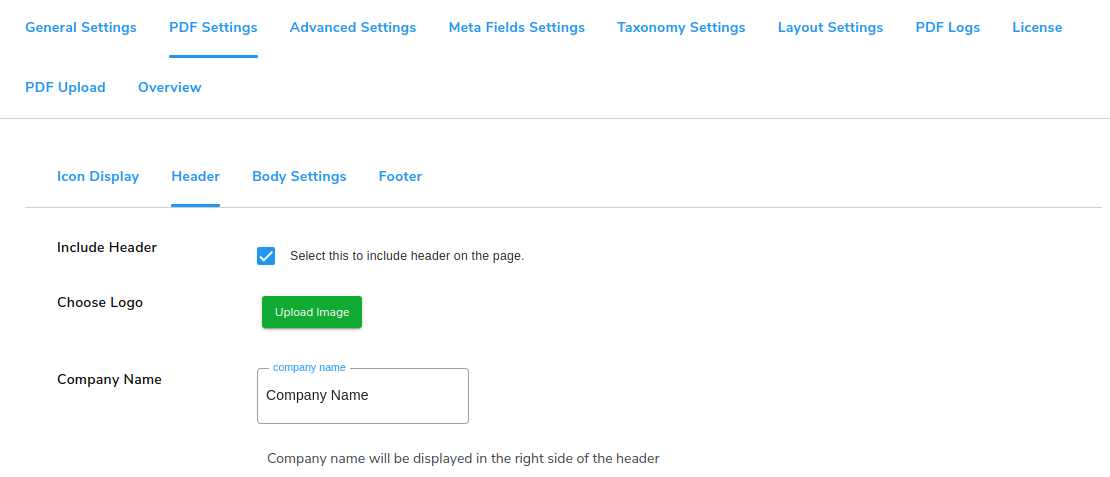
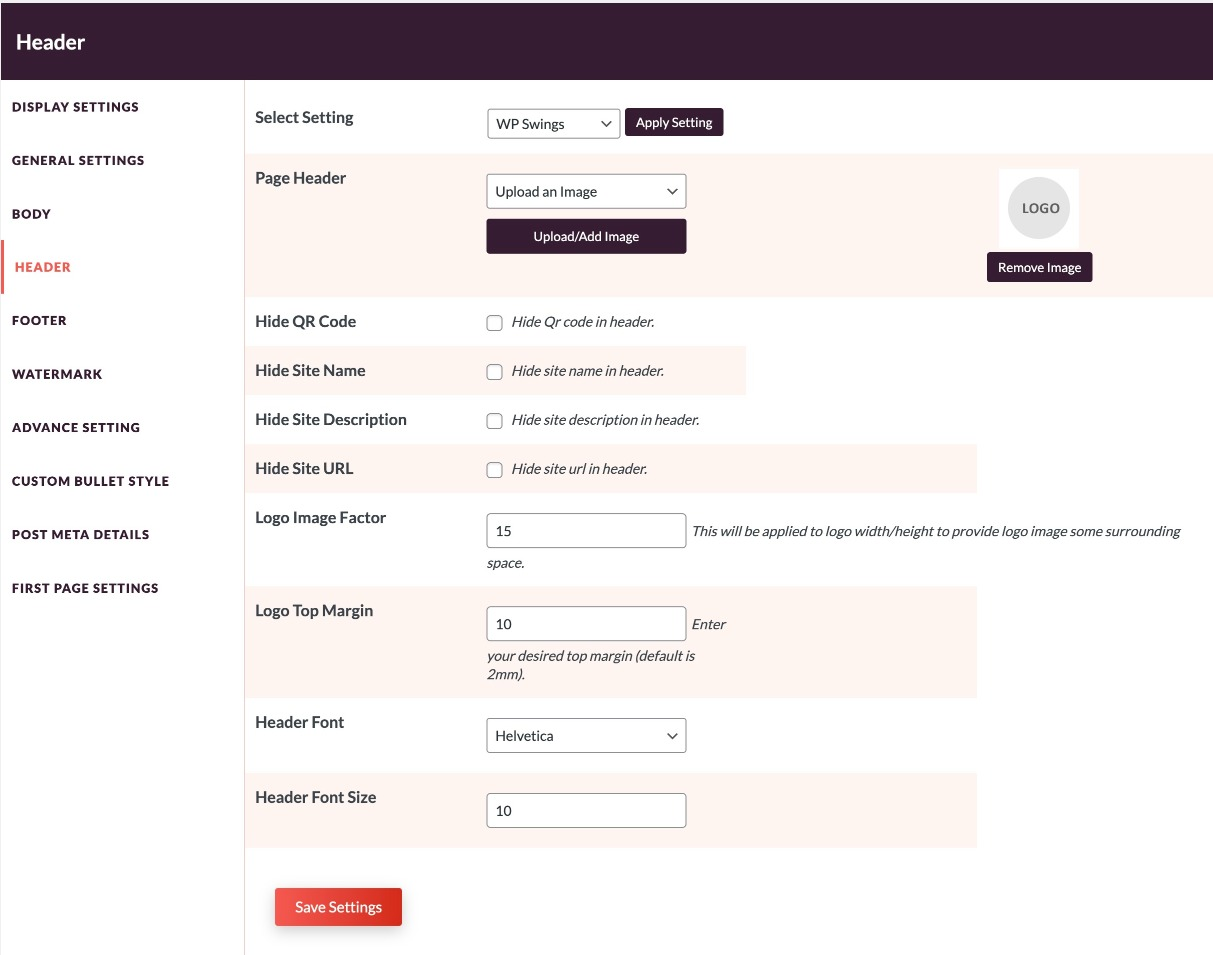
5.2.Header Settings
In this tab, you can customize the header of your PDFs.

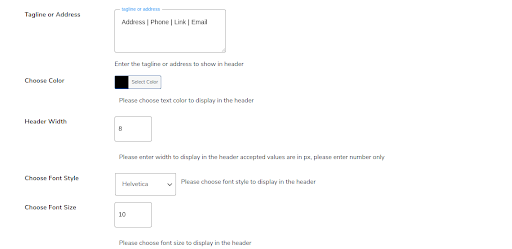
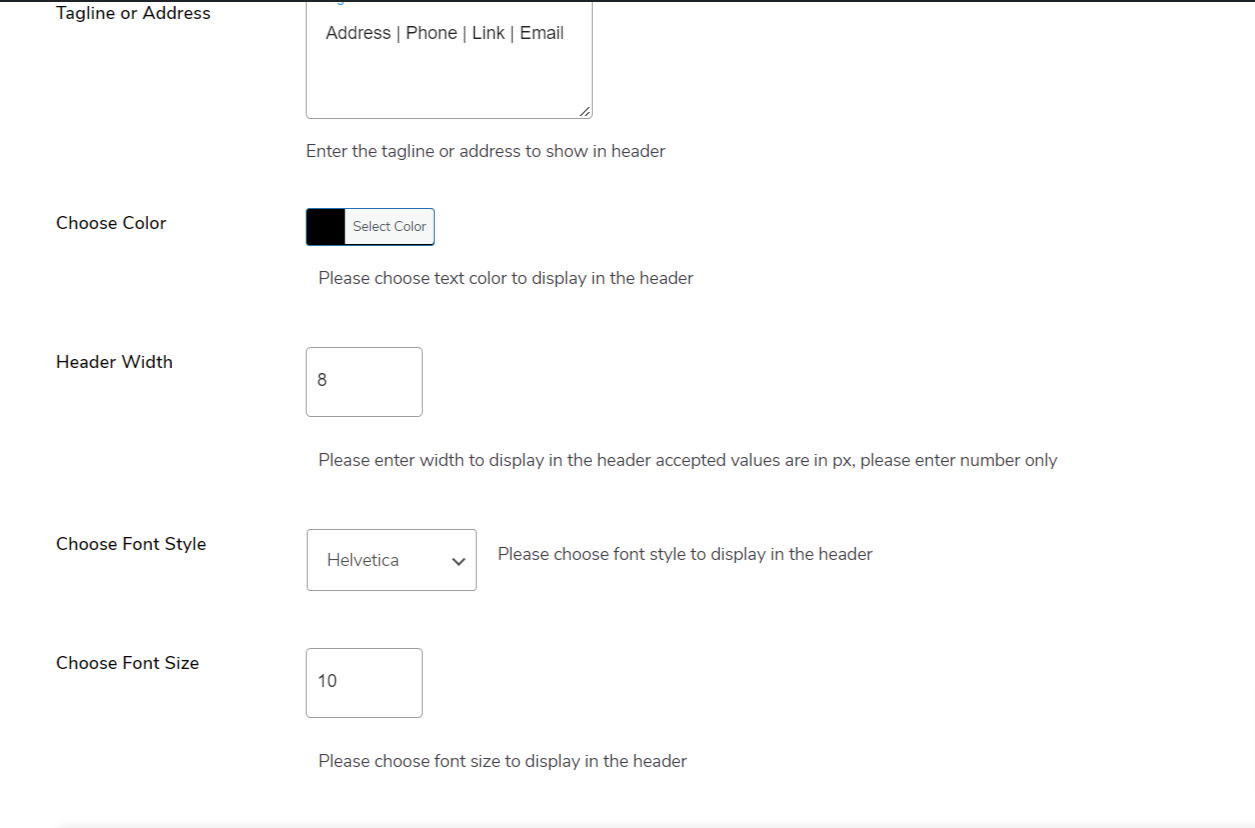
Entering Tagline or Address
In the Tagline or Address field, enter your tagline, address, or any other relevant information you want to display. This allows you to include important details in the header of your PDF templates.
Selecting Header Text Color
To customize the color of the header text, select your preferred color from the Choose Color setting. This option lets you match the header text color with your site’s color scheme or branding.
Setting Header Width
Specify the Header Width in pixels to adjust the text padding in the header. This setting allows you to control the amount of space around the header text, ensuring it fits well within your PDF templates.
Choosing Font Style for Header Text
From the dropdown menu under Font Style, choose the font style that best fits your design preferences for the header text. This customization option ensures that the header text complements your overall design.
Selecting Font Size for Header Text
Adjust the Font Size for the header text using the respective setting. This allows you to set the text size to ensure readability and visual appeal in your PDF templates.
Setting Header Top Placement
To adjust the position of the header, set the Header Top Placement value. A greater value will position the header further down from the top of the page, allowing you to control the vertical spacing and placement of the header within your PDF templates
Click on Save Settings.

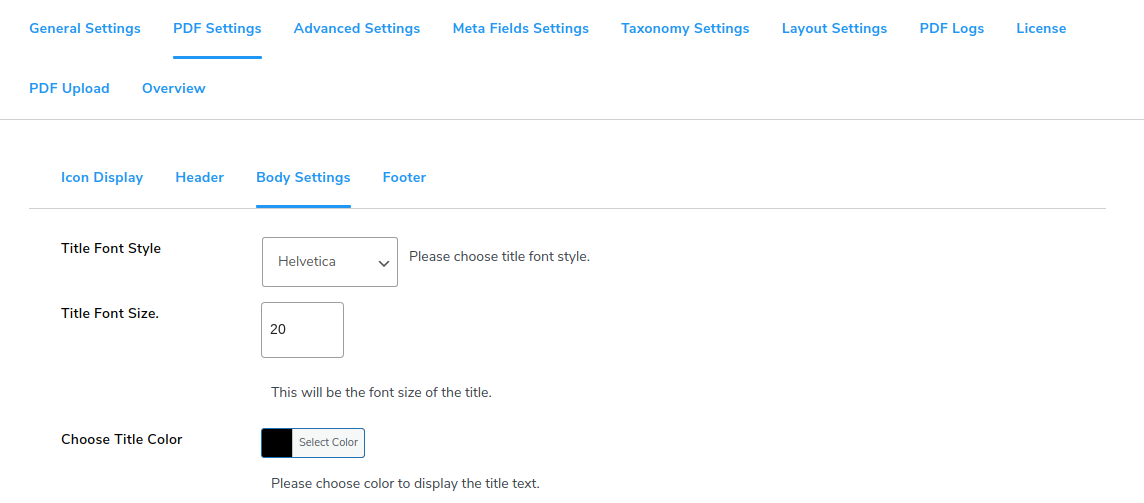
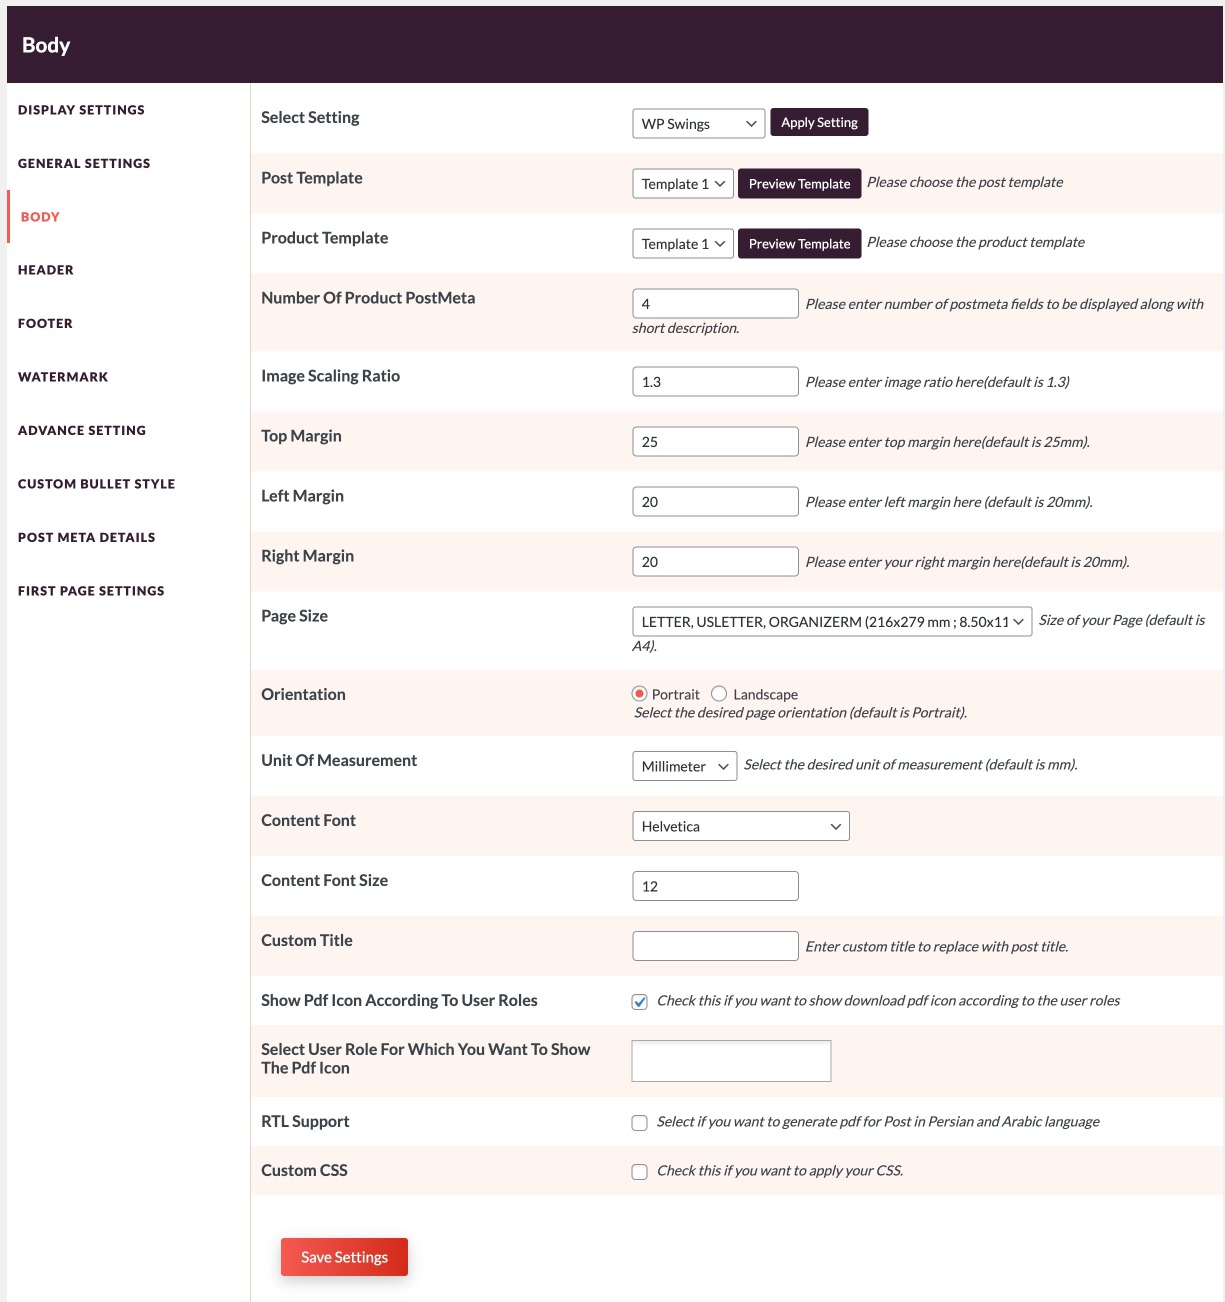
5.3.Body Settings
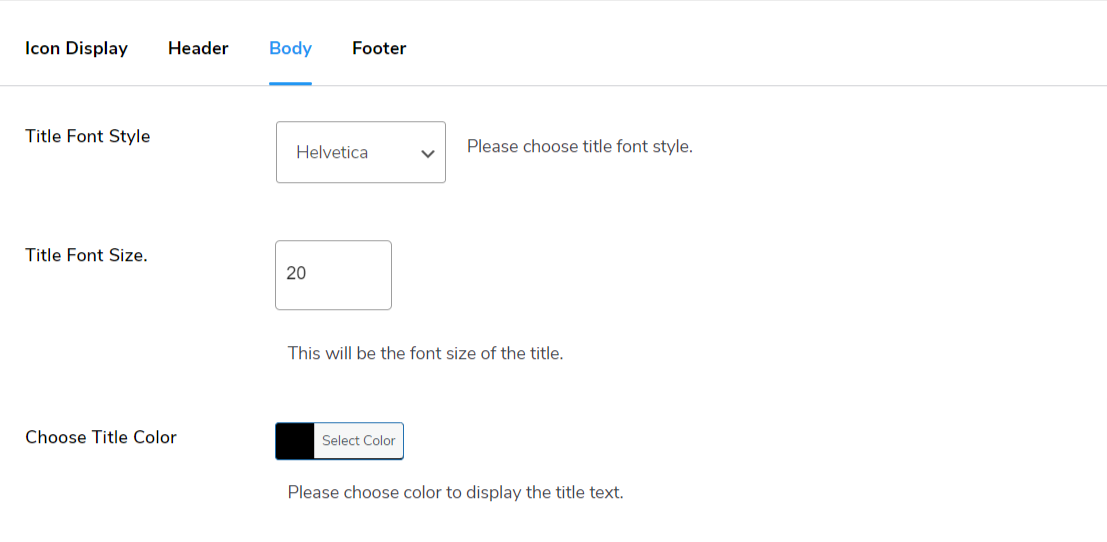
Accessing Body Settings
Navigate to WP Swings → PDF Generator for WP → PDF Settings → Body Settings to configure the body settings for generating PDF files. This section allows you to define various aspects of the PDF body, including title customization and text appearance.
Customizing the PDF Title Font Style
For the title of the PDF body, select the Title Font Style from the available dropdown options. This setting lets you choose a font style that aligns with your branding or design preferences for the PDF title.
Setting the Title Font Size
Enter the desired size for the PDF title in the Title Font Size setting. This customization option allows you to adjust the size of the title text to ensure it stands out appropriately within your PDF files.
Choosing Title Text Color
In the Choose Title Color setting, select the text color for the PDF title from the provided color palette. This option helps you match the title color with your overall design and branding.
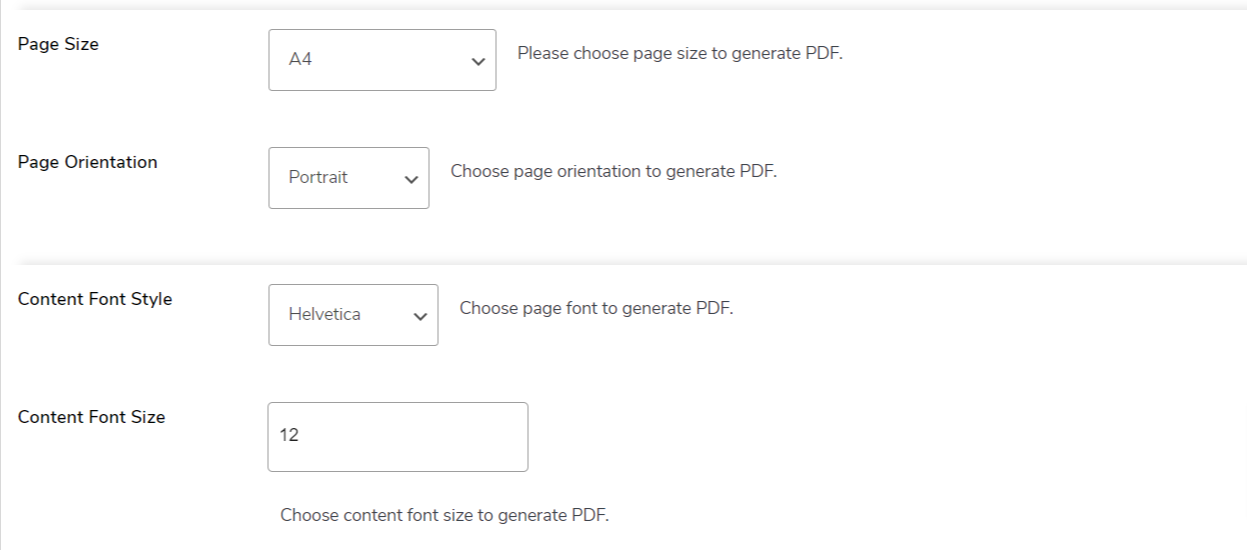
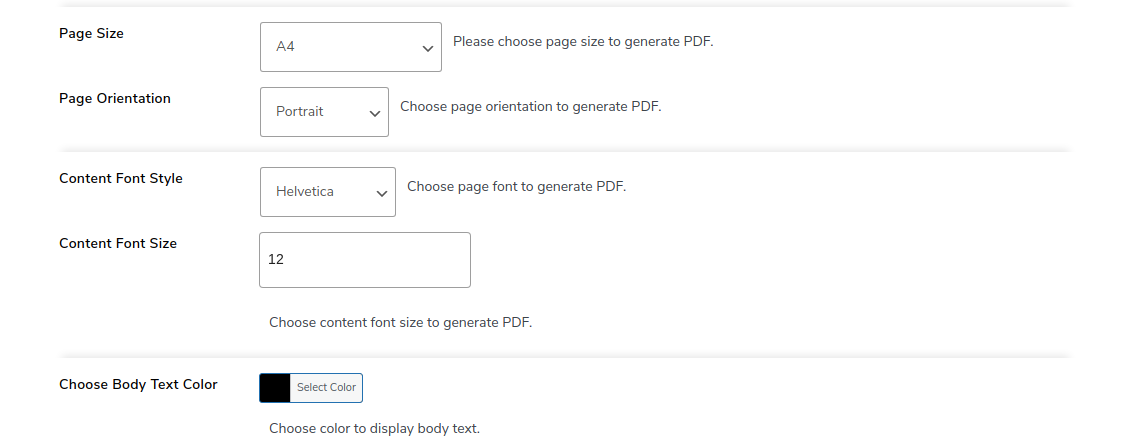
Selecting Page Size
Choose the Page Size from the dropdown menu to set the dimensions for your PDF files. This option allows you to select a predefined page size that best fits your needs.
Choosing Page Orientation
You can select the Page Orientation from two options: Landscape or Portrait. This setting determines the layout of your PDF pages, allowing you to choose between a horizontal or vertical orientation.
Setting Custom Page Dimensions
If you prefer a custom size for your pages, select Custom Page Size from the dropdown menu after choosing the page size. You can then set the Page Height and Page Width according to your specific requirements.
Customizing PDF Body Content
For the content in the PDF body, configure the Font Style, Font Size, and Body Text Color. These settings should be adjusted similarly to the title settings to maintain consistency in the appearance of your PDF content.
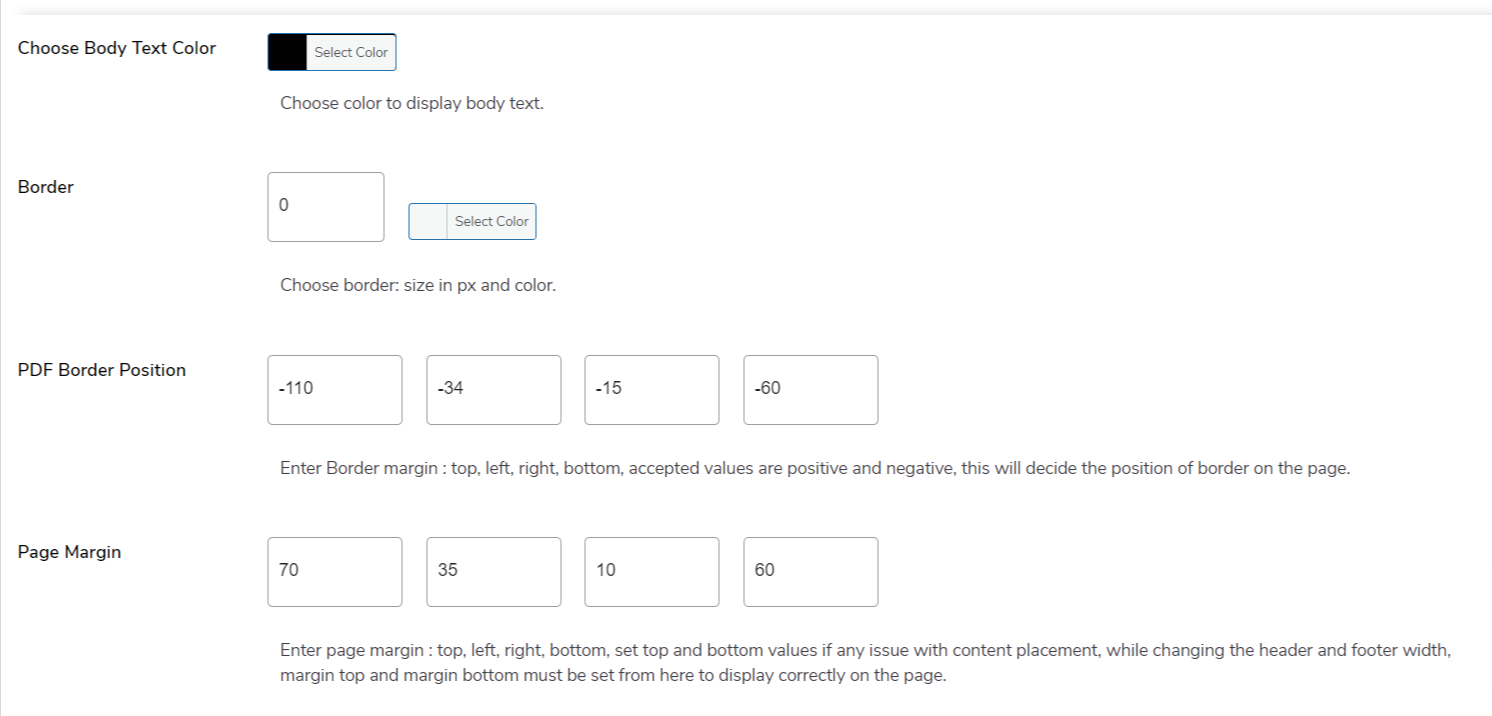
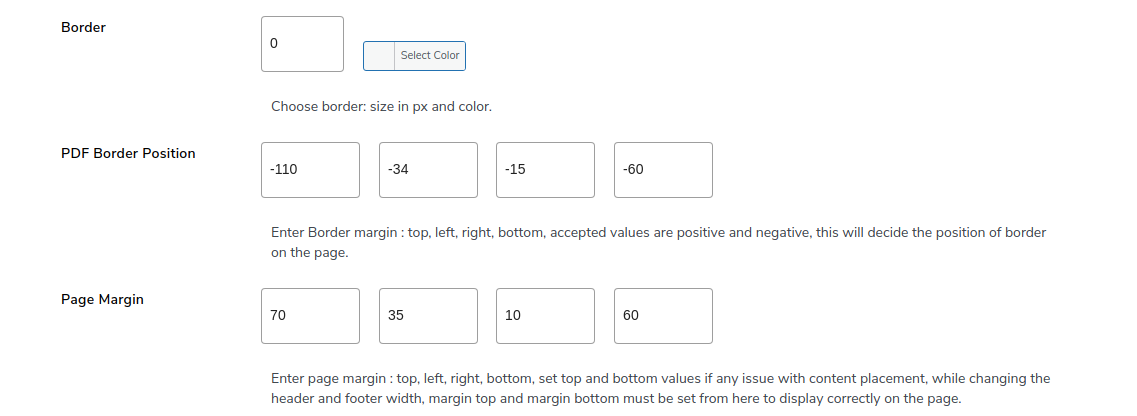
Configuring Border Settings
In the Border Settings, select the border size in pixels and choose the border color. This allows you to define the thickness and color of the border around your PDF content, enhancing the visual appeal and structure of your documents.
Setting Border Position
Enter the values for PDF Border Position to adjust where the border appears on the page. This setting enables you to precisely position the border to fit your design requirements and layout preferences.
Adjusting Page Margins
Enter the values for Page Margin to provide appropriate padding and ensure the correct placement of content within your PDF. This adjustment helps in managing the space around the edges of the page, ensuring that the content is well-aligned and visually appealing.

Enabling RTL Support
To support right-to-left (RTL) languages such as Arabic and Hebrew, tick the checkbox for RTL Support. This feature ensures that text and layout are properly adjusted for RTL languages, improving readability and alignment.
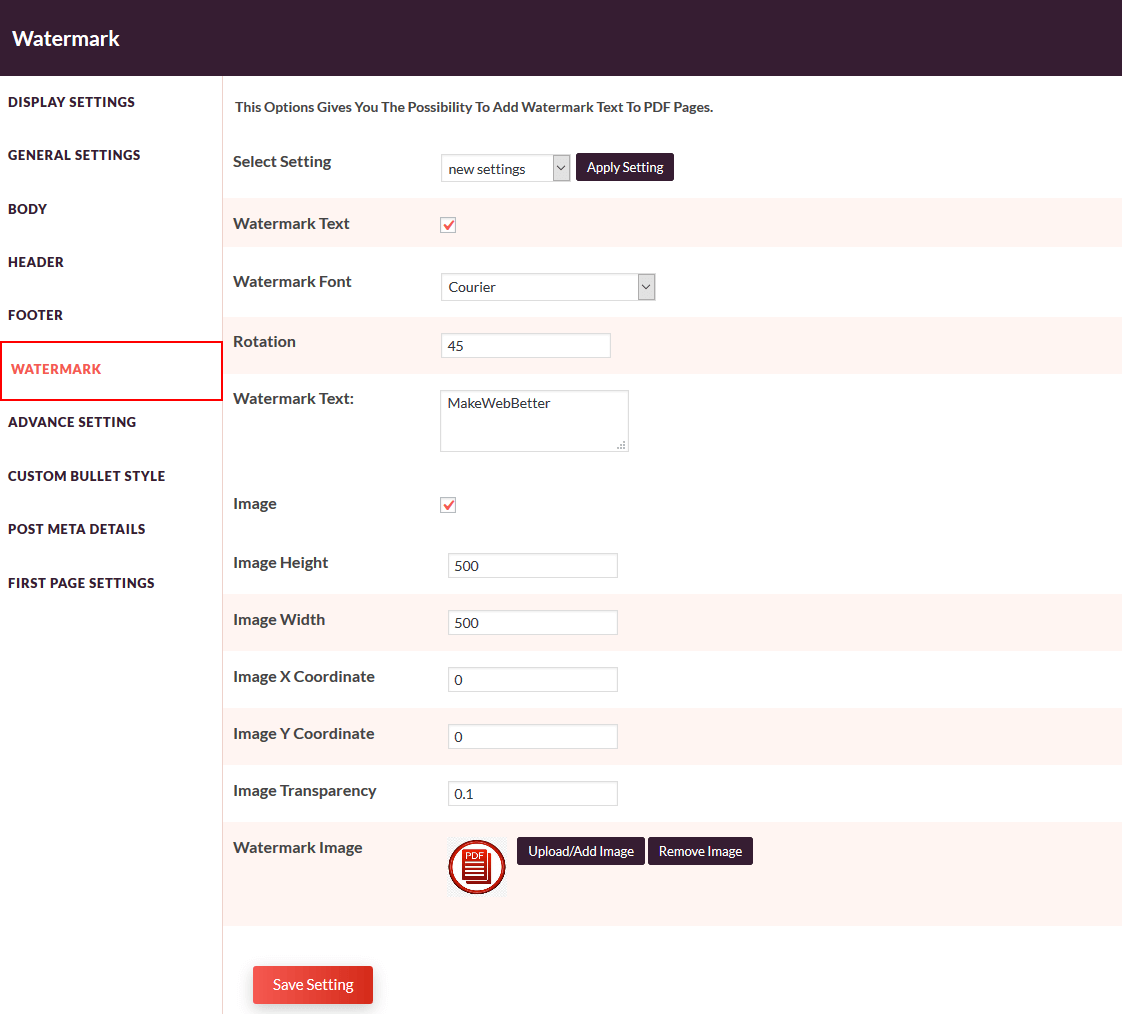
Adding a Watermark
To include a watermark on your PDF files, enable the watermark feature by ticking the checkbox for Add Watermark Text. This setting allows you to add a watermark to your PDFs, which can be useful for branding or protecting your content.
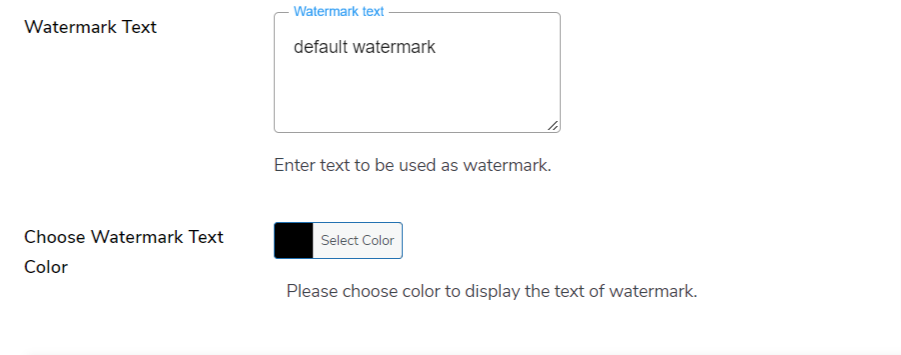
Configuring Watermark Text and Color
Enter the desired Watermark Text in the provided box to be displayed on your PDF files. Next, choose the color of the watermark from the color palette to ensure it matches your design preferences and stands out appropriately on the PDF pages.
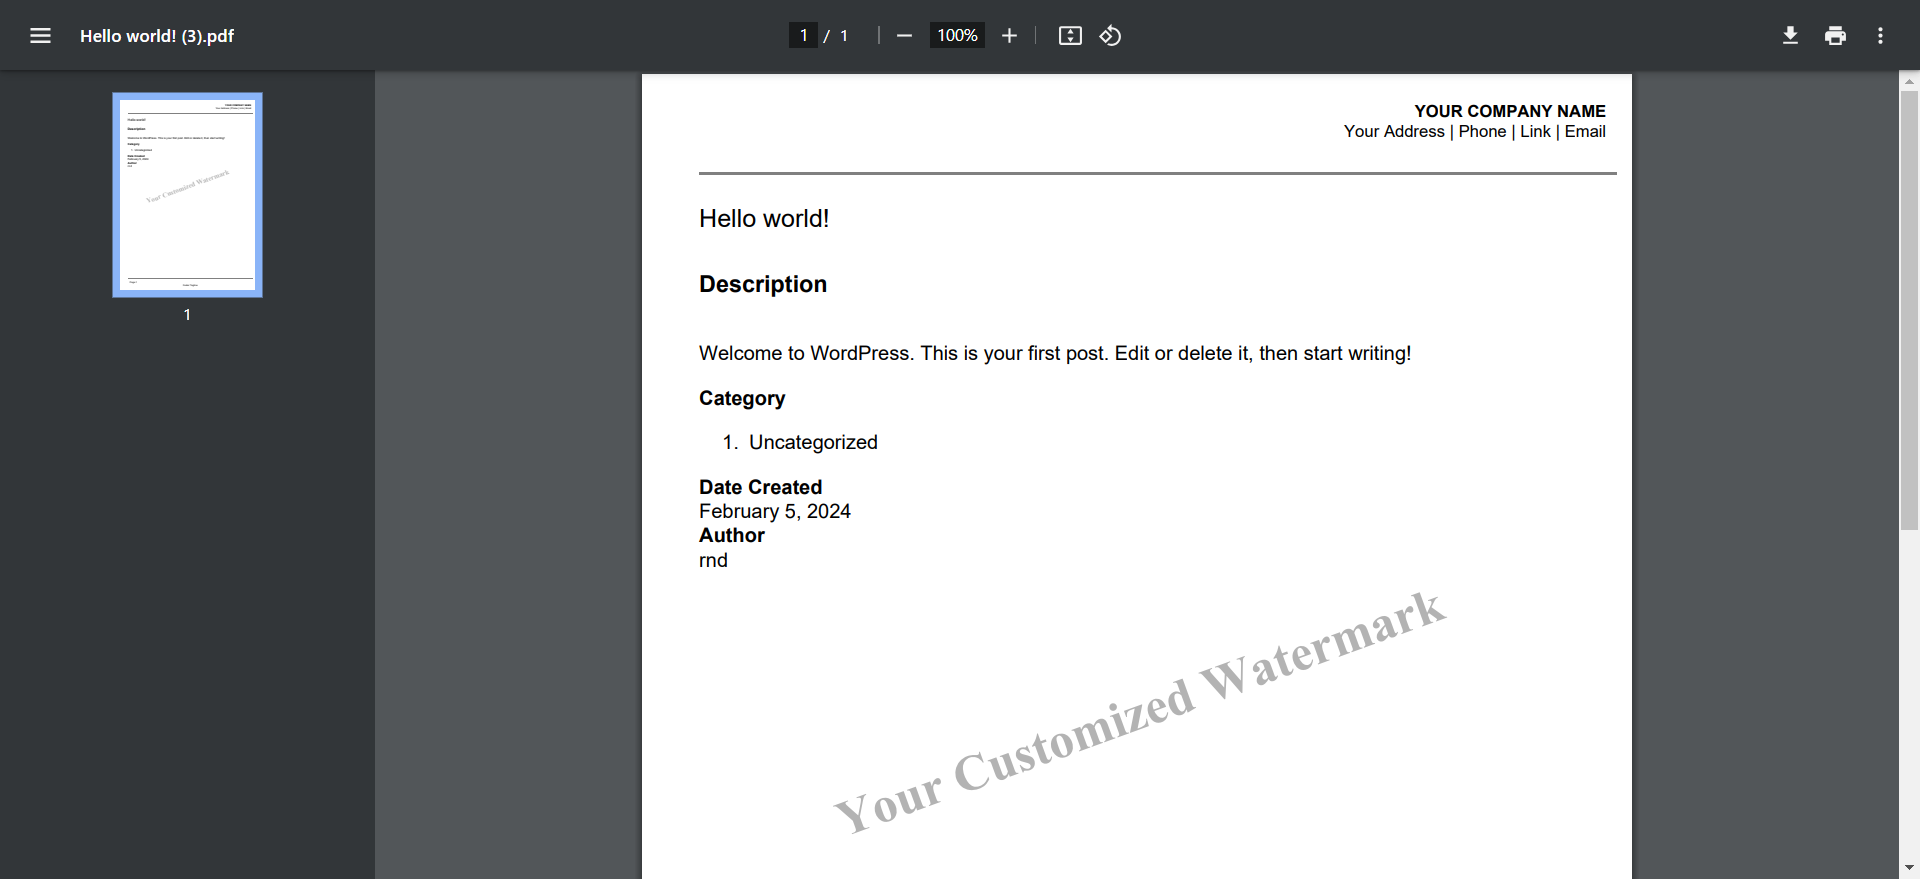
Customized Watermark Example:
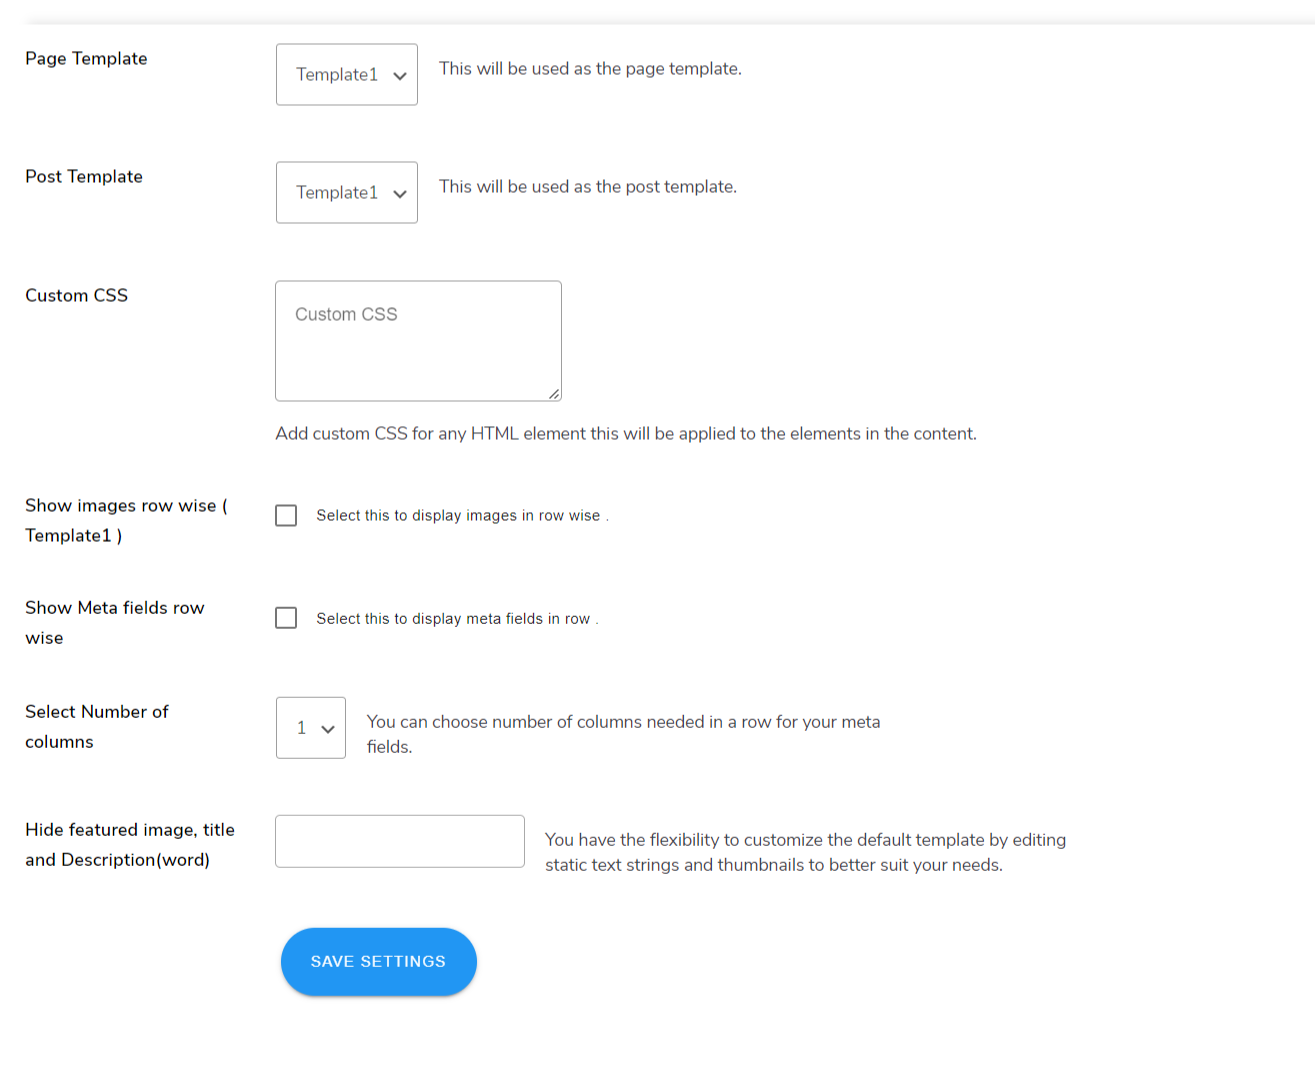
Selecting Page and Post Templates
Choose the templates for generating PDF files by selecting options from the dropdown menus for Page Template and Post Template respectively. This allows you to customize the layout and design of your PDFs based on the chosen templates for different types of content.
Adding Custom CSS
Use the space provided under the Custom CSS heading to add custom CSS for any HTML elements in your PDF templates. This feature allows you to apply specific styles and adjustments to enhance the appearance of your PDFs according to your needs.
Displaying Images Row-Wise
To display images row-wise in your PDFs, tick the checkbox for Show Images Row Wise (Template 1). This setting arranges images in rows, which can improve the organization and layout of visual content in your PDF files.
Displaying Meta Fields in Rows
Enable the display of meta fields in your PDF body by ticking the checkbox for Display Meta Fields in Rows. This option arranges meta fields in rows for better readability and organization in the PDF content.
Defining Number of Columns for Meta Fields
Under the Select Number of Columns setting, define the number of columns you need in a row for your meta fields. This allows you to customize the layout of meta fields in your PDFs according to the desired column structure.
Customizing Default Template
To tailor the default template to your needs, use the Hide Image, Title, and Description Word setting. This option lets you edit static text strings and thumbnails to better fit your customization requirements, allowing for a more personalized PDF template.
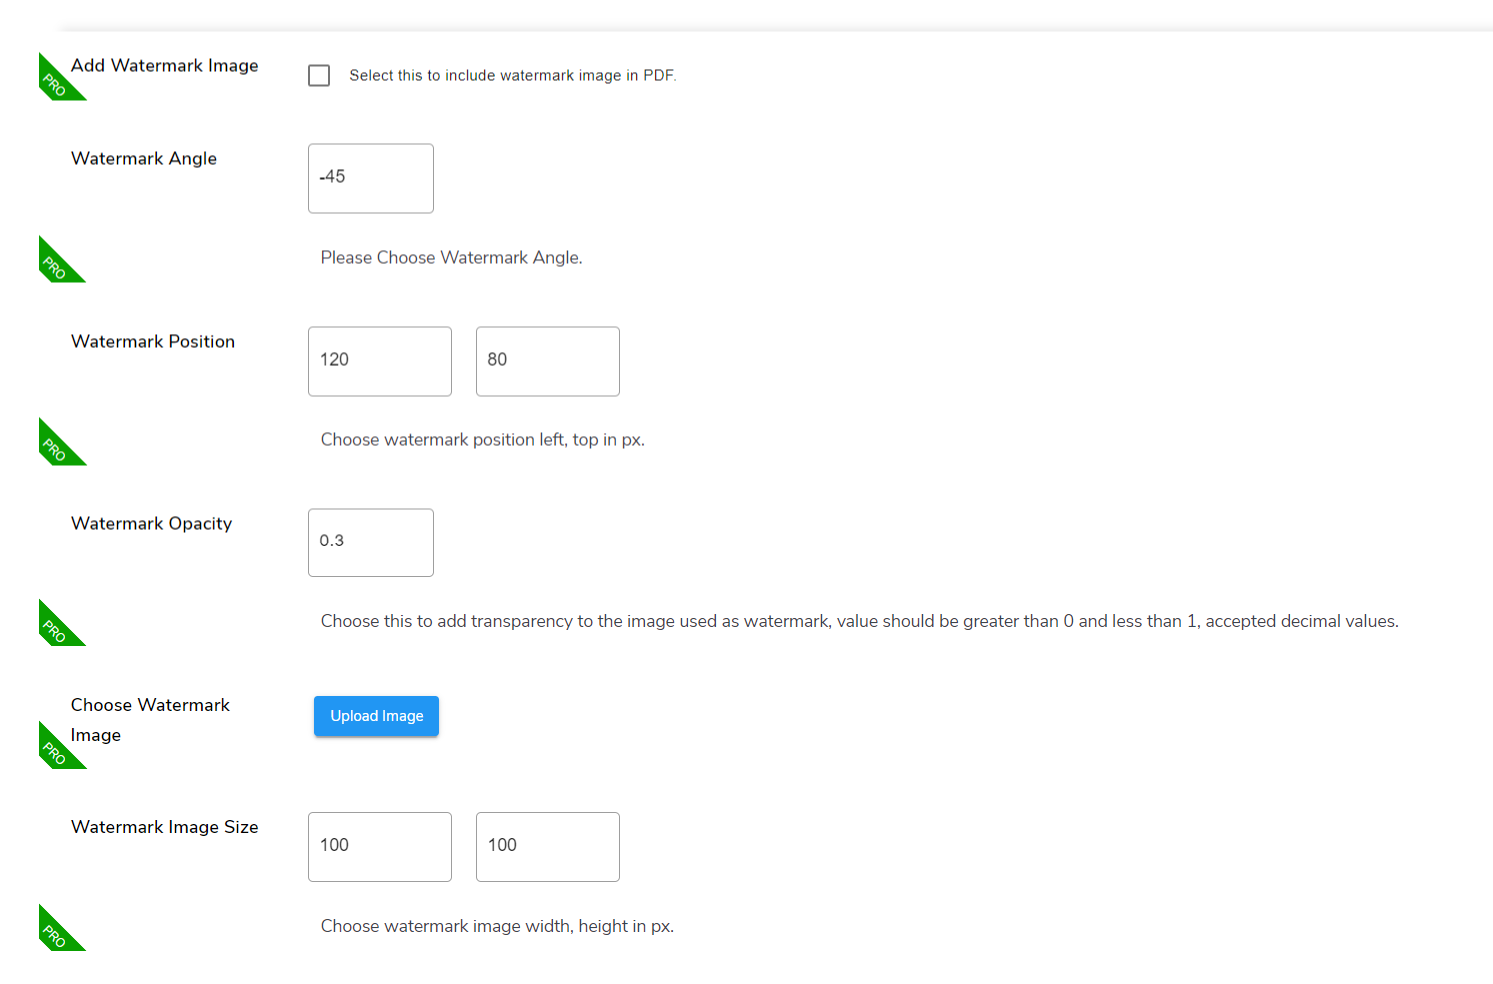
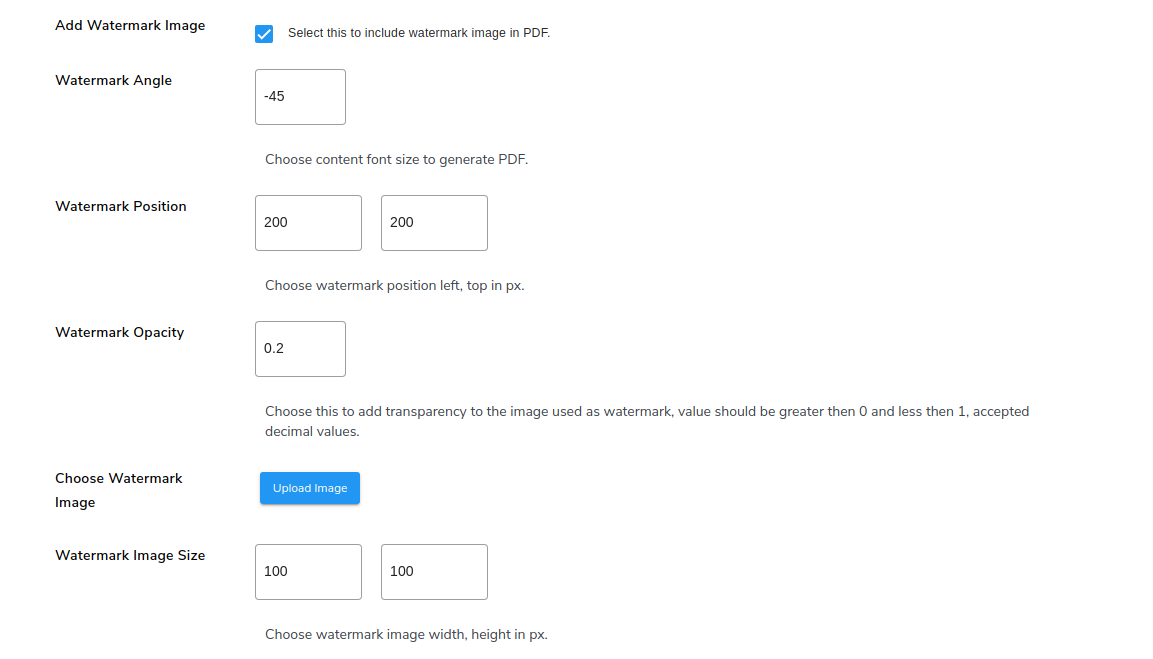
Adding a Watermark Image Premium
To use a watermark image, click on the checkbox for Add Watermark Image. This Pro feature allows you to include a watermark image in your PDFs, enhancing branding and protection.
Setting the Watermark Angle Premium
Enter the Watermark Angle in the corresponding space to specify the rotation of the watermark image. Use a negative sign to depict rotation in the anti-clockwise direction (e.g., -45 degrees). This setting allows you to position the watermark at the desired angle.
Configuring Watermark Position Premium
Set the Watermark Position by defining the distance from the left and top of the page in pixels. This Pro setting helps you place the watermark image precisely where you want it on your PDF pages.
Adjusting Watermark Opacity Premium
Set the Watermark Opacity to control the visibility of the watermark image. Opacity values range from 0 to 1, with a lower value making the watermark less intrusive. A best practice is to set the opacity to less than 0.3 for a subtle effect.
Uploading the Watermark Image Premium
Upload your chosen image for the watermark in the Choose Watermark Image setting. This Pro feature allows you to select and upload an image that will be used as the watermark in your PDFs.
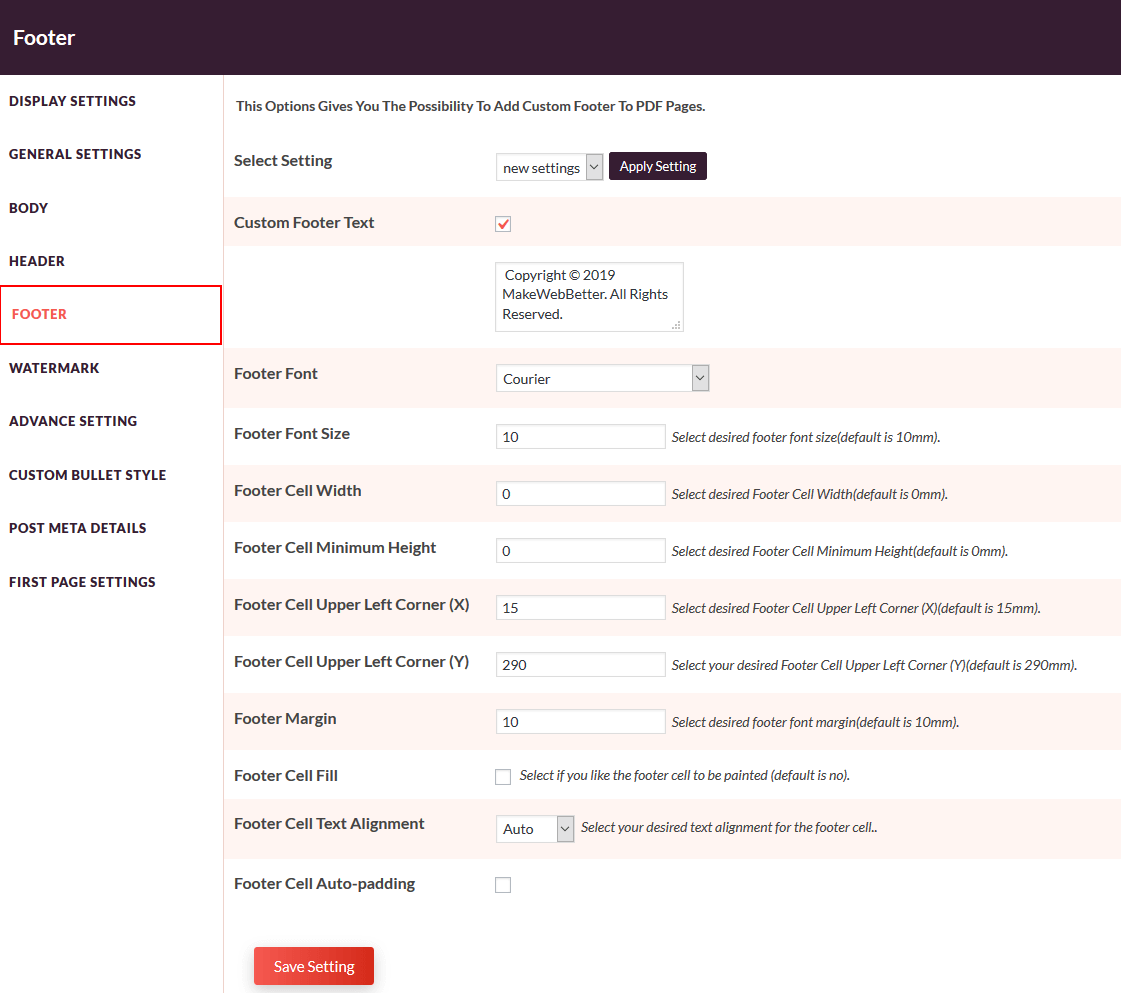
5.4.Footer Settings
Accessing Footer Settings
Navigate to WP Swings → PDF Generator for WP → PDF Settings → Footer Settings to configure the footer settings for generating PDF files. This section allows you to define the appearance and content of the footer in your PDFs.
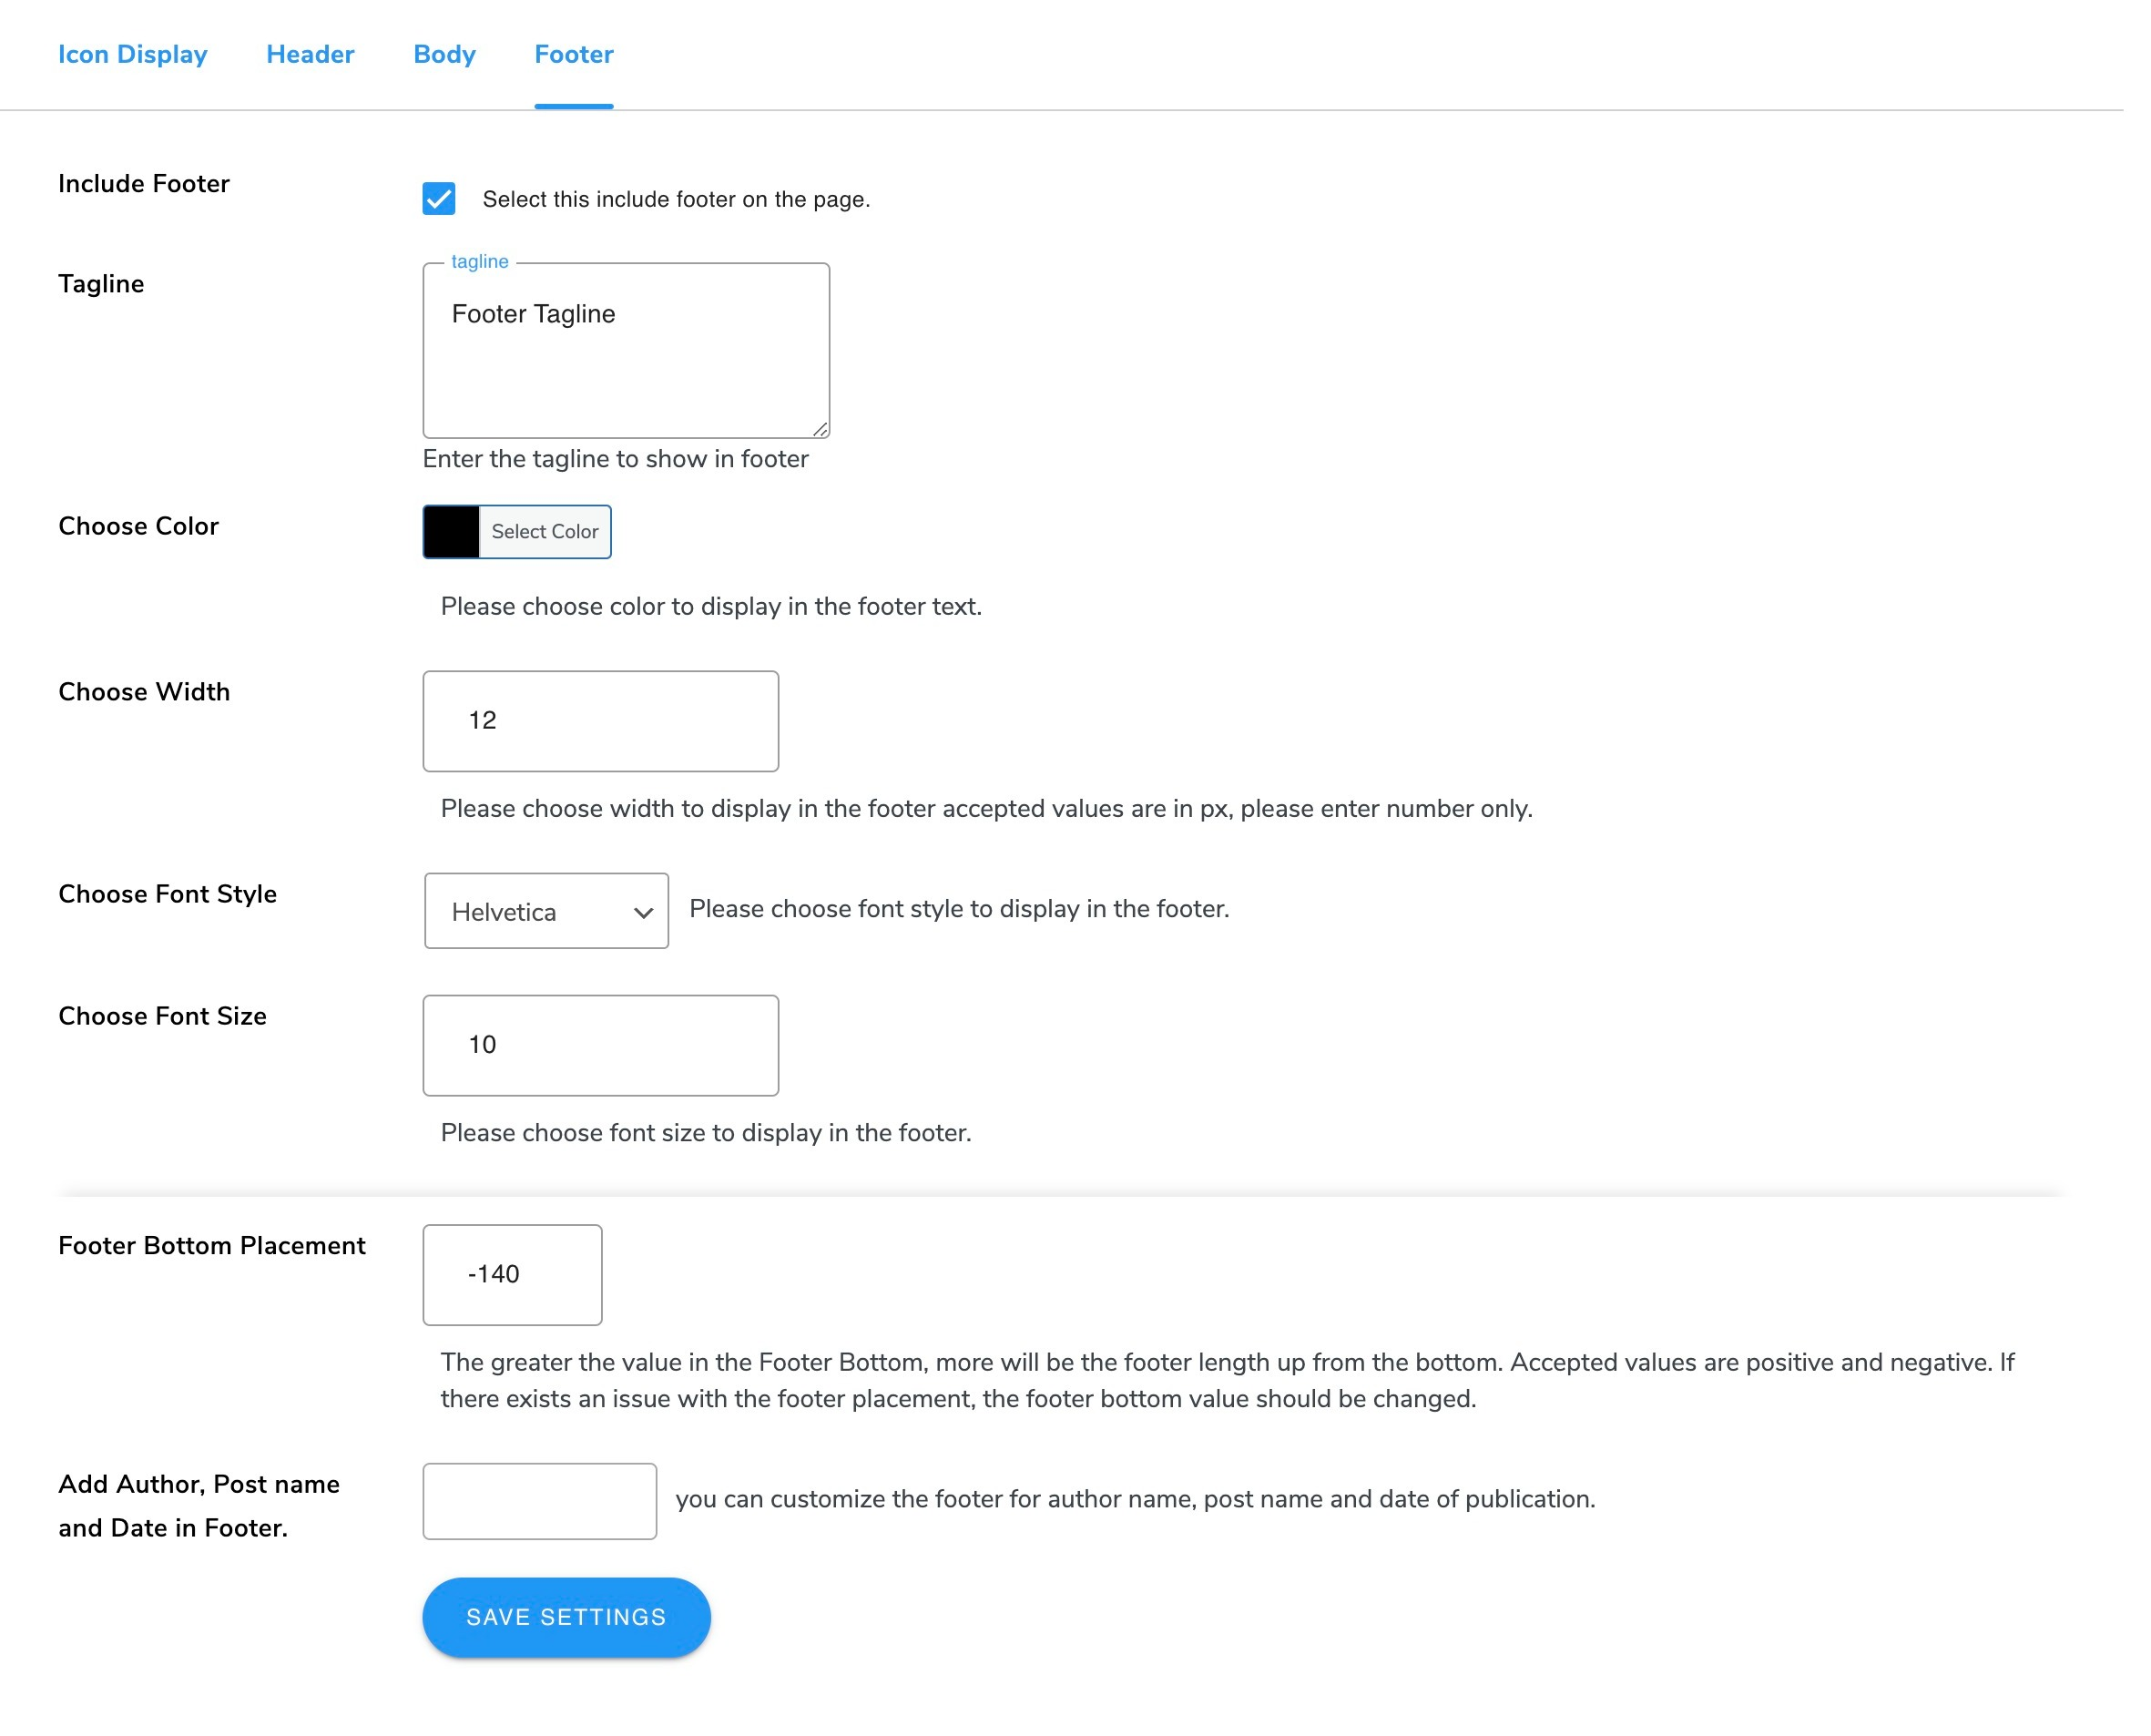
Including Footer in PDF
To ensure that a footer is included in the generated PDFs, tick the checkbox for Include Footer. This option will make the footer visible on each page of your PDF documents.
Entering Footer Tagline
In the Footer Tagline field, enter the text you want to appear in the footer. This tagline can include information such as branding or additional details relevant to your PDFs.
Choosing Footer Font Color
Select the Font Color for the footer text from the color palette in the Choose Color option. This allows you to customize the color of the footer text to align with your design preferences.
Setting Footer Width
Enter the Footer Width in pixels under the Choose Width option to provide padding for the footer. This setting helps you adjust the width of the footer area to ensure proper spacing and alignment.
Customizing Font Style and Size
Choose the Font Style and Font Size for the footer text by selecting the desired values in the respective fields. These settings allow you to customize the look of the footer text according to your style preferences.
Adjusting Footer Bottom Placement
Set the Footer Bottom Placement value to control how far the footer is positioned from the bottom of the page. A greater value will move the footer further up from the bottom, adjusting the vertical placement of the footer on your PDFs.
Adding Author Name, Post Name, and Post Date
Use the blank space provided to include additional information in the footer, such as the Author Name, Post Name, and Post Date. This allows you to add relevant details to each PDF generated.

Adding Page Number Format Premium
Enable the checkbox for Change Page No Format in the footer settings to include page numbers along with the total page count in your PDF files. This Pro feature allows you to set up a format that displays the current page number and the total number of pages (e.g., “Page 1 of 10”). You can also specify the Page Number Position in the footer to determine where the page numbers will appear on each page of the PDF.
Customized Footer Example:
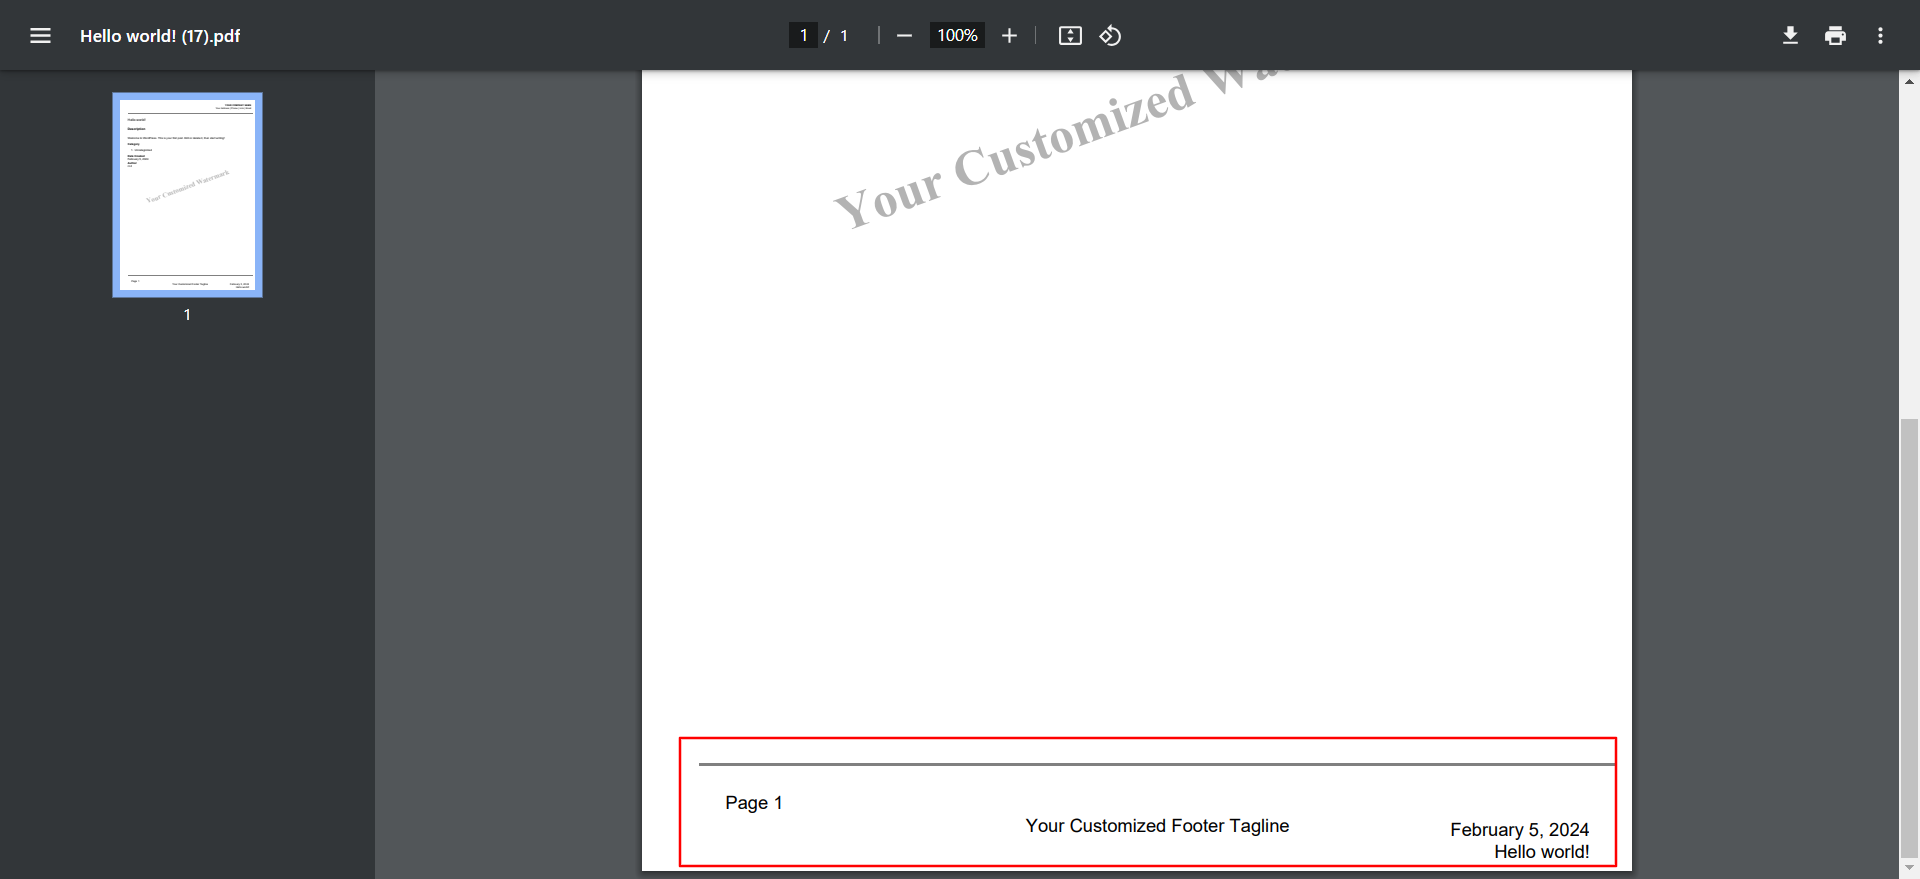
Click on the Save Settings button to save your entries.
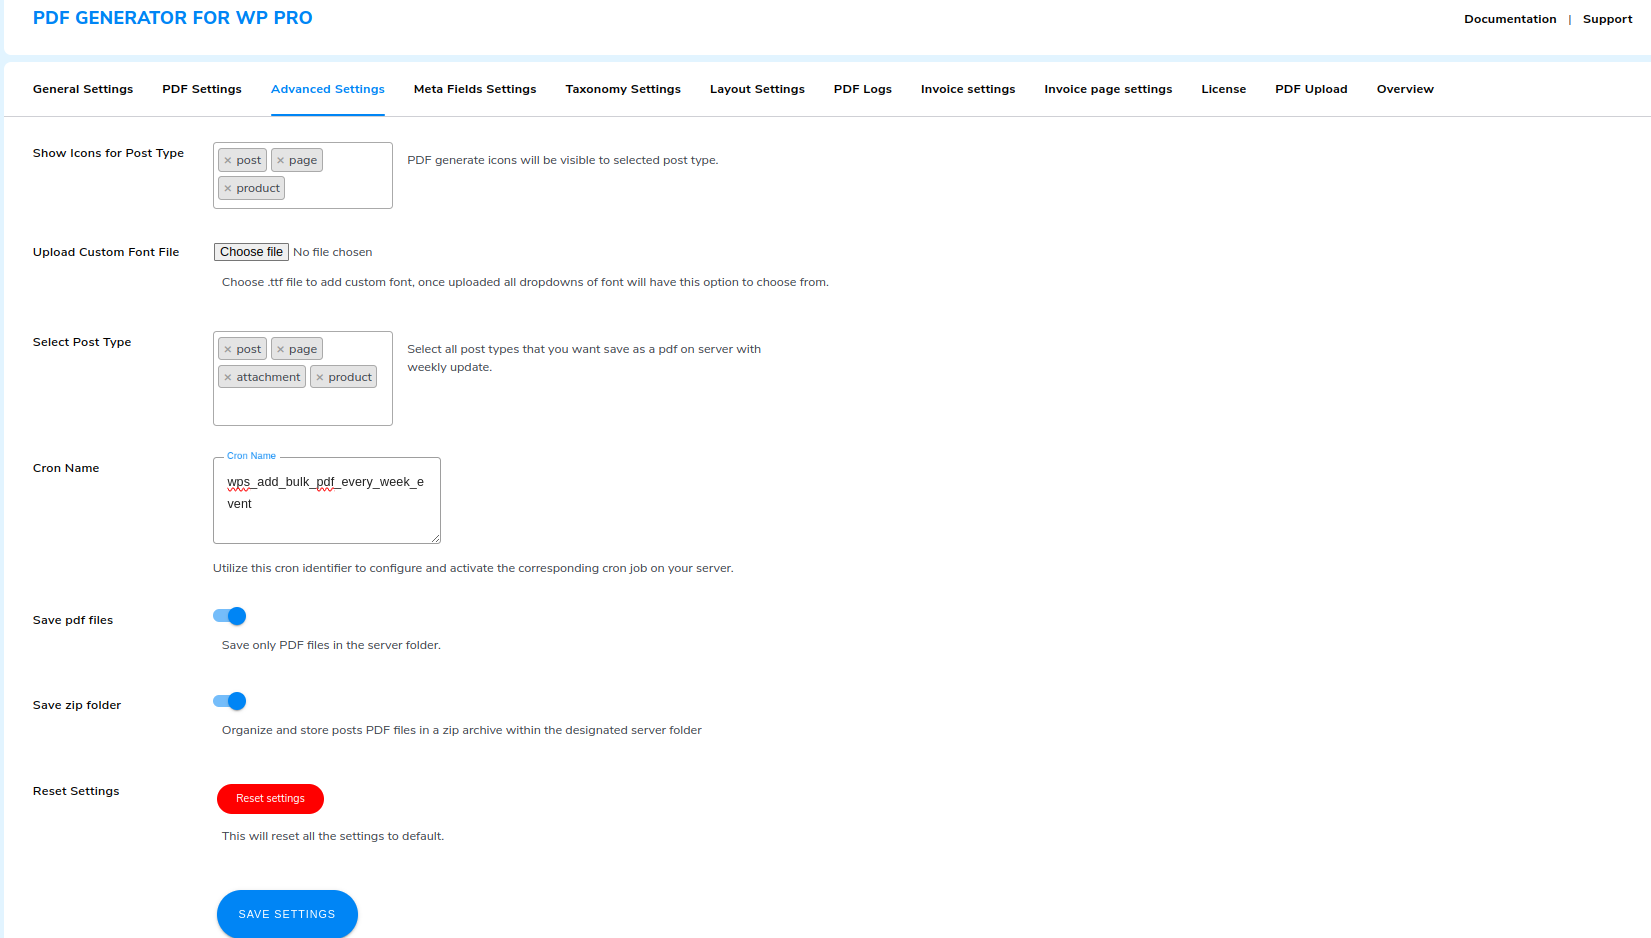
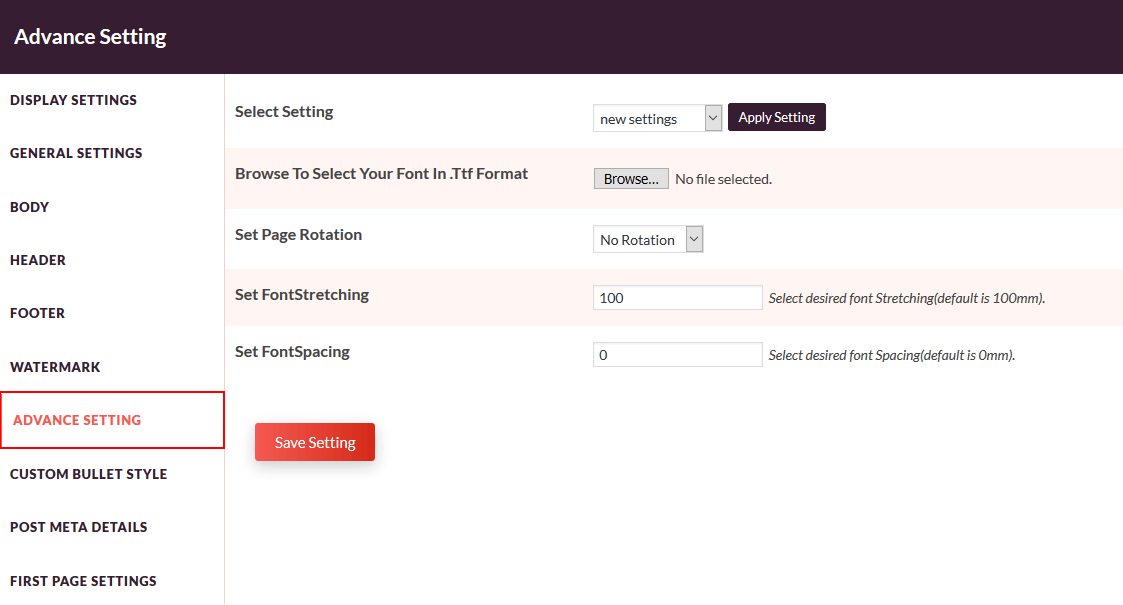
6.Advanced Settings
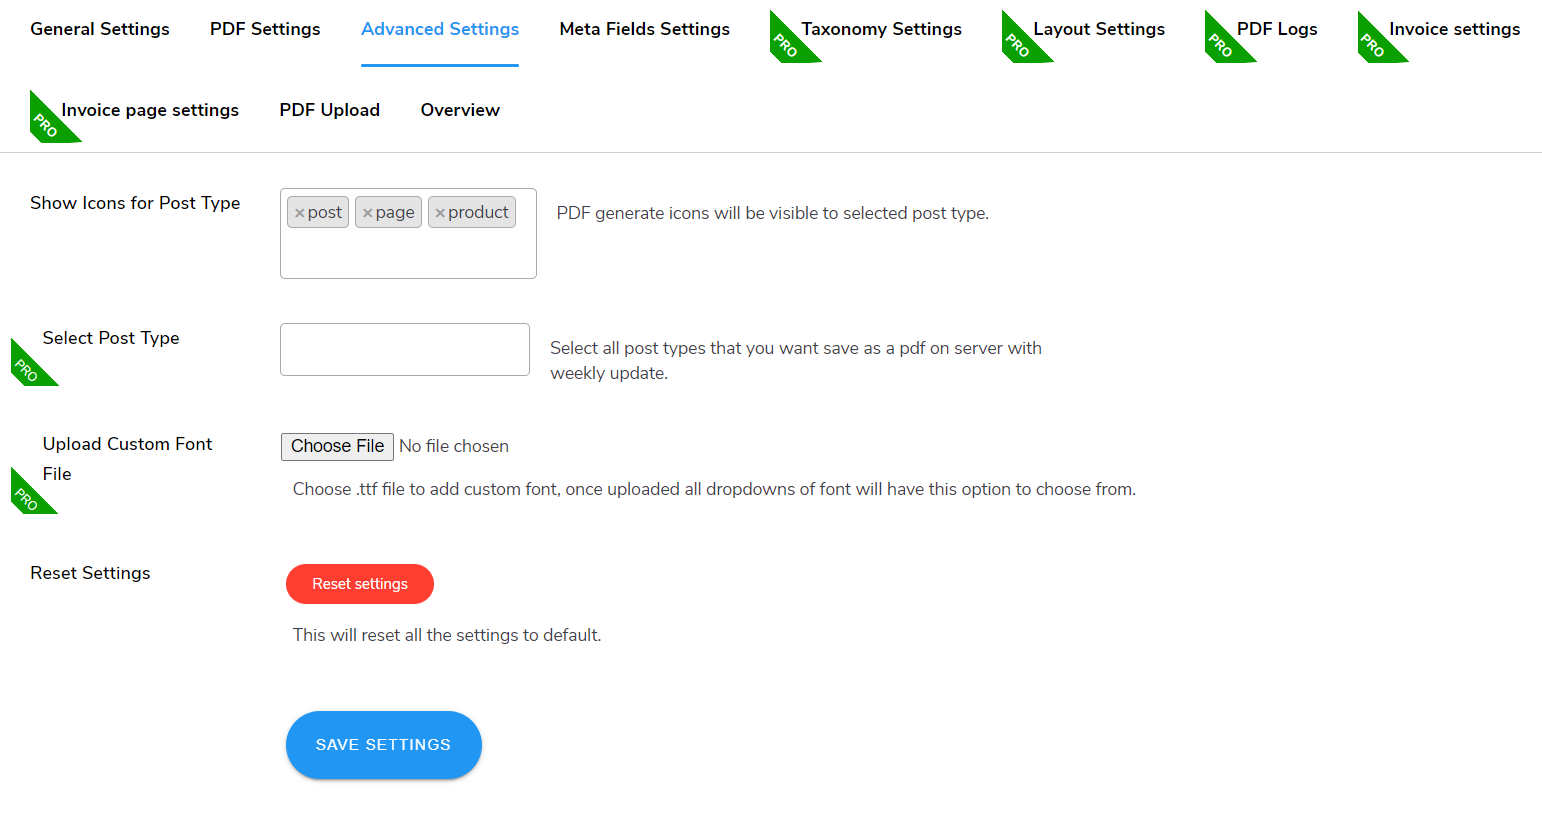
Configuring Display of ‘Generate PDF’ Icon
Navigate to WP Swings → PDF Generator for WP → Advanced Settings. In the provided space, enter the selected post types where you want the ‘generate PDF’ icon to appear, such as post, page, and/or product. This setting allows you to customize which types of content will display the option to generate a PDF, based on your specified criteria.
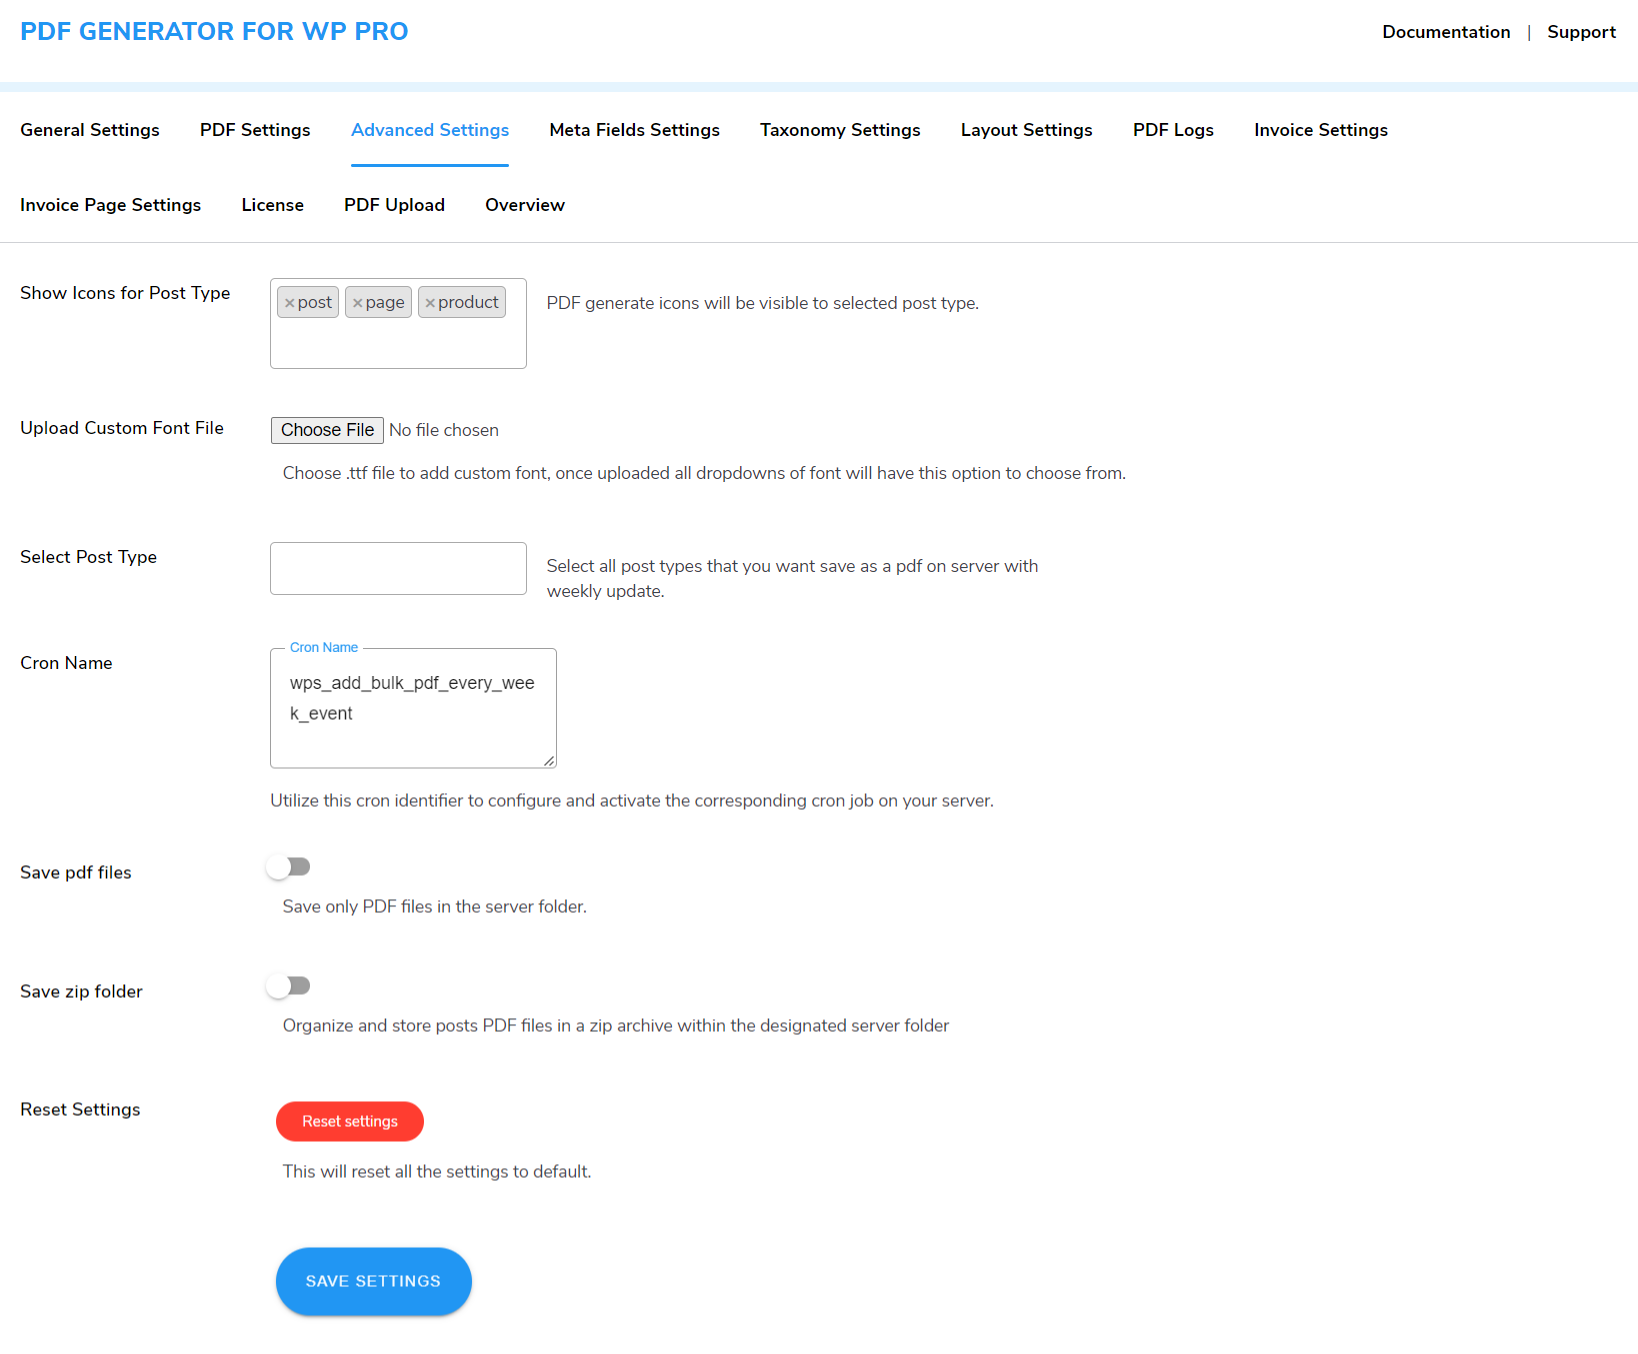
Uploading a Custom Font Premium
Click on Choose File to upload a custom .ttf font file in the Upload Custom Font File setting. This will make the font available in all dropdown lists of fonts, allowing you to use it across your PDF documents.
Entering Cron Name Premium
Enter your Cron Name to initiate a cron job. This setting is used to start a scheduled task for automated processes related to PDF generation, such as regular updates or file handling.
Saving PDF Files on the Server Premium
Toggle the Save PDF Files option to enable saving generated PDF files on the server. This setting allows you to store PDFs on your server for future access and management.
Saving PDFs in a Zip File Premium
Toggle the Save Zip Folder option to save generated PDFs in a zip file. This feature compresses multiple PDFs into a single zip file, simplifying storage and download.
Click on the Reset Setting button to set all the settings to default.
Click on the Save Settings button to save your choices.
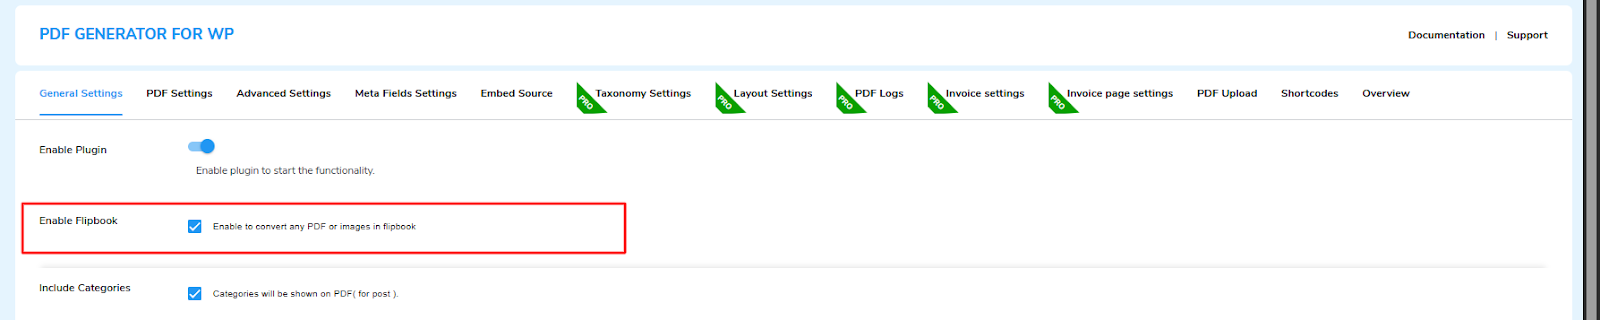
7.Create Flipbook With PDF and Images
To start creating flipbooks, you first need to enable, Flipbooks option from the General settings
Once enabled, you will see a new section in you WordPress sidebar
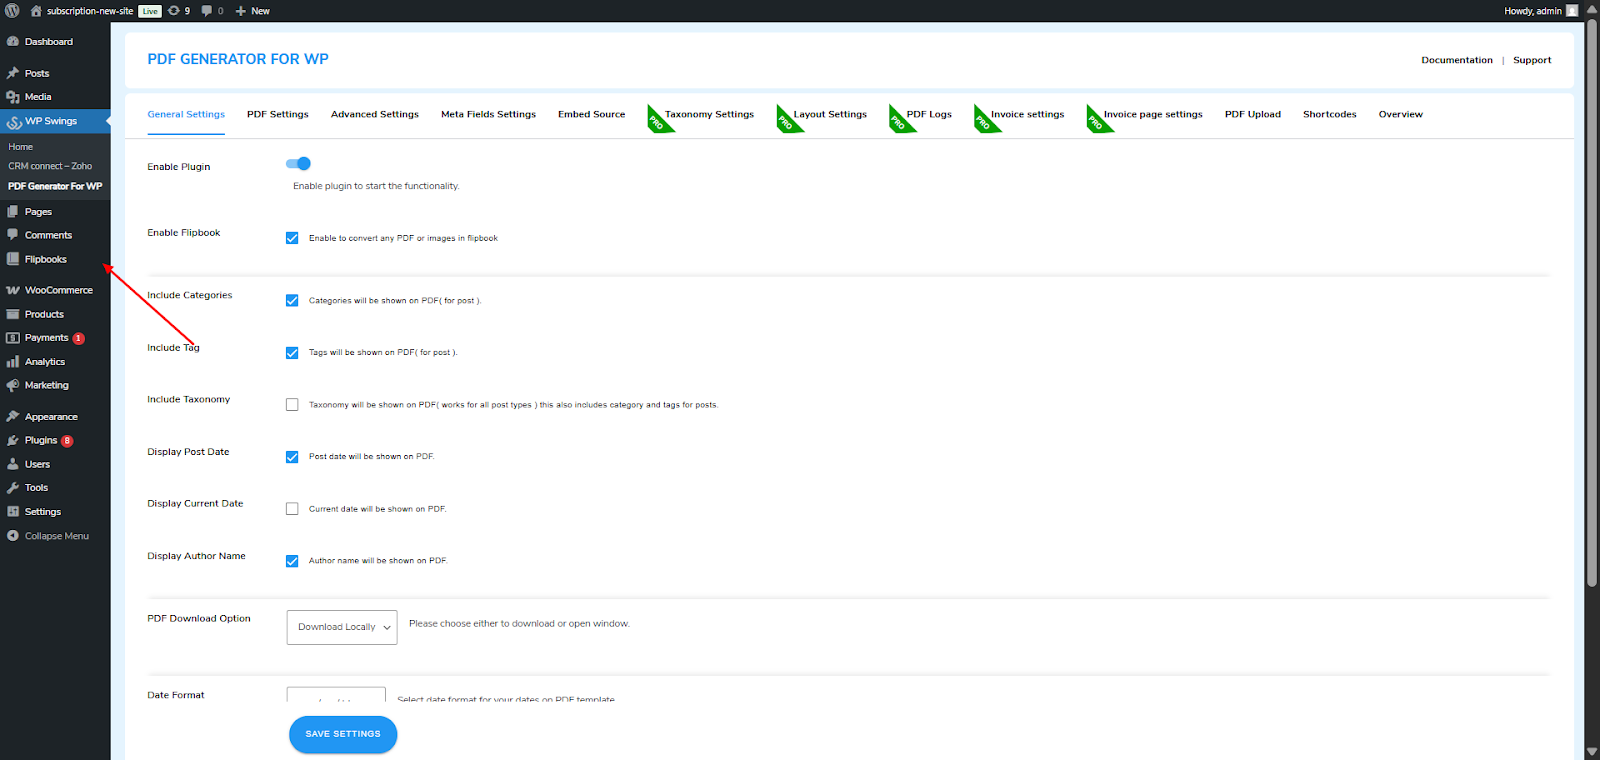
Click on the option and you’ll be redirected to a new screen.
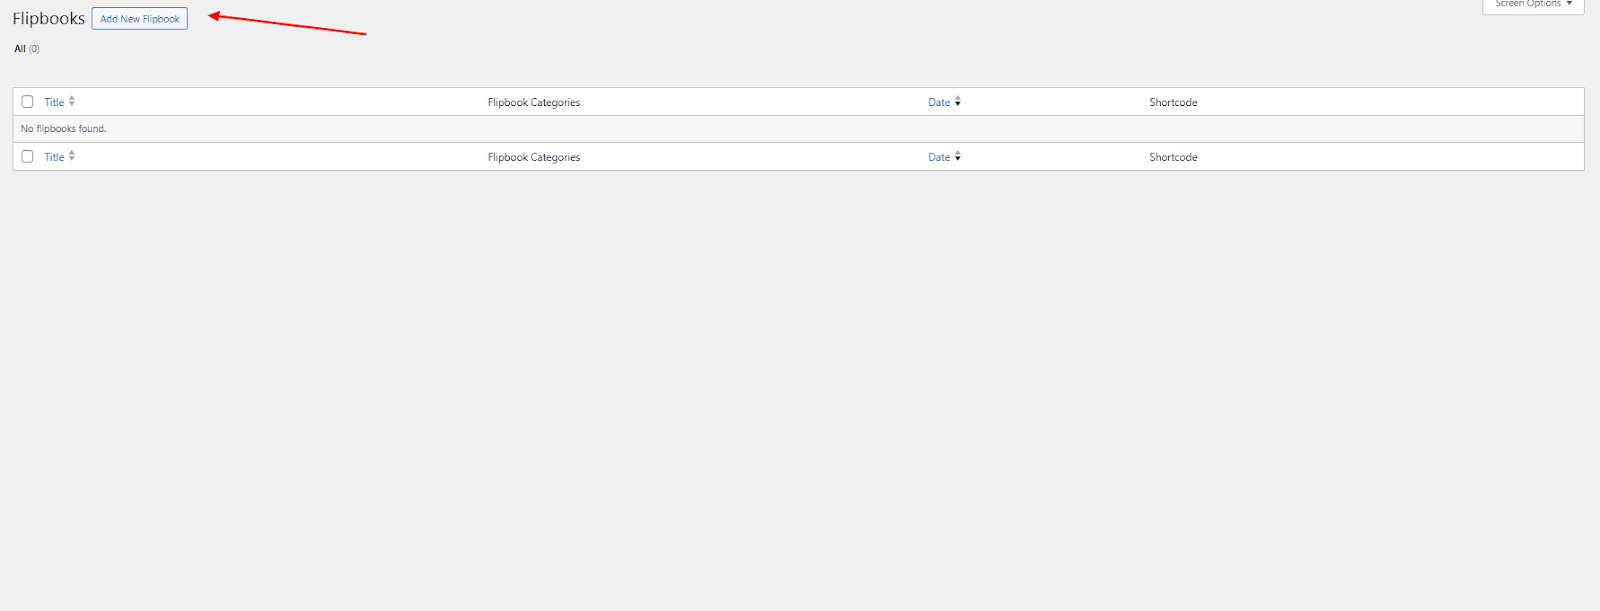
Create a new Flipbook
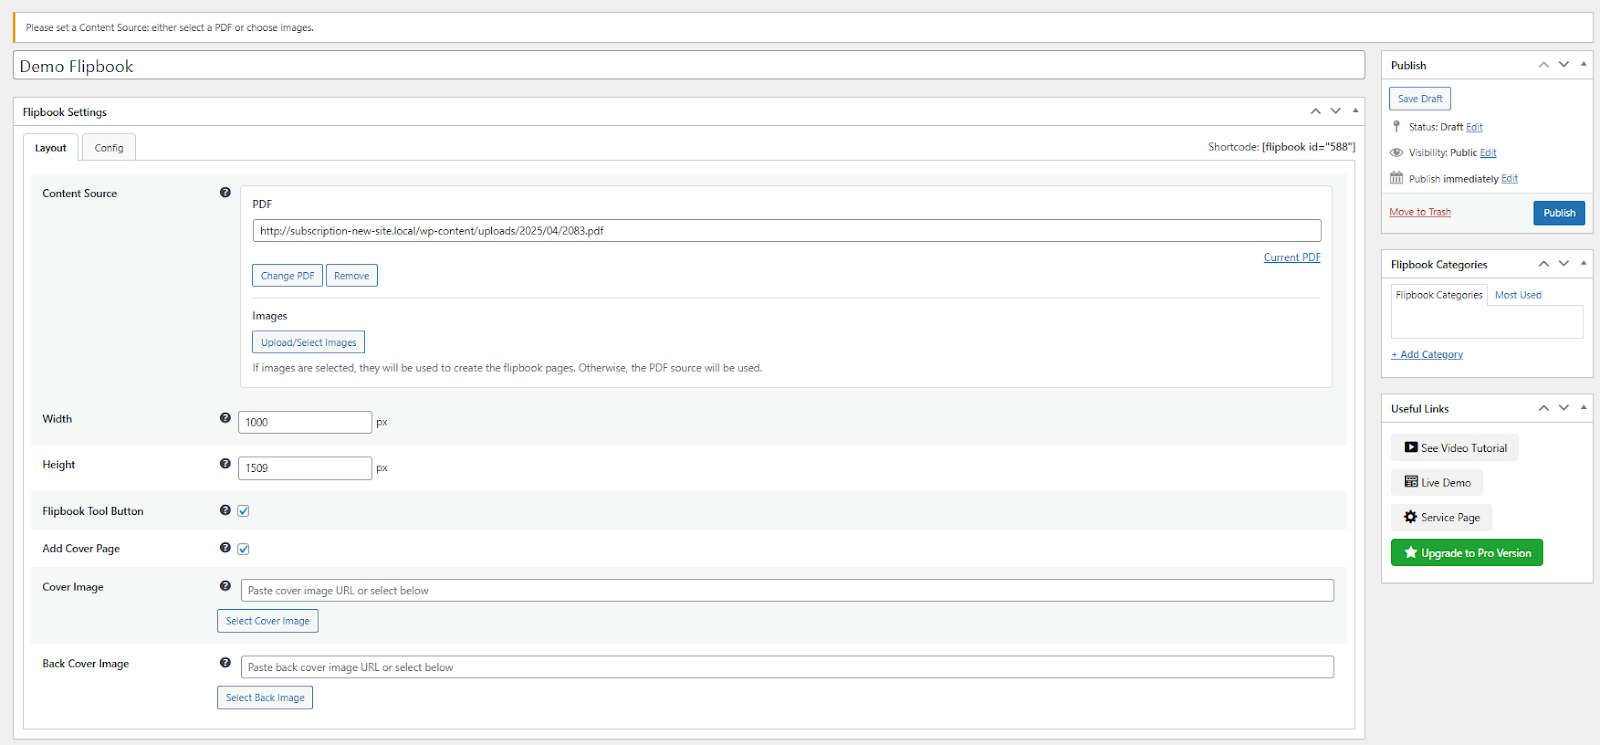
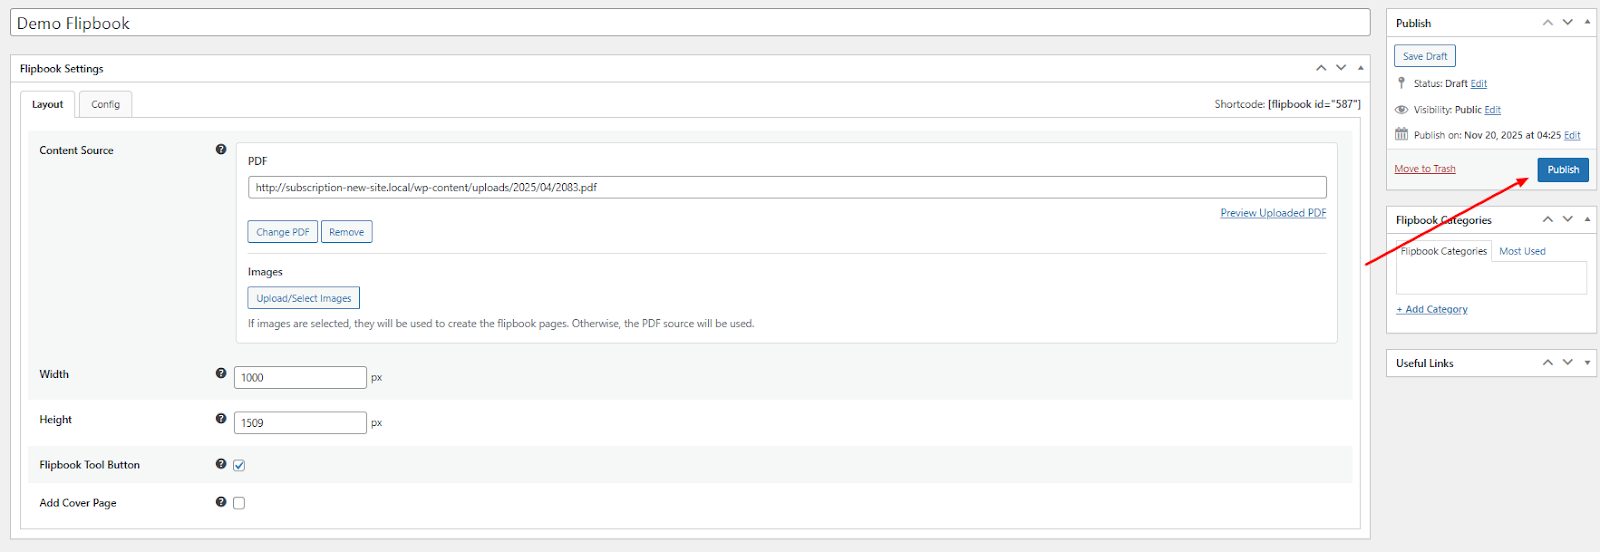
You’ll be redirected to a new settings page, where you can name your flipbook, for example, as I did, “Demo Flipbook.”
7.1 Layout Section
Content Source: Here you have 2 options, you can choose a PDF to create a flipbook, or you can select multiple images to convert them into a flipbook
Note: You can either choose PDF or images, plus if images are selected.
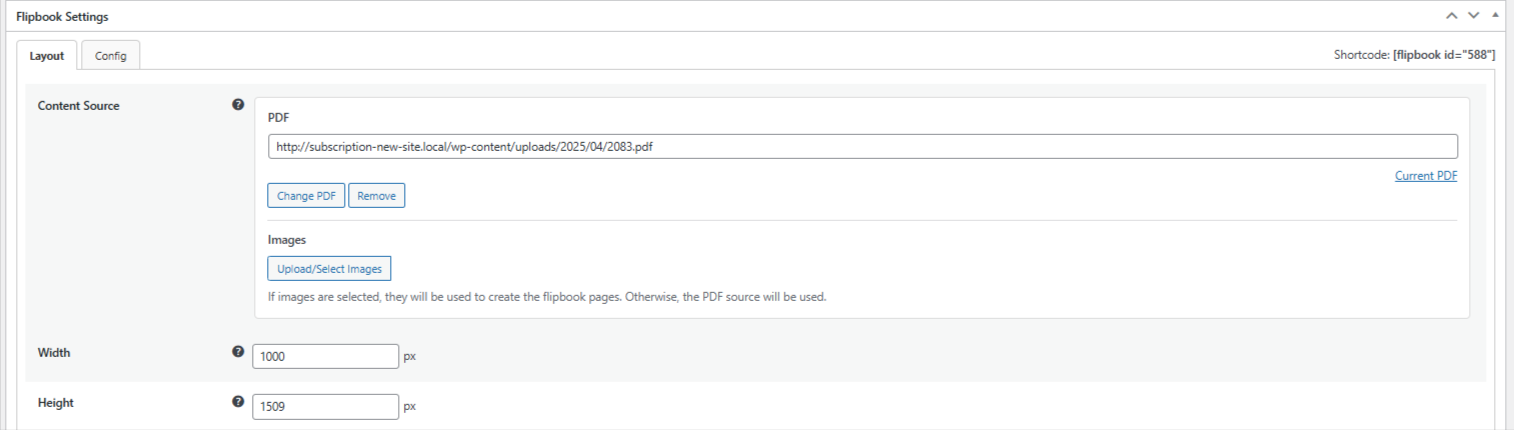
Width & Height: Next you have the option to define the width & height of you flipbook
Flipbook Tool: You can tick this box to enable the flipbook tool.
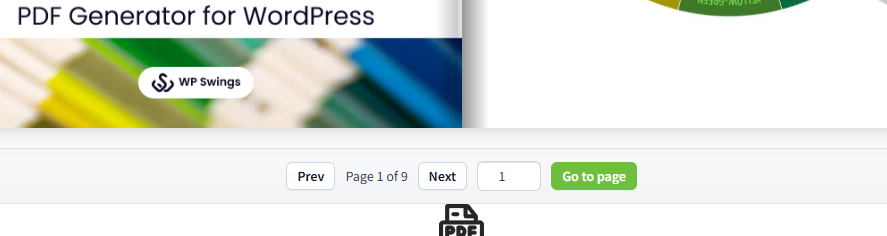
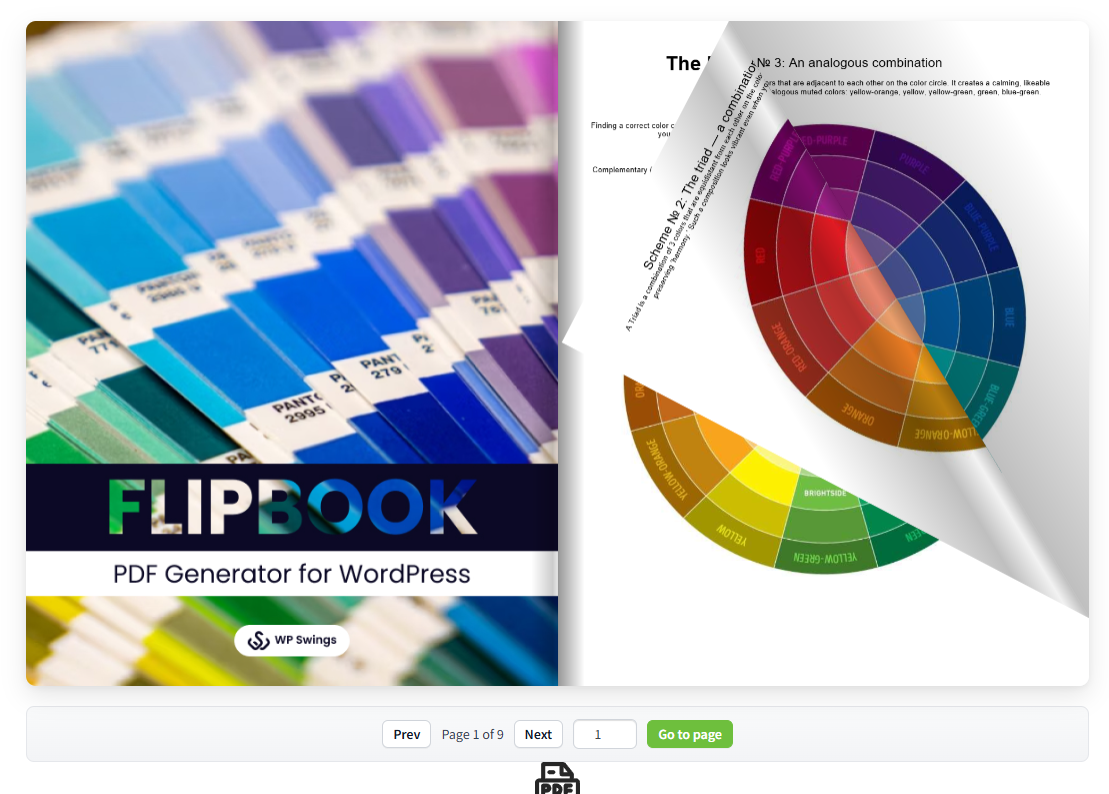
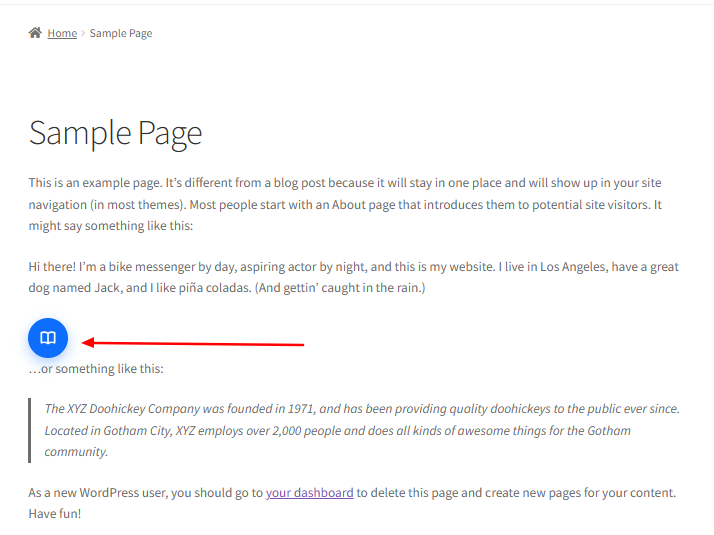
Frontend Representation:
Add Cover Page: Tick the checkbox if you want to add a cover page. You can upload the images for both front and back cover pages.
Frontend Representation:
7.2 Config Section
Here you can control the configuration related to the fipbook.
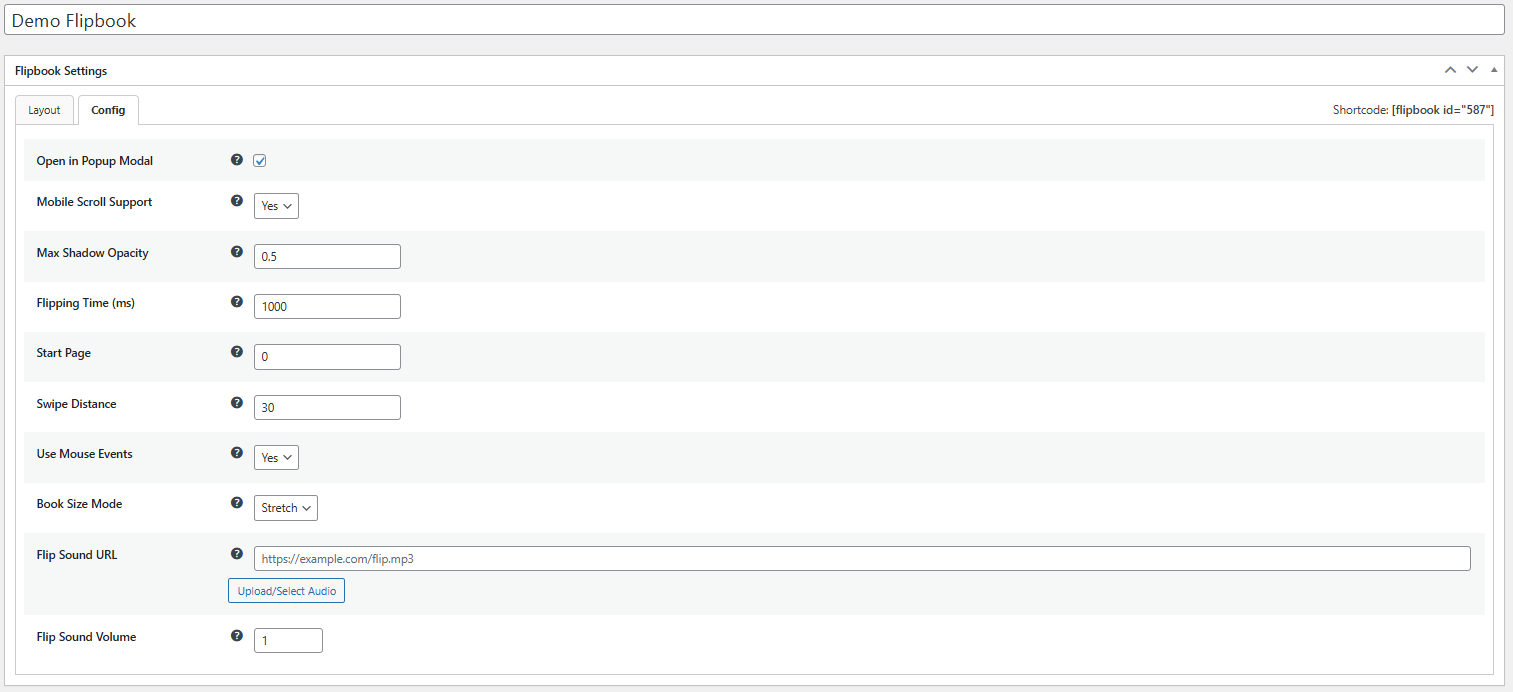
Open in Pop-up Modal: Toggle this option to show a button, once clicked a modal popup with flipbooks will appear
Frontend Representation:
- Mobile Scroll Support: Enable this option to allow smooth scrolling on mobile devices.
- Max Shadow Opacity: Use this setting to control how dark the page shadow looks.
- Flipping Time: Set how fast the pages flip, in milliseconds.
- Start Page: Select the page from which the flipbook should open.
- Swipe Distance: Adjust how far a user must swipe to flip a page.
- Use Mouse Events: Turn this on to let users flip pages with a mouse click.
- Book Size Mode: Choose whether the flipbook should be stretched or have a fixed size.
- Flipbook Sound URL: Add a custom sound (like a page flip sound) by uploading an audio file.
- Flipbook Volume: Control the volume level of the flipbook sounds.
7.3 Saving and Adding Flipbook
Once your flipbook configuration is done, click on “Publish”
Navigate to the all flipbooks section, and find the shortcode for the flipbook you have published
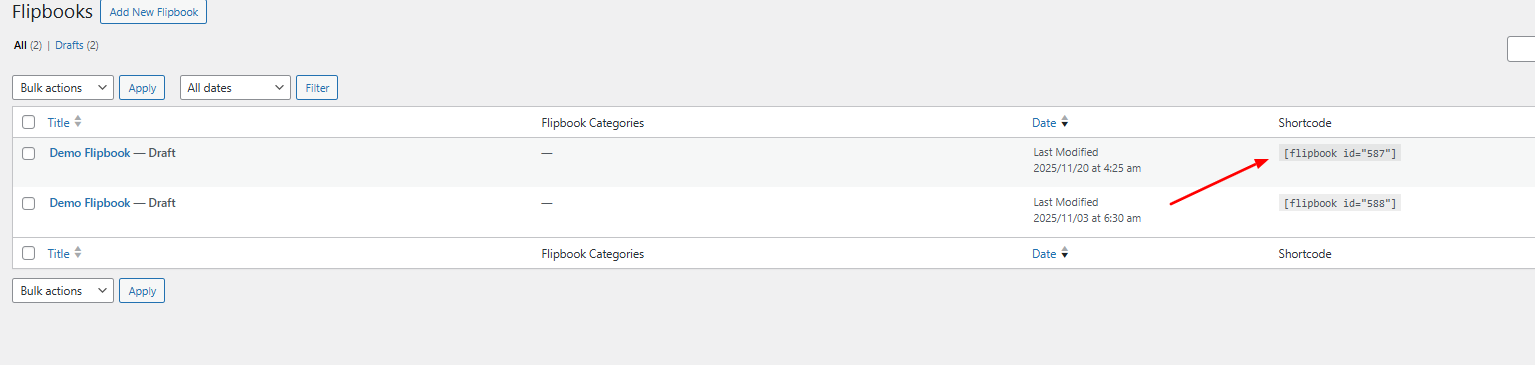
Copy that Shortcode and paste it into your desired post or page.
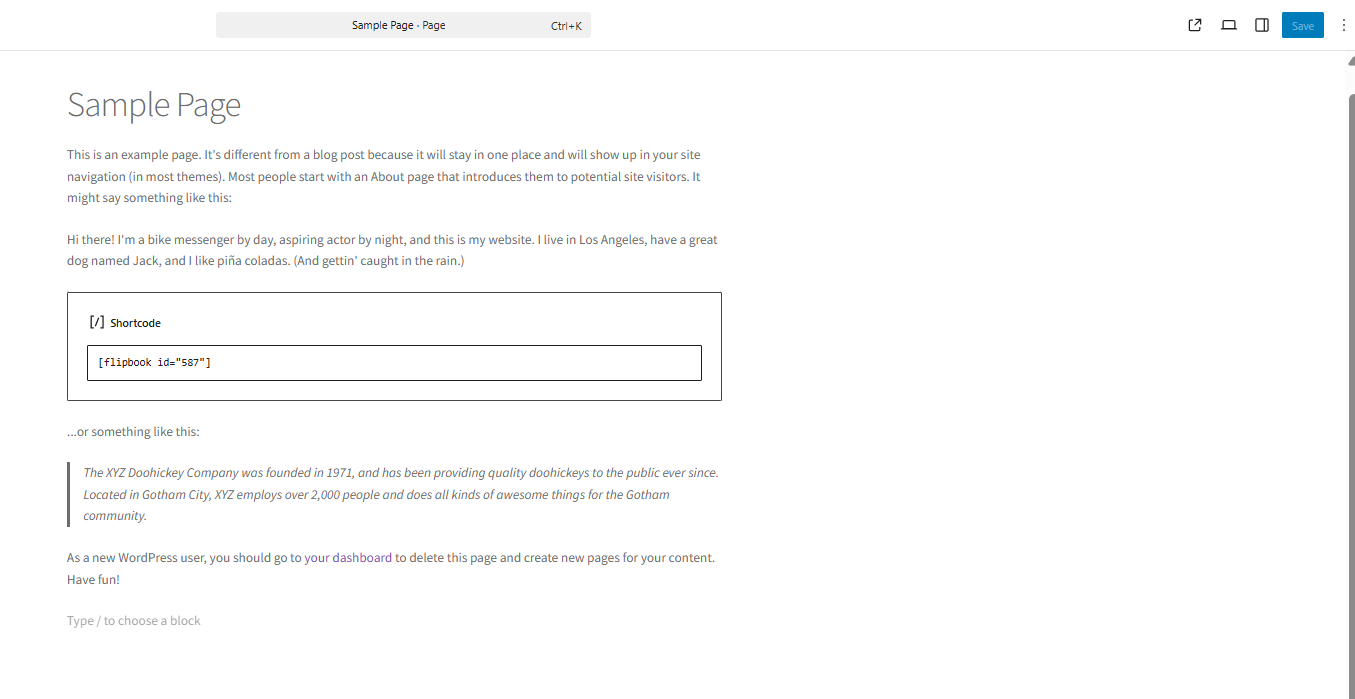
Click save and you are all set.
8.Automate PDF Generation Using Cronjob
You can automate your PDF generation process and generate PDFs in bulk using a cron job.
- Navigate to the WPSwings→ PDF Generator for Wp→ Advanced Settings.
- Select Post Types: Select the post types you want to convert to PDF.
- Cron Name: Set the cronjob on your server.
- Save PDF file: Enable this option to store all PDF files in bulk.
- Save Zip Folder: Enable this option to save all PDF files created via cron in a zip folder.
Note: The cron job is designed to automatically convert published posts of selected types into PDF format. In the event of a post being deleted or unpublished, the corresponding generated PDF will also be removed. Similarly, any modifications made to a post will be reflected and updated in the converted PDF files.
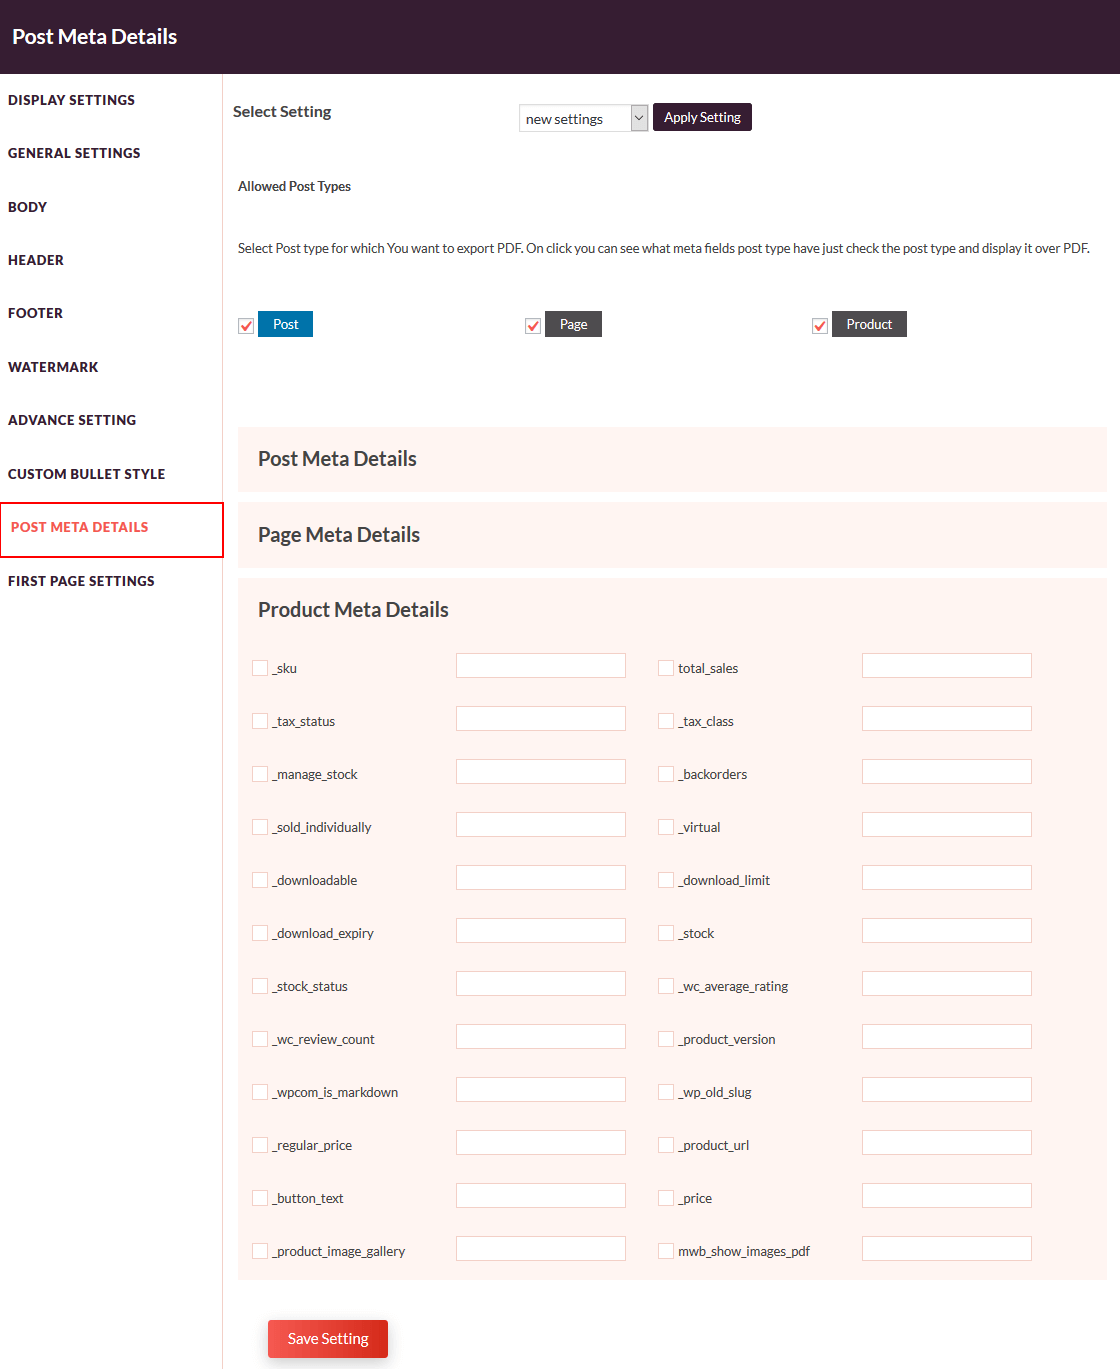
9.Meta Fields Settings
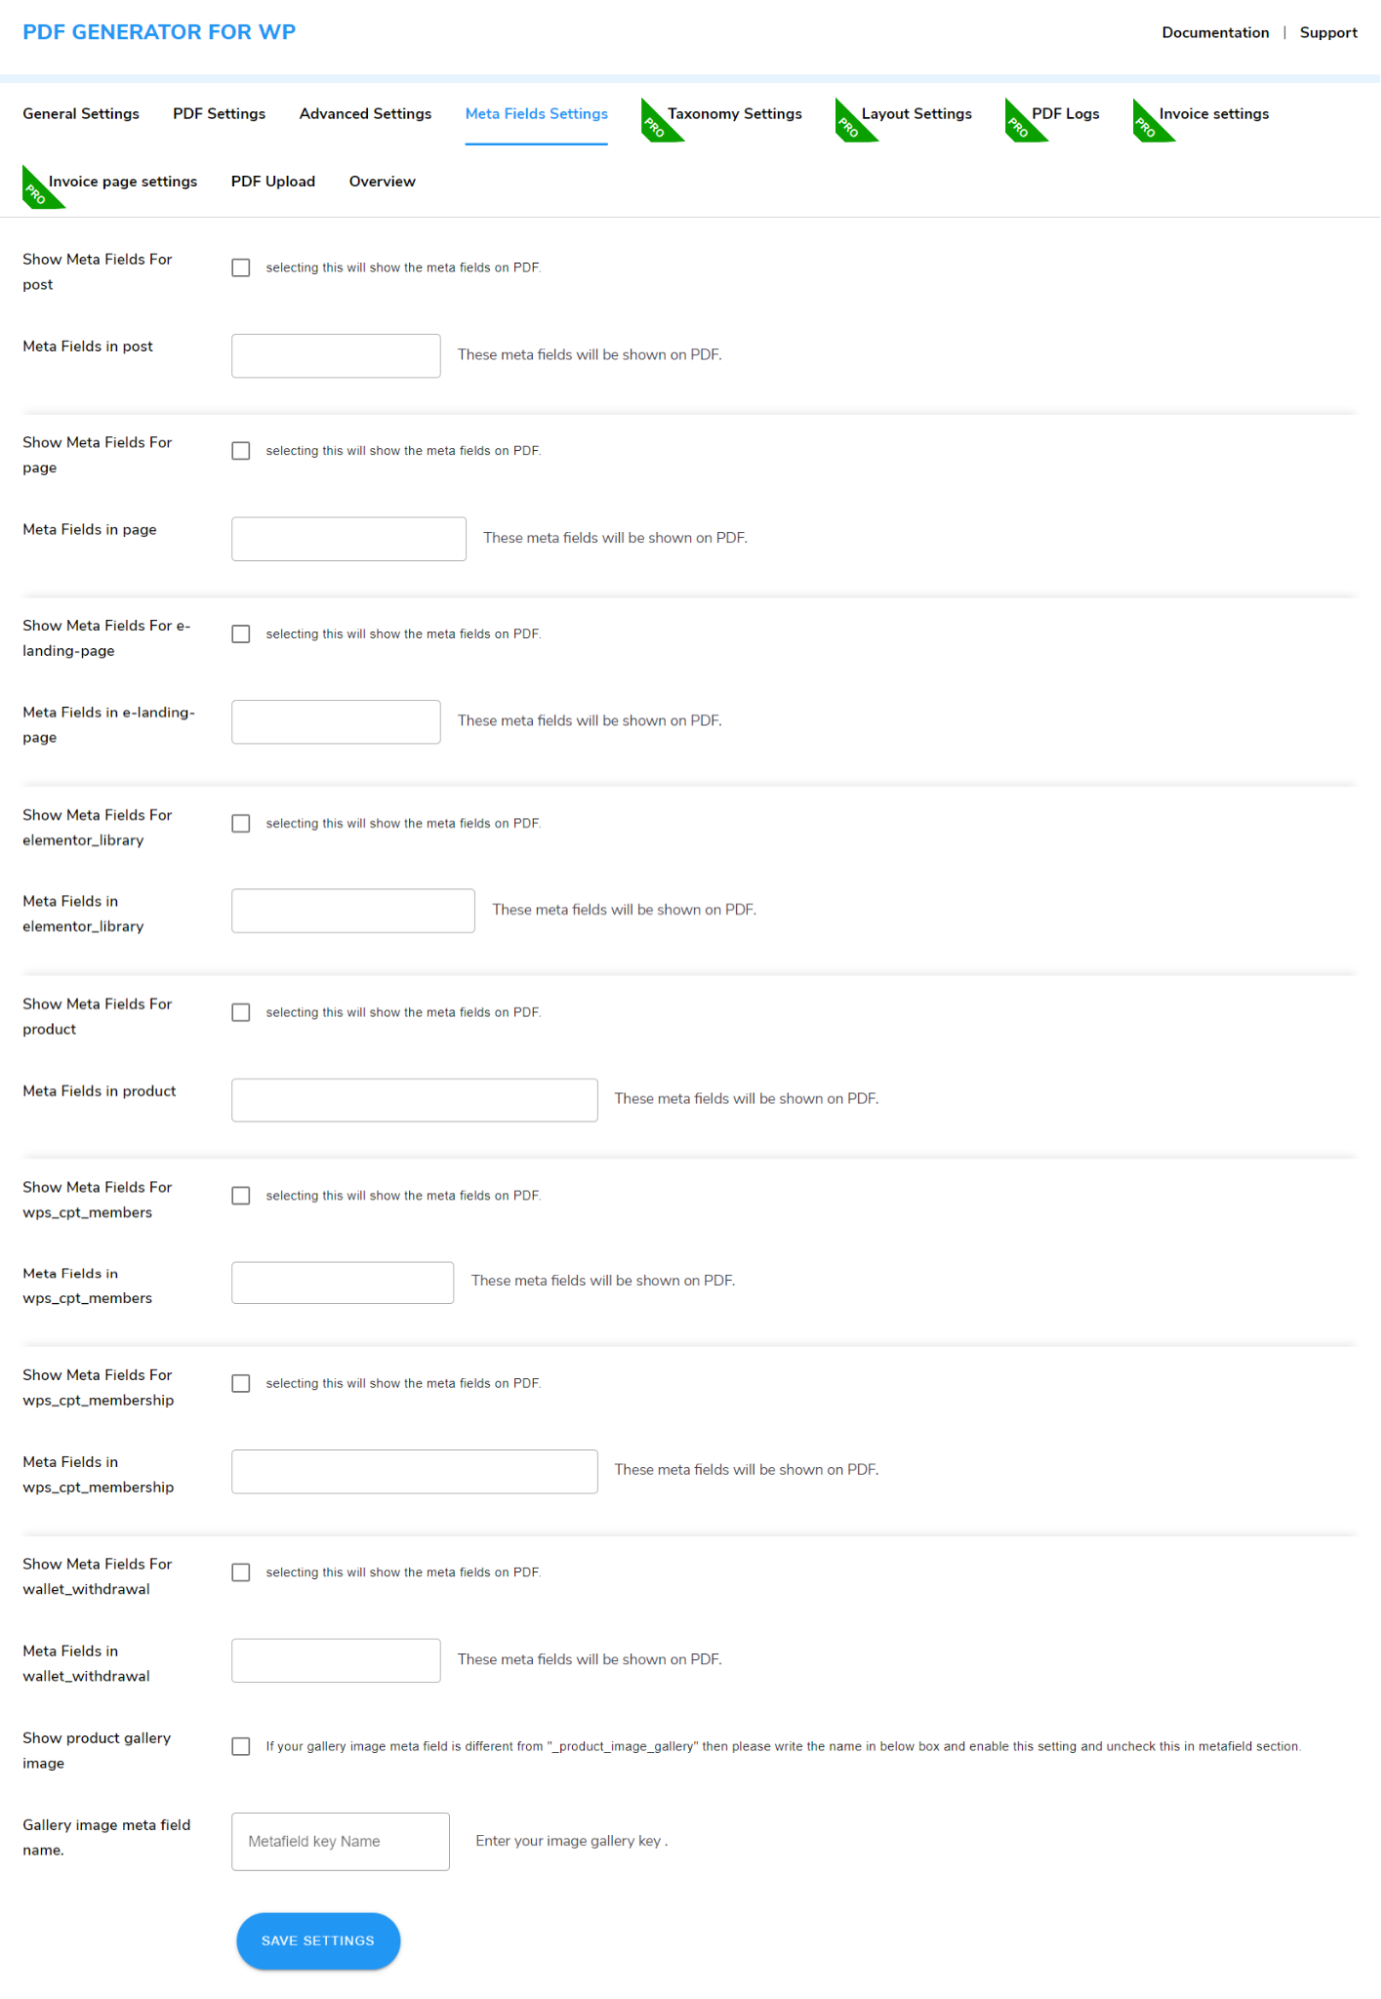
Accessing Meta Fields Settings
Navigate to WP Swings → PDF Generator for WordPress → Meta Fields Settings to configure how meta fields are displayed in your generated PDF files.
Displaying Meta Fields for Posts, Pages, and Products
Allow the display of meta fields separately for posts, pages, and products by ticking the relevant checkboxes. Enter the specific meta fields you want to include in the PDFs for each type of content.
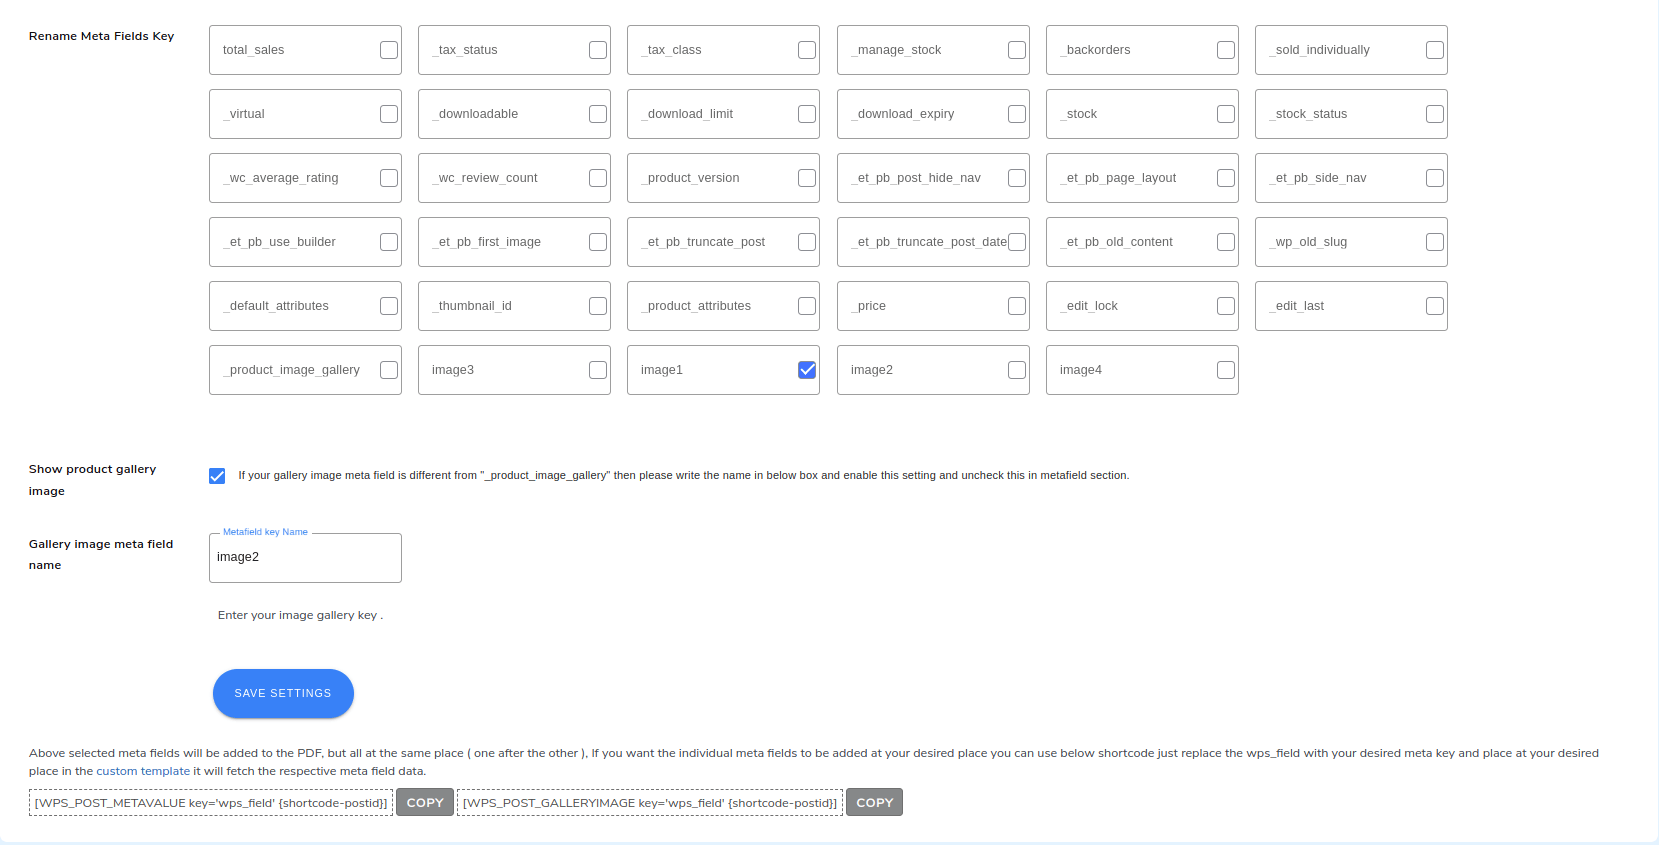
Configuring Product Gallery Images
If your product images differ from your product image gallery, enter the name of the product image gallery in the provided box. Enable the setting by clicking on Show Product Gallery Image to include these images in the generated PDFs.
Renaming Meta Fields Premium
Enable the Ability to Rename Meta Fields to customize the names of the meta fields in your PDFs. This Pro feature allows for more precise and relevant labeling of meta information.
Click on the Save Settings button to save your choices.
Note: The selected meta fields will be added to the PDF one after the other, all in the same place. If you want individual meta fields to appear at specific locations, use the following shortcode:
[WPS_POST_METAVALUE key=’wps_field’ {shortcode-postid}]
Simply replace wps_field with your desired meta key and place the shortcode in your custom template where you want the meta field data to appear. This will fetch and display the respective meta field data at the specified location.
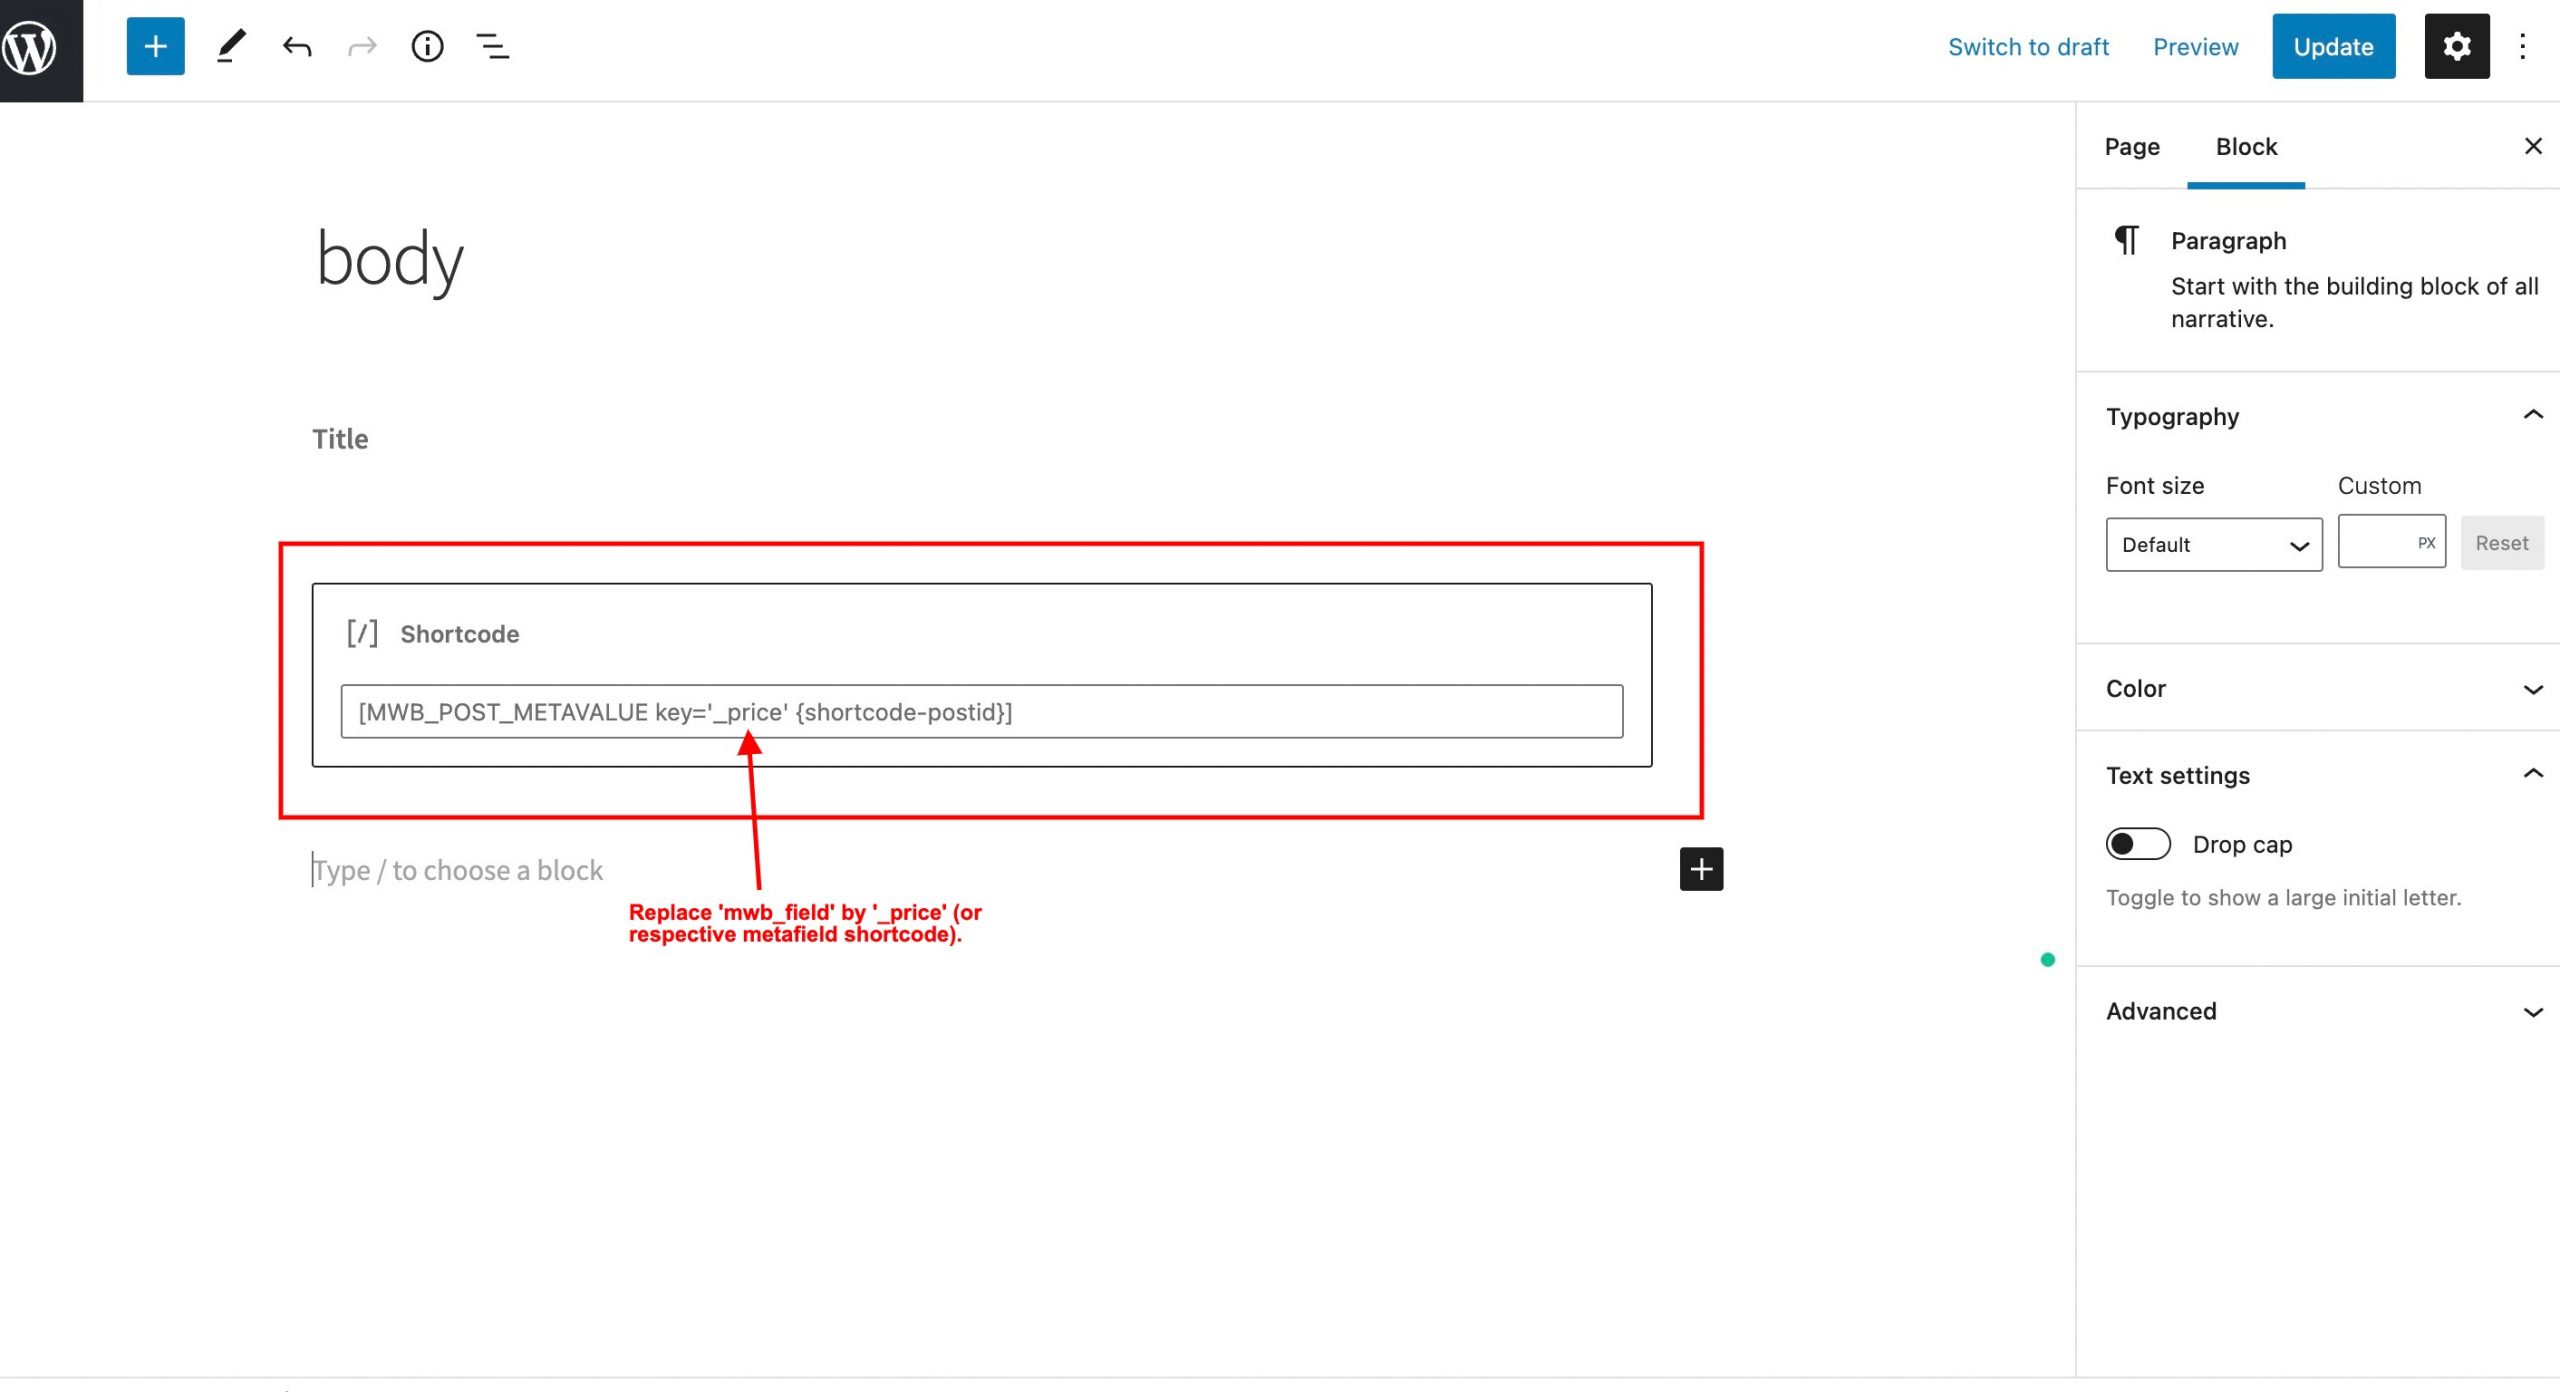
9.1.How to Add Meta Fields Anywhere on Page
- Navigate to WP Swings→ PDF Generator for Wp → Layout Settings→ Internal Page.
- Click on Create Template or select header, body, or footer to open the Gutenberg editor to add the meta fields in desired sections.
- Place the block in the Gutenberg editor as per your choice.
- Search and select the shortcode snippet and paste the copied shortcode (step 4) in the space provided. Replace ‘mwb_field’ with the respective meta field shortcode provided. For example, if you wish to place the price meta field, replace ‘mwb_field’ with ‘_price’.
- Click on Update to update the page layout.
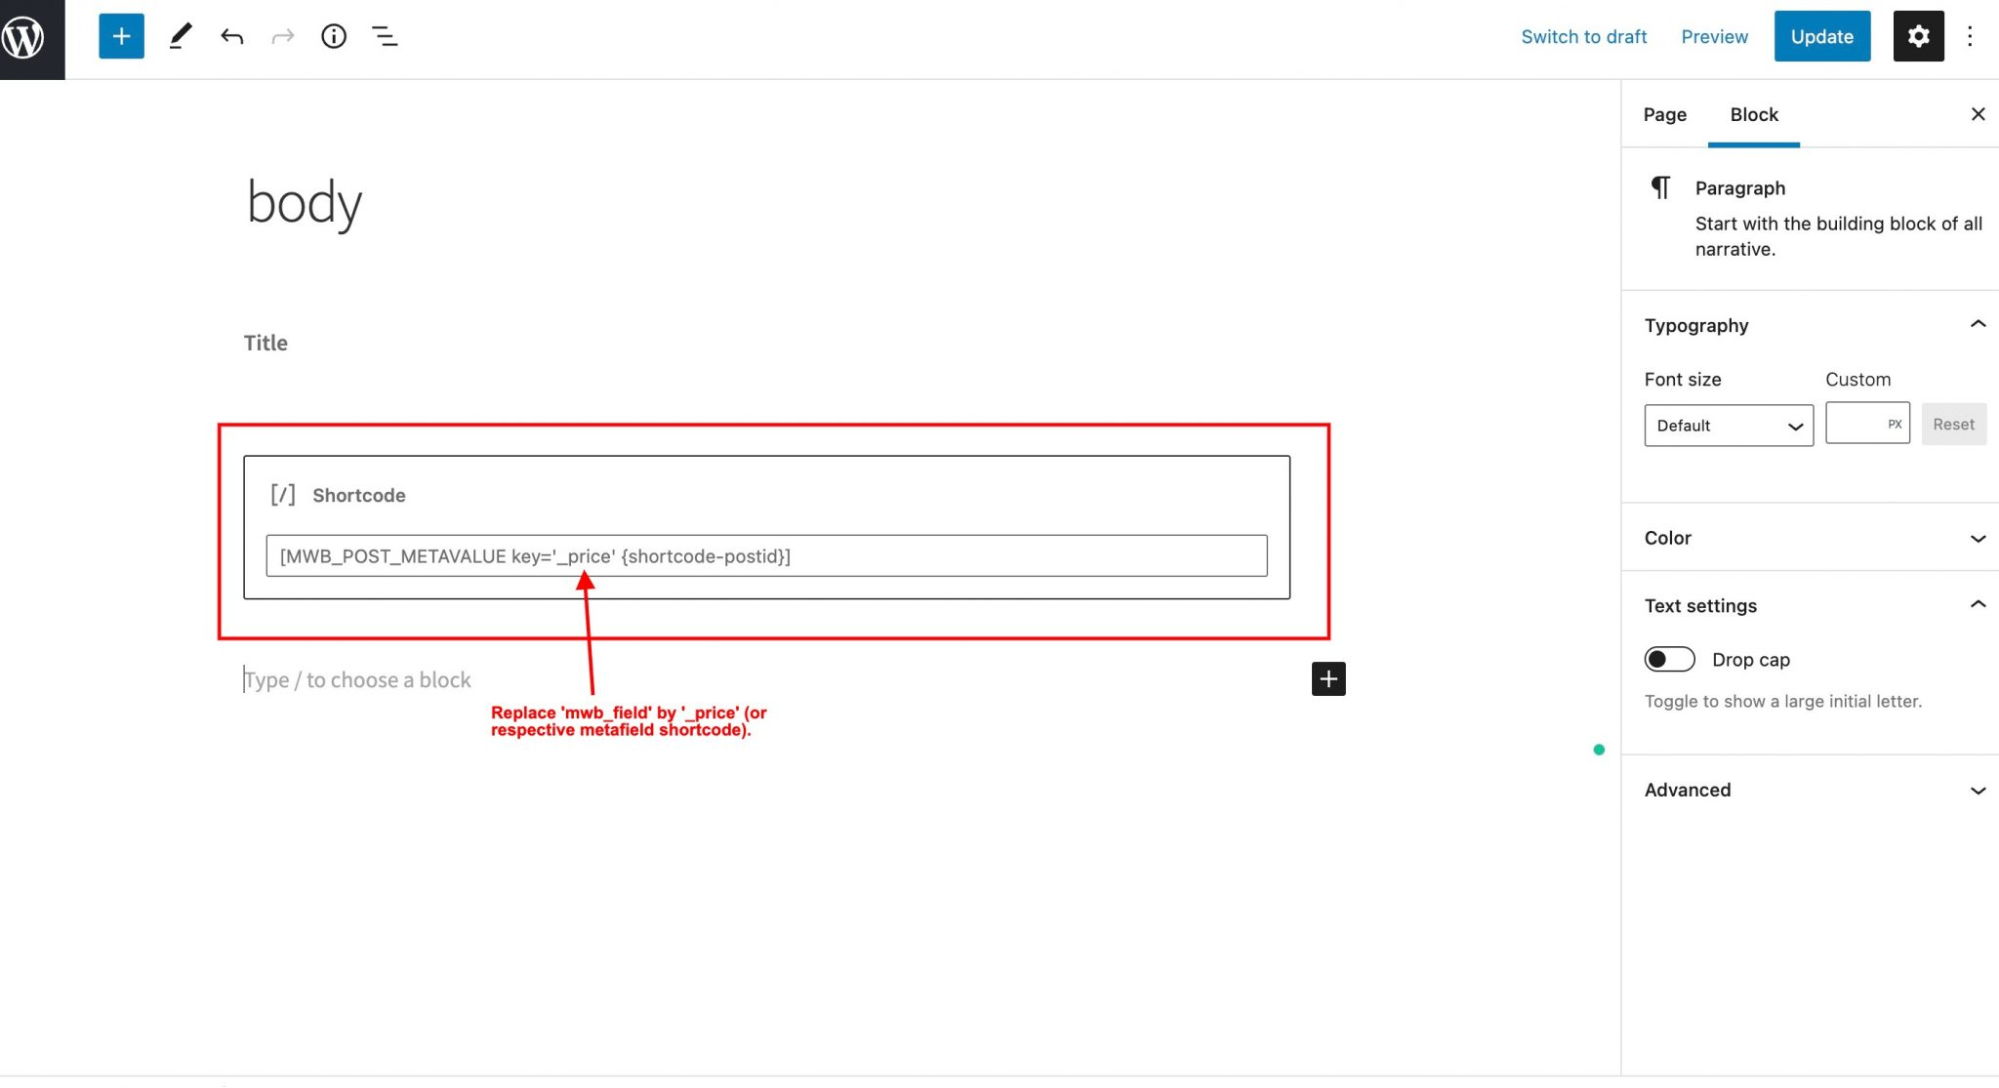
- This will allow you to place the meta fields conveniently anywhere on the page.
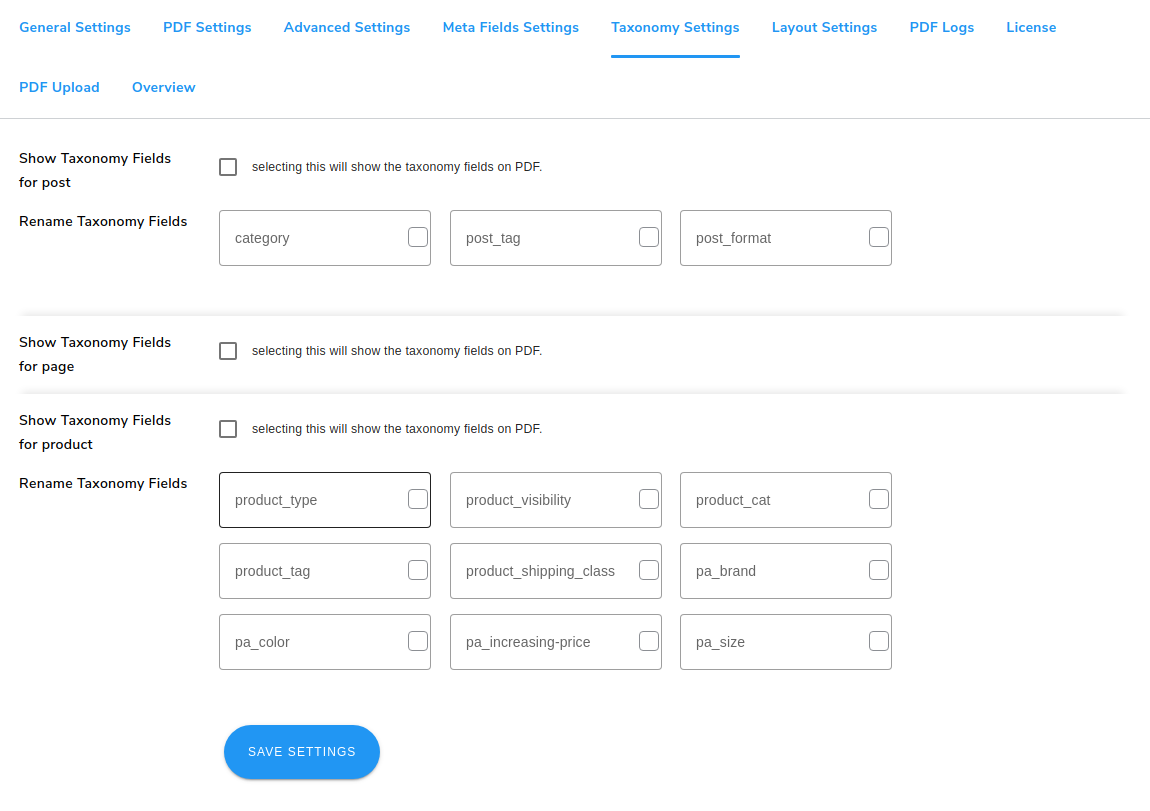
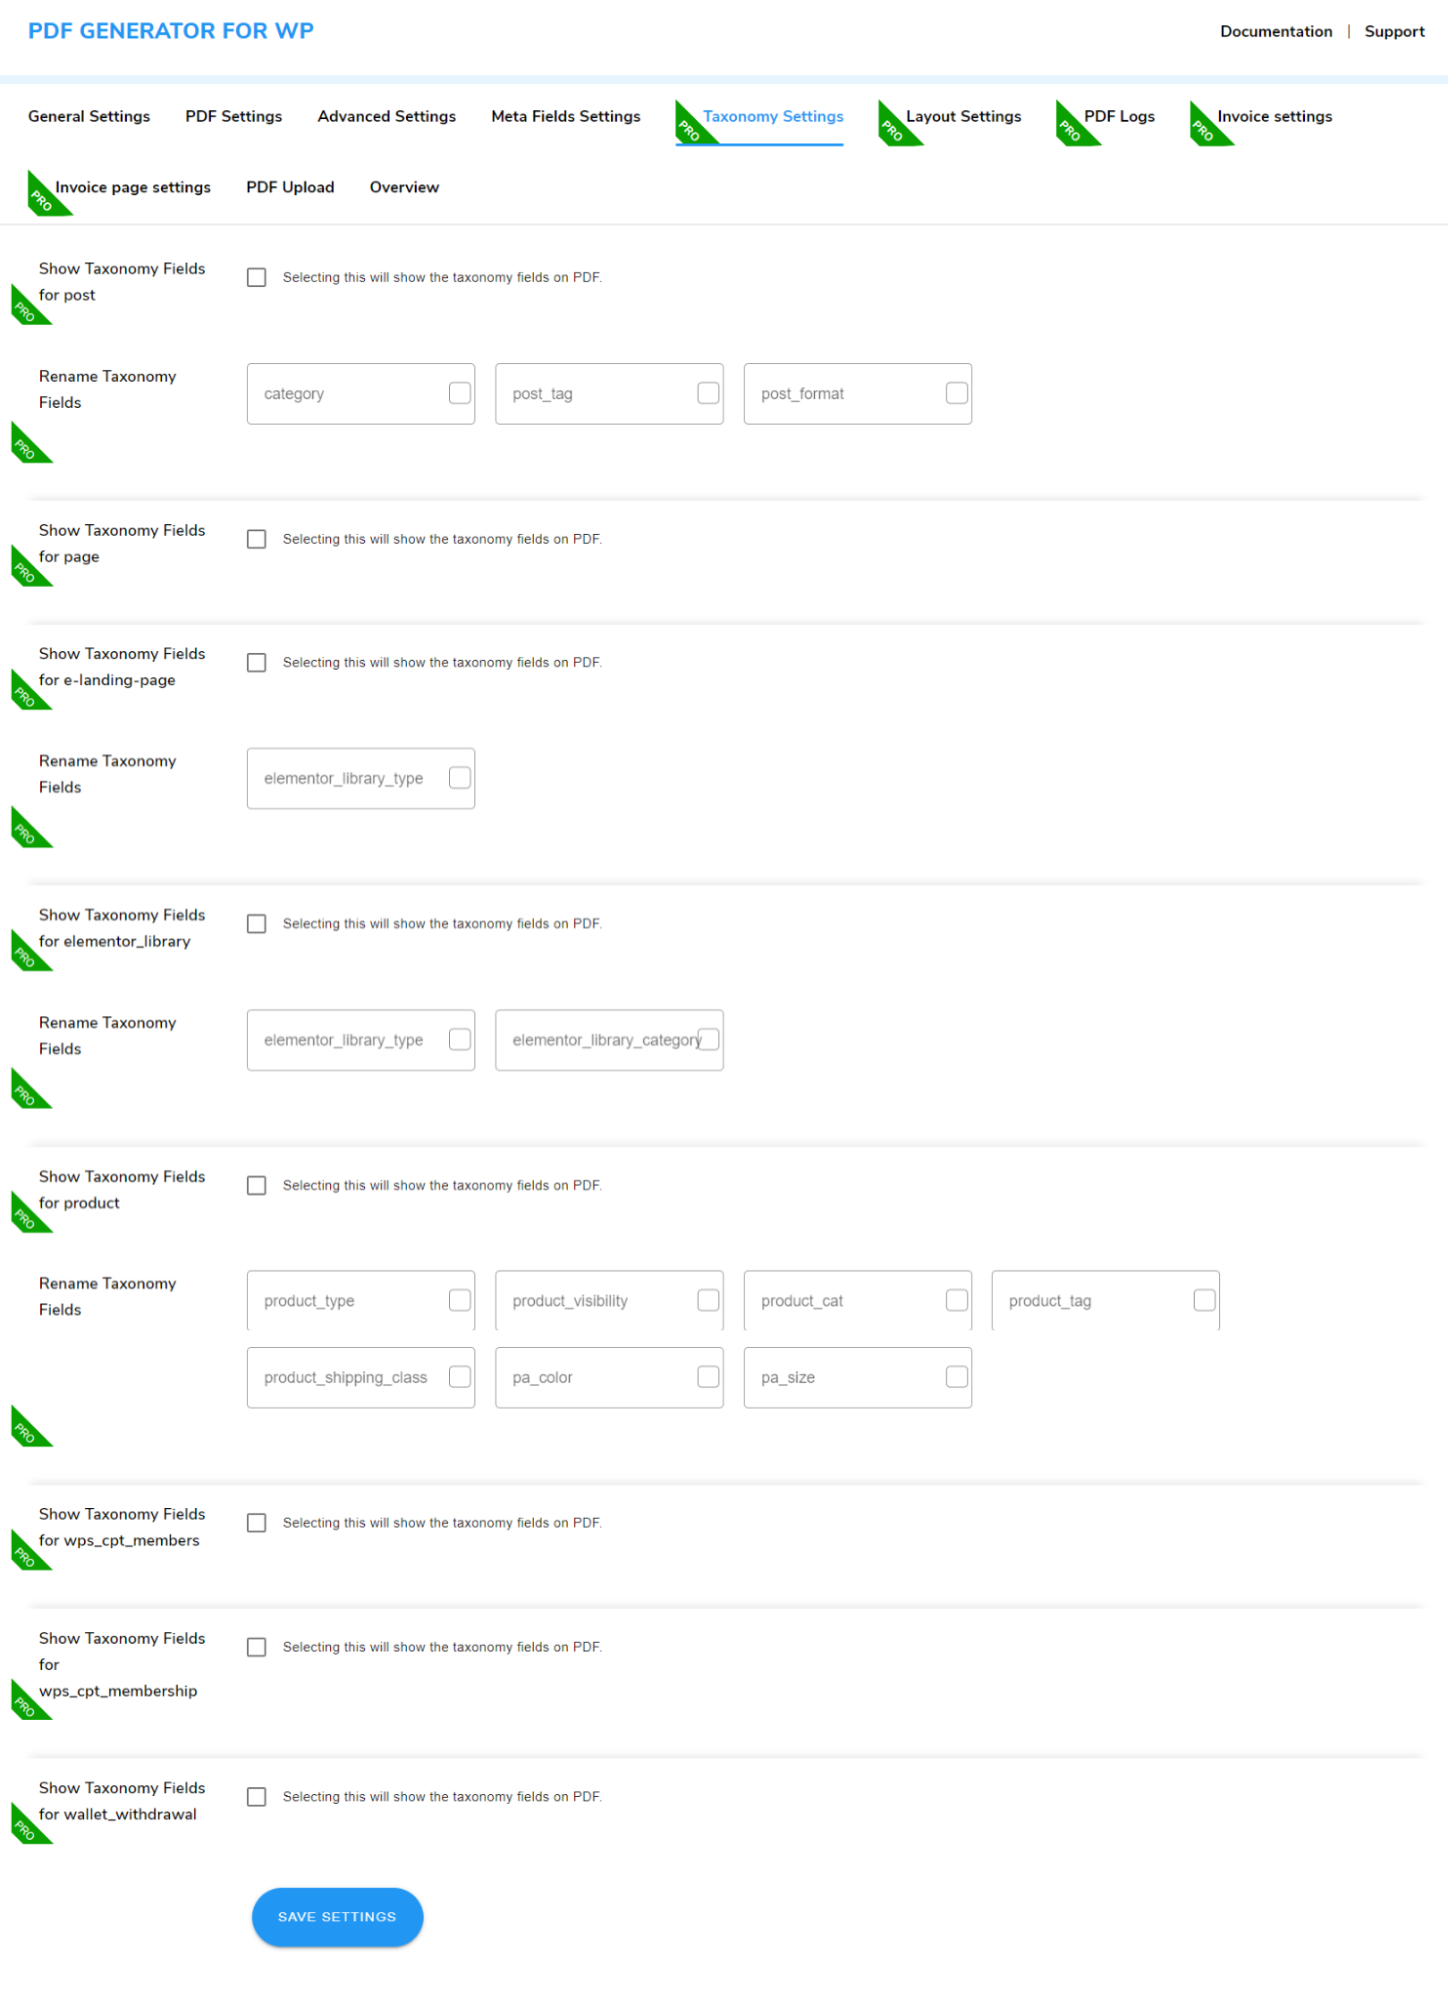
10.Taxonomy Settings

- Go to WP Swings→ PDF Generator for WP→Taxonomy Settings.
- Allow displaying meta fields separately for posts, pages, and products by clicking on the respective checkboxes- Show Taxonomy Fields for the post, Show Taxonomy Fields for page, Show Taxonomy Fields for the product, Show Taxonomy Fields for e-landing page, Show Taxonomy Fields for page elementor_library, Show Taxonomy Fields for page WPS_cpt_members, Show Taxonomy Fields for page WPS_cpt_membership and how Taxonomy Fields for page wallet_witdrawal
- Tick or Rename Taxonomy Fields Key that you want to display in the generated PDF files for posts and products in the corresponding spaces provided.
- Click on the Save Settings button to save your choices.
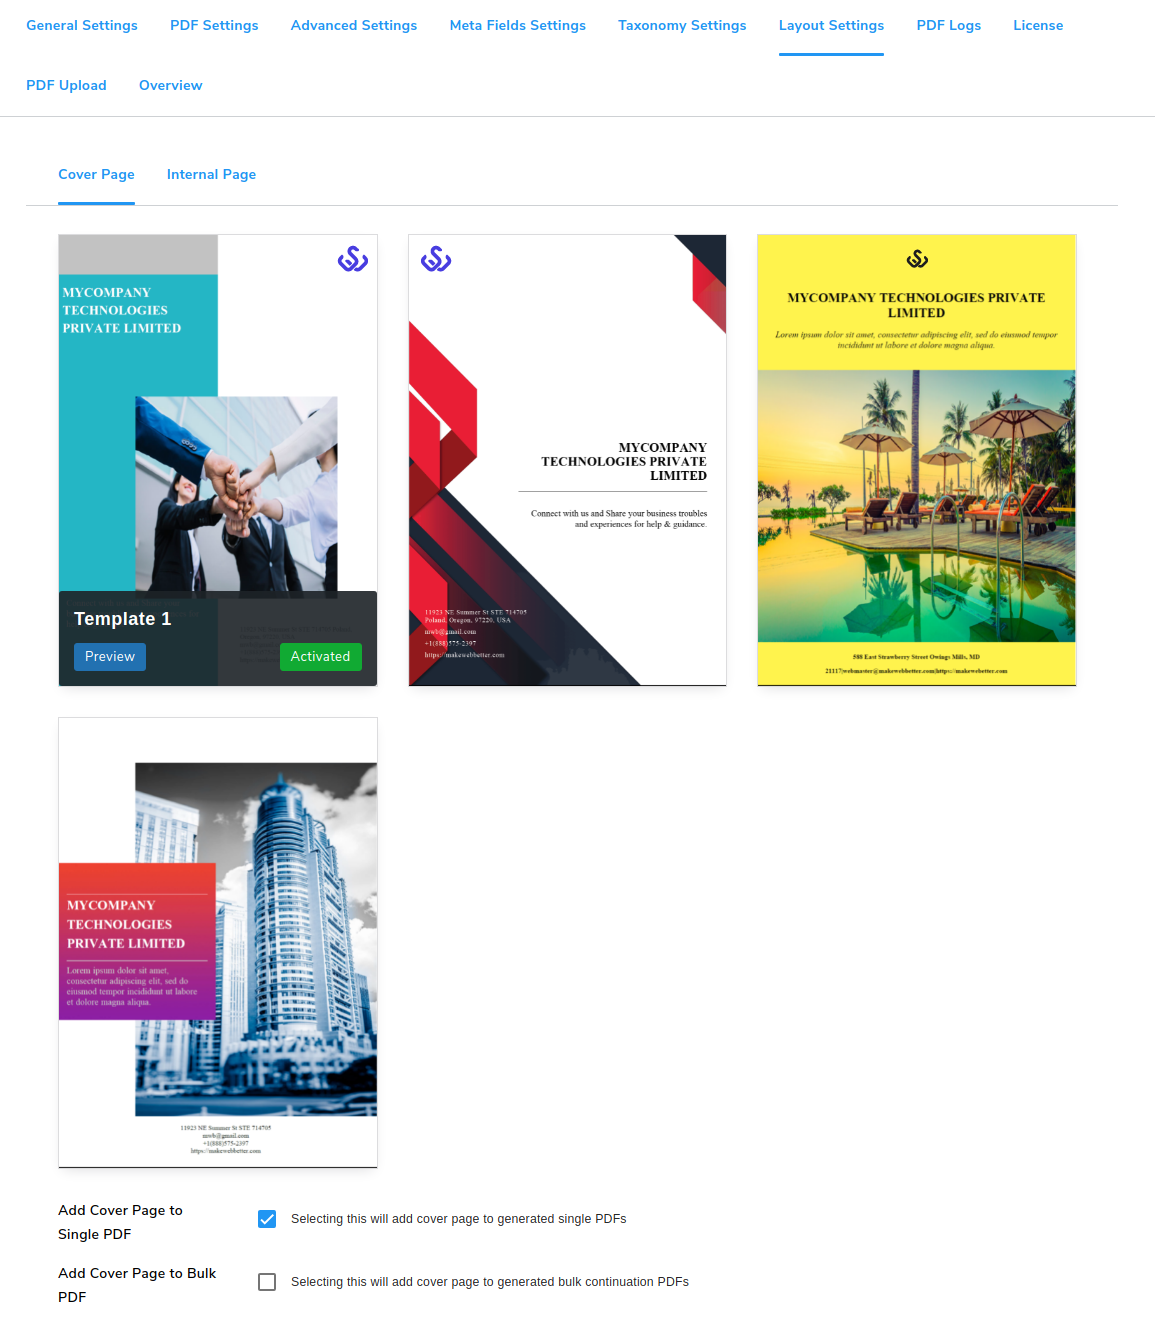
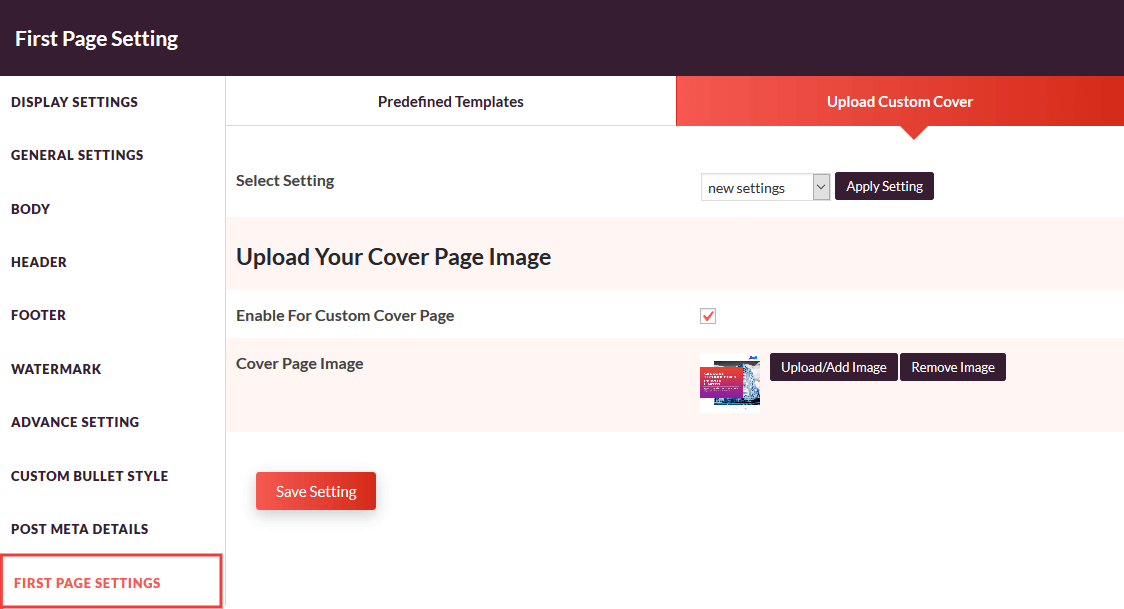
11.Layout Settings
Define the cover page settings and internal page settings separately in the layout.
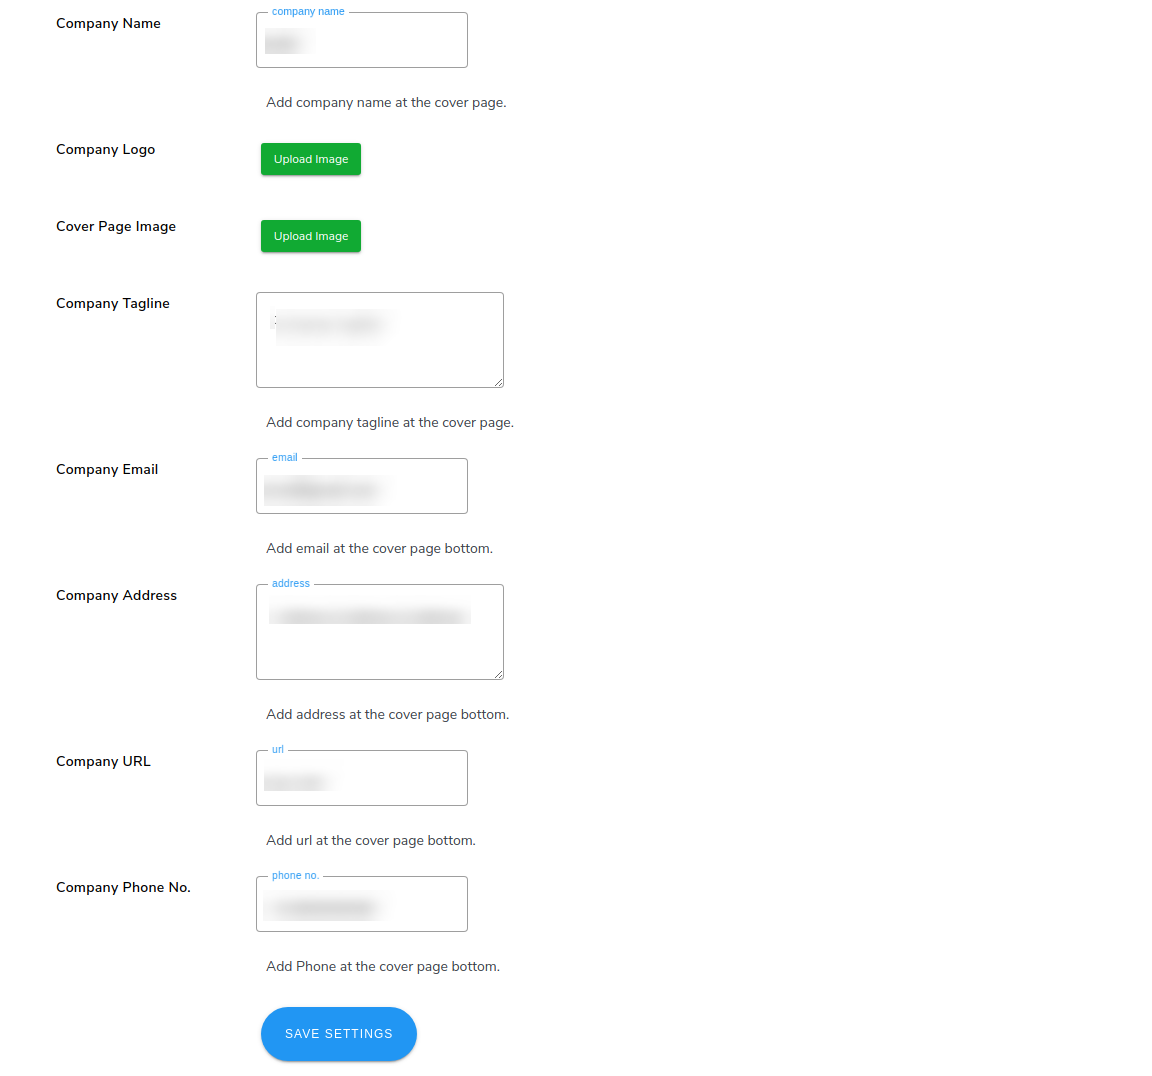
11.1.Cover Page

- Add Cover Page to Single PDF, will add cover pages to generated PDFs
- Add Cover Page to Bulk PDF, will add cover pages to bulk generated PDFs
- Add Company Name in the corresponding space provided.
- Upload Image to add Company Logo.
- Upload Image to add Cover Page Image.
- Mention details of the company in the respective fields such as Company Tagline, Company Email, Company Address, Company URL, Company Phone No to display these details on your cover page.
- Click on the Save Settings button.
11.2.Internal Page
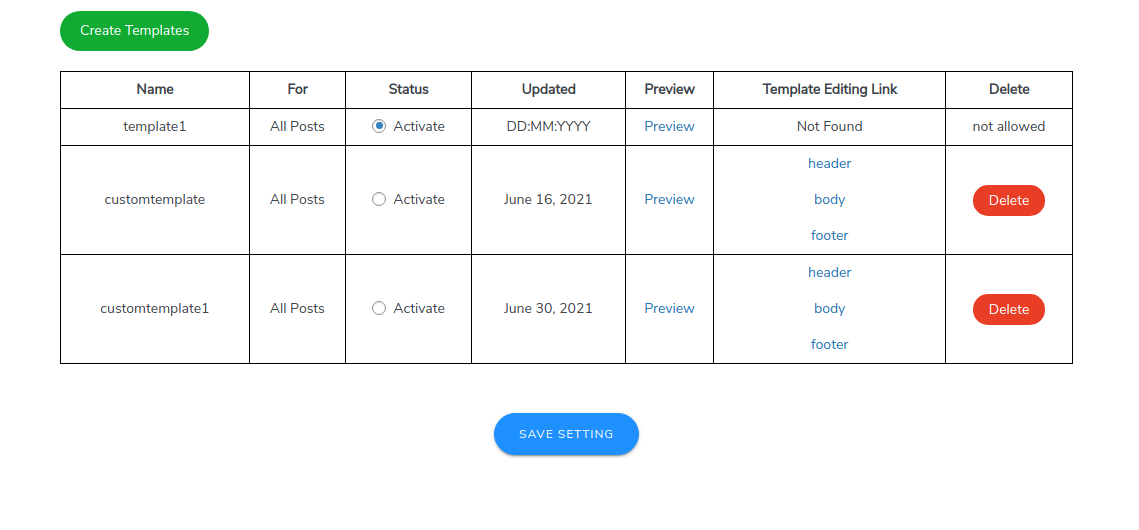
- Go to WP Swings→ PDF Generator for WP→Layout Settings→ Internal Page.
- Click on the Create Template button to create custom templates.
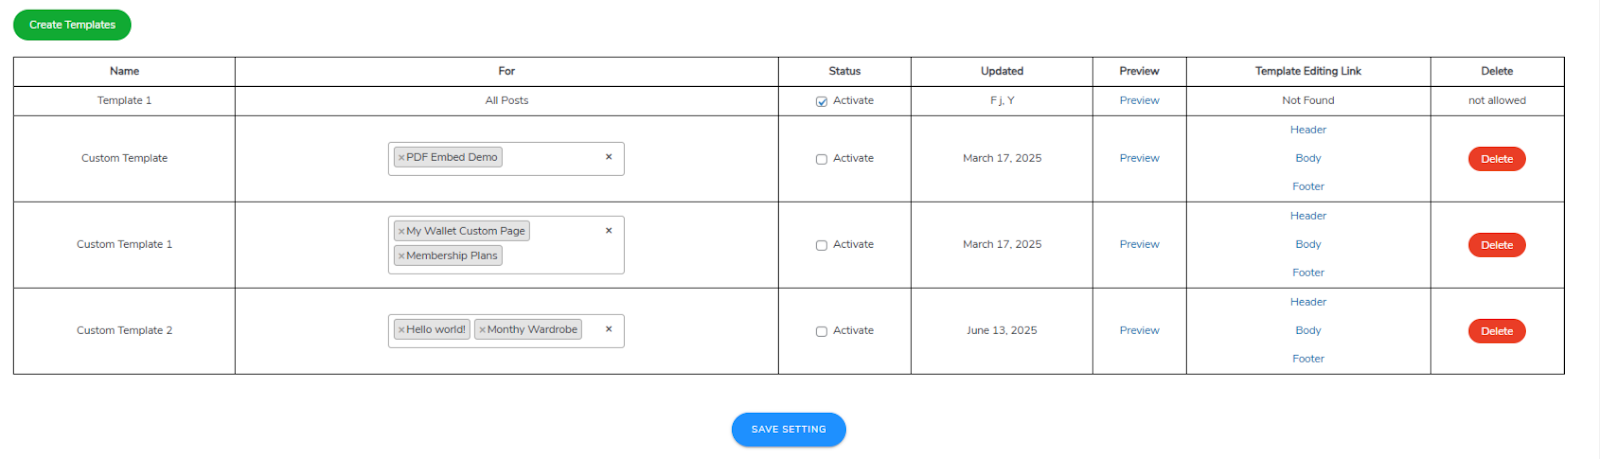
- This will add three pages, each for header, body, and footer with default layouts. You can edit them by clicking on the header, body, and footer links respectively.
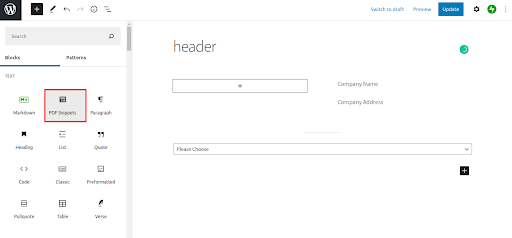
- It will redirect you to the editor, you can add snippets from the PDF Snippets block, which is provided in the block section of the Gutenberg editor, and choose accordingly.
The example is displayed below.

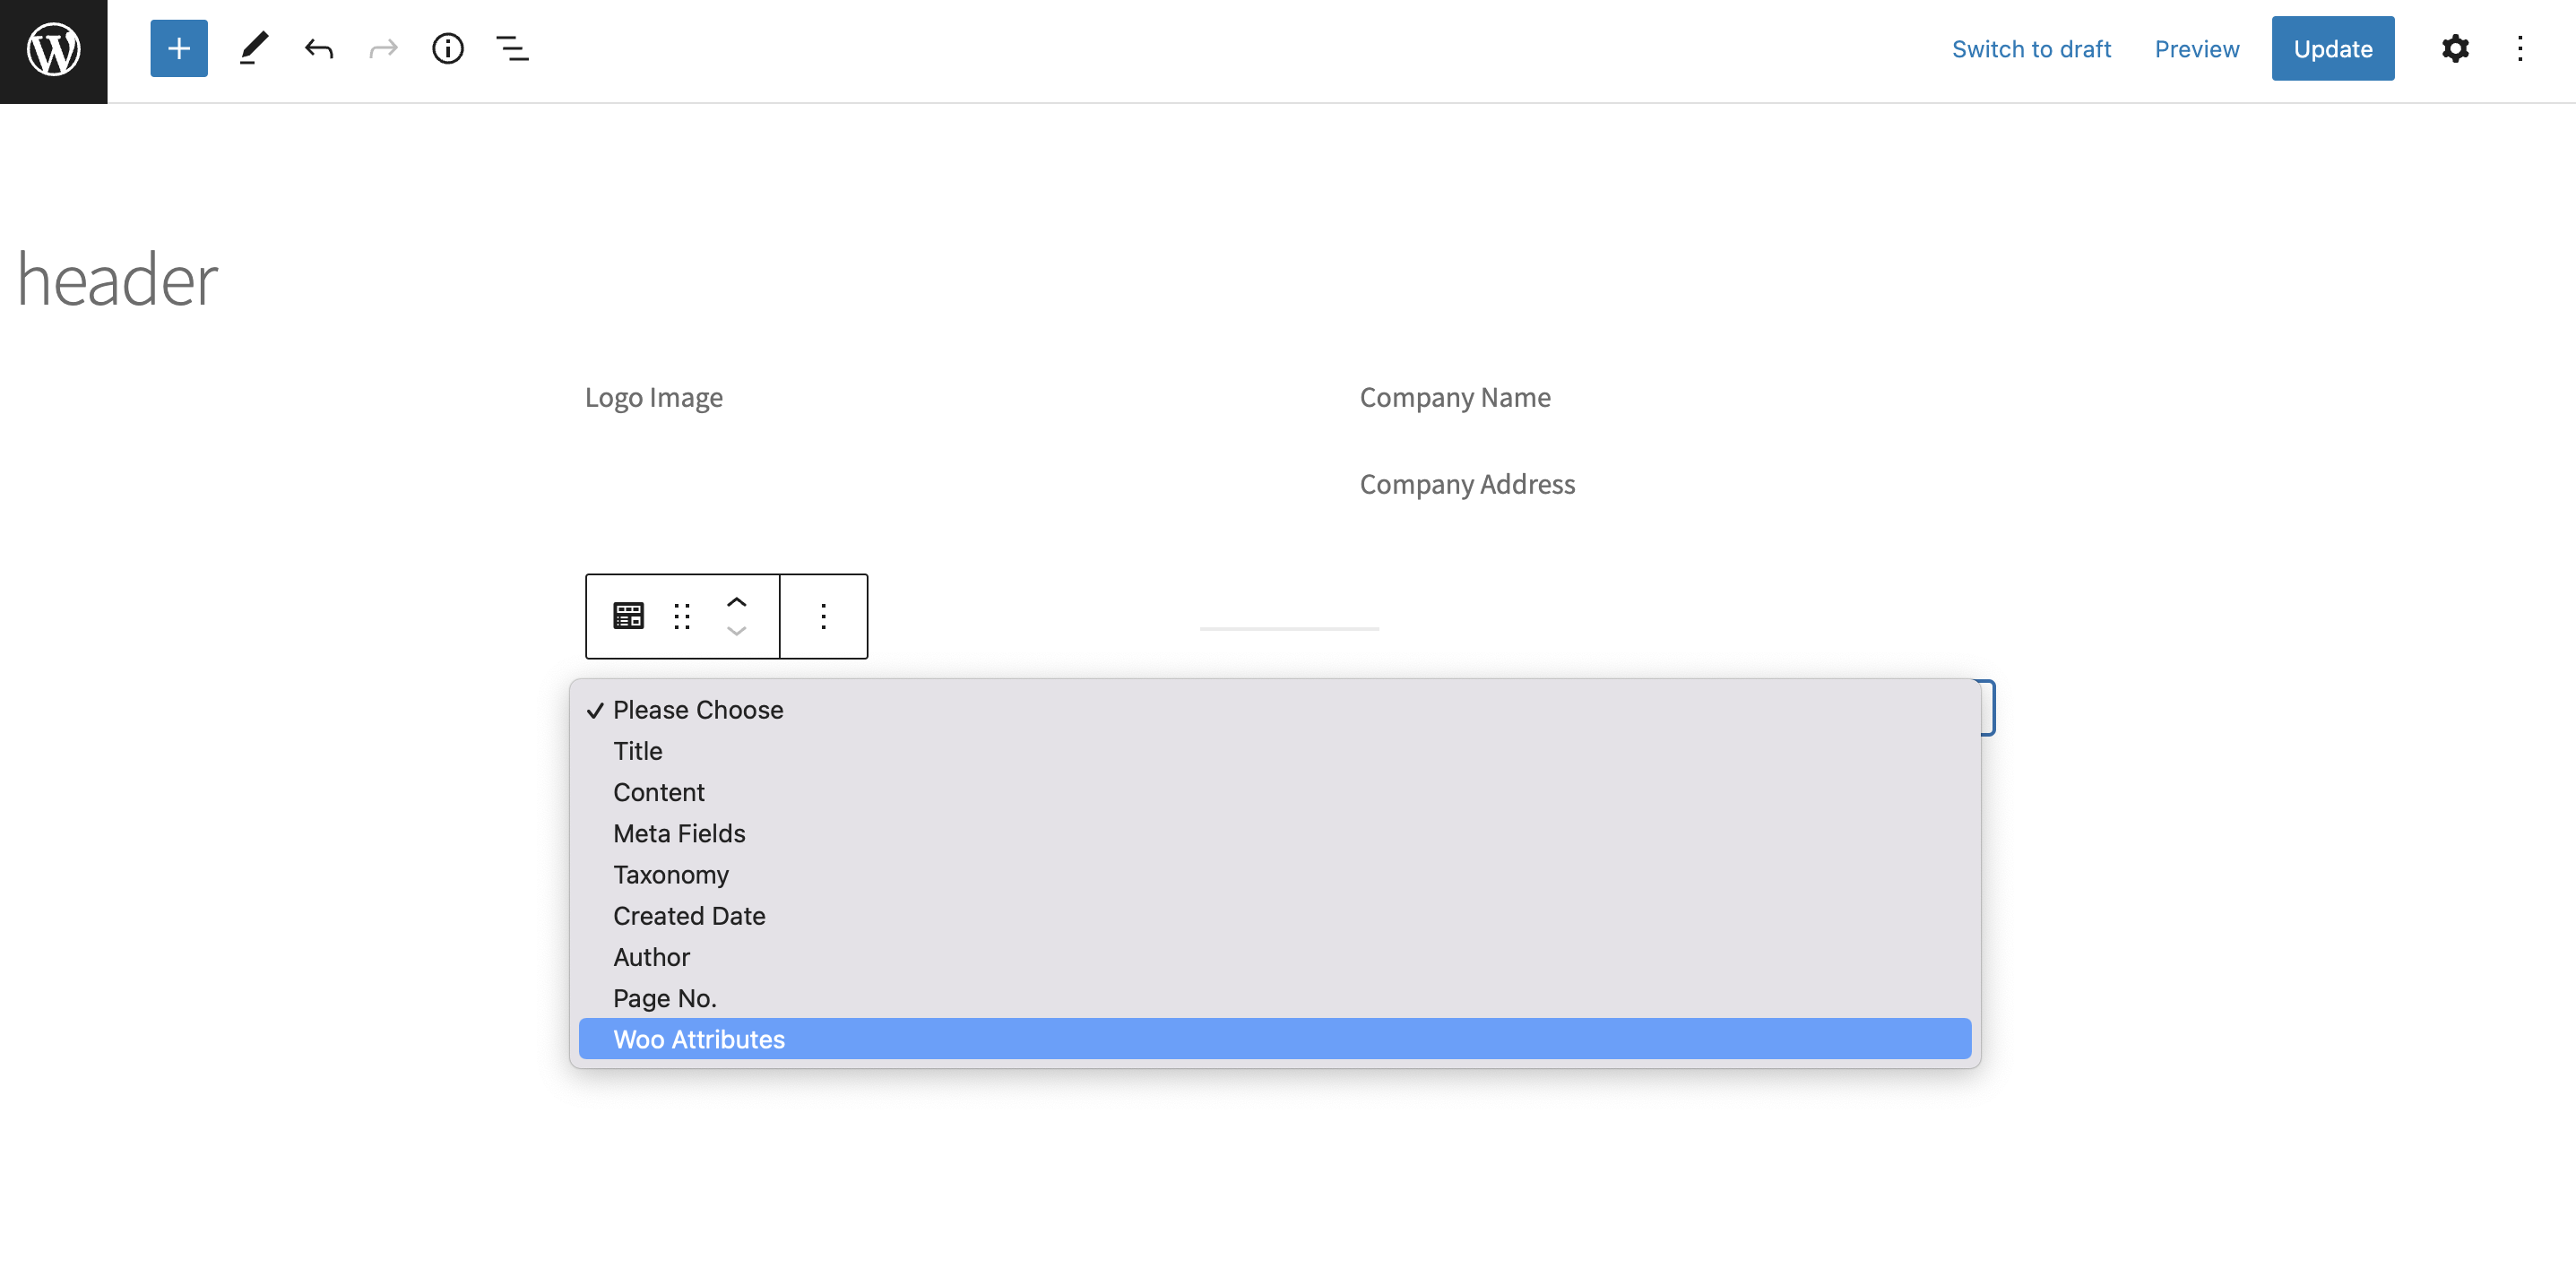
- Customize the layout by selecting the desired fields in the added PDF Snippets from the given dropdown menu as shown below. In the latest update of the plugin, you can also add the woo attributes for the generated PDF files of your plugin.

- Use the shortcode given in the plugin—[QR_CODE] at your desired space in the header, footer, or body layout as per your need.
- Click on the Update button to save your edited layout.
- You can add a Short Description in the body of your generated PDF file by using PDF snippets for creating your custom templates.
- Add a Current Date to your generated PDF file as your per requirement in the given PDF snippets dropdown menu. You can add this in the body of your custom templates.
- After customizing the layout, click on the Save Setting button.
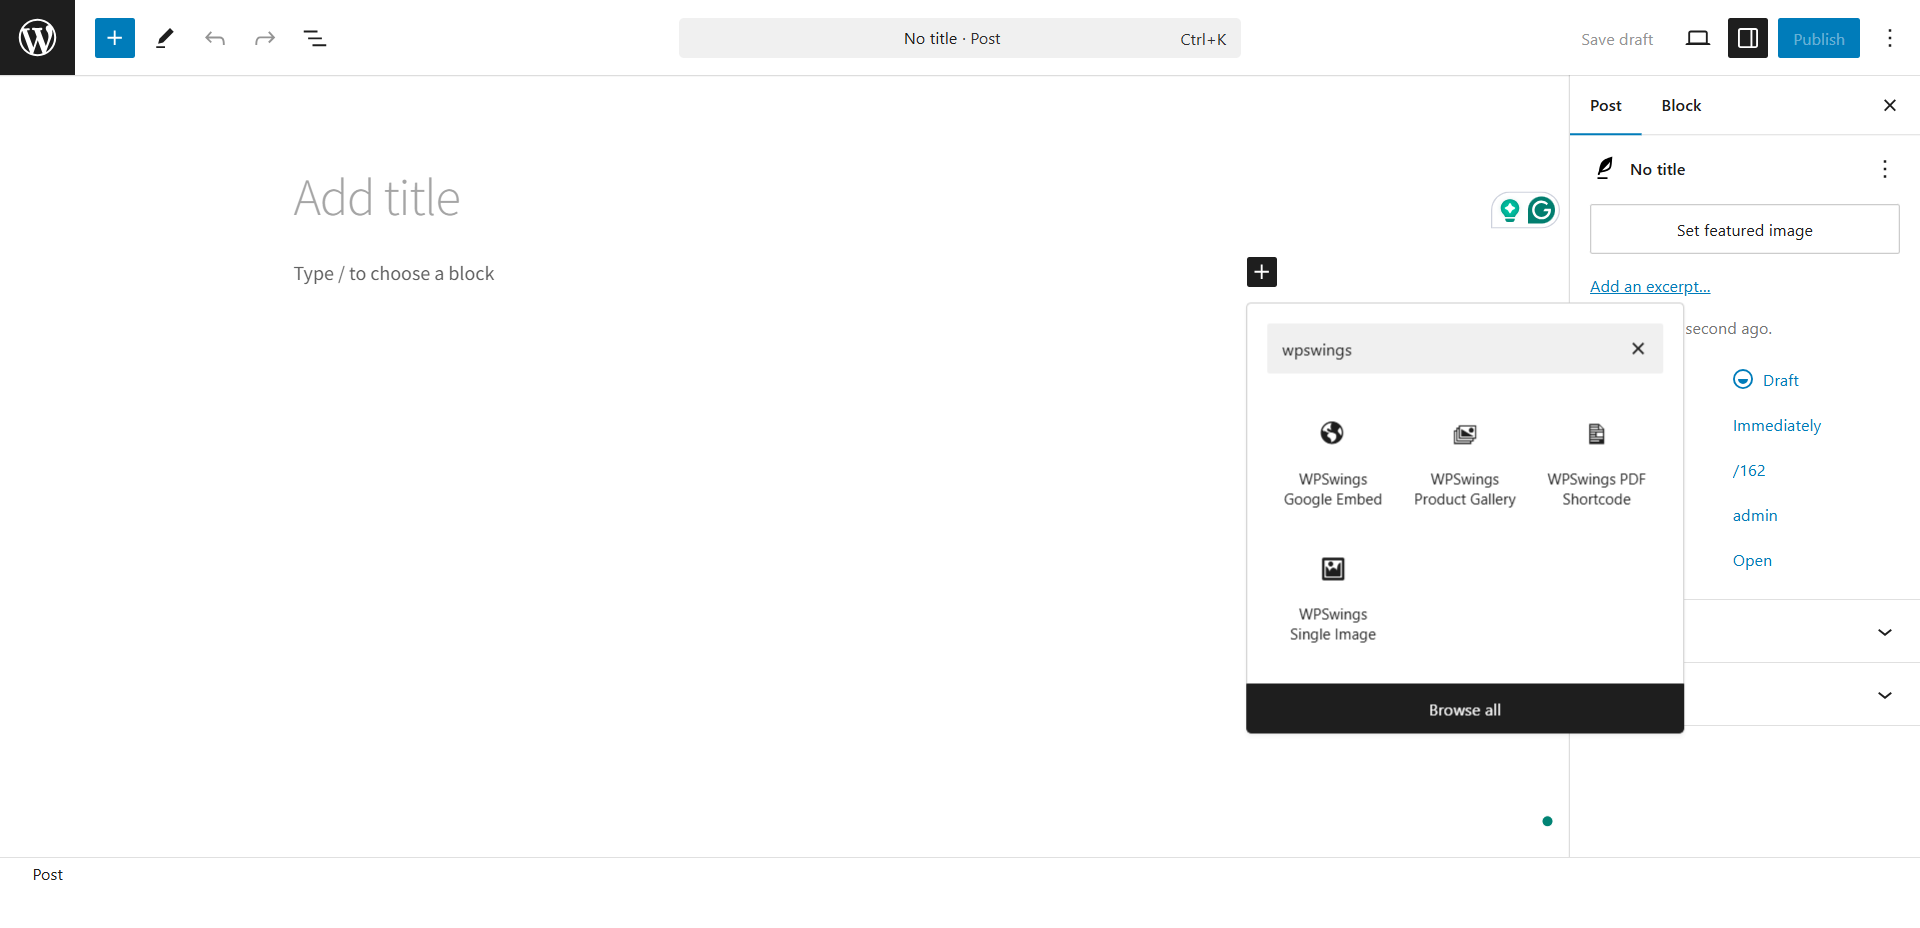
12.Gutenberg Blocks To Embed Google Services
WP Swings PDF shortcodes are now available as Gutenberg blocks! This makes it easy to customize your pages using a simple drag-and-drop interface.
To use it, just search for “WPSwings” in the block search bar, then drag and drop your desirable shortcodes
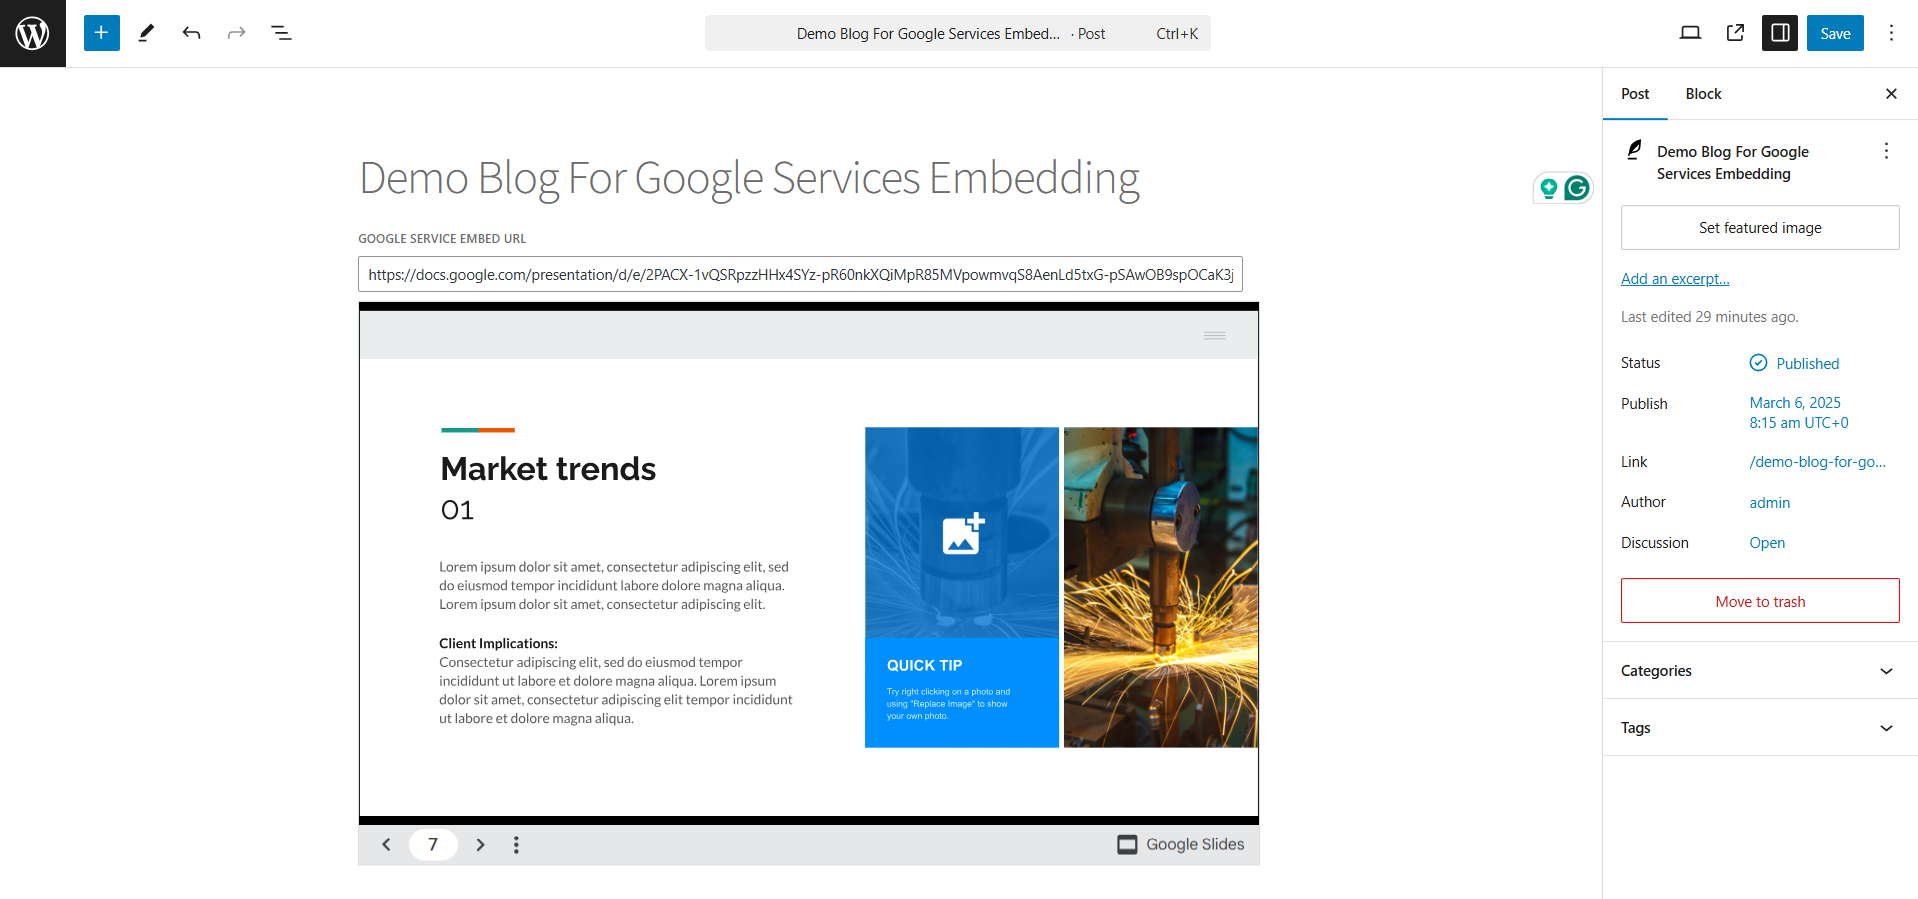
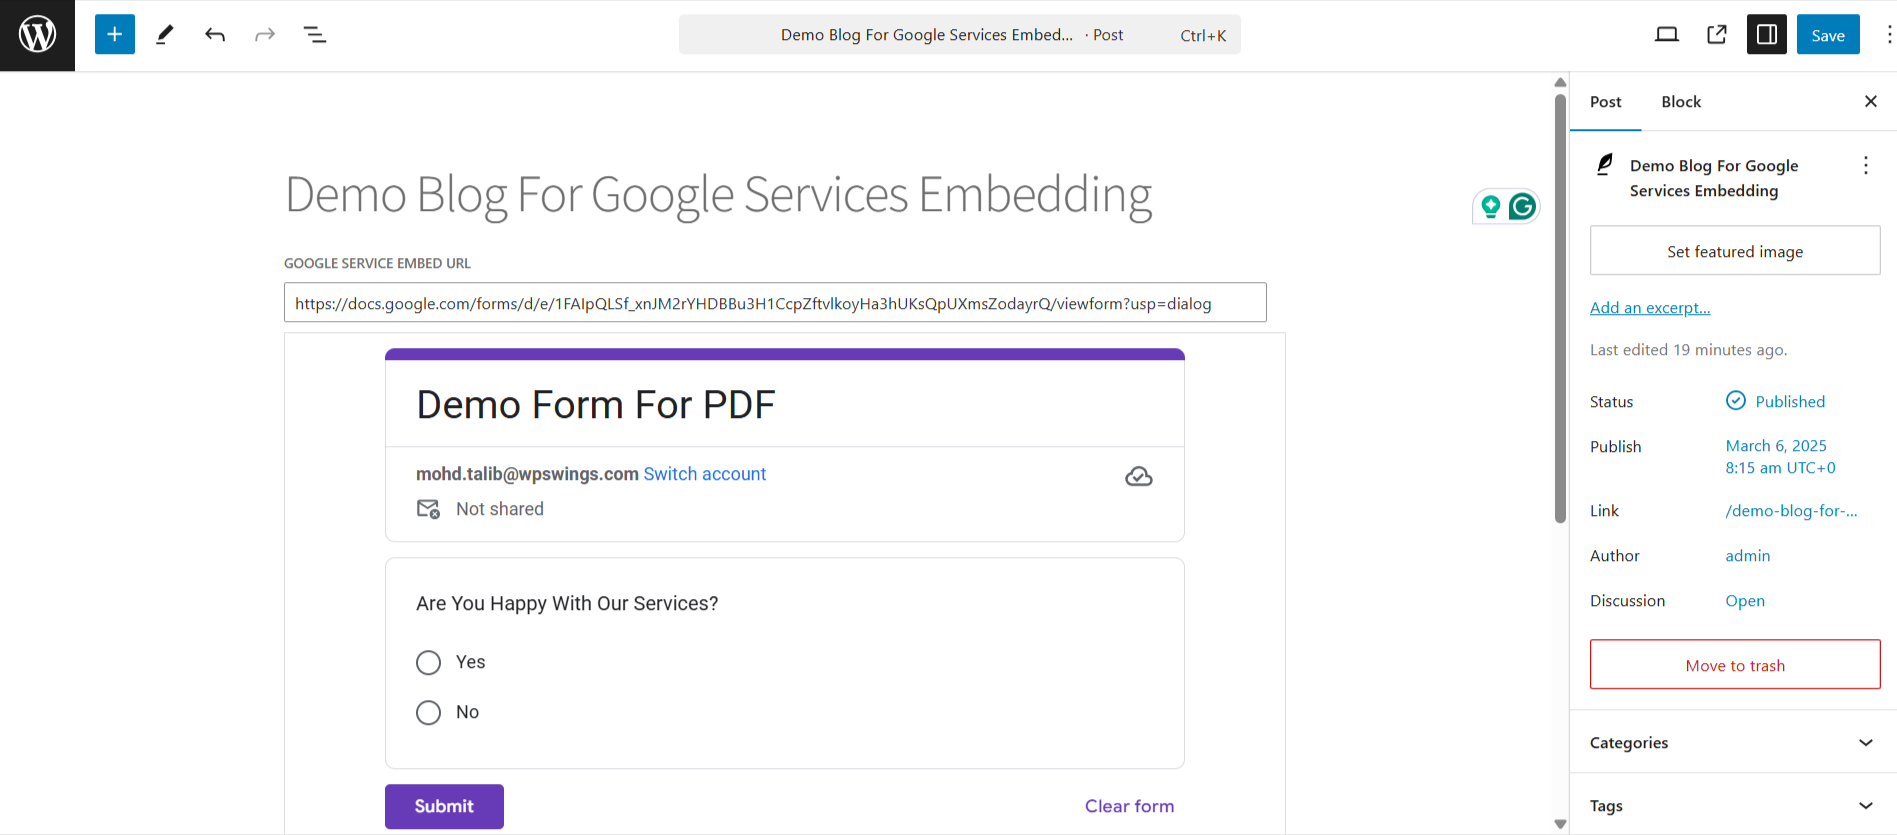
To embed the Google services, search for “WPSwings Google Embed Block” and drop it into your page.
To embed Google services like Docs, Forms, Sheets, or Slides into your page, you first need to publish them to the web. Each service has its own way of doing this to generate a link.
Once you have the link, paste it here to embed the service on your page.
For Google Slides:
- Log in to Google Slides and open the presentation you want to publish.
- Go to “File” > “Share” > “Publish to the web.”
- A window will pop up, as shown in the screenshot below.
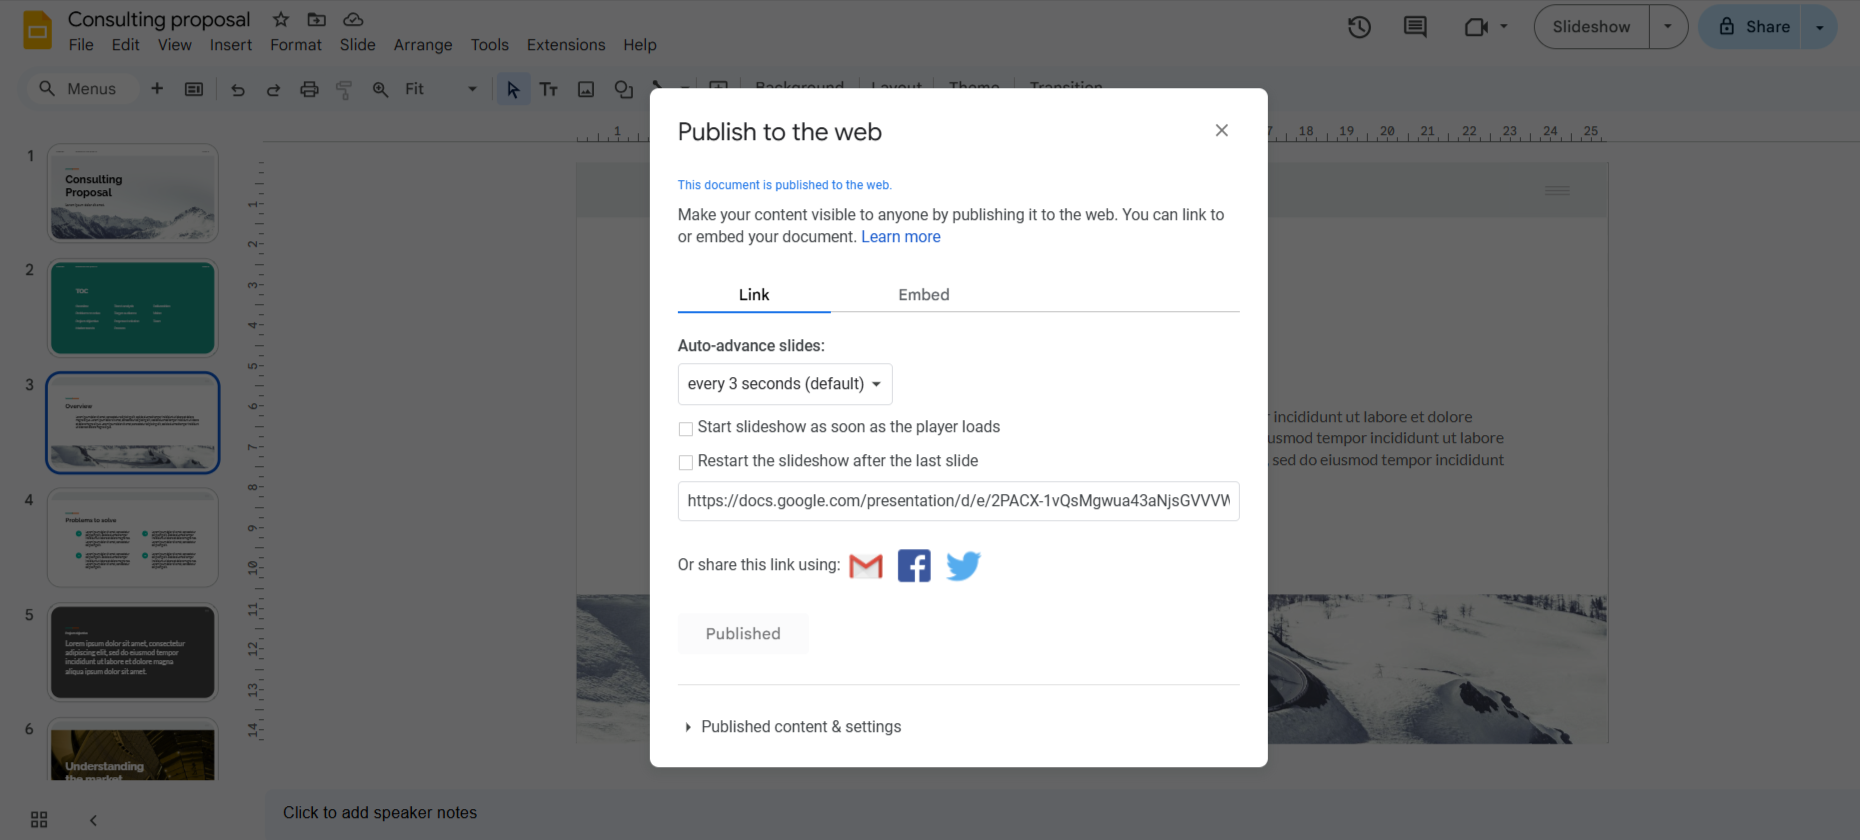
4. Copy the link from the “Publish to the web” window.
5. Paste it into the embedding block in WordPress.
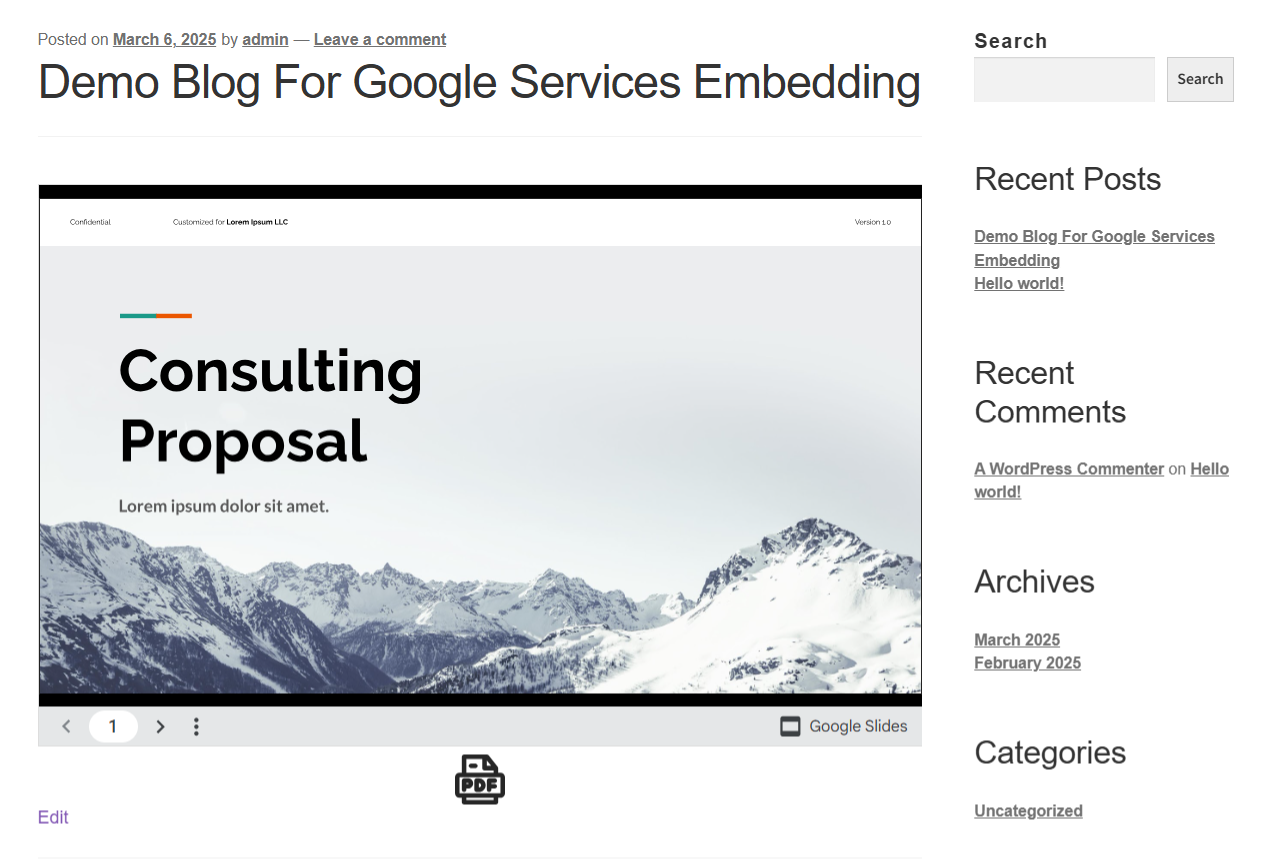
Frontend Representation:
The same process applies to all compatible Google services. Below are the steps to publish each service to the web.
For Google Forms:
- Create a new form or open an existing one.
- Go to the upper-right corner and click “Publish.”
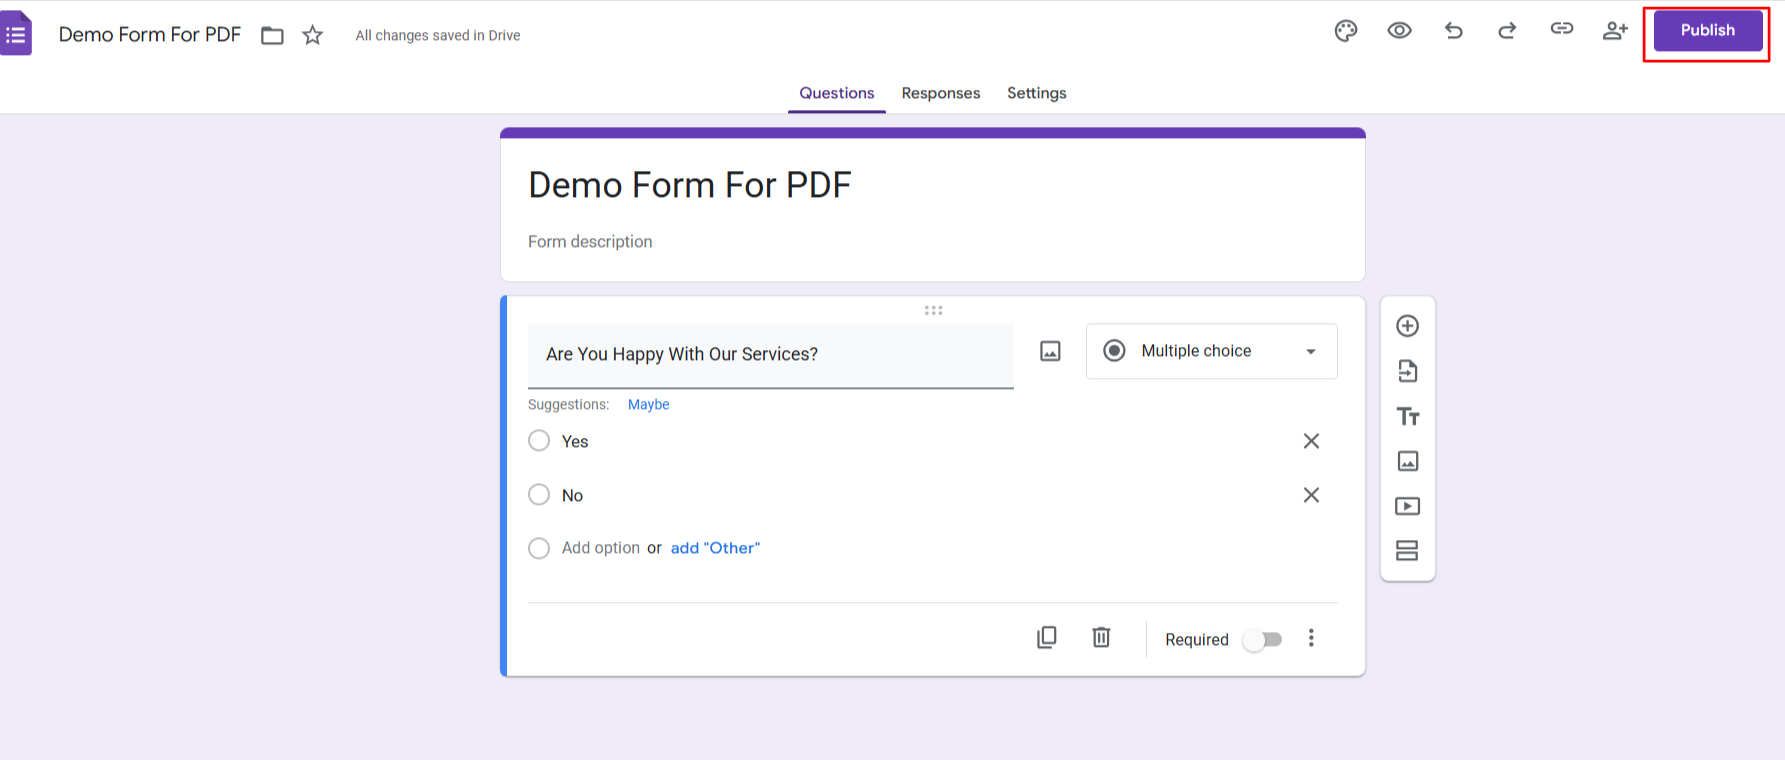
- After publishing the form, copy the responders’ link.
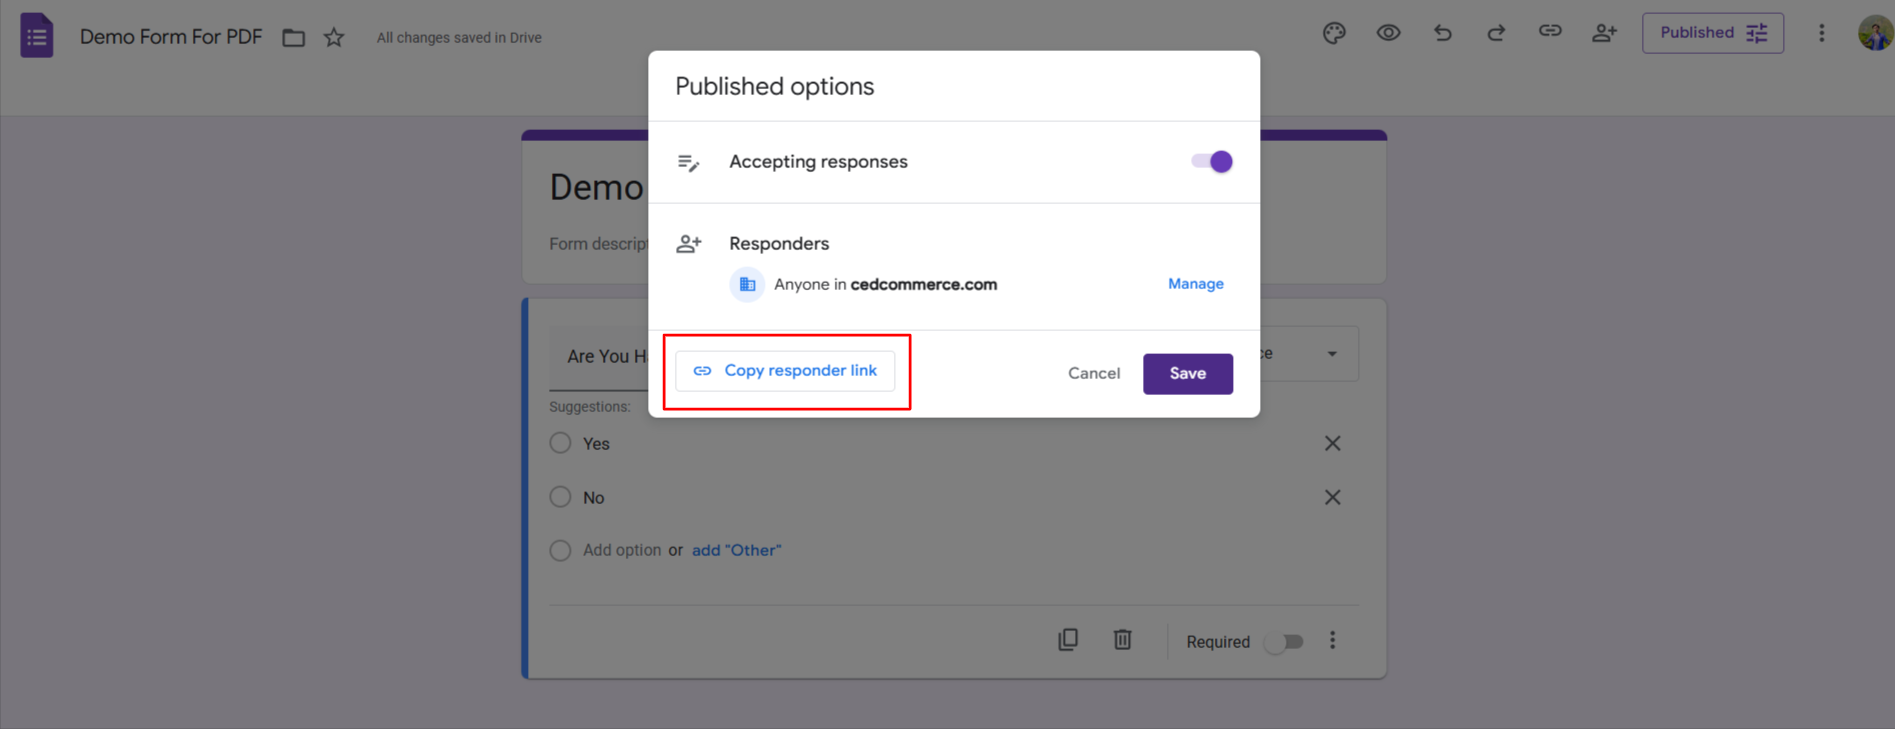
- Paste it into the block.
The process is the same for all Google services. Here’s how to get the publishing link for each:
For Google Sheets:
- Log in to Google Sheets and open the document you want to publish.
- Go to “File” > “Share” > “Publish to the web.”
- Copy the published link and paste it into the block.
For Google Docs:
- Log in to Google Docs and open the document you want to publish.
- Go to “File” > “Share” > “Publish to the web.”
- Copy the published link and paste it into the block.
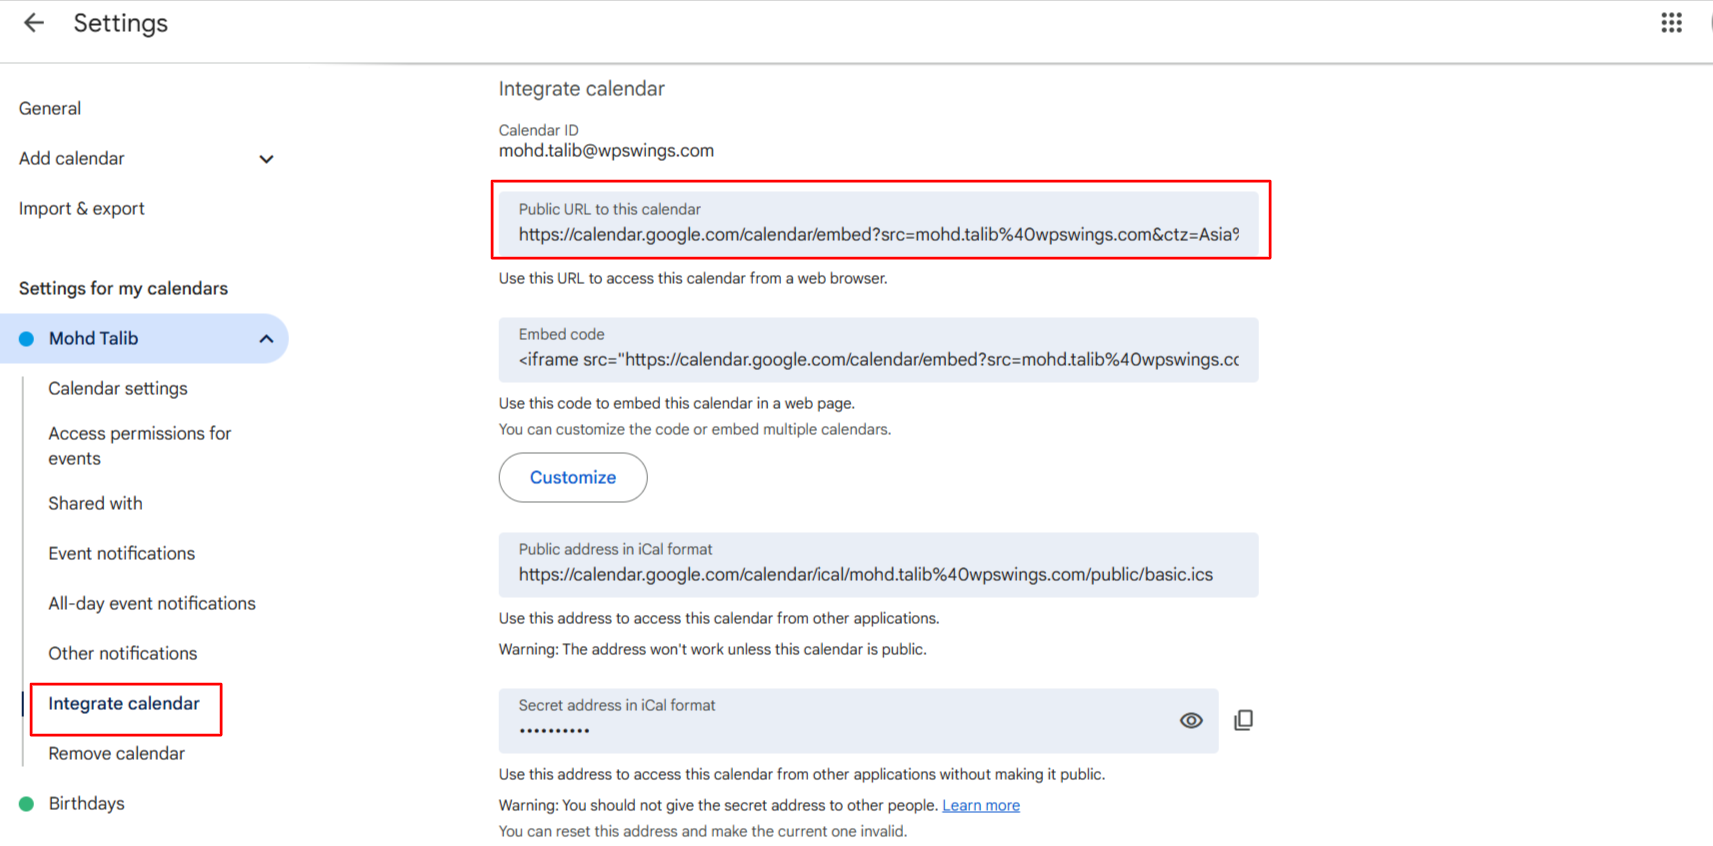
For Google Calendar:
- Open Google Calendar.
- On the left side, under “My Calendars,” click the three dots next to your calendar.
- Select “Settings and Sharing” (as shown in the screenshot below).
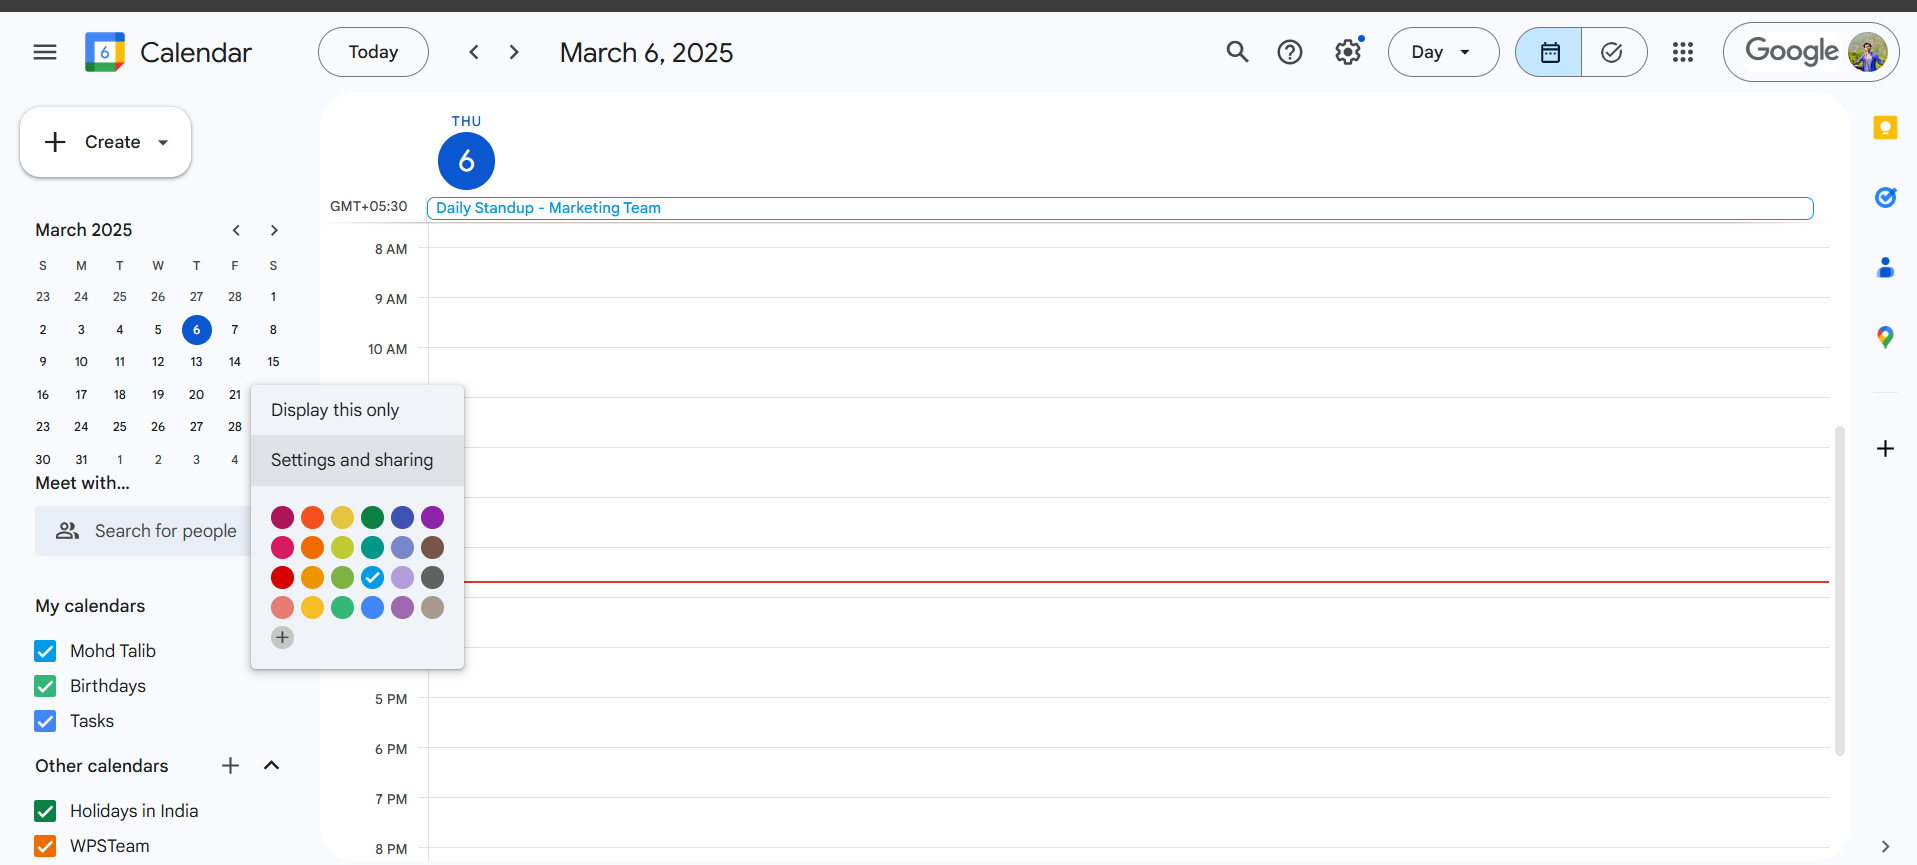
- Go to the “Integrate Calendar” section and copy the URL.
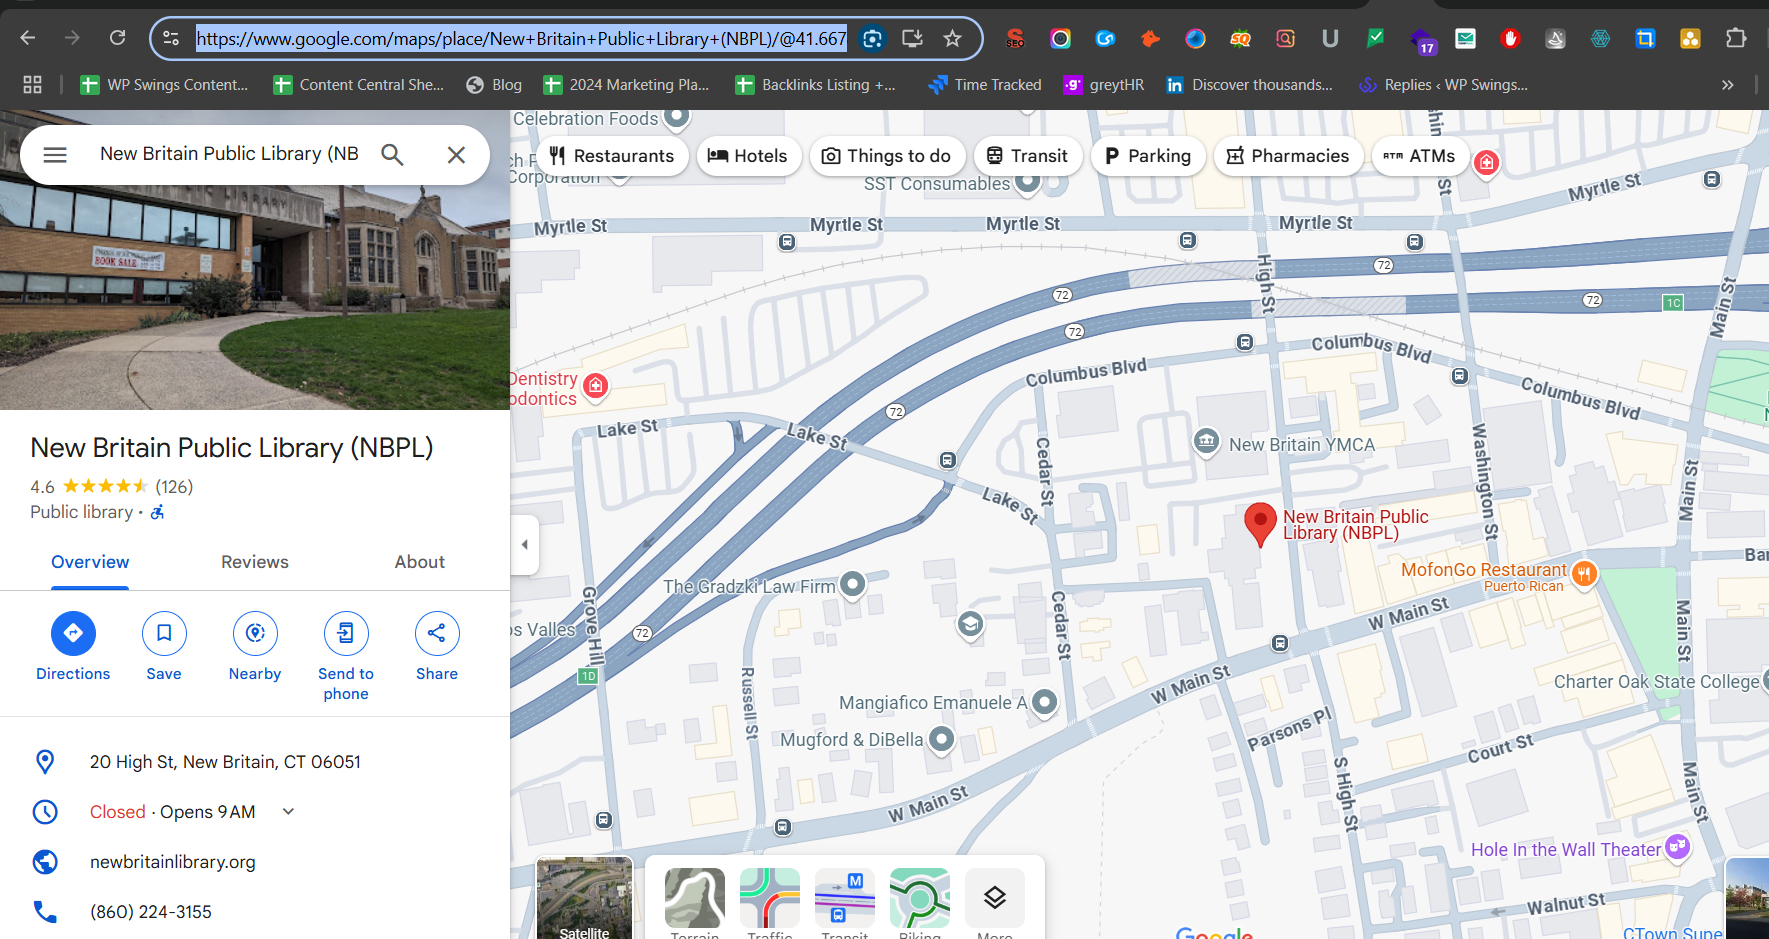
For Google Maps:
- Open your location in Google Maps.
- Copy the webpage URL (as shown in the screenshot below).
- Paste it on the block on you page
13.Gutenberg Blocks To Embed Third-Party Services
With our PDF plugin, you can now also embed third-party services like Reddit posts, LinkedIn posts, loom videos, and Canva creatives on your website.
Below are the steps to embed these third-party services on your website using simple drag-and-drop gutenberg blocks
Reddit Embed:
To embed a Reddit post, open the desired post and copy its URL, as shown in the screenshot below.

Next, go to the post or page on your WordPress website where you’d like to embed the Reddit post.
Locate the WPSwings blocks, then drag the “Reddit” block onto the page.
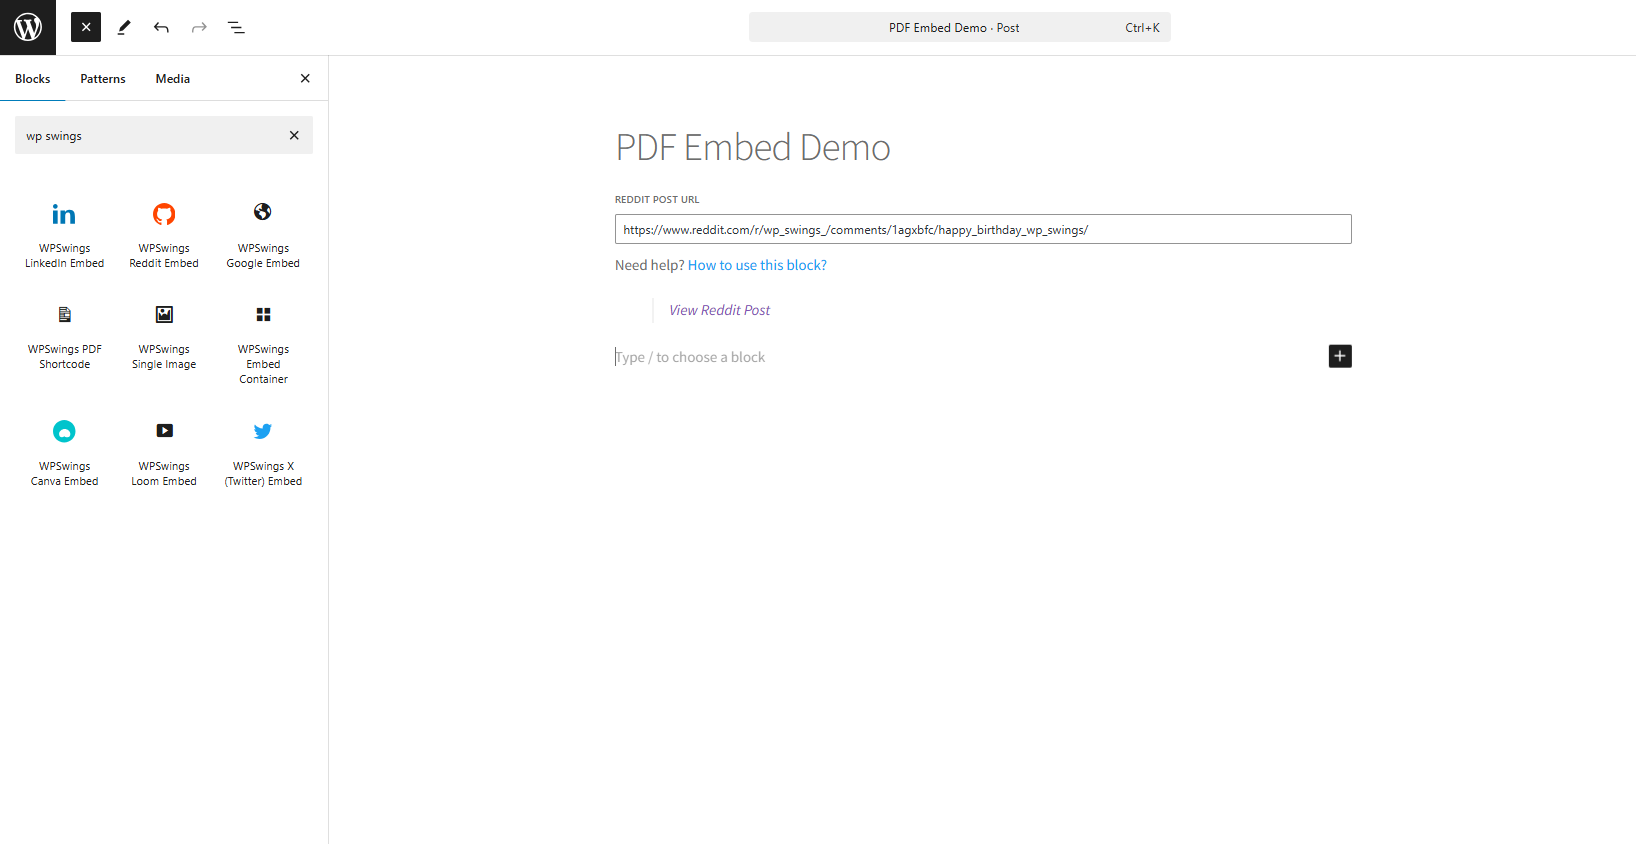
Paste the copied Reddit post URL into the block to embed it. And save the post.
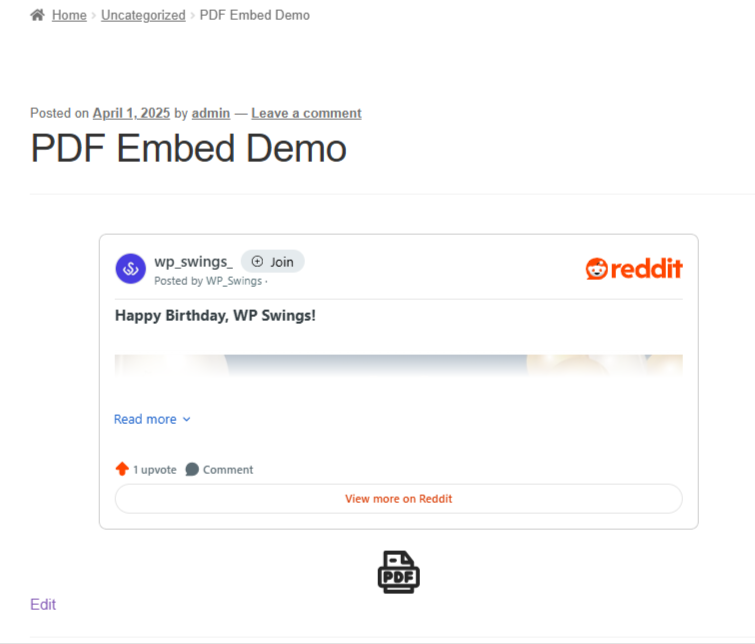
Here’s how it will appear on the front end.
Twitter (X) Embed:
To embed a Twitter (now known as X) post, click the three dots on the post and select the “Embed Post” option.
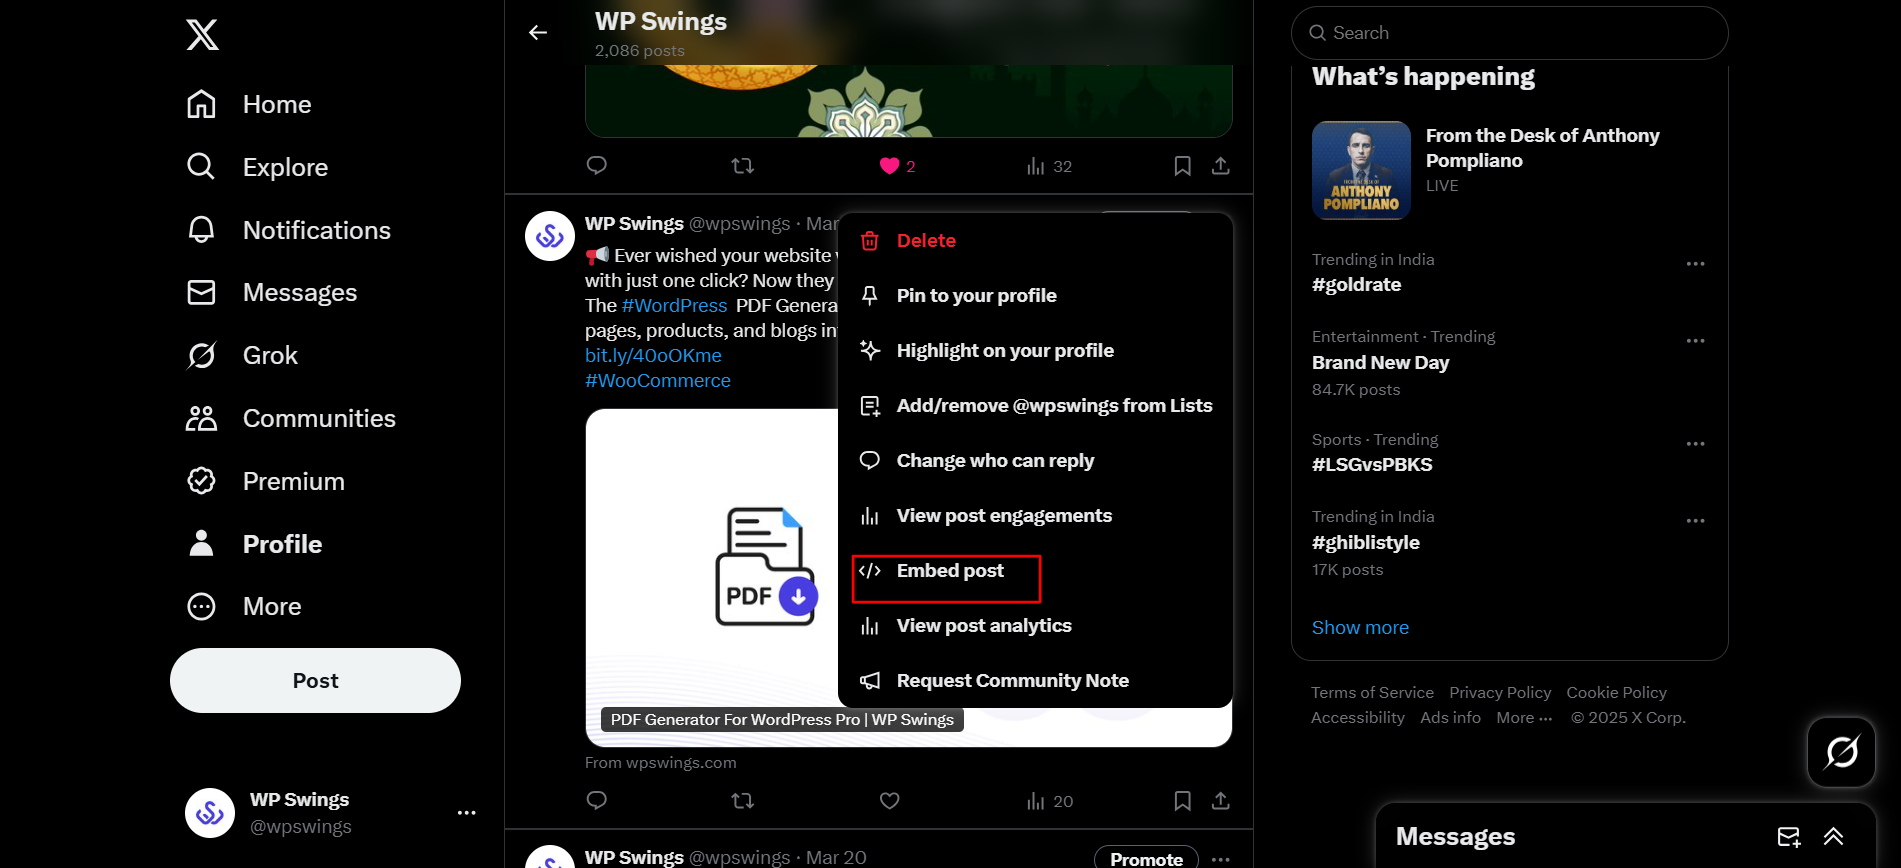
Copy the provided embed link.

On your WordPress site, search for the WPSwings “Twitter Embed” block, drag it onto your post or page, and drop it in place.
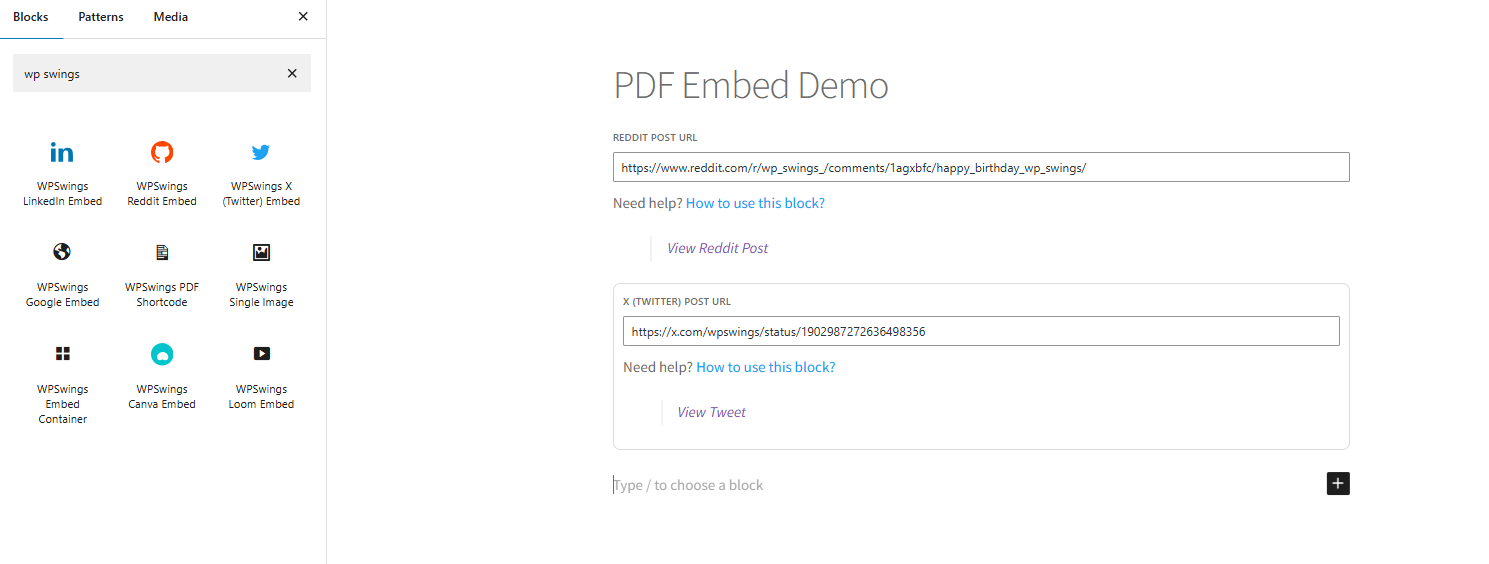
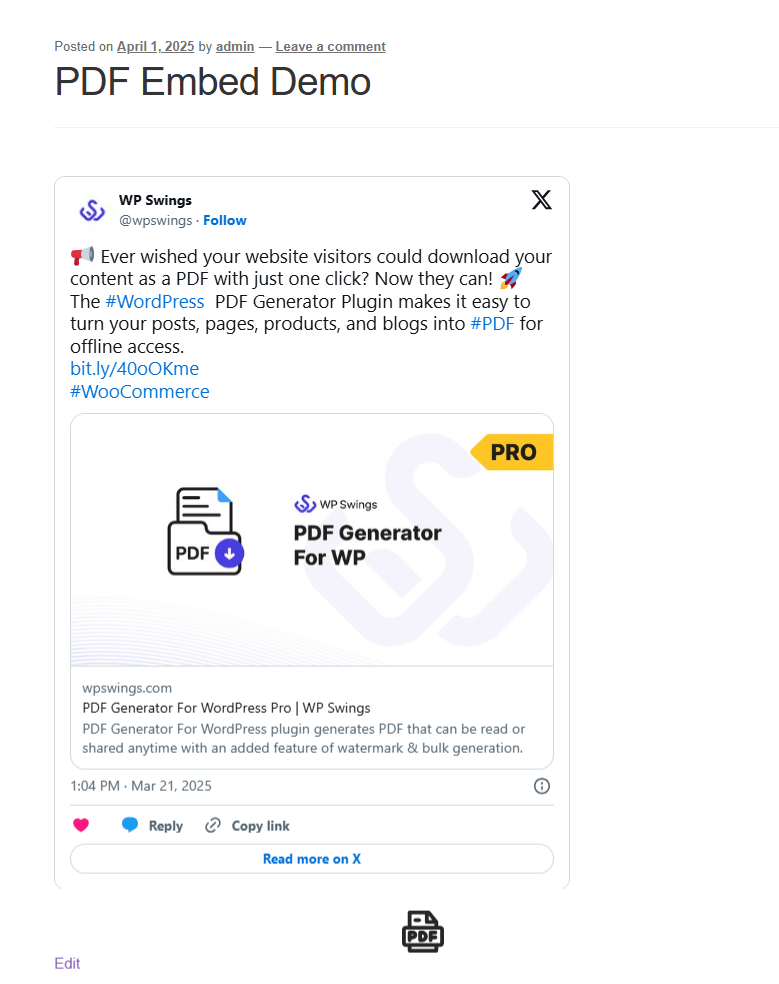
Paste the embed link into the block. Save your post, and you’re done! The embedded post will display on the page, as shown in the screenshot below.
Canva Image/Video Embed:
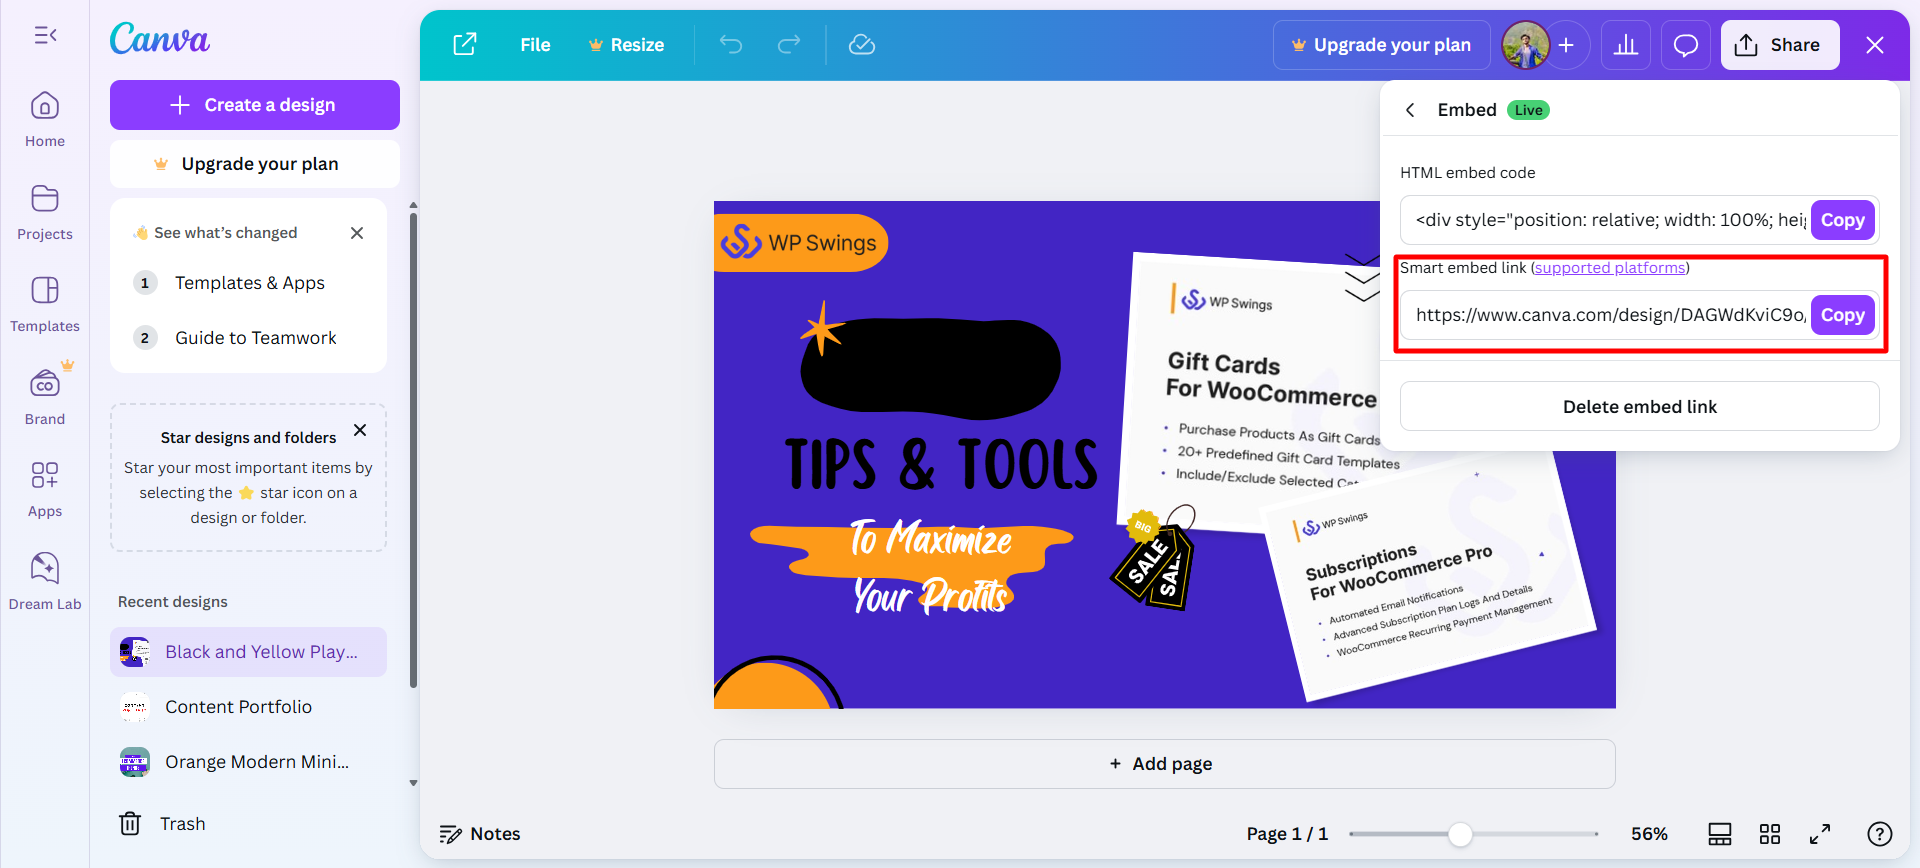
To embed a Canva creation, open your image or video in Canva, click the “Share” option, and select “Embed.”
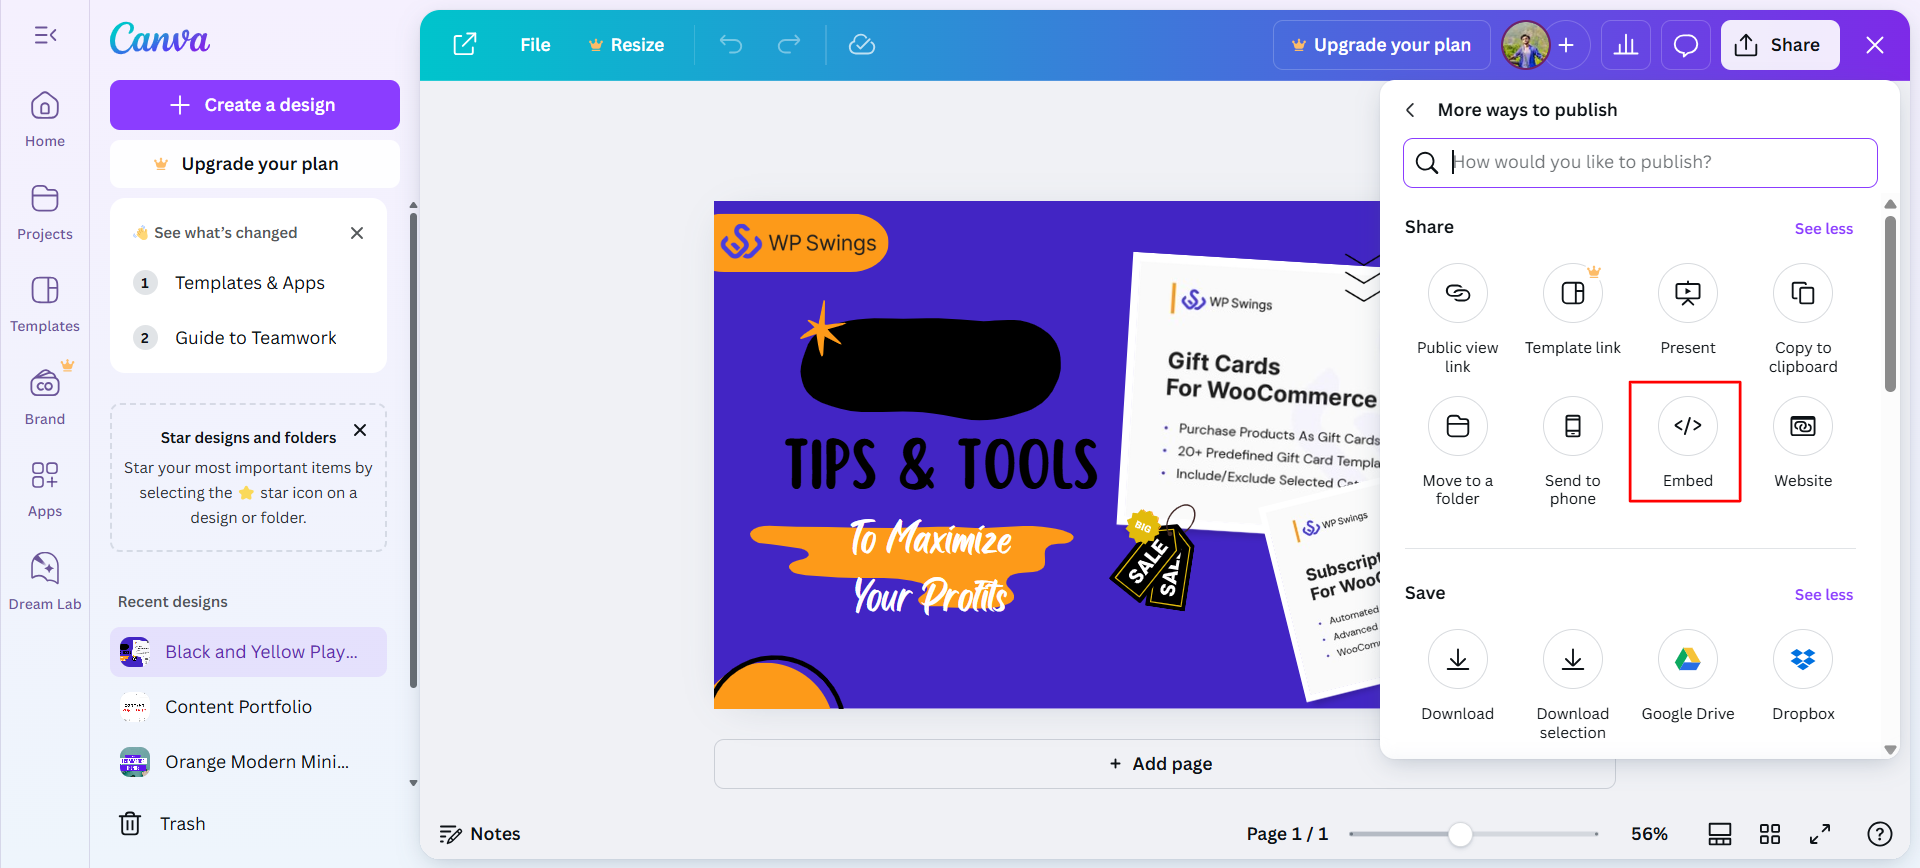
Copy the smart embed link.
On your WordPress site, search for the WPSwings “Canva Embed” block, drag it onto the page, and drop it where you want. Paste the embed link into the block.
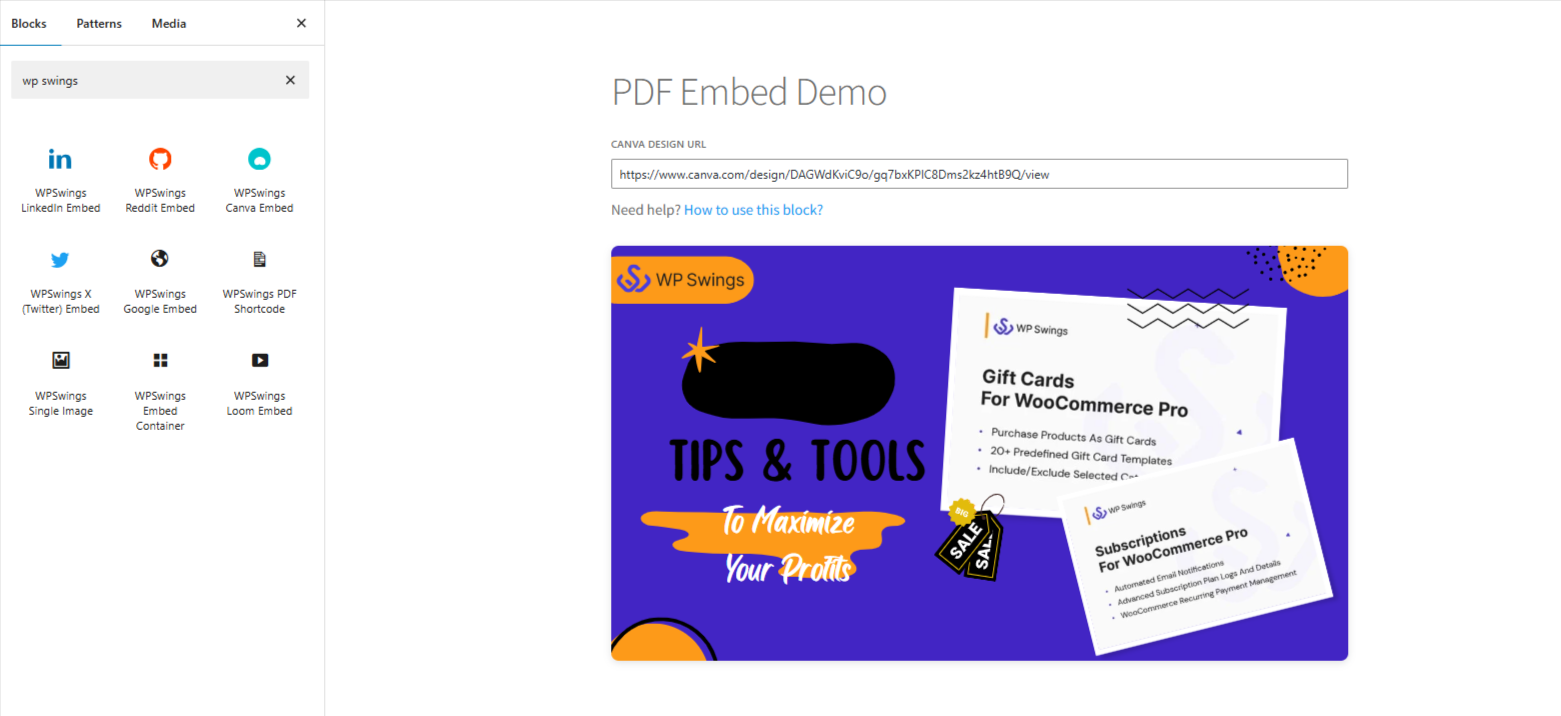
Here is how it’ll look on the website to the customers.

Loom Embed:
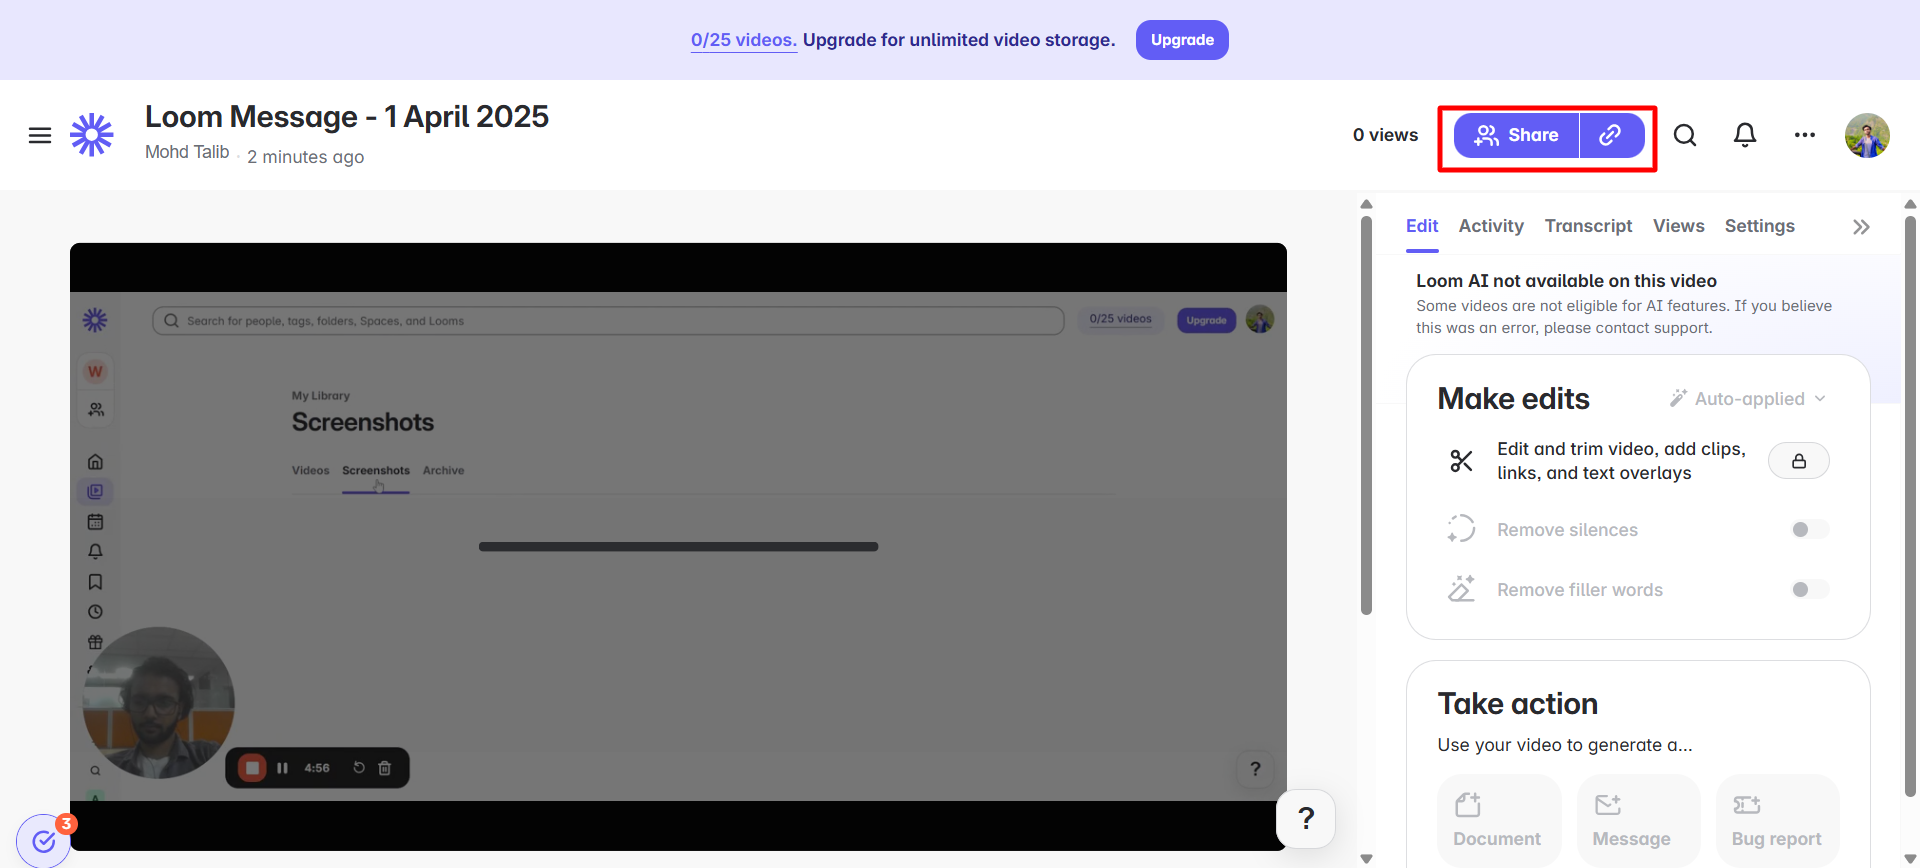
To embed a Loom video, open your video and copy its link, as demonstrated in the screenshot below.
Navigate to your WordPress post or page, search for the WPSwings “Loom Embed” block, and drag it onto the desired spot. Paste the copied link into the block to embed the video.
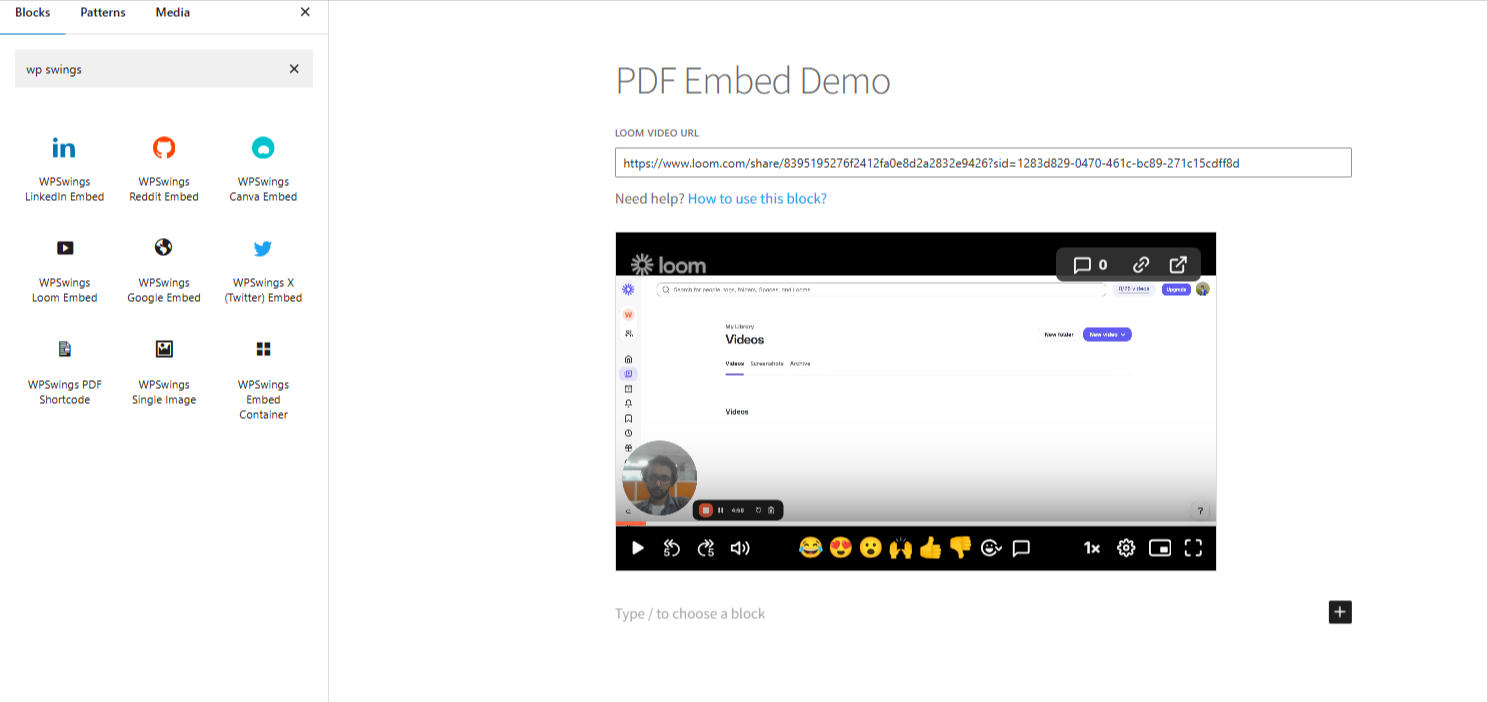
Save your changes, and you’re set! Here’s how it will appear on the website.
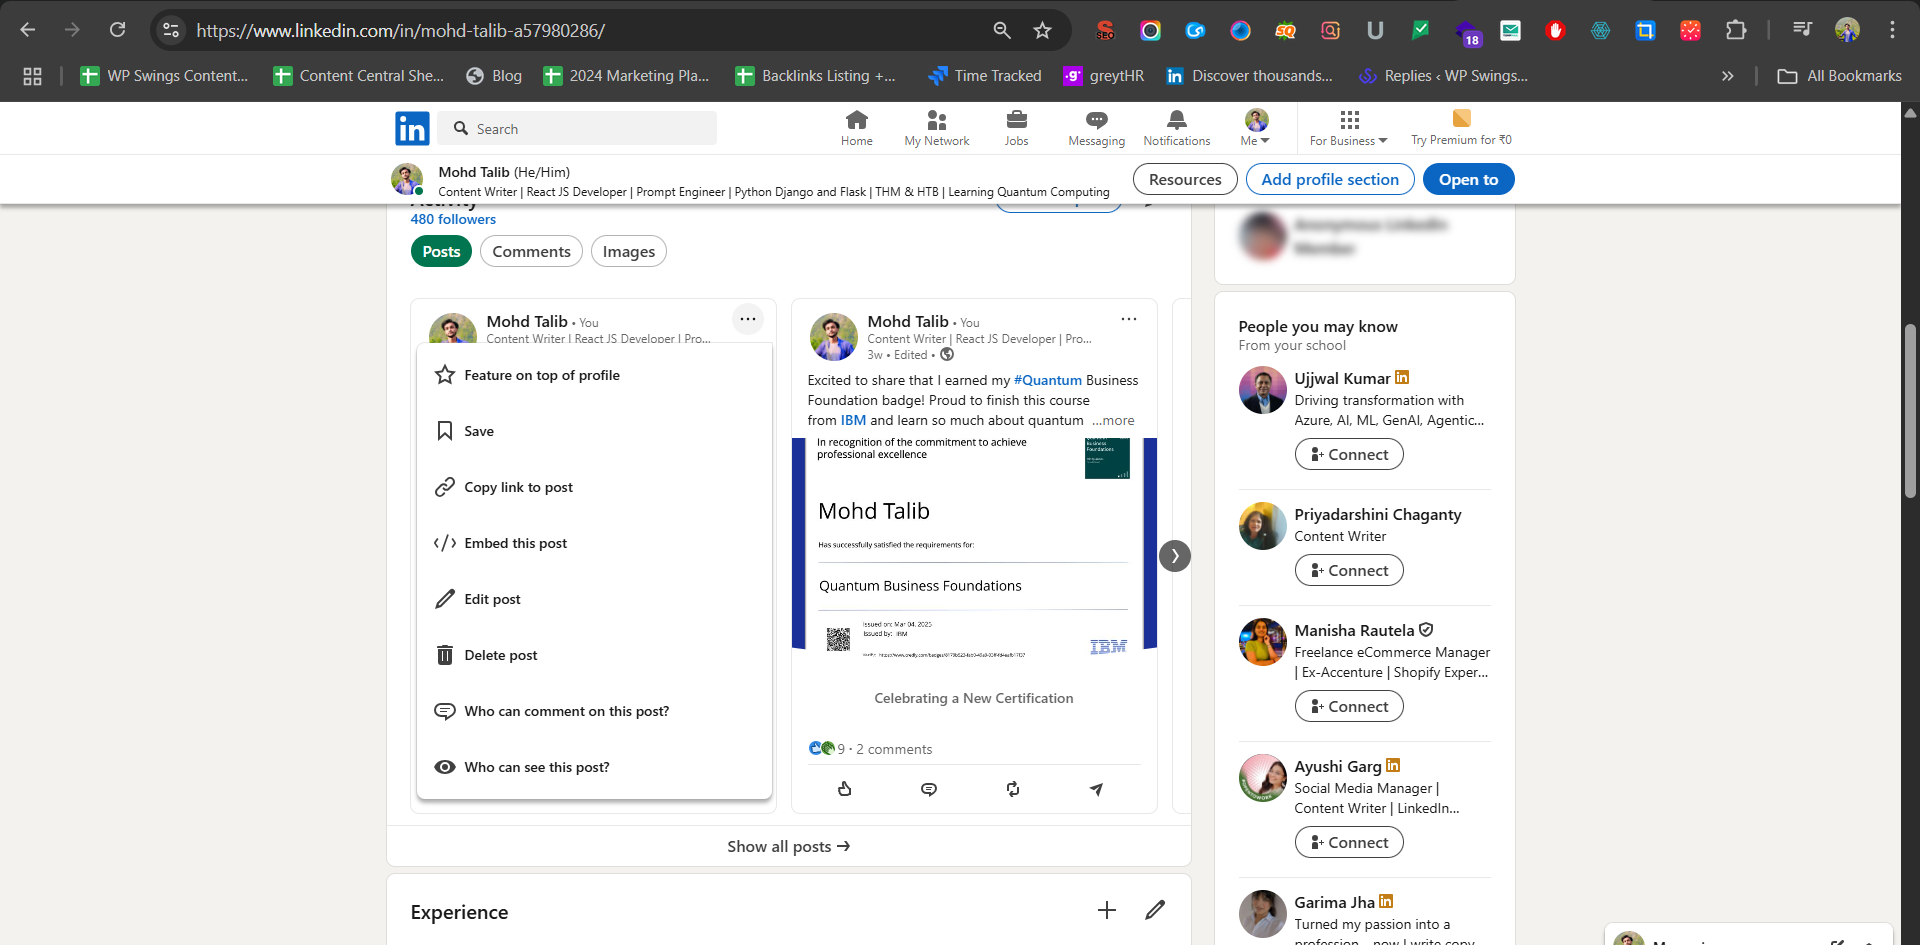
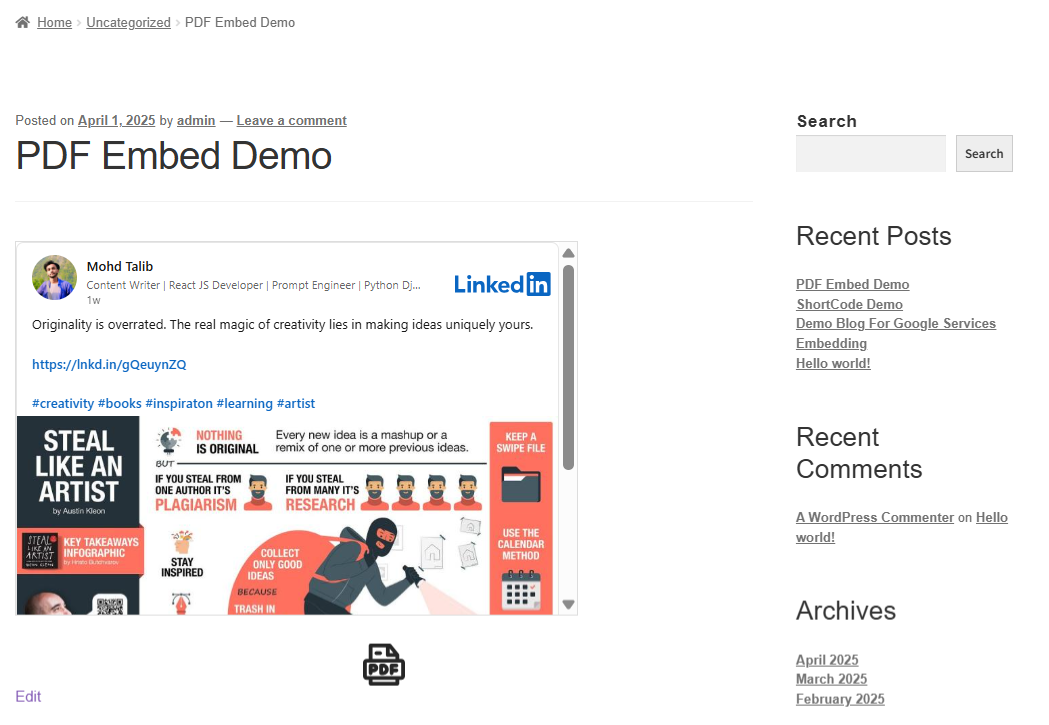
LinkedIn Embed:
To embed a LinkedIn post, go to your profile, select the post you want, click the three dots, and choose the “Embed Post” option, as shown in the screenshot below.
A pop-up will appear with the embed details. Copy only the post ID (you don’t need the full embed code).
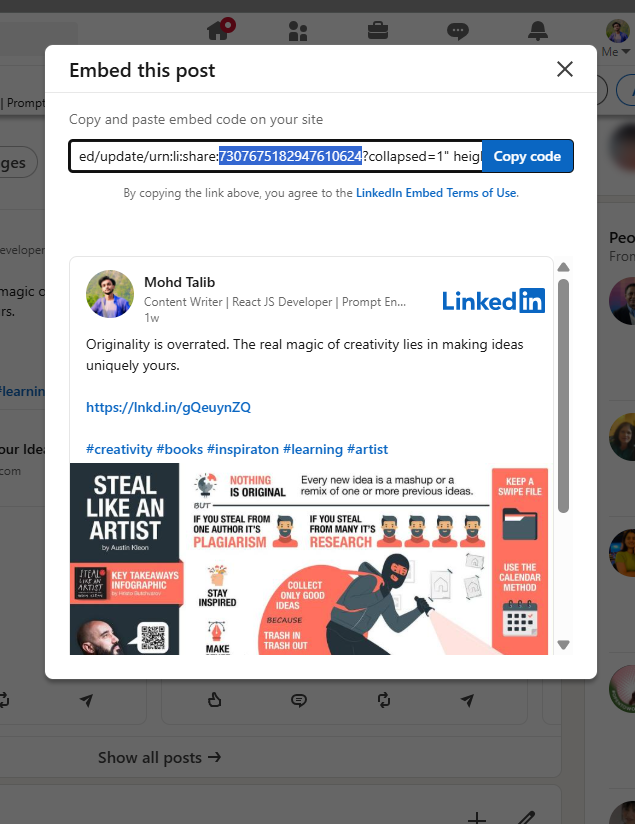
On your WordPress site, search for the WPSwings “LinkedIn Embed” block, drag it onto the page, and drop it in place. Paste the post ID into the block.
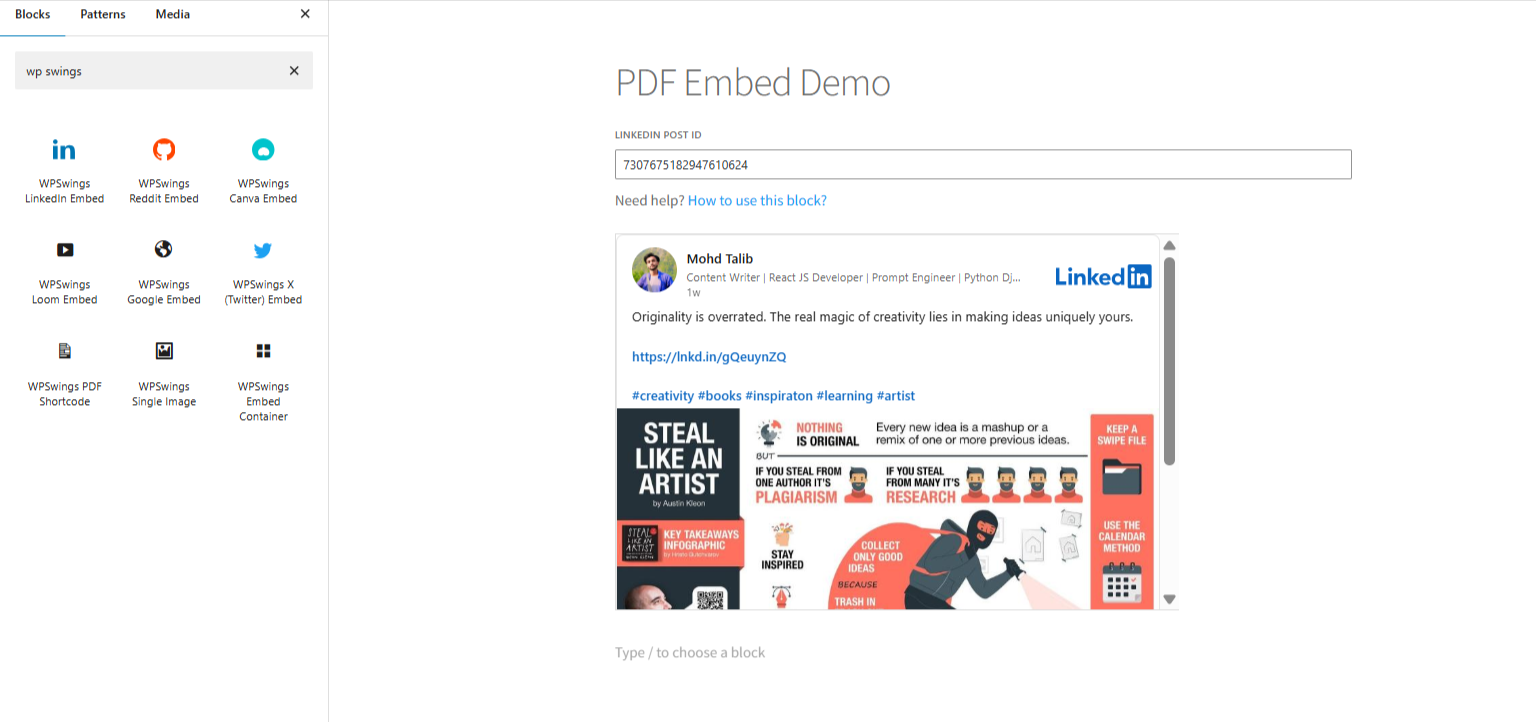
Click “Save,” and here’s how it will look on your website.
Calendly Embed:
To embed an event from Calendly, navigate to your events and click on share, and copy the link as shown in the screenshot below.

Go back to your post or page where you want to show this event, search for “WPSwings Calendly Embed” and paste the link in that block, save the page, and that’s it.
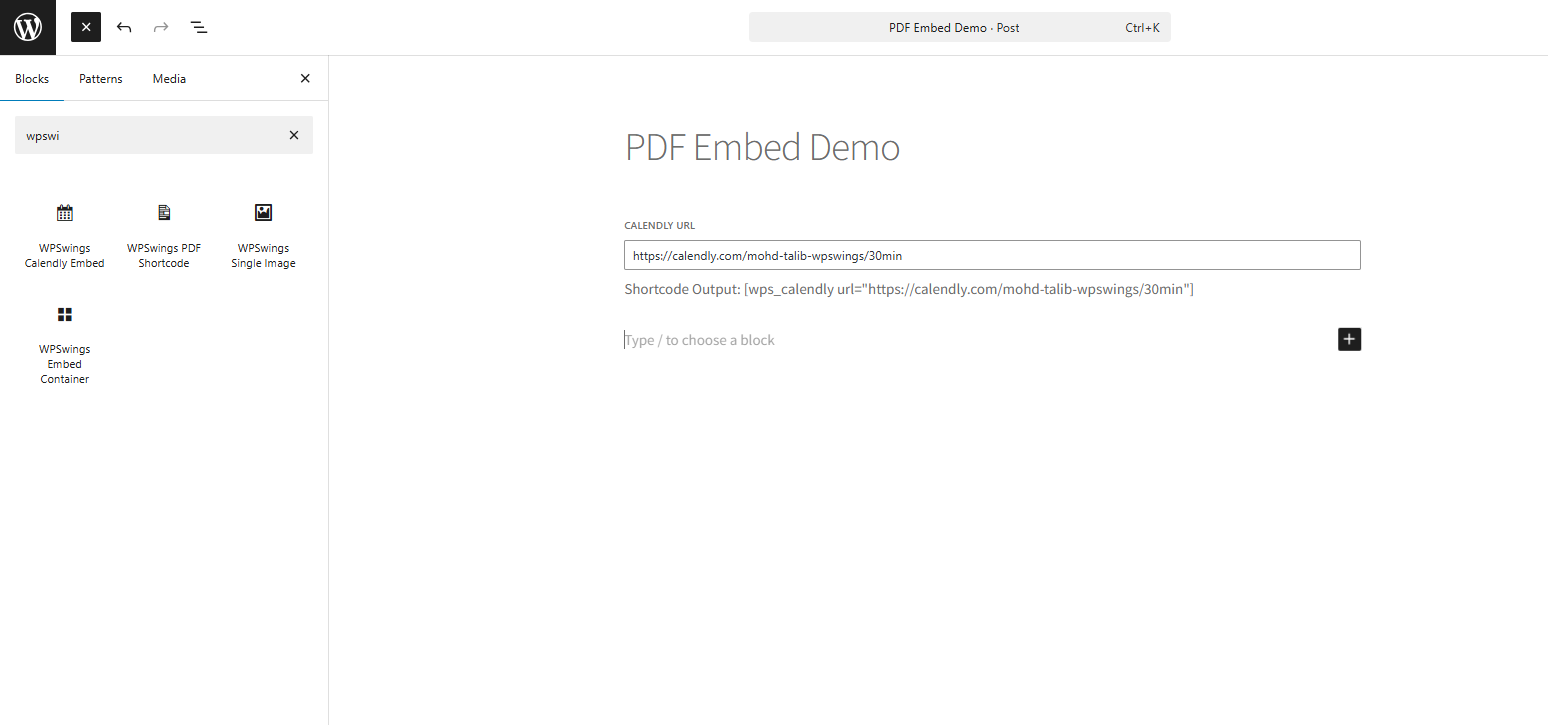
Here is how this will look to your users

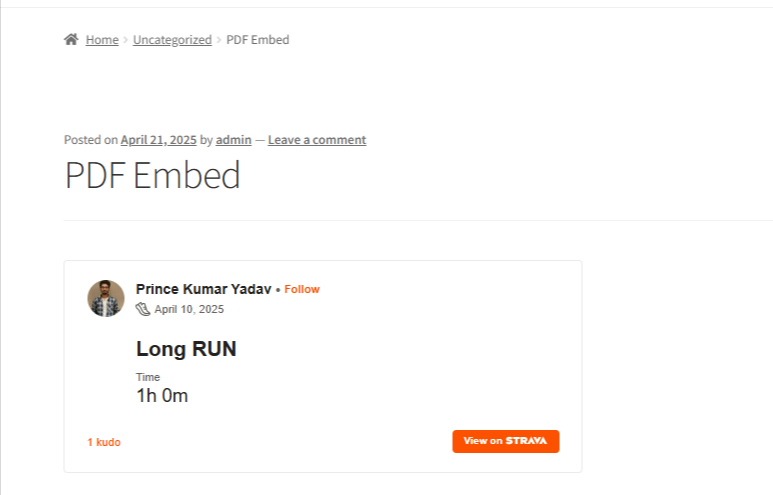
Strava Embed:
To embed any Strava activity, open your activity and copy the ID from the URL as shown in the screenshot below

Now go to your page, search for Strava embed block by WP Swings and paste the id there
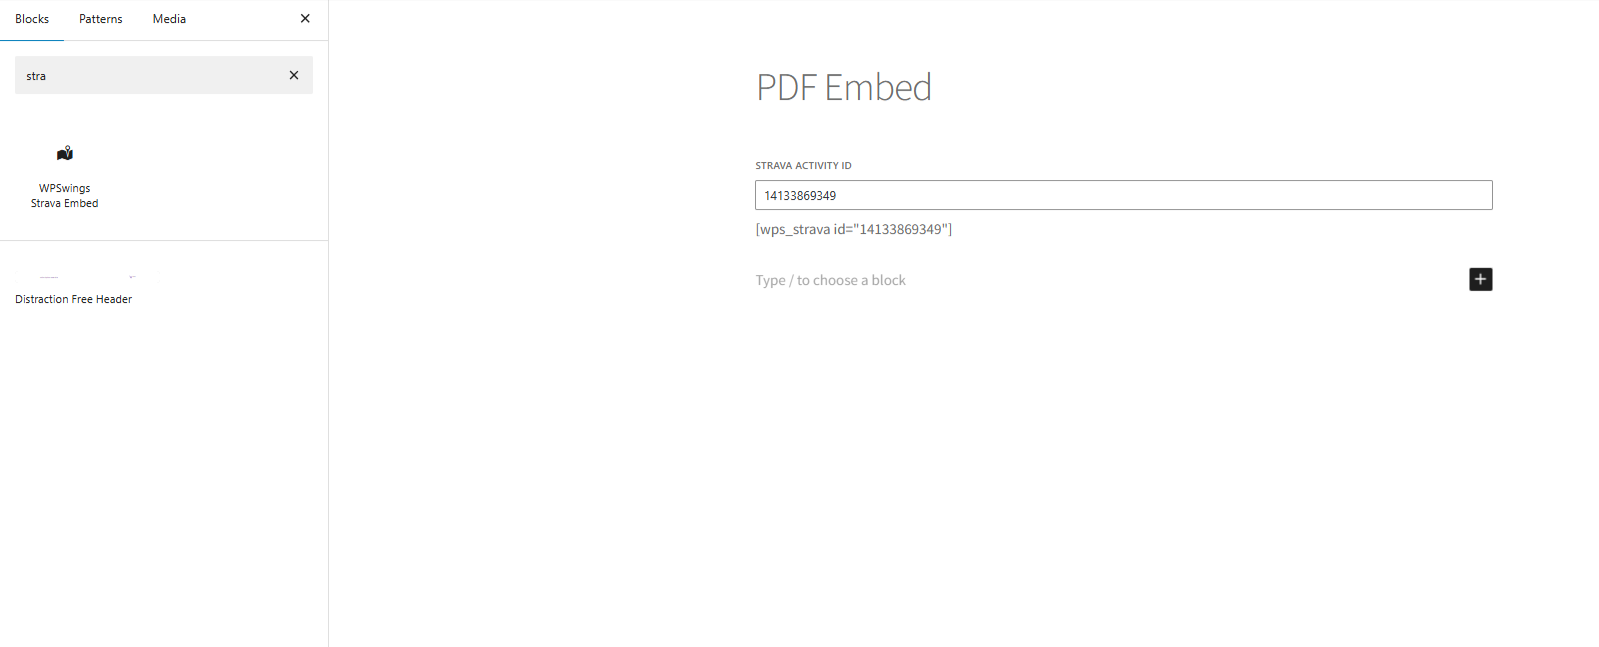
Here is how it will look on the page
13.1.RSS Feed Embed
To embed an RSS feed into your WordPress site, open the RSS feed, navigate to the widgets tab, click on the “add to website” button, and copy the URL
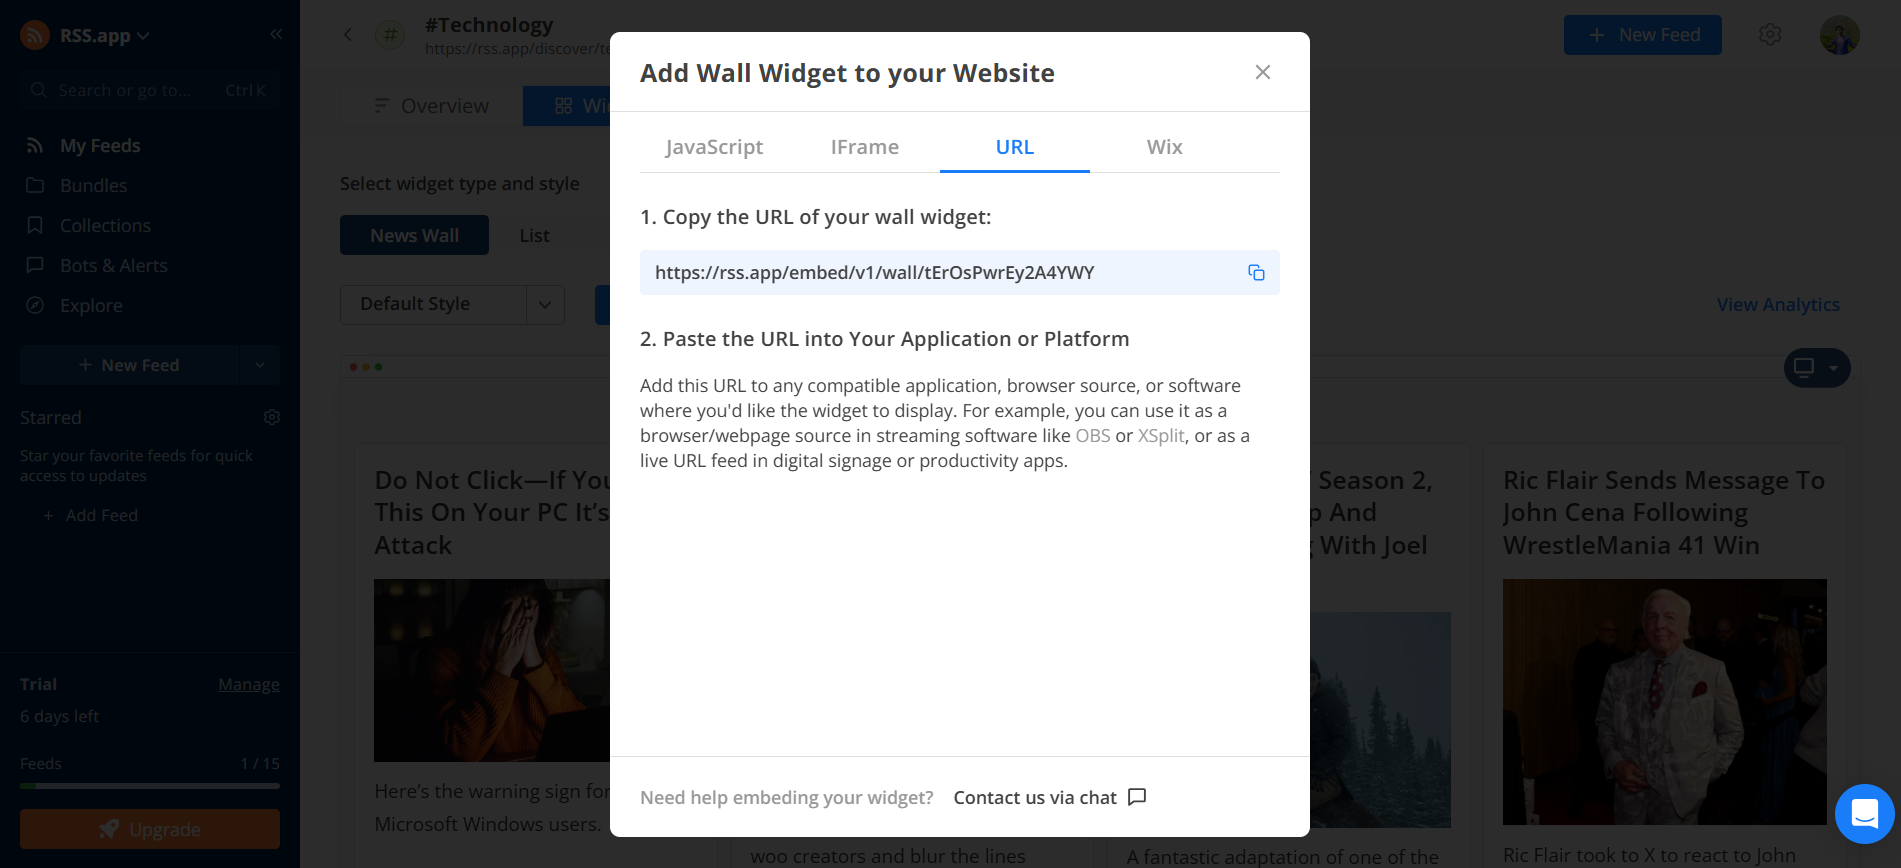
Go back to your WordPress page, find the WPSwings RSS block, and paste the link there. Here is how it’ll show to your users

13.2.AI Chatbot Embed
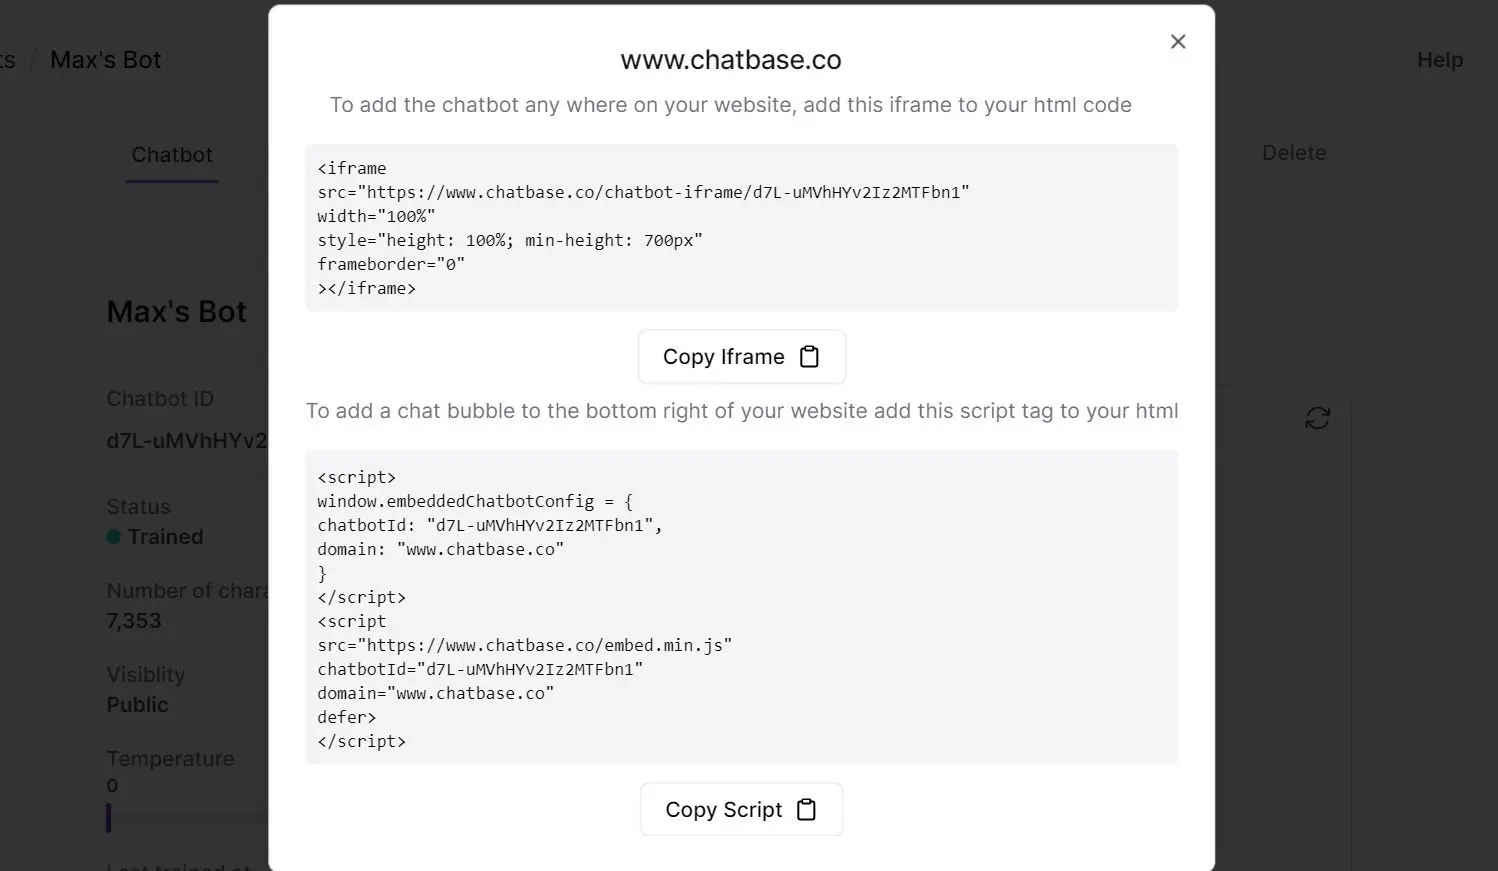
To embed this AI chatbot by Chatbase, refer to this guide and create your chatbot
After creating your chatbot, navigate to the embed tab, and copy the src URL, pls note you don’t have to copy the whole iframe, just copy the src URL
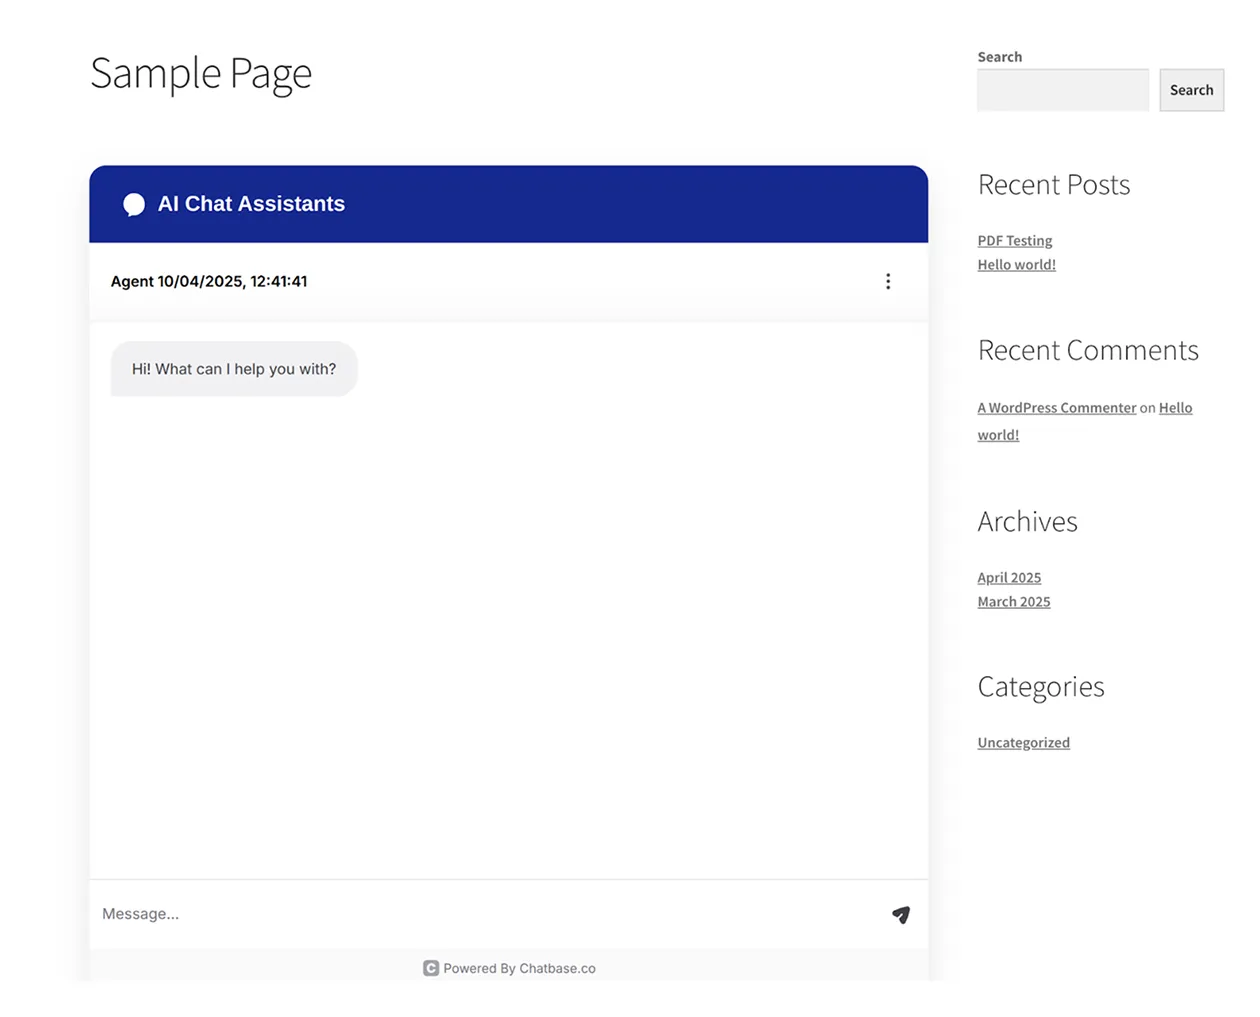
Find the WPSwings chatbot block and paste the URL there

Here is how it’ll look to users on the page.
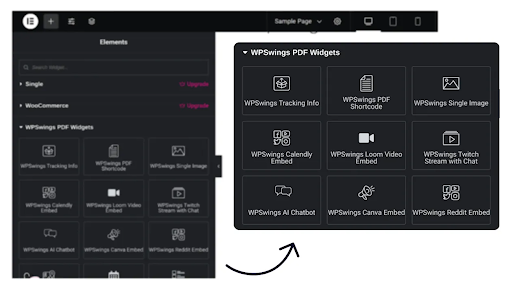
14.Elementor Blocks For Shortcode
Good news for the Elementor users, all our plugin’s shortcode is now converted into Gutenberg blocks, you just need to find the one you want to use and drag and drop them!
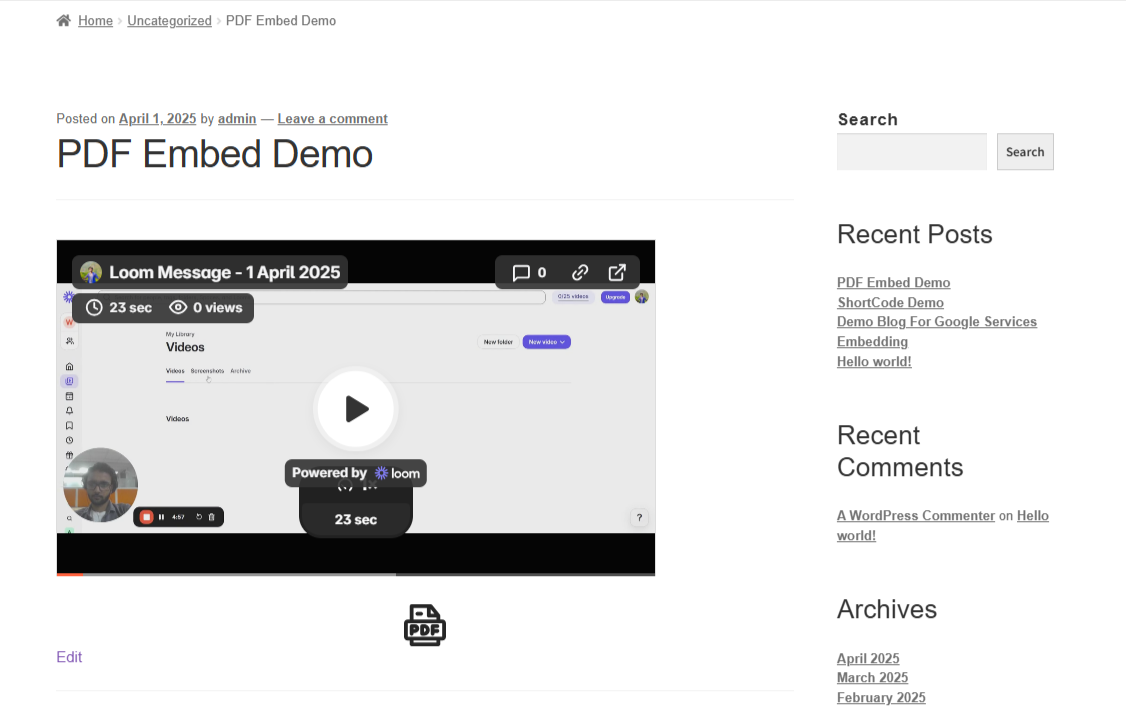
15.Embed PDFs On Posts and Pages
With our PDF Generator Pro plugin, you can easily embed custom PDFs into your posts or pages.
Open the post or page where you want to embed your PDF, and add the “WPS PDF Embed” block to the content area.
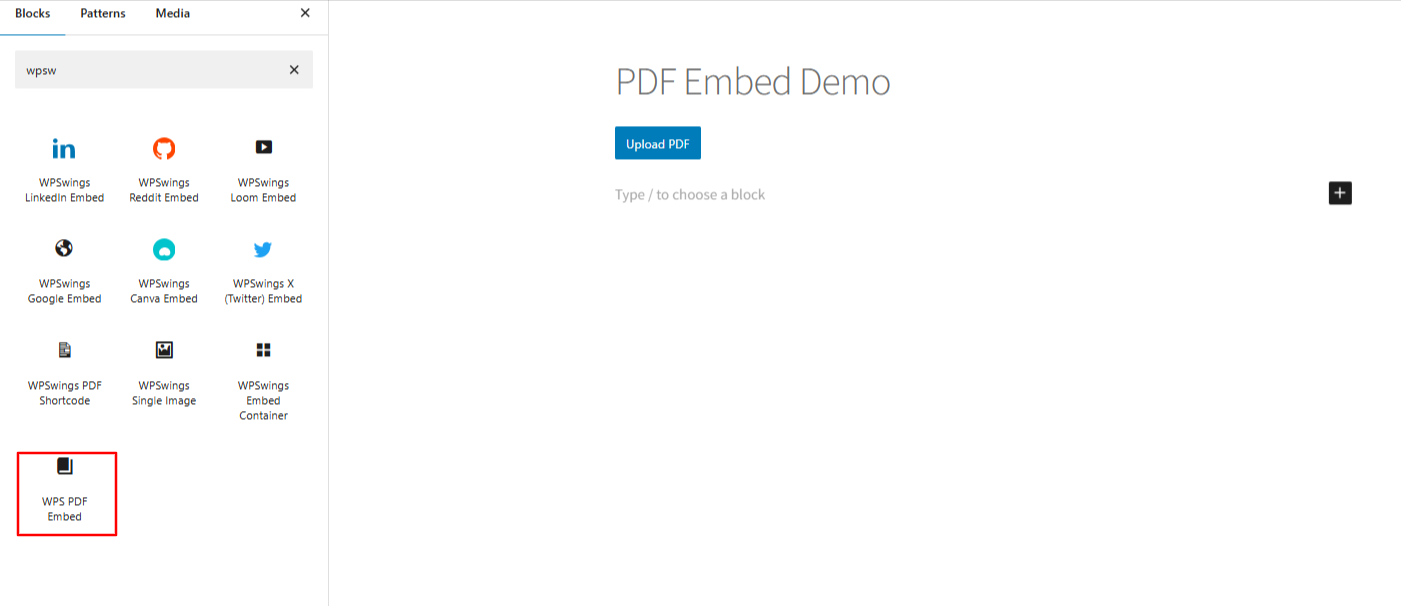
Next, you’ll see an option to upload a PDF. Upload your file and save the post.
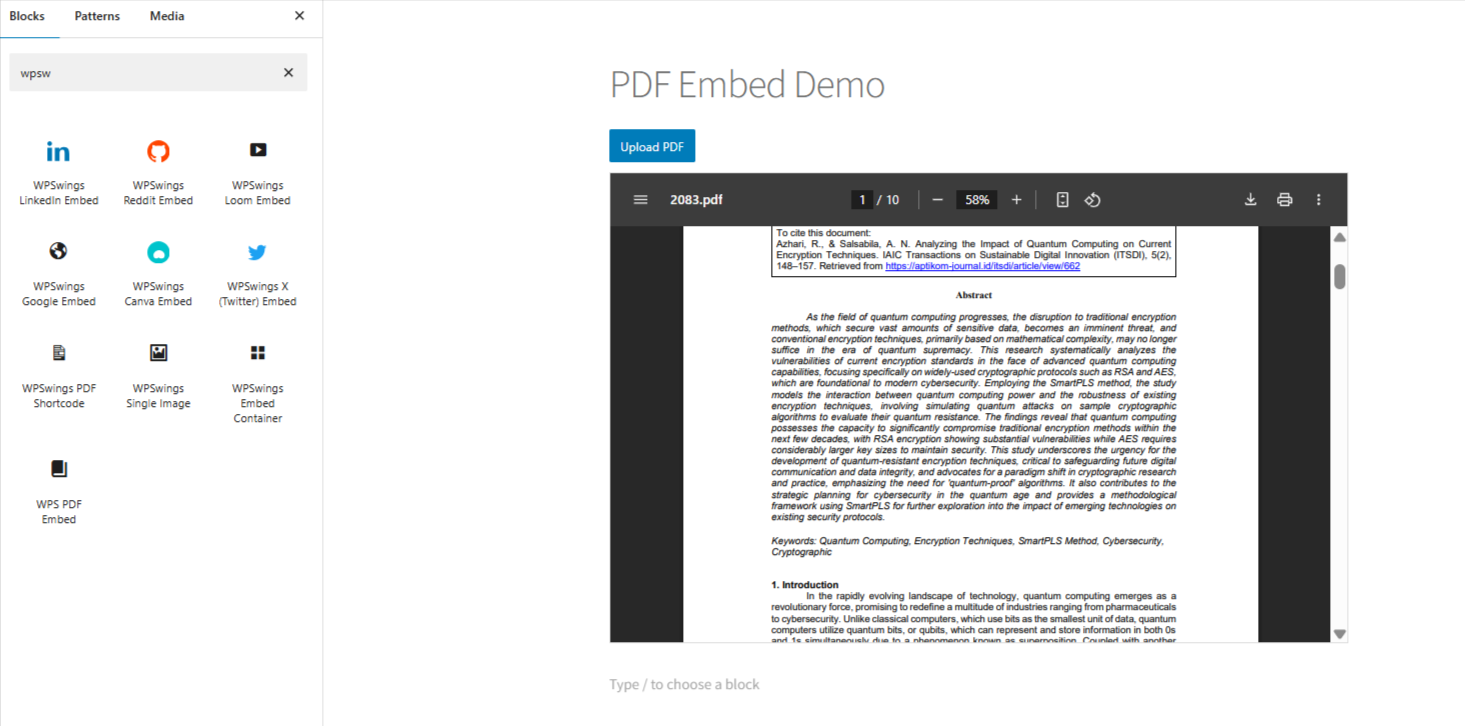
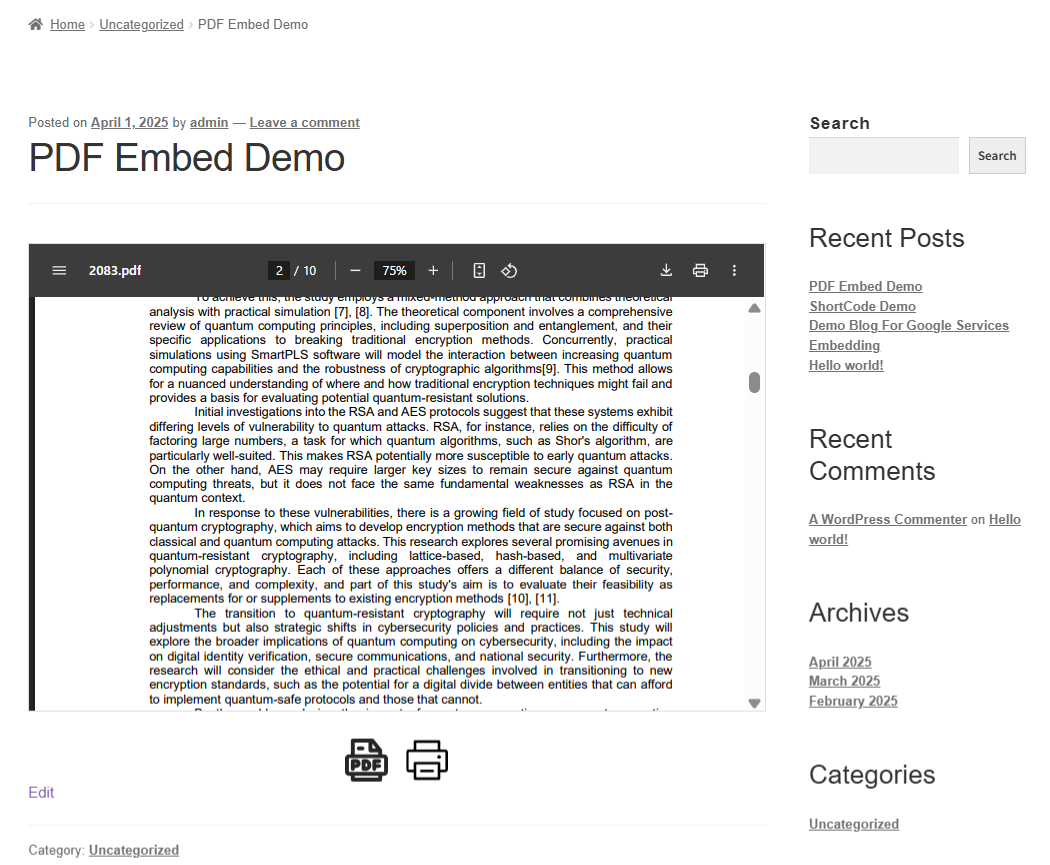
Here’s how it will appear to users on the front end.
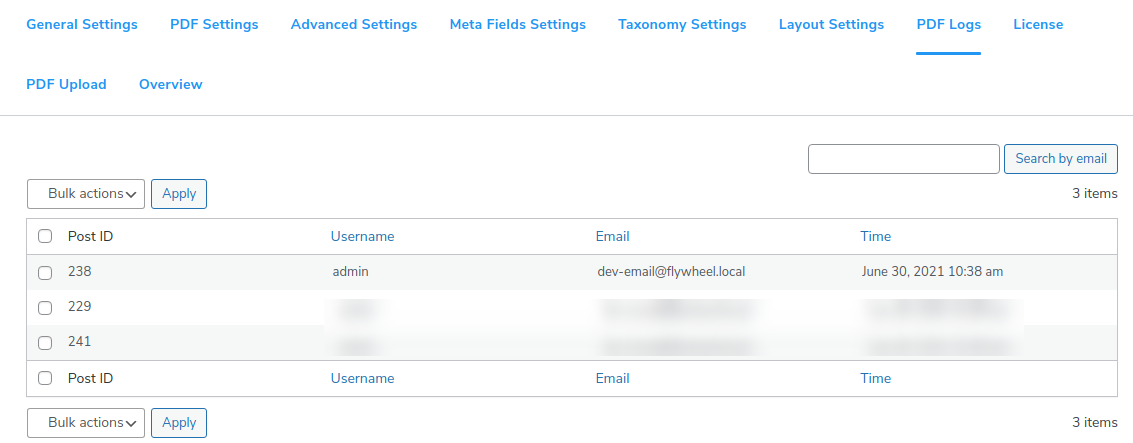
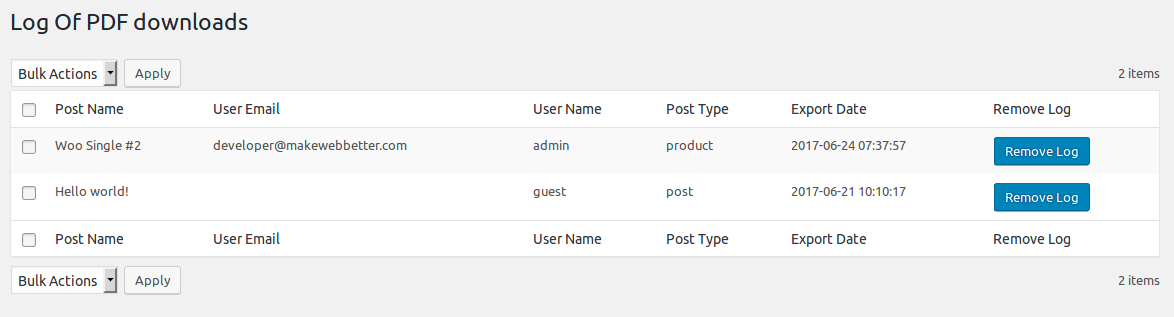
16.PDF Logs
- Go to WP Swings→ PDF Generator for WP→PDF Logs.
- Keep a track of the download PDF files along with crucial details such as Username, Email, and Time.
- If you wish to delete the log in bulk, select the entries and choose delete from the Bulk actions. Then, click on the Apply button.

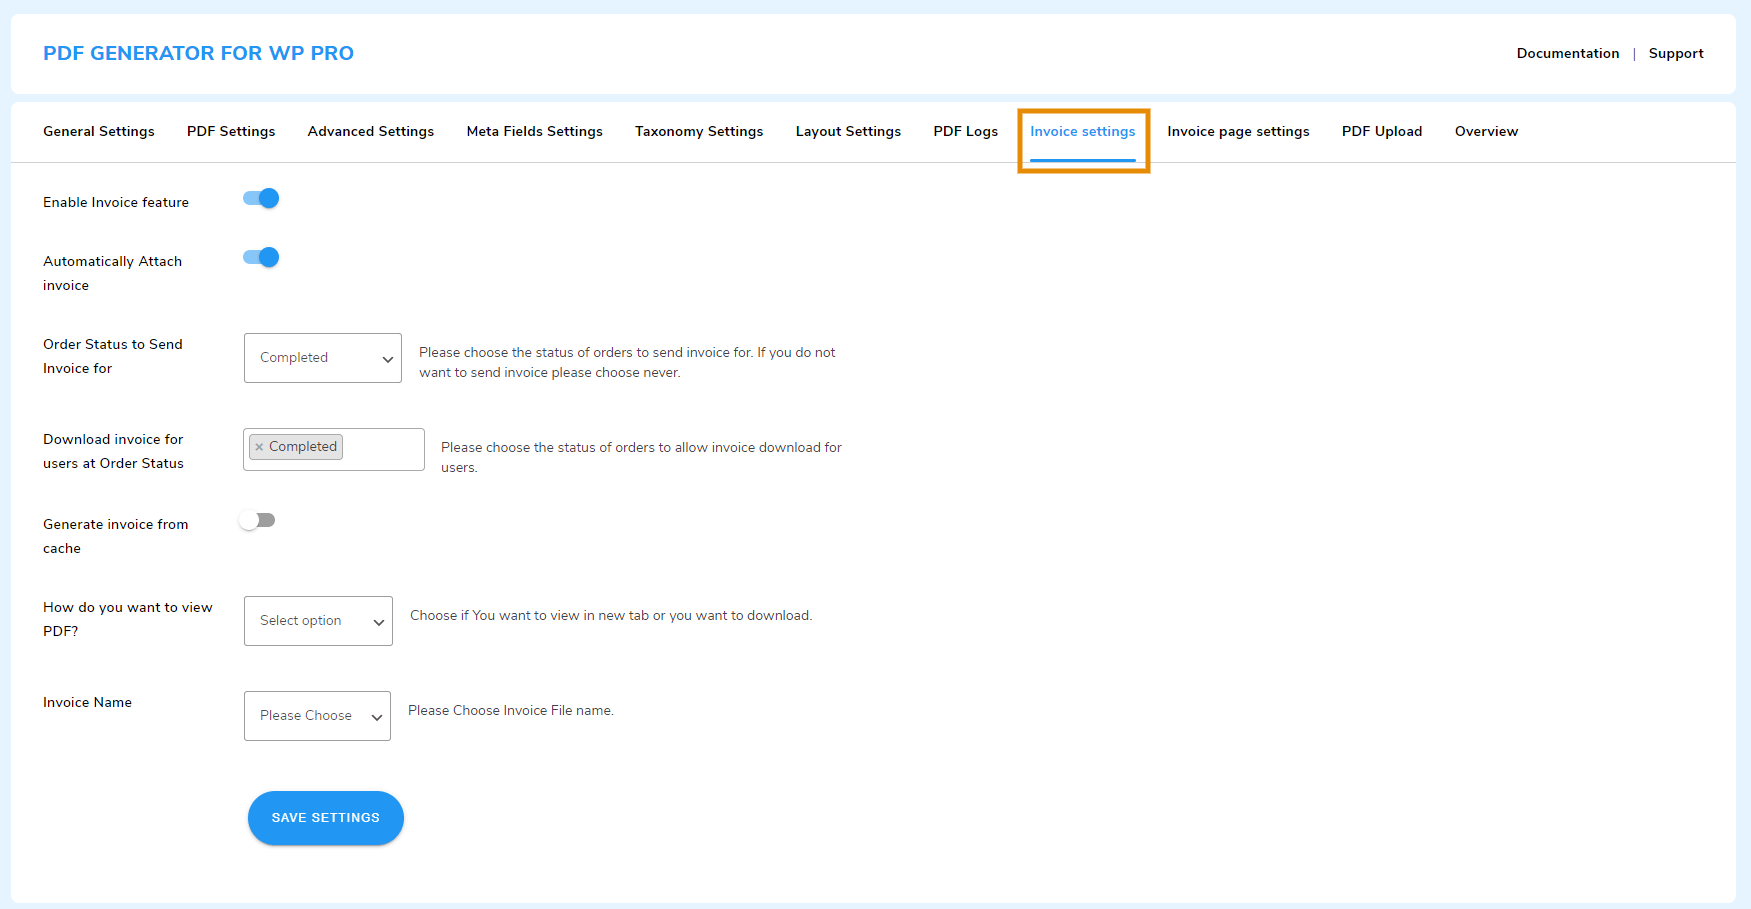
17.Invoice Settings
You can generate invoices for purchase products and allow users to download it. These invoices will be automatically added to the email order confirmation email.

To setup your WordPress PDF invoice, go to the WP Swings→ PDF Generator for Wp→ Invoice Settings and follow these instructions:
- Enable Invoice Feature: Enable this toggle button to activate the PDF invoice feature.
- Automatically Attach Invoice: Turn on the toggle button to let the generated invoices to be automatically attached to the emails.
- Order Status to Send Invoices for: From this dropdown, select the order status at which the PDF invoices will be automatically sent to customers.
- Download Invoice for Users at Order Status: You can specify at which order status the customers will be able to download their order invoice post-purchase. If you don’t want them to download it, select “Never”.
- Generate Invoice From Cache: Turn on this toggle button to generate an invoice from the cache. It will fetch all the relevant product details from the cache and generate a formal invoice for you & your customers.
- How Do You Want To View PDF?: You can select how customers view their PDF invoices. There are two view types to choose from: Thank You page and the Open in a new tab.
- Invoice Name: The PDF Generator Pro plugin allows you to define a naming system for the downloadable PDF invoice files. The unique file name will be shown to both customers and administrators.
- Invoice Order ID: Selecting this option will name the invoice files using the Order ID of the corresponding purchase.
- Invoice ID: Choosing this option will name the invoice files using a unique Invoice ID.
- Custom: The Custom option allows you to create a personalized naming convention for your invoice files. Enter a combination of text or dynamic variables or both to create a custom format that suits your requirements.

To create a unique name, the Order ID will be clubbed with your custom file name. You can verify them by downloading any invoice.
Finally, click on the Save button to implement the changes.
18.Invoice Page Settings
The WordPress PDF Invoice page settings allow you to customize the WooCommerce PDF invoice you are generating for your customers. You can make the following changes:
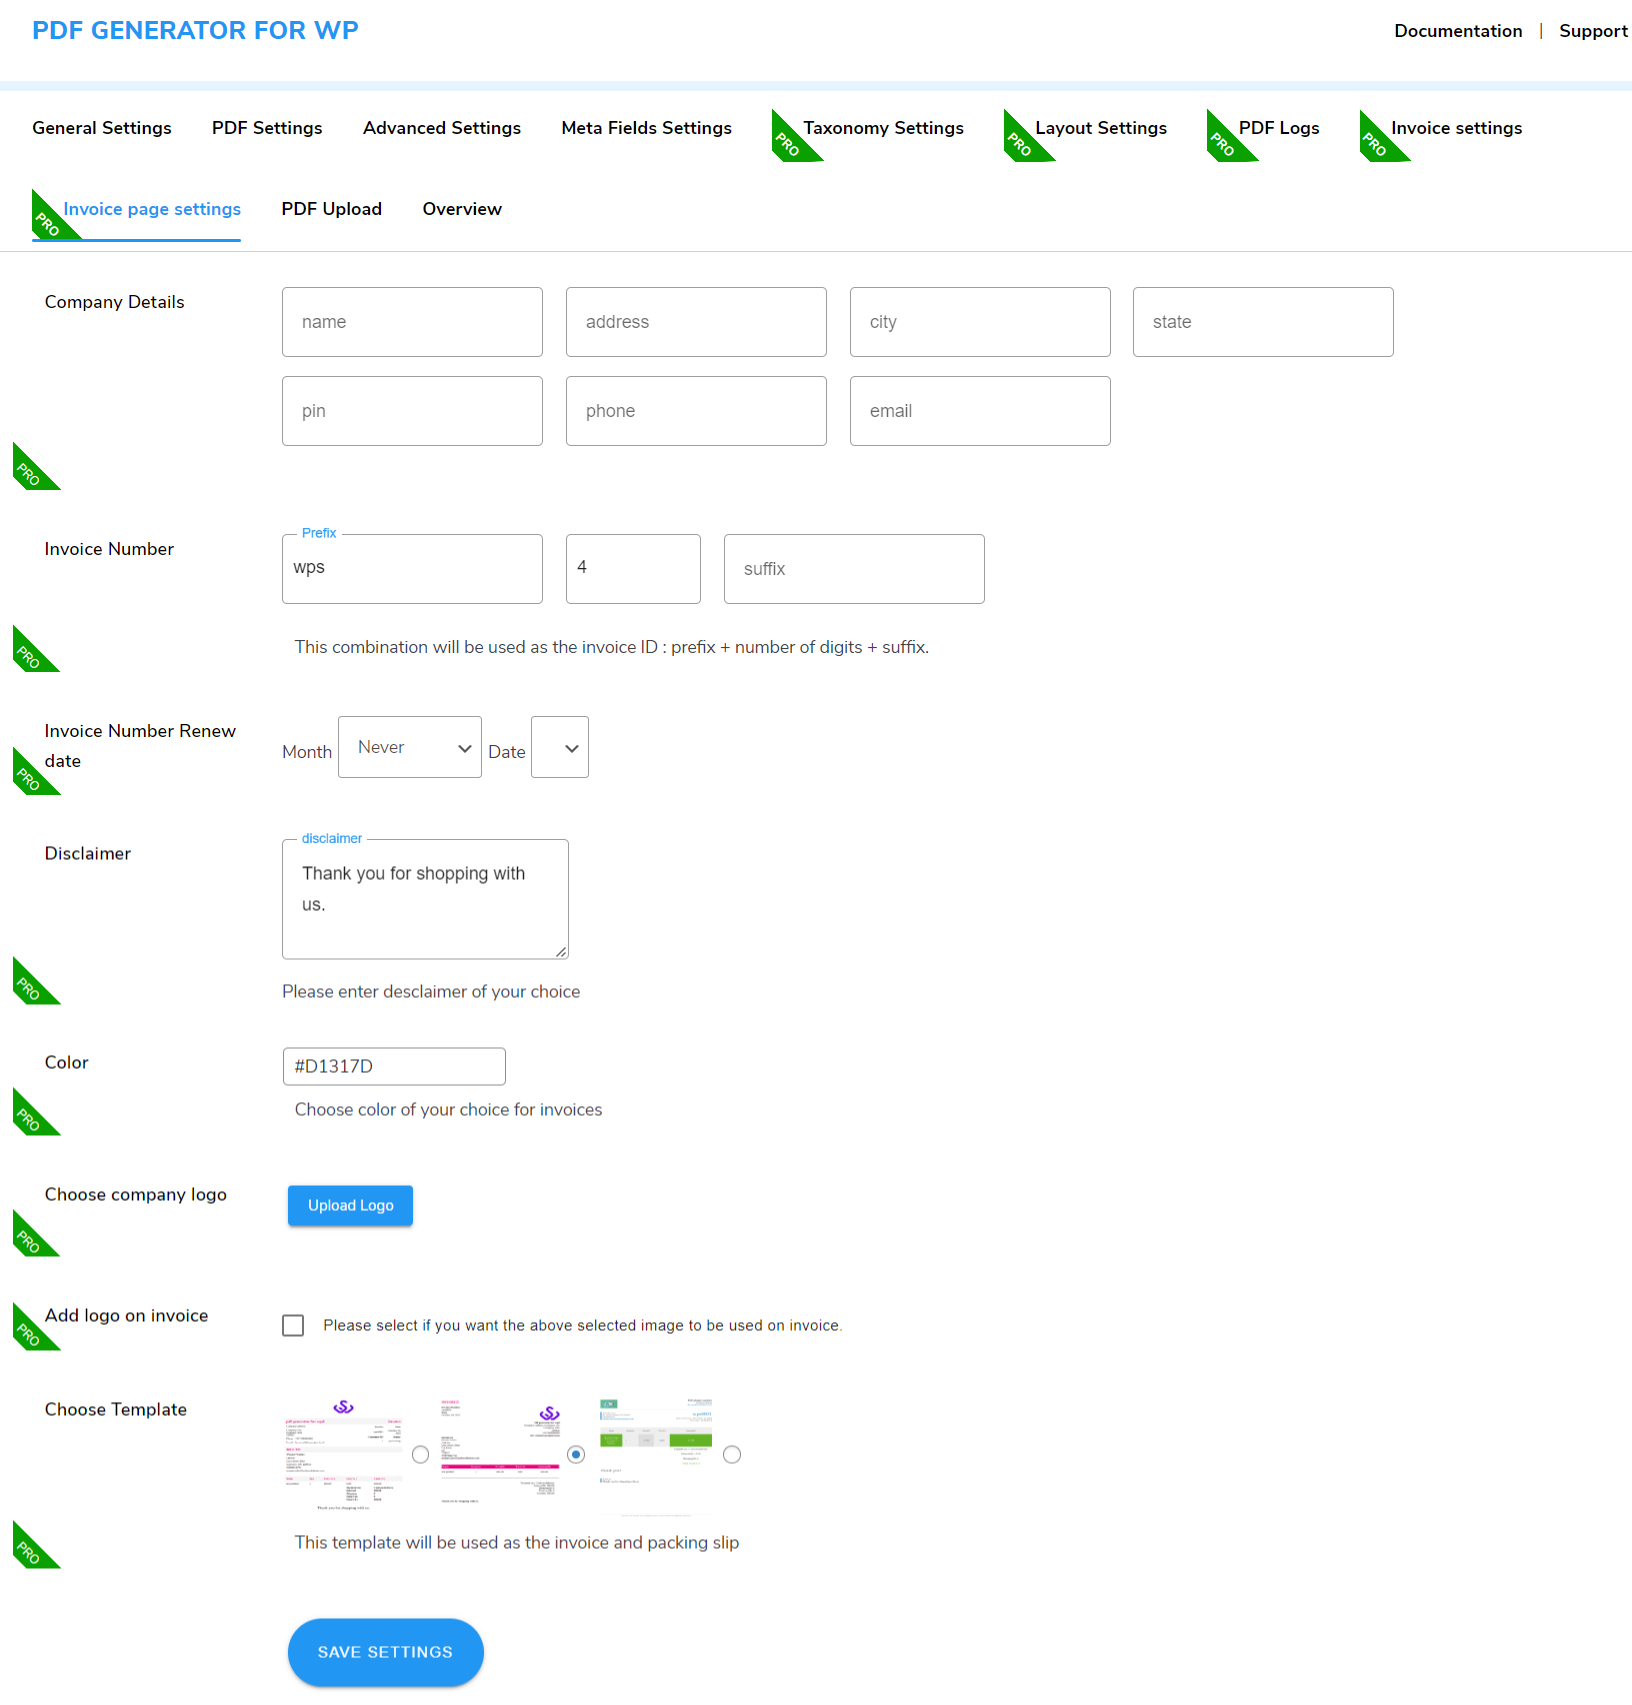
- Company Details: You can enter the company information that is required on the invoice. It includes: Name, Address, City, State, Pin, Phone, and Email.
- Invoice Number: Enter the custom prefix and suffix to make a unique invoice number for your business.
- Invoice Number Renew Date: You can set a date (month and day) after which the invoice number will be renewed.
- Disclaimer: You can enter your disclaimer or any note for your customers in this textbox. It will be displayed on the PDF invoice.
- Color: Color customization of invoice is possible with the WordPress PDF plugin. Click on the color picker and choose the color you like.
- Choose Company Logo: Click on the upload logo button and upload the logo of your brand from the WordPress gallery or your device.
- Add Logo on Invoice: Enable this toggle button to display your uploaded logo on your PDF invoices.
- Choose Template: Our PDF Generator plugin has three templates for invoices. Click on the template you’d like for your invoices. And you are done.
Lastly, after making all the customizations, click on the Save Settings button.
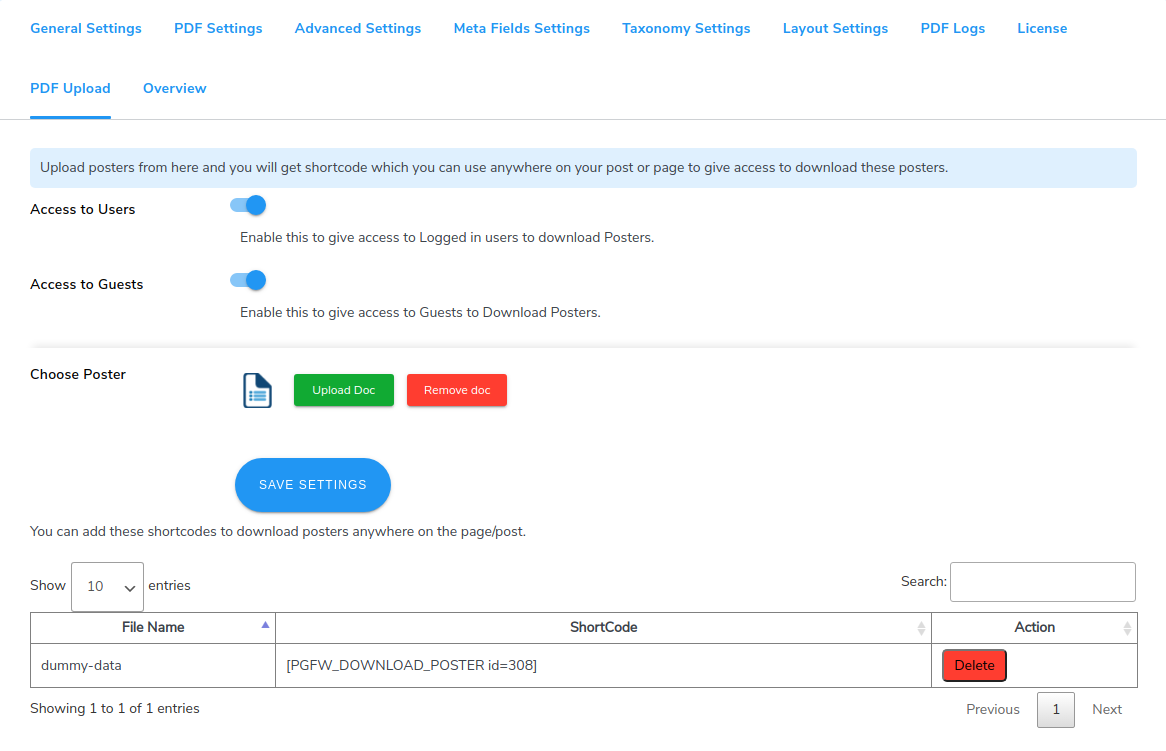
19.PDF Upload
- Go to WP Swings→ PDF Generator for WP→PDF Upload.
- Turn on the toggle to give Access to Users to allow registered or logged in users to download your uploaded document.
- Turn on the toggle to give Access to Guests to allow guest users to download your uploaded document.
- Click on the Upload Doc button to upload your own PDF file or poster in the Choose Poster settings.
- Click on the Save Settings button.
- A shortcode will be generated for your uploaded document. You can place it anywhere on your page or post to allow access to your document to the users.
Hence, using this PDF plugin, you can easily generate or embed PDF files.

20.WPML Compatibility
WordPress PDF Generator is now compatible with the WPML plugin. To be able to use it, use follow the steps below:
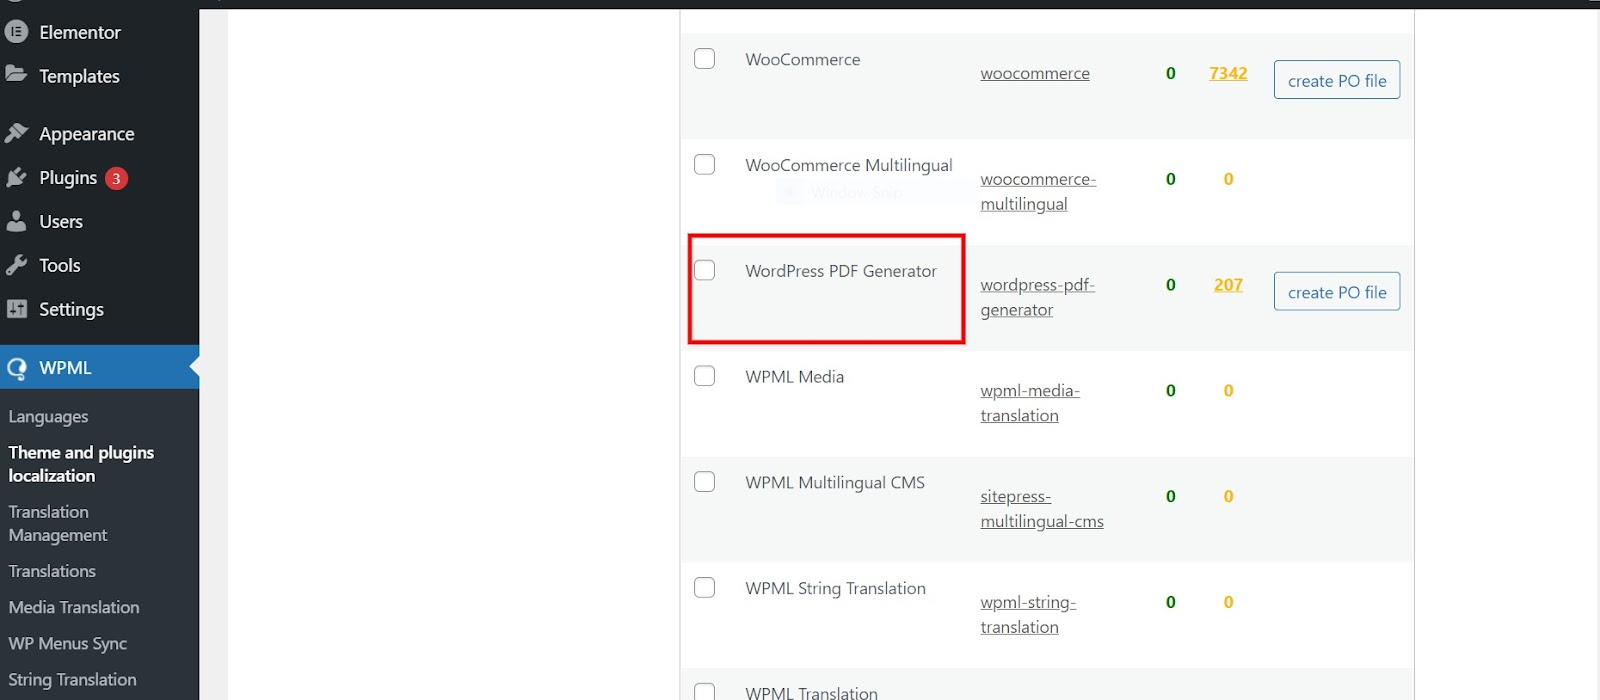
- In your WordPress dashboard, go to WPML→ Themes and Plugins Localisation.
- Now, scroll down to the Strings in the plugins section.
- Lastly, select the WordPress PDF Generator plugin from the given list of plugins.
- To translate the strings into the language of your choice press the Translate Strings button present next to the wp post to PDF plugin plugin.
- You’ll be redirected to a page where all the strings of the PDF plugin are listed and you can translate each string from here.
- Upon visiting this page you can manually select a string for translation by clicking on the “+” button next to each string in a row. You can write the translation of the string in the space provided.
- Once you’ve written the translation it will be automatically saved and when the customer chooses a different language they’ll see the translated version of the string.
21.WooCommerce HPOS Compatibility
PDF Generator PRO is compatible with High Performance Order Storage (HPOS) Which uses WooCommerce CRUD design to store order data in custom tables to optimize order queries and ensure the smooth workflow of your WooCommerce store.
To Enable HPOS Follow these steps:
Firstly, make sure your WooCommerce version is updated with the latest 8.0. After that navigate to WooCommerce > Settings > Advanced > Features and choose the High Performance Order Storage option for orders.
For more information, refer to the WooCommerce HPOS Documentation
22.Other Settings
You can also export PDF files from live pages, products, and posts from the backend itself using WP PDF Generator.
Go to the live Post, Product, or Page. Click on the Export pdf button. There you have, your generated PDF file.


23.Shortcodes
- Add [WORDPRESS_PDF] Shortcode anywhere on your page or posts to display the PDF generating icon.
- Use [WPS_POST_METAVALUE key=’wps_field’ {shortcode-postid}] To show any meta value where “wps-field” will be your meta field key. Refer to the meta fields section on the plugin to get the available meta keys
- Use [WPS_SINGLE_IMAGE id = “any image id” Height = 100 widths = 200 ] To add any image to the pdf via image id
24.Feedback and Suggestions
If you have a suggestion or any idea you’d like to see in the plugin, we’d love to hear about it. Reach out to our support and we’ll consider adding it to the future release.
25.FAQs
How can i add the PDF button on a single-product page?
You need to follow this step to add a PDF button on a single product page. Pdf Generator > POST META DETAILS tab >select the post type and meta field and fill the name of meta field and save the changes.
This plugin will work with other themes which doesn’t show full article on home page?
We generally fetch the article content from the database, it does not depend on how much content is showing there.
If the content is through meta fields then you have to select it from the settings as provided.
I used the product to assemble a 364 page PDF of all my posts.I ended up creating pdf files with 25 posts each then assembling them into one.
We have the option of the bulk Export on product listing page from where you can export the PDF in a bulk.
Is your plugin compatible with Genesis theme or all WordPress themes ?
Yes, our plugin is compatible with Genesis, Divi, Flatsome and supports all Popular WordPress themes.