1.Overview
WooCommerce Ultimate Points And Rewards plugin is a Loyalty tool that makes it easy for you to recognize, reward points, and incentivize your loyal customers by giving them opportunities to earn points and further redeem the points for the varied reward program.
This Ultimate Rewards plugin is an alternative to your marketing approach as well by attracting new leads and higher traffic, ultimately resulting in a better conversion rate.
Features:
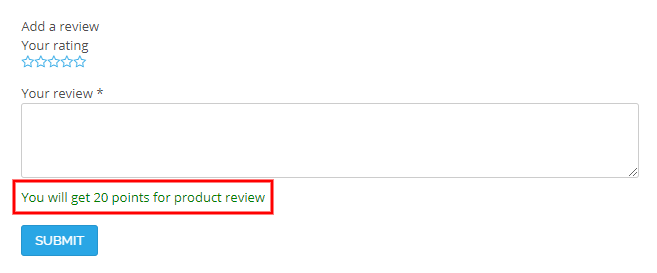
- The administrator can provide the points to their customer at signing in on your website, Referral User, Share the Referral link, Referral Purchase, Product Assign, Per Product Purchasing, Per Currency Spend, and Reviewing the products.
- Redeem rewards points into the Coupons, From the Cart SubTotal, or Directly purchase the products.
- Set the expiration date of the coupons or set how many times a customer can use that particular coupon.
- Set the expiry date of Points. On selected dates points will expire.
- Create different Membership levels for the customer and provide discounts according to their membership level.
- Deduct the customer’s points if they make a refund request.
- Send the Notification Mail as a reminder of the expiration of reward points.
- The administrator can also allow their customer to share earned points with someone.
Note:
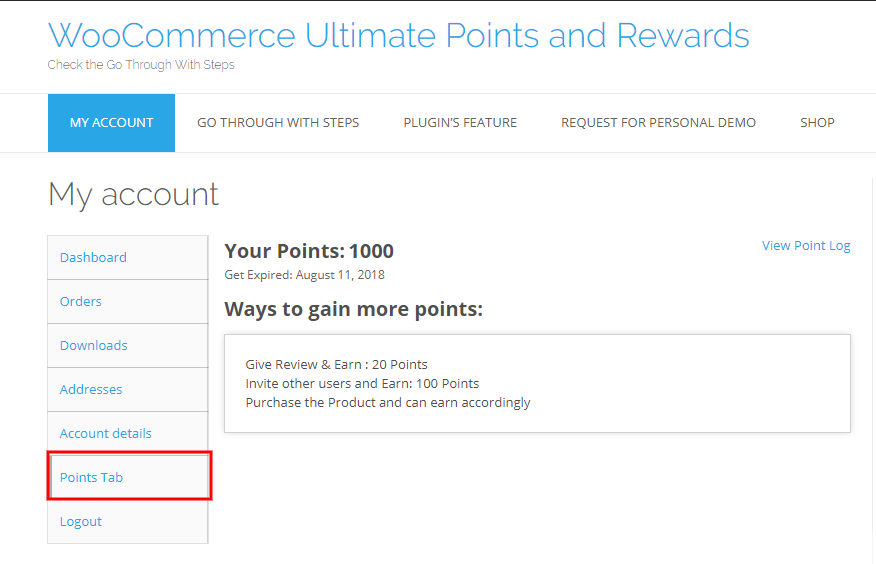
The “Points” tab is a section that holds all the points of the customer which is display on the “My Account” page. It will be visible only for the registered customers, not to Admin. If the admin wants to see the “points” tab, register as a customer, and please make sure to save Permalink once.For saving the permalink first Login to your admin panel and go to WordPress “Settings > Permalinks” and click on the “Save Changes” button. After Clicking on this button your permalinks will get saved successfully.
2.1.Signup Points
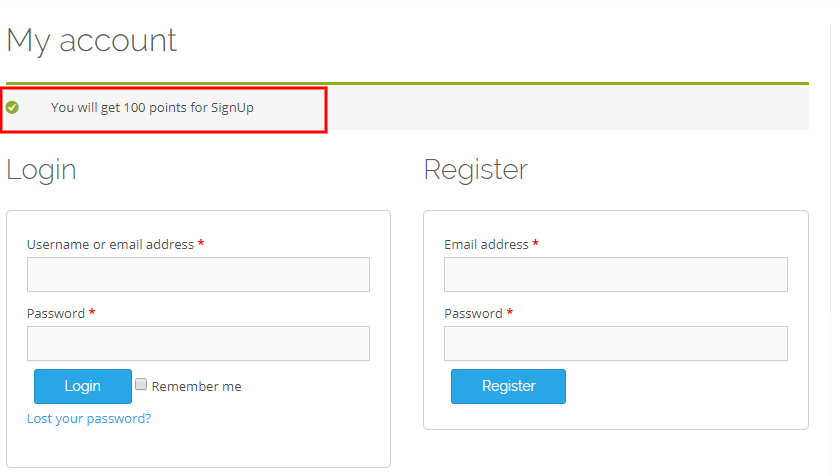
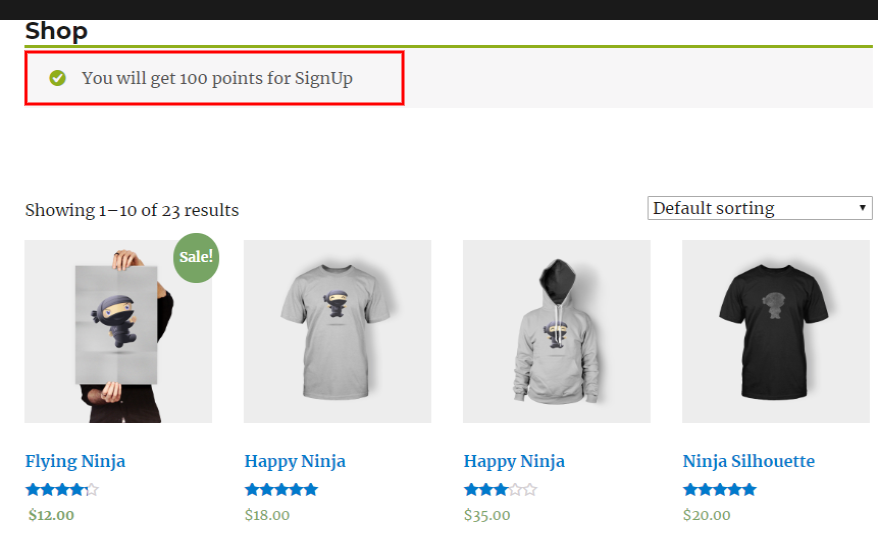
Enable the Signup Points for your customers. When customers sign up on your site then they will get some signup points as reward points.
For example, we set the 100 points as the signup rewards, when the customer registers on site then they earn 100 points.
Note: Please make sure you have enabled the required setting, as well as your Registration Form, must be of WooCommerce Registration. For any third party registration form, we need to check the possibility of making the compatibility.
2.3.Referral Points
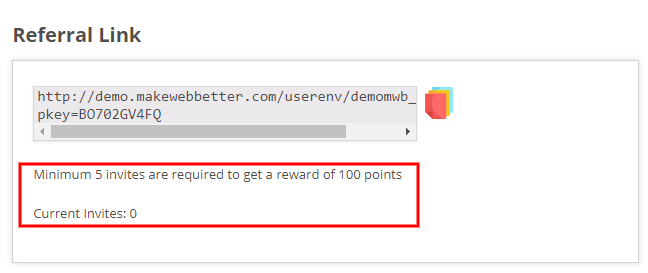
After enabling this setting your customers earn WooCommerce points and rewards by inviting other users to the site through the referral link. Here you can also add the required limit for the referral, after completing this limit your customers will get the points.
Minimum Referrals Required: Here you can enter the minimum required limit for the referrals, your customer will be able to get reward points after completing the condition.
Here you can see, a Minimum of 5 invites are required to get a reward of 100 reward points.
2.4.Referral Purchase Points
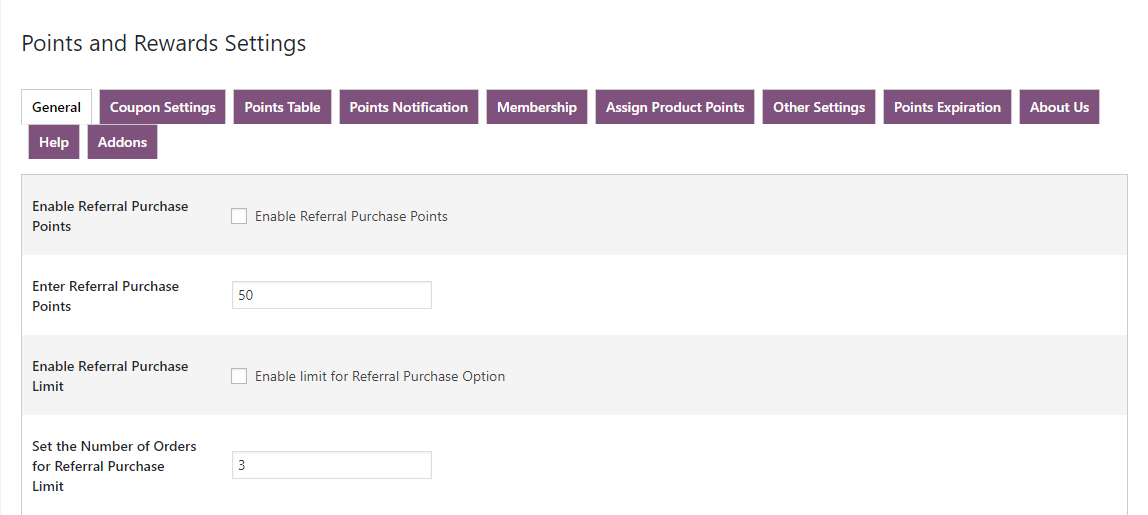
Enable the Referral Purchase Points for the customers. Through this setting a customer can get the points on the referee(user invited by the customer) purchase, you can also apply the restriction on the referral purchase points.
Referral Purchase limit: After enabling this setting, the referee(user invited by the customer) would get assigned points after till limit would be reached.
2.9.Purchase Through Points
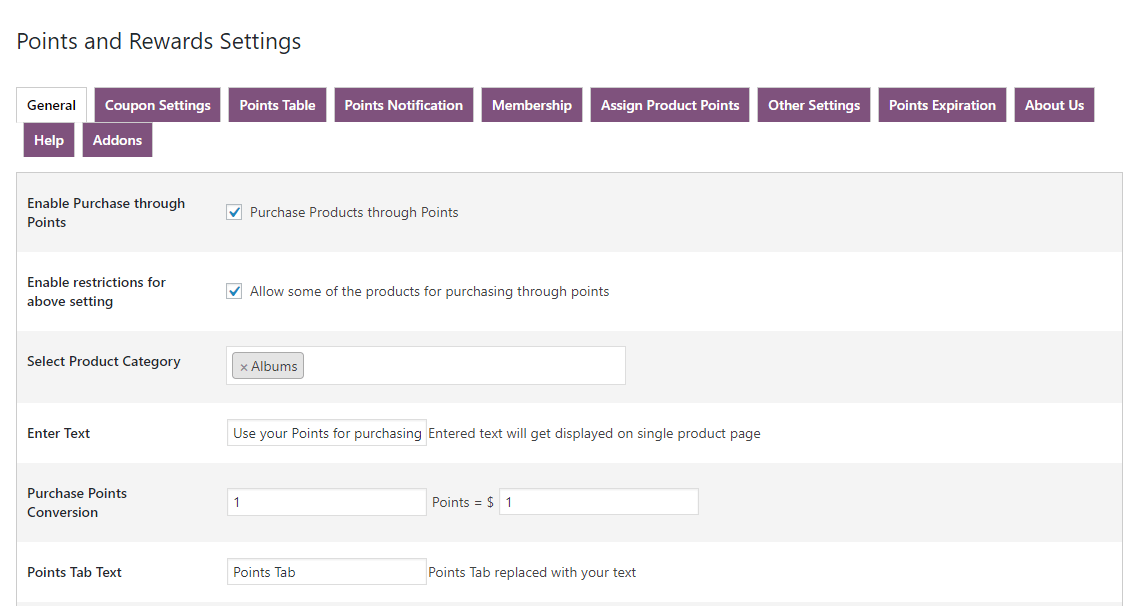
This setting allows/restricts your customers to purchase products through points.
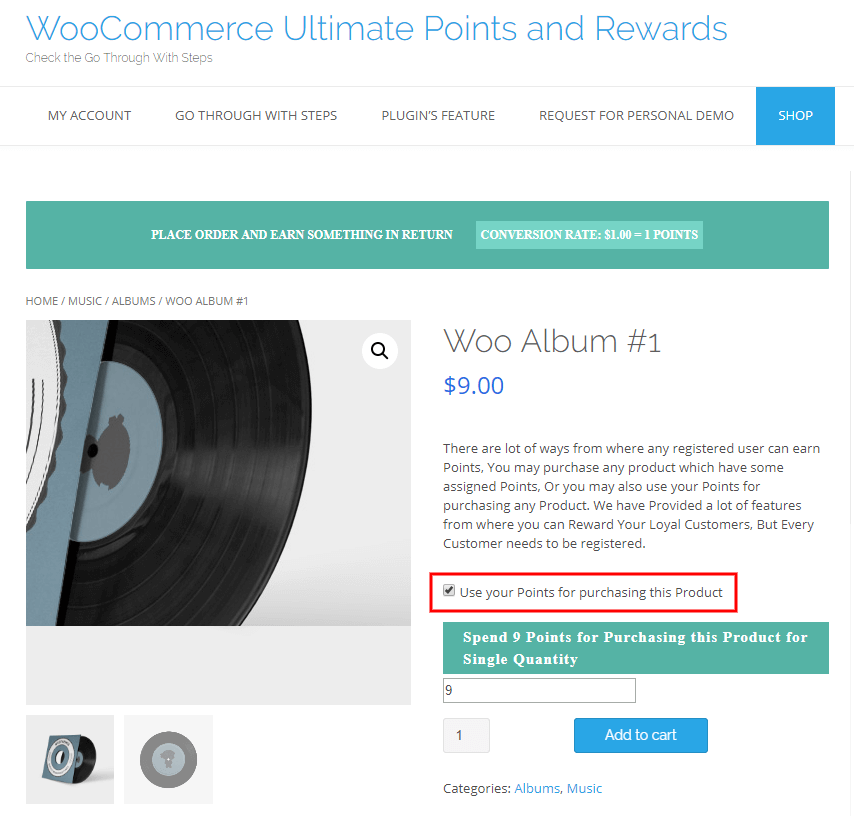
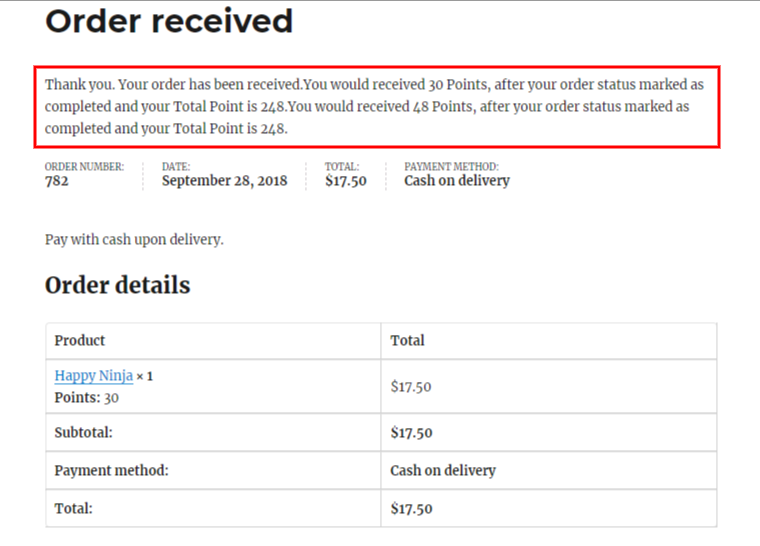
Enable Purchase through points: After enabling the “Purchase through points” setting your customer will able to purchase the product through the earned points.
Purchase Point Conversion: The Admin can decide how many points he wants to provide for each purchase. Admin can set the currency settings accordingly for each purchase.
Enable Restriction for Purchase through points: For this setting, you can restrict the particular categories for purchasing through the reward points.
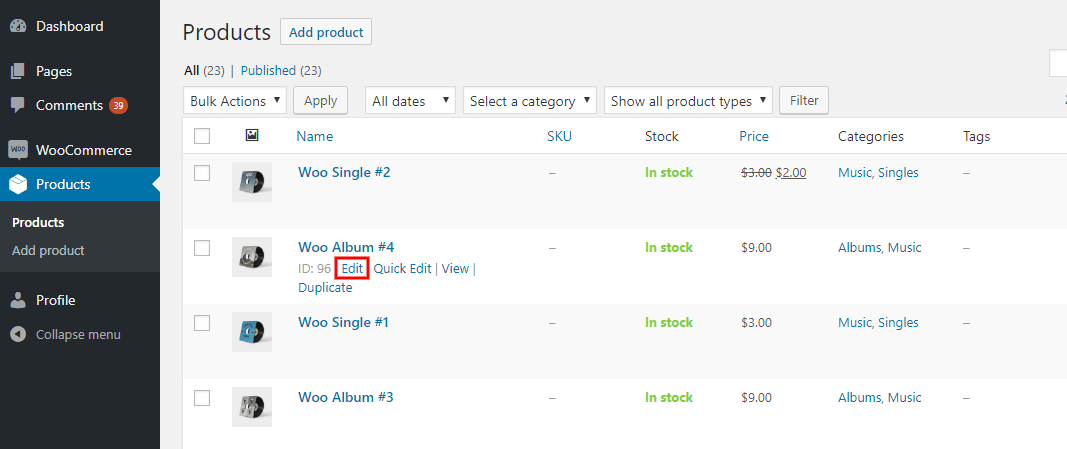
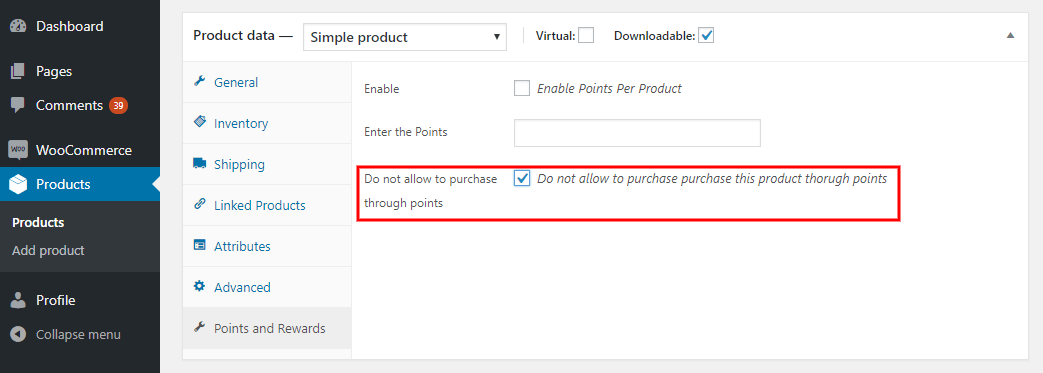
Here you can also apply the restriction per product-wise.
Enable Restriction on Per Product-wise for Purchase through points :
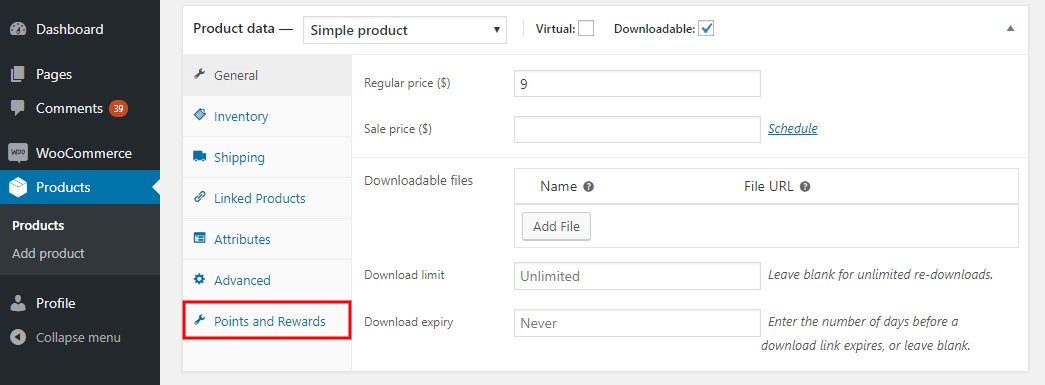
Go to the product-> edit page of the particular product.
Scroll down and go to the “Points and Reward section”
Enable the setting to apply the condition for that particular product that doesn’t purchase through the points.
Enter Text: Enter the text in which you want to display the message on the single page of the product for notifying the user to use the points during purchasing the product.
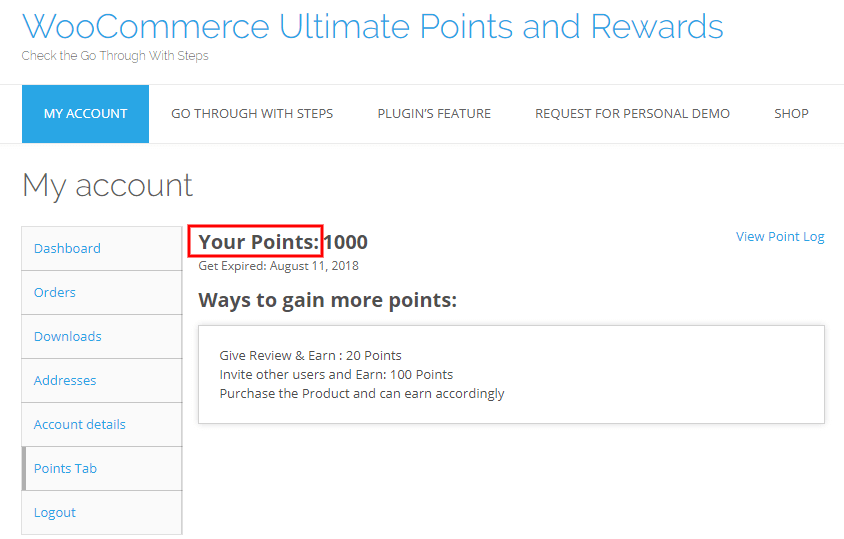
Point Table Text: Through this setting, you can replace the Point tab text with your text.
2.13.Show Points in WP User Table
The admin can enable this setting if he wants to show the points in the WP User Table. This will make the overall process easy for the admins, as they’ll be able to see the reward points that the user is earning
This is how the WP User Table will look after enabling the feature
2.14.Enable Wallet Settings
This admin can enable this setting if he wants to activate the “Wallet compatibility”. We’ll also give you an overview of this compatibility.
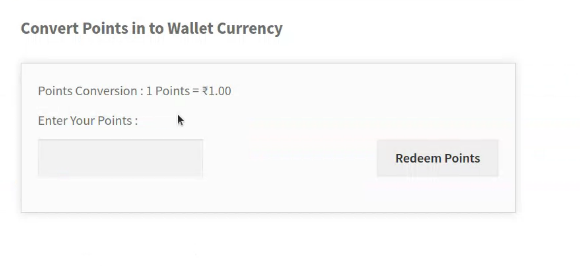
With this wallet compatibility, if the admin wants, he can allow his customers to redeem their points in their wallets, and use those points as and when required. He can also set the conversion rates for this.
For example: If he sets the conversion rate for 1 point to be ₹1. Then when he redeems the points he’ll get ₹100 for 100 points.
- Enable Wallet Settings: The admin can check the box to enable the wallet plugin setting, shown on my account page.
- Enter the Conversion Rate: The admin can set the conversion rate using this setting.
After enabling this feature, this is how the front end will look,
3.Coupon Setting
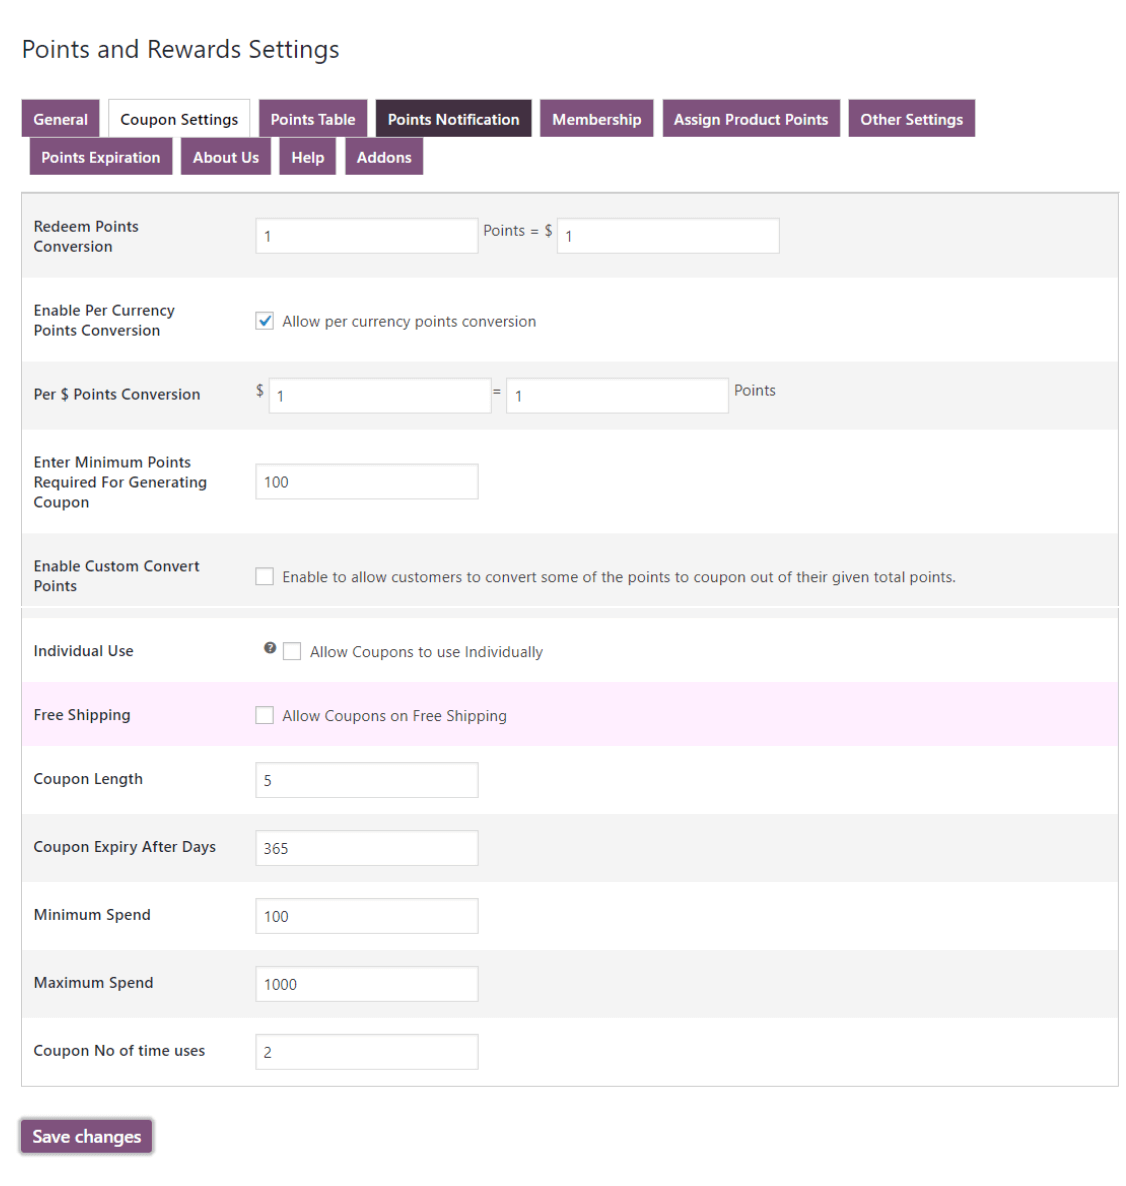
In this section, you can allow your customer to generate the coupon with multiple terms of conditions like how many reward points are equivalent to the money, Enable Per currency point conversion, Minimum Points limit for generating coupon, Set the expiration date of the coupon, Minimum Points limit for generating the coupon, Maximum and minimum spend of the coupon, how many time a coupon valid for use, etc.
3.1.Redeem Reward Points Conversion
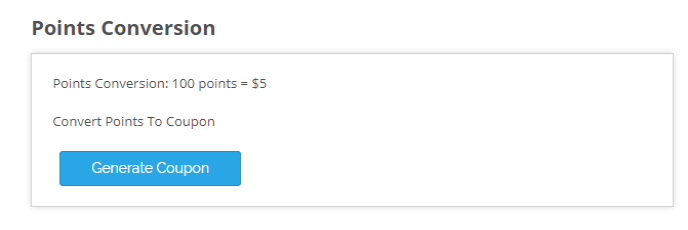
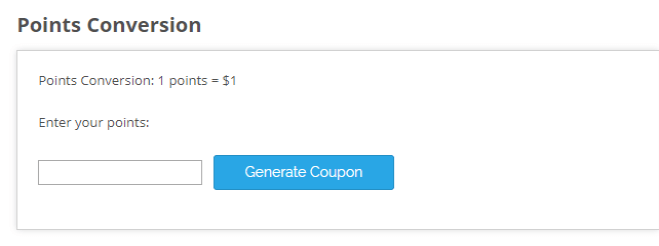
The admin can set how many points are required that will convert to generate a coupon. For example, if 1 point equals 1 $, and the user has a total of 50 points, he can generate a 50$ coupon.
Here you can set how many points will be equivalent to the money.
After enabling the setting your customer can generate the coupon by clicking on the “Generate Coupon” button.
3.2.Per Currency Point Conversion
Enable Per Currency Point Conversion: Admin can enable the per currency point conversion for coupons.
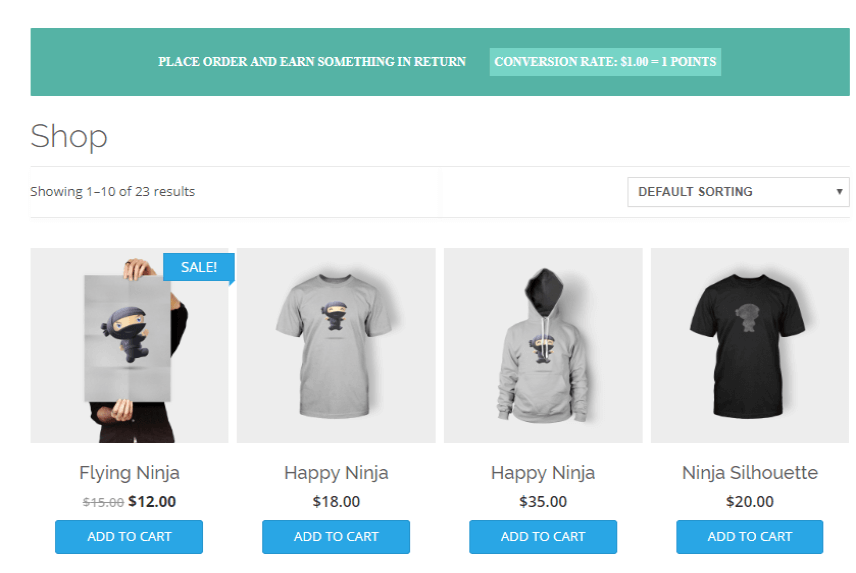
Per $ Point Conversion: Admin can set per point conversion to unit currency for coupons. For example, 1$ = 1 point If any user purchases a product worth 50 $ then he or she will be rewarded 50 points.
Here you can allow the customer to per dollar spent points, which means the customer will get points per dollar spent on the site.
Your customer can see the notification on the shop page.
4.Points Table
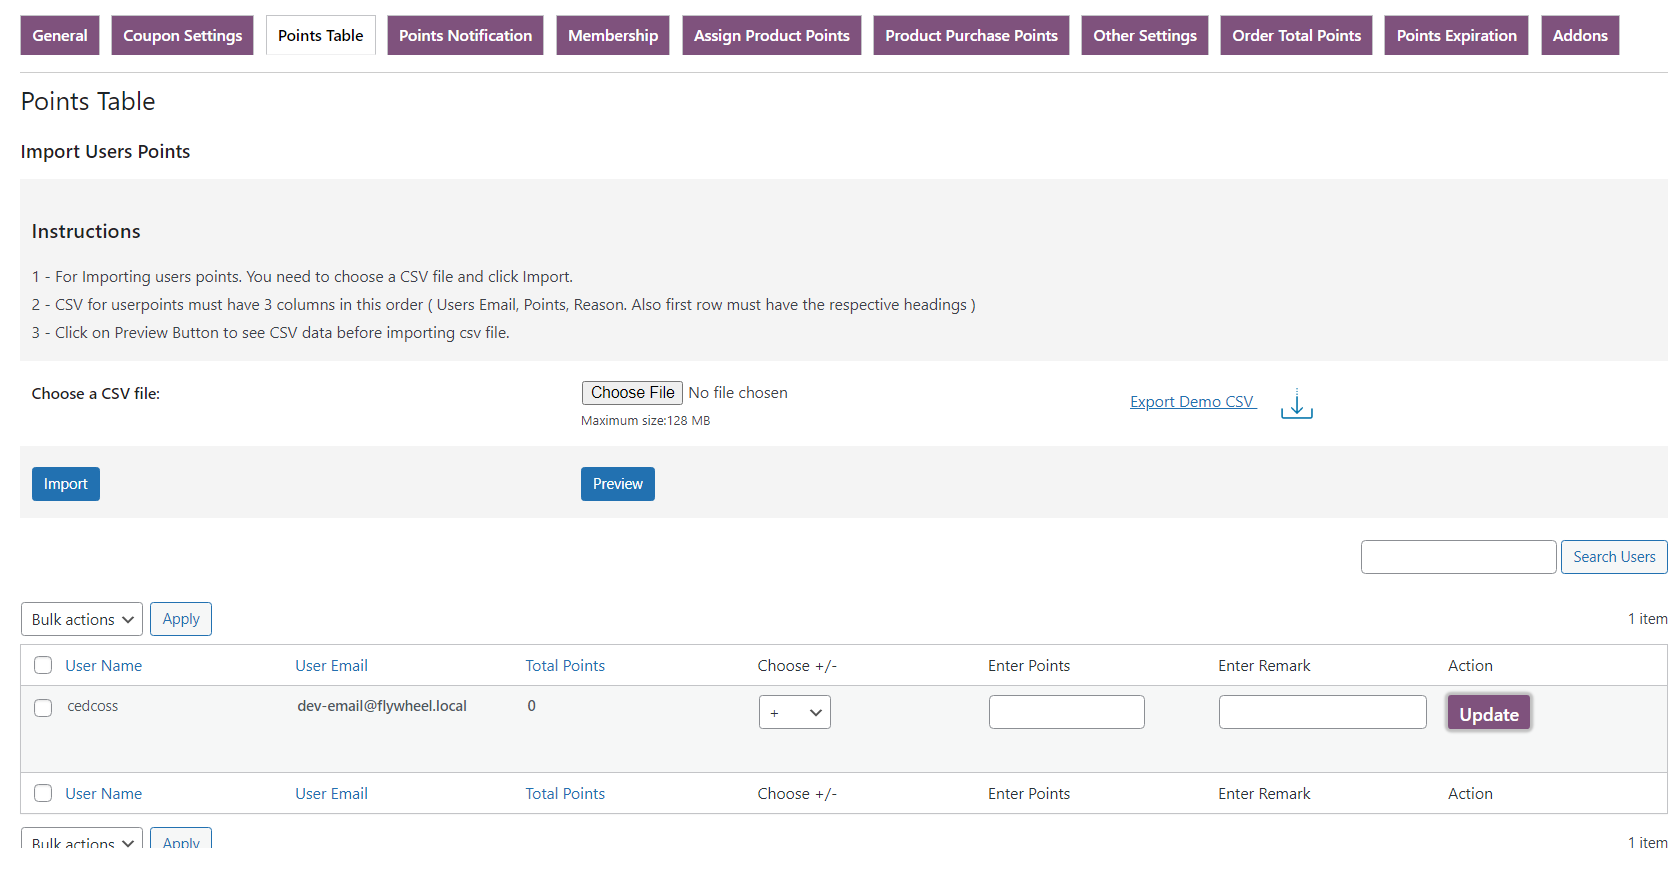
Through this setting, the plugin allows you to view the point log, coupon detail, and modify the points of the customer with a specific remark. You can also import the .CSV file of the points table to update the points of customers. The users can also have a quick preview of the CSV file that they are importing, to find anomalies in the file (if any).
For example, if you want to add some points for a customer simply enter the necessary reward points, and a reason for that, and click on the update button. Similarly, you can also deduct the point of the customer.
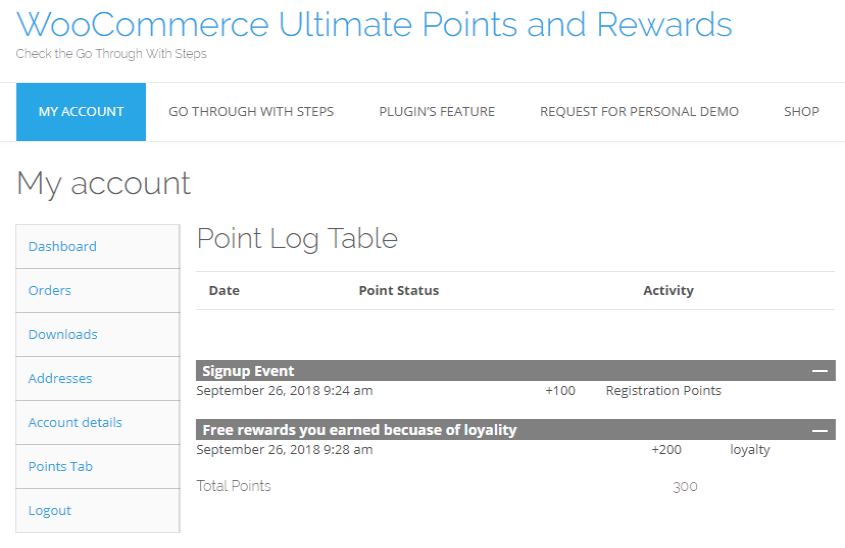
On the Account page, your customers can view their point logs.
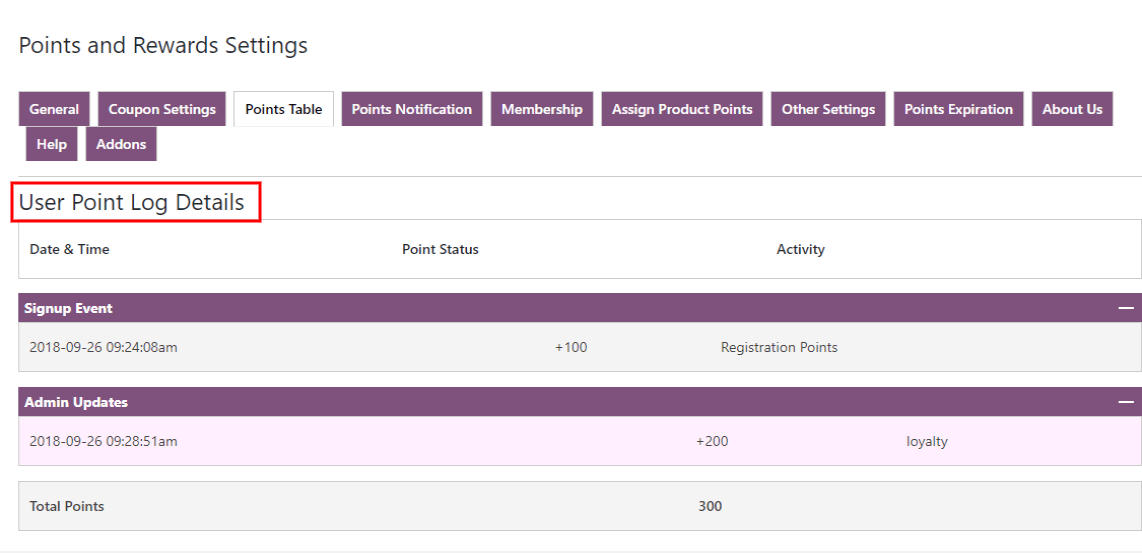
If you want to see the point log of any customer click on “viewpoint log”.
Here you can see your user Point Log Detail.
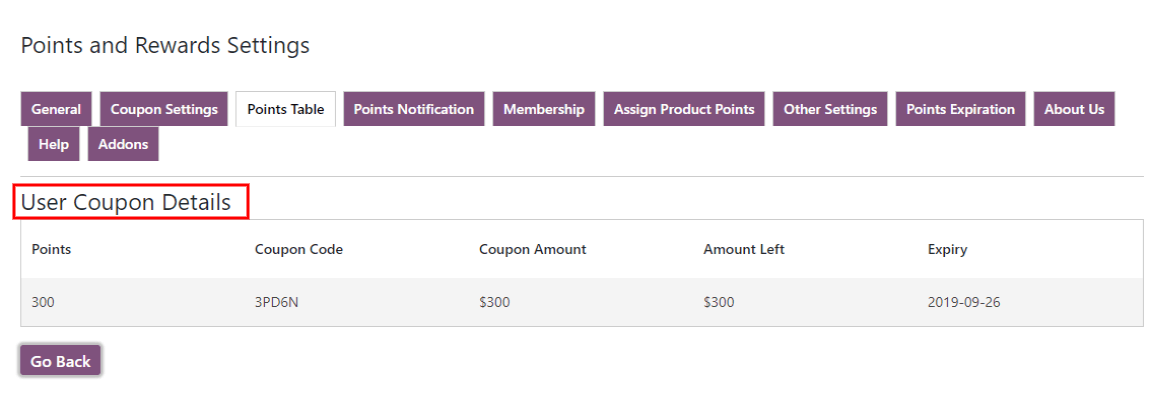
If you want to see the Coupon Details of any customer click on “View Coupon Detail”.
Here you can see your user Coupon Detail.
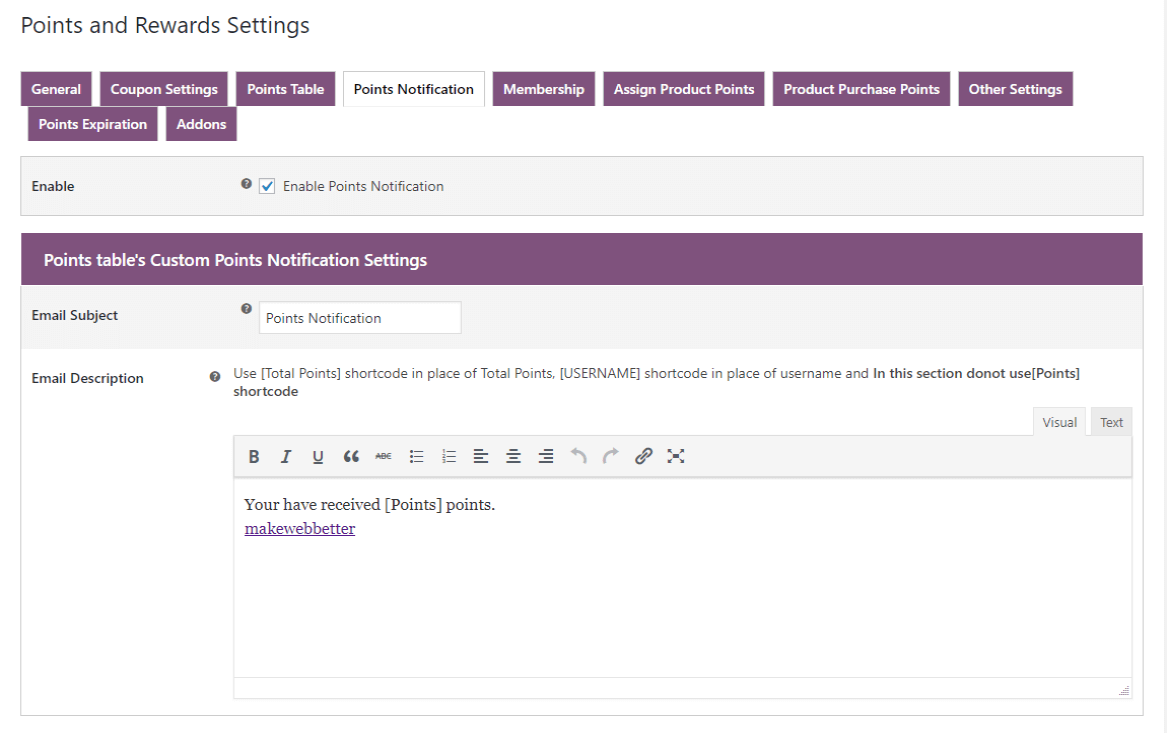
5.Points Notification
Through this setting, you can notify your users about their points via email. You can easily customize that subject and description of the email according to necessity.
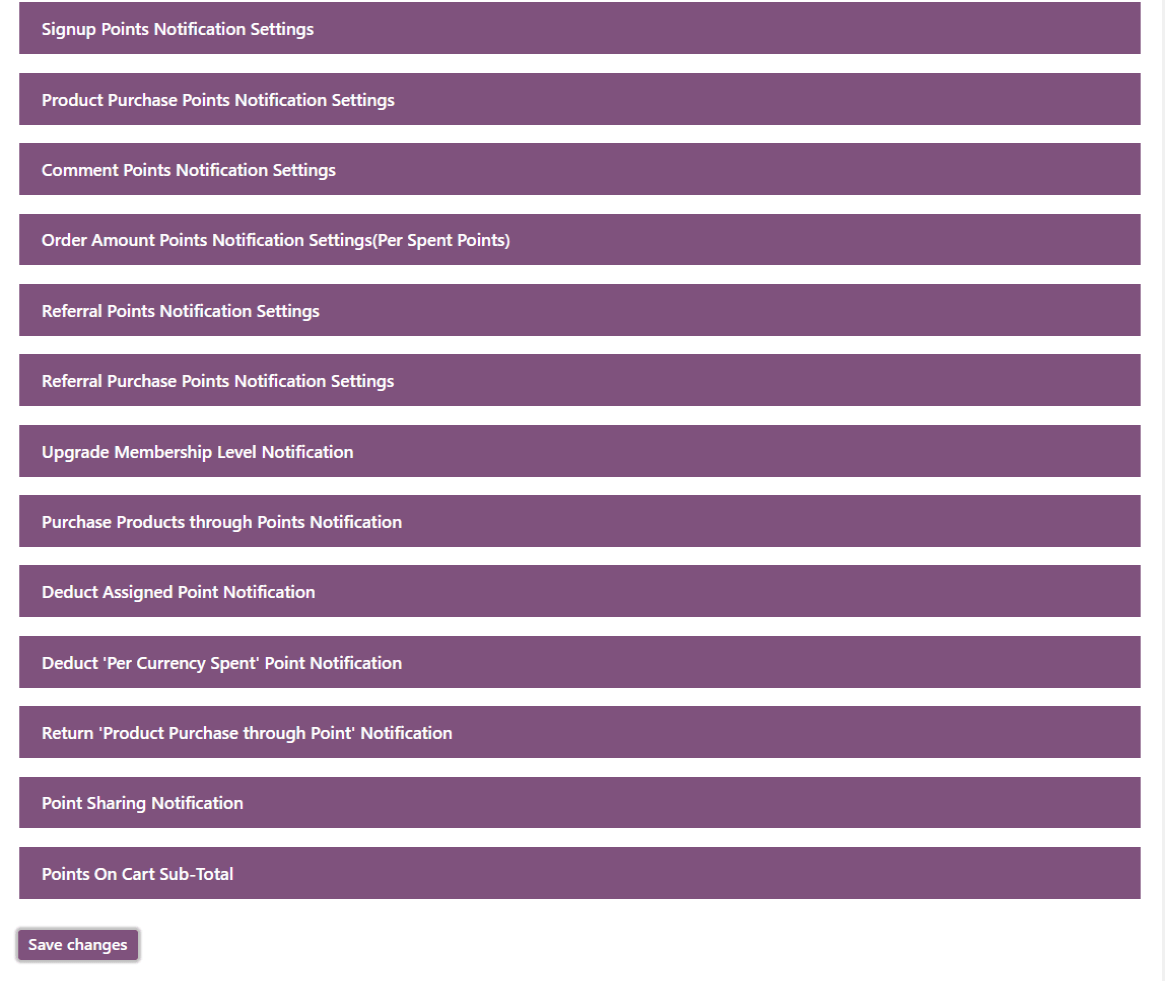
You can notify your users via multiple notifications like Total Points, Signup Points, Product Purchase points, Referral Points, Comment Points, Product Purchase Points, Referral Points, Comment Points, Product Purchase Points, Referral Points, Referral Purchase Points, Upgrade Membership Level, Purchase Products through Points, Deduct Assigned Points, Deduct ‘Per Currency Spent’ Point, Return ‘Product Purchase through Point’, Point Sharing, Points On Cart SubTotal.
6.Membership
Woocommerce Ultimate Points and Rewards plugin allows you to give the members of your customers. Membership Setting allows your customers to get the membership level through the required points and keep the discount on the selected categories or products fulfilled by that level.
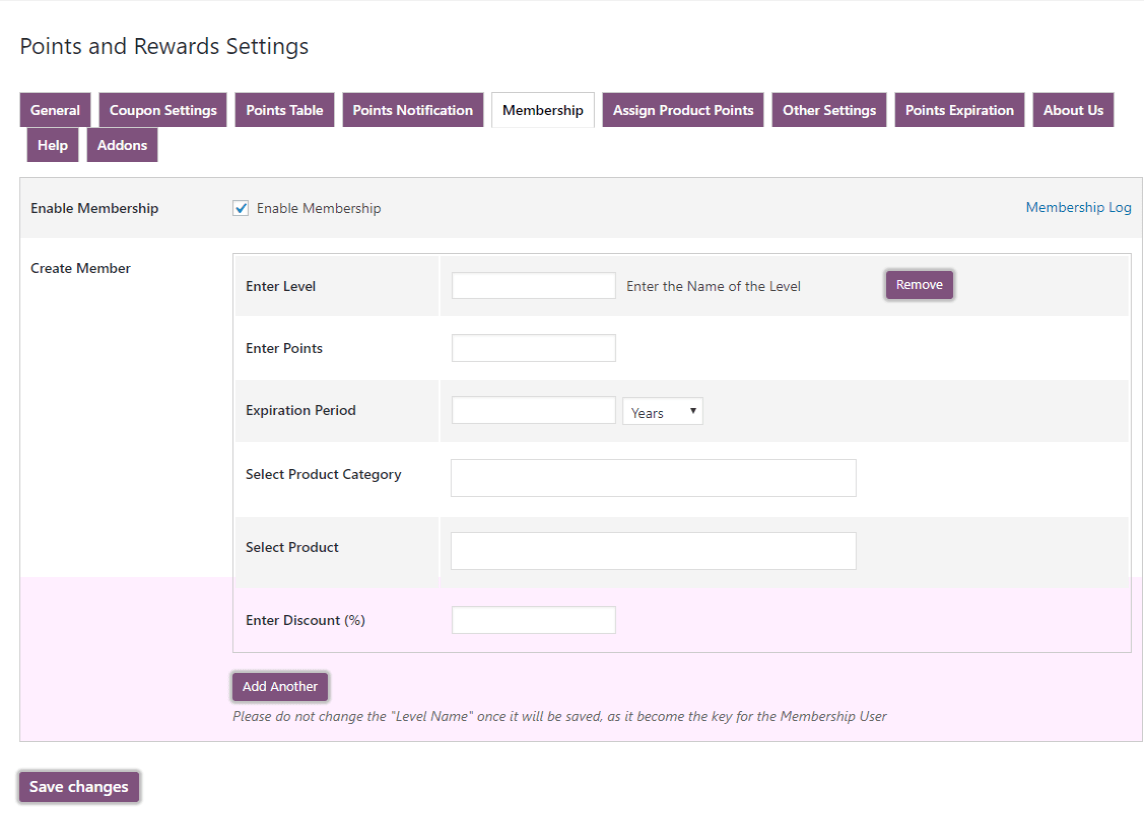
You can create levels for the membership by following the steps:
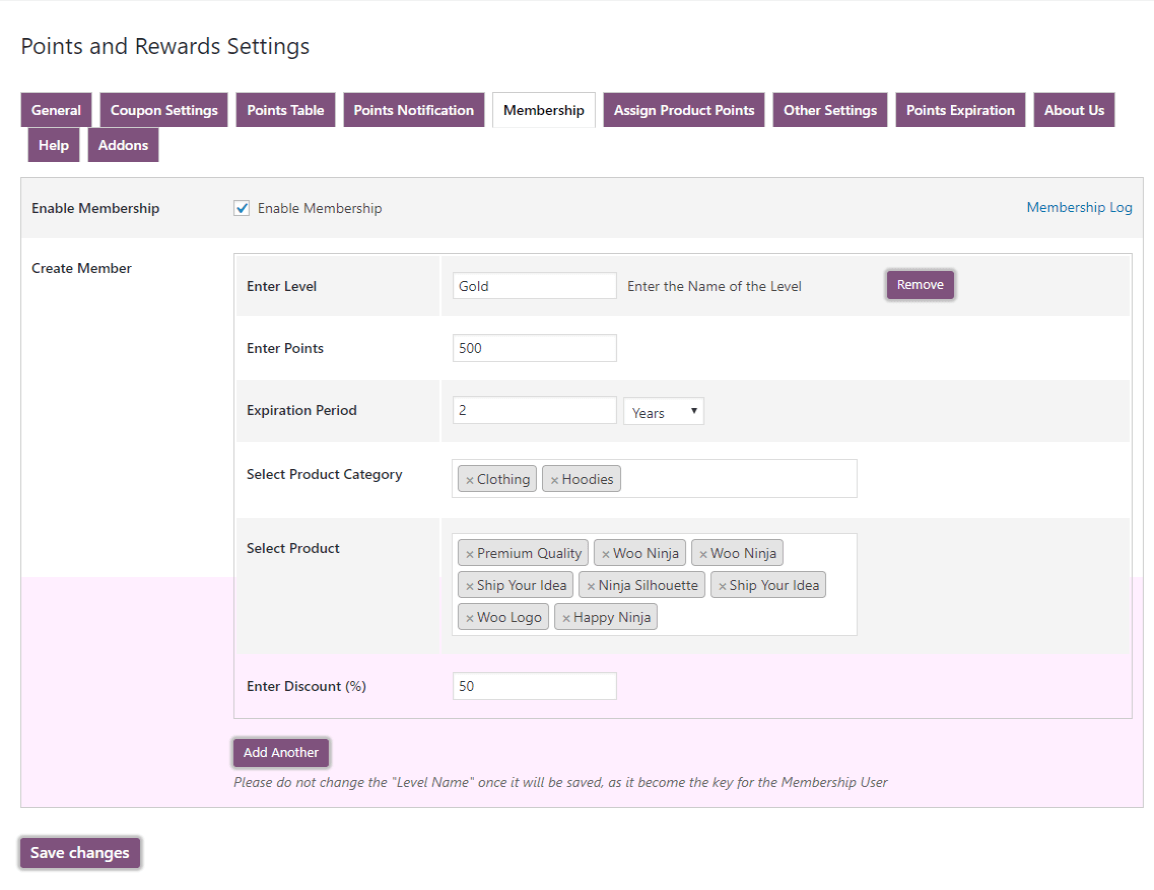
1. Tick the checkbox to Enable Membership settings for your customers and create levels by clicking on “Create Member”.
2. Fill the required field of the level like Level Name, Points for reach that level, Expiration Period of the current level, Select Product Category for the discount, Select Product for the discount, Enter Discount (%) amount.
3. After filling out all fields click on save changes. The level of membership will display on the user end.
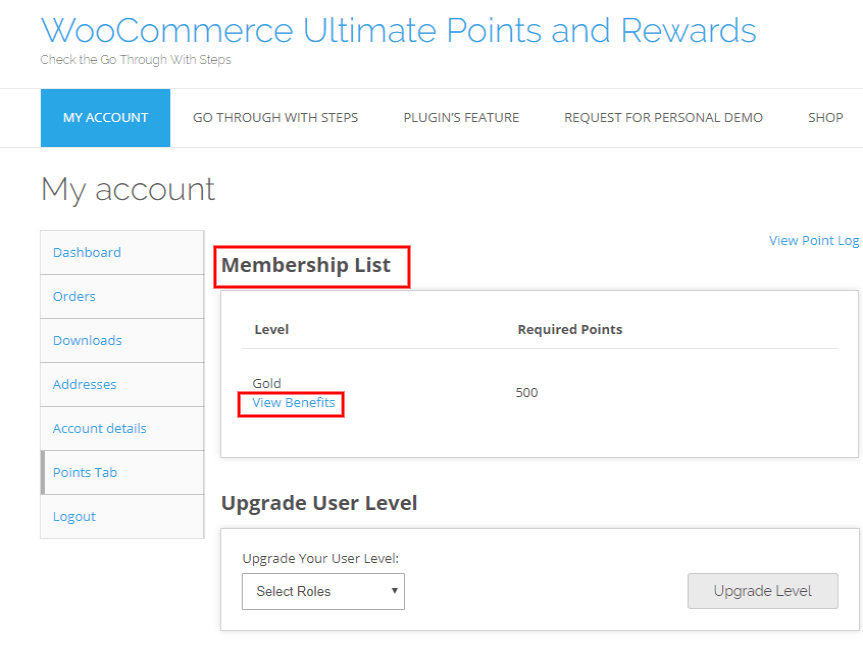
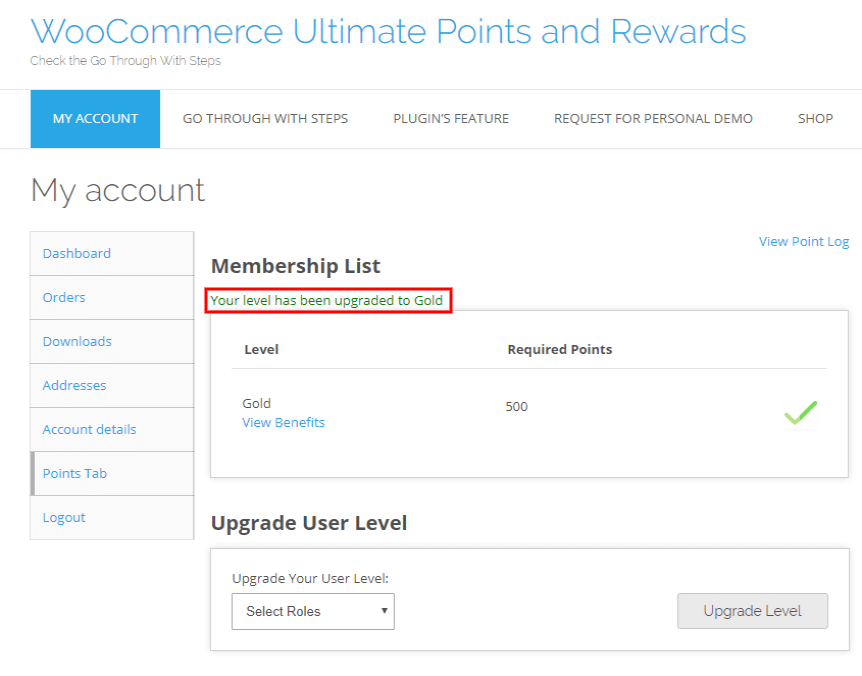
Here your customers can see the Membership List on the Account Page -> Points Tab.
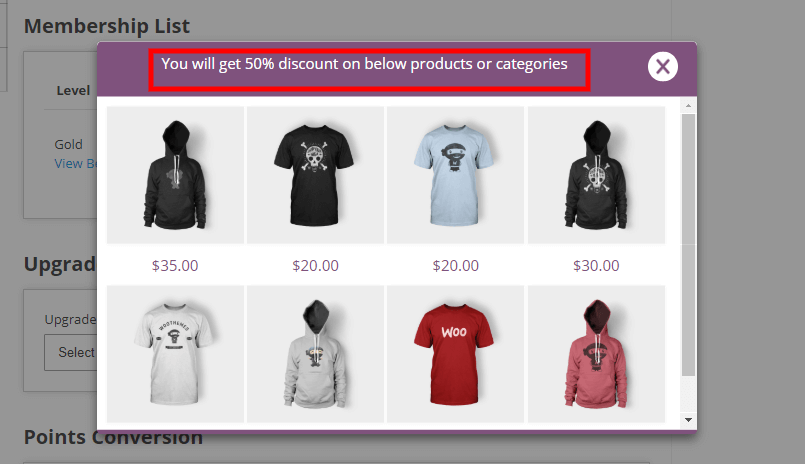
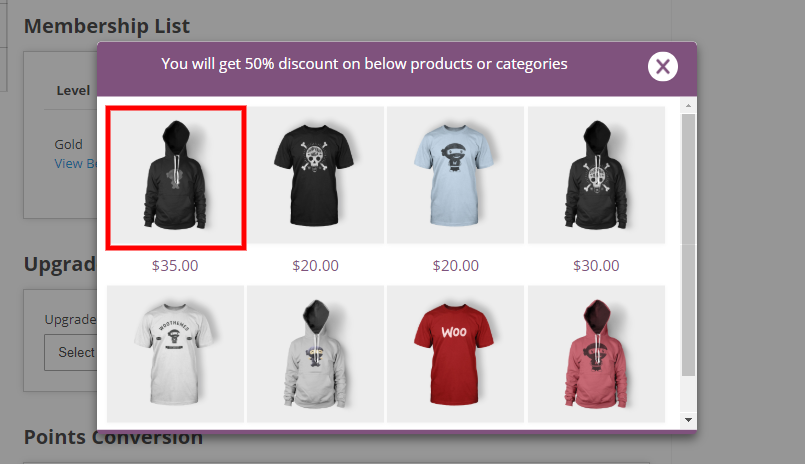
View the benefits of that level.
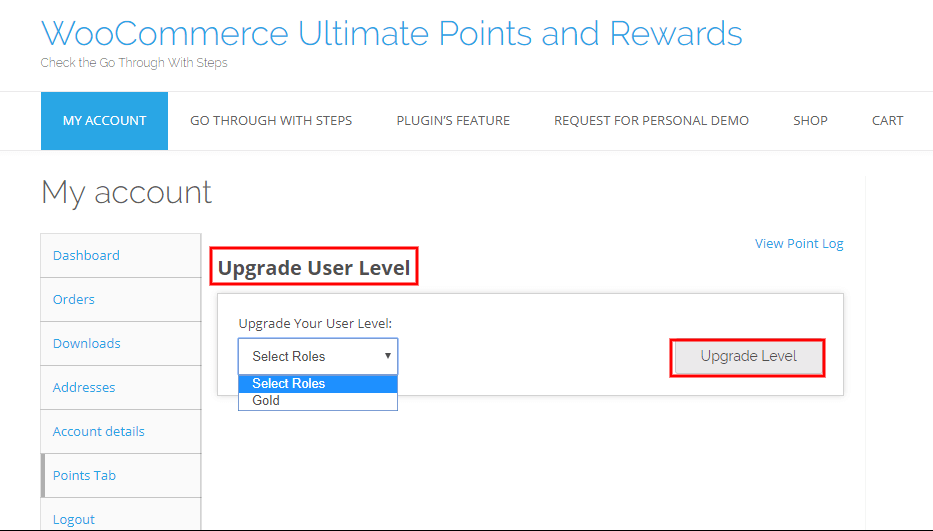
From this setting, your user can select the level to upgrade your membership.
After click on the “Upgraded level”, their membership is successfully upgraded.
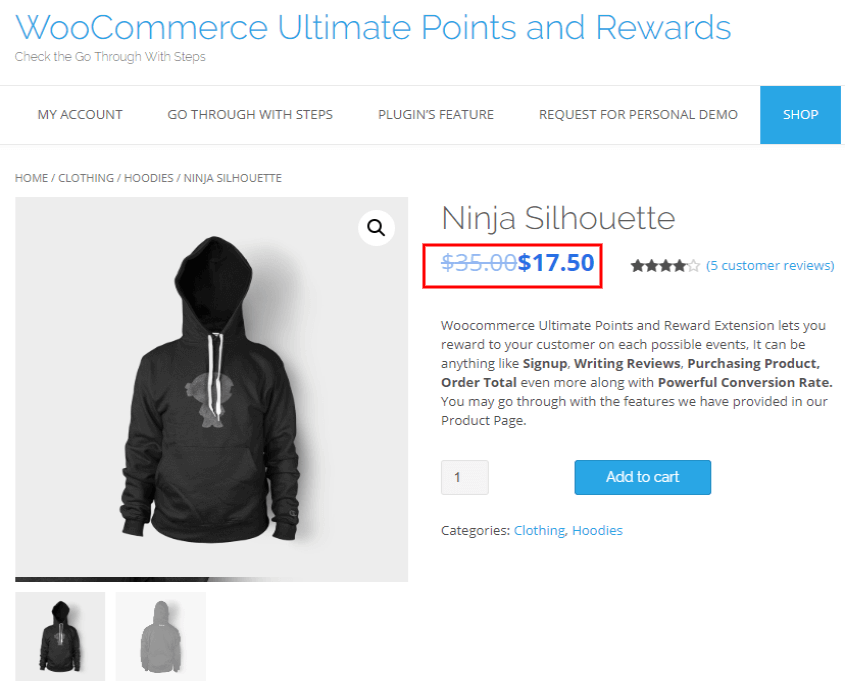
Now they can see the discount on the single page of the selected product.
Here they can see the discount.
7.1.Global Setting
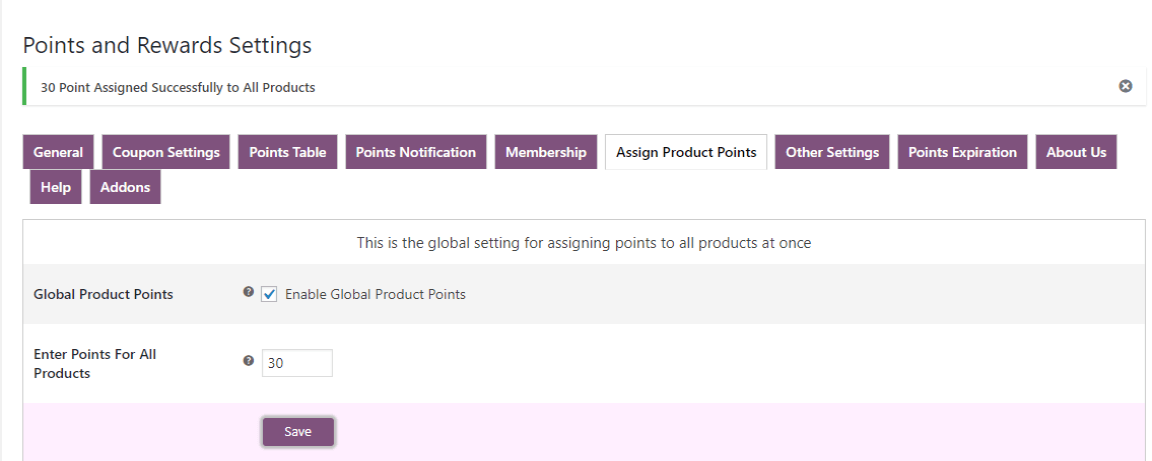
Through this setting, you can assign equal points to each product at once in the global setting. Enable this setting if you want to assign the same points on all the products and enter the points which you want to assign for all products.
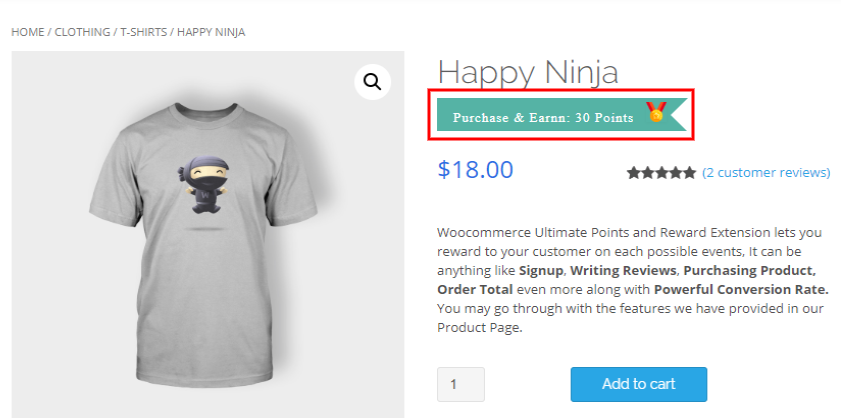
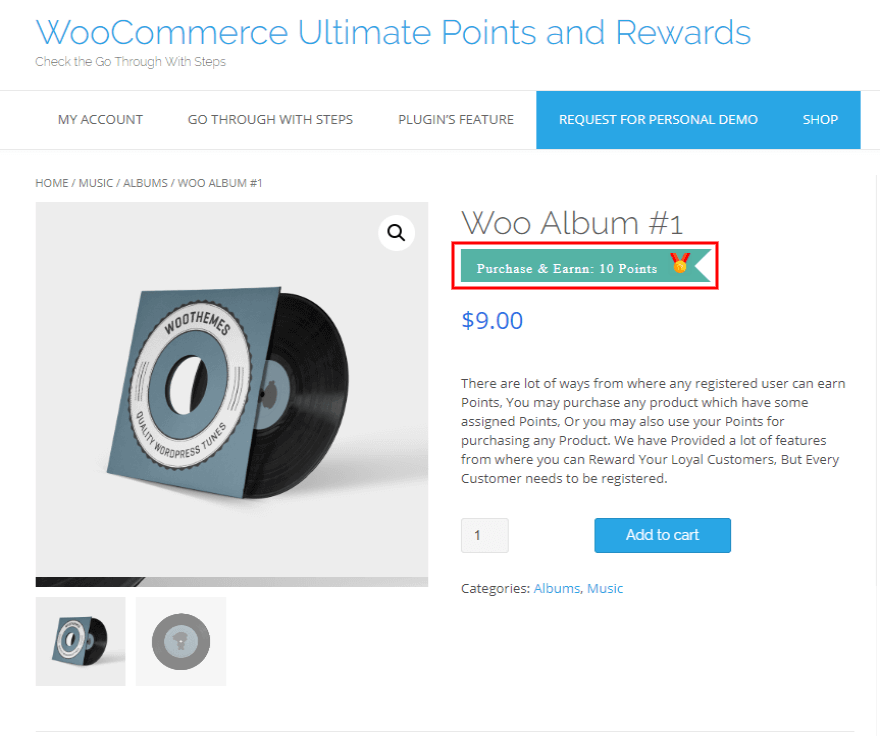
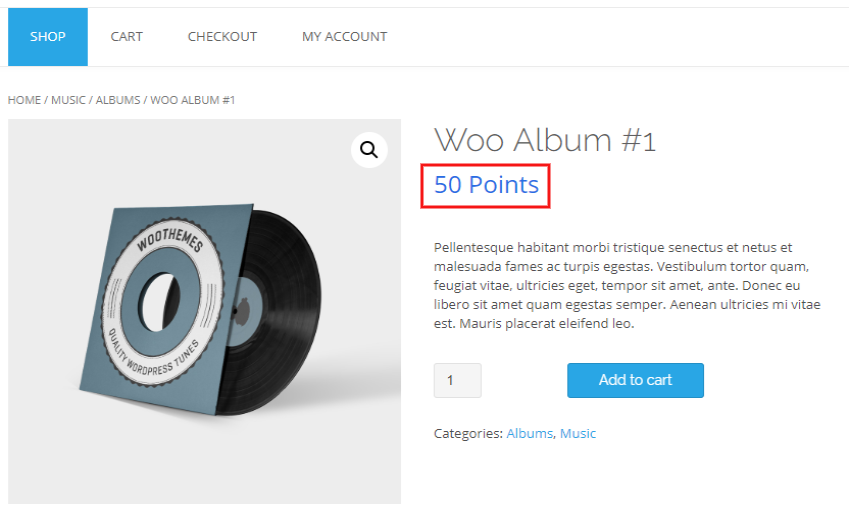
Your customer can see the assigned points on a single page of the product.
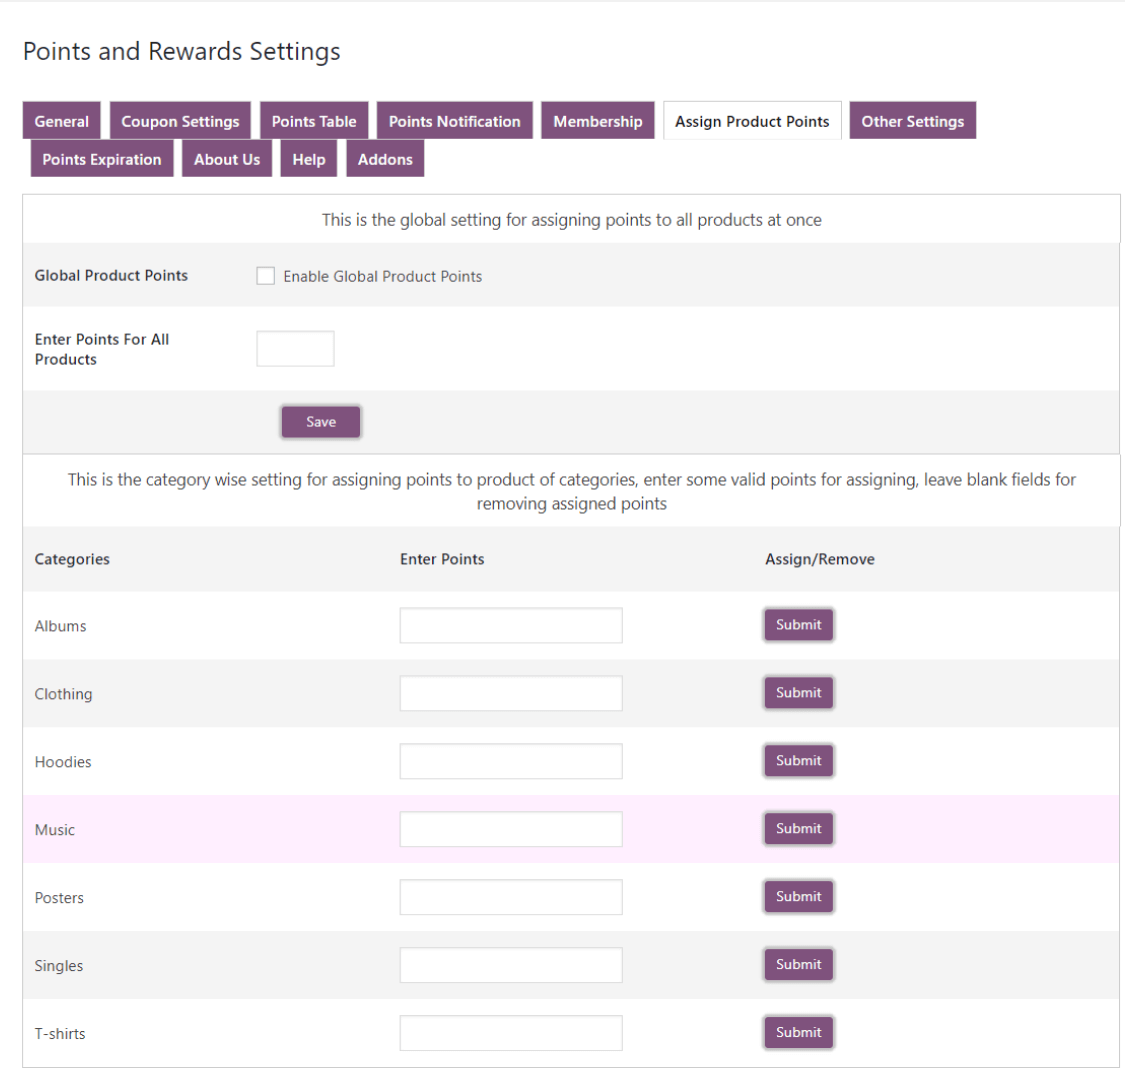
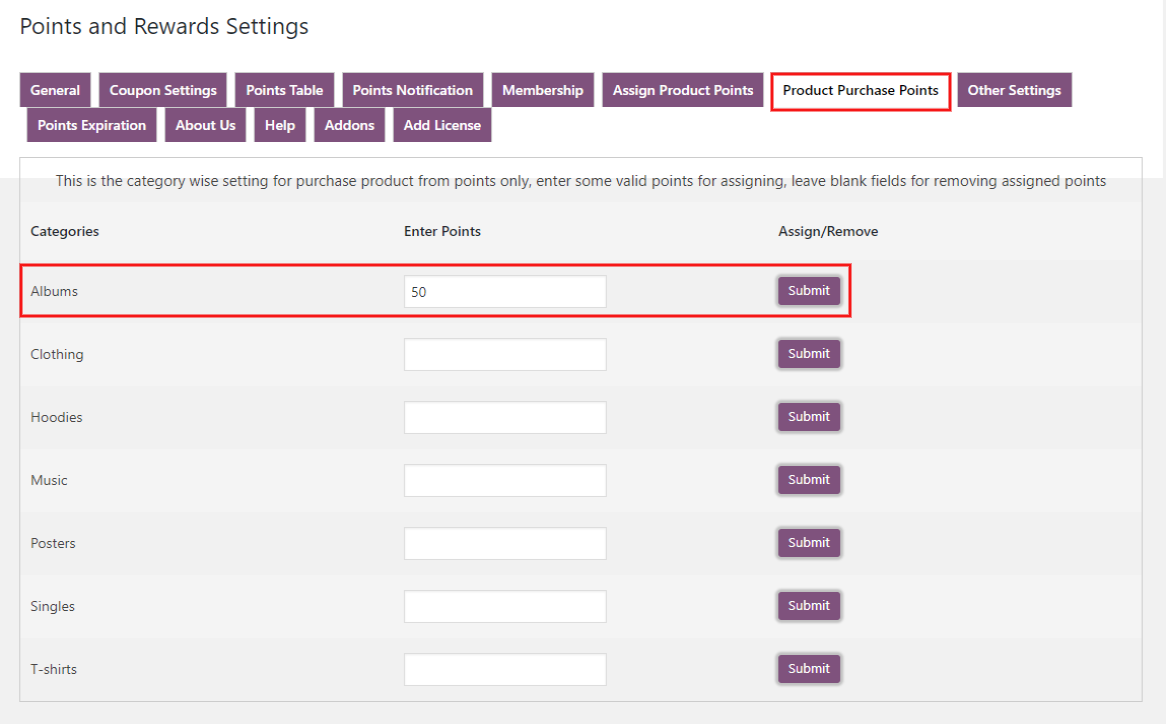
7.2.Category wise Setting
This is the category-wise setting for assigning the reward points to the product. Enter some valid points for assigning or leave blank fields for removing assigned points and click on the “submit” button.
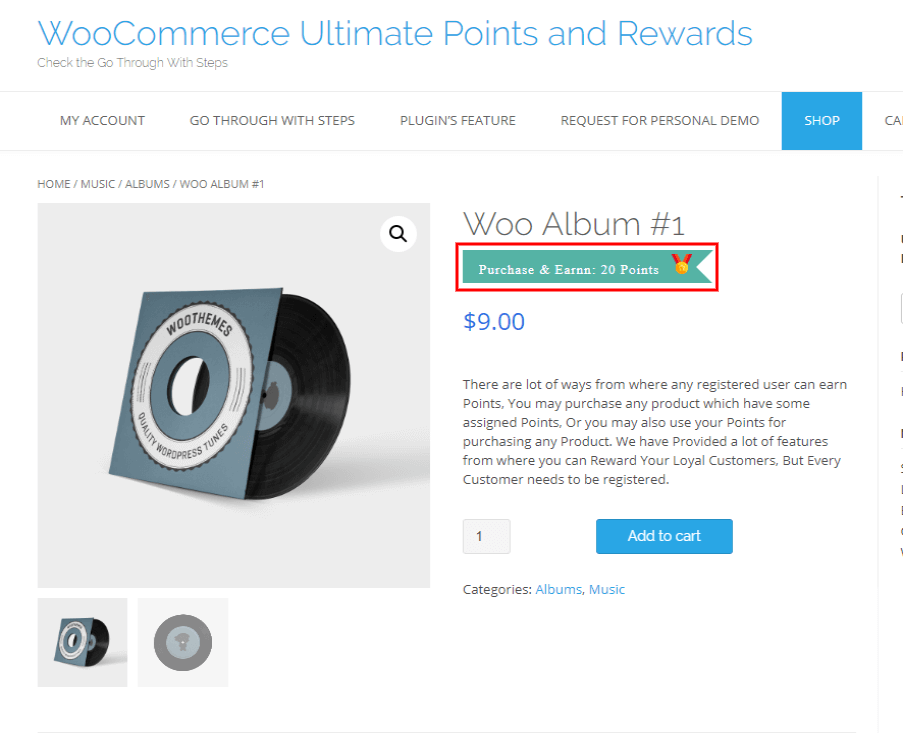
Your customer can see those assigned points on a single page of the product.
7.3.Per Product wise Setting
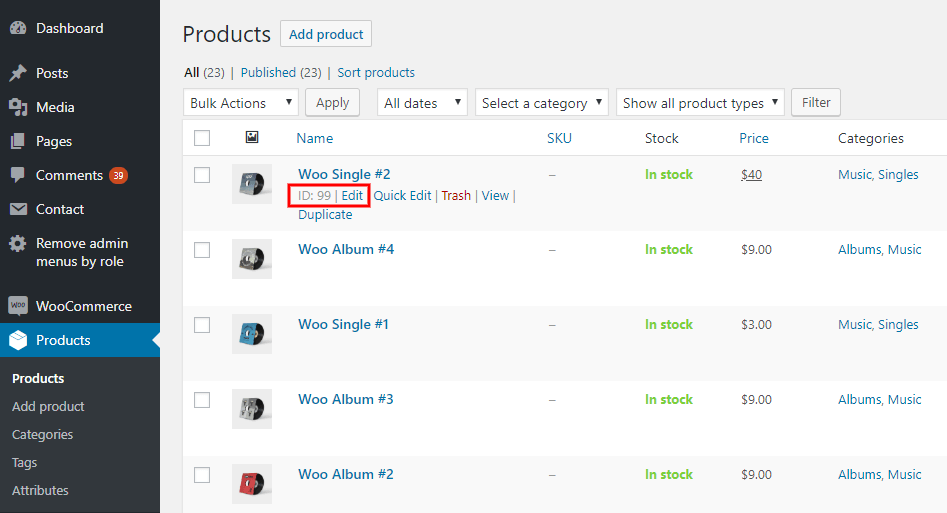
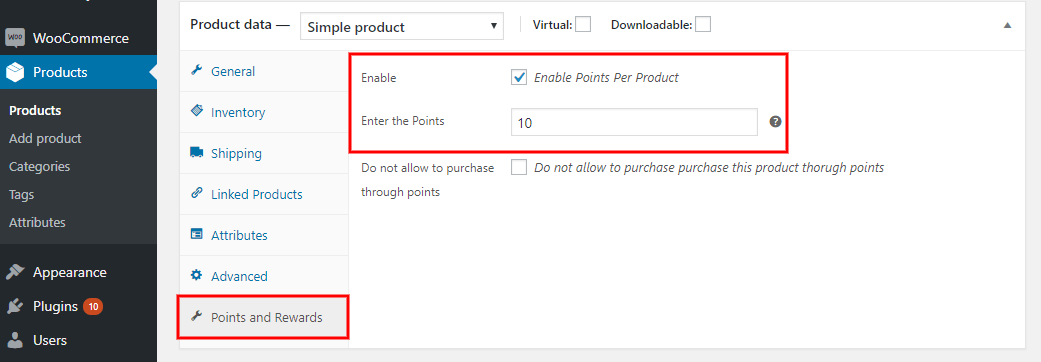
This setting for assigning points per product-wise. Go to the “products” and click on the edit page of the selected product.
Click on the “Points and Rewards” setting. Enable the setting and enter some valid numbers for assigning WooCommerce reward points.
Your customer can see the assigned points on a single page of the product.
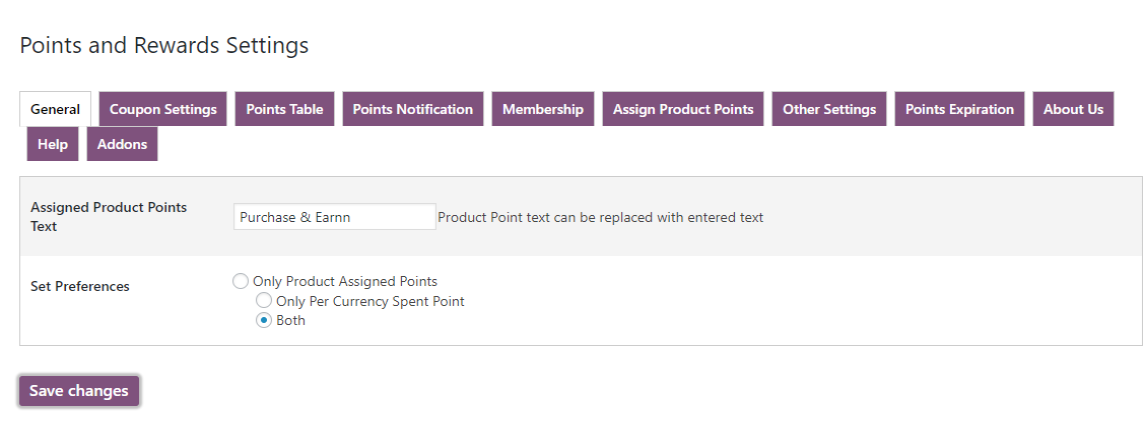
7.4.Assigned Product Points Text & Set Preference
Go to the “General Setting” tab scroll down to that setting.
Assigned Product Reward Points Text: Enter the notification text which you want to display on those products that have been assigned some points.
Set Preferences: Here you can set the preferences of points in three ways:
- Only Product-Assigned Points: Customers can get the points only for the product-assigned points.
- Only Per Currency Spent Points: Customers can get points only per currency spent points.
- Both: Customers can get the points both ways “per currency spent points” and “product assigned points”
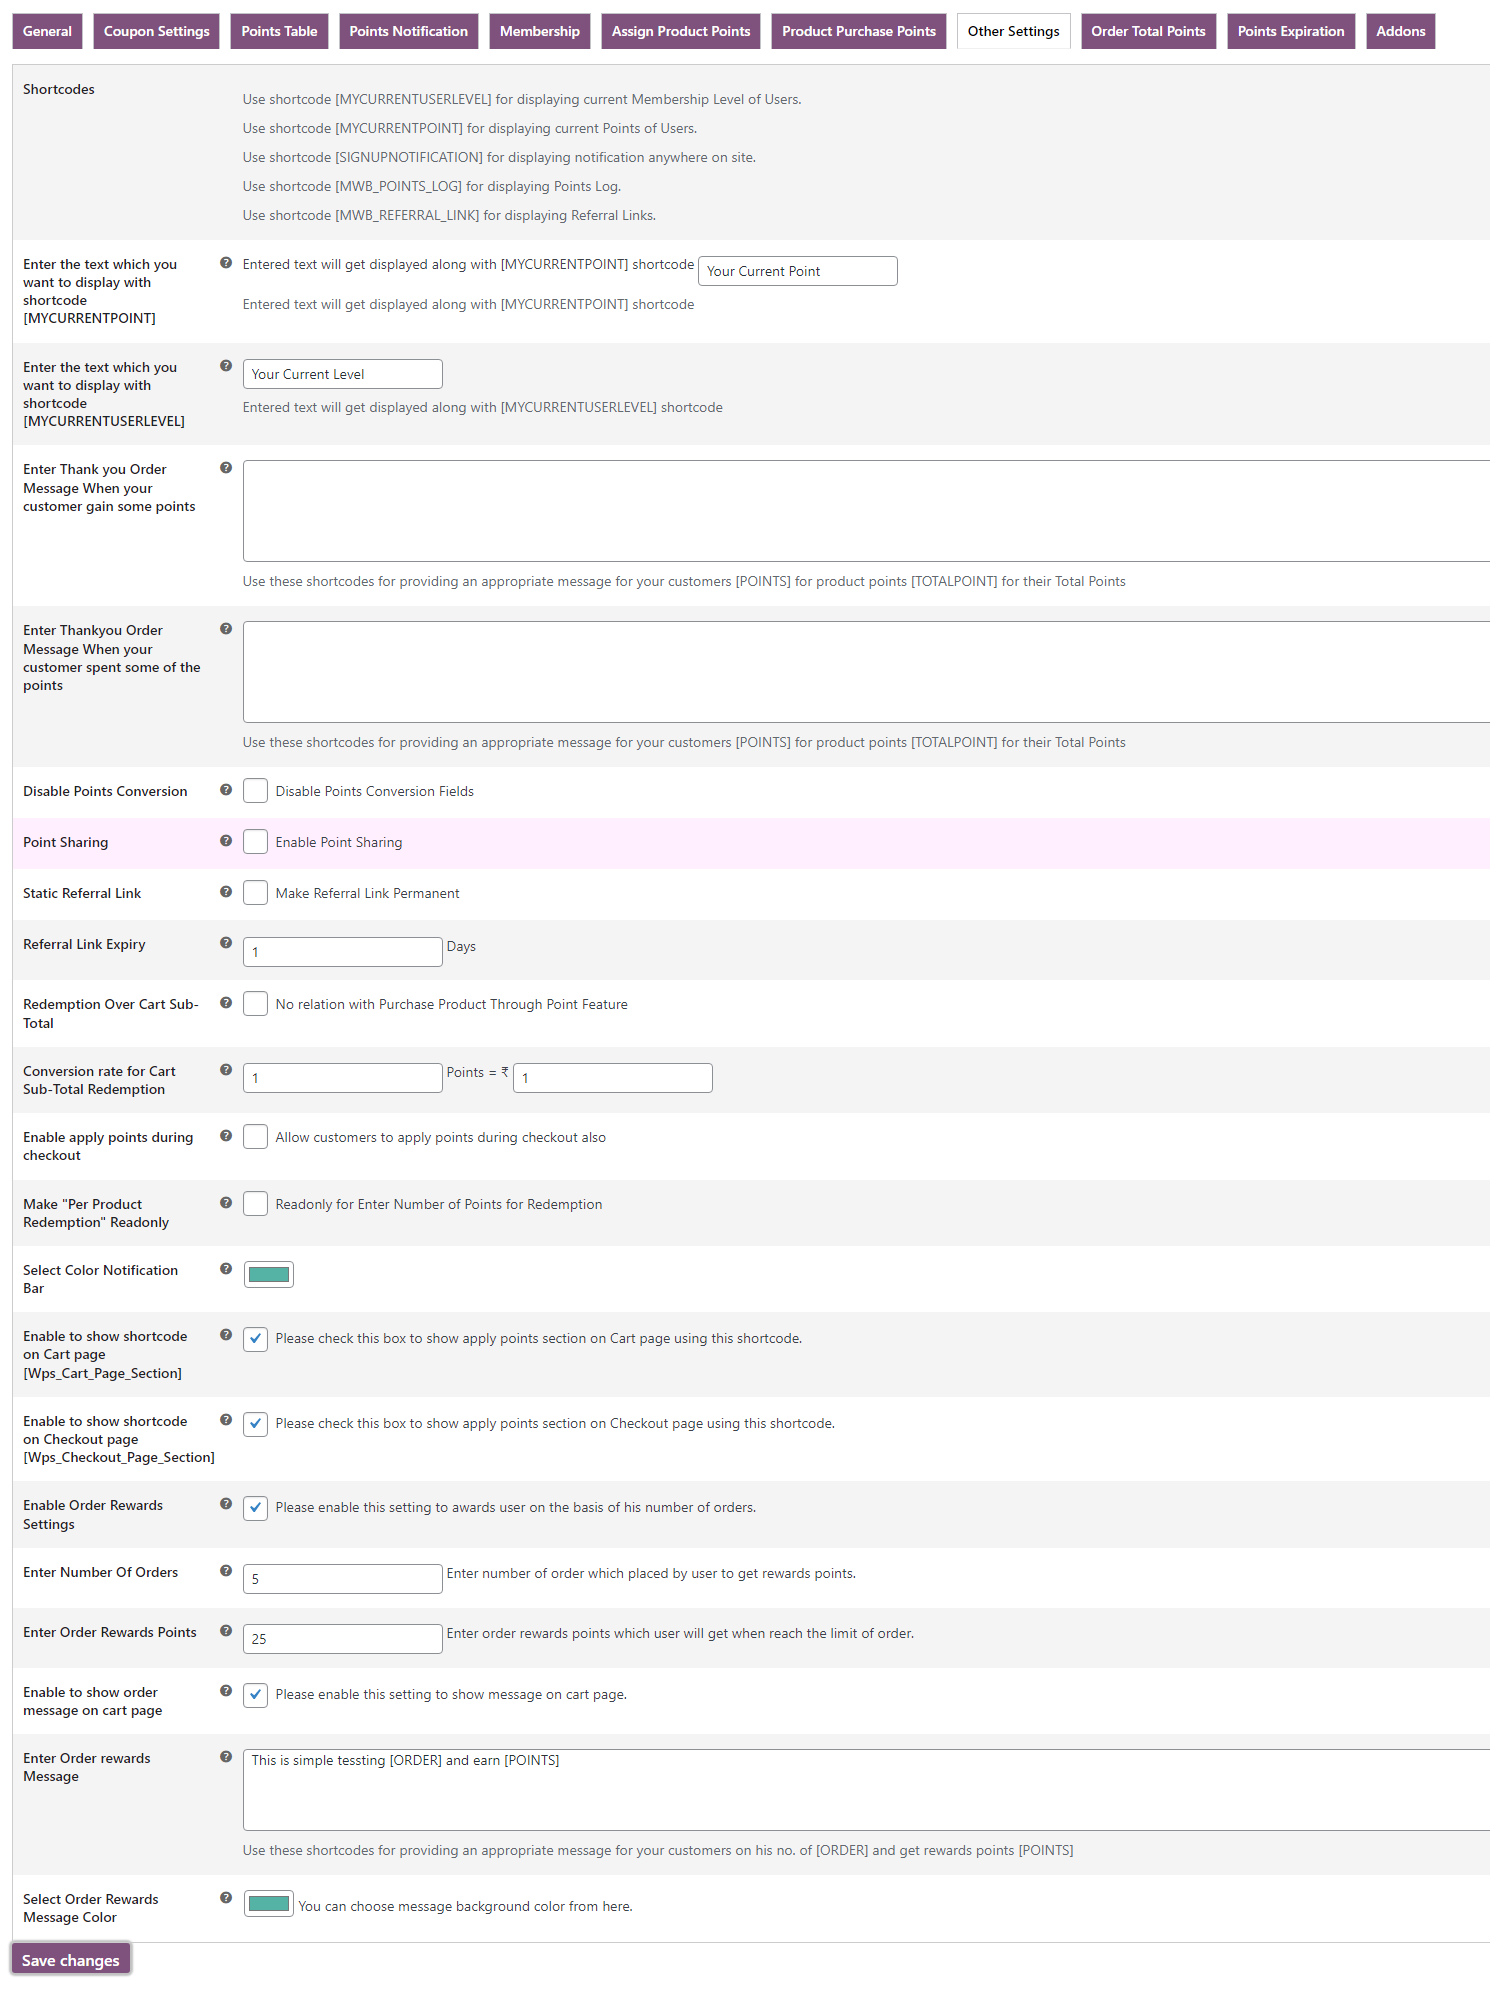
9.1.Use of Shortcodes
Shortcodes: Use shortcodes for displaying the notification anywhere on the site. we are proving five types of shortcodes
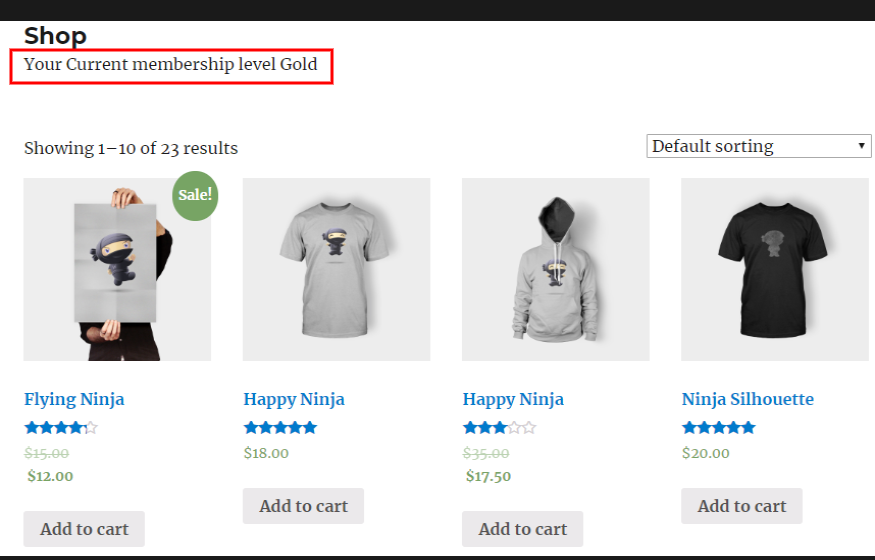
[MYCURRENTUSERLEVEL]: This shortcode use for displaying the current Membership Level of Users.
For example, If you want to show the current Membership Level for the customers on the shop page.
simple Go to the “Shop page” paste the Shortcode of Membership Level and click on the update button. The current Membership Level of the customer will get displayed along with the text.
Enter text for Current Points: Entered text will get displayed along with [MYCURRENTPOINT] shortcode.
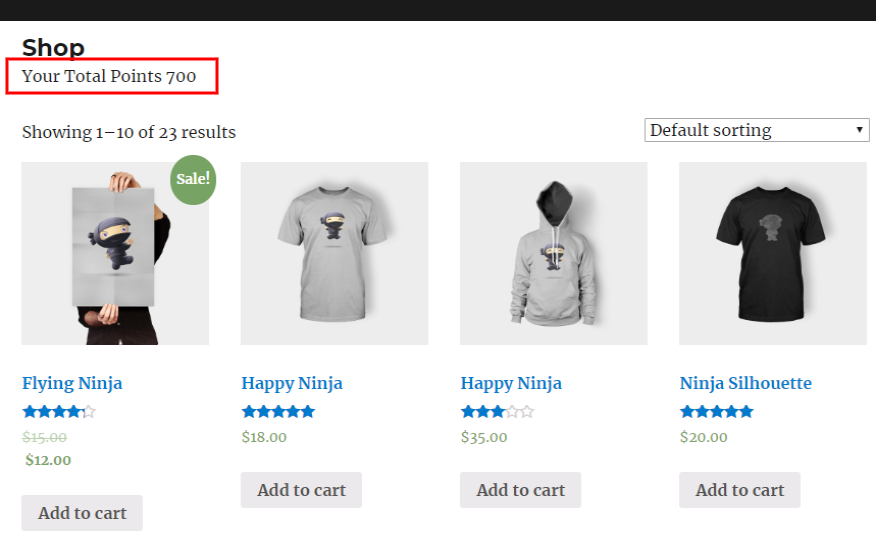
[MYCURRENTPOINT]: This shortcode displays the current Points of Users.
For example, If you want to show the customer’s current points on the shop page.
simple Go to the “Shop page” paste the Shortcode of current points and click on the update button. The current points of the customer will display with the text.
Enter text for Current User Level: Entered text will get displayed along with [MYCURRENTUSERLEVEL] shortcode.
[SIGNUPNOTIFICATION]: This shortcode is used for displaying signup notifications at any place on-site.
For example, If you want to show the signup notification on the shop page.
simple Go to the “Shop page” paste the Shortcode of sign up notification and the most important thing is that the signup point feature must be enabled from the “General Setting”.
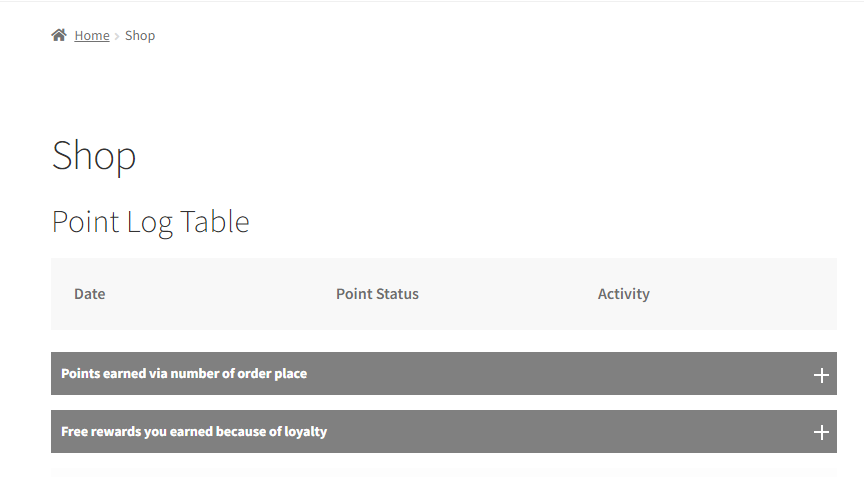
[MWB_POINTS_LOG] : This shortcode is used to display points log at any place on-site.
For example, if the admin wants to show the customer’s points log on the shop page. Simply Go to the “Shop page” paste the Shortcode of points log and click on the update button. The points log table of the customer will be displayed.
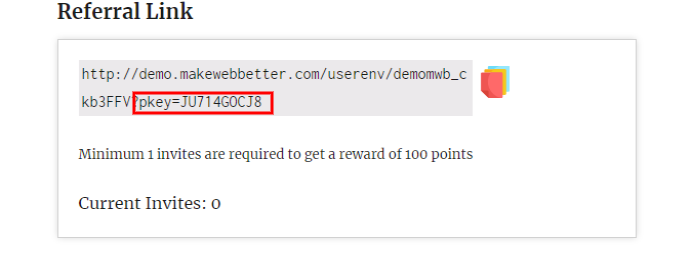
[MWB_REFERRAL_LINK]: This shortcode is used to display the referral link at any place on-site.
For example, if the admin wants to show the customer the referral link on the shop page. Simply Go to the “Shop page” paste the Shortcode of points log and click on the update button. The referral link of the customer will be displayed.
9.2.Disable Points Conversion
If you want to disable the coupon generation for the user, you can enable this setting here
9.7.Redemption Over Cart
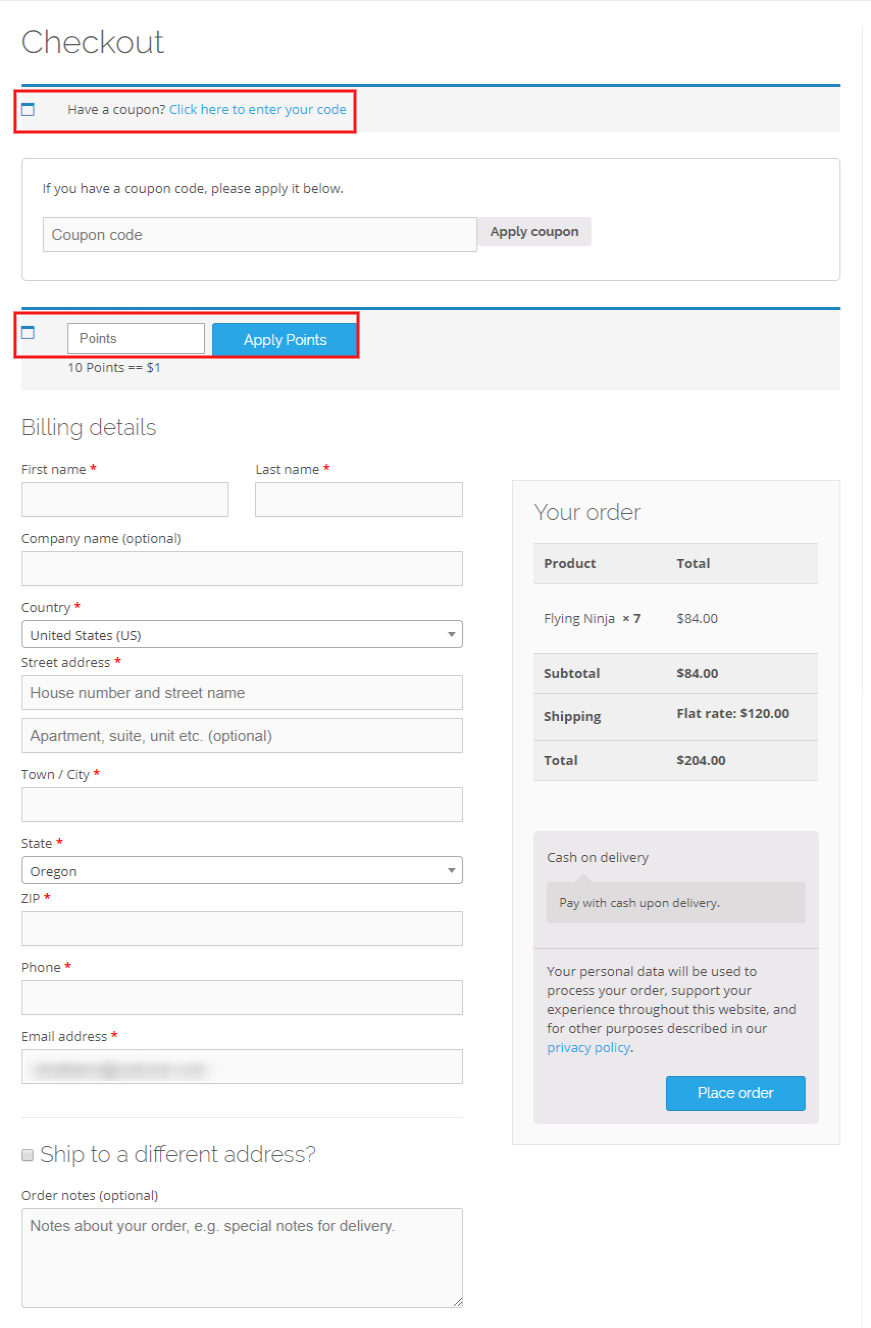
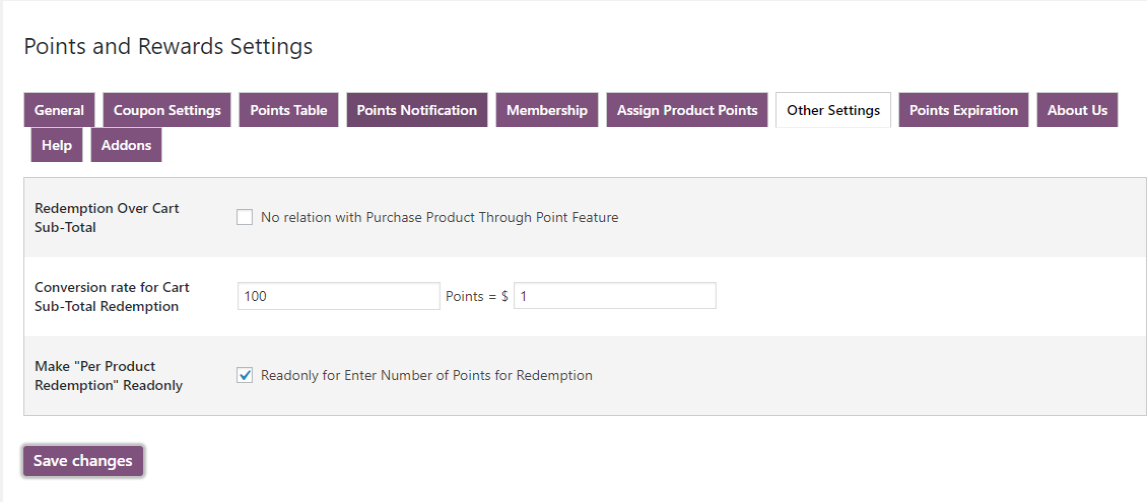
Allow Users to Apply Points: Enable this setting if you want to allow your customer to redeem rewards points and their earn into the cart subtotal. There would be no relation for purchase through the points feature.
The conversion rate for Cart Sub-Total Redemption: Enter the points that you want the user to redeem on cart sub-total, i.e. how many points will be equal to your currency when applied on the cart subtotal.
Make “Per Product Redemption” Read-only: Enable this setting if you want to make the redemption box used read-only for your customers.
9.9.Shortcode for Cart Page and Checkout Page
[Wps_Cart_Page_Section]: This shortcode is used to enable the “Apply points” section on the cart page.
For example: If you want to allow the “apply points” section on the cart page. Simply enable the “enable to show the shortcode on cart page” settings.
[Wps_Checkout_Page_Section]: This shortcode is used to enable the “Apply points” section on the checkout page.
For example: If you want to allow the “apply points” section on the cart page. Simply enable the “enable to show the shortcode on checkout page” settings.
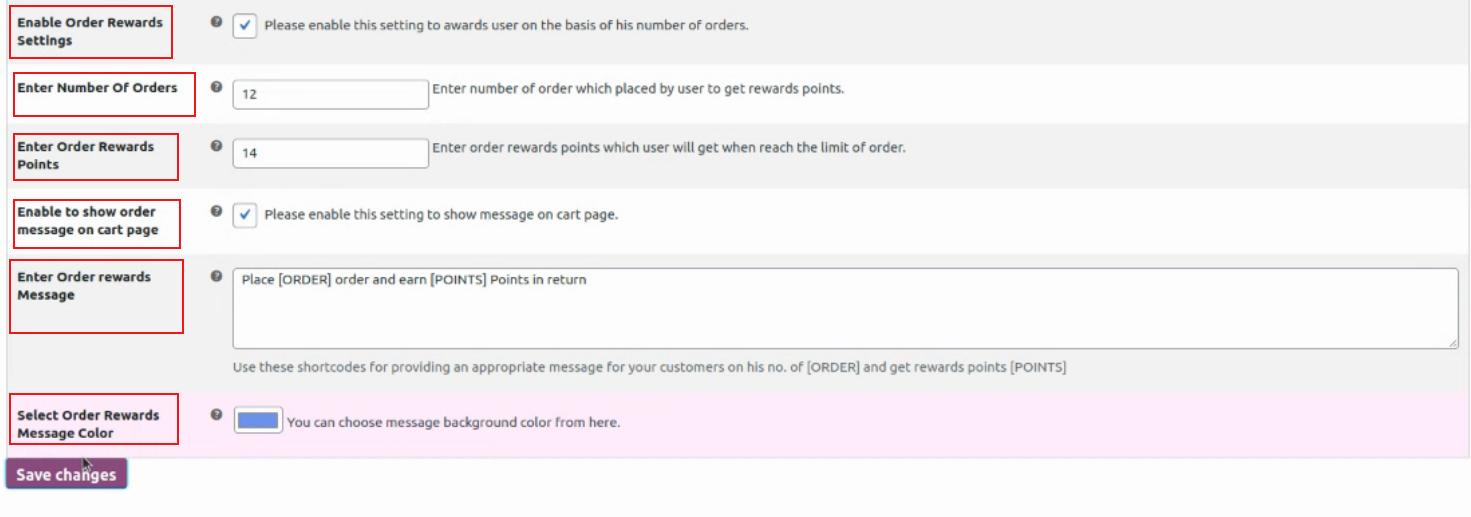
9.10.Order Reward Settings
This feature allows the admin to enable order reward points i.e. the customers will earn extra points on ordering a certain number of orders.
- Enable Order Reward Settings: If you want your customers to earn extra points while purchasing products from your website. You can enable this particular feature.
- Enter Number of Orders: The admin can specify the upper limit of the order. For example, if the admin has kept the number to 15 orders. Then the customer will be rewarded with the points, after successfully placing 15 orders.
- Enter Order Reward Points: The admin also gets a chance to decide the number of points that the customer will be rewarded with. For example, let’s continue the example mentioned above. Say the admin decides that on placing 15 orders, the customer will be awarded 12 points. So, now when the customer completes placing 15 orders, he shall be rewarded with 12 points.
- Enable to Show Order Message on the Cart Page: If you enable this setting, then the customer will be able to see an exclusive message on the cart page, stating the order rewards.
- Enter Order Reward Message: This particular part of the settings, takes it to the next level. The admins can also customize the message at their convenience.
Select Order Reward Settings Color: The admin can select the color of the message box as well.
10.Order Total Points
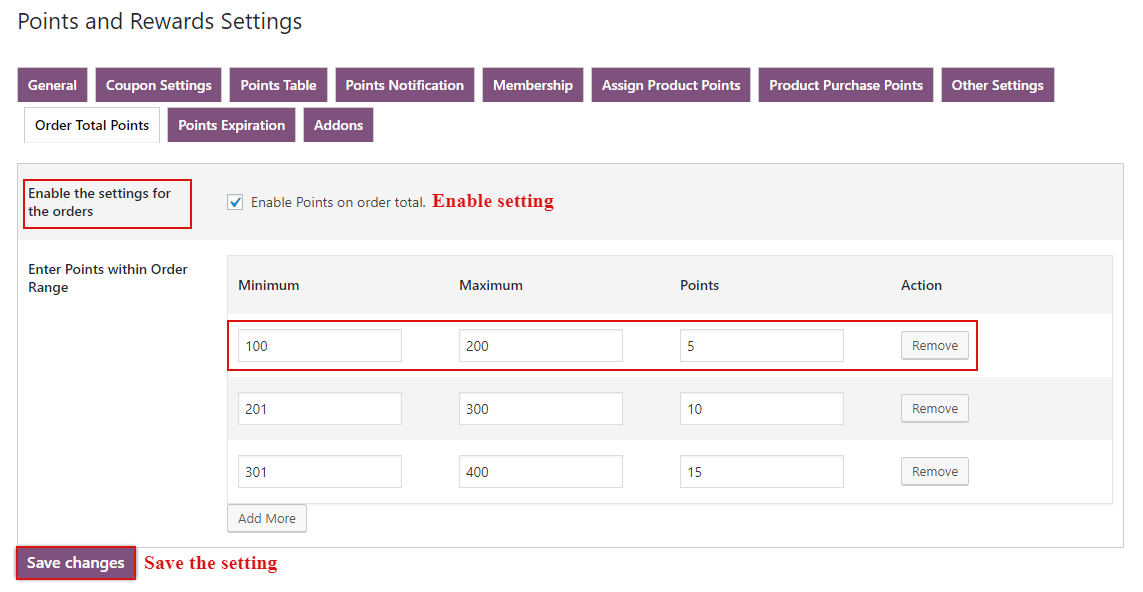
To enable the ‘Order Total Points’ setting first you have to click on the checkbox to enable the setting and then set the points within the order amount range and the last click on the ‘Save Changes’ button to save the settings.
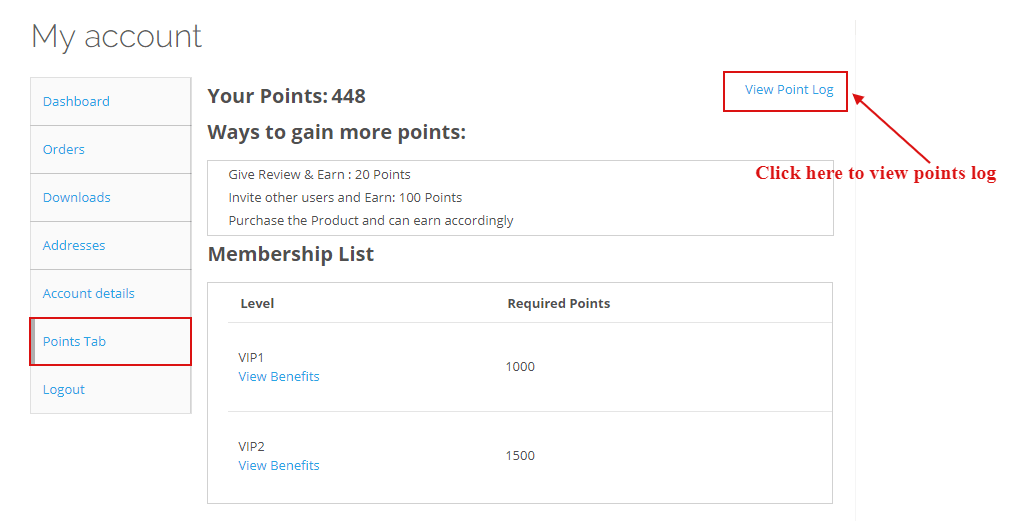
After successfully completed the order, your customers will get the points according to the order range and they can view their points from the My Account page.
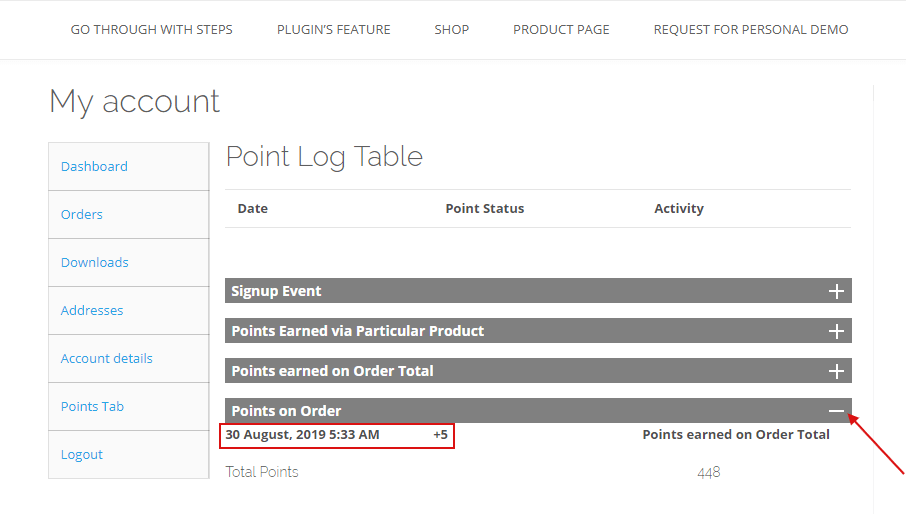
To view the detailed description of the points go to the My Account > Points Tab > and then click on the View Points Log link, here you can see the detailed description of points.
11.Points Expiration Notification
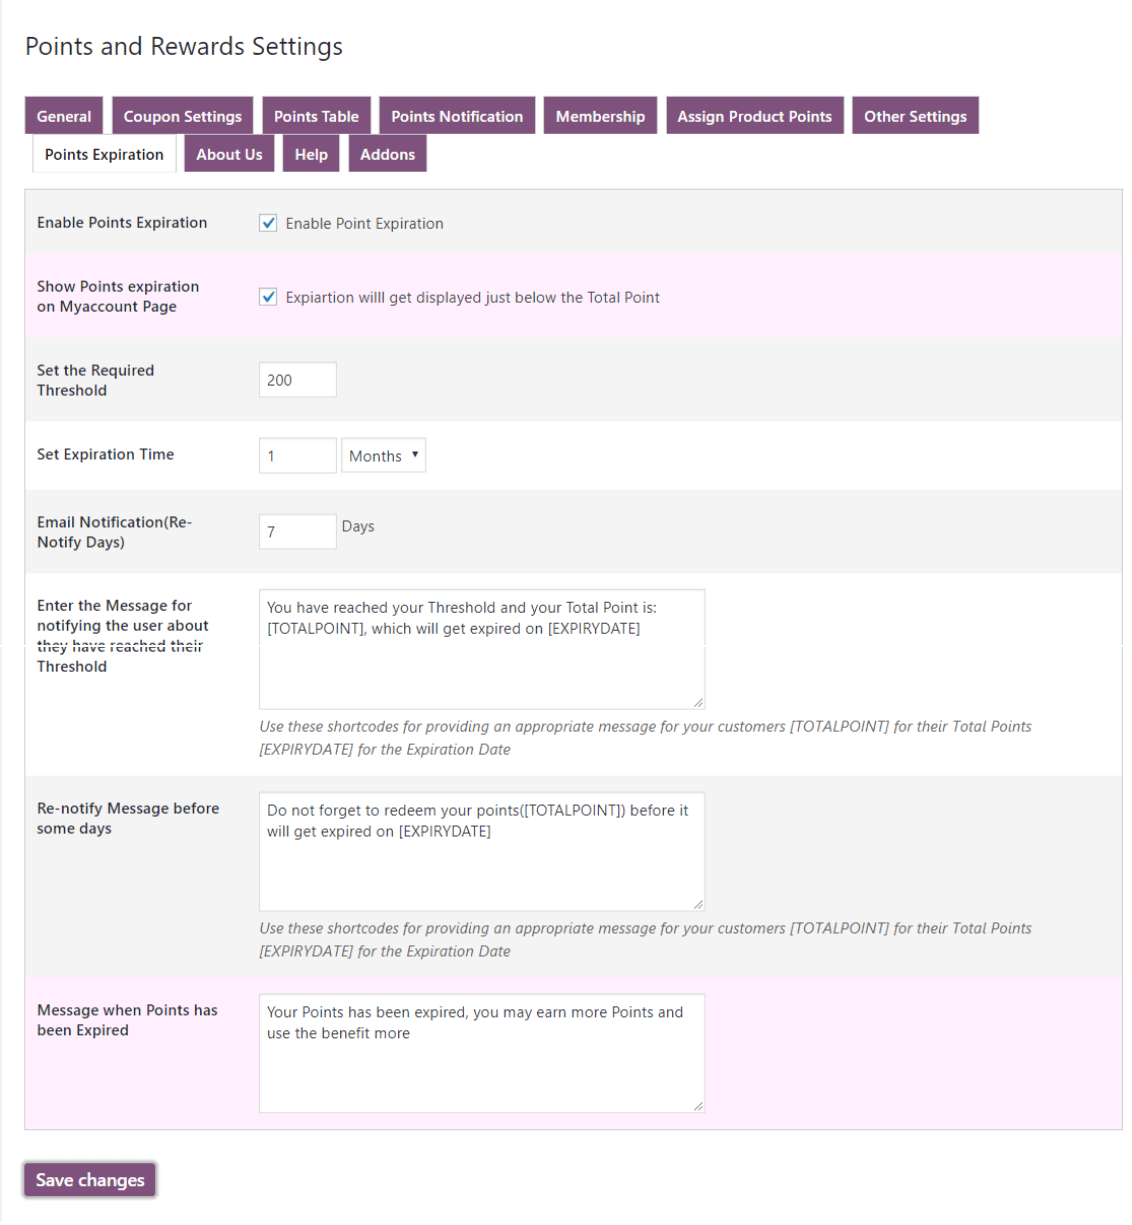
In this section, you can set the Expiration Period of the customer’s points and send the Notification Mail as a reminder of the expiration of points.
Enable Points Expiration: Enable this checkbox if you want to set the expiration time period of rewarded points for your customers.
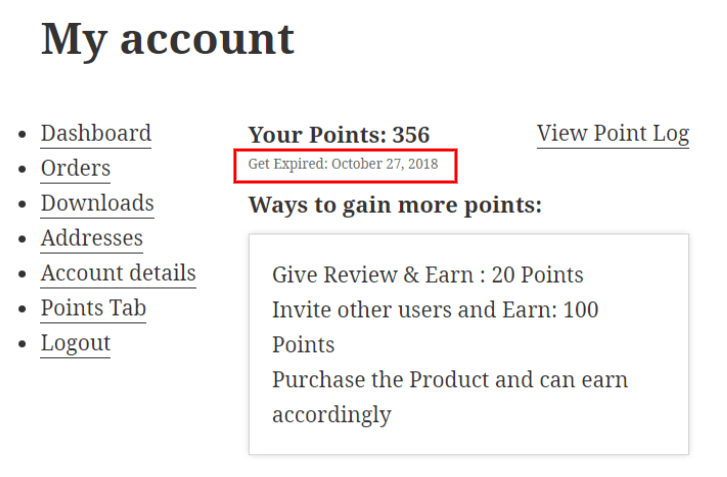
Show Points expiration on My Account Page: Enable this setting if you want to show the expiration time period of points on my account page.
Set the Required Threshold: Set the threshold for rewarded point expiration, the expiration period will be calculated when the threshold will be reached.
Set Expiration Time: Set the maximum time limit for points expiration. After this time limit points need to get expired. It will be calculated after the above threshold time.
Email Notification(Re-Notify Days): Set the number of days before the mail will get sent out for the re-notify the customer for points expiration.
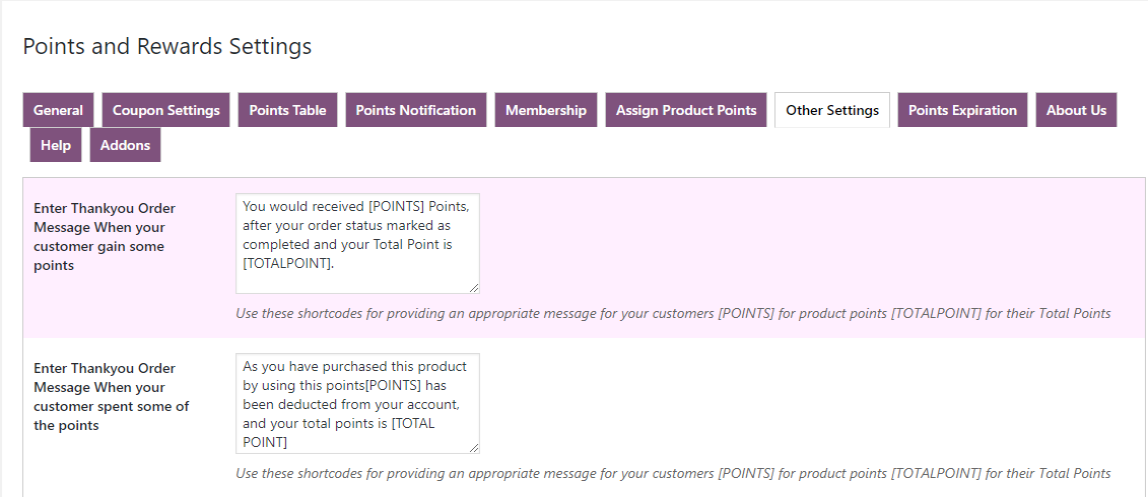
Enter the Message for notifying the user about they have reached their Threshold: Use these shortcodes for providing the first notification to the customer, that they have reached the threshold now they should redeem their point before it will get expired.
Re-notify Message before some days: Use these shortcodes for providing the re-notification their the customer that they have left some days more for the expiration of points.
Message when Points have been Expired: Enter the message notifying your customer that their points have been expired.
12.Compatibility With Currency Switcher
The WooCommerce Ultimate Points and Rewards plugin is compatible with the Currency Switcher for WooCommerce plugin.
The WOOCS plugin allows you to change your website’s working currency.
To change the currency of the wallet system, Install and activate the Currency Switcher plugin. And follow the instructions:
- Go to WooCommerce > Settings > Currencies.
- Select any of the listed currencies.
- Click on the Save Changes button.
- Afterward, all transactions will take place in the currency you choose.
13.Compatibility With MultivendorX Marketplace And MultivendorX
WooCommerce loyalty rewards plugin is compatible with MultiVendorX Marketplace and MultiVendorX, enabling the vendors to earn points and rewards on purchases made in their stores.
14.FAQs
I couldn’t locate where I set up the points amount for products?
You can assign points to the product in three ways.
- Global Point Assign (Assign Points to all Products)
- Per Category Point Assign ( Assign points to the different categories)
- Per Product Assign Points (Individually Assign Points )
For Globally assigned points visit WooCommerce > Assign Product Points Here you find “Global Product Points”. Now enable the setting and assign points to all products in a single click.
For Category assign points, below the “Global Product Points” setting you will find an option to assign points per category.
For the Per product assigned point, visit the particular product edit page. In the Product data section, you will find a tab “Points and Rewards” Click on that tab after that Enable Points Per Product and Enter the points. Now, update the product, and Product points will get displayed on the Product Page.
Why the social share button doesn't appear on my website?
Please make sure that you have Enabled the Settings from the "General Tab" and selected the social buttons you want to let it display on your site.
How can i translate your plugin in another language?
You can translate the plugin in any language you want. We have provided all our plugin translation ready. Using suitable software you can translate our plugin.
How to share the points?
Enable the required Setting from “Other Setting” (tab) i.e “Enable Point Sharing”, Now on My Account Page customer can see the related fields and can enter the Email of that customer( Valid WordPress User_Email Id ) to whom they want to share his/her Point.
What is the difference between “Redeem Points Conversion” and “Per $ Points Conversion” and also whats the use of “Enter Product Points”?
About Redeem Points Conversion: In this setting Merchant can set the amount for converting reward points to generate the coupon. For example, if you have set 1 point will be equivalent to the 1$ (for your site) and if any user has 50 points then he or she will get the coupon amount of 50 after converting it from the “My Account” section.
About Per $ Points Conversion: Let's take an example if Merchant has set the $1 = 1point (for their site) and any customer will purchase any product with 50$ then he or she will be rewarded with 50 points.
About entering Product Points: From here Merchant can select some product and can set the Points for a particular product, and if any user will purchase that selected product he or she will be rewarded with those Points.
Is it possible Admin can set the points per product , category wise product and globally?
Yes, We have the features Admin Can Set the points as follows:
- Globally
- Category wise
- Per Product-wiseGo to Points and Rewards Setting > Assign product Points Setting > Enable Global Product point and enter the points according to needs.
Go to Points and Rewards Setting > Assign product Points Setting > Enable Category Product point and enter the points according to needs.


























2.6.Share Referral Link on Social Media
Enable social media channels for sharing the referral links.
After enabling this setting customers can share a referral link on selected social media channels.