
1.Overview
WooCommerce Variation Master plugin allows the admin to display WooCommerce variations of variable products in an attractive format. WooCommerce Variation Master is an easy-to-use and configure. Admin can simply Export/Import the variation gallery images and color/image/text swatches for each WooCommerce variation product, along with the easy global setting features. It provides full control to modify the setting for each variation.
Admin can disable the color/image/text swatches for particular variations, show the stock alert messages, hide/show the attribute name, and change the color/images/text for a particular variable product.
Features of WooCommerce Variable Product:
These are some of the extra-ordinary features of WooCommerce Variation Plugin,
- Admin can add multiple gallery images for each variation, color, and image swatches for attributes for WooCommerce variation product custom attributes.
- Admin can use both ‘select’ and ‘color and image swatch’ combinations.
- Easy WooCommerce import products for variation/ export for variation gallery images, attributes color and image swatches.
- Enable and customize the stock alert message. Set the minimum quality for displaying the stock alerts.
- Admin can determine the number of variations to be created on one request.
- Variation wise color and image swatches customization.
- Allow buyers to update variations on the cart.
- Module-wise control of each feature from a single page.
- Product Gallery Slider in the variable product.
- Easy to change the variation of image size.
- Gallery image slider on variable products.
- WooCommerce Variation Swatches in Variable Product Update Cart Popup.
- WooCommerce Variation Product Gallery Slider in Variable Product Update Cart Popup.
- Product Gallery with two Layouts.
- On the WooCommerce product Attribute swatch for display type will text along with image & color.
- Hide Add To Cart button and Product Quantity from the shop page.
- Add custom size to display the WooCommerce product attributes term thumbnail on the shop page.
- Show/Hide variation button on related products.
- Hide Add to Cart and Quantity fields from the shop page/related products.
- The variation will be Crossed, when not available.
- Settings to show only one attribute on the shop page.
- Change the WooCommerce variation image on the mouse-hover event of attributes.
2.Installation
- Automatic Installation:
Automatic installation is the easiest option as WordPress handles the file transfers itself and you don’t need to leave your web browser.
The steps are as follows:
- Log into your WordPress dashboard.
- Navigate to the Plugins menu and click on Add New.
- Click on the ‘Upload Plugin’ button.
- Click on the ‘Browse’ button and navigate to the downloaded ‘WooCommerce Variation Master’ zip file and click ok.
- Most importantly, of course, you can install it by simply clicking Install Now.
- Manual Installation:
The manual installation of the Extension is another option to install the extension to your WordPress environment. The manual installation method involves downloading our WordPress Extension and uploading it to your webserver via your favorite FTP application.
The steps are as follows:
- Extract the downloaded ‘WooCommerce Variation Master’ zip file.
- Upload the WooCommerce Variation Master folder to the /wp-content/plugins/ directory.
- Activate the ‘WooCommerce Variation Master’ through the ‘Plugins’ menu in WordPress.
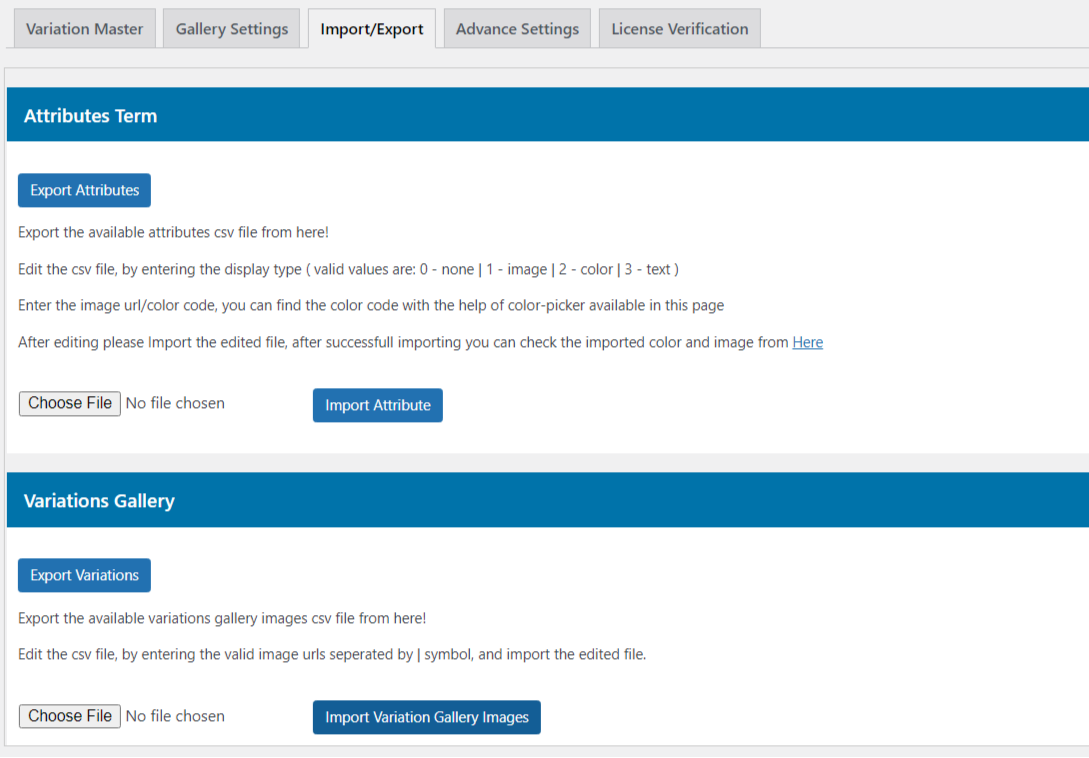
3.WooCommerce Variation Swatches
This WooCommerce Variation Swatches plugin replaces the default variation color swatches selection of products with attribute term swatches. Here you’ve two options to display the variation swatches for WooCommerce store:
- Manually: You can assign the attribute term text/image/color from the attribute edit page under product > Attributes > edit attribute and select the text/image/color you want to show instead of the default options in the dropdown.
- Using Import / Export: You can import the text/color/images for all/selected attribute terms using our export/import feature.
- To do this, you need to open the Variation Master > Import/Export tab and press the ‘export attribute’ button. You will get a CSV file with all of your attribute terms.
- After editing the CSV file, browse the file location and import it via pressing the ‘Import Attribute’ button.
- Afterward, please go to the Variation Master Setting > Enable Swatches setting and Use Attribute Terms Thumbnails.
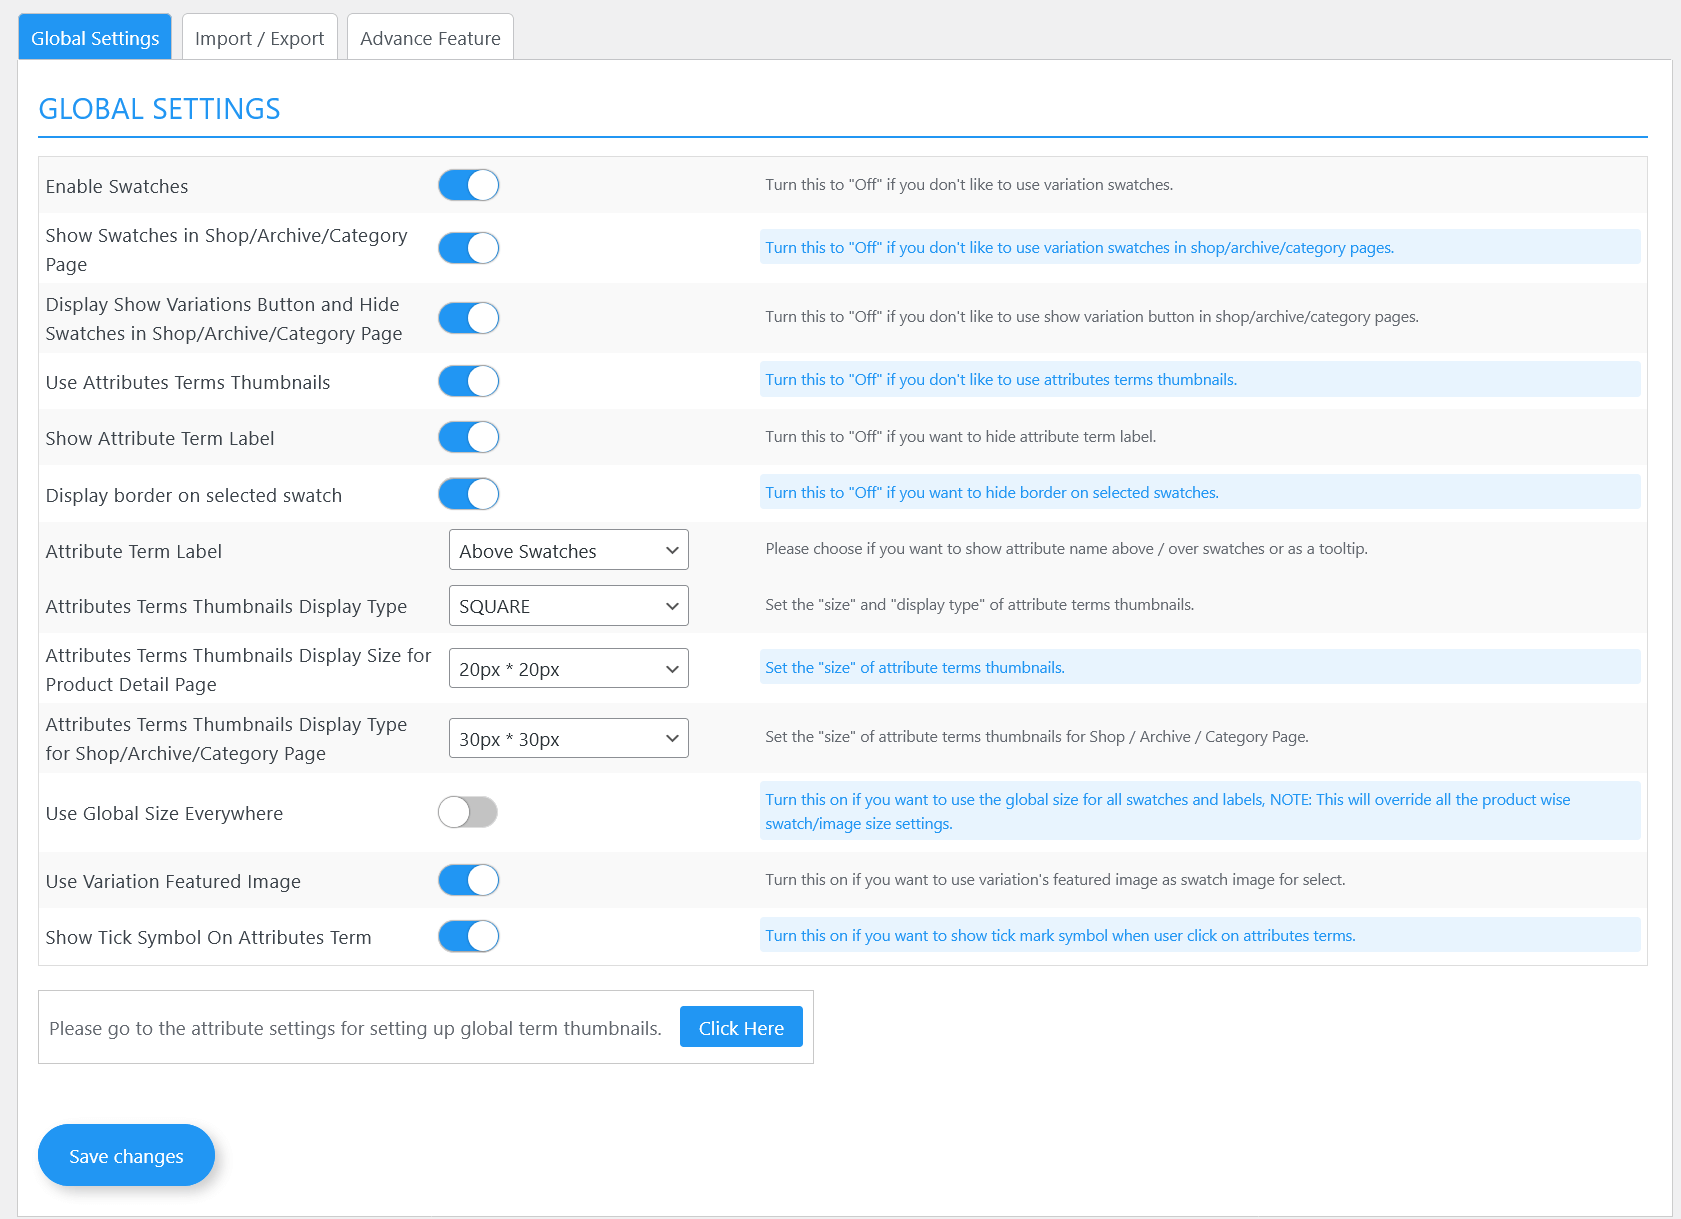
3.1.Global Setting
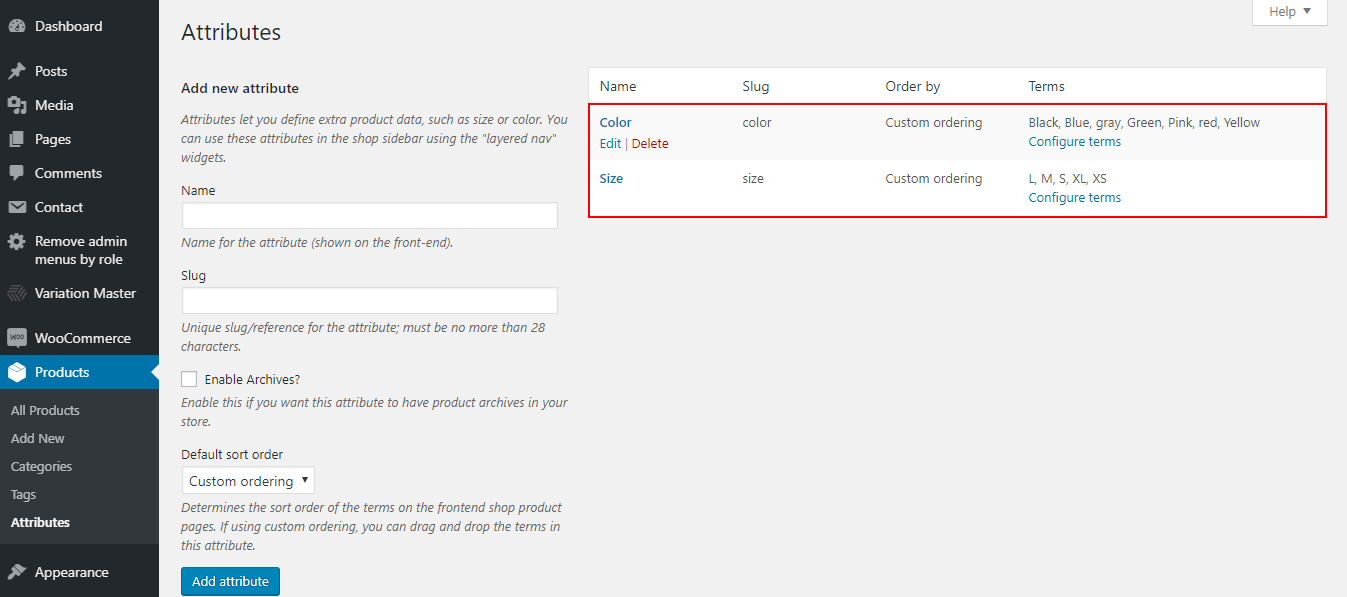
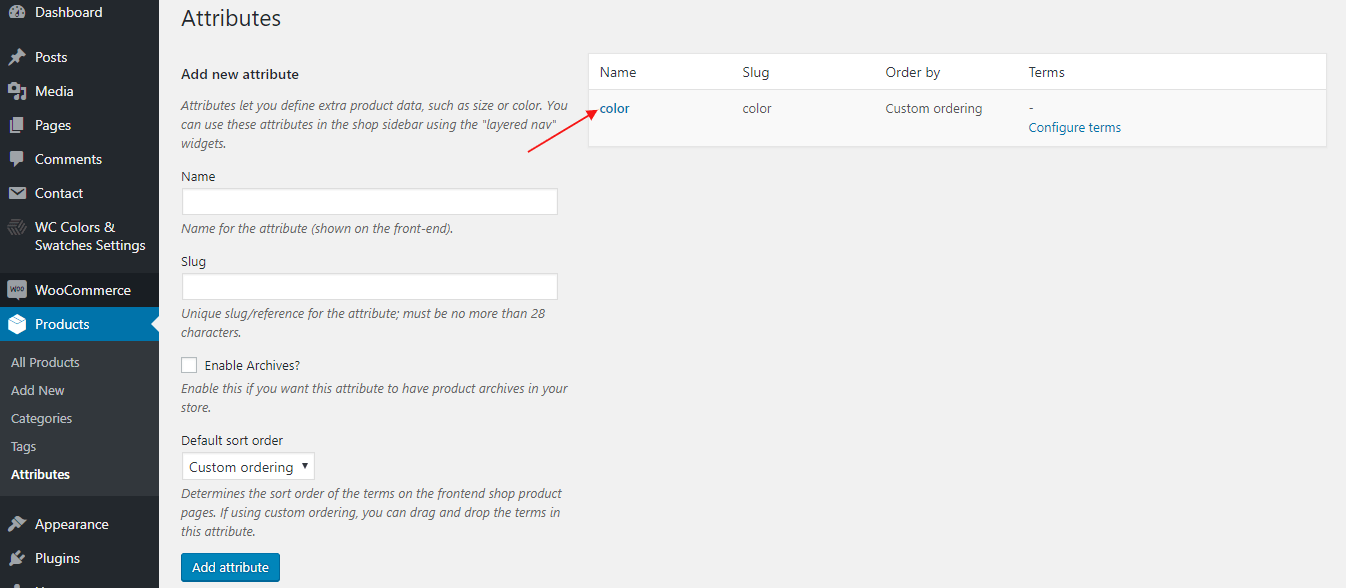
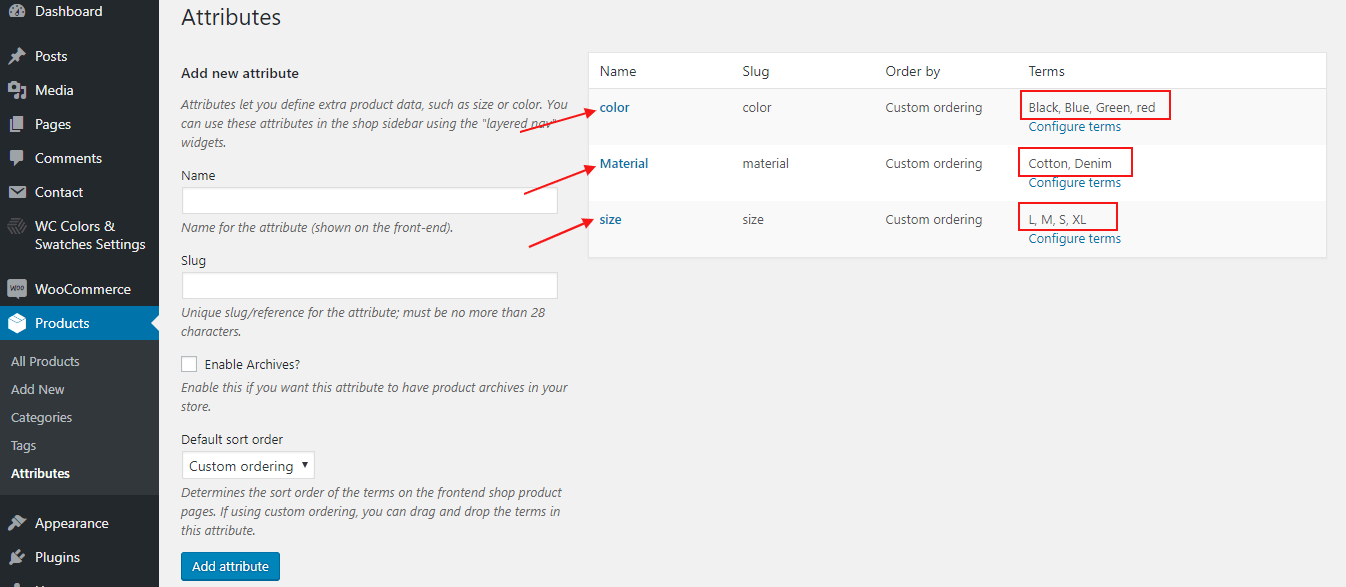
To implement Global settings, you need to start with creating Global WooCommerce Product Attributes.
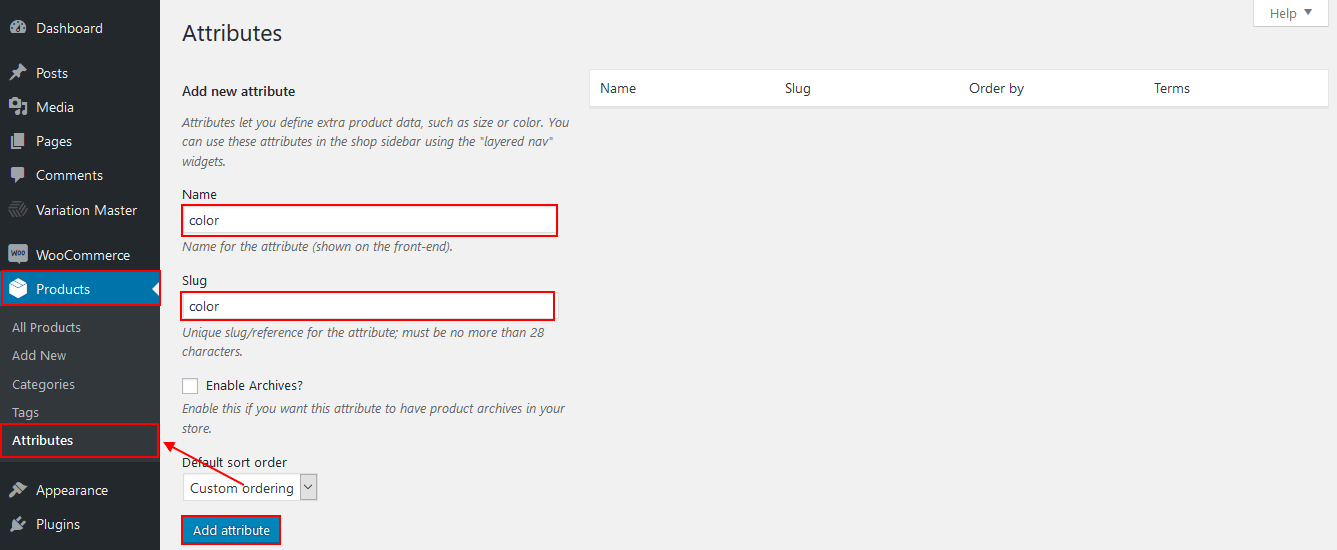
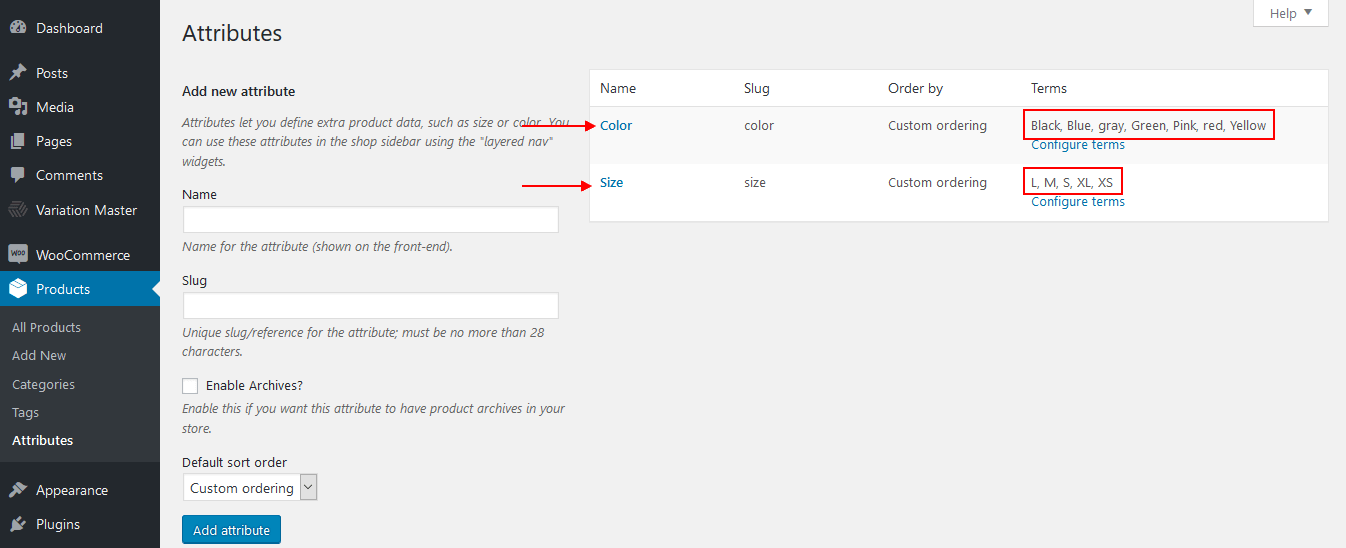
- Navigate to the sidebar and click on Products > Attribute. Here you can create a new attribute and edit/delete previously created attributes.
- To create a new attribute, fill out the required fields like Name, Slug, etc.
- Lastly, click on the ‘Add Attribute’ tab.
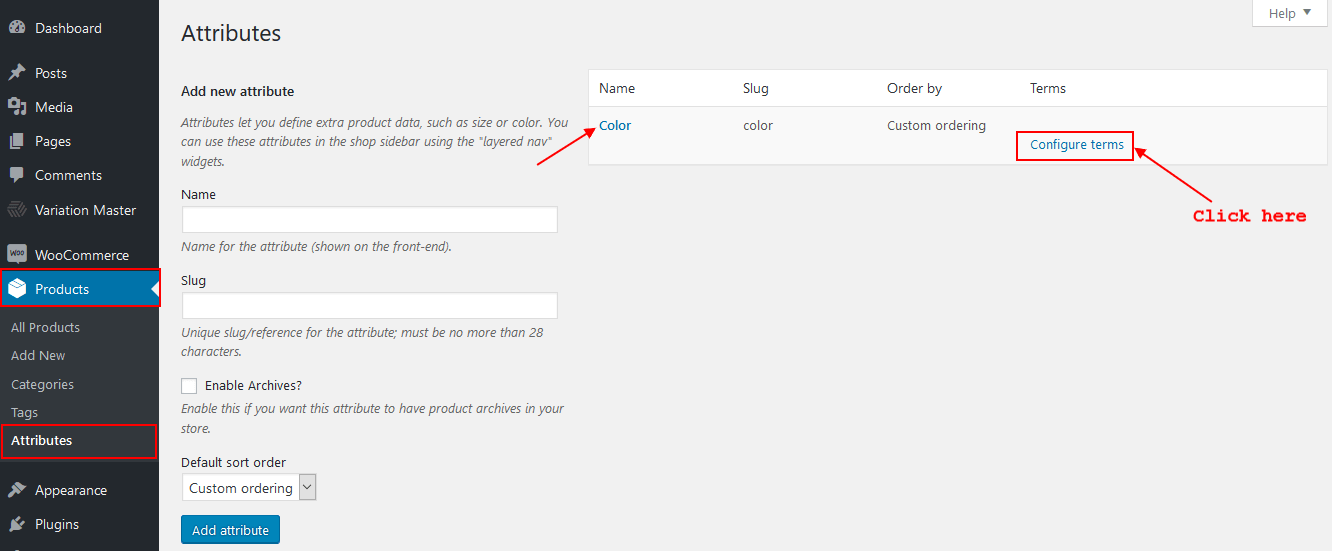
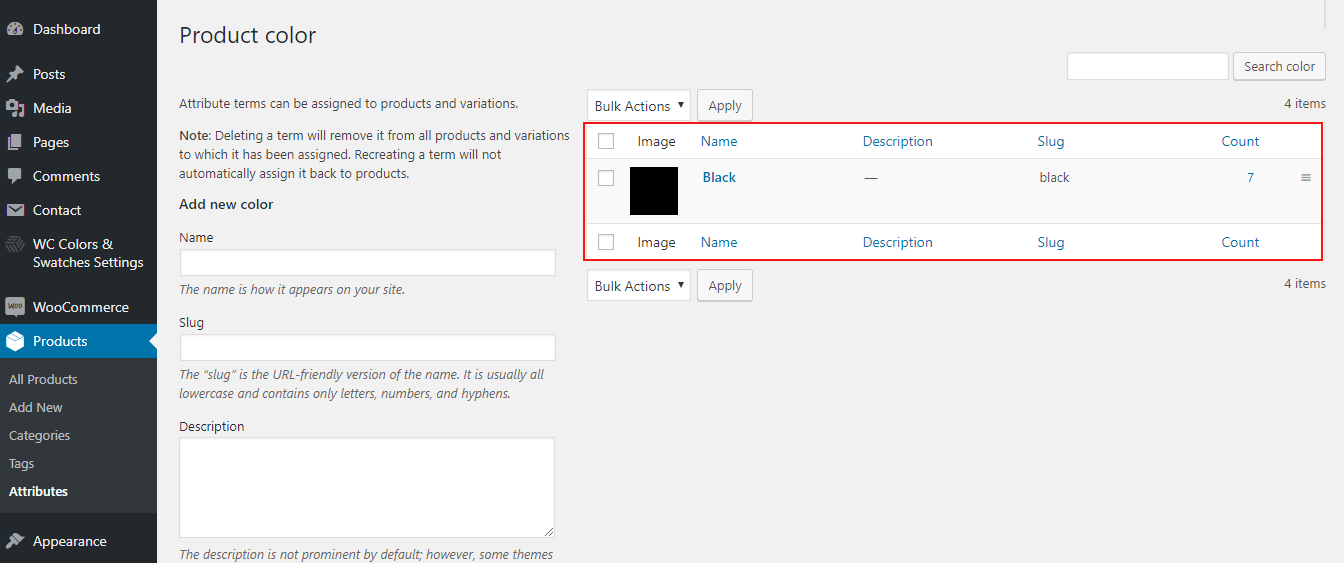
After successfully creating an Attribute, click on a particular WooCommerce Product Attribute Name to Add Attributes terms.
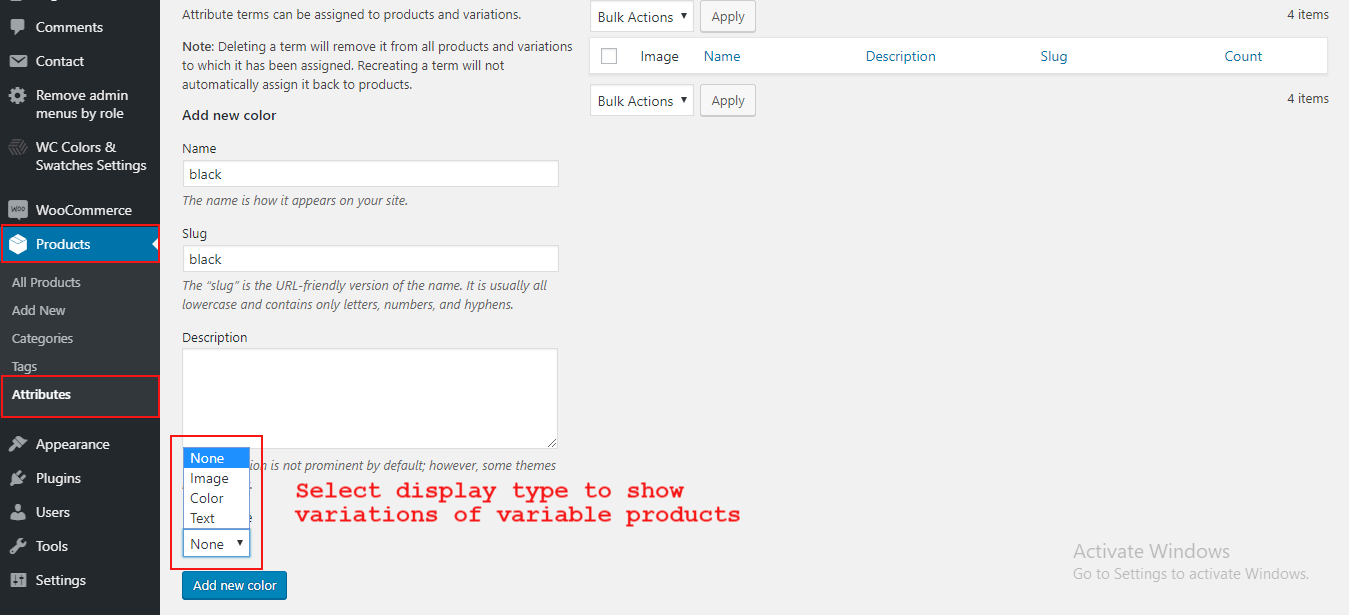
To configure the terms you have to enter the Term Name, Term Slug, Description, and select the Display type. This plugin provides three types of display types, Image, Text, and Color.
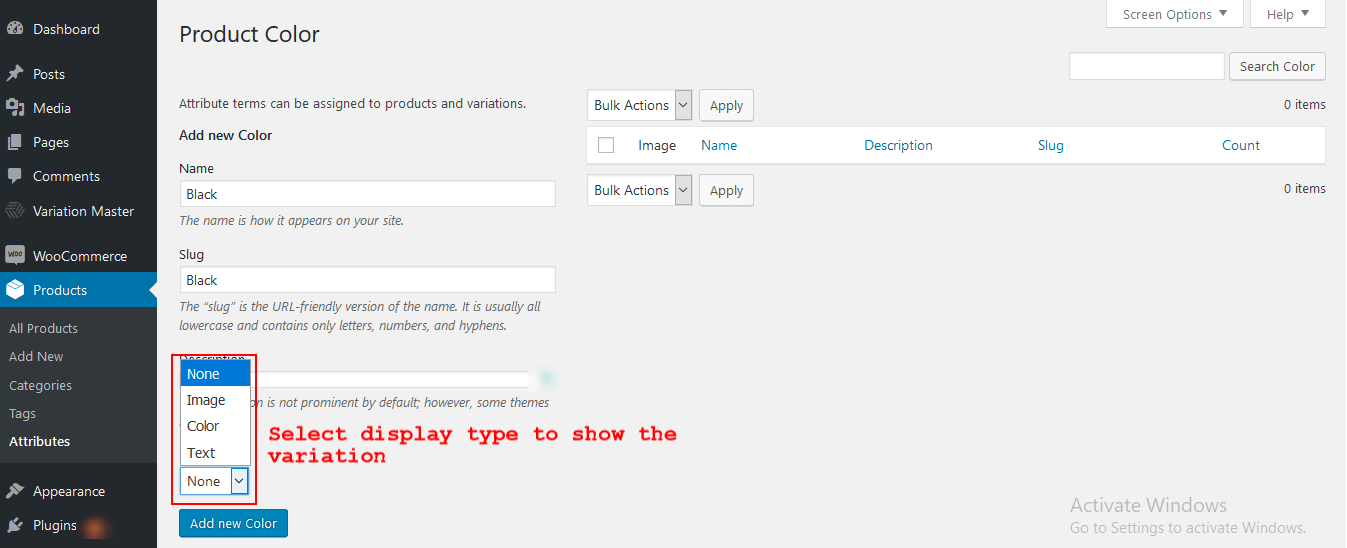
And the last click on ‘Add New Term’, your Attribute Term is successfully created.
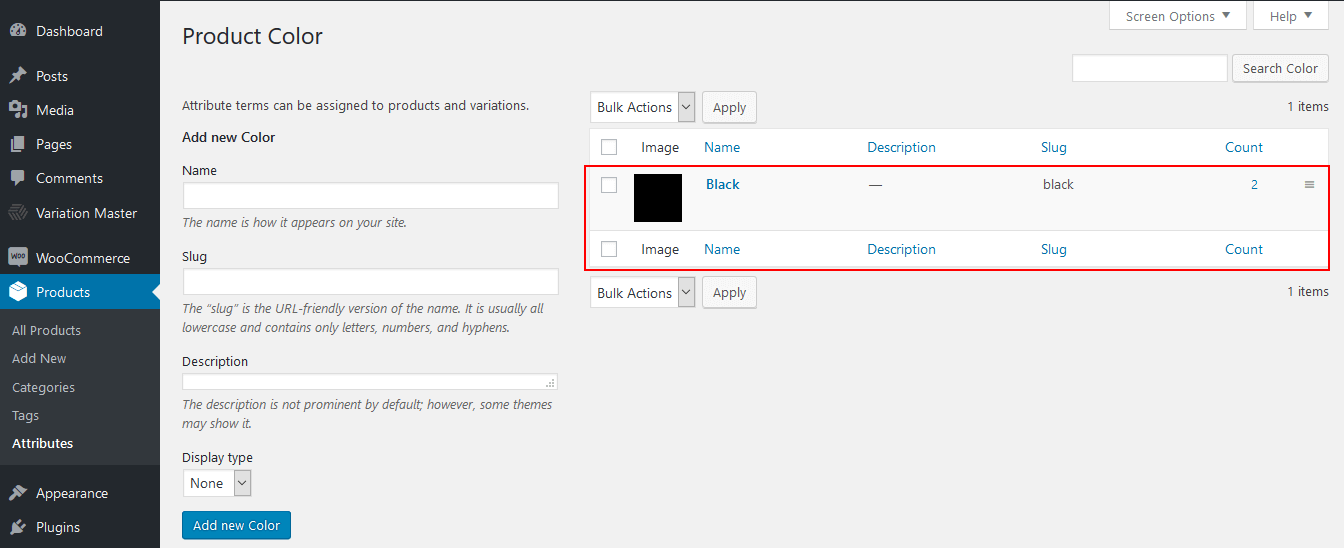
Now, you can add multiple ‘Attributes’ and ‘Attributes Terms’ according to your requirements.
After successfully creating attributes, you have to enable the plugin setting. Go to the dashboard, click on ‘Variation Master’ settings, and enable ‘Enable Swatches’ and ‘Use Attributes Terms Thumbnails’ settings.
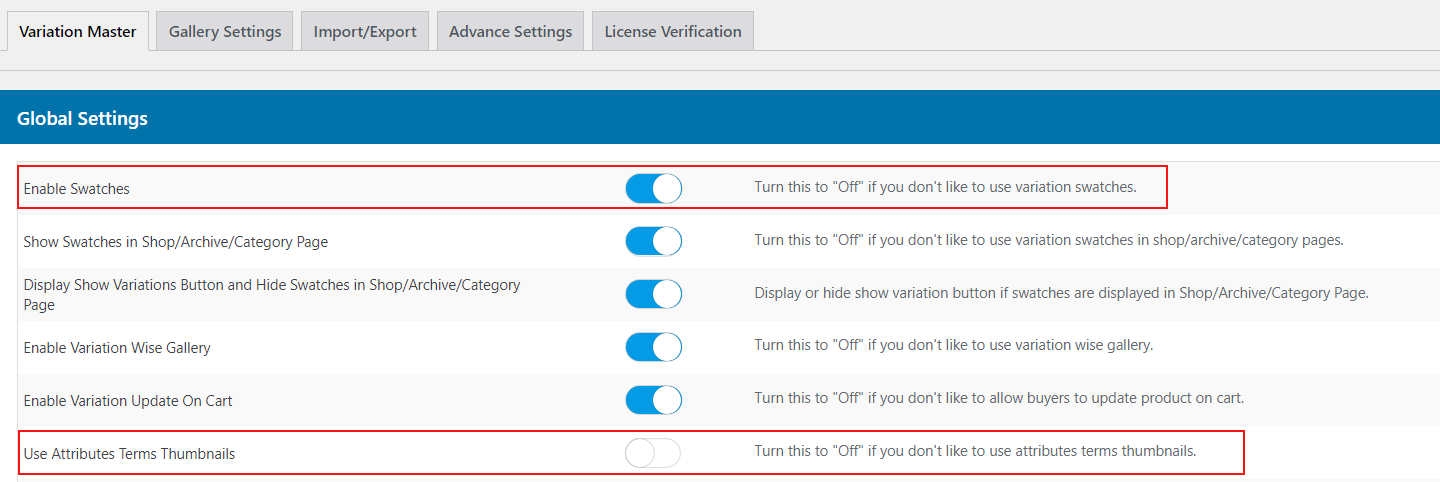
After enabling these two toggle buttons, you can view the colored swatches variation of the product.

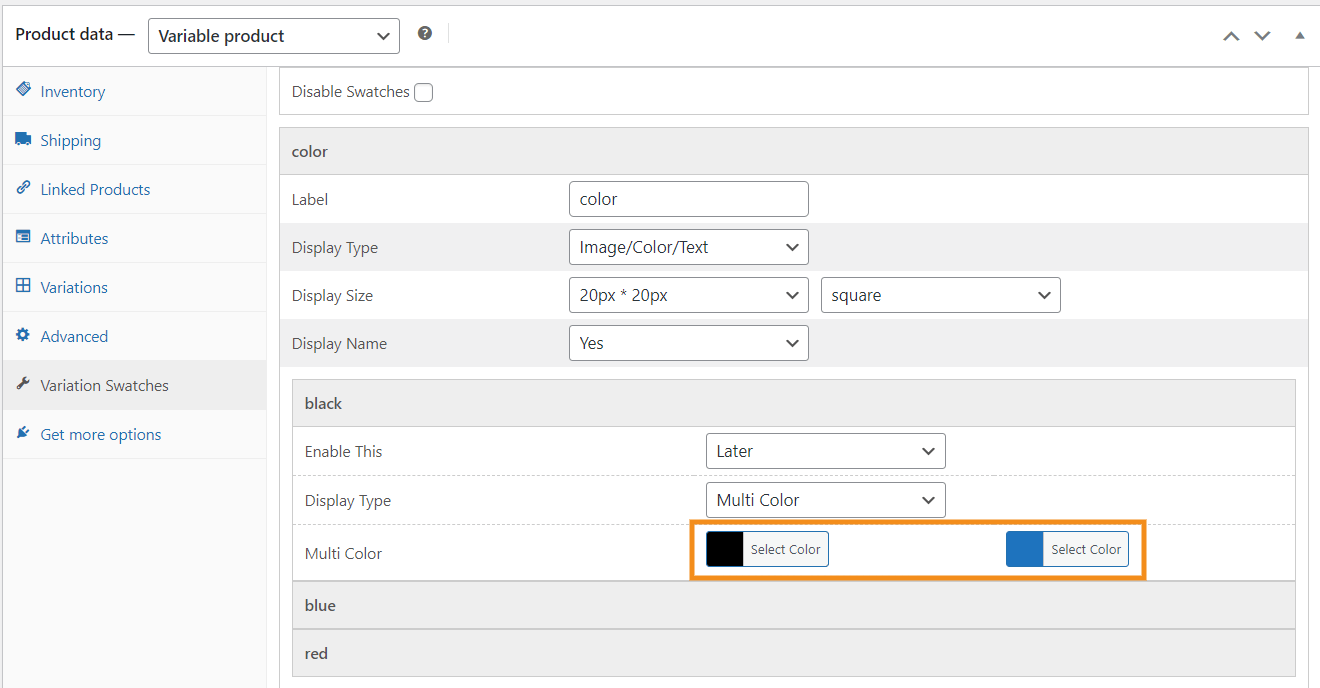
3.2.Per Product Setting
To enable the WooCommerce variation swatches product-wise, go to the product edit page on which you want to set the per product set. To enable the product-wise setting first you need to add attributes and their values by clicking on the WooCommerce Product ‘Attribute‘ tab.
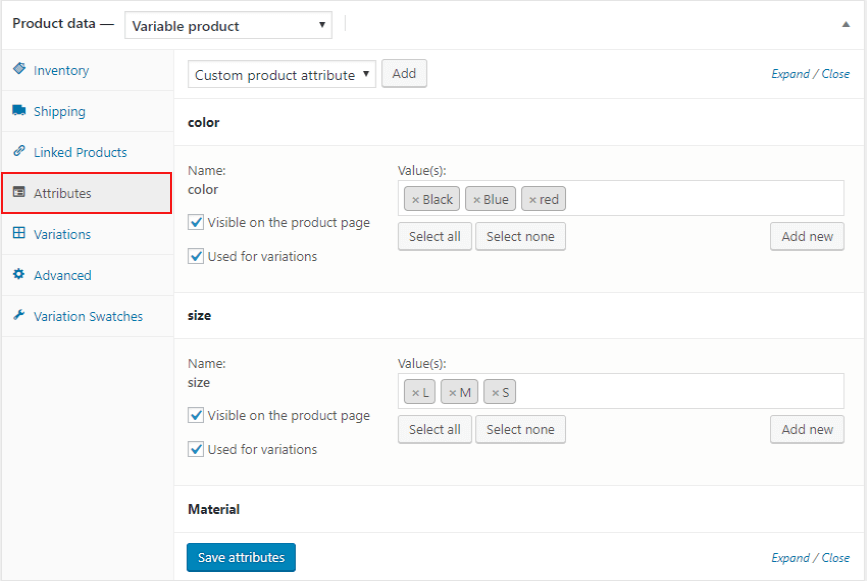
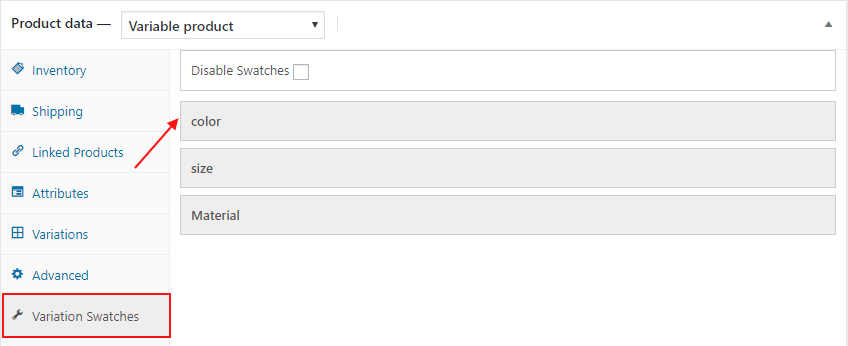
And then click on the “Variation Swatches” tab after “Advanced” tab, from here admin can –
- Disable the swatches for this variable product.
- Change the label name for each attribute.
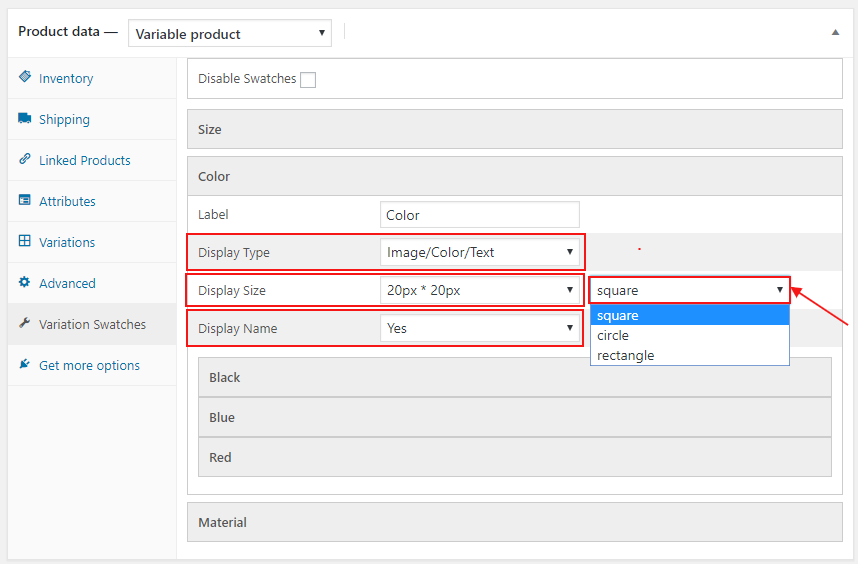
- Select the display types to show attribute terms.
- Text/color/Image
- Default Global Select
- Select the display size of attribute swatches.
- Pre Defined Size
- Default Global Size
- Custom Size
- Hide the term display name.
- Using attribute term (global) for each term.
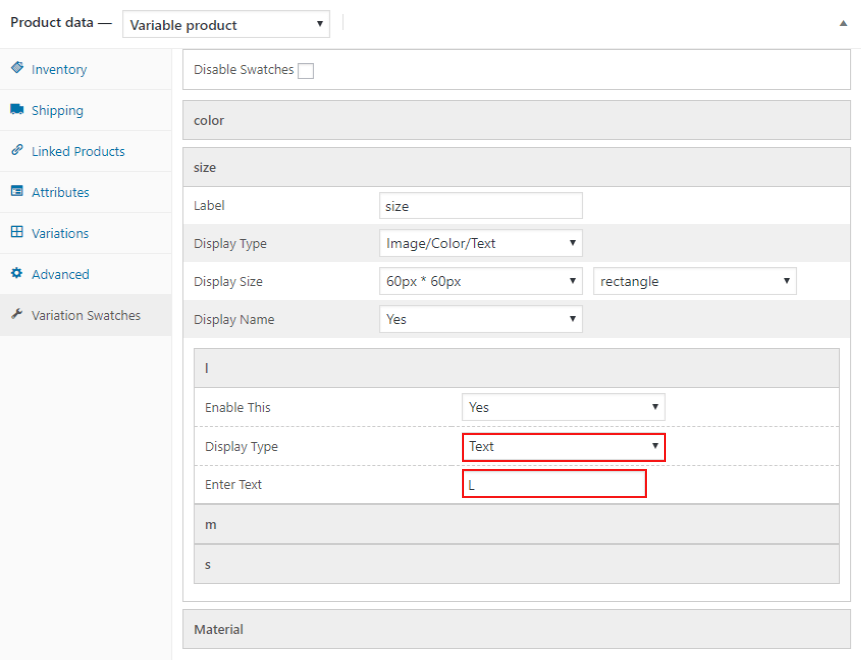
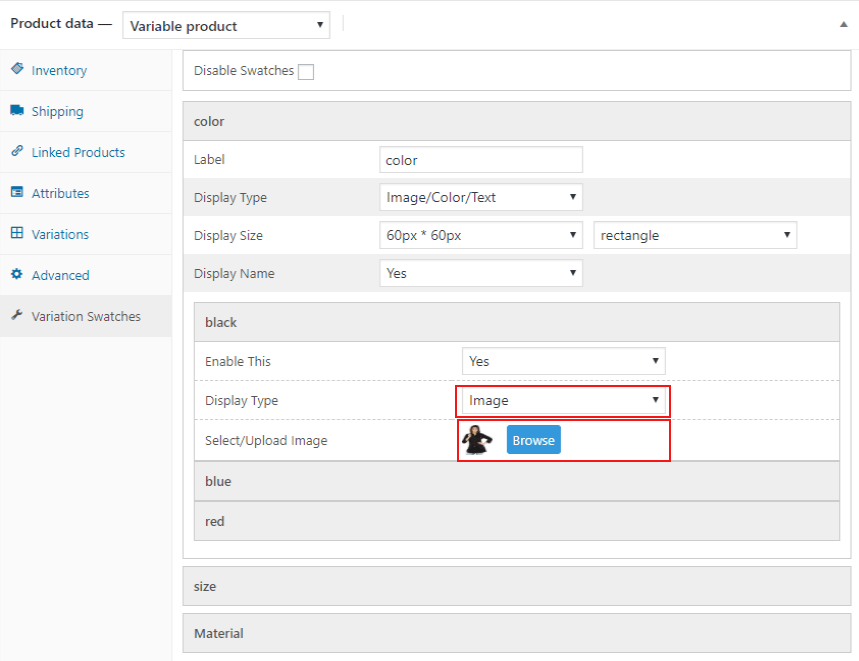
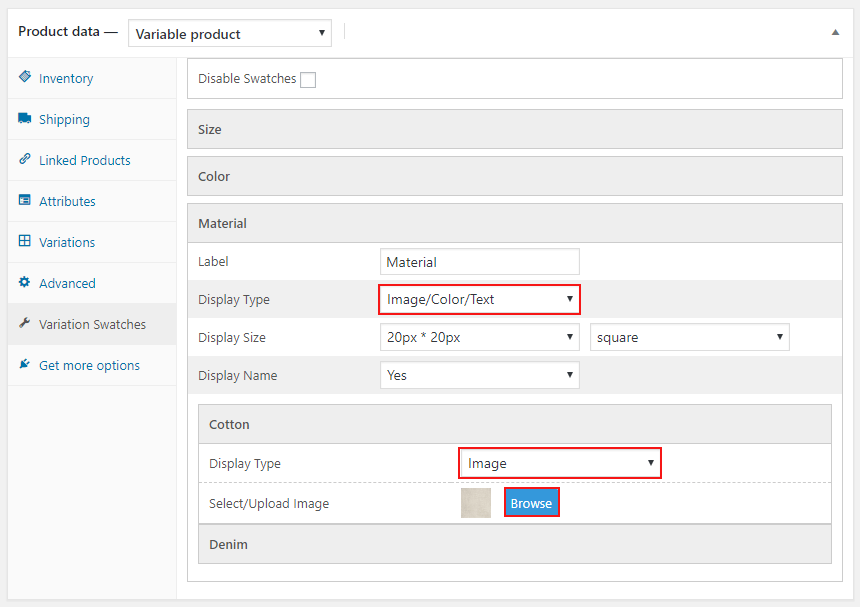
Now click on the Display Type Image/Color/Text, select Display Name ‘Yes’ from the dropdown list and select the Display Size of attributes.
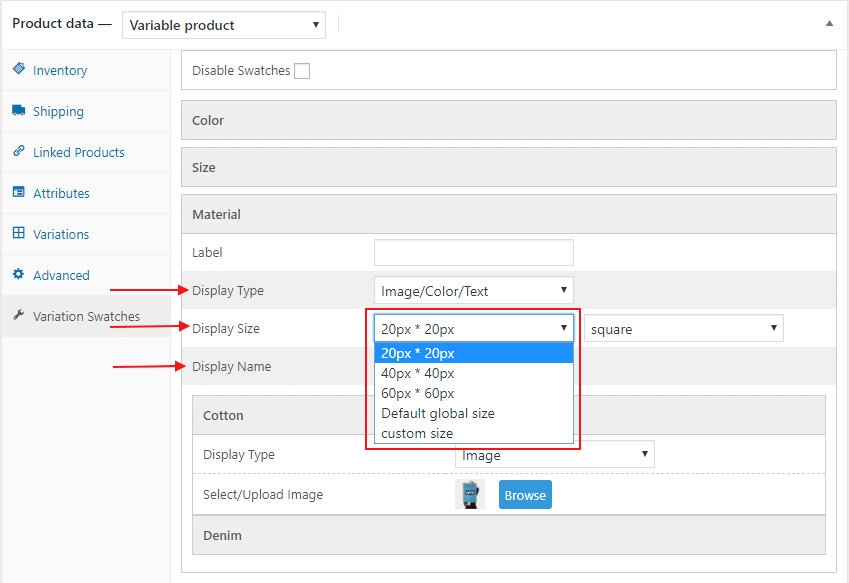
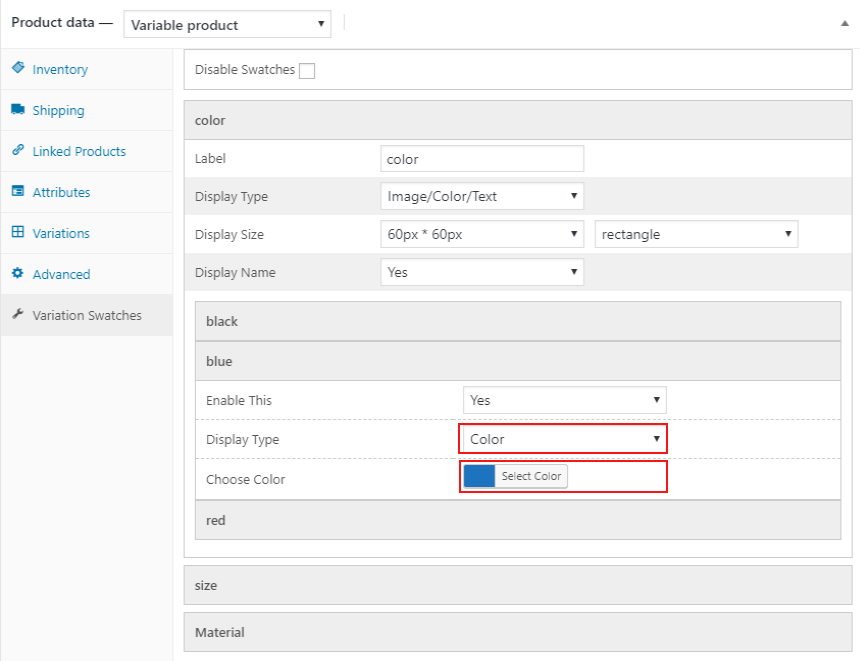
Now click on attribute terms, Here set the Display Type and related display settings of WooCommerce Product attributes.
⇒If select Attribute Display Type ‘Text‘ then enters text to show variation in attributes.
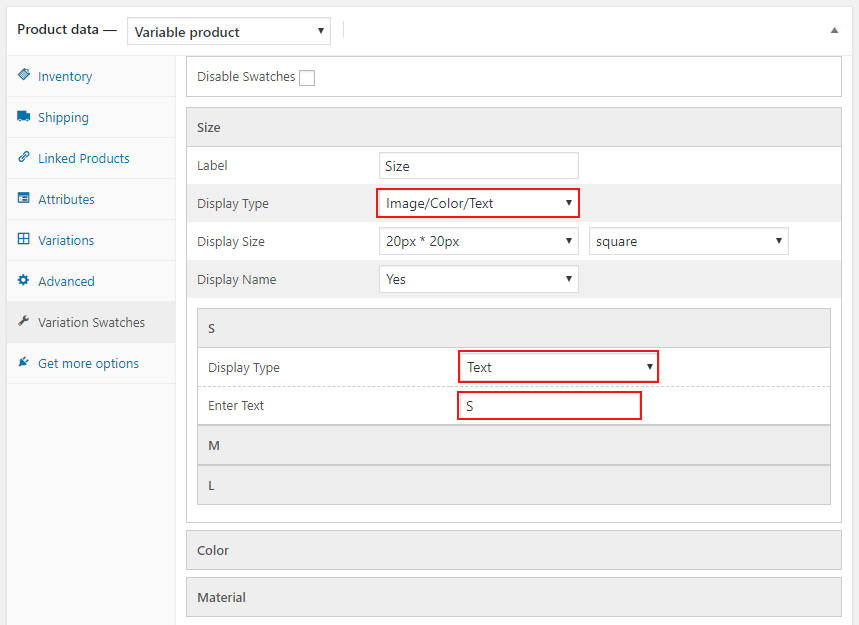
⇒If select Attribute Display Type ‘Color‘ then chooses a color to show variation in attributes.
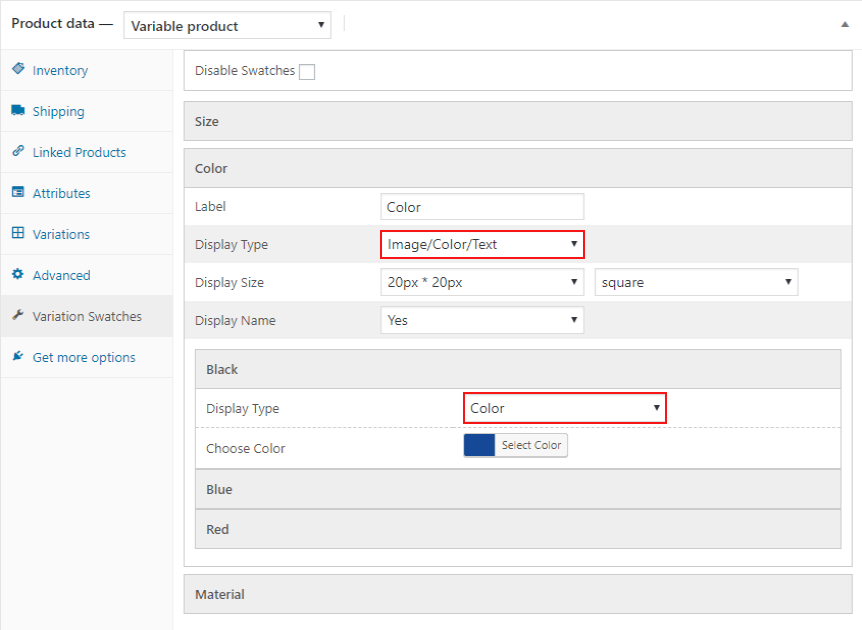
⇒If select Attribute Display Type ‘Image’ then Select/Upload to show variation in attributes.
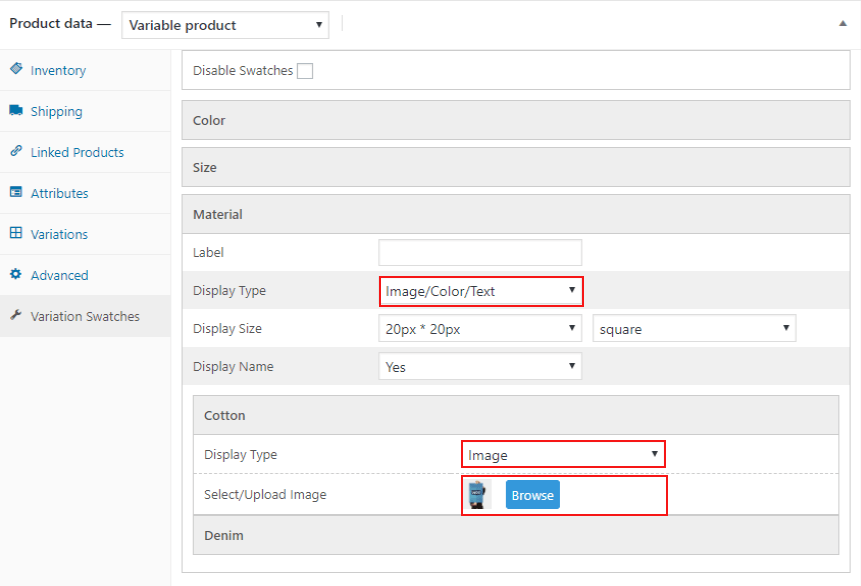
Enable the WooCommerce variation Swatches and last click on the ‘Save Changes‘ button.

Now you can see the per product variation swatches of the product.

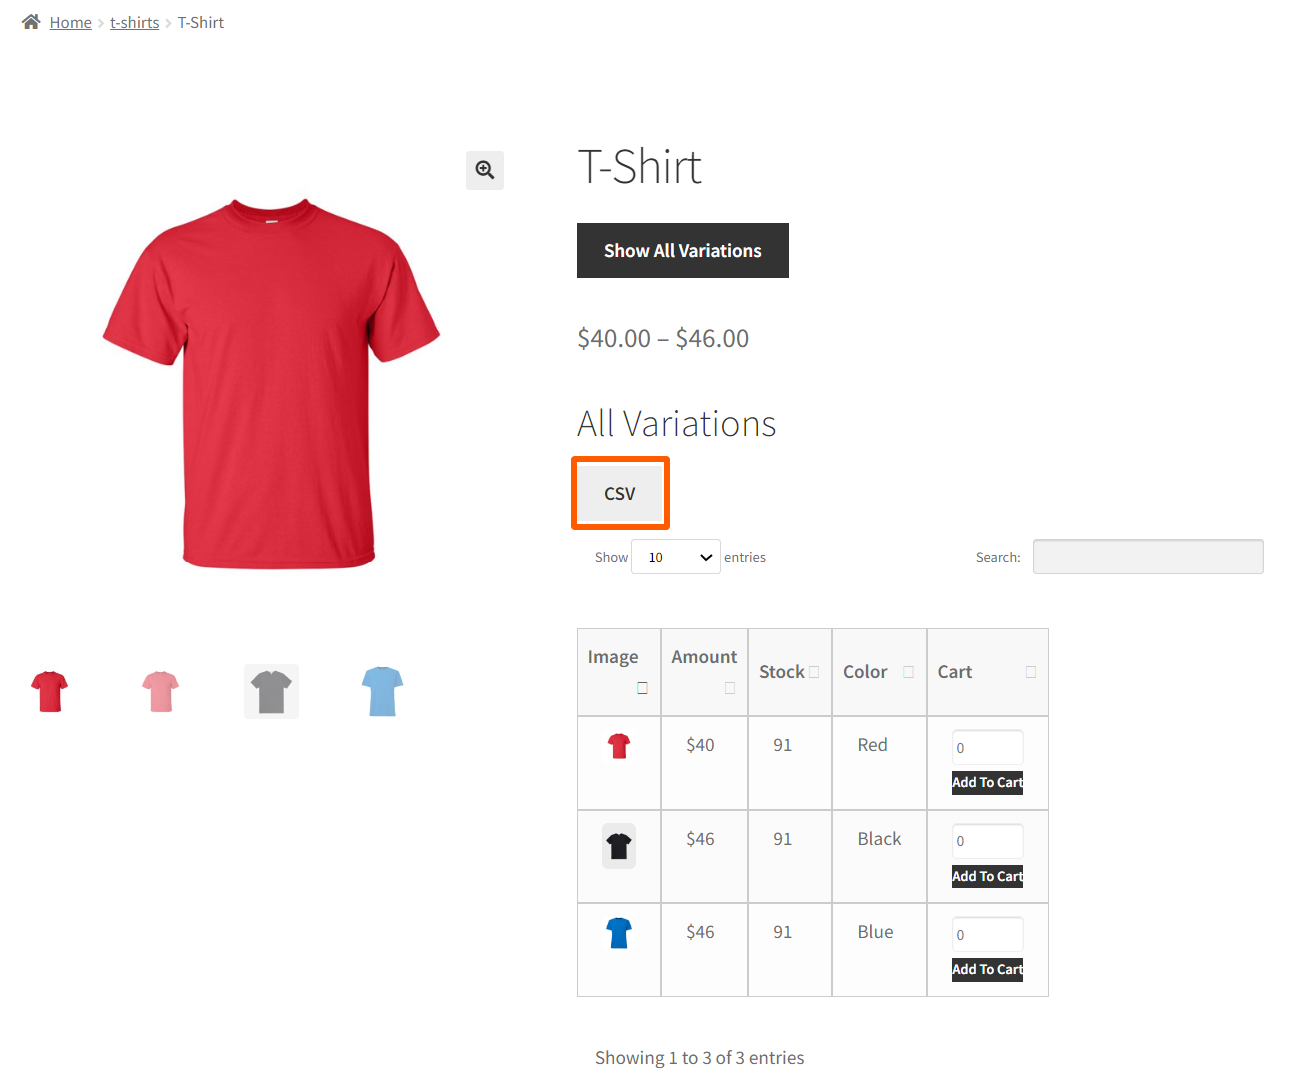
3.3.Import Attribute CSV file
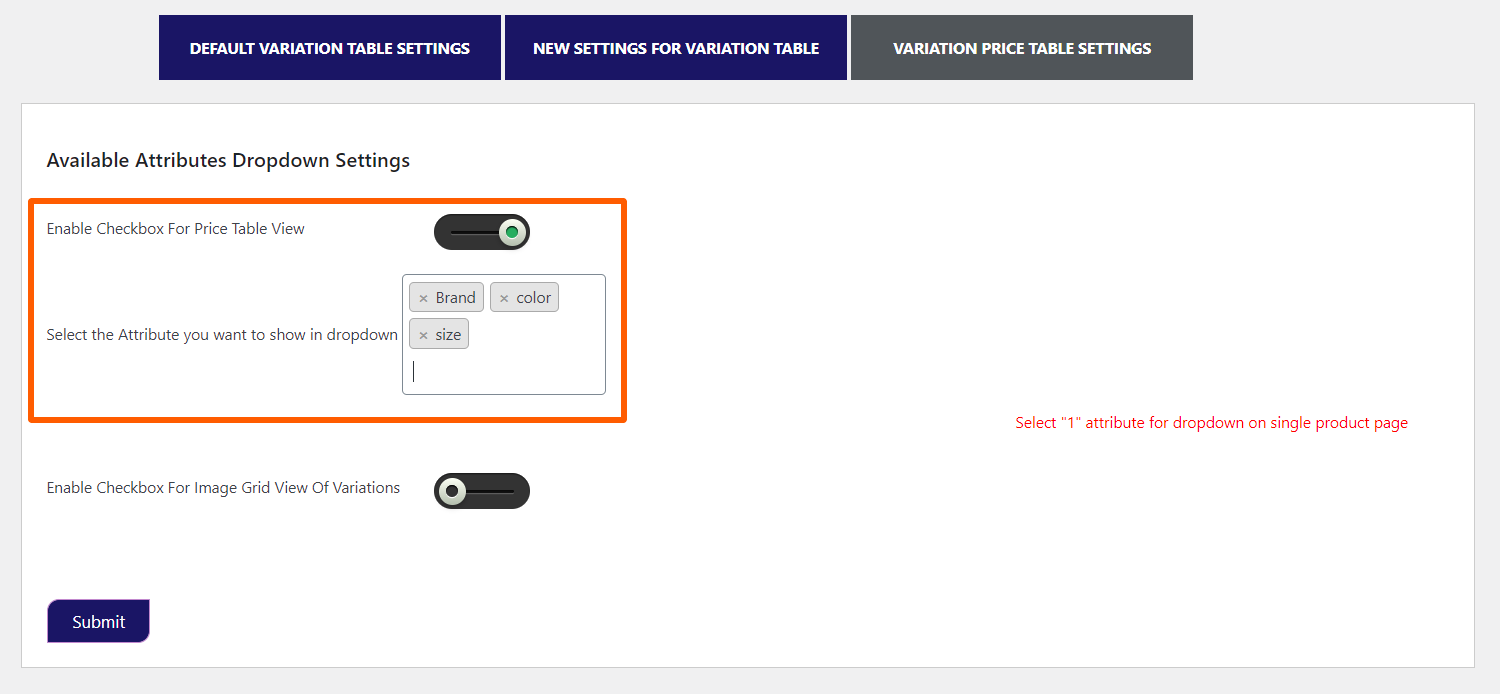
From here admin can download the .csv file for all existed attributes, terms and after editing the .csv file by providing the display type (0 if you don’t want to use the term, for now, 1 for images, 2 for color swatches and 3 for text), image URL and color code all you need to browse the edited file and press the import button.
Demo CSV file:
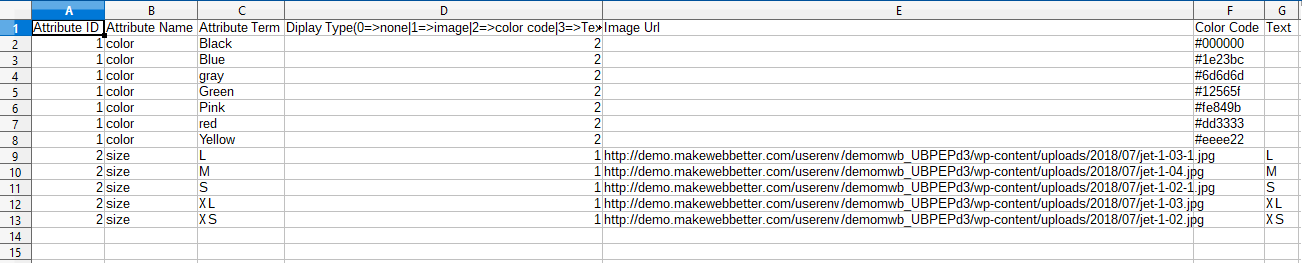
After importing.CSV file, you can check the changes applied to the attribute edit page of each term under the products tab of WooCommerce.
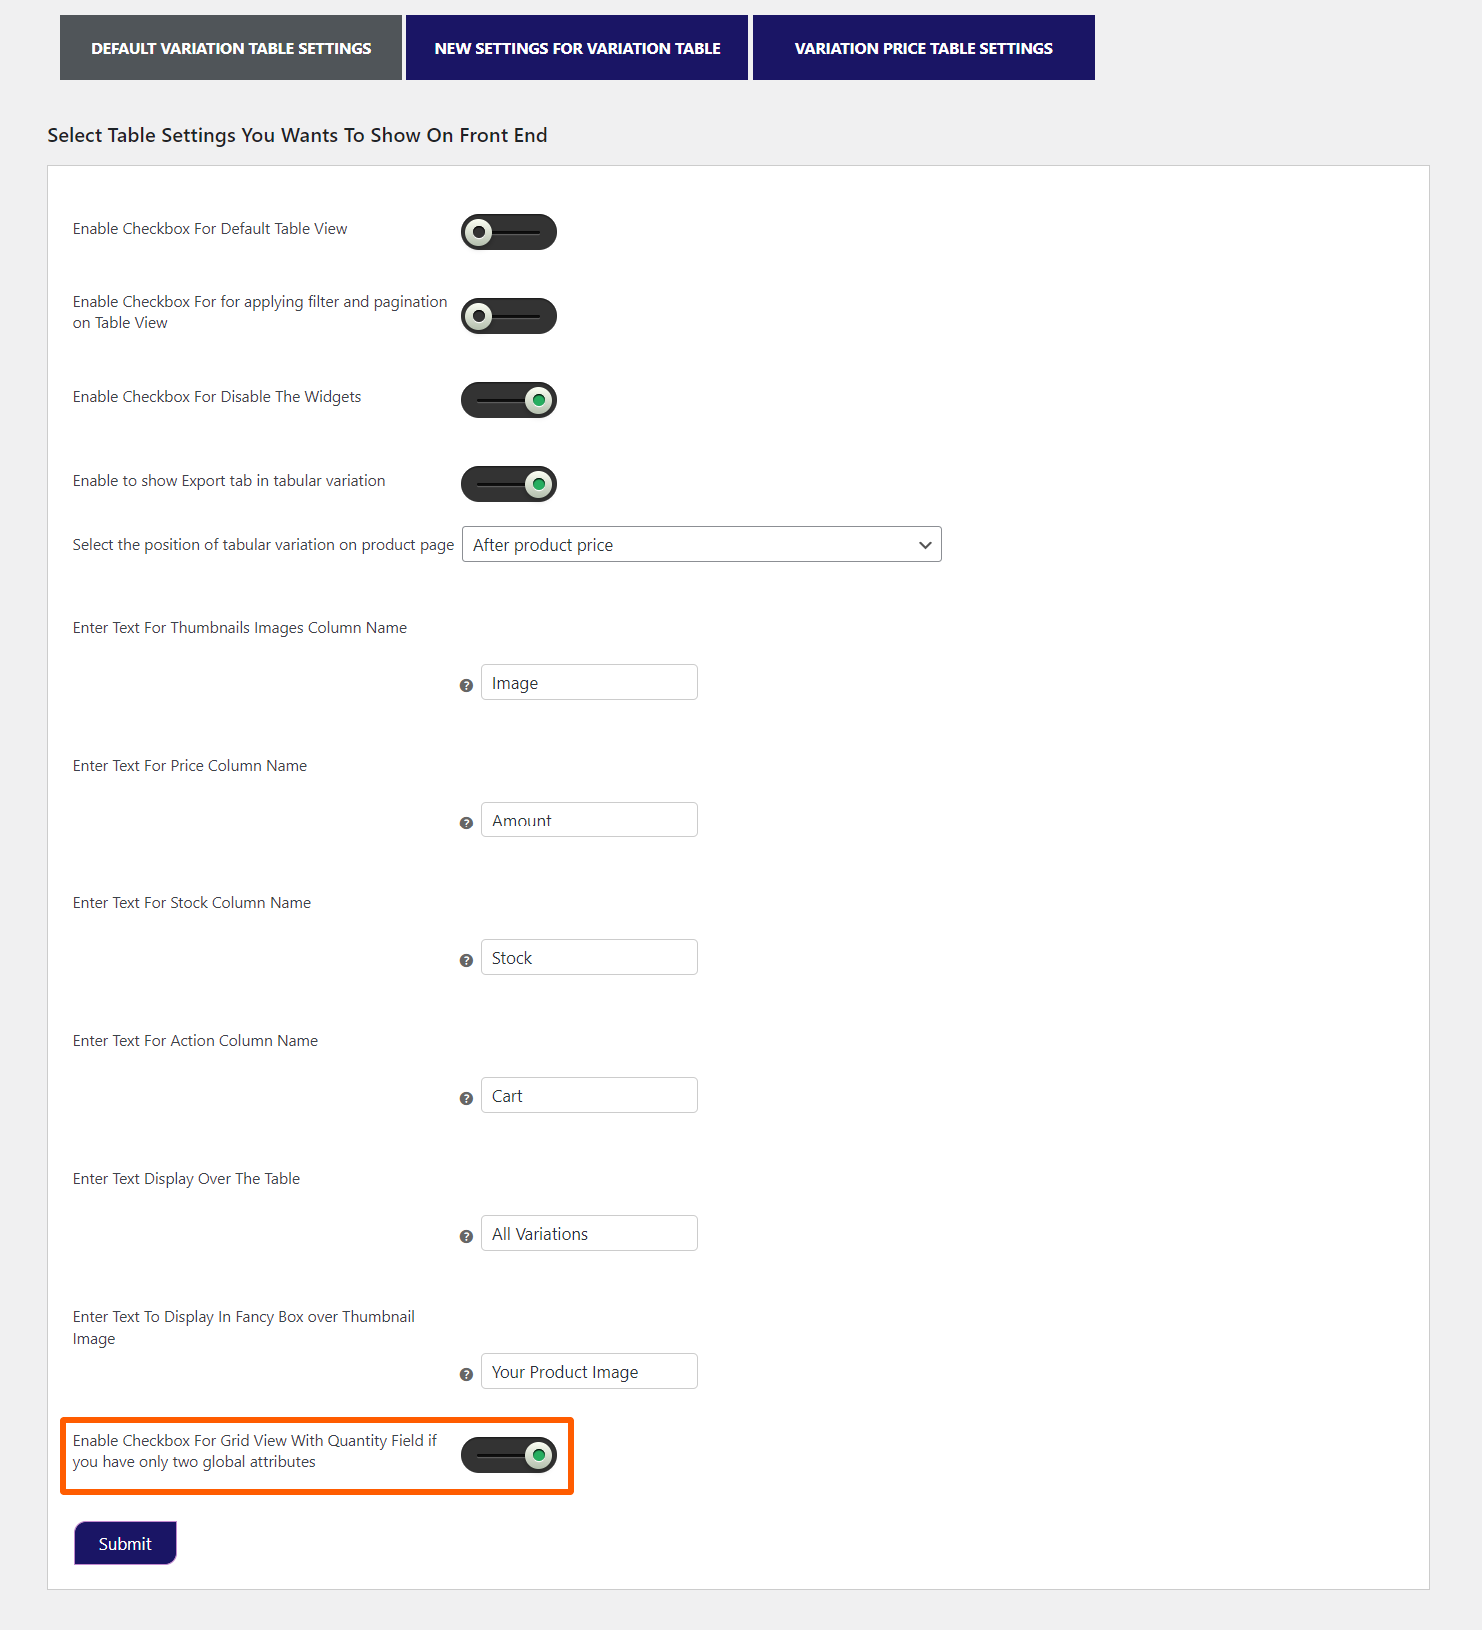
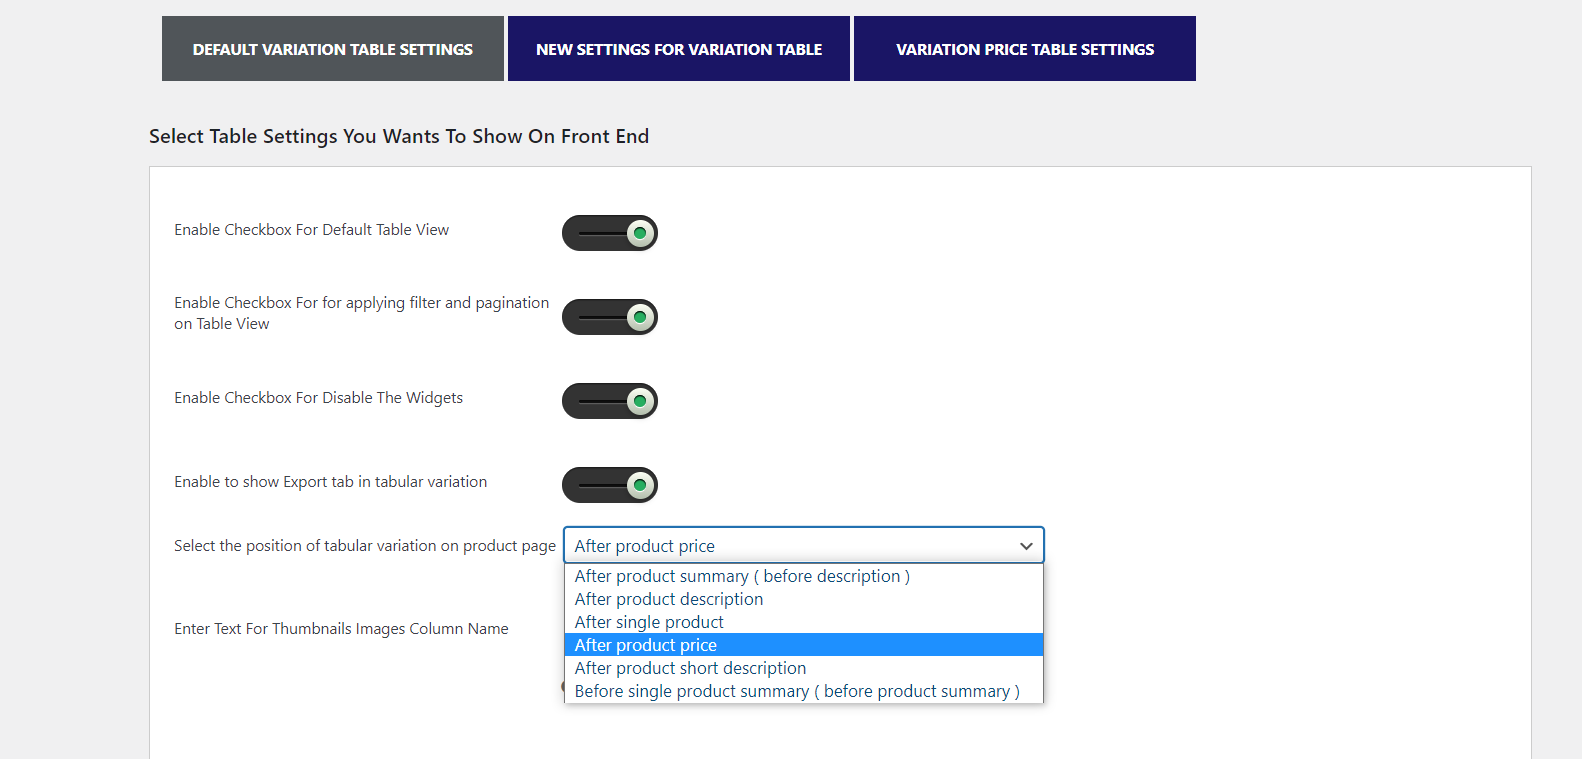
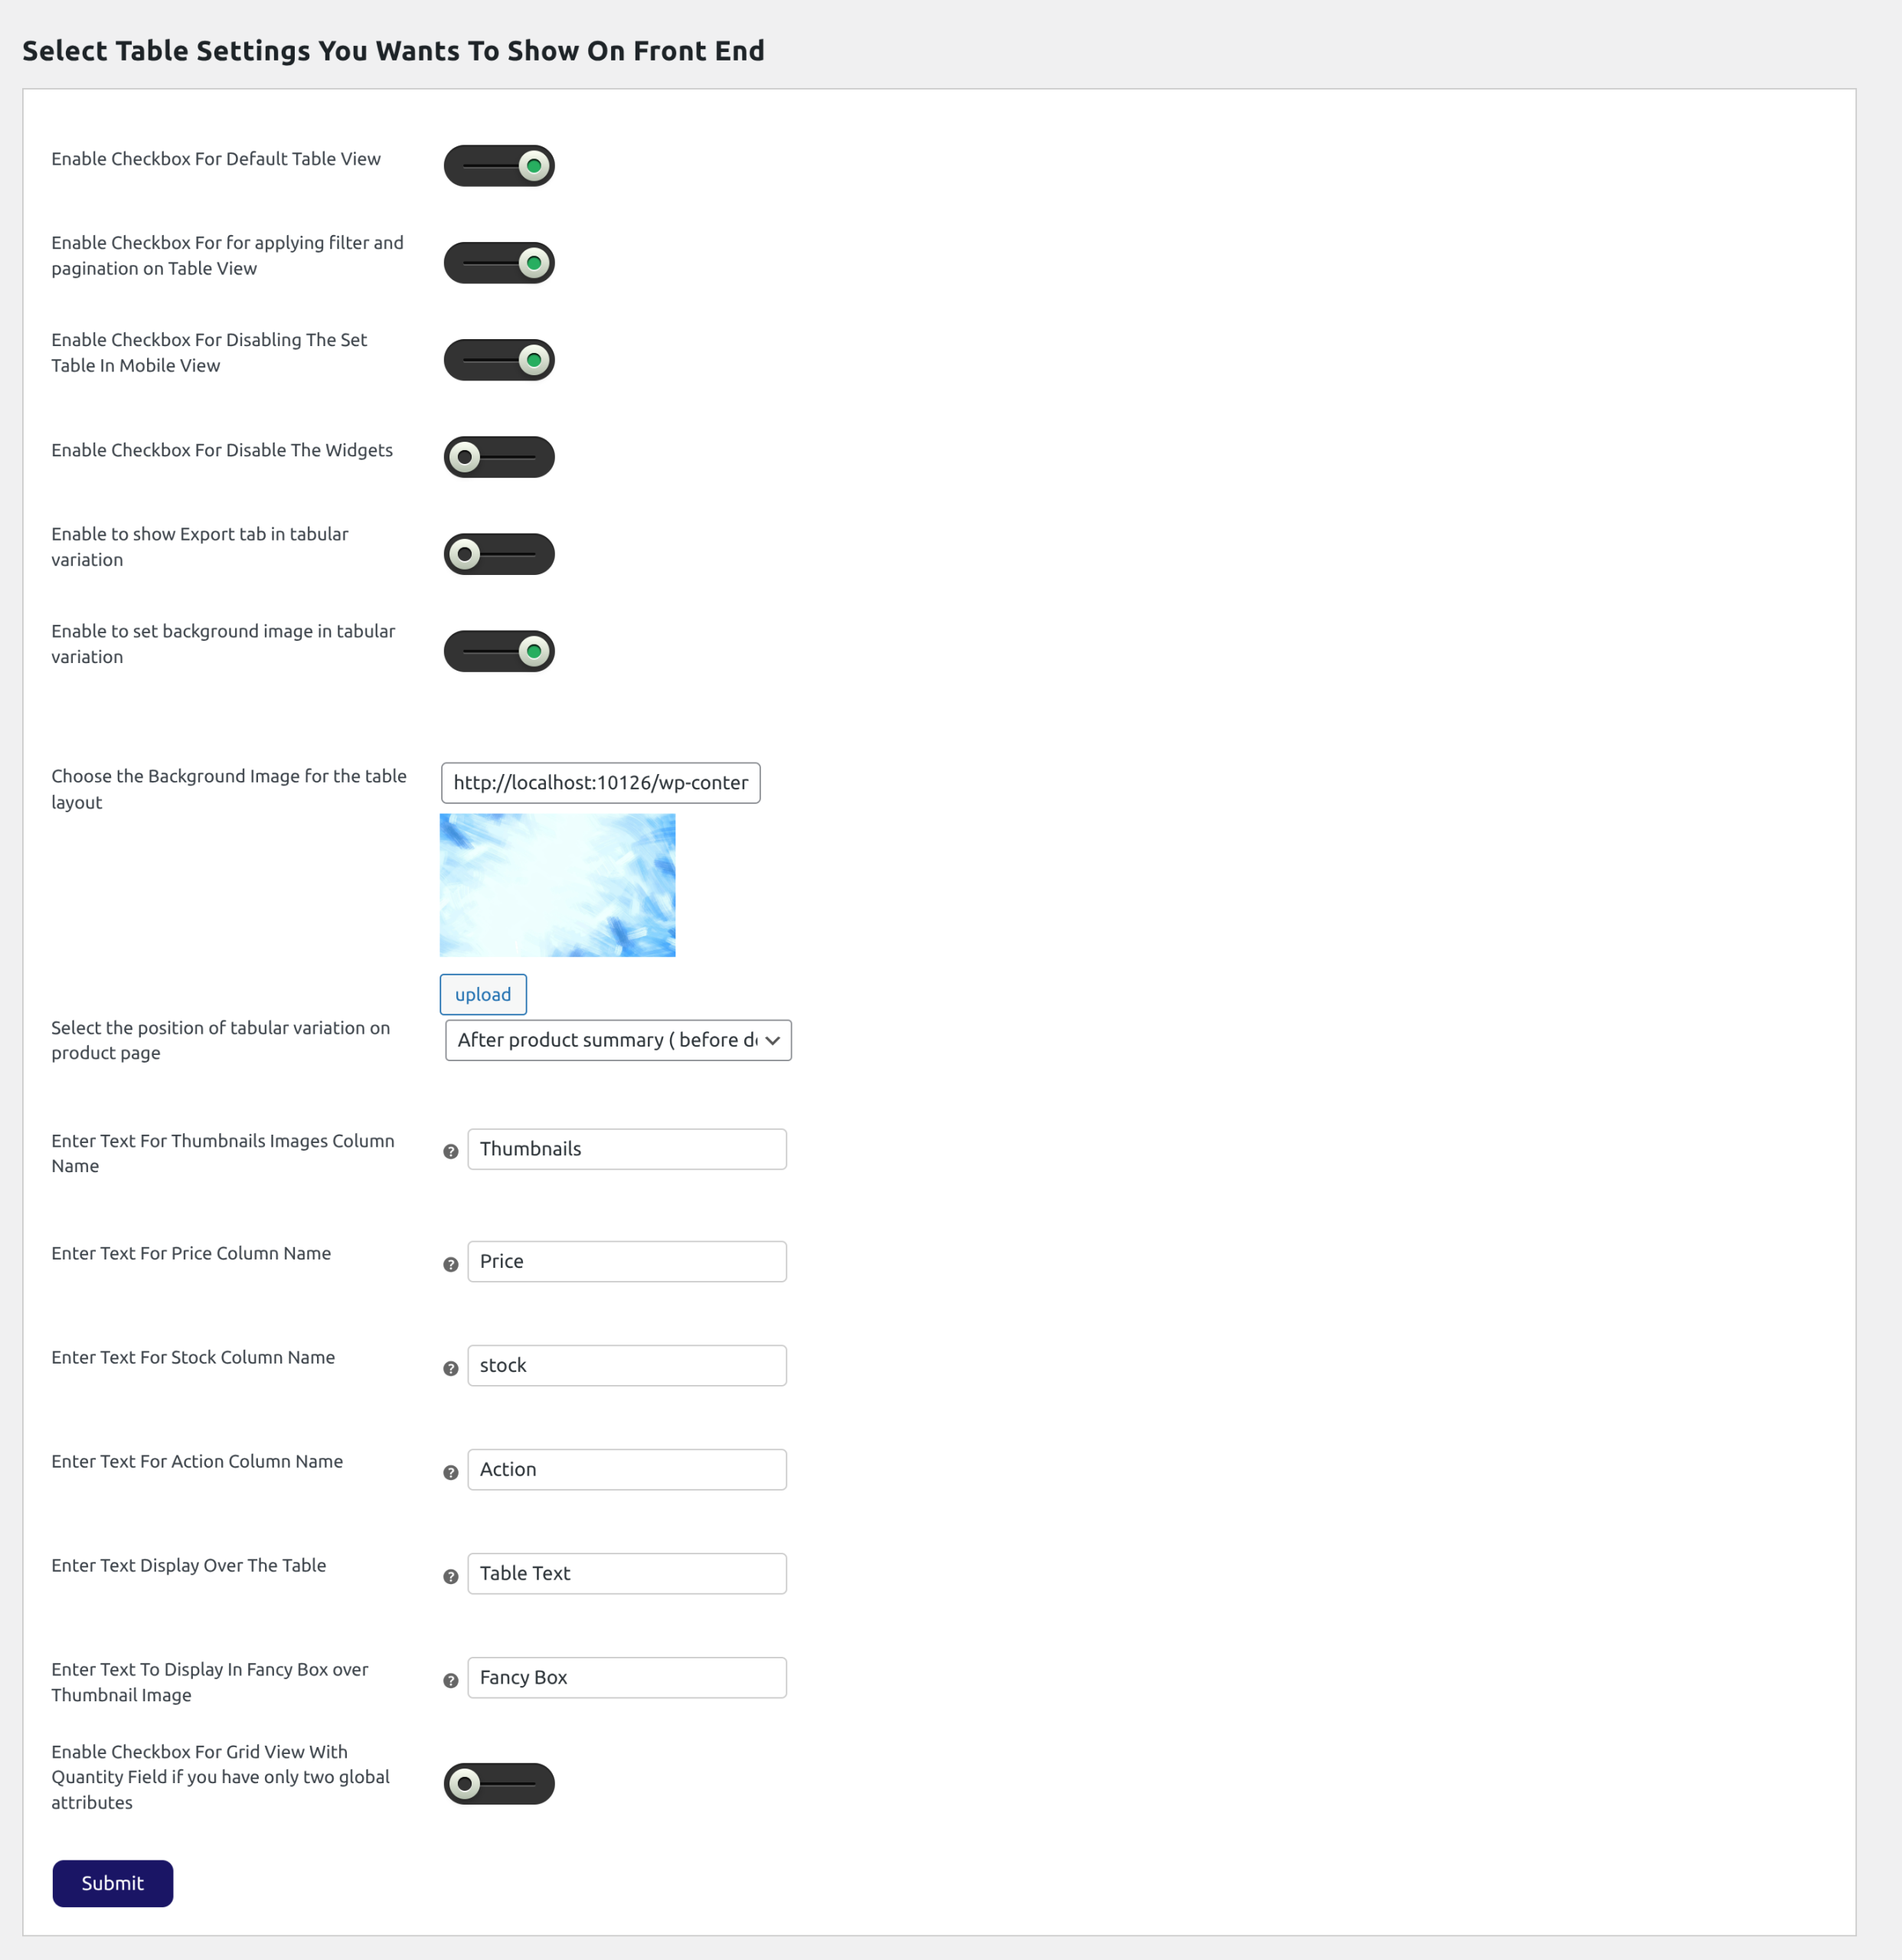
4.General Setting
Here we are introducing you, Global Settings of the plugin. If you don’t set the per product setting then this setting will work on all products.
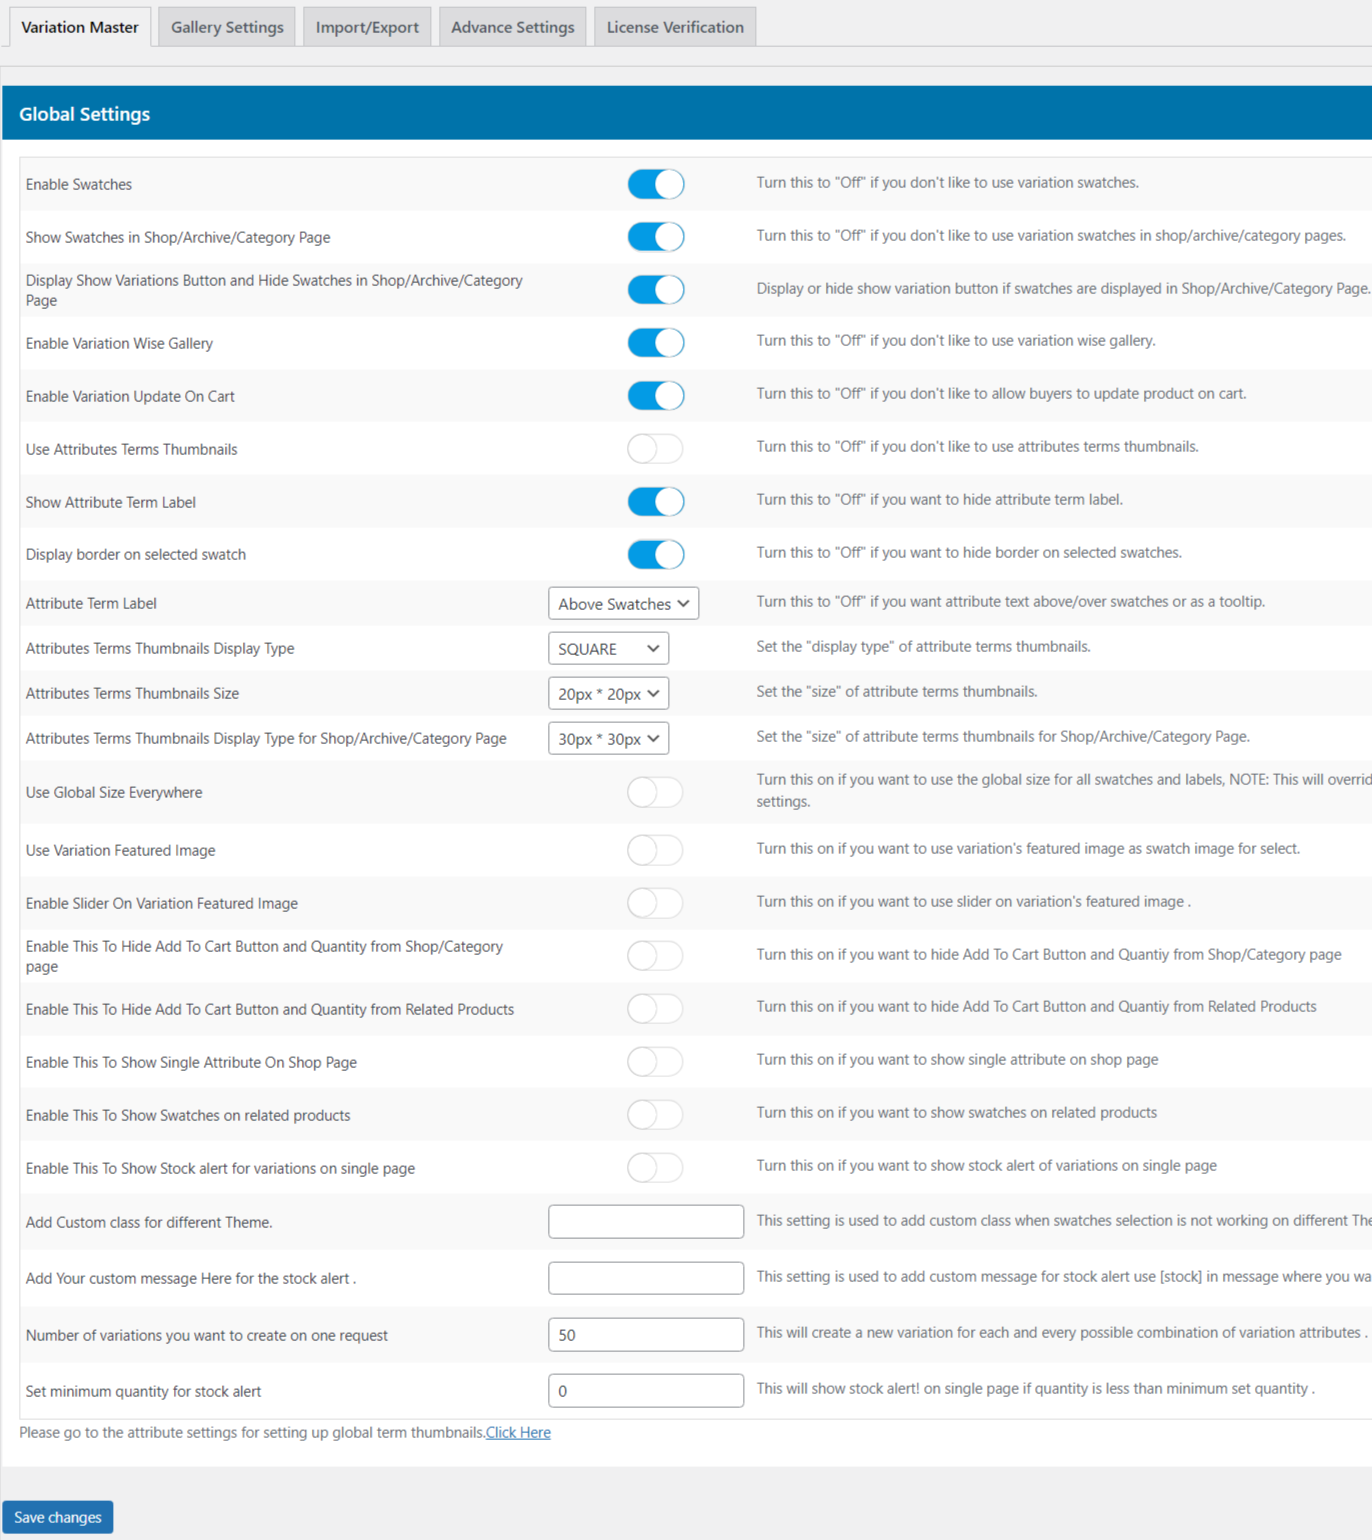
4.1.Enable Variation Swatches for WooCommerce
Enable this toggle to use the amazing features of our plugin.
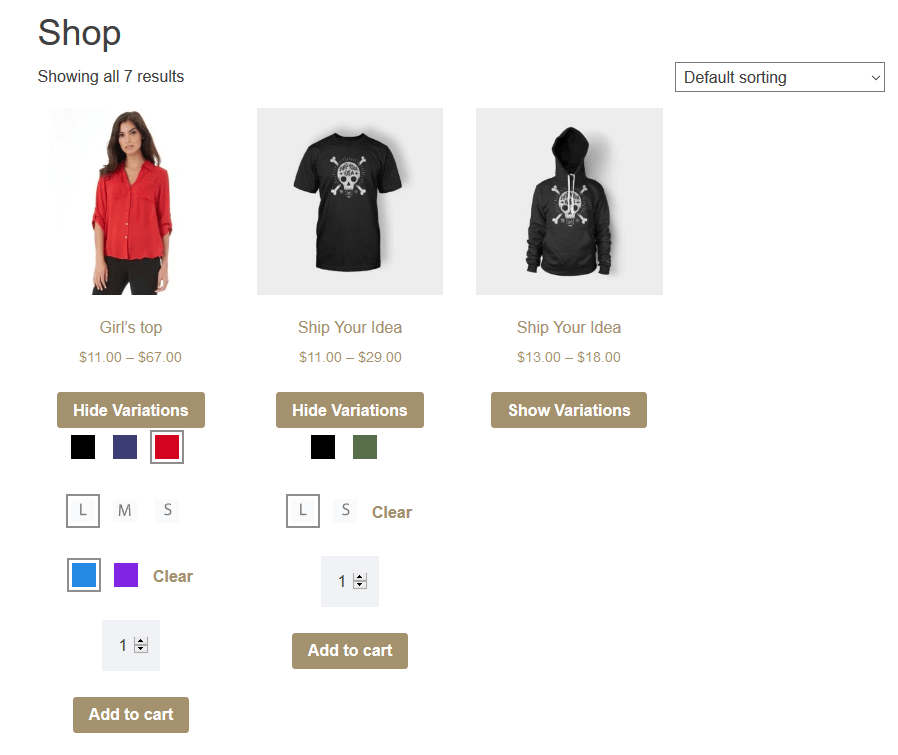
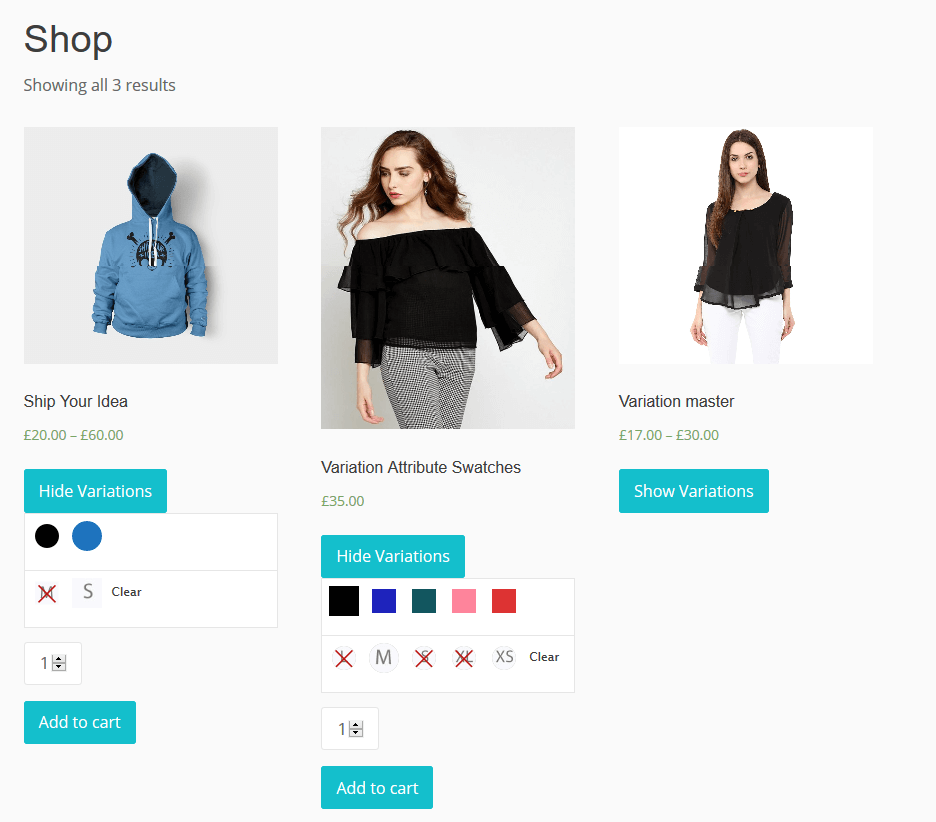
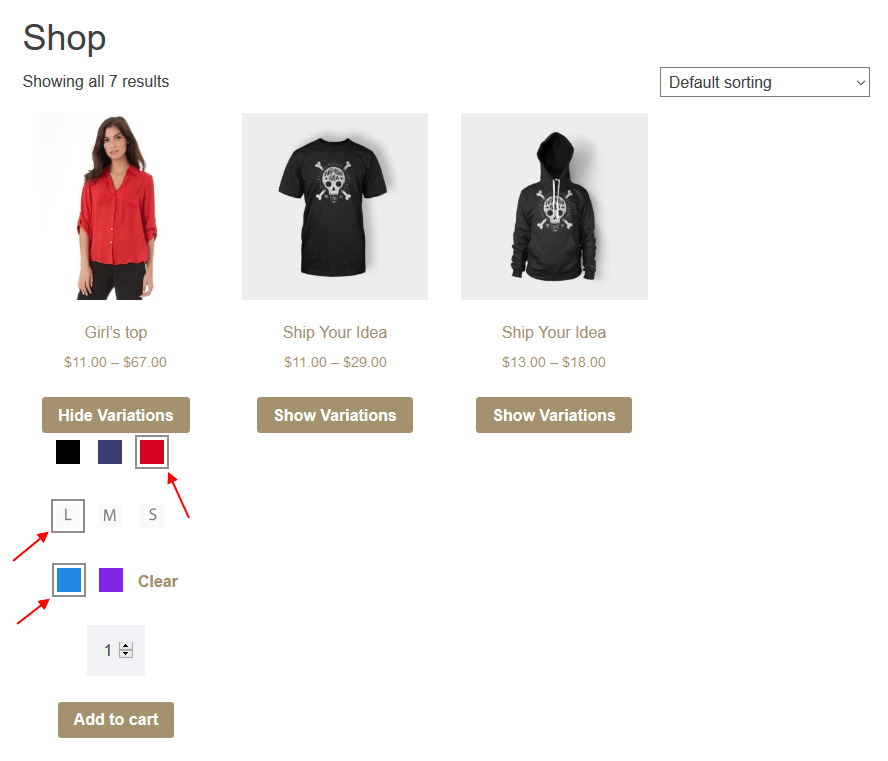
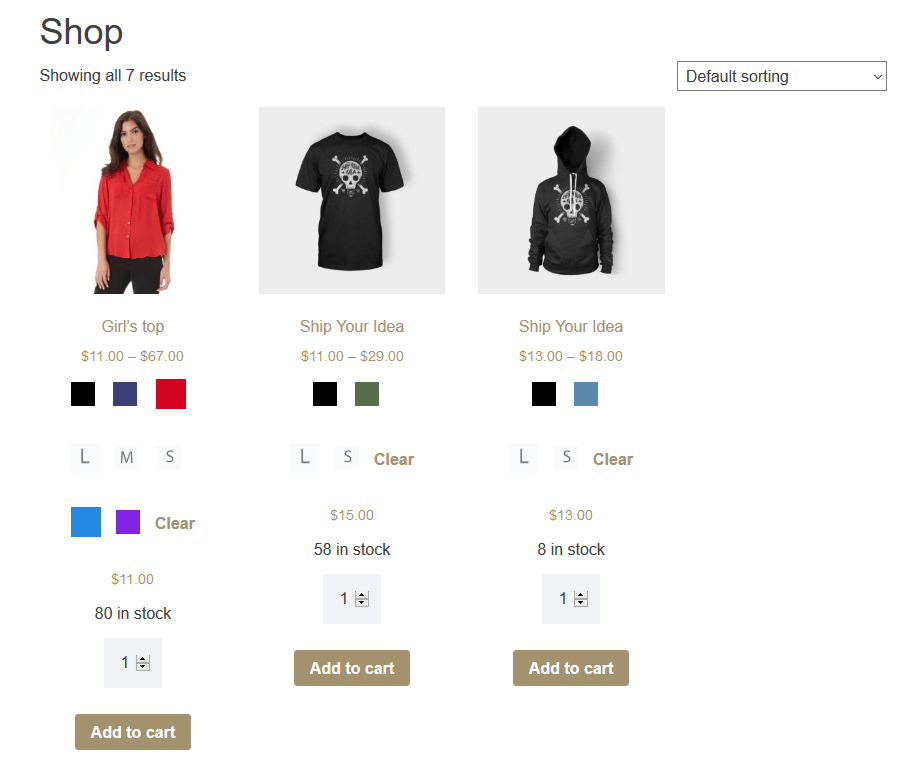
4.2.Show Color Variation Swatches over Shop/Archive/Category Page
Enable this feature to show WooCommerce Variation Swatches on Shop/Archive/Category pages.
Now, here you can see the variation color swatches on the shop page.
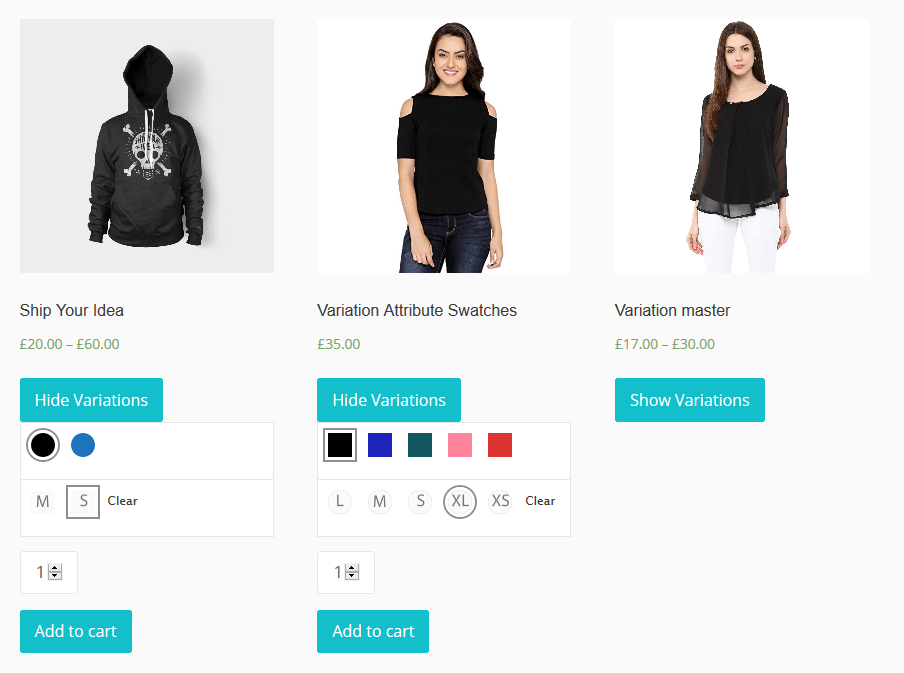
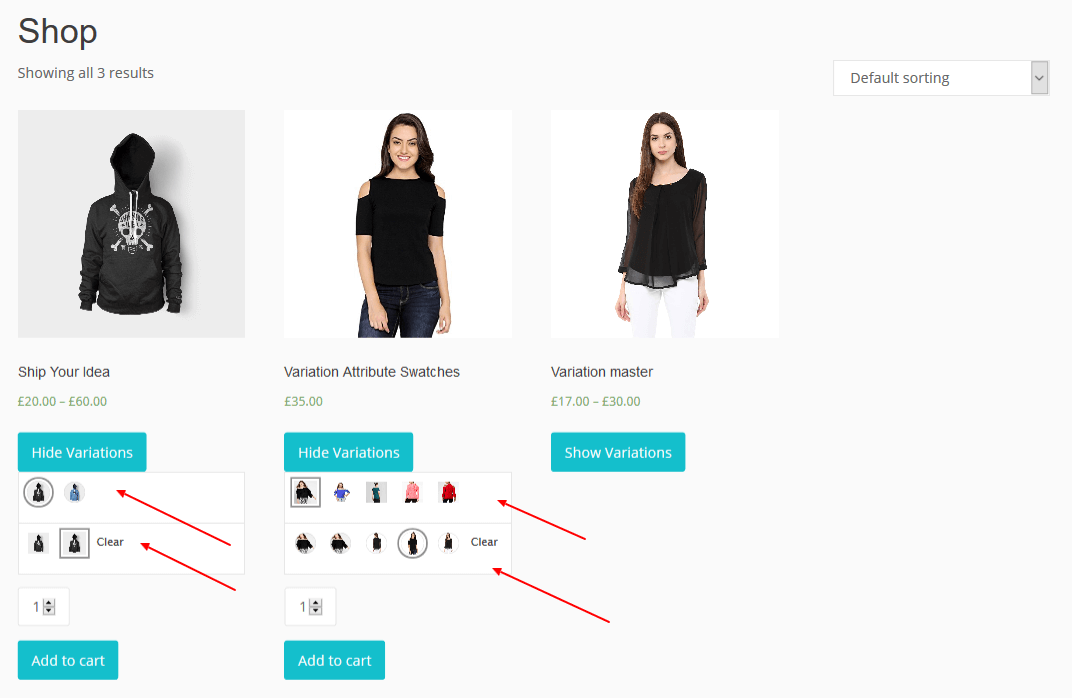
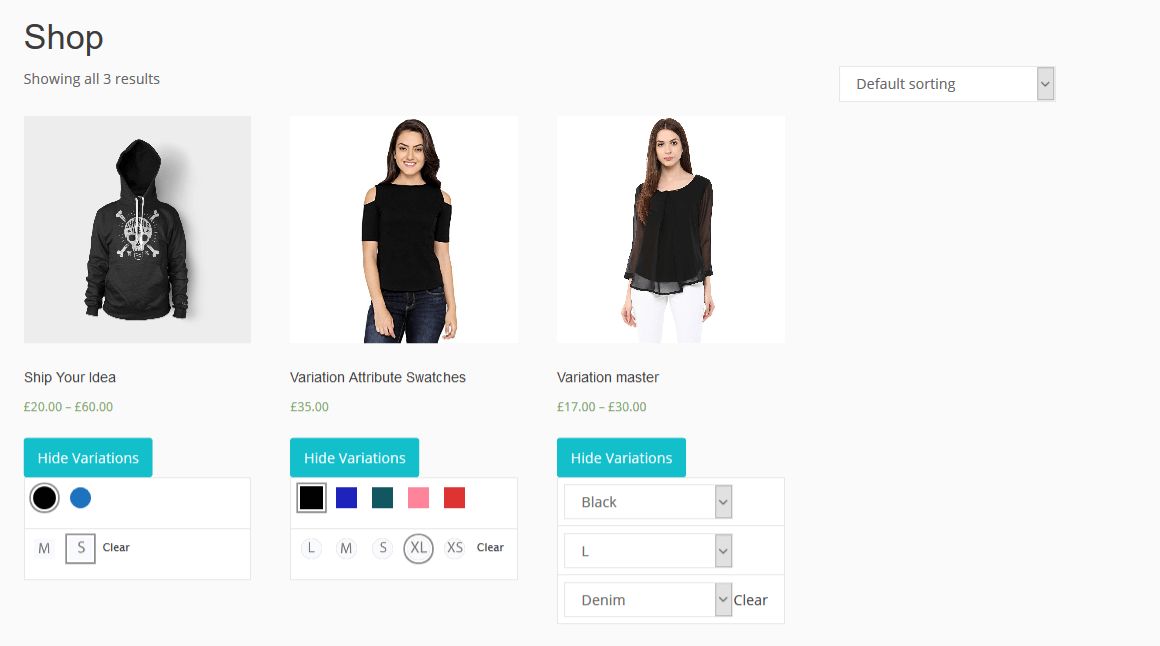
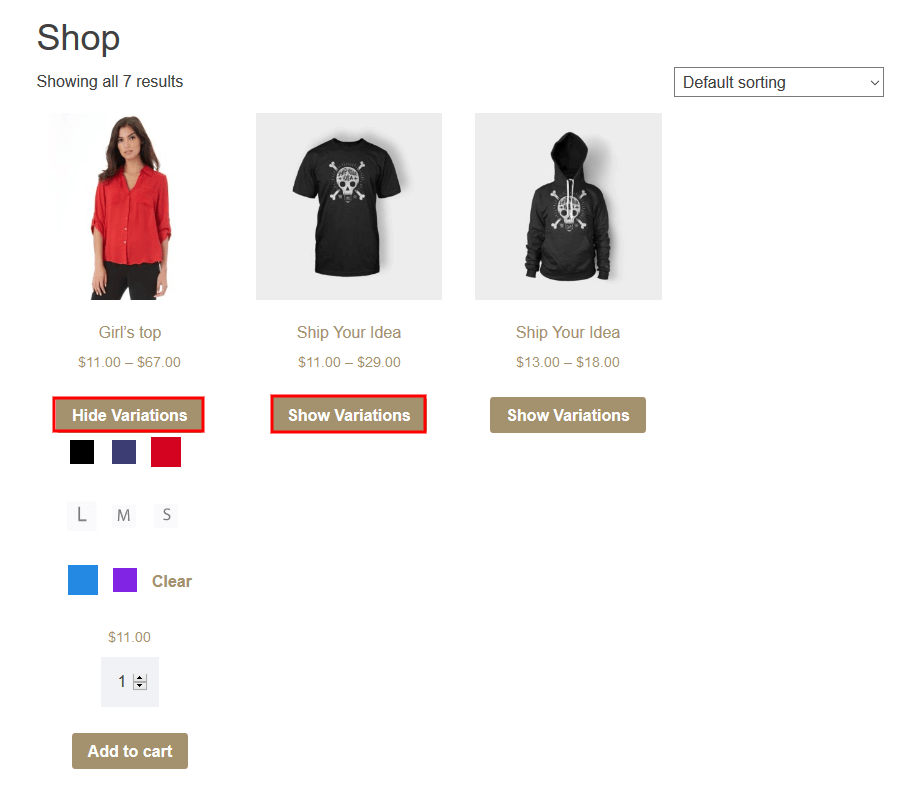
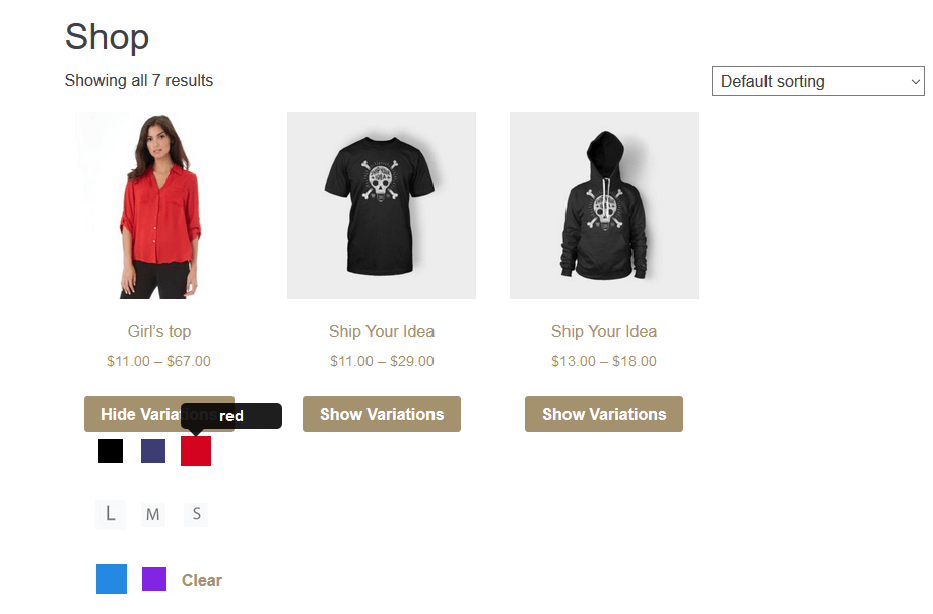
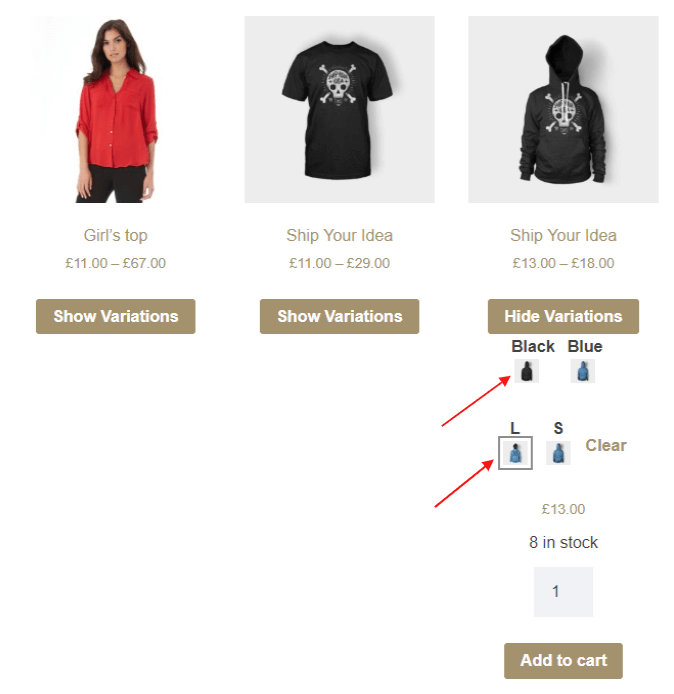
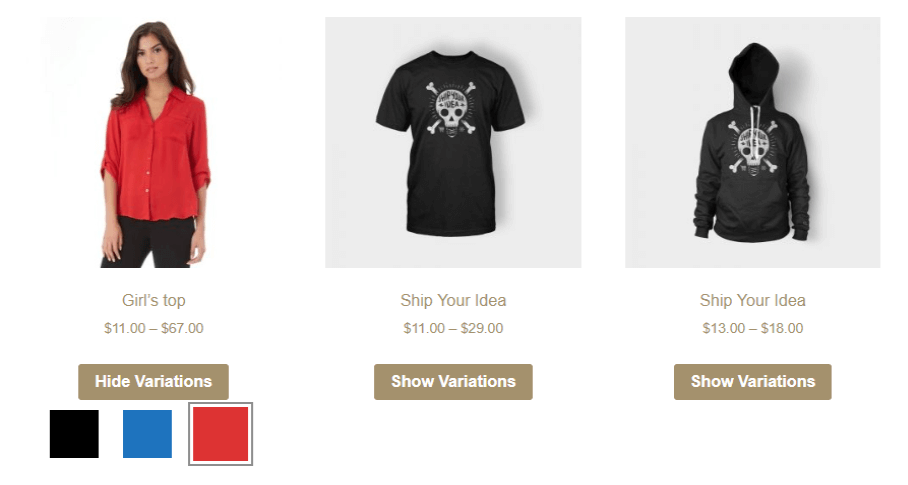
4.3.Display Show Variations Button and Hide Swatches
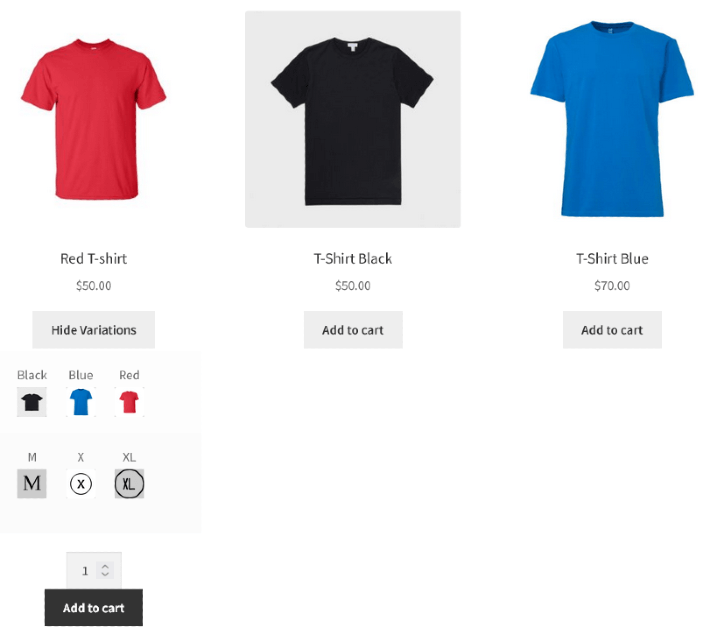
Enable this toggle to Display Show WooCommerce Variations Button And Hide Swatches on the Shop/Archive/Category page.
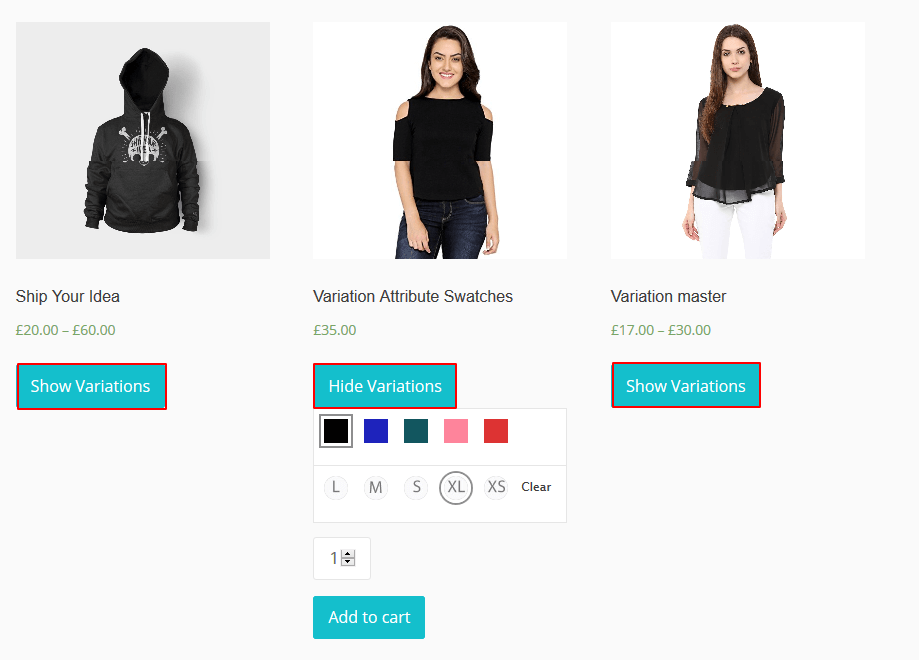
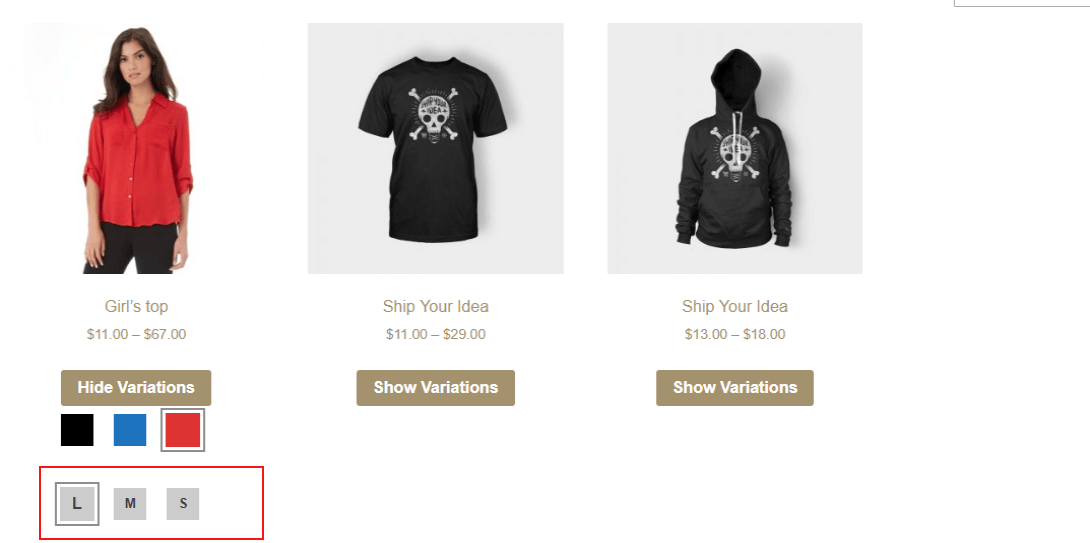
After enabling this feature, you can see the Hide Variations and Show Variations Button on the shop page.
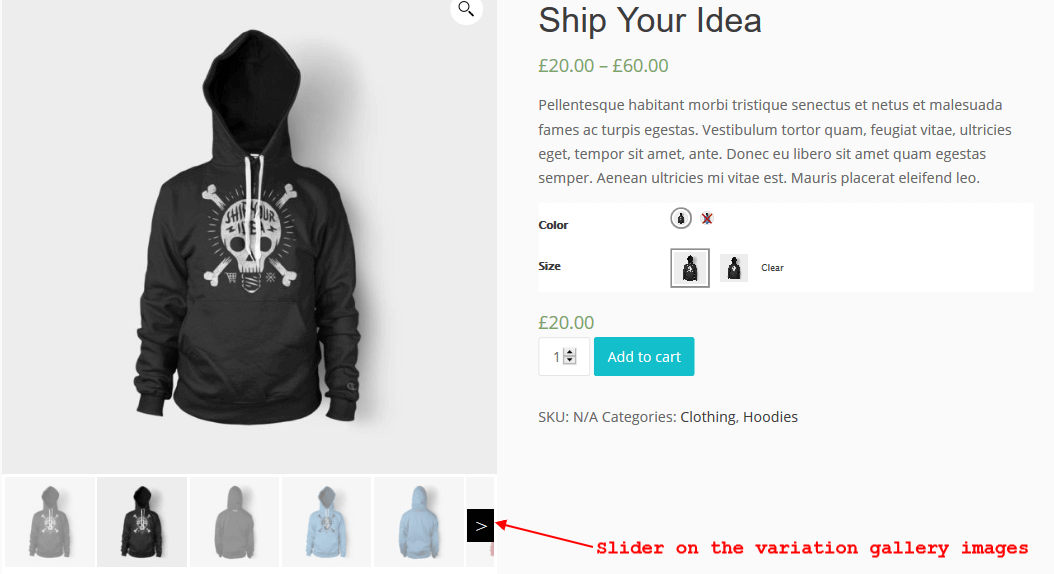
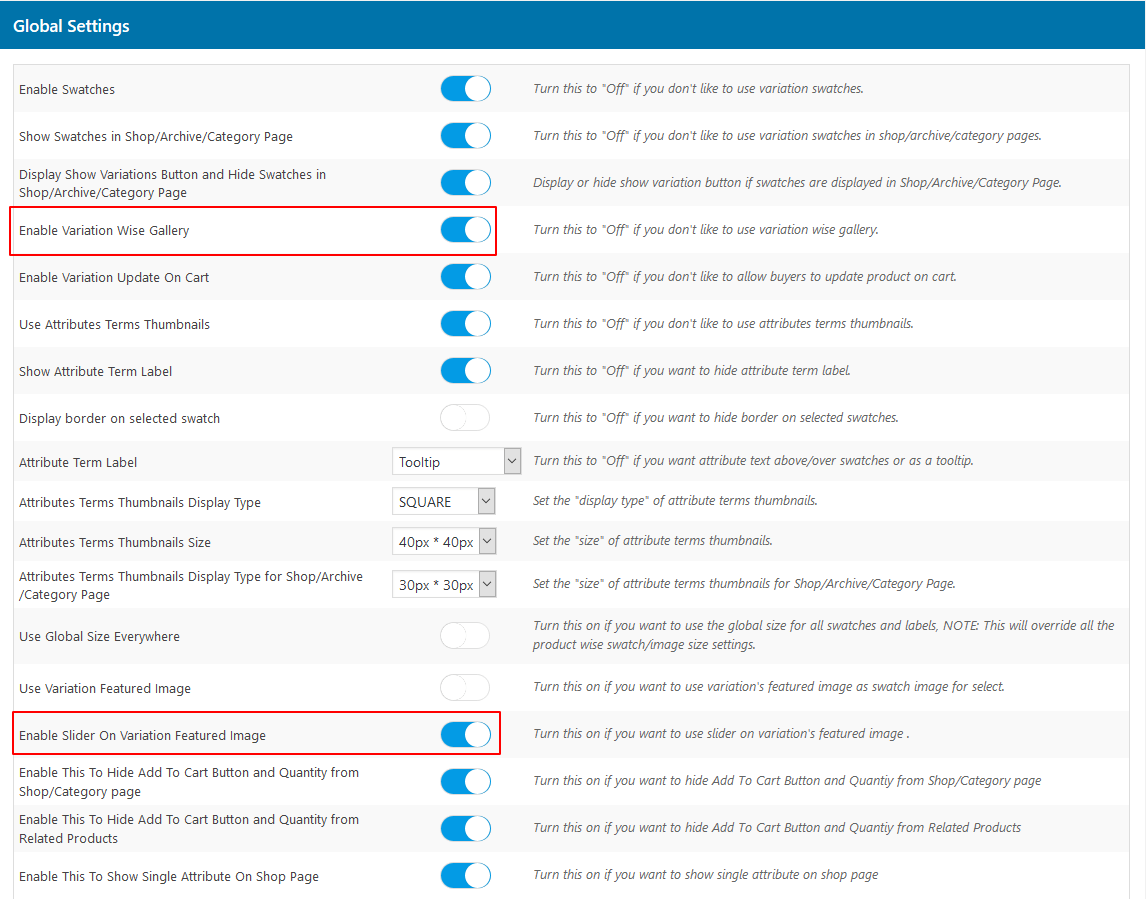
4.4.Enable Variation Wise Gallery and Add Slider On Variation Featured Image
Enable this toggle to add the variation-wise gallery on the product detail page. It will help your customers to easily select a variation.
Click on the Enable Slider On Variation Featured Image toggle to use the slider on the variation feature image.

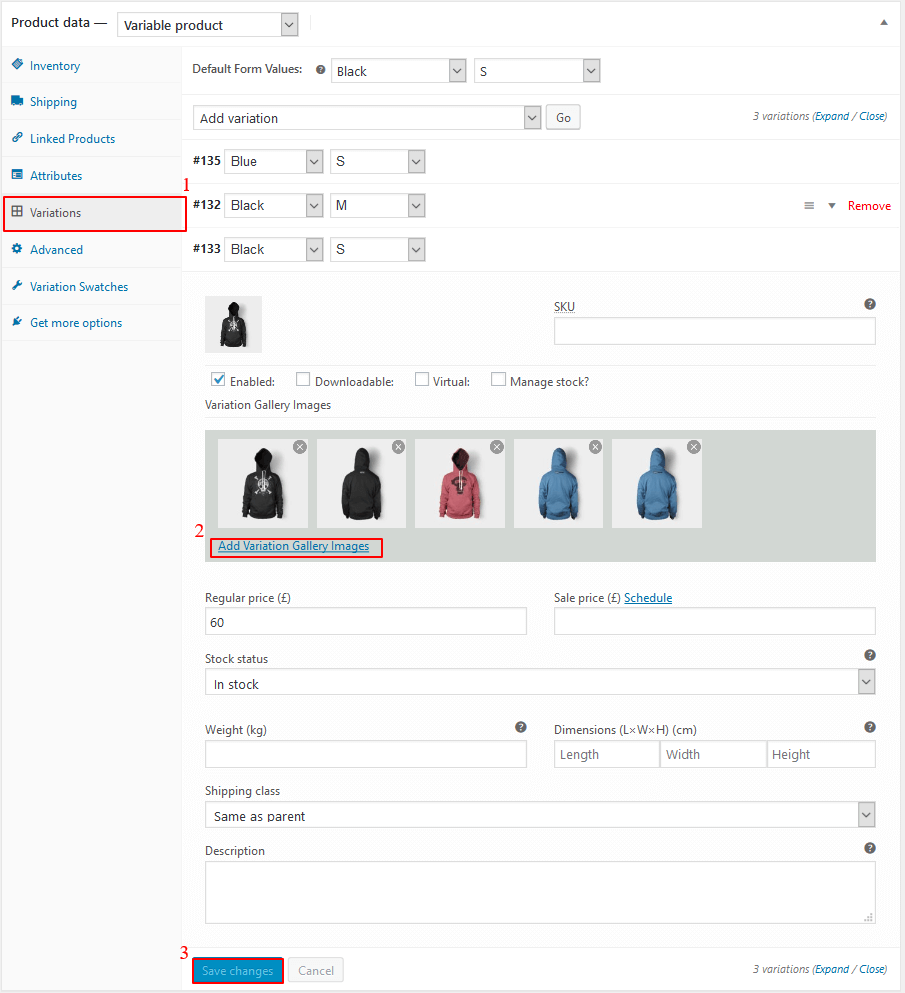
After successfully saving the setting, set the variation gallery images of a particular product.
- Go to the product edit page.
- Click on Variations > Add Variation Gallery Images.
- Here you can add multiple images of your variable product.
At last, click on the Save Changes button.

Next up, you can see the variation gallery on the product detail page.
4.5.Enable Variation Update On Cart
Through this setting, you can allow your customer to change the variation on the cart page.
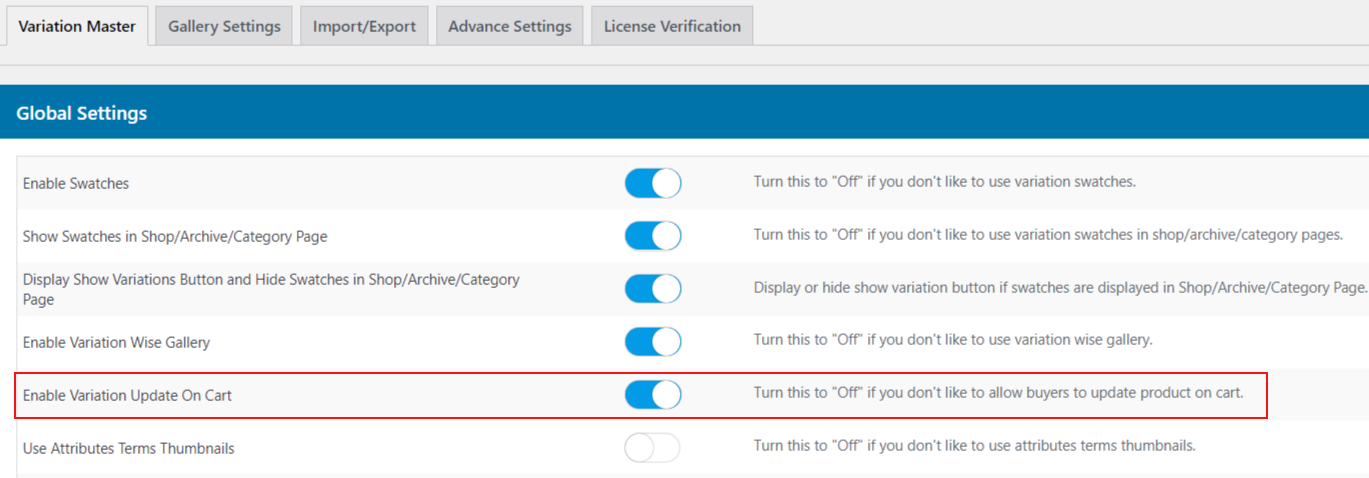
After adding this feature, your customer will see the update button on the cart page.
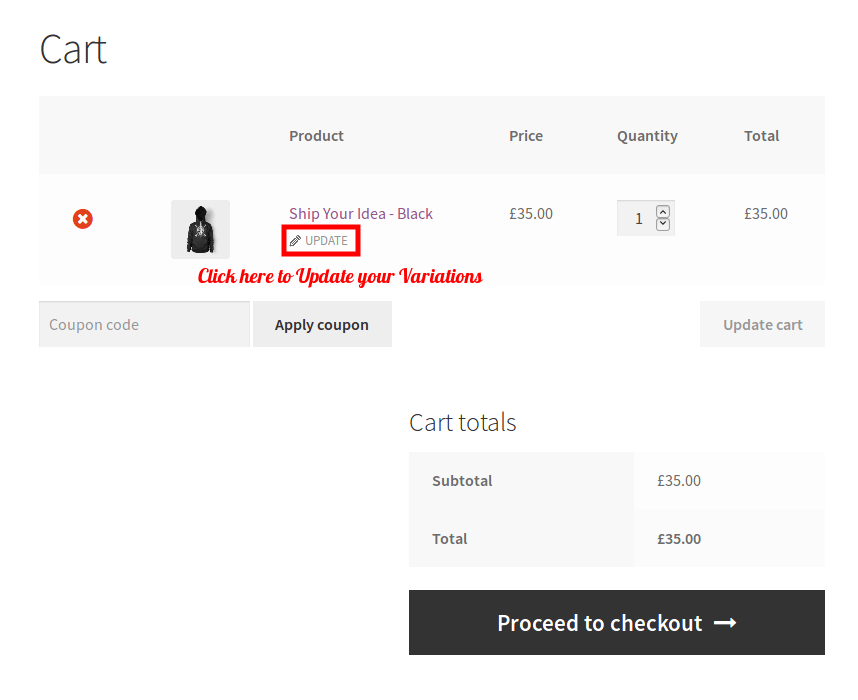
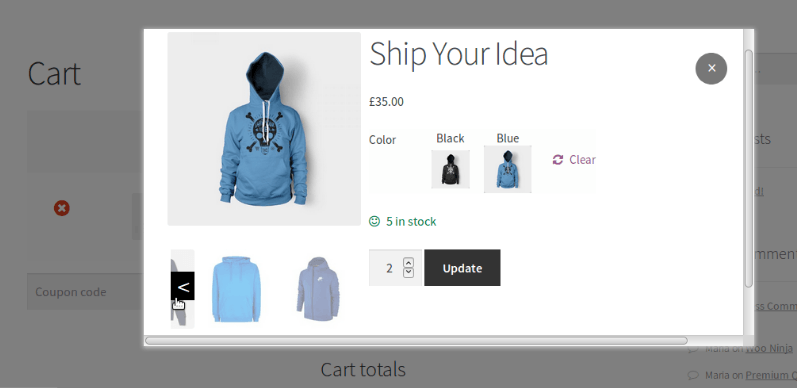
After clicking on the ‘Update’ button, a Popup will display where customers can see the Gallery Slider and Variation Swatches. It will allow them to easily update their variations and product quantity.
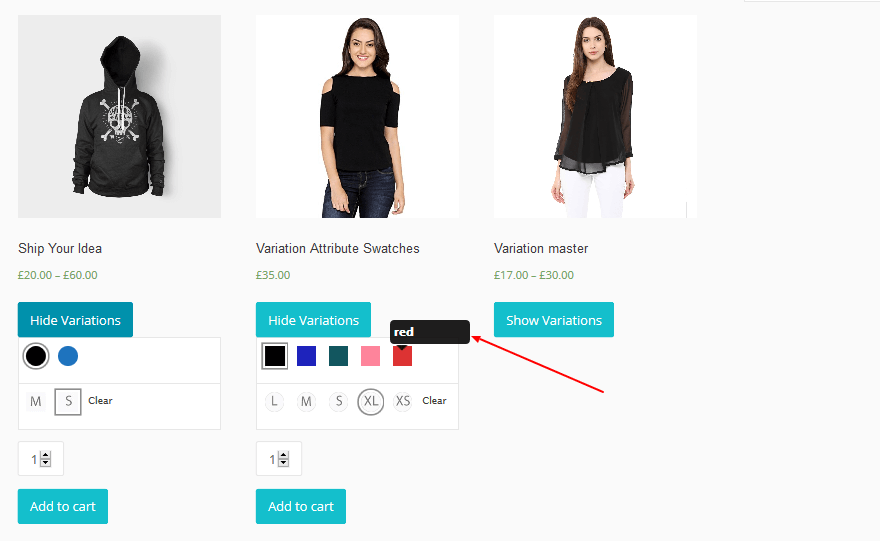
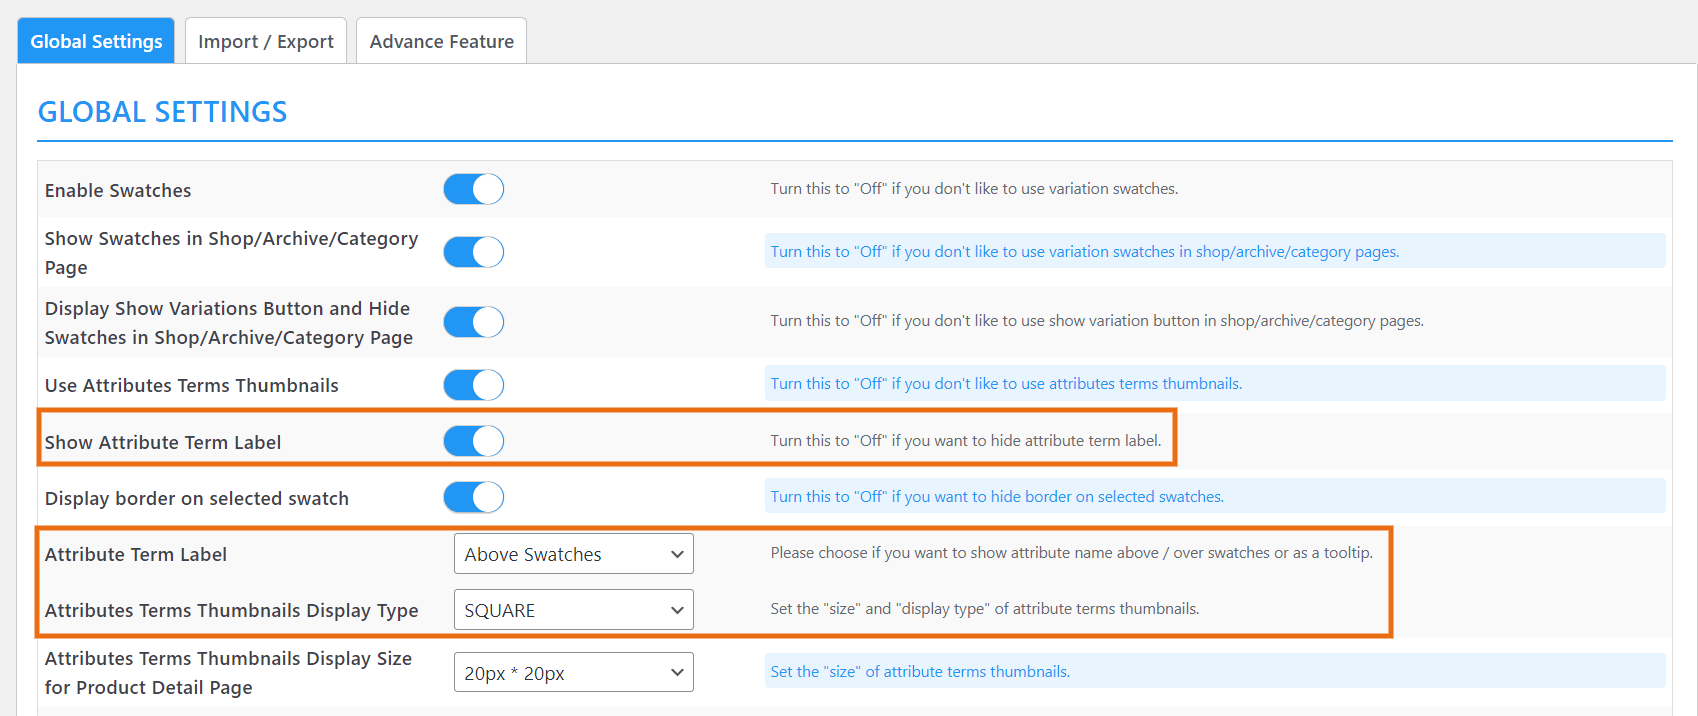
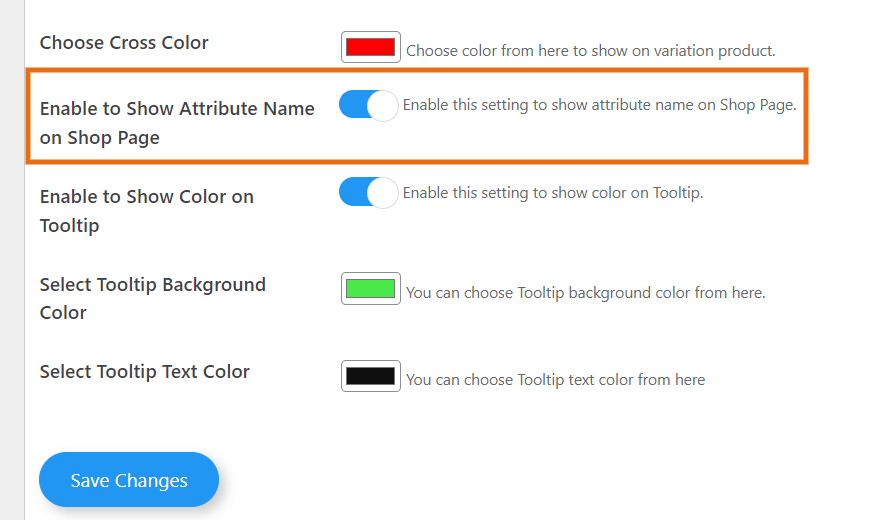
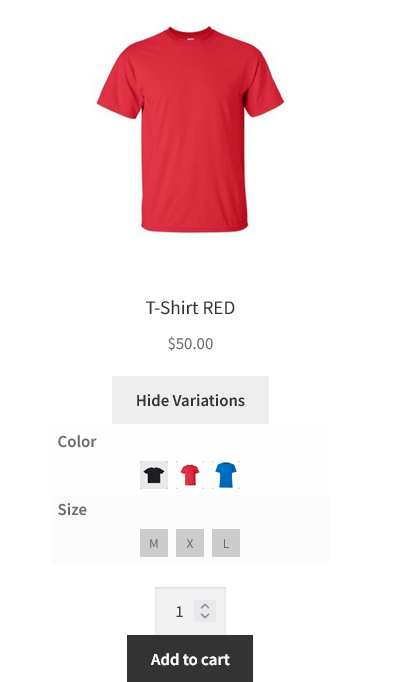
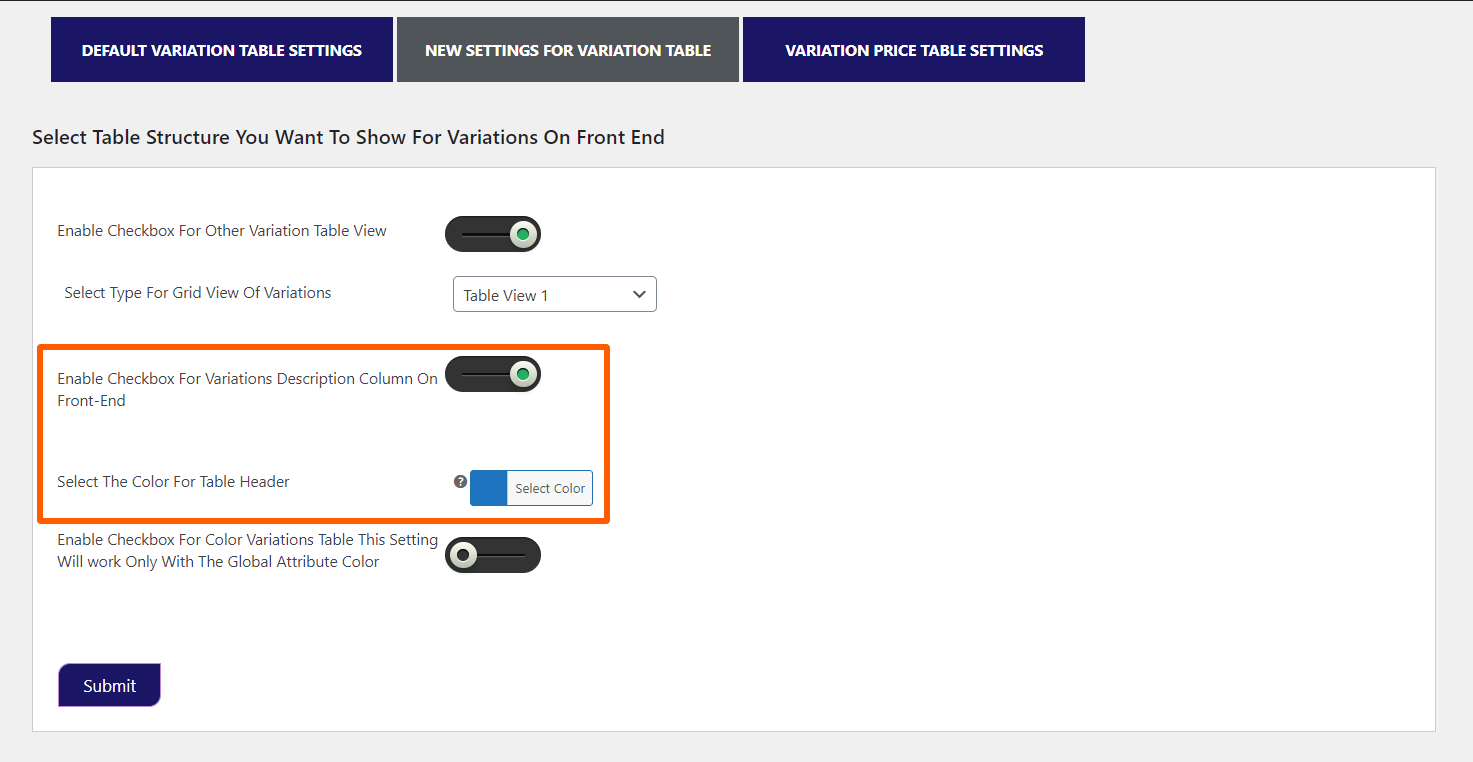
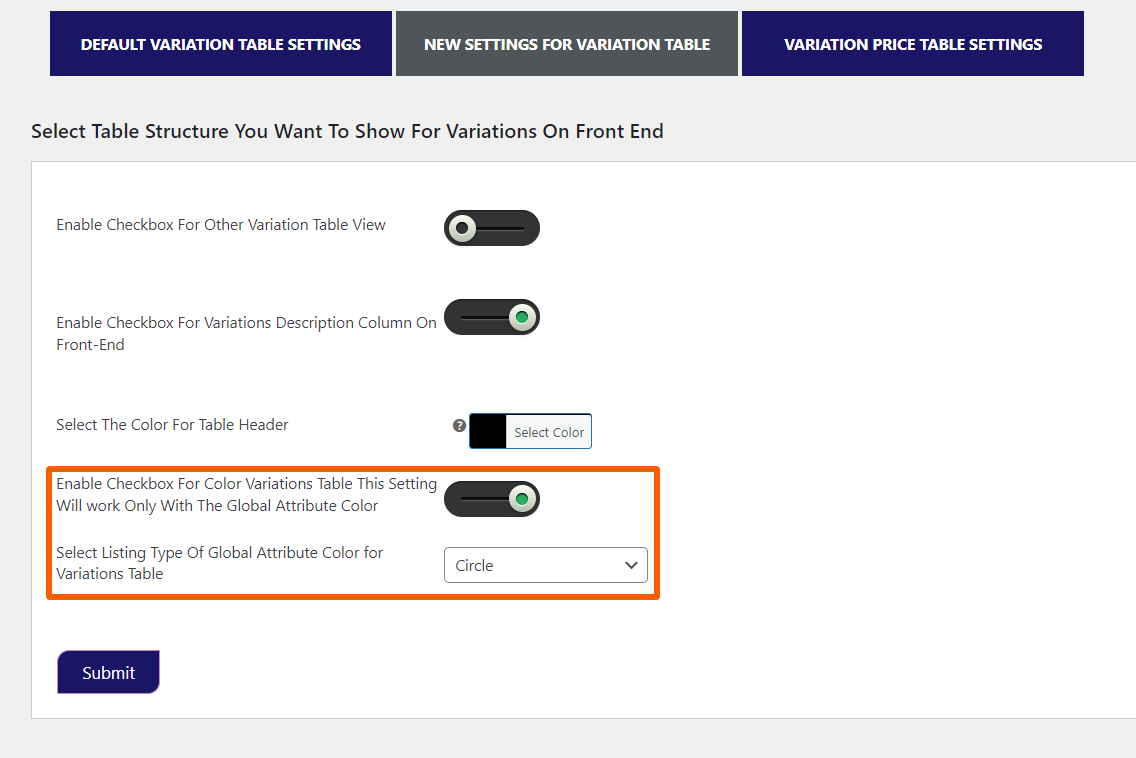
4.6.Show Attribute Term Label
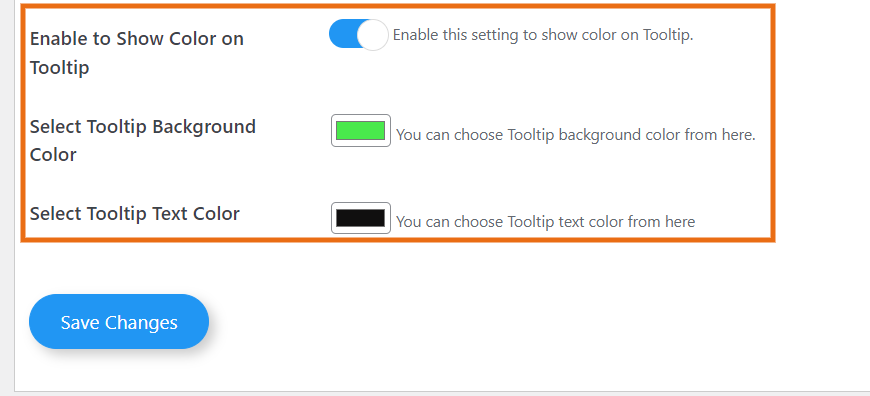
Enable this feature to show the attribute text as Above Swatches, Over swatches, and Tool-tip.
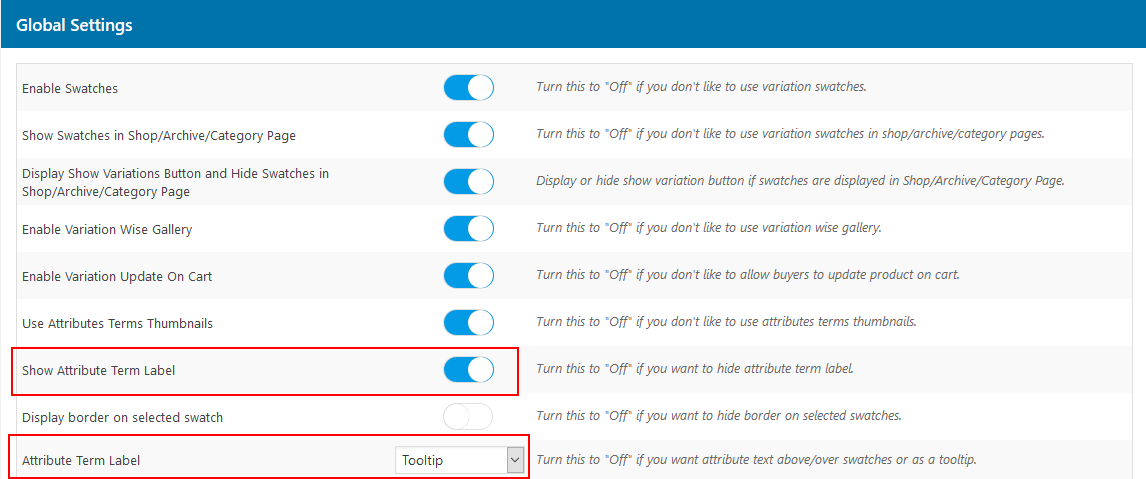
If you select the Attribute Term Label as the Tooltip, you can see the attribute text like this:
4.7.Display border on selected swatch
Enable this feature to show the border on the selected WooCommerce Variation swatches.
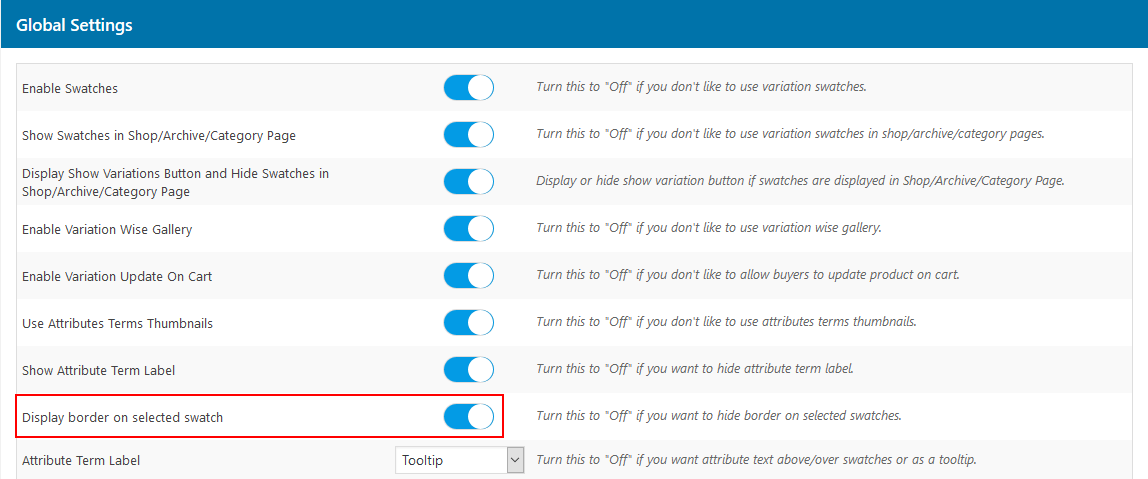
Here’s how to appear on the frontend.

4.8.Attributes Terms Thumbnails Display Type
Set the display type of attribute terms thumbnails. There are three types of display types: Circle, Square, and Rectangle.
Note: This setting will work when the per-product setting is disabled.
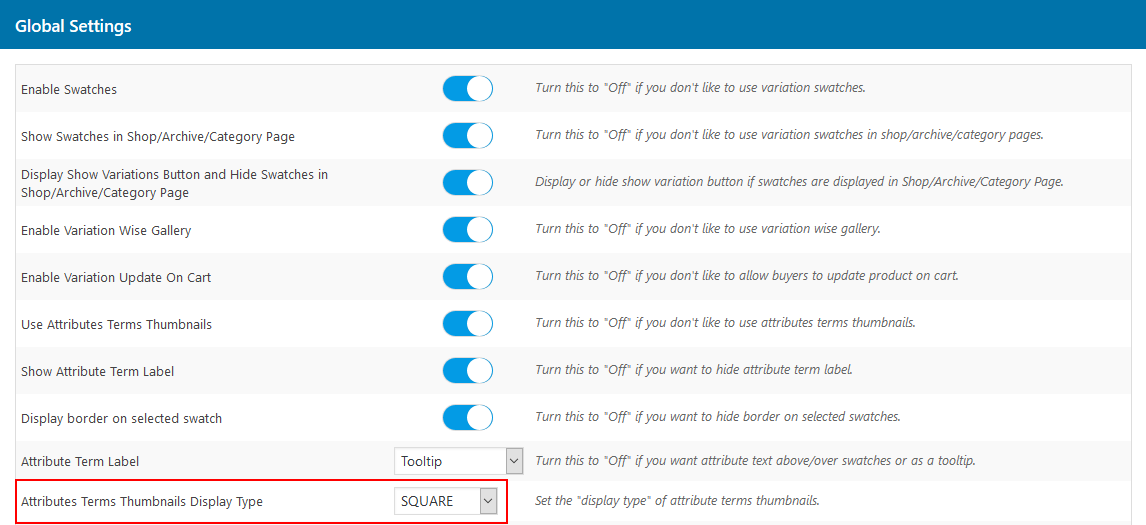
Here you can see the attribute terms thumbnails are square format.
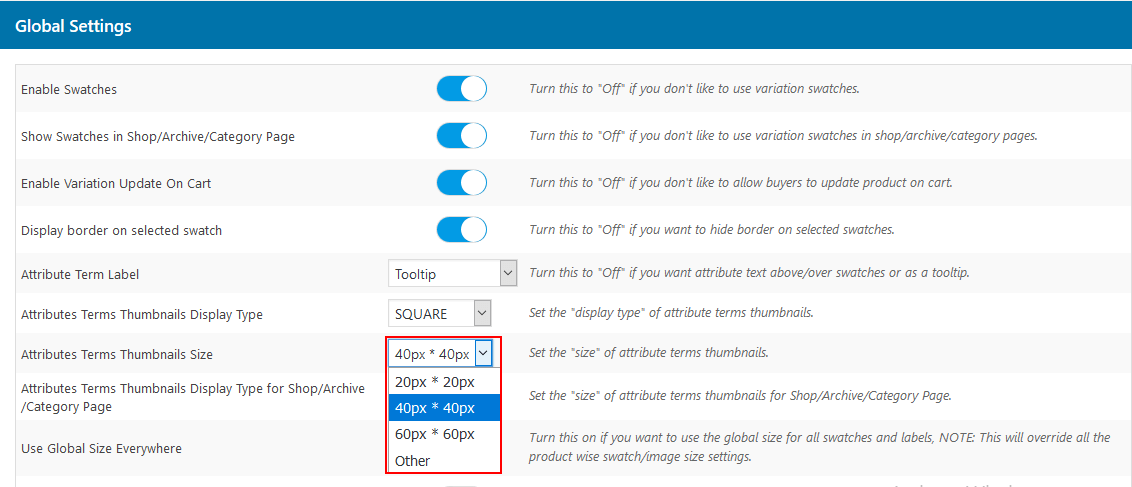
4.9.Attribute Terms Thumbnails Display Size for Product Detail Page
Set the ‘size’ of attribute terms thumbnails for the Shop Page. You can choose from the following four types of display sizes:
- 20px*20px
- 30px*30px
- 40px*40px
- Other (This allows the admin to set the requested size of the thumbnail attribute)
4.10.Attributes Terms Thumbnails Display Type for Shop/Category Page
Attributes Terms Thumbnails Display Type for Shop/Category Page: Through this setting set the “size” of attribute terms thumbnails for Shop Page. Here we are providing four types of display size.
- 20px*20px
- 30px*30px
- 40px*40px
- Custom size: This setting allow the admin to set the requested size of the thumbnail attribute.
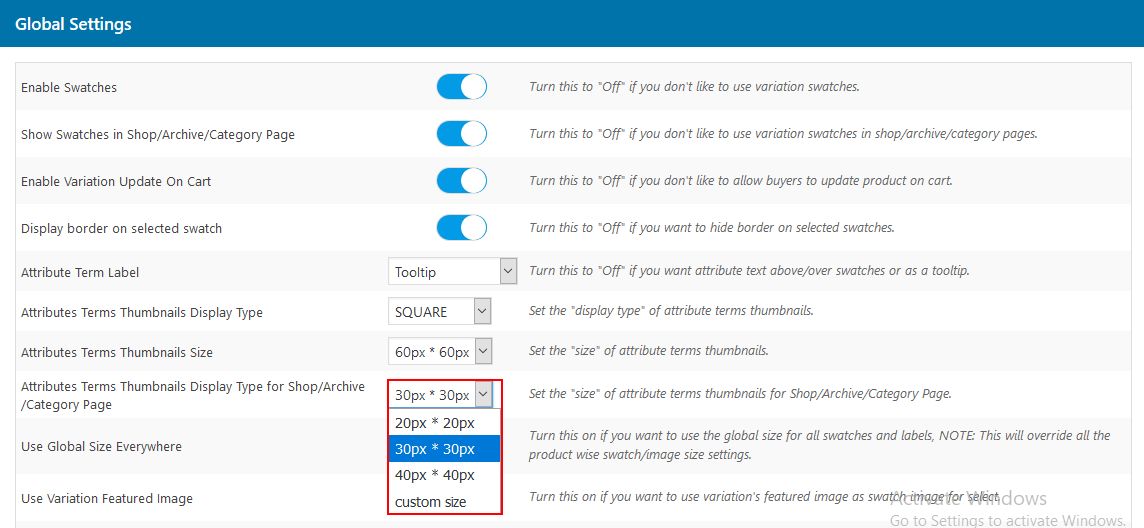
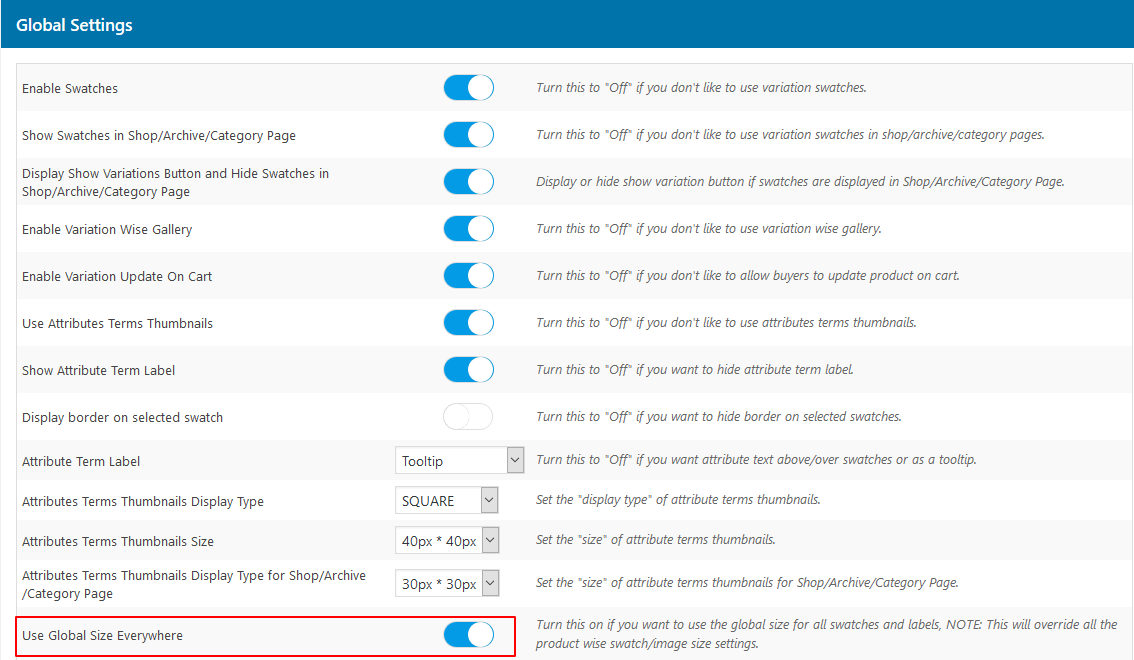
4.11.Use Global Size Everywhere
Enable this toggle button to use the global size for all swatches and labels.
Note: When you enable the Global Setting, then the per-product setting of size doesn’t work.
4.12.Use Variation Featured Image
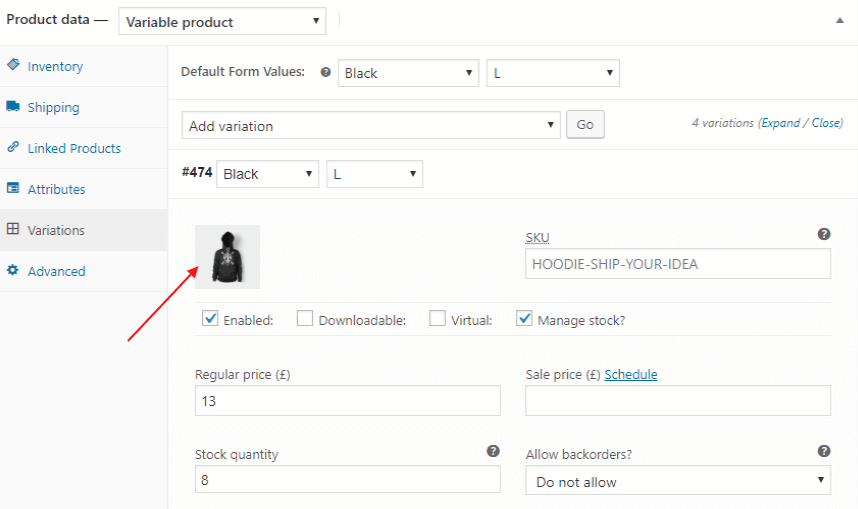
Enable this setting to use the variation feature image as a swatch image for the selected product.
Follow these steps to set the featured image for color swatches.
- Go to the Product edit page > Variations.
- Set the featured image for WooCommerce variation swatches.
- Click on Variations and go to the Add Variation.
- Click on ‘Go’ and fill all the required fields, and set a featured image.
- Choose only those colors that are previously selected under the attribute section.
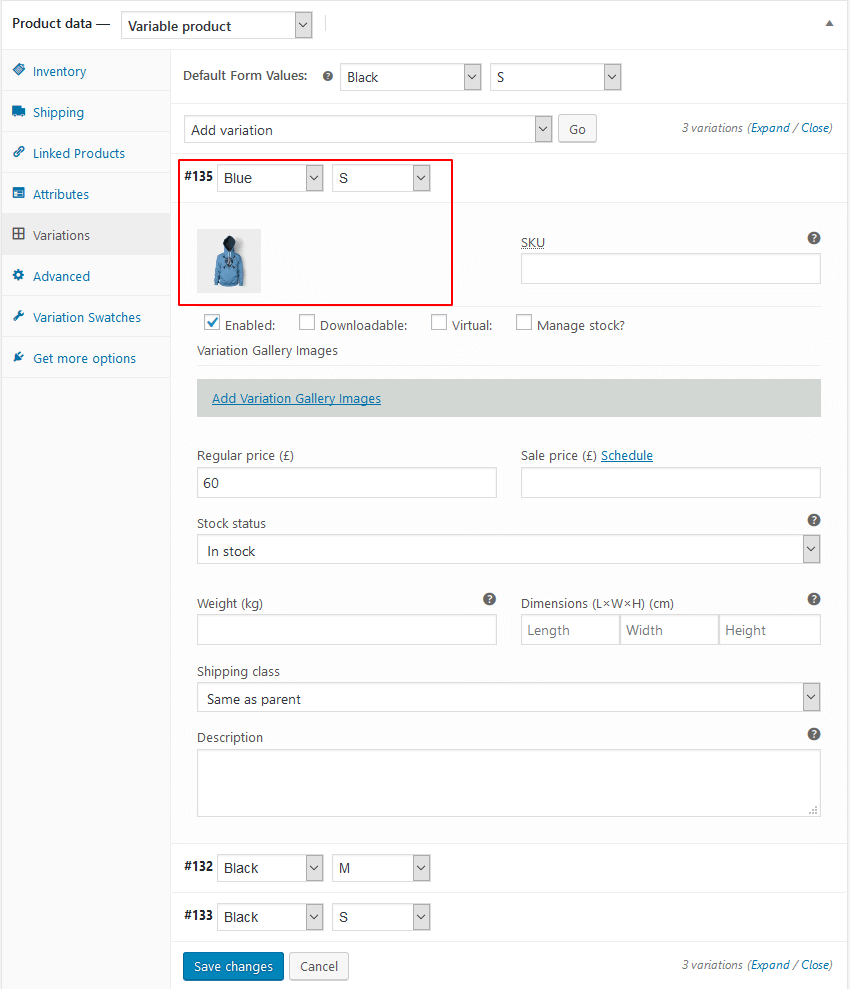
- Enable the ‘Use Variation Feature image’.
- Click on the ‘Save Changes’.
On the product detail page, you can see the variation swatches as the featured images.
4.13.Hide Add To Cart Button and Quantity from Shop
Click on the toggle to hide the Add to Cart button and Product Quantity from the shop/cart page.
On the front end, you can’t see the Add to Cart button and the Product Quantity of the product.
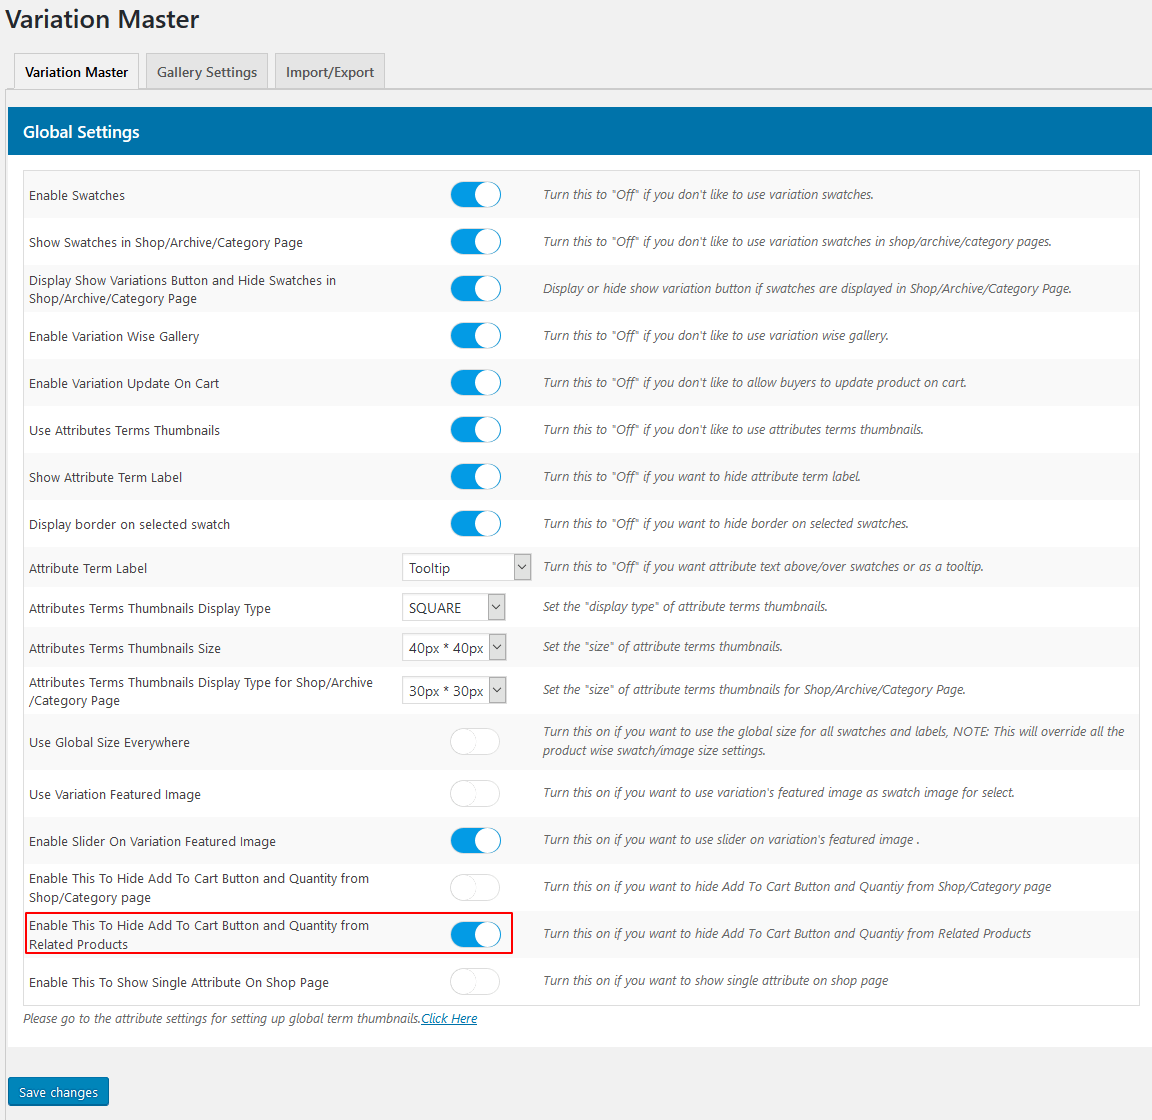
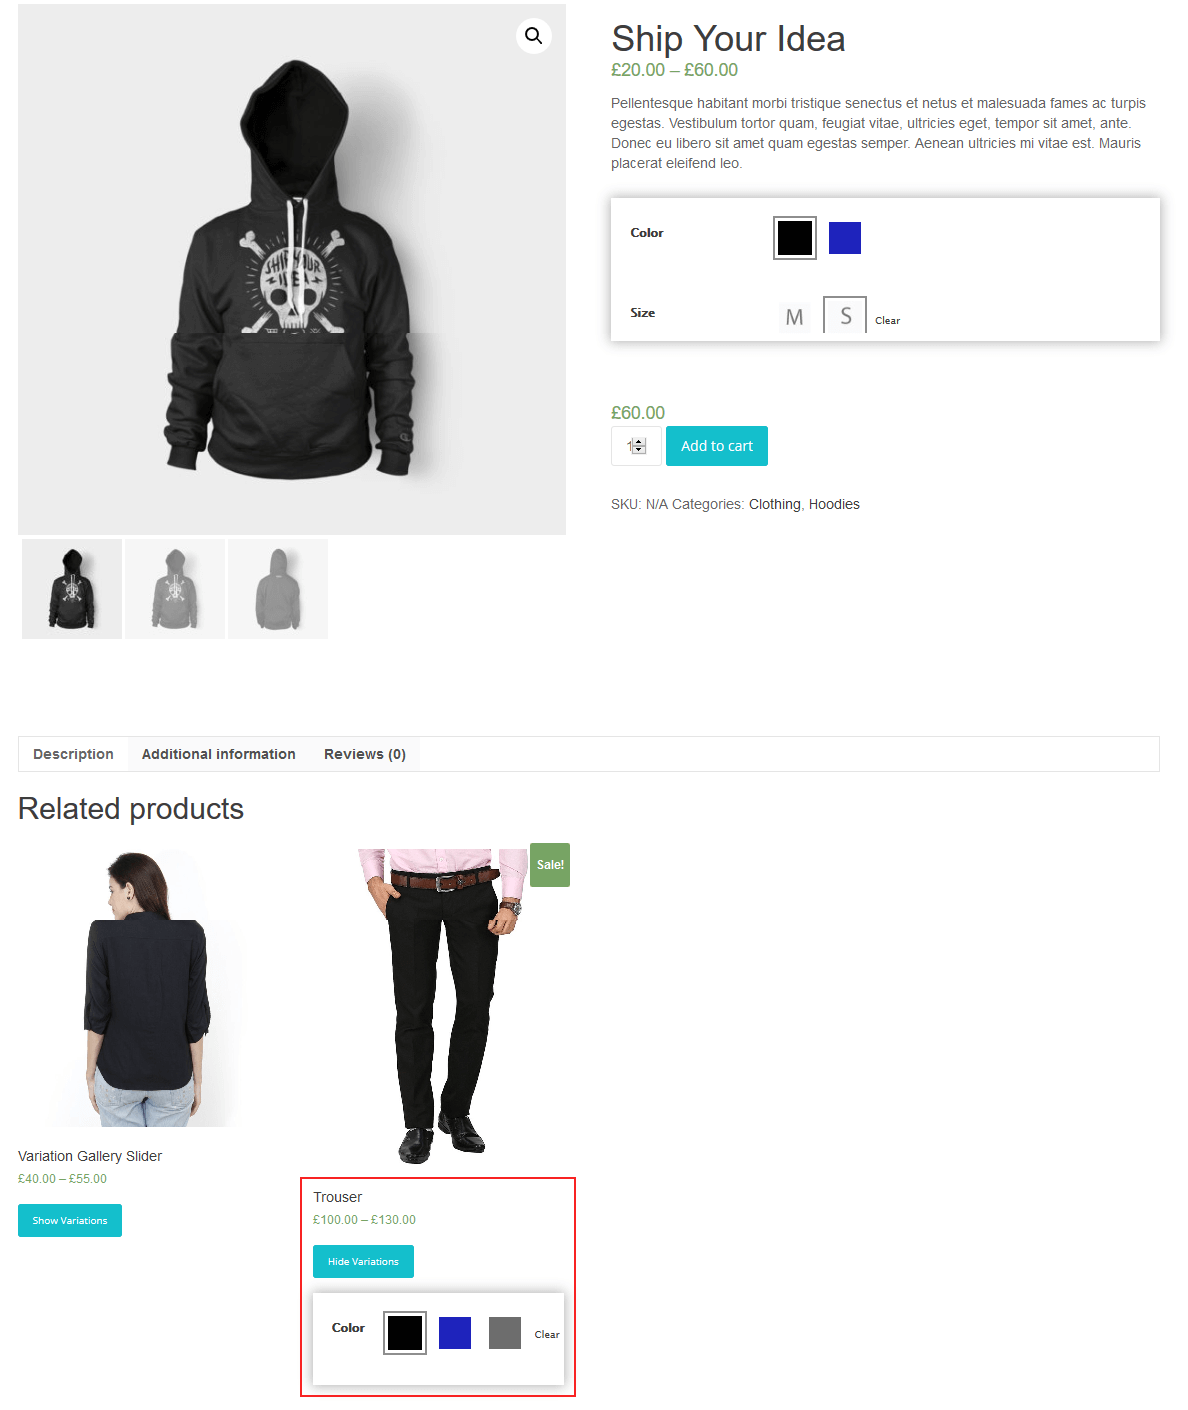
4.14.Hide Add To Cart Button and Quantity from Related Products
This setting allows you to remove the Add-To-Cart button and Product Quantity from the related products.
Here’s how it appears on the front end.
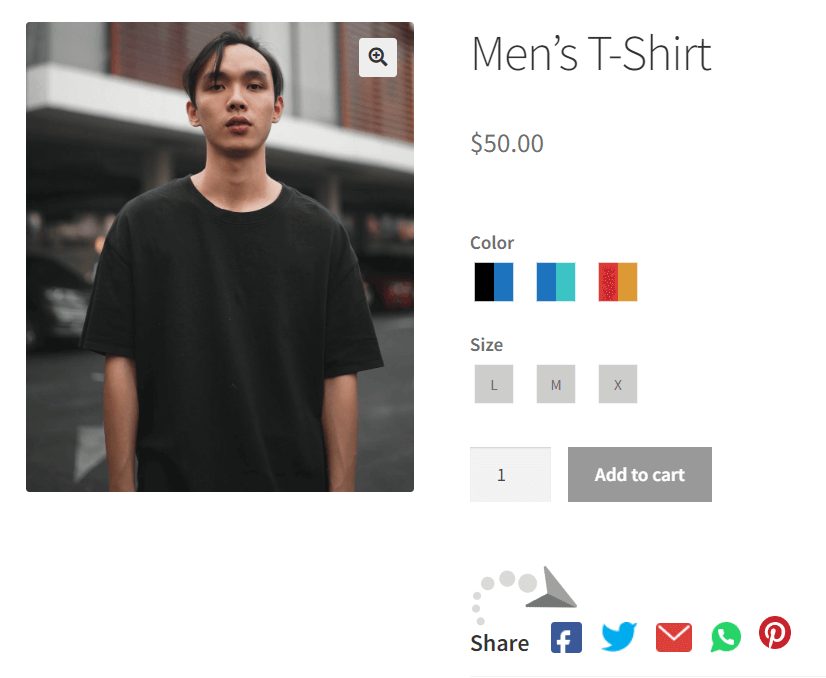
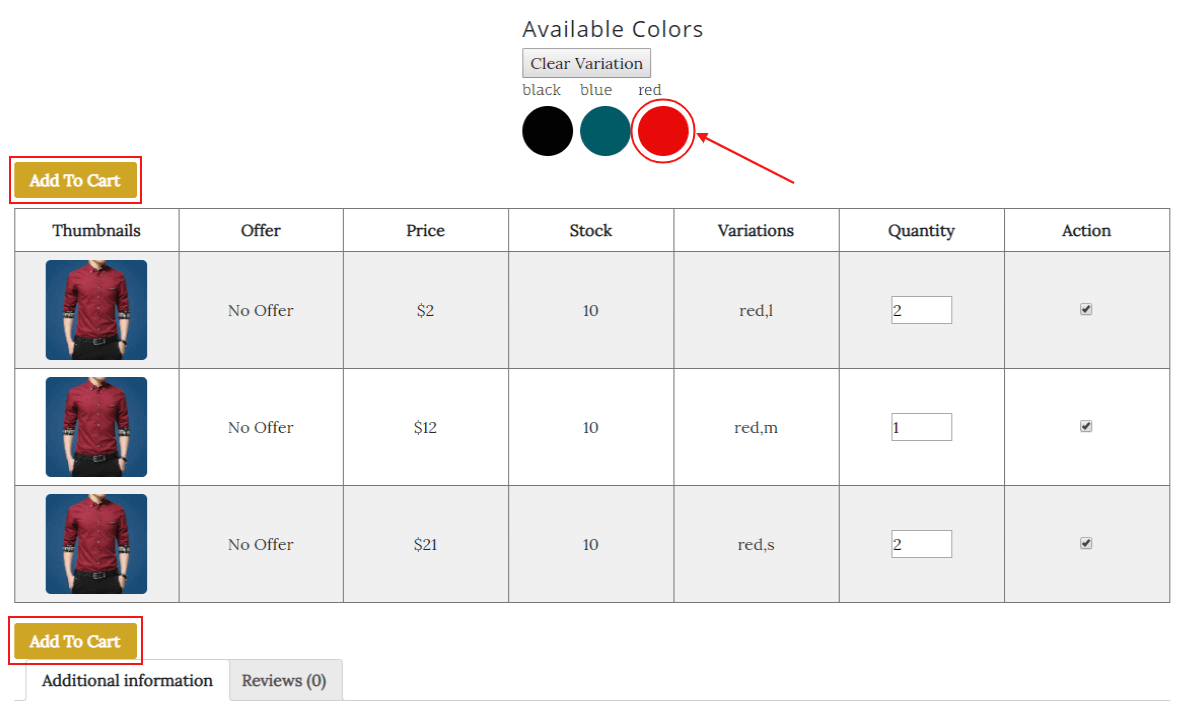
4.15.Show Single Attribute On Shop Page
This setting allows you to show a single attribute on the shop page rather than displaying all swatches attributes and change the variation image on the hover of attributes.
After the implementation, this is how it looks.

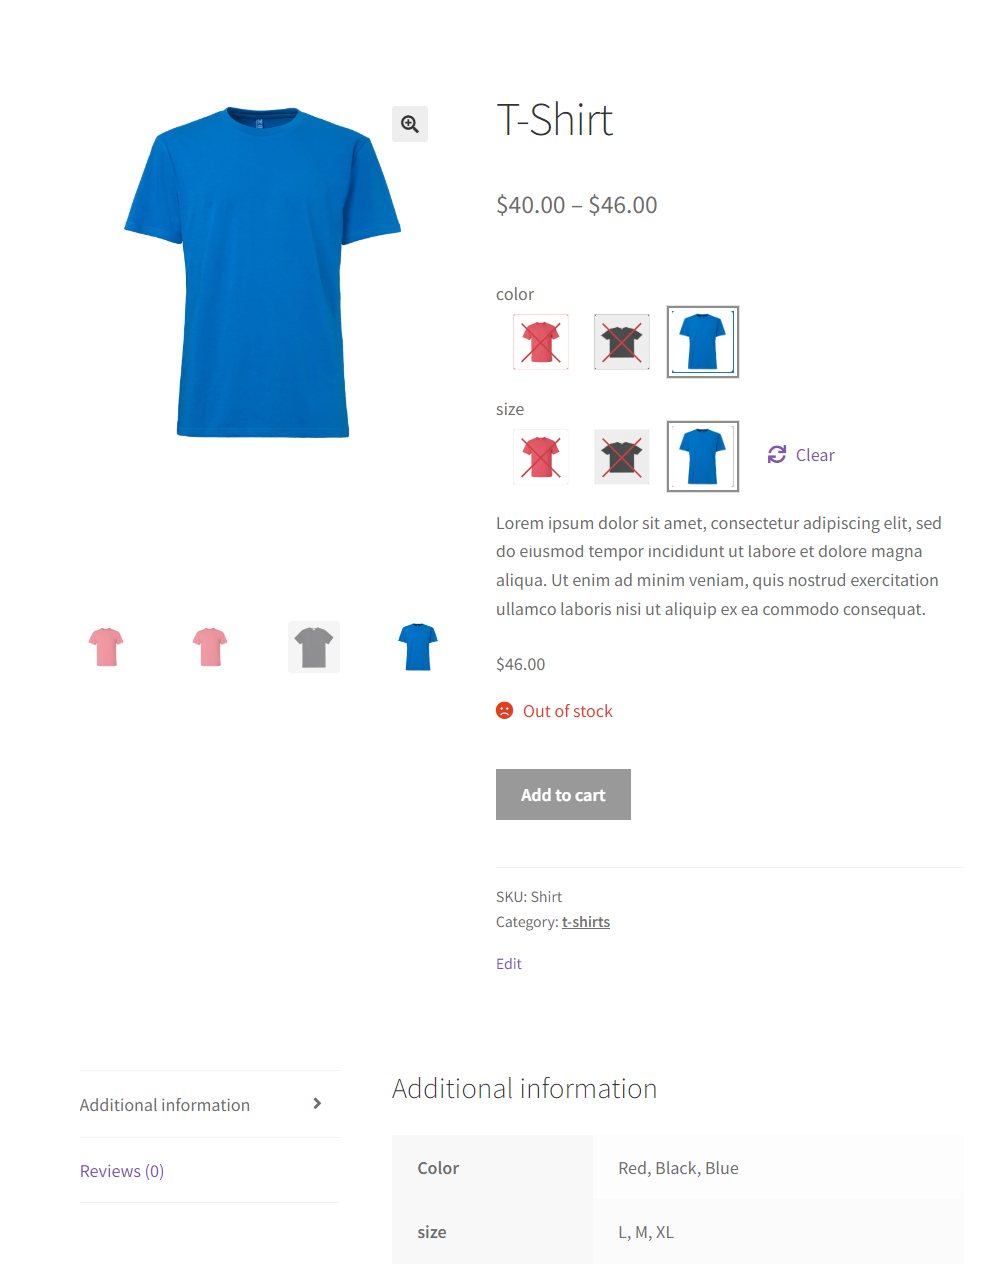
4.16.Cross Variation Setting
This plugin provides an option to show the cross mark on unavailable variation. For example, you can see the variety of blue colors are not available with the medium size then display the cross sign on that variation.
4.17. Number of Variations You Want to Create on One Request
4.17. Number of Variations You Want to Create on One Request
This setting enables you to increase/decrease the number of batch counts for variation creation with available product attributes. By default, it is 50.
Follow these steps to edit the batch count number:
-
- Go to Variation Master > Global Settings > Number of Variations You Want to Create on One Request .
- Enter the number of variations .
- Click on Save Changes.
To see the change you have made, go to edit or create any variation product. Navigate to the WooCommerce variations tab in the product data section.
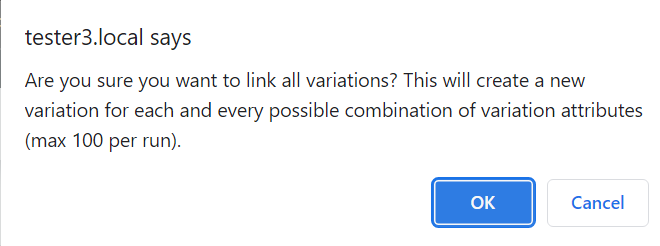
Click on the Add Variation dropdown and select Create Variations for All Attributes.
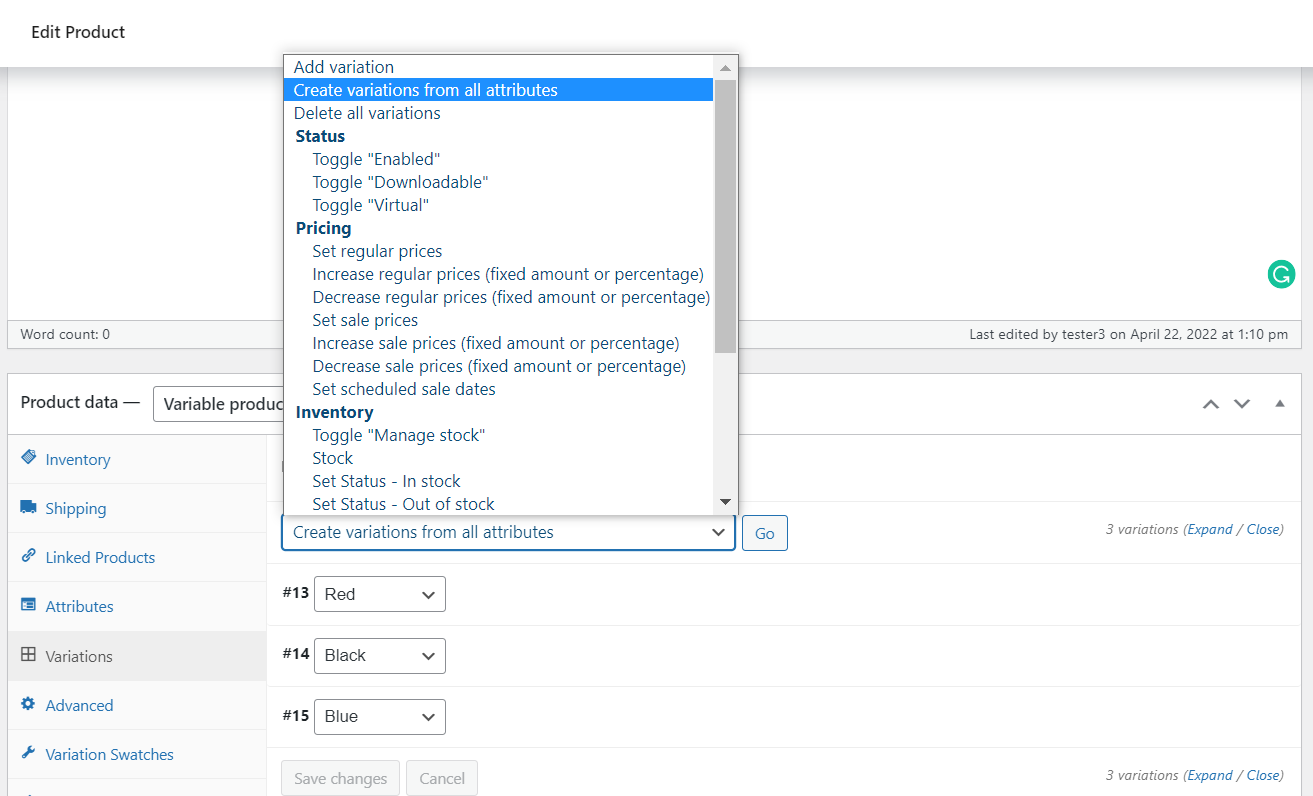
A notification will appear reminding you of the number of variations that can be created.
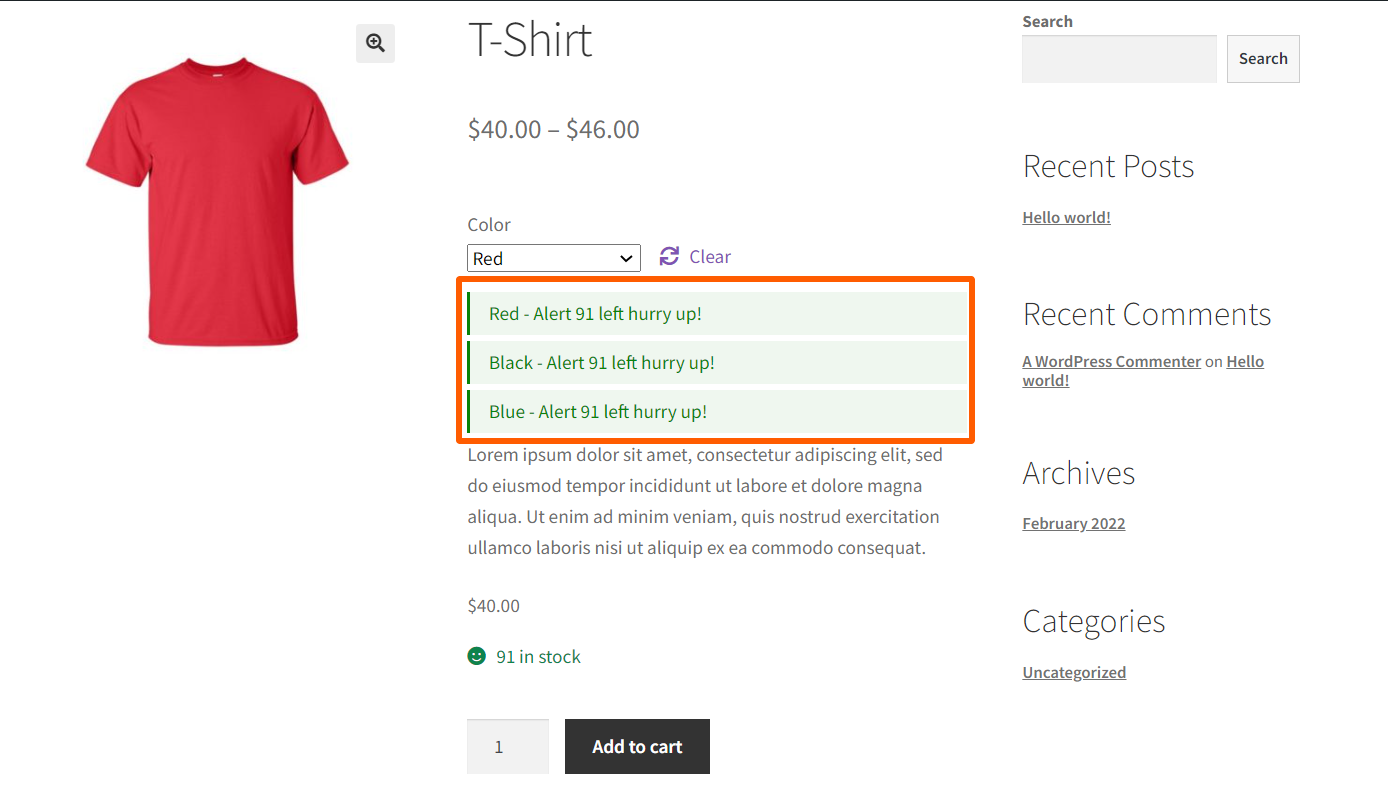
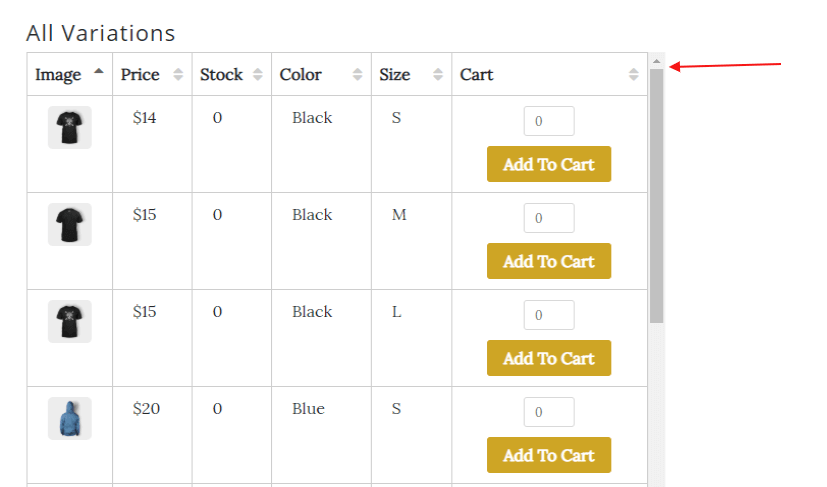
4.18.Show Stock Alert for Variations on a Single Page
Enable this toggle button to show a stock alert for variations on a single page. You can add a custom message for a stock alert in the textbox and set a minimum stock quality to trigger the alert.
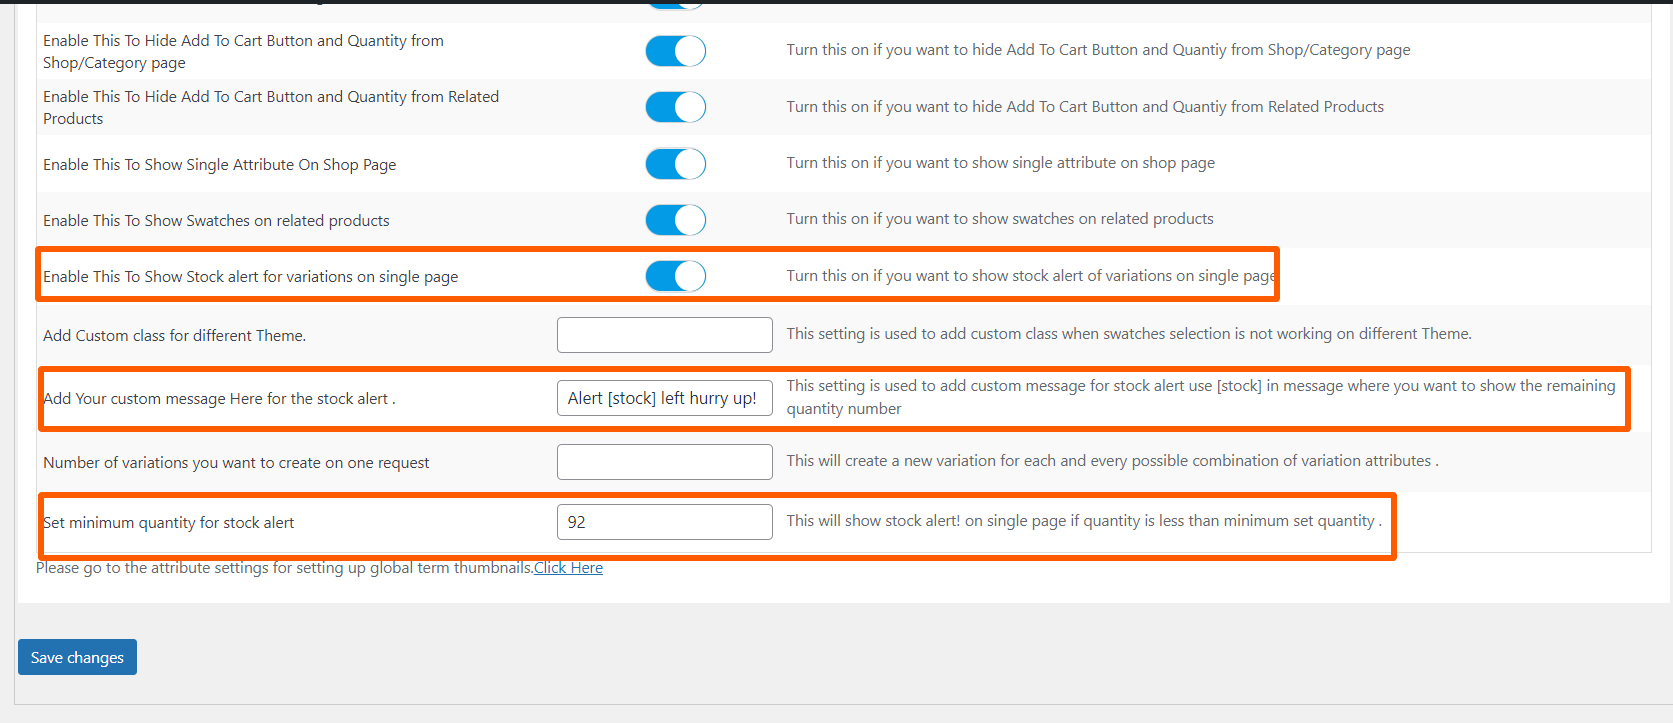
Here is how the stock alert appears on the front end.
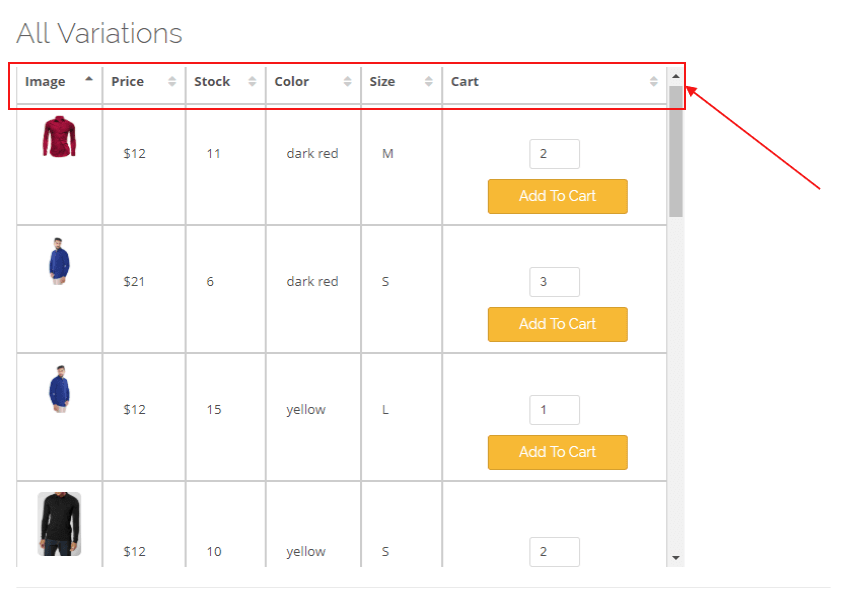
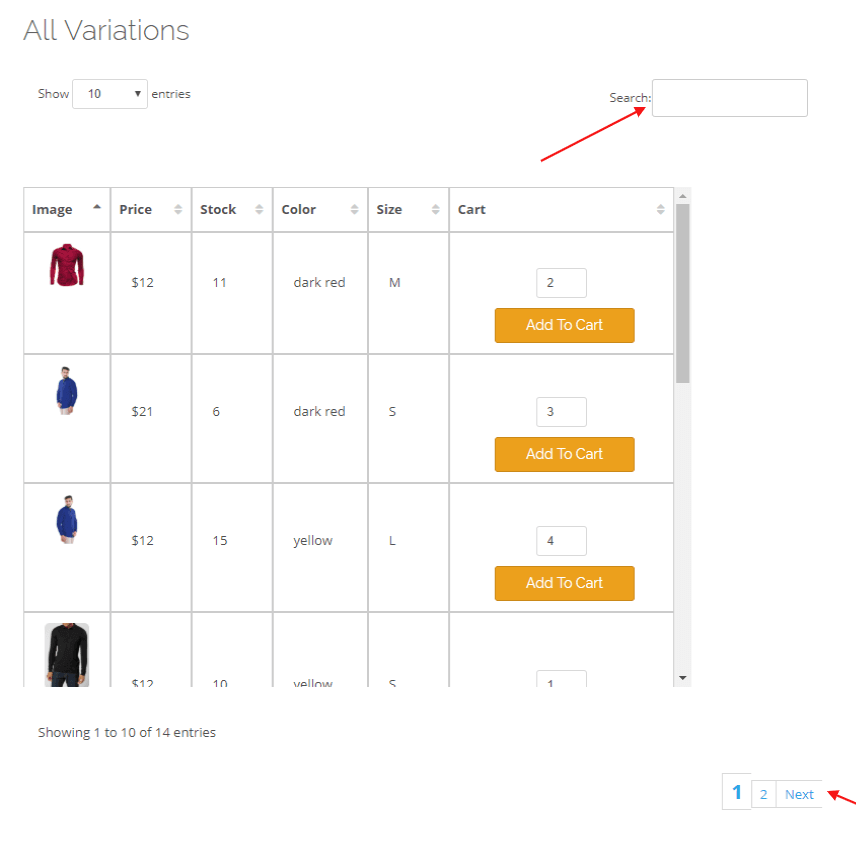
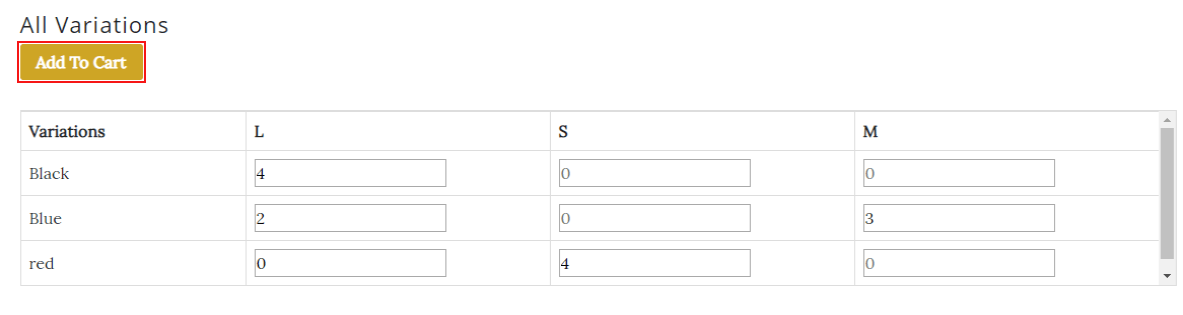
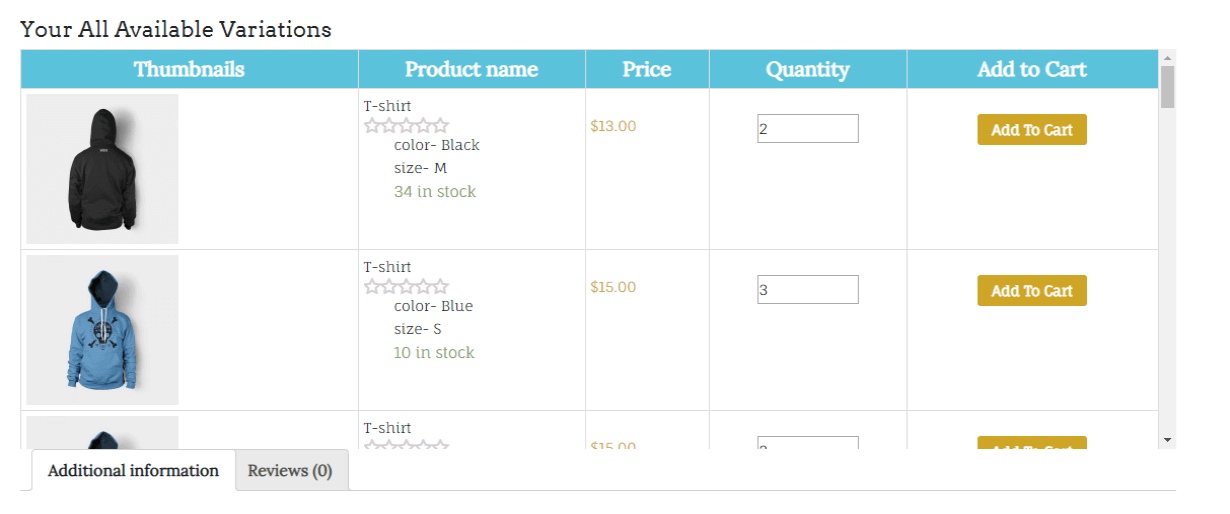
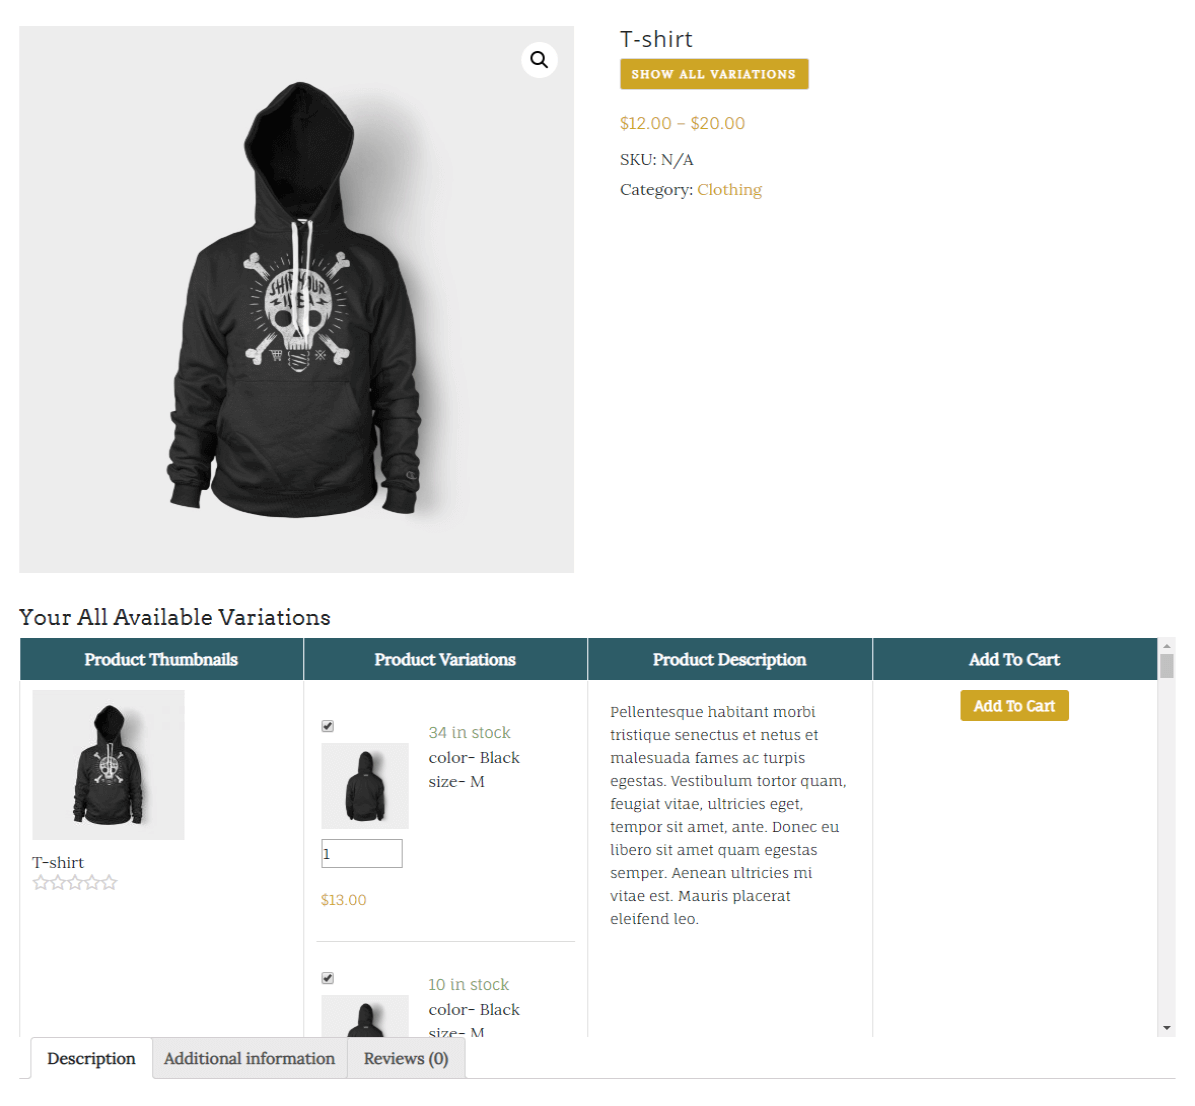
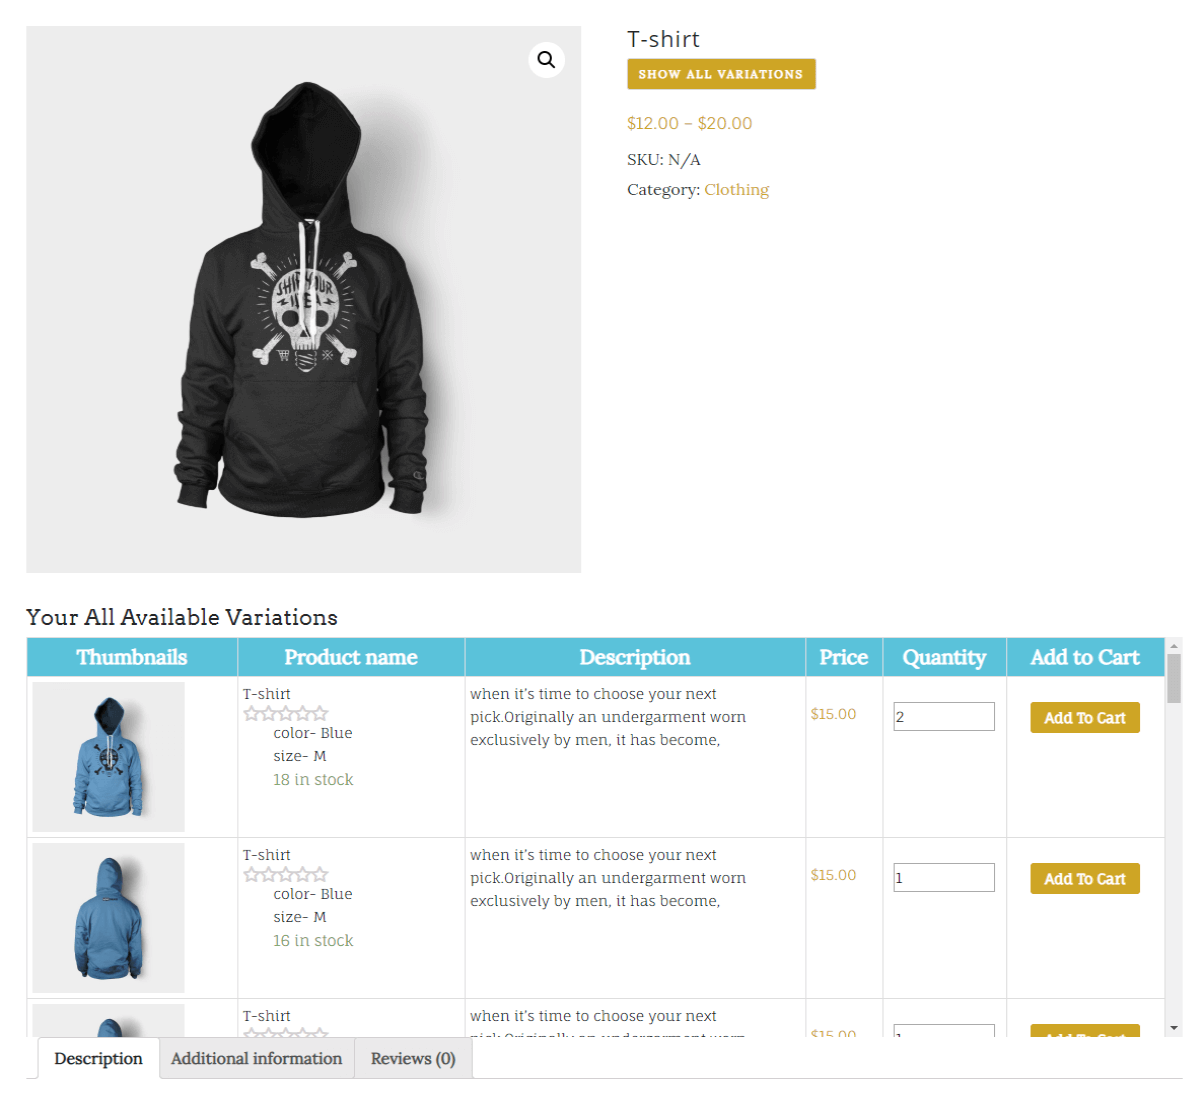
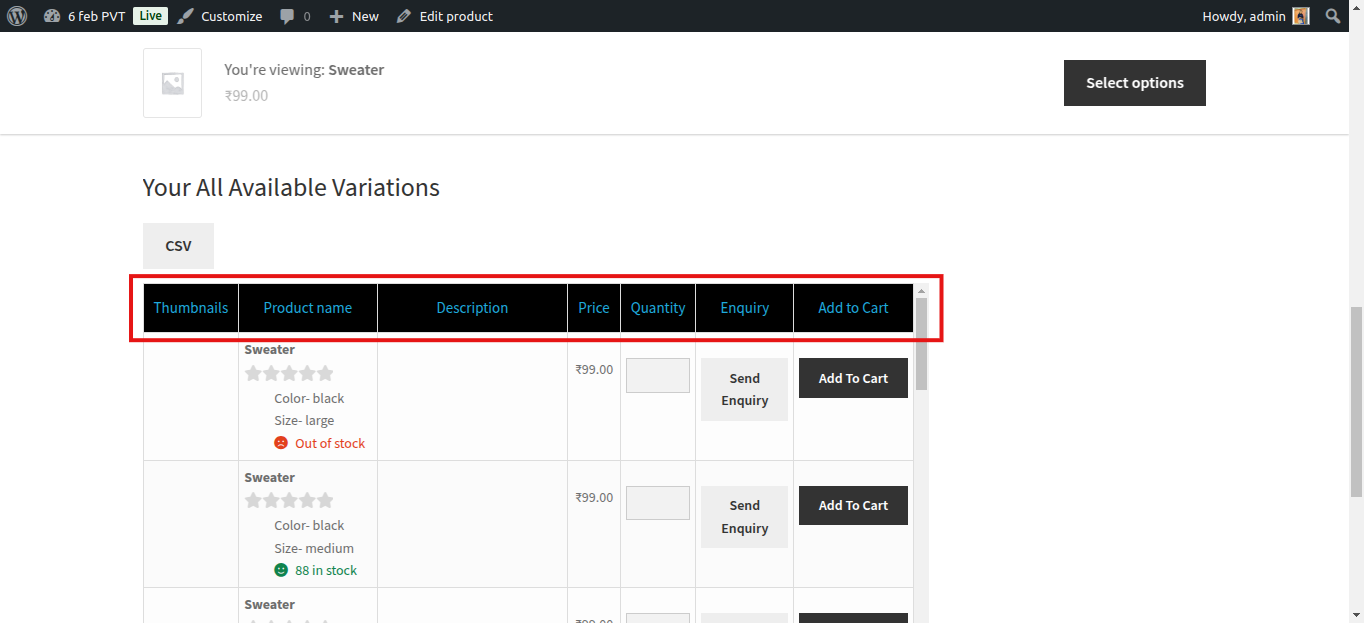
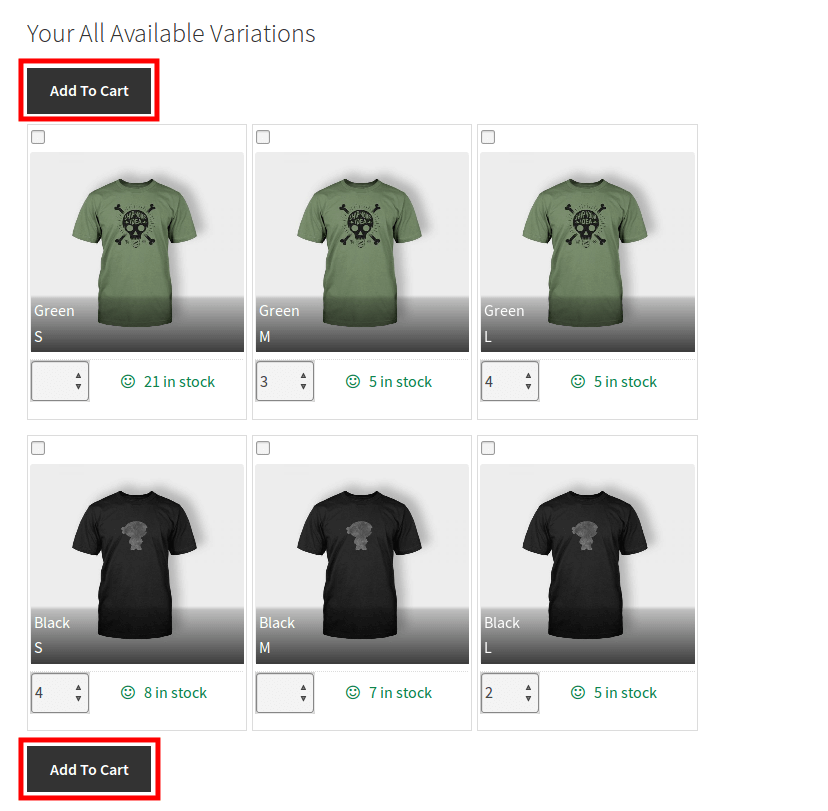
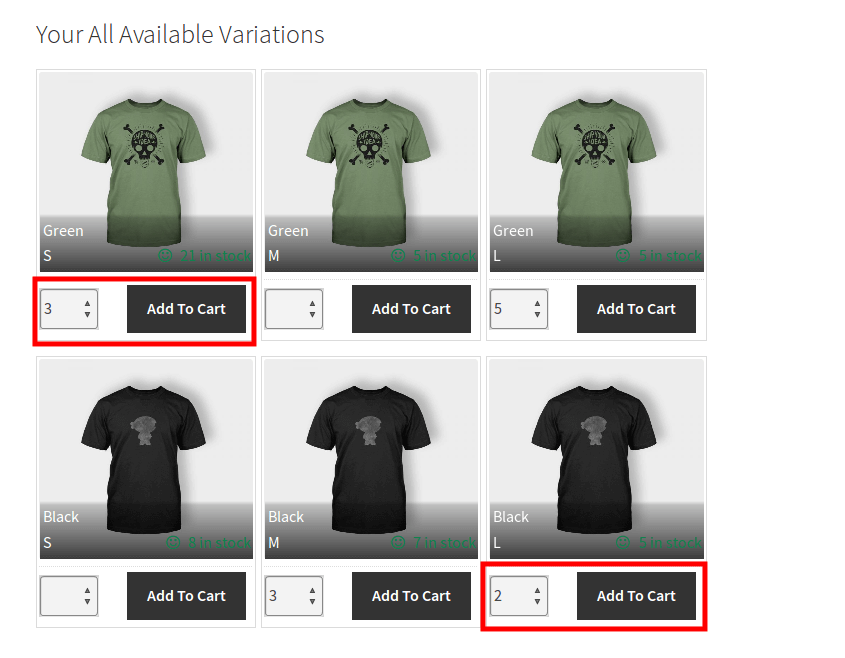
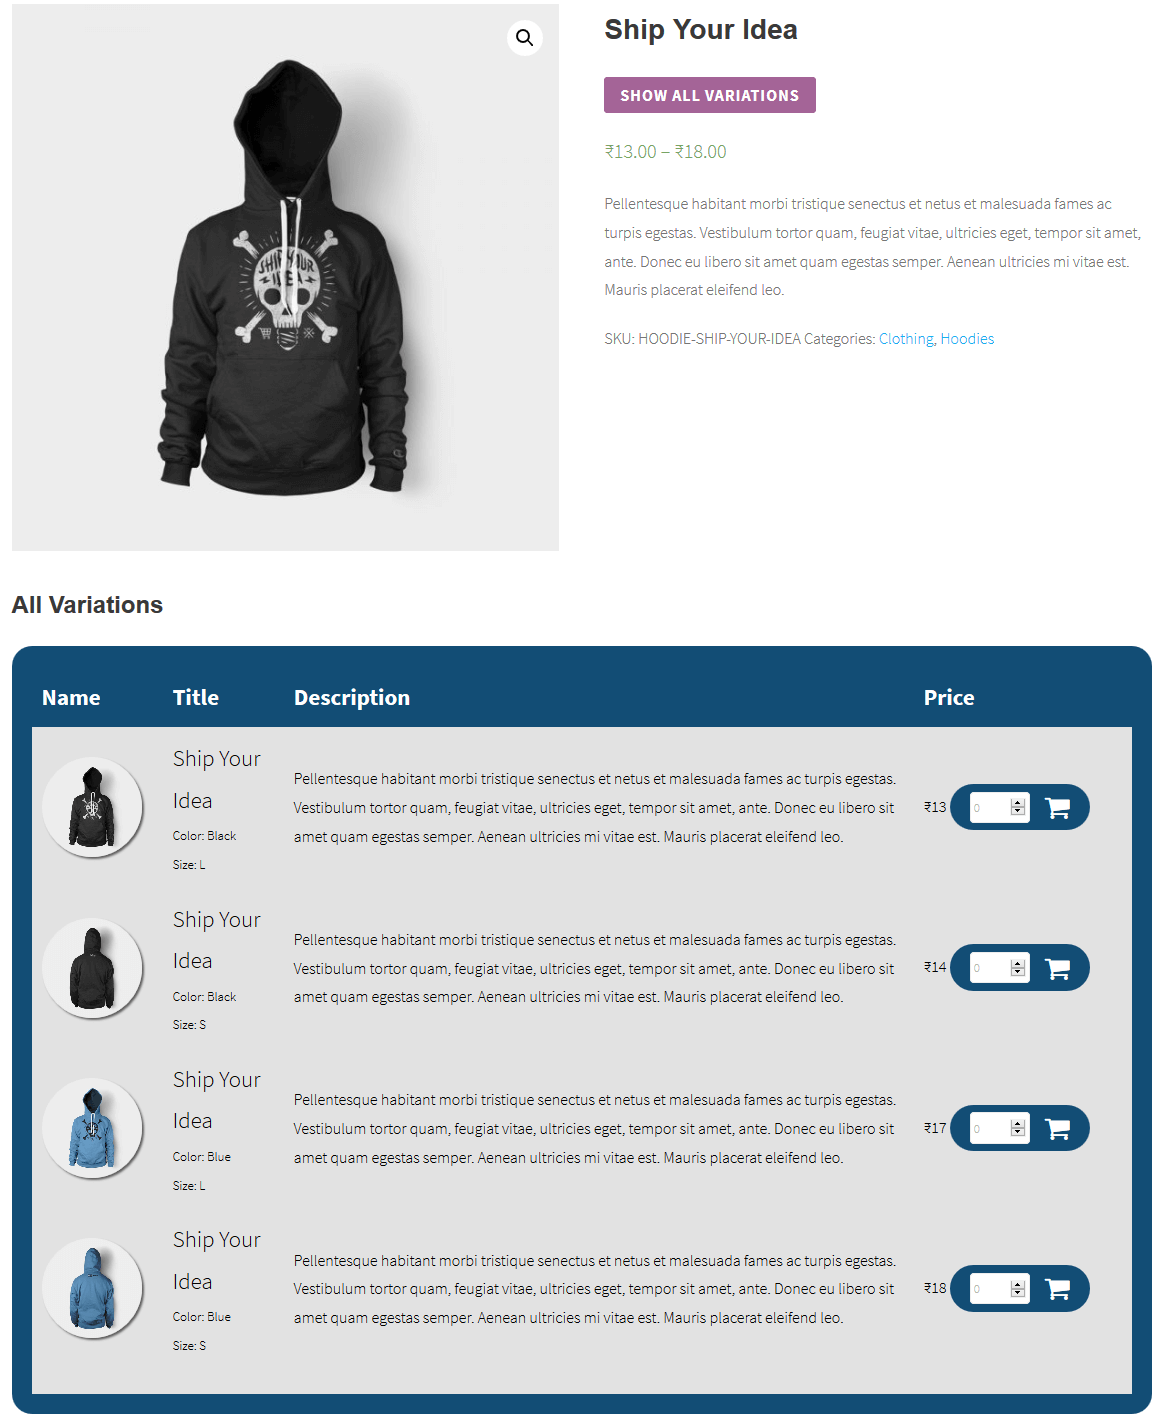
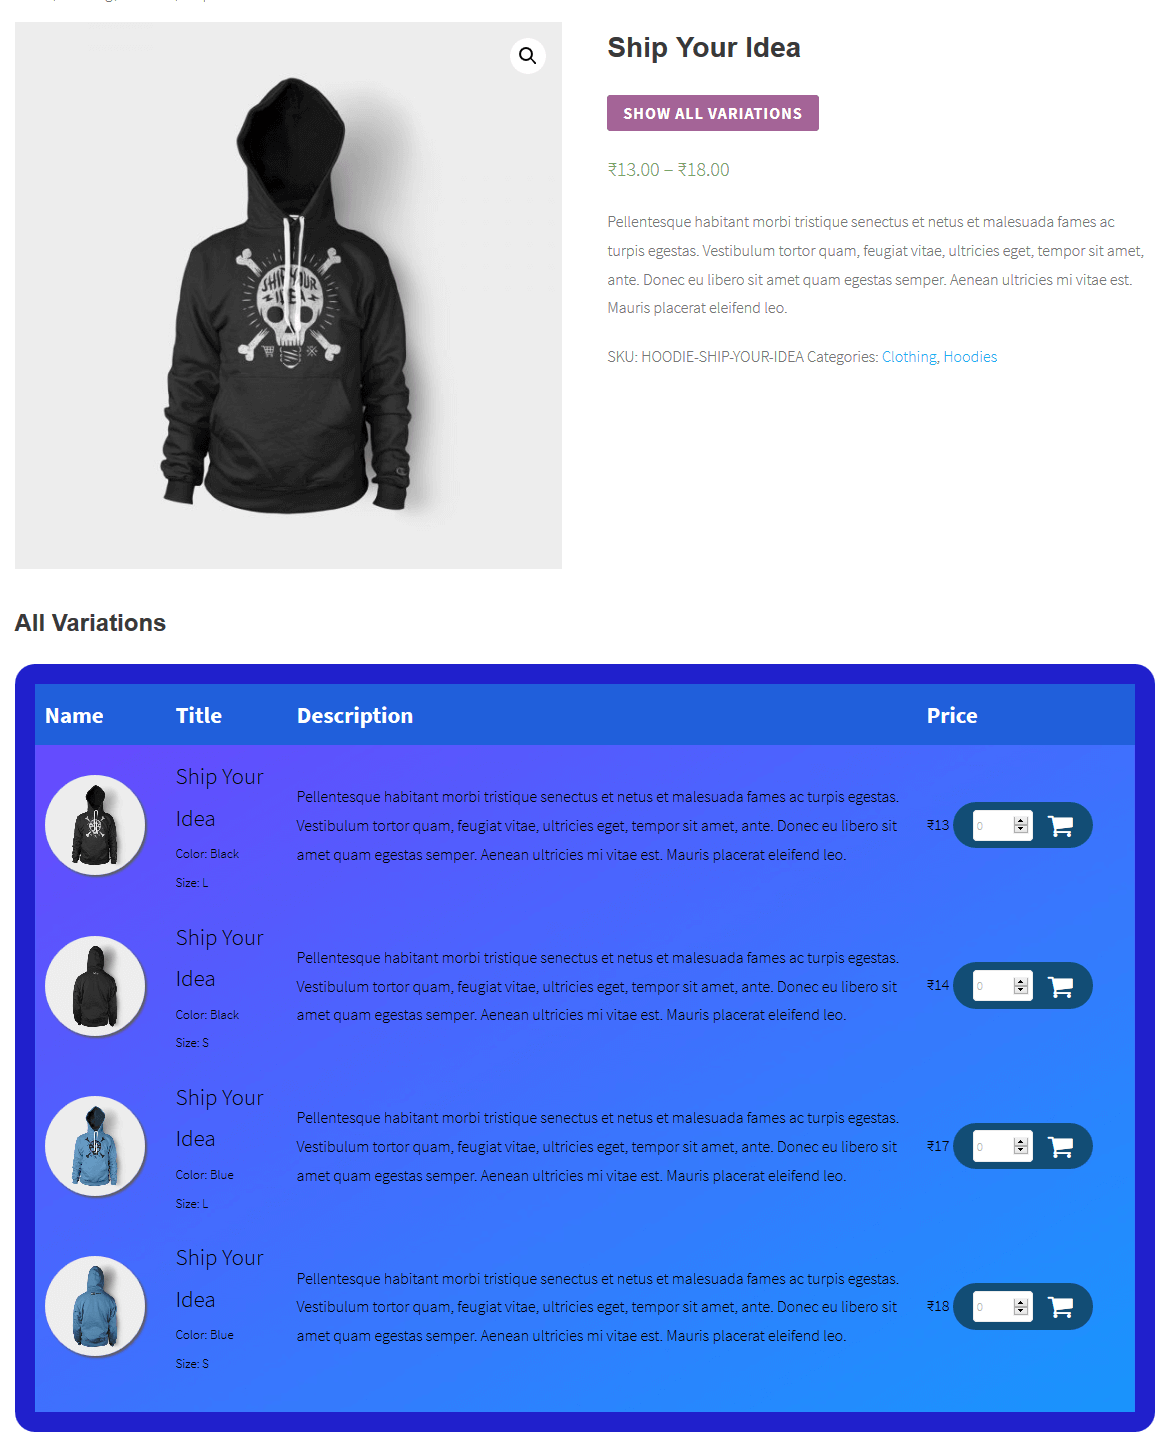
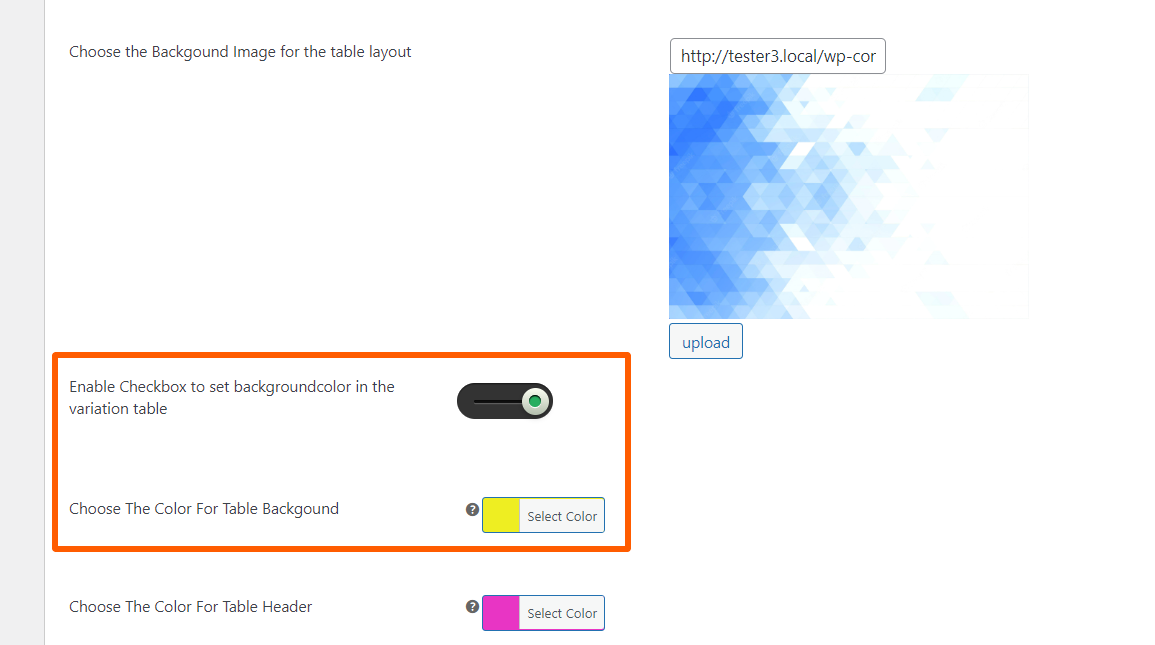
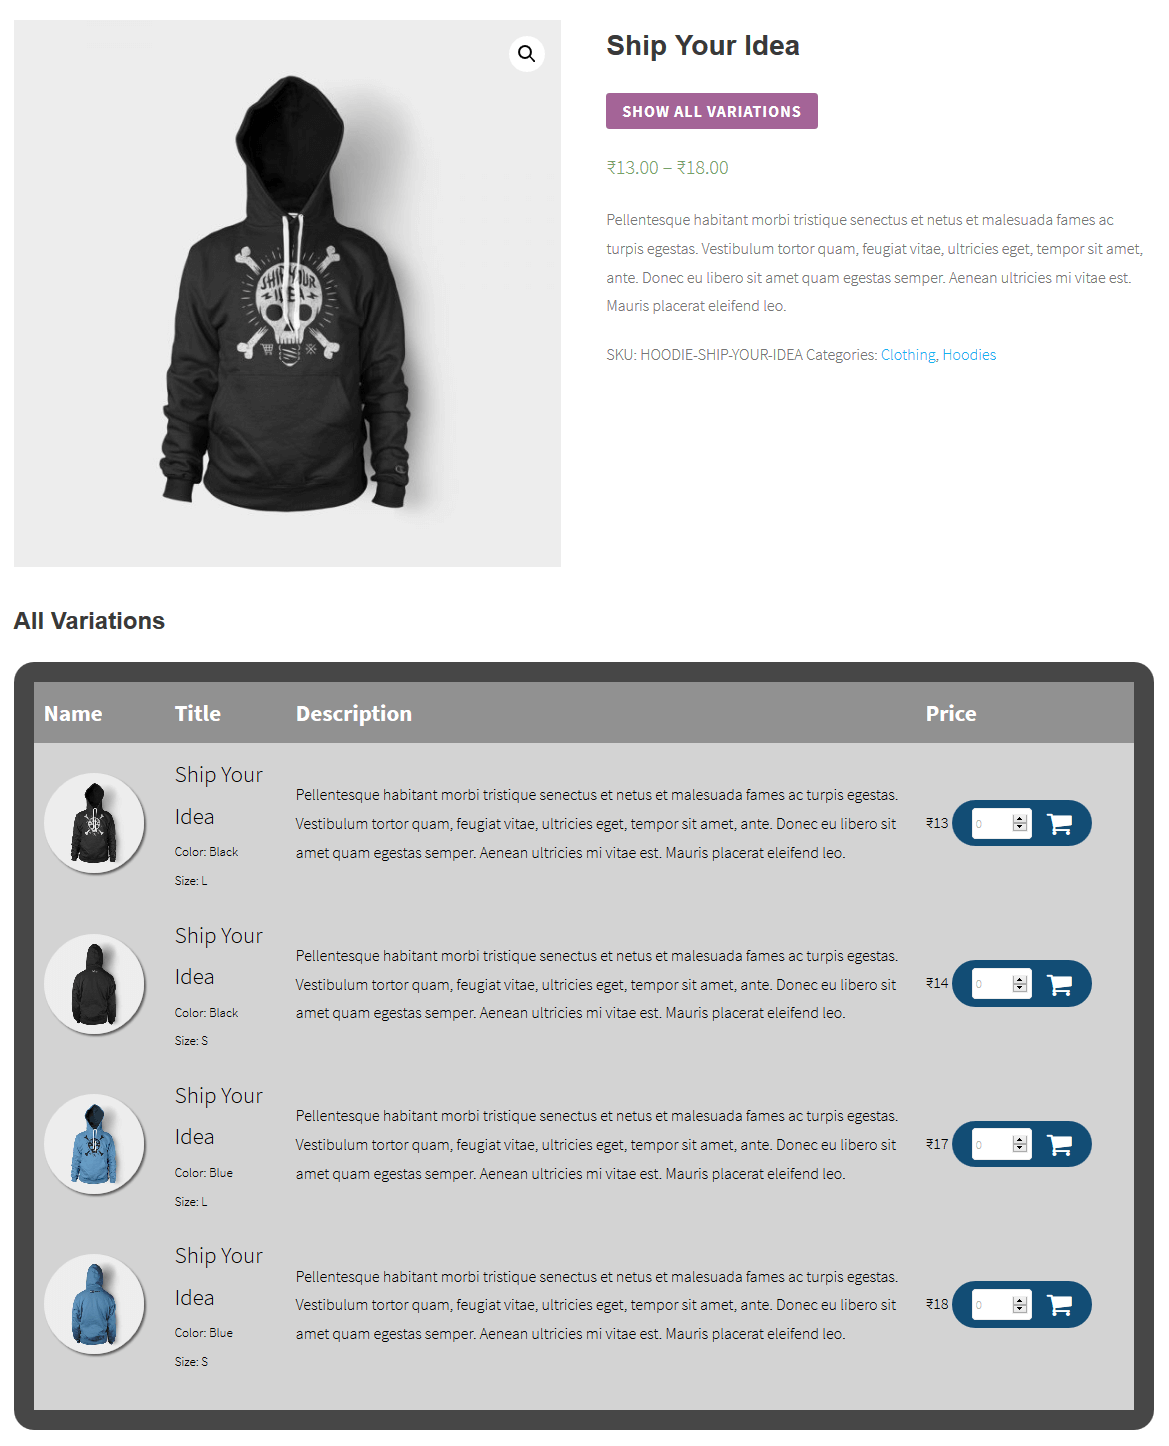
5.WooCommerce Variation Gallery
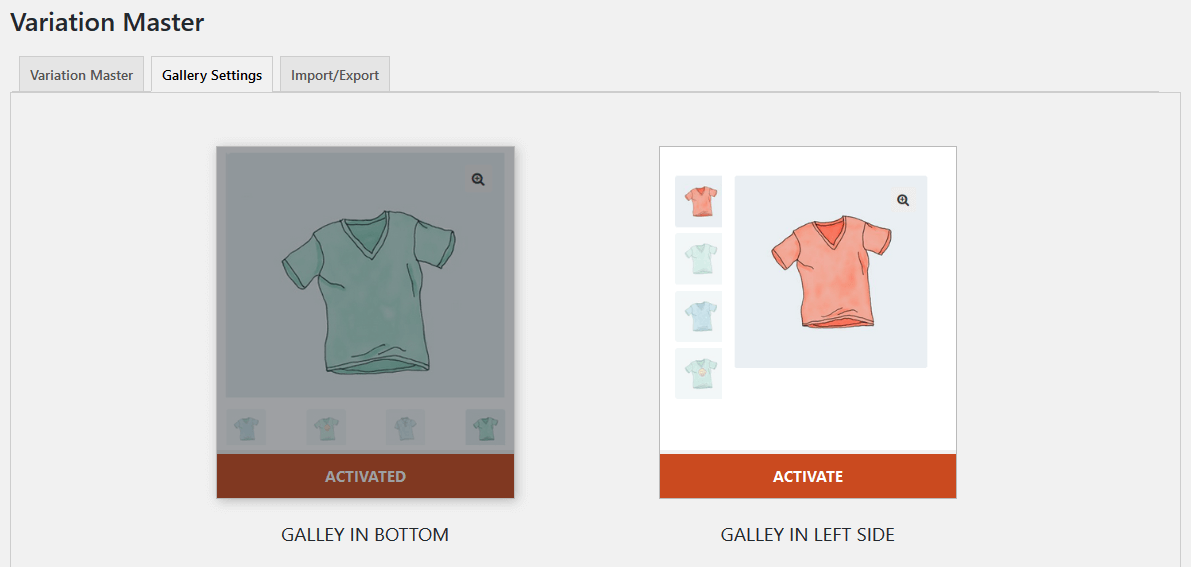
Variation swatches for Gallery: Here we are providing two different layouts of the product variation gallery.
- Gallery at Bottom
- Gallary in Right Side
To set the variation gallery goto the edit page of a particular product click on variations > add variation gallery images. Here you can add the multiple images of your variable product and last click on the Save Changes button.
Finally, go to the ‘Global Setting’ of the plugin and enable the ‘Variation Wise Gallery’ setting and the ‘Slider on Variation Featured Image’ setting of the plugin. And click on the ‘Save Setting’ button.
After successfully enable the settings, you can see the product variation gallery in a selected layout.

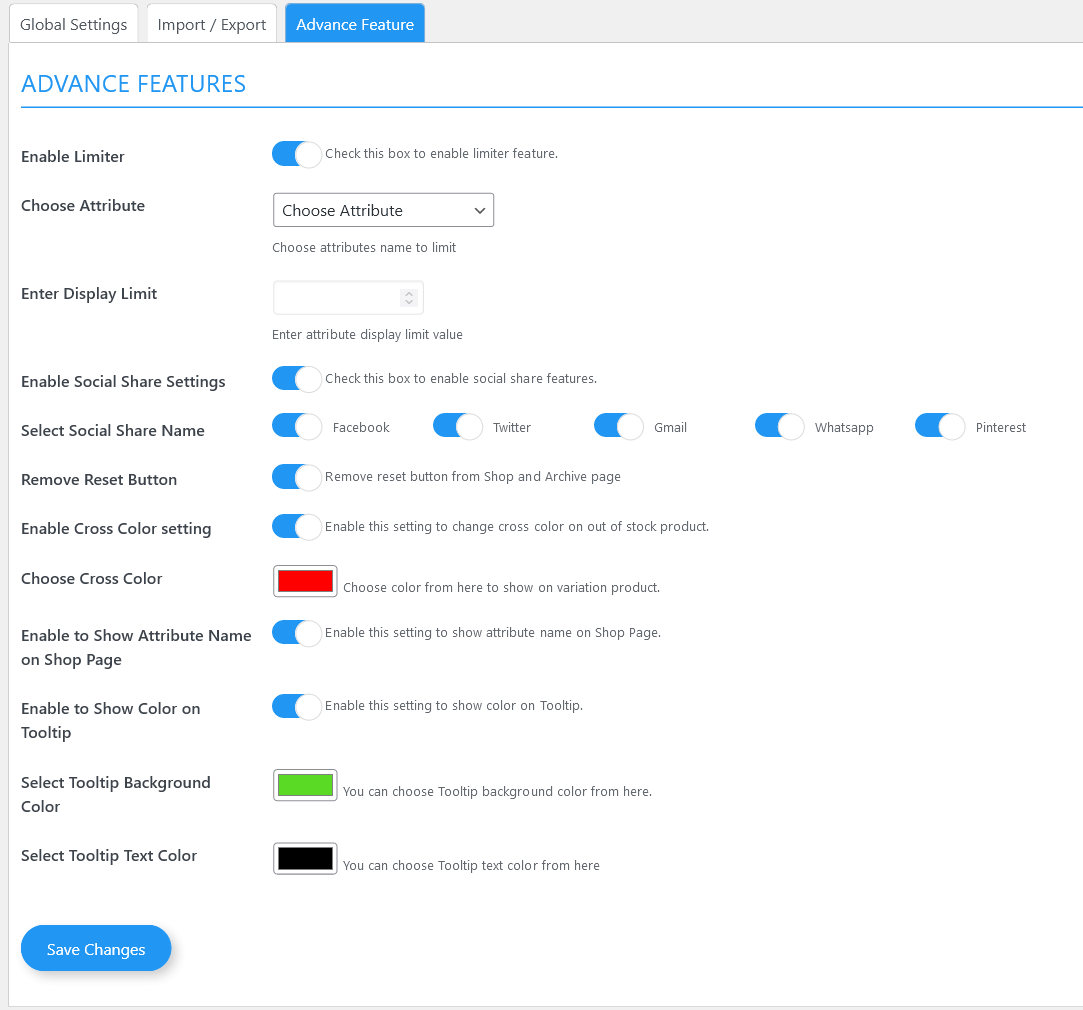
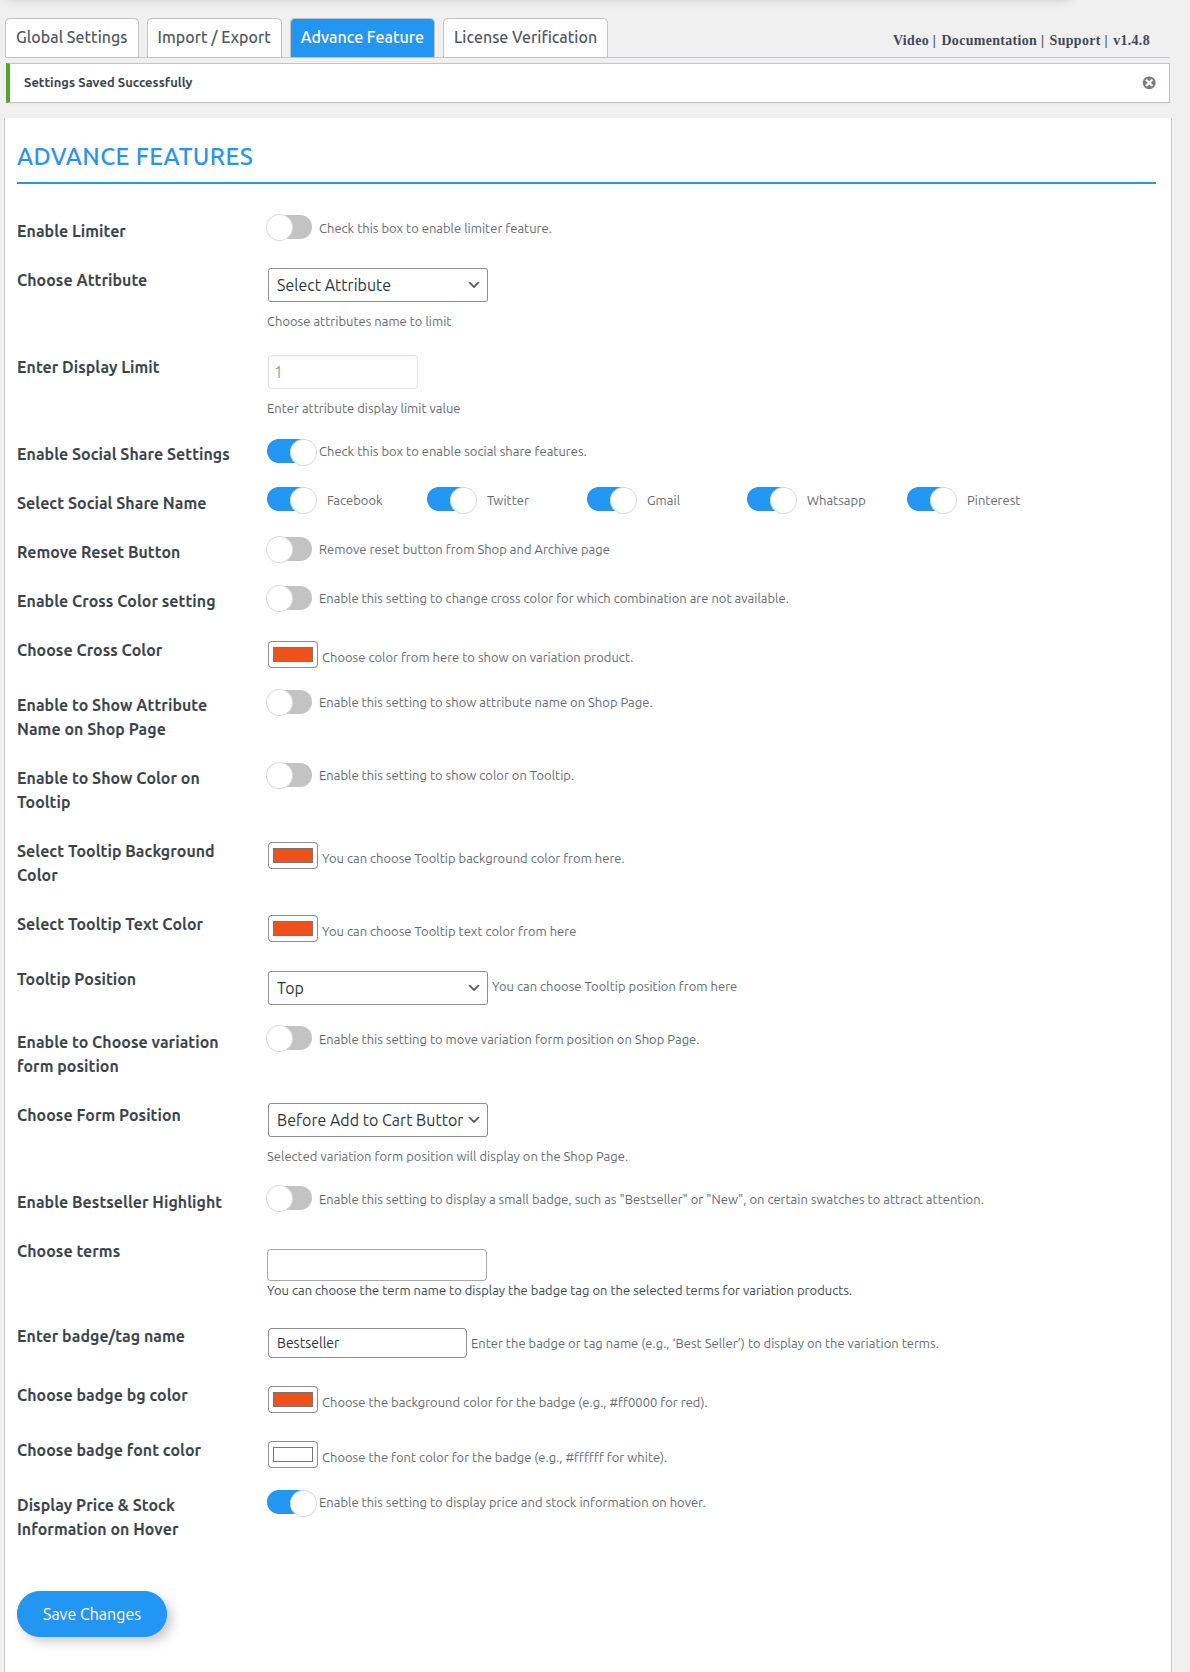
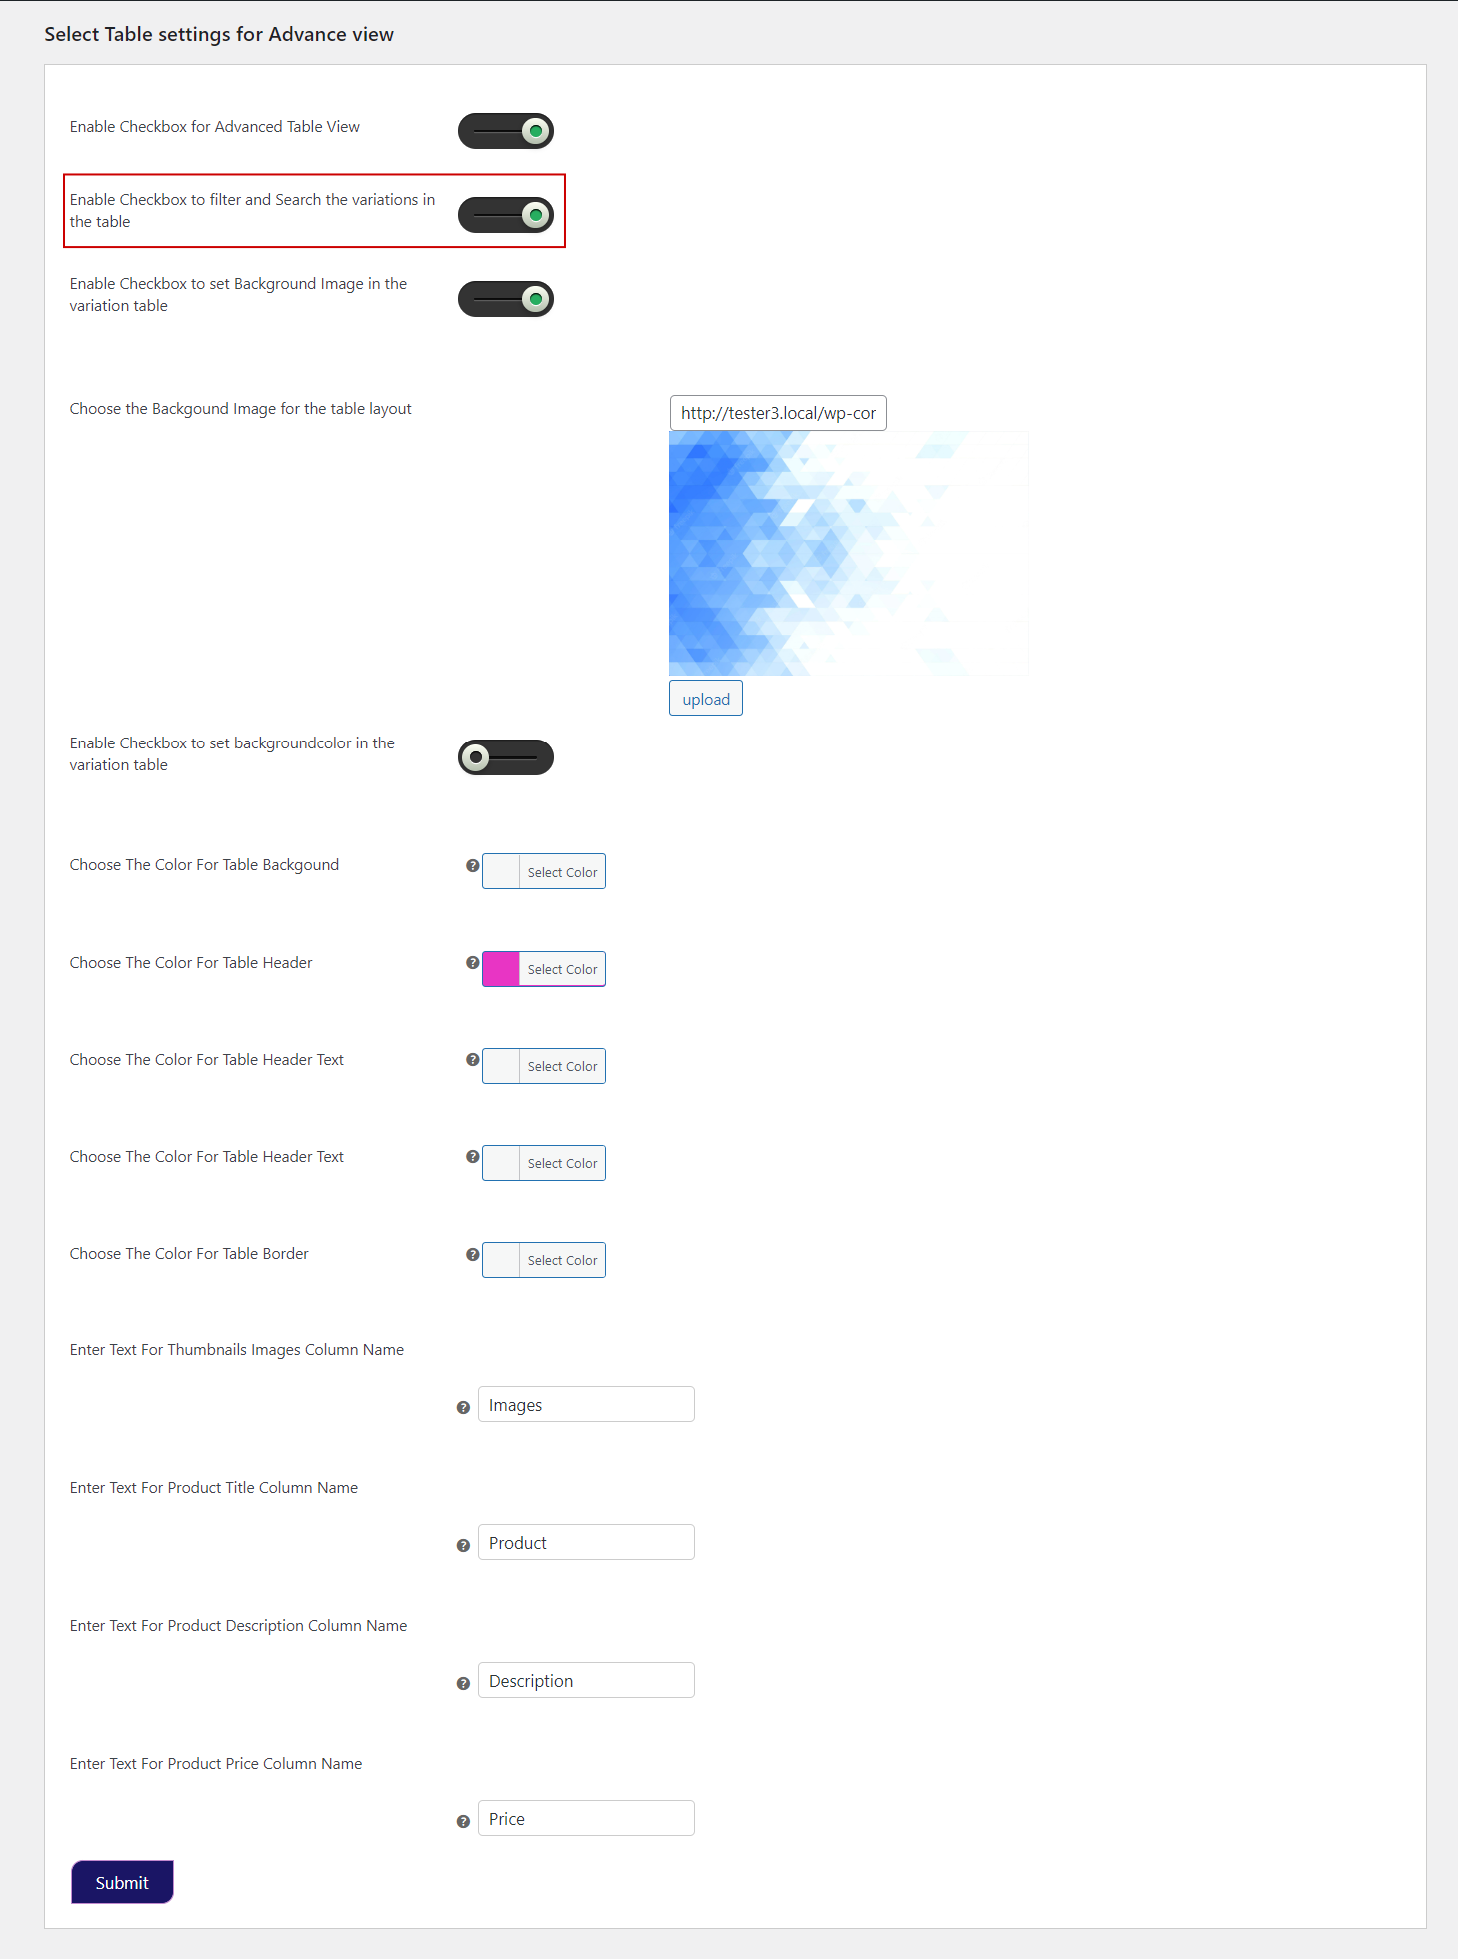
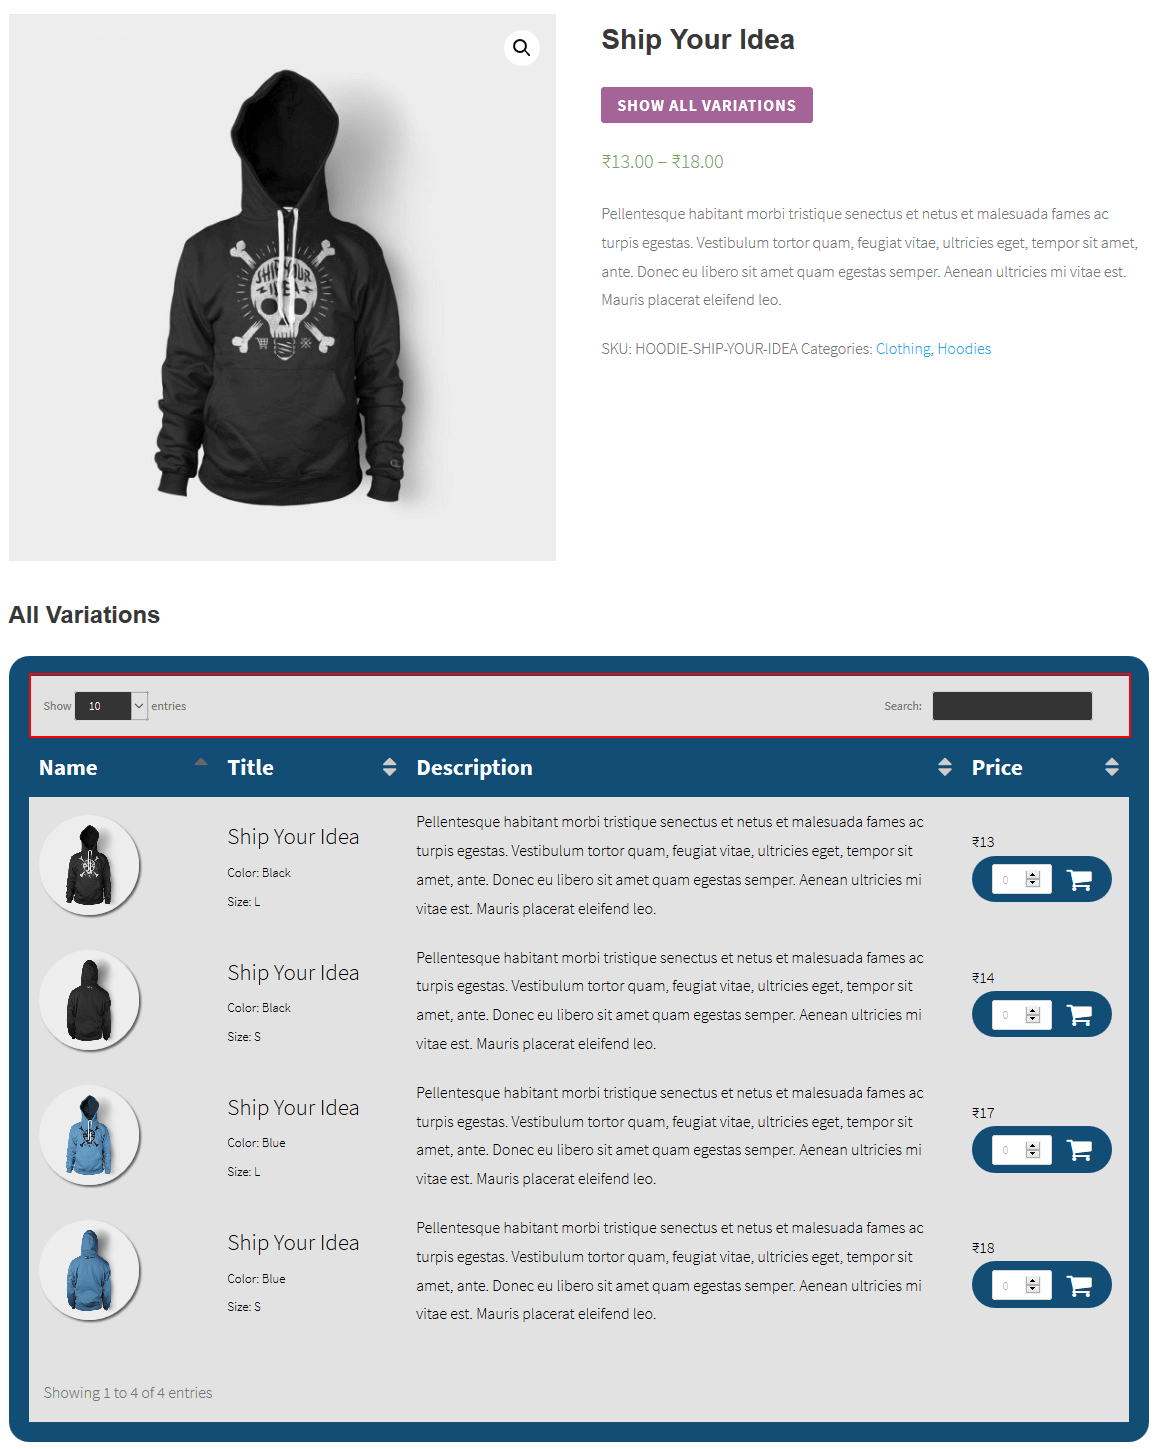
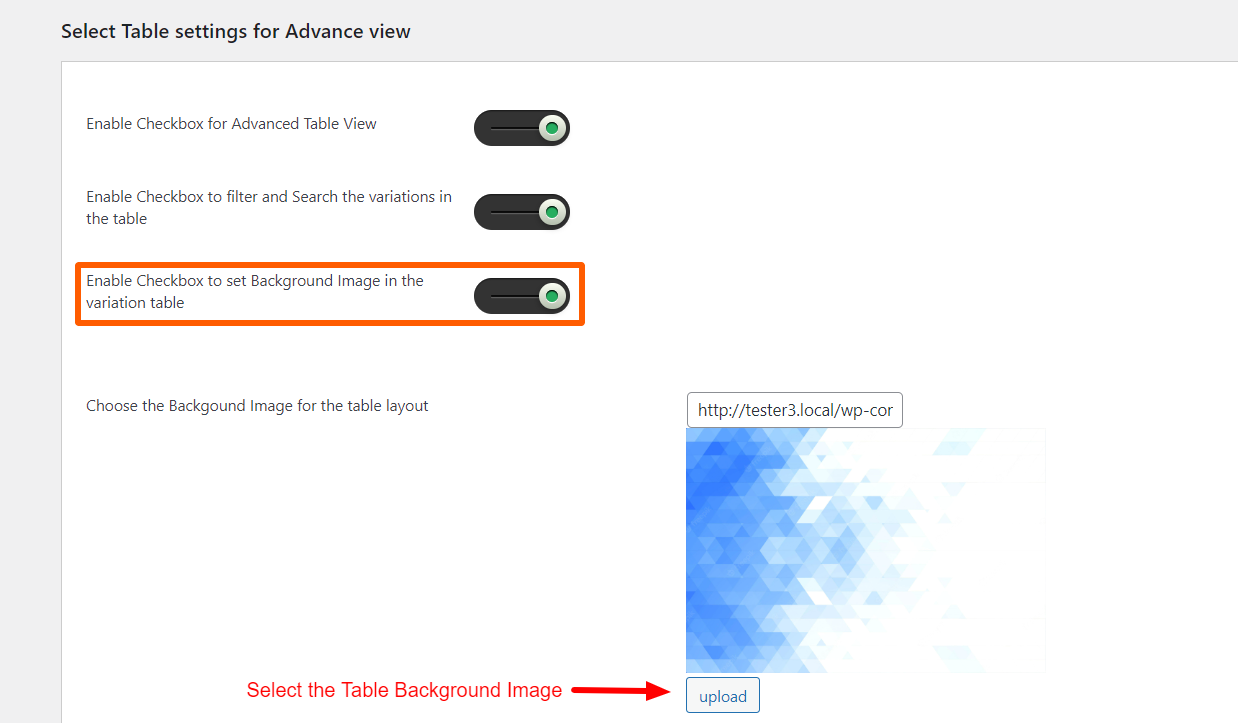
6.Advance Settings
The advanced settings, include the social sharing setting that allows the merchants to enable the social share buttons for social media platforms like Facebook, Gmail, Twitter, and Whatsapp for customers to share variable product details on social sites.
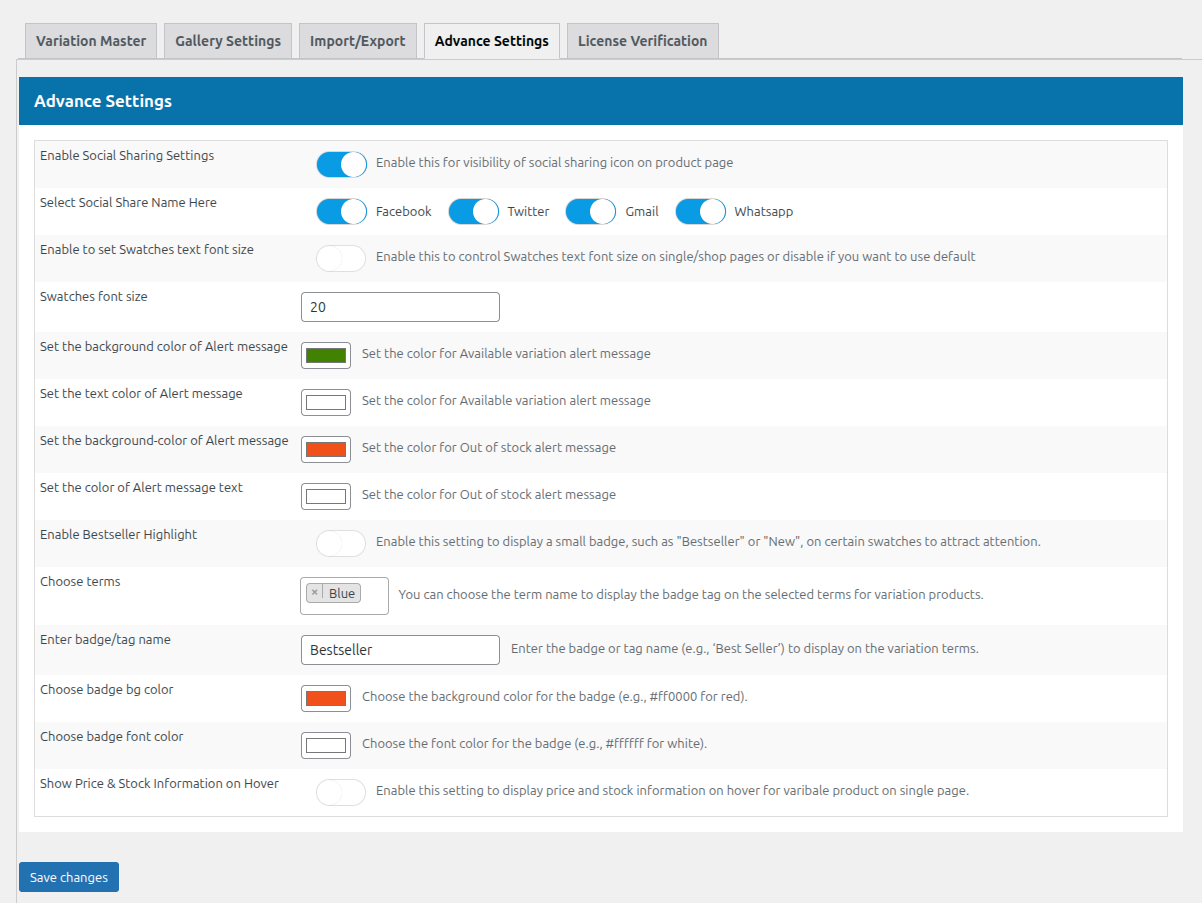
6.1.Enable Social Sharing Settings
The admin/ user can enable this settings if he wants to make the social sharing icons visible on the product page.
6.3.Enable to Set Variation Swatches Text Font Size
With the WooCommerce Variations plugin, the admin can also enable this setting if he/she wants to control the swatches’ text font size on the single/ shop page. You can disable this setting if you want to go ahead with the default settings.
6.4.Swatches Font Size
WooCommerce product variation also enables the admin the enter the exact font size for the text, which will be shown over the swatches on the single/shop page.
6.5.Set the background color of the Alert message For WooComerce Variations
The admin can set the background color of the alert message (available variation alert) WooCommerce Variations that he has already set.
6.6.Set the text color of the Alert message
The admin can also set the text color for the alert message (available variation alert) that he has already set for WooCommerce variations.
6.7.Set the background color of the Alert message
The admin can set the background color of the alert message (out-of-stock alert) WooCommerce Variations that he has already set.
6.8.Set the text color of the Alert message
The admin can also set the text color for the alert message (out-of-stock alert) that he has already set for WooCommerce variations.
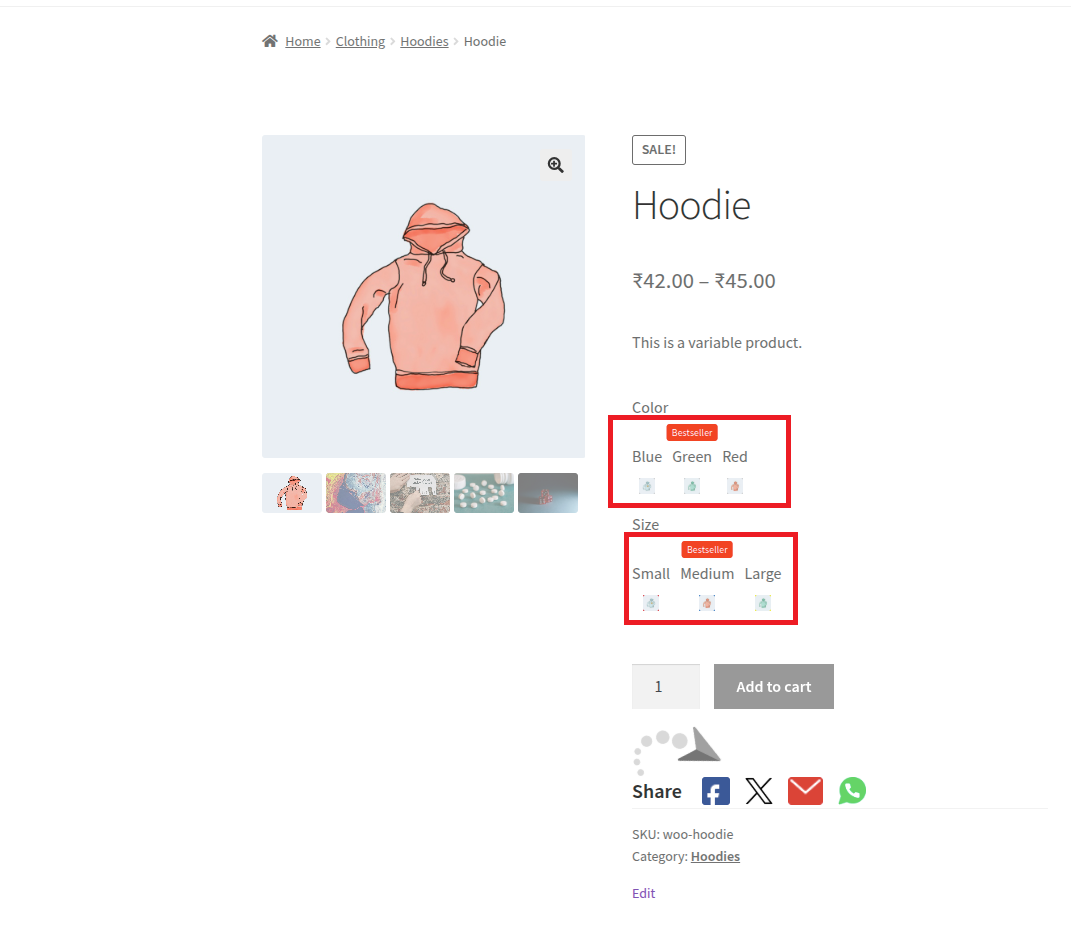
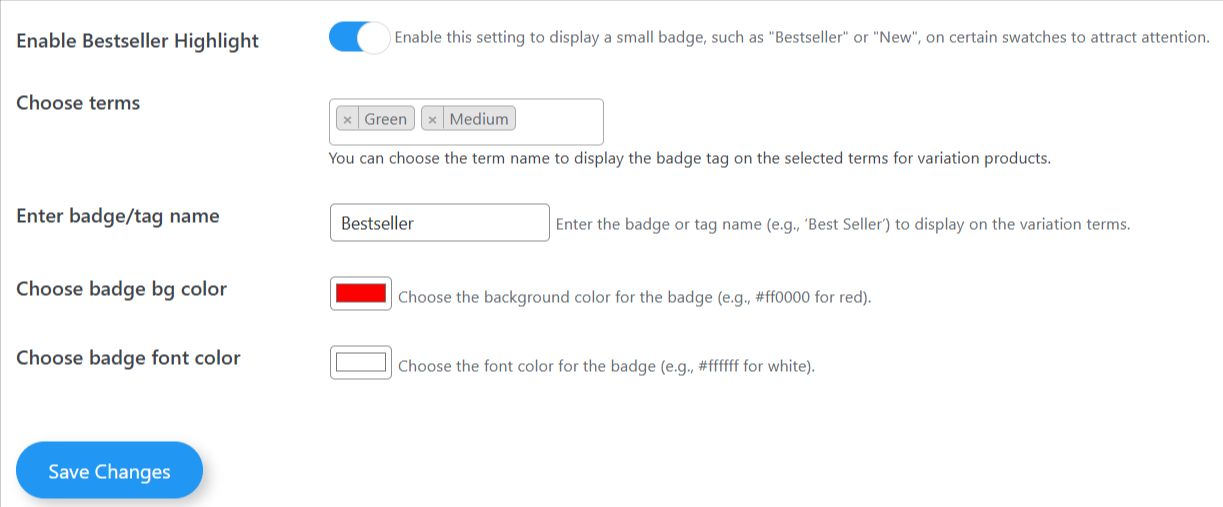
6.9.Enable Bestseller Highlight
This is the functionality of WooCommerce variation master, which allows you to assign badges to any product attribute.
6.10.Choose Terms
This settings allows you to choose terms or products which you want to showcase. For example, suppose your red, medium-sized T-shirt is a bestseller (something that customers usually like purchasing). In that case, you can easily configure the settings to display a “Bestseller” badge on red color medium-sized T-shirt options.
6.11.Enter Badge/ Tag Name
This settings allows the admin to change the name of badge, that will show on selected variation items.
6.12.Select Badge Background Colour
This settings allows admins to change the background color of badges that showcases the bestseller variations.
6.13.Choose Badge Font Colour
The admins can choose the font color for the badge that they want to display.
Frontend Representation Of This Feature,
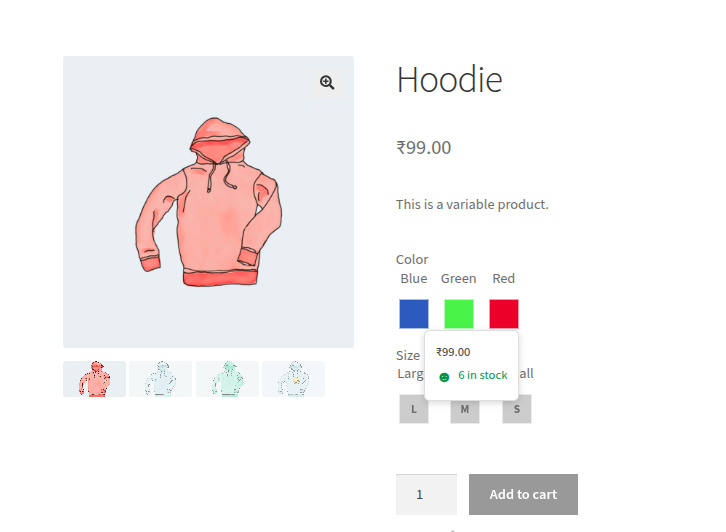
6.14.Show Price And Stock Information On Hover
By enabling this setting, the admin can display the price and the stock on hovering over the variations.
Frontend Representation –


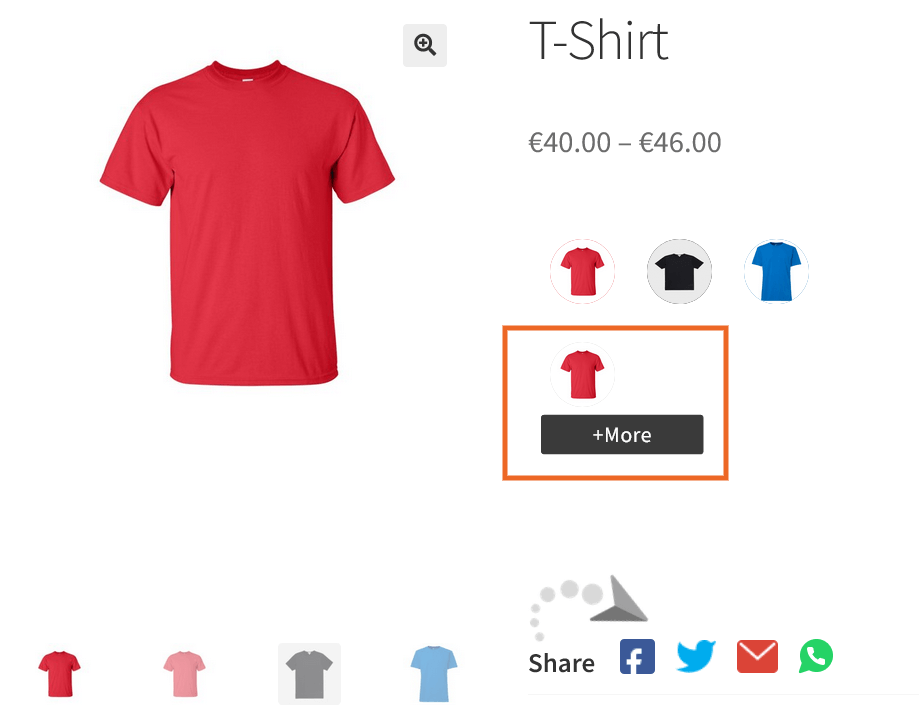

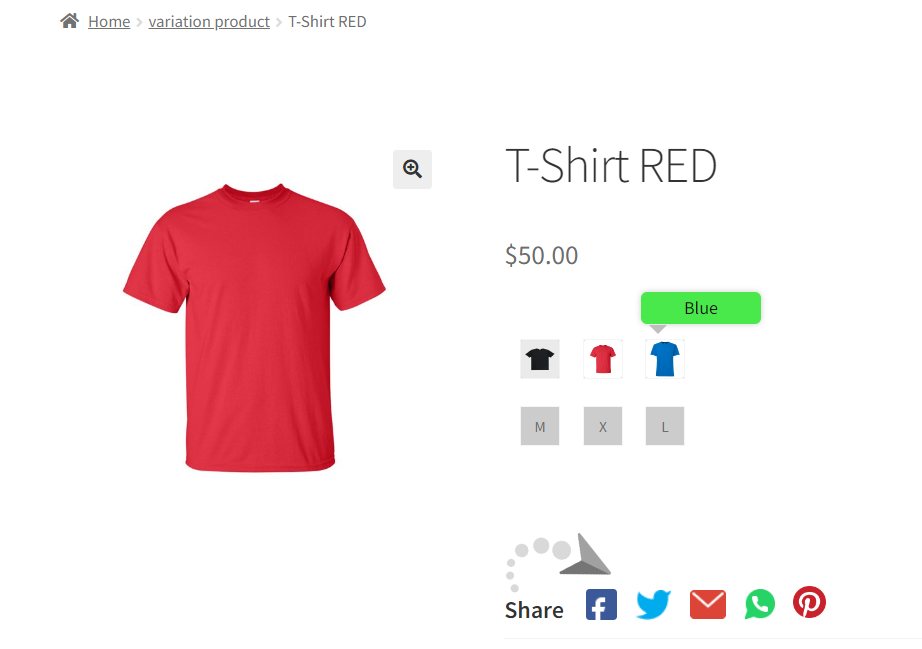


7.2.Social Sharing of Variable Product
You can easily add social share buttons to the product pages and allows users to share your products.
To do this, follow these instructions: