X
Exclusive Sale! Grab Flat 10% OFF on WooCommerce plugins | Use Coupon: WPSGRAB10
Get More Offers
  • Skip to primary navigation
  • Skip to main content
  • Skip to footer
WP Swings Documentation

WP Swings Documentation

  • WooCommerce Plugins
  • Services
  • Blog
  • Knowledge Base
  • Submit Query

woocommerce

WooCommerce Order Tracker

May 15, 2018 by Vipul Yadav

search_image
  1. Overview
  2. Installation
  3. Track Your Order
  4. Track Order Setting
  5. Create Custom Order Status
  6. Common Setting
  7. Different templates for your order tracking
  8. Shipment Services Integration
  9. Select Order Status to Show on Tracking
  10. Track Your Order with Google Map
  11. 17 Tracking Integration
  12. Select Shipping Companies
  13. WooCommerce Order Tracker Theme Compatible
  14. Custom Status for Bulk Action
  15. Additional Order Details
  16. Shortcode for Creating Order Tracking Page
  17. Track Order
  18. Order Tracking for Logged In Users
  19. Order Export
  20. Payment Link email Reminder on Pending Payment Order Status
  21. FAQs
  22. Helpful Resources !!

1.Overview

WooCommerce Order Tracker allows customers to quickly and easily track their orders in a graphical and interactive way. In this plugin, you can also track your customer’s order in an easy way with FedEx shipping service, Canada post Shipment Tracking, USPS Shipment Tracking, Google Map Tracking, 17Track.net Tracking, and other Enhanced Shipment Tracking Services. The whole process goes under a dedicated tracking system which keeps the customer aware of their order status and the time when their order will be delivered. This plugin is very easy to customize and simple to use. 

Here are the extraordinary features offered by WooCommerce Order Tracker:

  • Graphical and user interactive frontend for tracking orders.
  • Admin can use the templates for order tracking.
  • Admins can create custom order statuses for providing a more interactive frontend for tracking orders.
  • Admins can enable the pop-up window to view the order status.
  • Admins can send the email notification when the order status changes.
  • Admins can enable/disable Google maps for tracking.
  • Admins can select the cities through which the client’s order will arrive.

2.Installation

Automatic Installation

Automatic installation is the easiest option as WordPress handles the file transfer itself. You don’t need to leave your web browser.

Admins can perform automatic installation by following the few simple steps:

  • After opening the Dashboard of your WordPress website, go to the Admin Panel. Navigate to the Plugins menu. Click on Add New option.
  • Click on the Upload Plugin button.
  • Click on the Browse button. Navigate to the downloaded Order Tracker zip file.
  • Simply install it by clicking Install Now.

Manual Installation

In order to install the install the Order Tracker, follow these steps:

  • Upload the Order Tracker folder to the  /wp-content/plugins/ directory.
  • Activate the plugin through the ‘Plugins’ menu in WordPress.
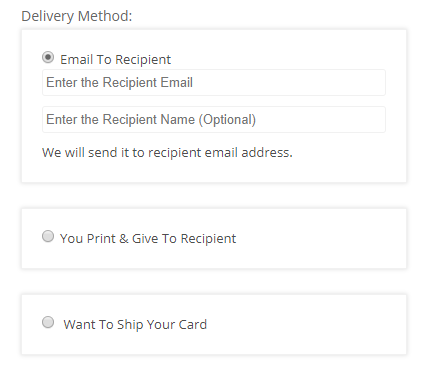
3.Track Your Order

The login user can track their orders by navigating from My Account>Order Section.

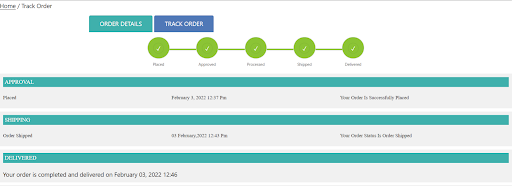
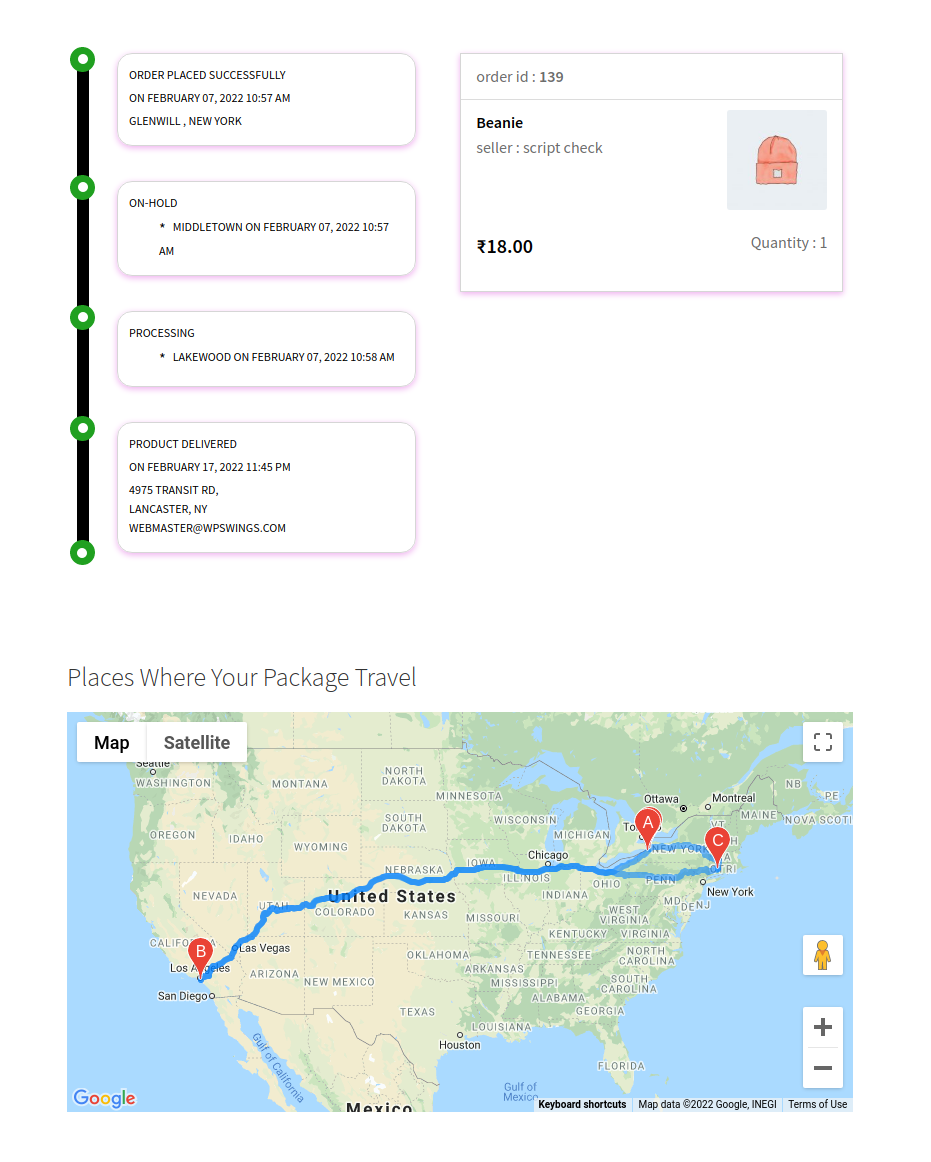
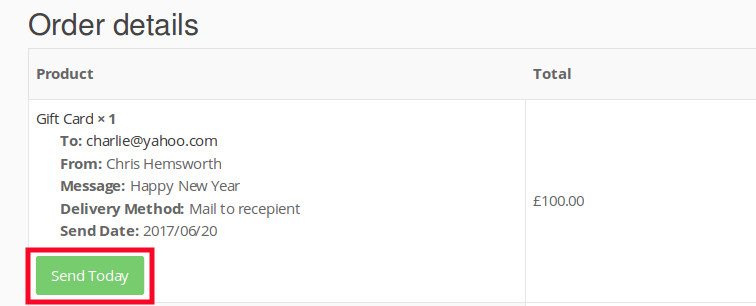
Just click on Track Orders. Your customers will be able to see the entire details and processing of their orders.

Track Your Order
Order Tracker

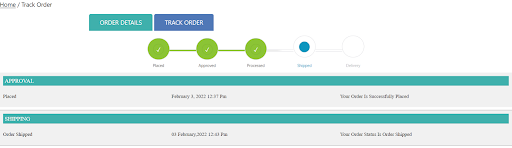
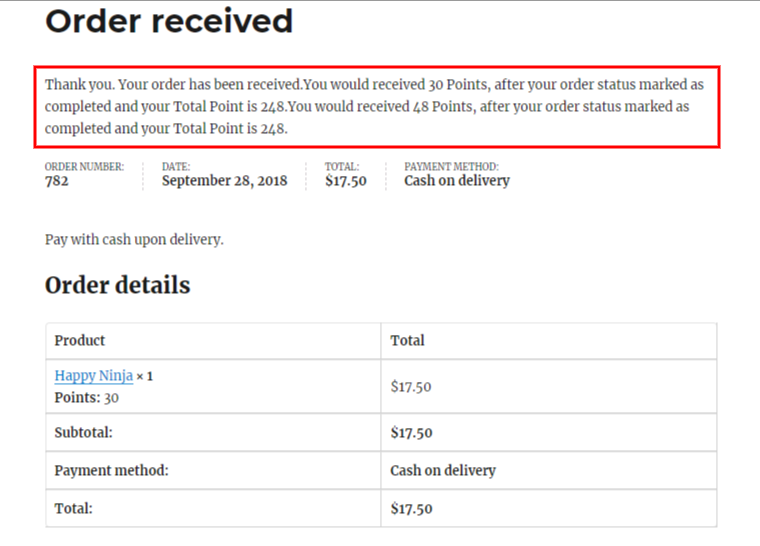
Once the order is successful the final tracking will look like:

Order Tracker
Suppose the order is returned or reverted back. In this case the customer can also view the order tracking.

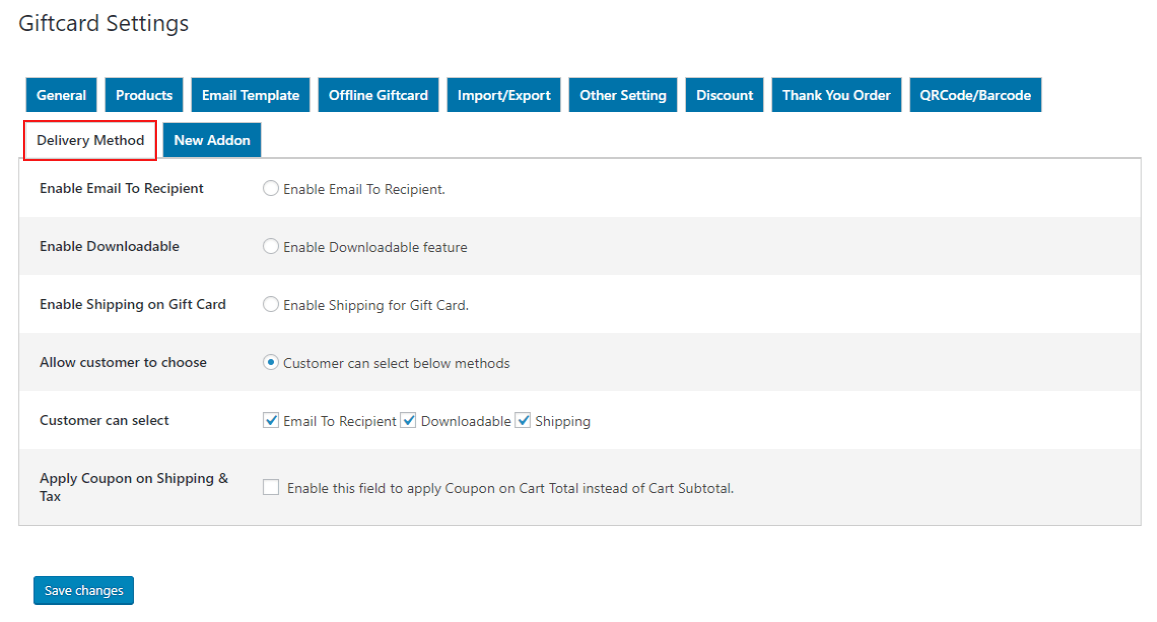
4.Track Order Setting

In the Track Order Section, admin can enable the order tracking, select and create custom order status if required. On selecting the custom order status, a dropdown will appear from which you can select new order status. It includes- Order Packed, Order Dispatched, Order Shipped, etc.

Admin needs to select the order status for the different order tracking stages. The stages are- approval, processing, and shipping.

WooCommerce Order Tracker
  1. Enable Tracking Feature: Clicking on the ‘Enable Order Tracking Feature‘ to enable the order tracking.
  2. Enable Tracking Feature in the pop-up: The merchant can enable the order status feature in the pop-up.
  3. Enable the Use of Custom Order Status: The merchant can enable this feature to use its own custom order status.
  4. Custom Order Statuses: The admin can select different order statuses that can be used for tracking. Custom Statuses include Order packed, Order dispatched and Order shipped, etc.
  5. Approval: This is the first step of order tracking. Admin needs to select an order status that needs to be shown in this section while order tracking.
  6. Processing: This is the middle step of the order tracking. Admin needs to select order status that needs to be shown in this section while order tracking.
  7. Shipping: This is the last step of order tracking. Admin needs to select order status that needs to be shown in this section while order tracking.
  8. Enable e-mail notification on order status change: This feature provides the ability to admin to send the notification mail on changing the order status.

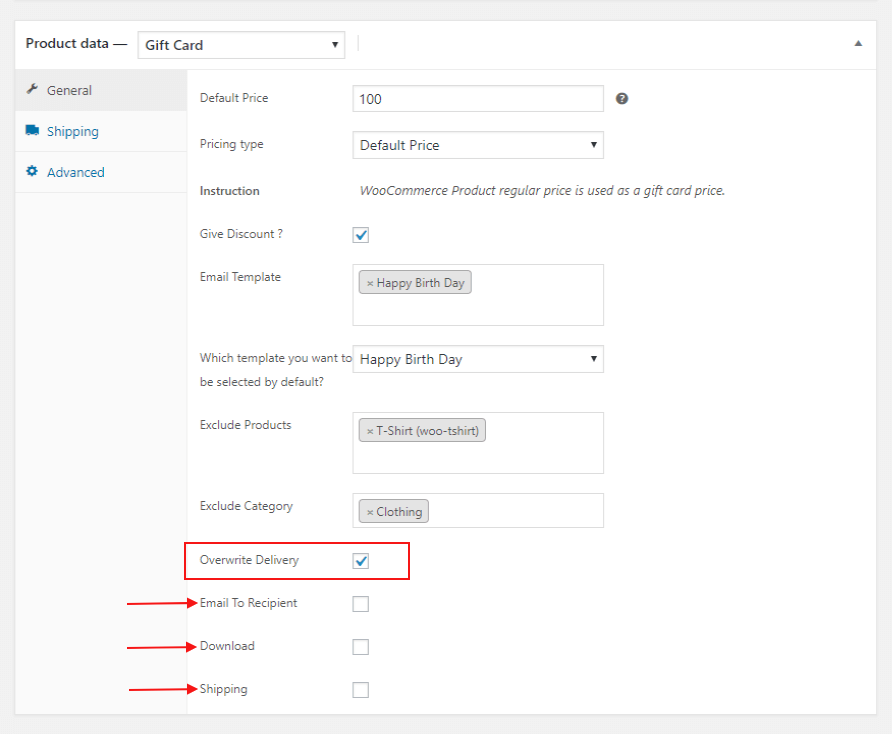
5.Create Custom Order Status

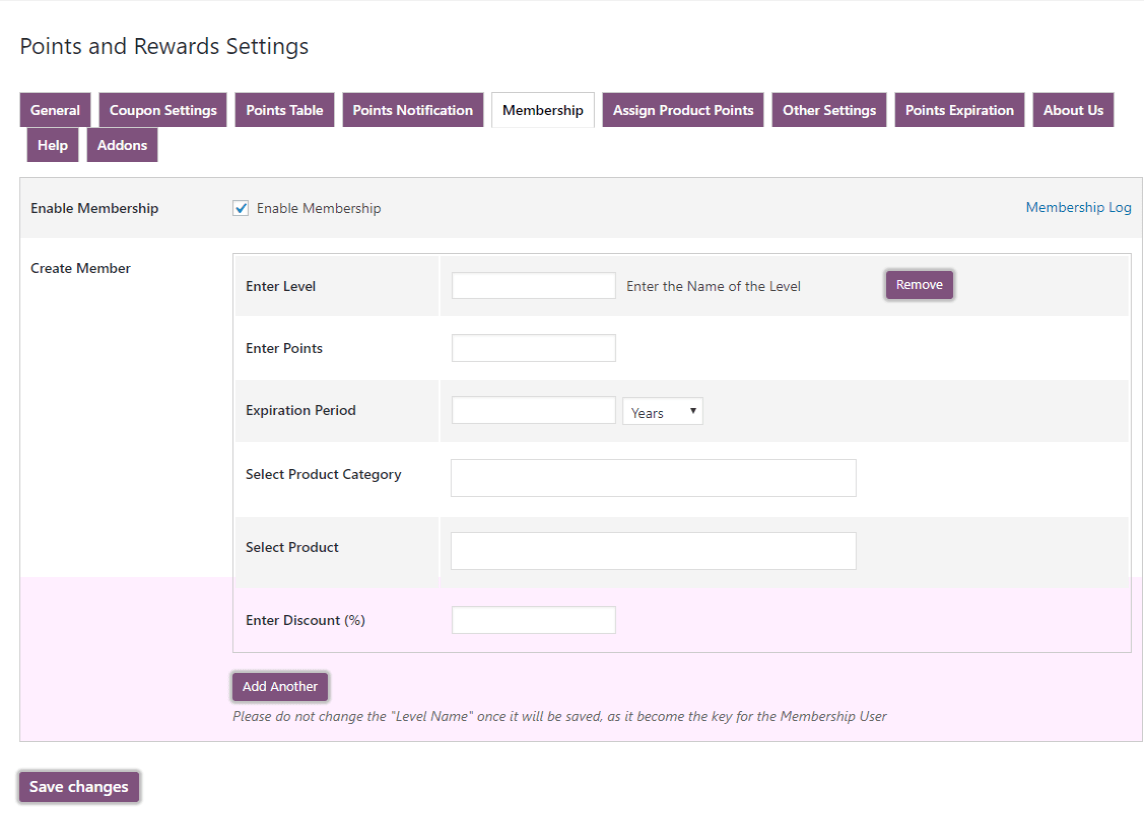
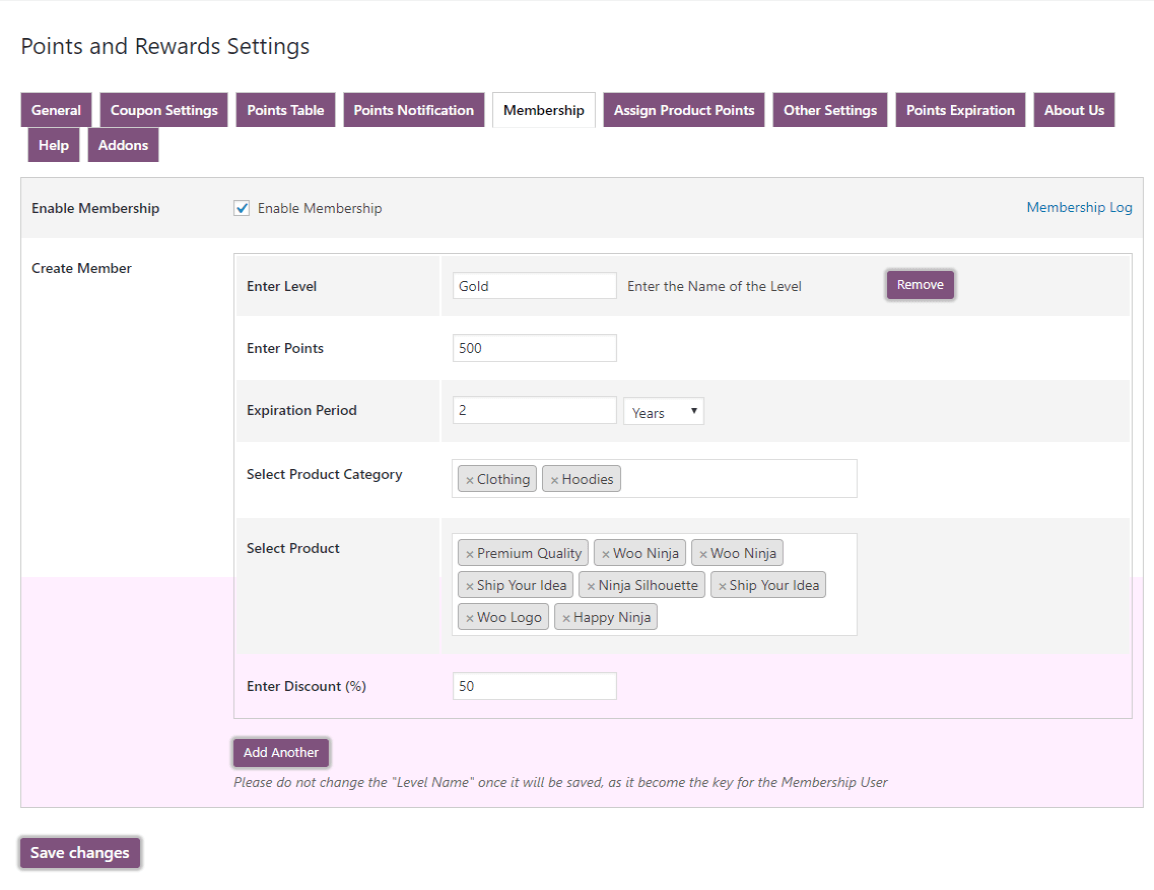
To create a new custom order status you need to insert an order status name and default image of order status.
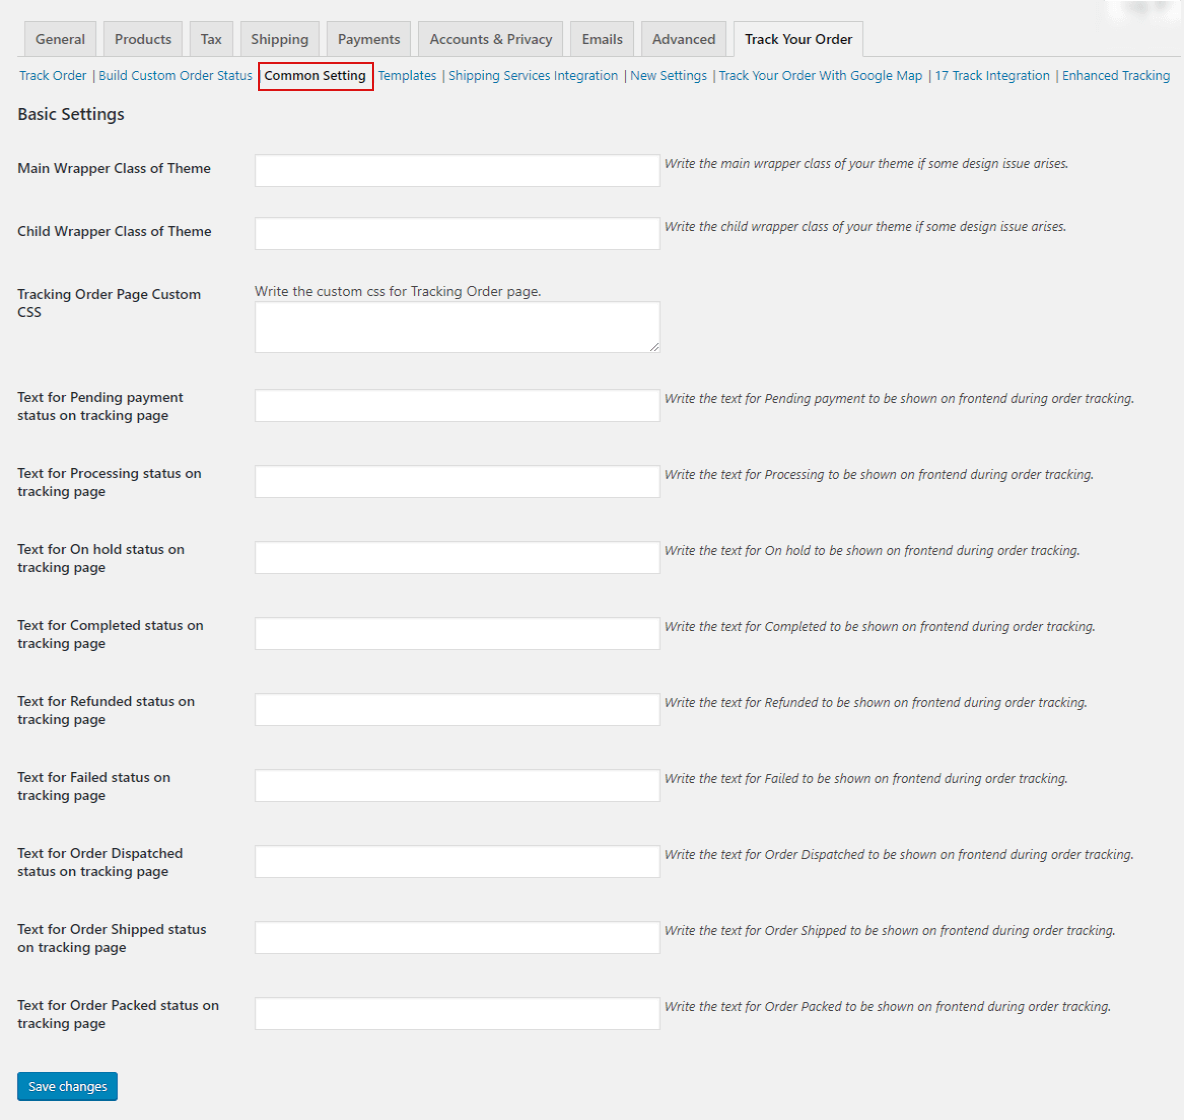
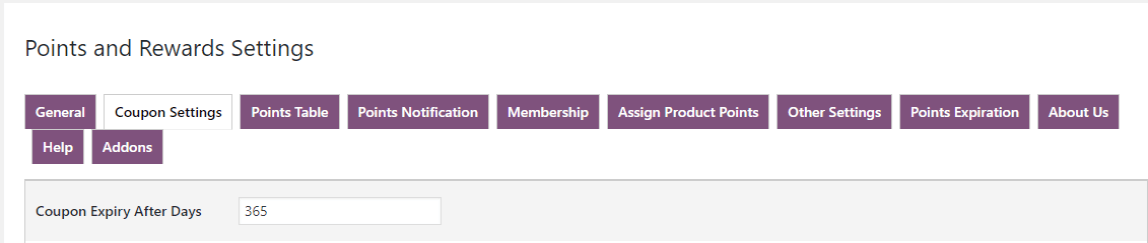
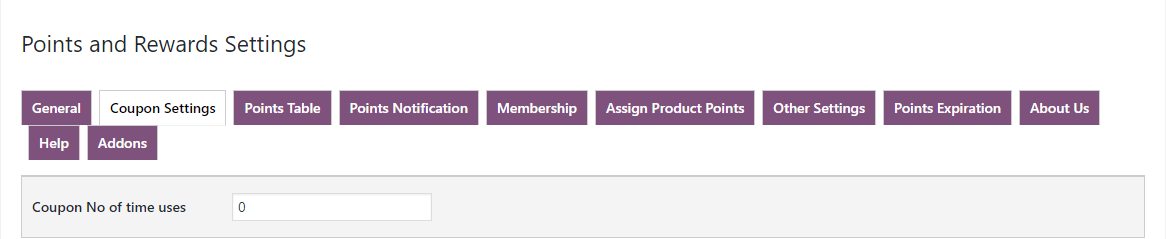
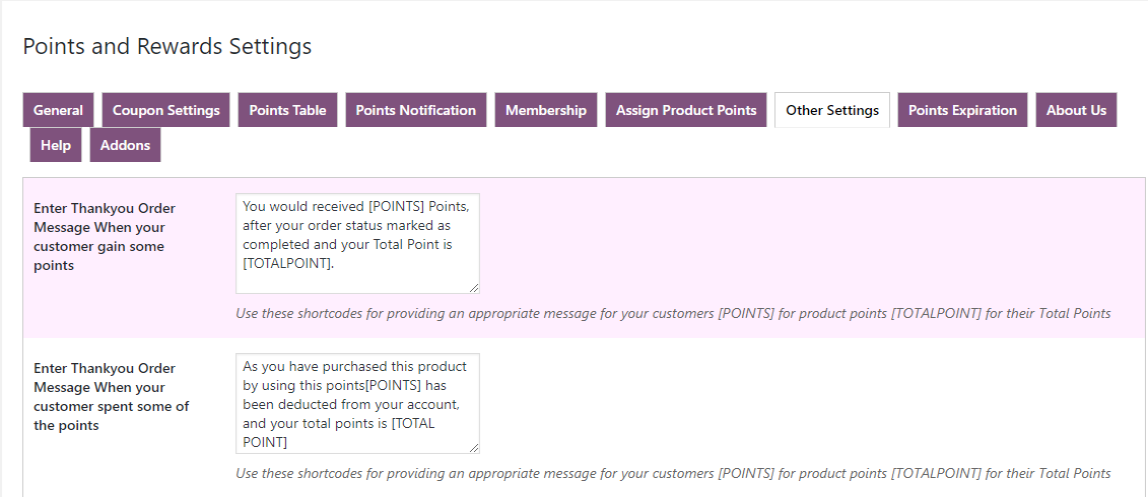
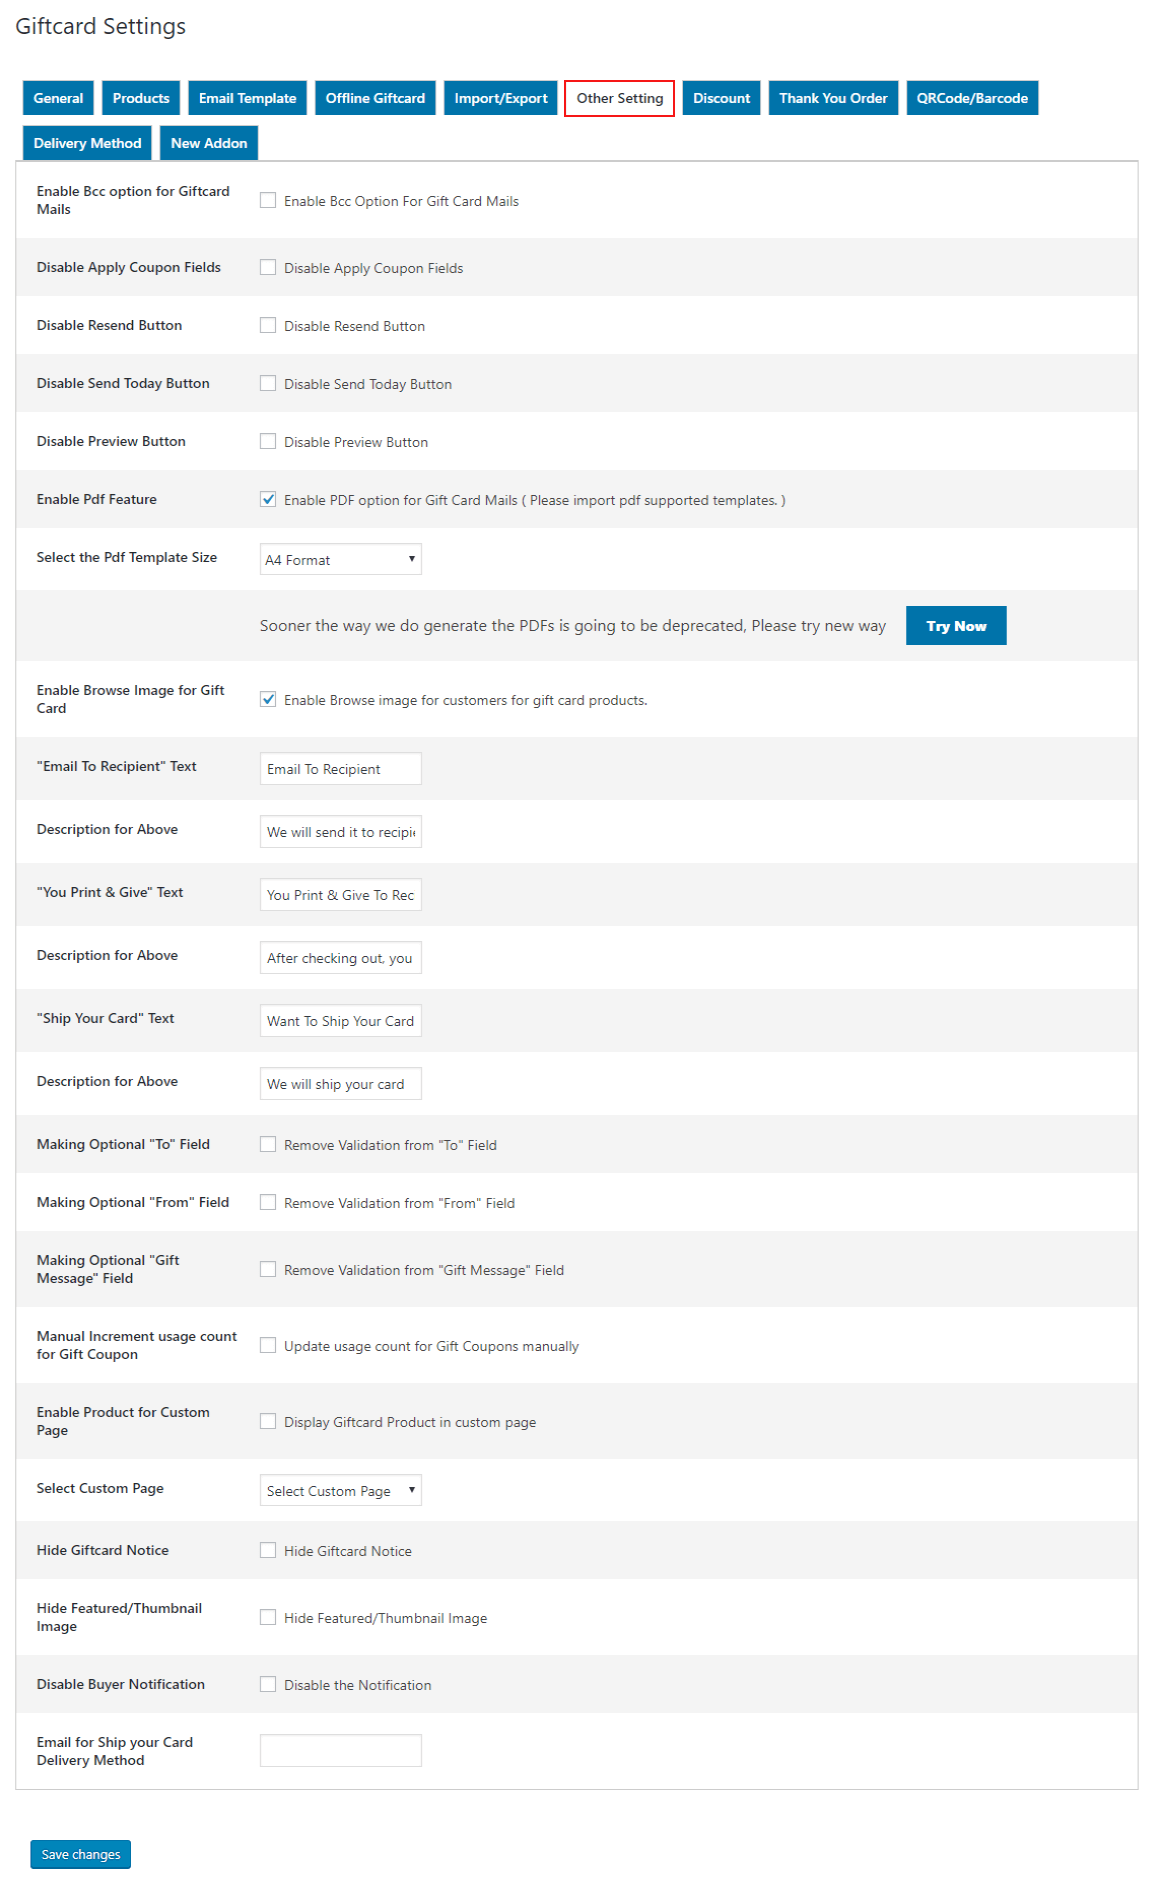
WooCommerce Order Tracker

6.Common Setting

In the Common Settings Tab, the admin can fill in the messages which need to be displayed with the order status during order tracking. They can write their own custom CSS if any design issues arise.

WooCommerce Order Tracker

7.Different templates for your order tracking

You can select one of the available templates to display the order tracking.

WooCommerce Order Tracker

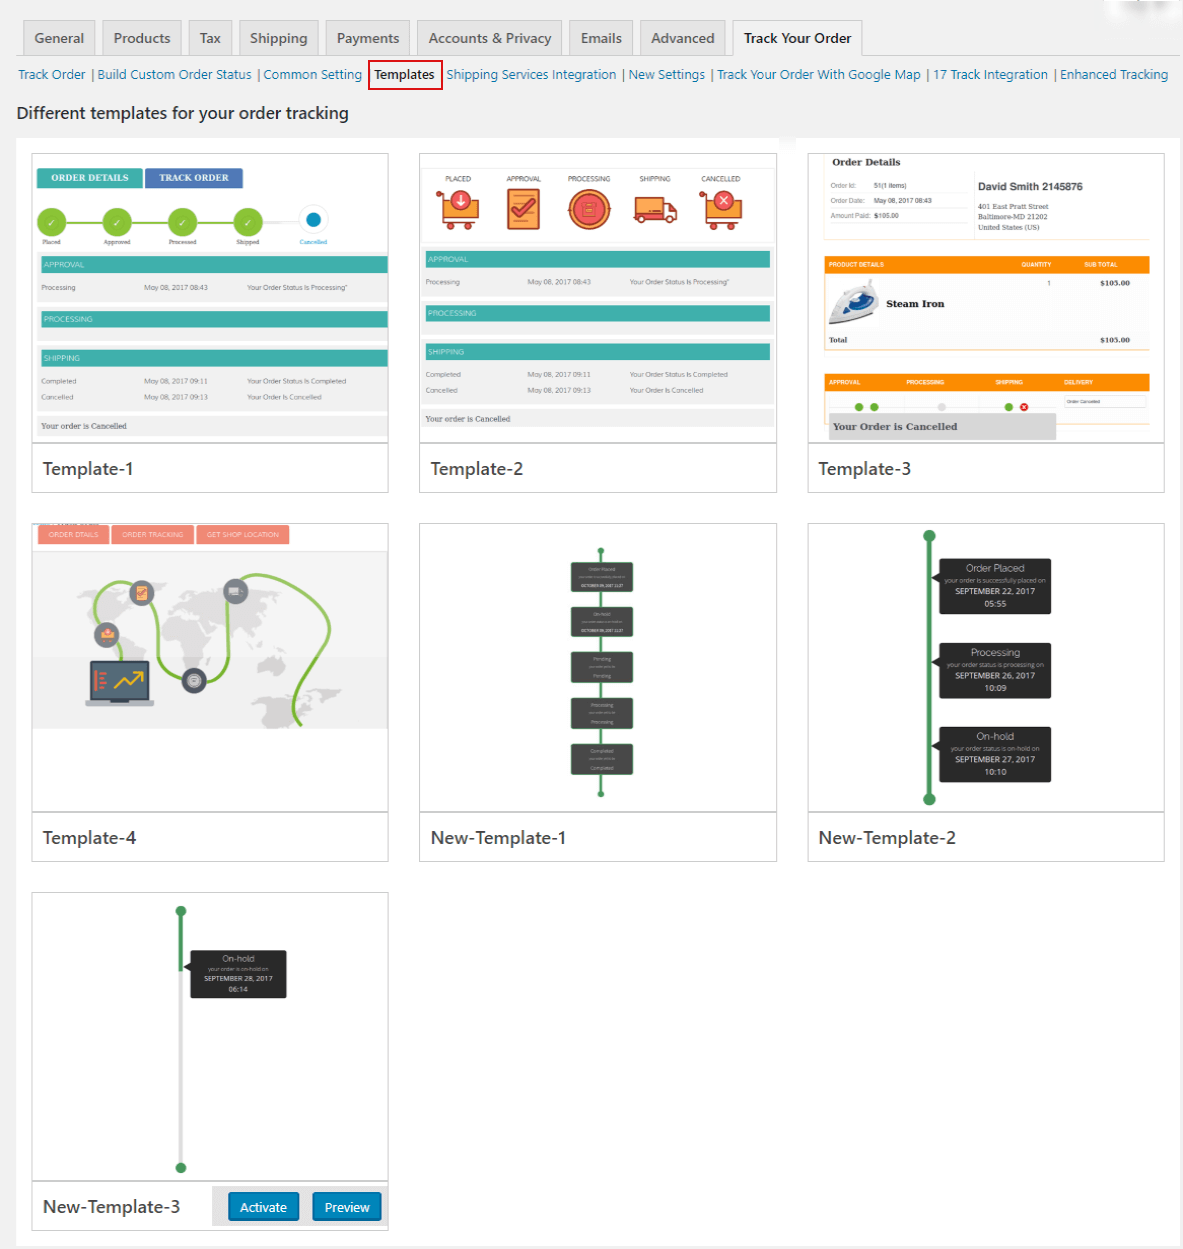
The order statuses will show in a different section on the front end.

woocommerce-order-tracker-order-status

8.Shipment Services Integration

Enable the Third Party Shipping API to track the order in real-time. To enable this setting you have to enter the User Key and Password of the selected Shipment Tracking Company.

WooCommerce Order Tracker

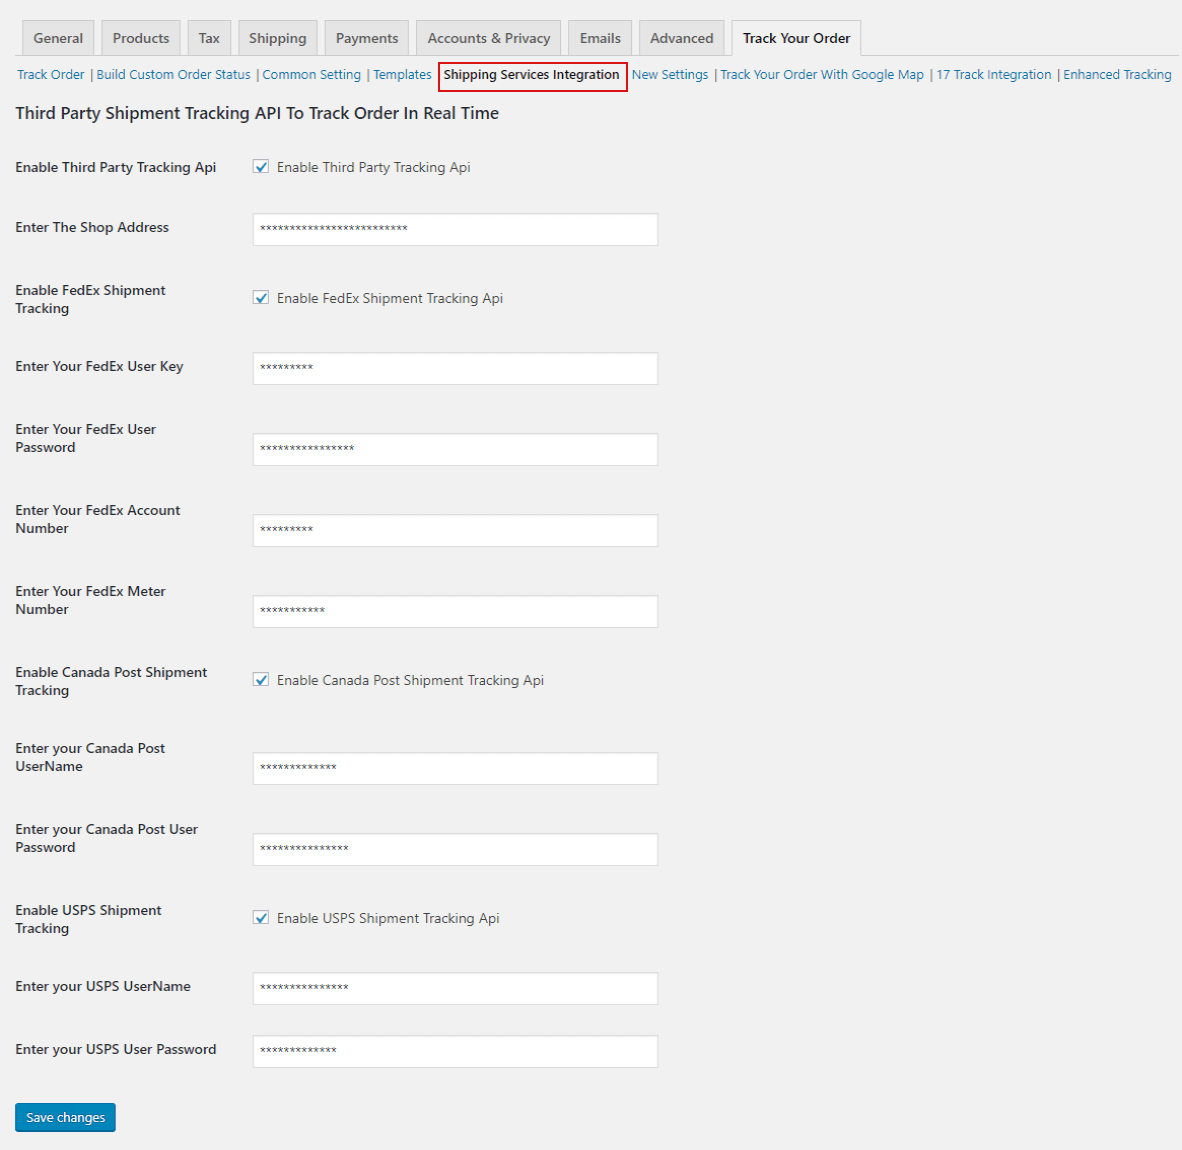
Suppose an order is placed and the admin provides the FedEx Shipment Tracking. In this case,  enter the FedEx tracking number from the order edit page to have a clear vision of the product.

After this, the customer can track their order easily from My Account >Shipping Tracking by using the given Tracking ID.

After generating the Tracking Number your customer just needs to click on the ‘Track Order’ button and enter the Order ID and Tracking Number.

woocommerce-order-tracker-submit-shipping-tracking

After Clicking on the ‘Submit’ button your customers can easily check their order product’s explicit delivery time with their current location.

woocommerce-order-tracker-shipping-detail

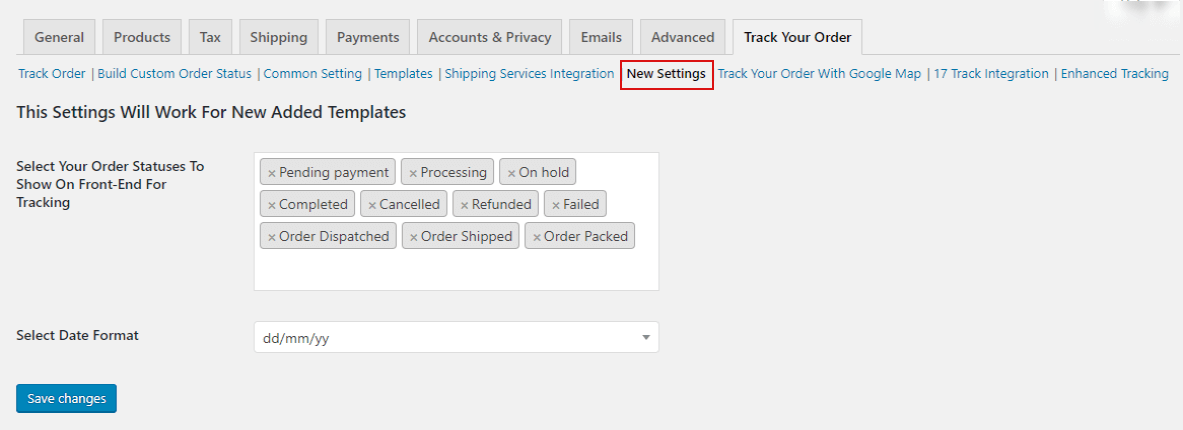
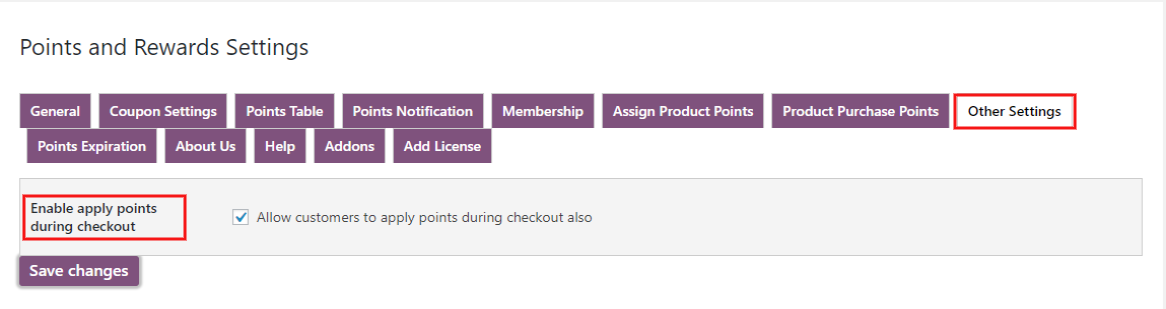
9.Select Order Status to Show on Tracking

Here you can select your order statuses to show on the front-end for tracking.

WooCommerce Order Tracker

10.Track Your Order with Google Map

Admin can enable Google Map API for Tracking. Enter your Google API Key and the address where your order has gone.

woocommerce-order-track-ordre-google-map

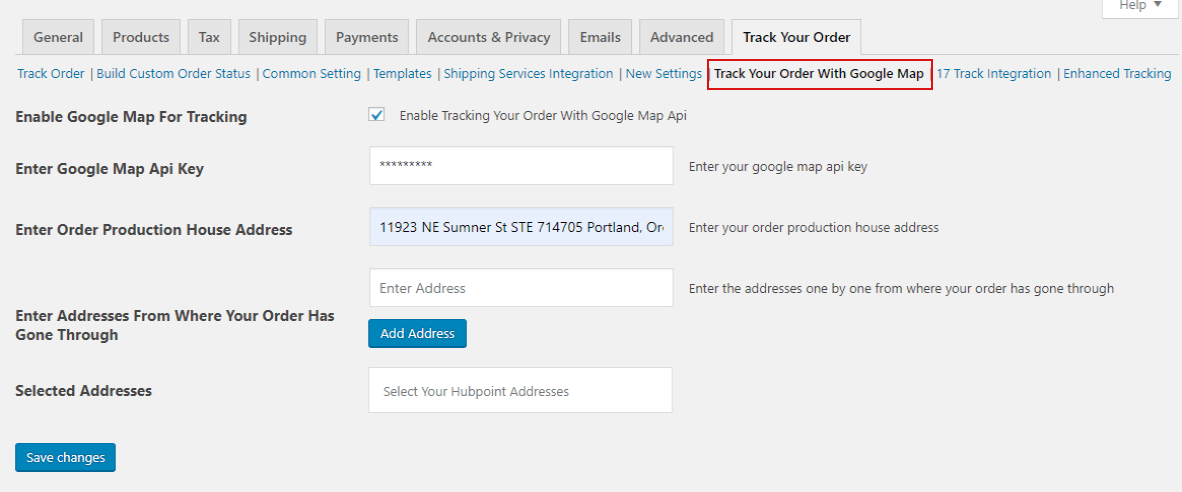
Click on save changes. All order details will appear in the selected areas.

Track your order

The customer can track the order by clicking on the Track Order Button.

woocommerce-order-tracker-orders

Customers track their own order on a real-time basis on the Google Map.

Track Your Order with Google Map

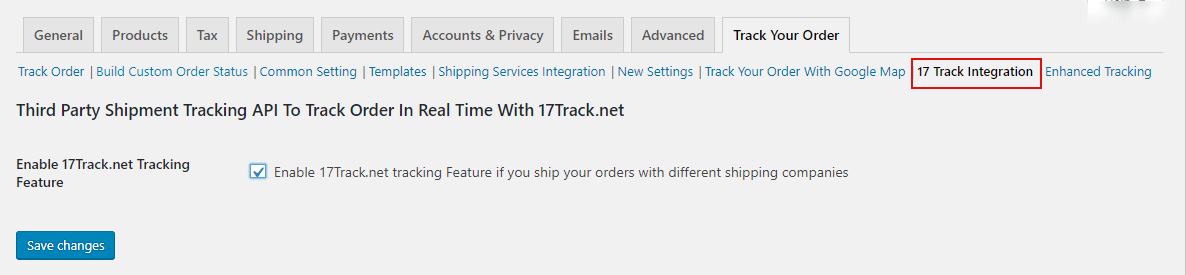
11.17 Tracking Integration

If you want to enable the shipping tracking with the 17Track.net. Simply enable the setting and click on the ‘Save Changes’ button.

woocommerce order tracker

Once an order is placed in the shop. Admin can provide the 17Track.net tracking number from the order edit page.

woocommerce order tracker

After this, the customer can track their order easily from the My Account >Shipping Tracking by using the given Tracking ID.

woocommerce-order-tracker-track-order

After generating the Tracking Number your customer just needs to click on the ‘Track Order‘ button and enter the Order ID and Tracking Number.

12.Select Shipping Companies

We are providing integration with 17 different shipping tracking companies. The admin can integrate with other shipping companies by simply entering the provider name and provider tracking page URL.

woocommerce-order-tracker

13.WooCommerce Order Tracker Theme Compatible

WooCommerce Order Tracker is compatible with various themes that are suitable for any kind of WordPress project.

  • Flatsome – Multi-Purpose Responsive WooCommerce Theme
  • Visual Composer – Free WordPress Website Builder
  • Elementor – Create, Manage and Host your Website
  • WC Vendors – A Modern WordPress Theme
  • DIVI Theme – The Ultimate WordPress Theme

Want some other theme compatibility? Contact Us


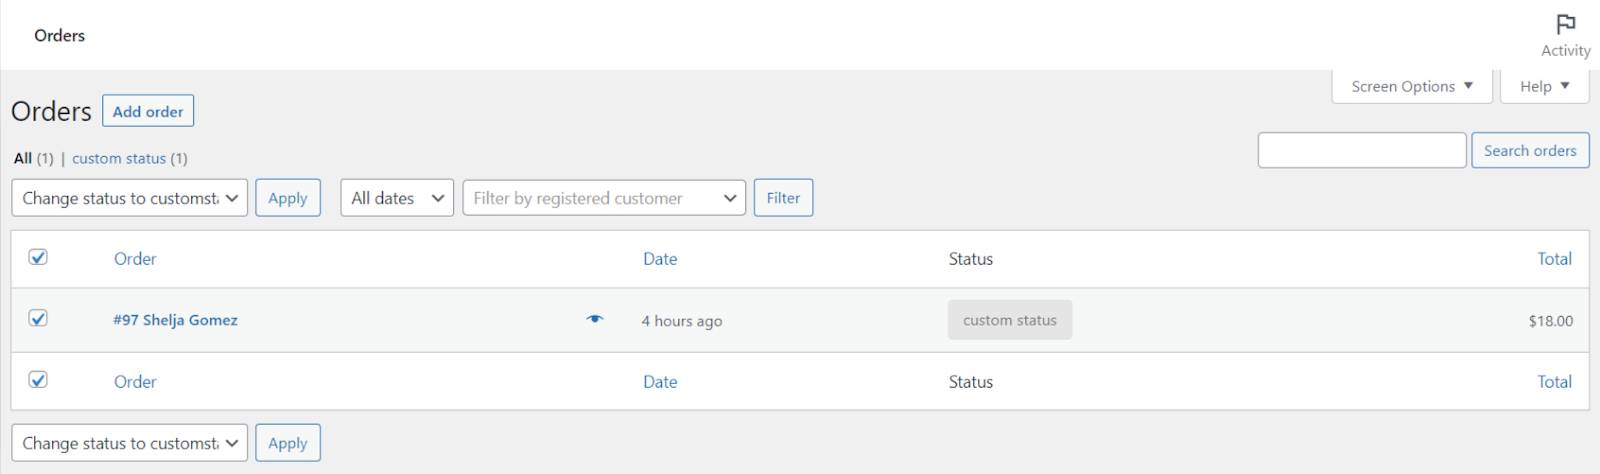
14.Custom Status for Bulk Action

WooCommerce Order Tracker plugin allows to apply bulk action on custom status.

For applying custom status to your order. Go to WooCommerce>Orders option. Then, here you will be able to see an option- change status to custom status under the Bulk actions option. Then, click on Apply.

“

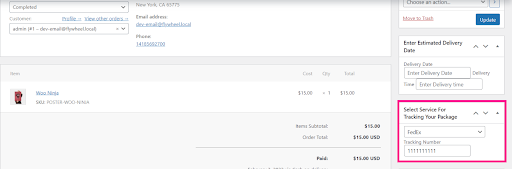
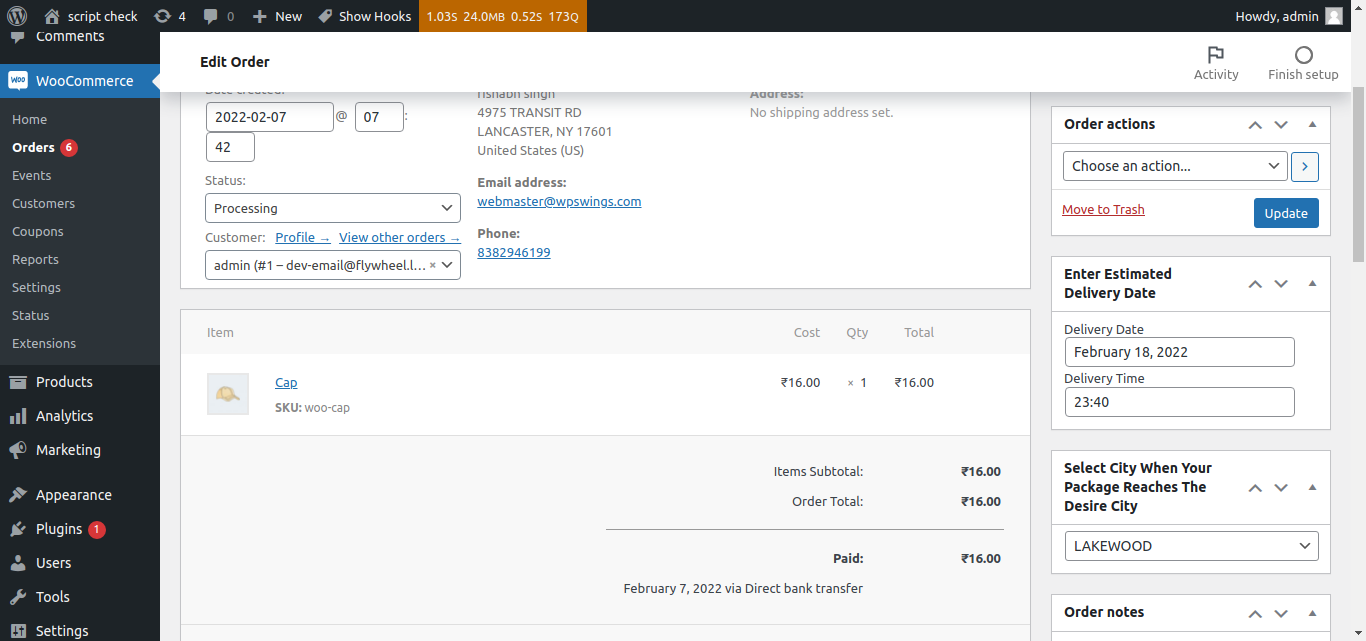
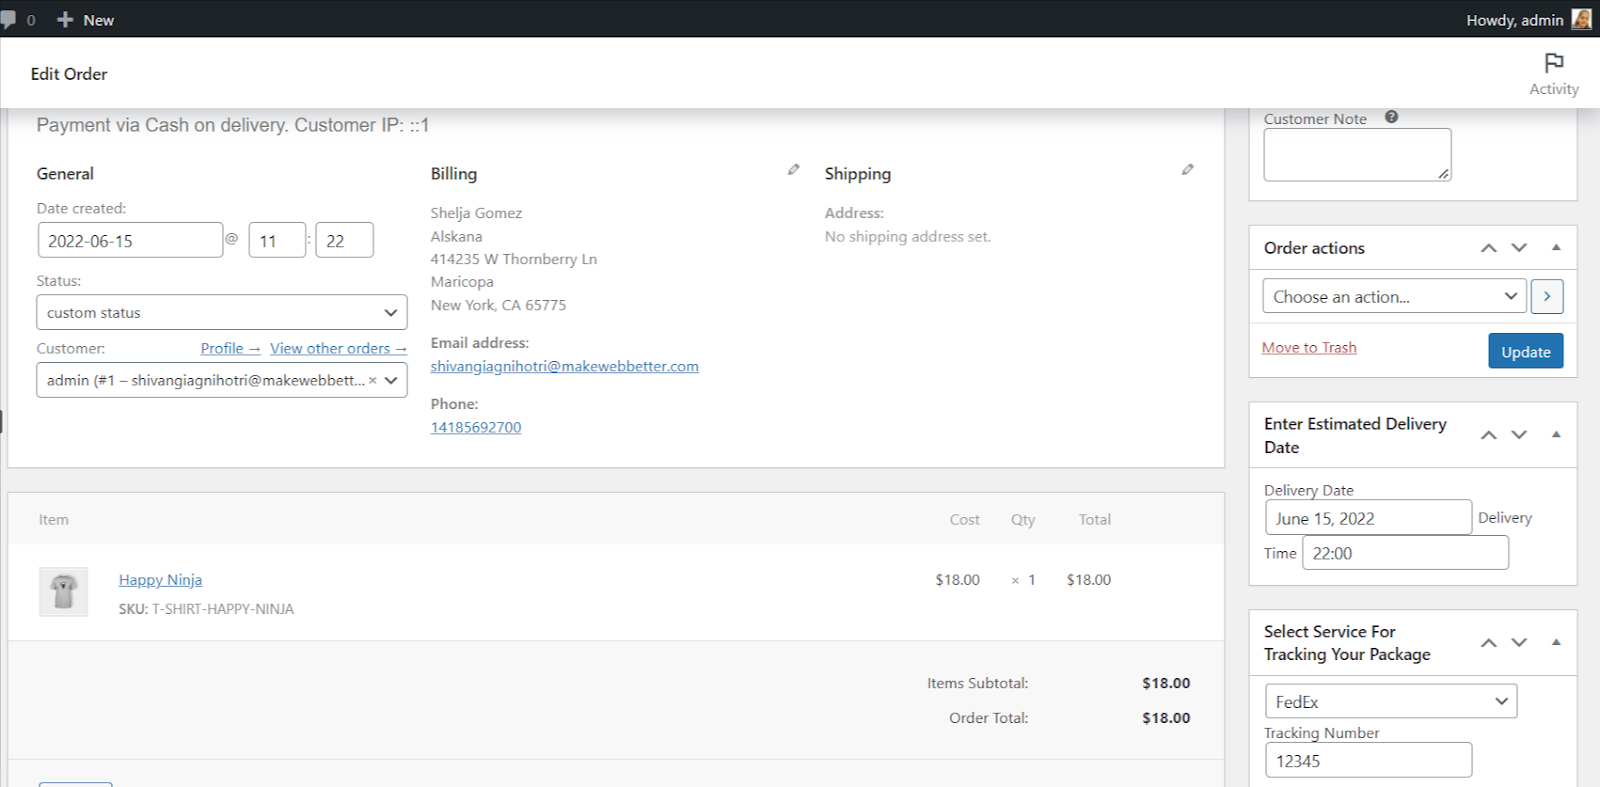
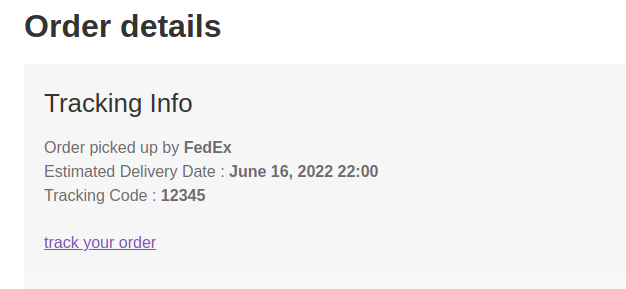
15.Additional Order Details

The customer will be able to get the entire tracking information such as Order picked by FEDx, Estimated delivery date, and tracking code.

For this, the admin needs to go in the order backend. Set the delivery date and time. Also, select the shipping service and enter the tracking number. Then finally click on the Update option. 

order details
additional order details

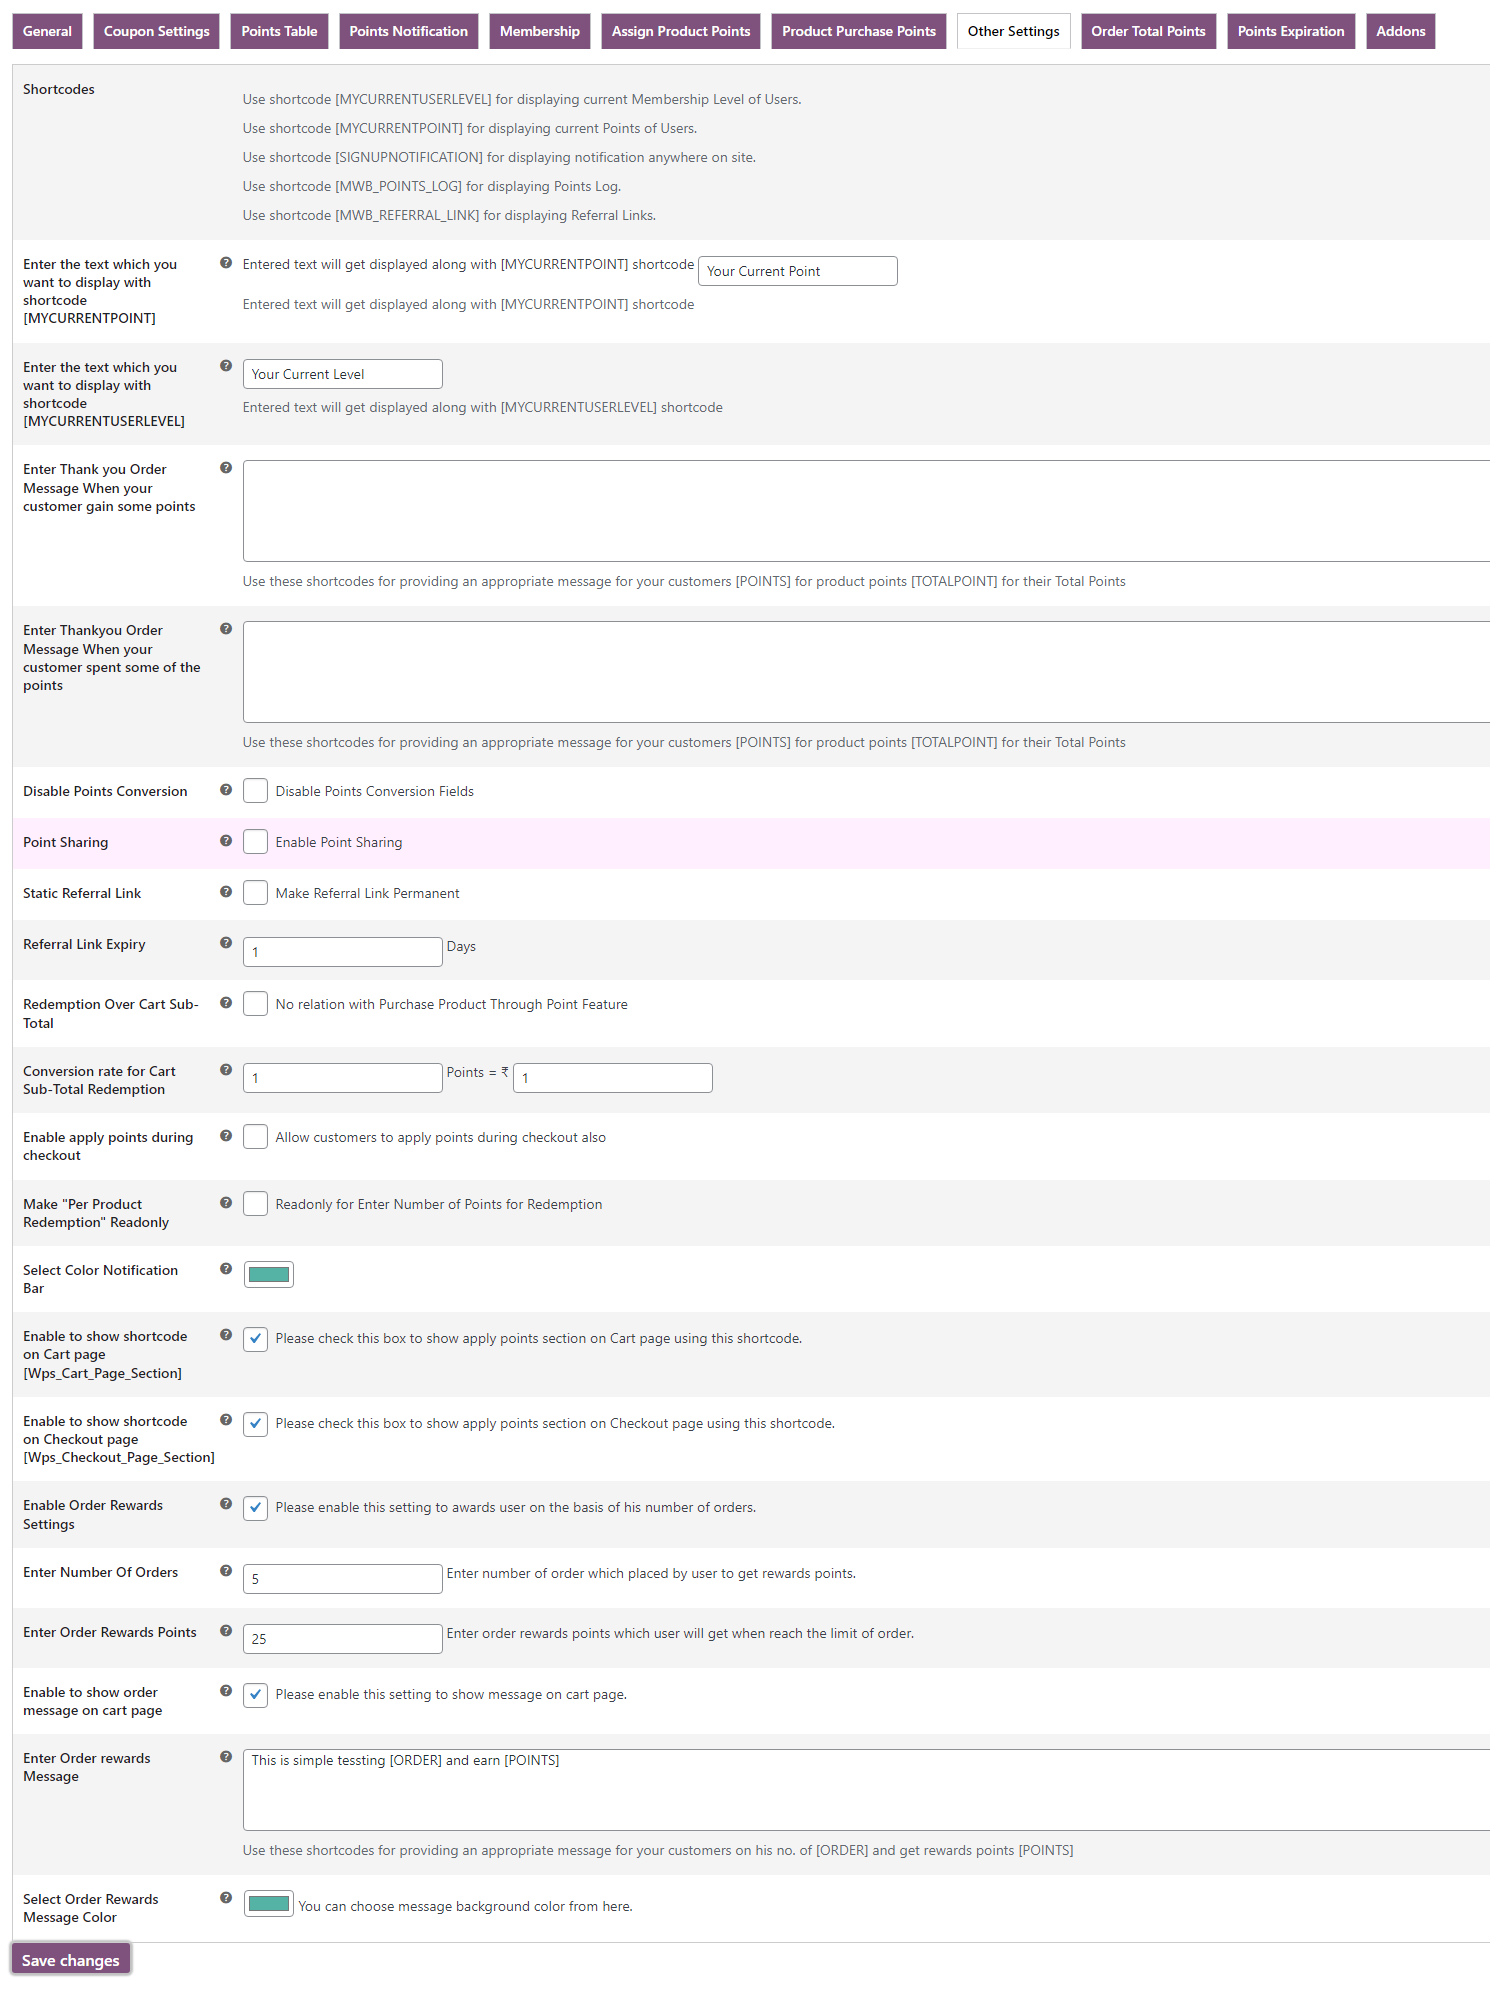
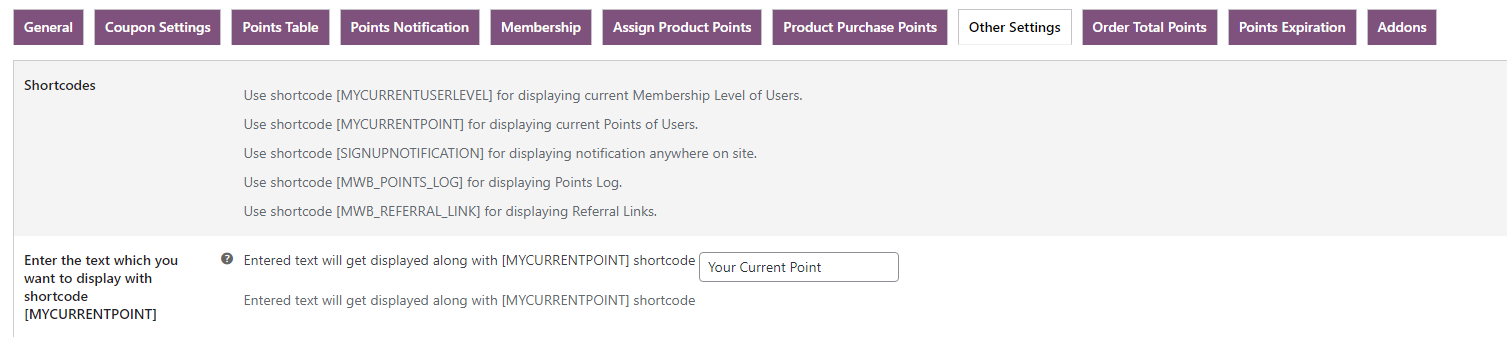
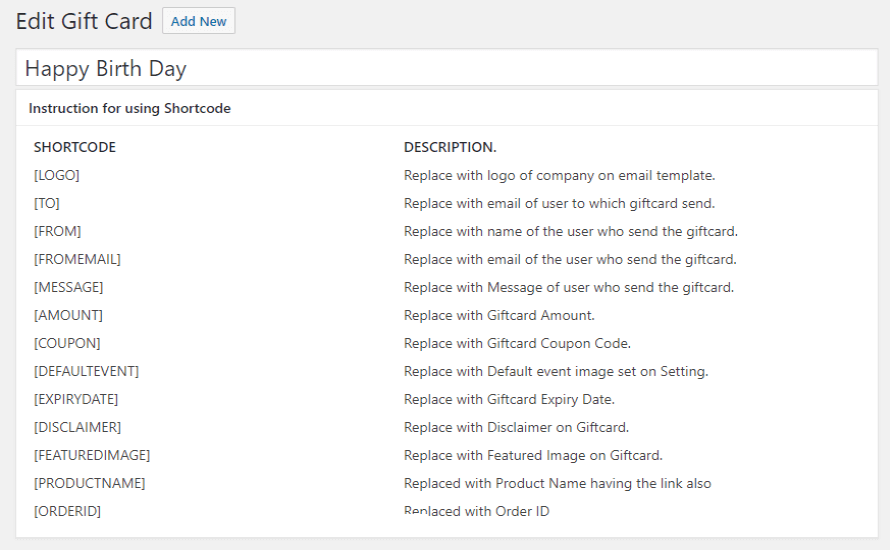
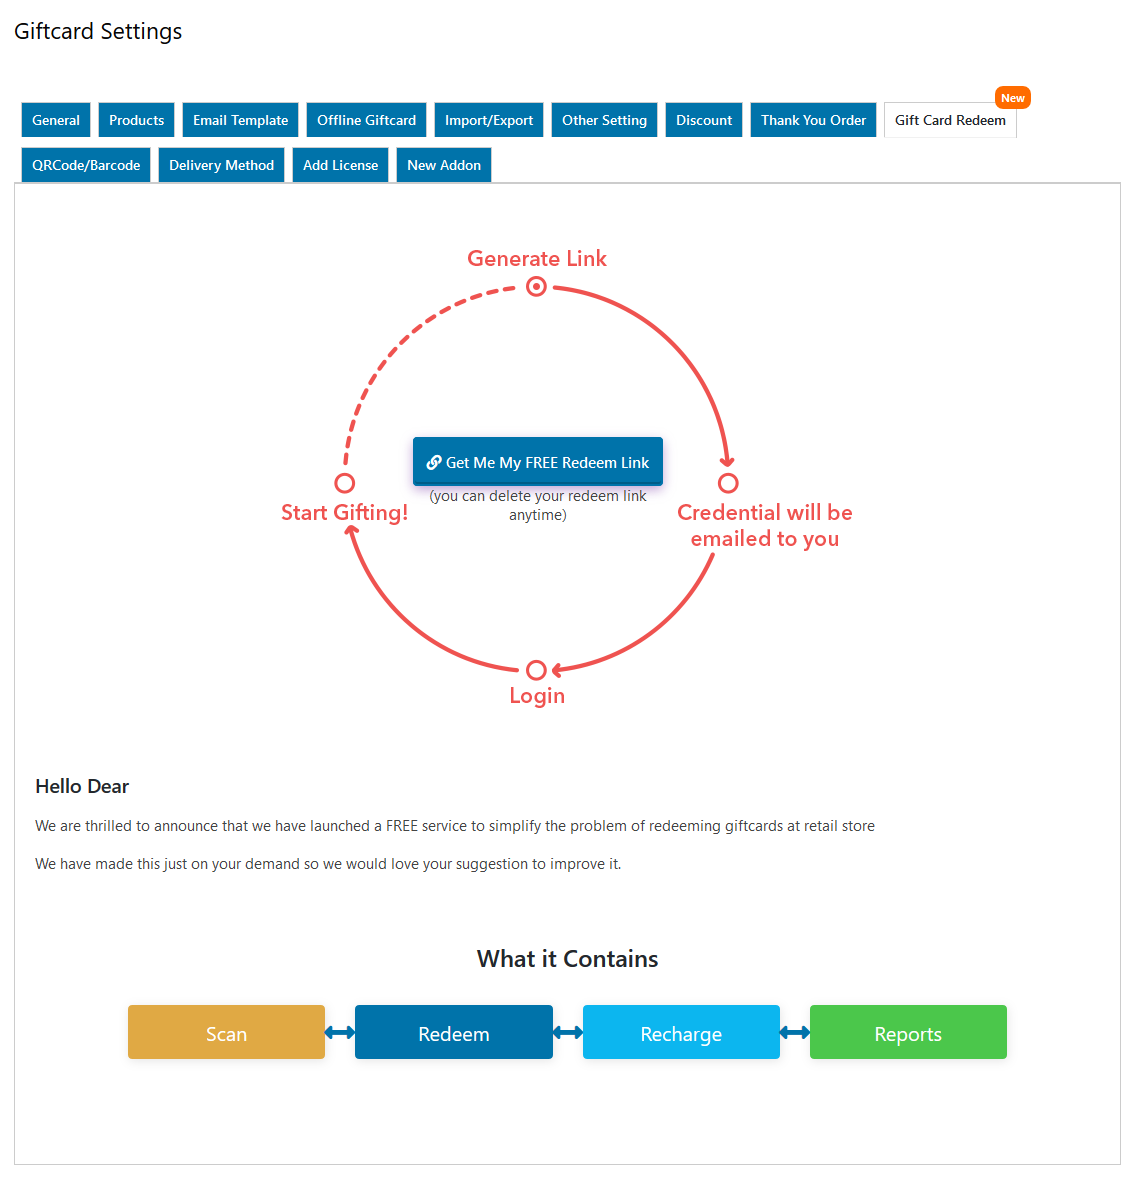
16.Shortcode for Creating Order Tracking Page

WooCommerce Order Tracker allows admins to create their custom pages for order tracking. 

For this they will have to put shortcode- [wps_create_tracking_page] while creating the page.

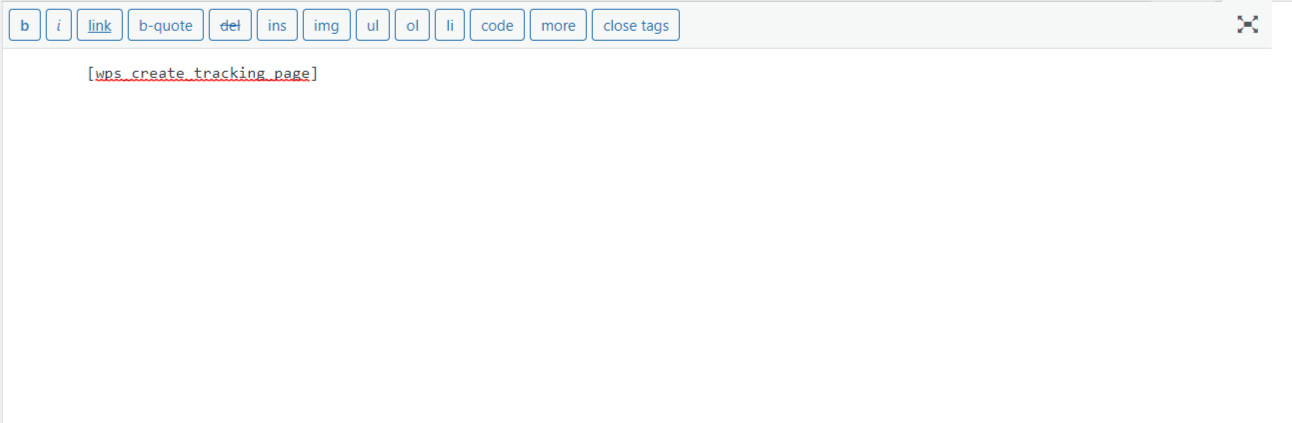
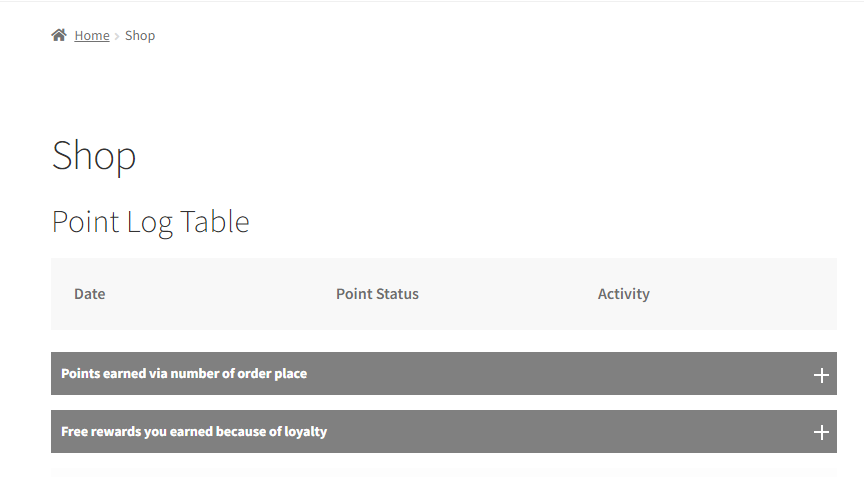
You will able to view your order tracking page like this:
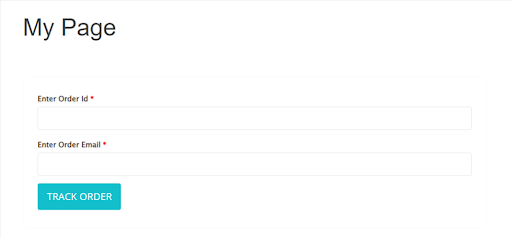
17.Track Order

For fast order tracking, guest users can track their orders using Order ID only. There will be no need to put both email as well as Order ID.

18.Order Tracking for Logged In Users

WooCommerce Order Tracker also enables logged In users to track order form using the shortcode- [wps_track_order_form]
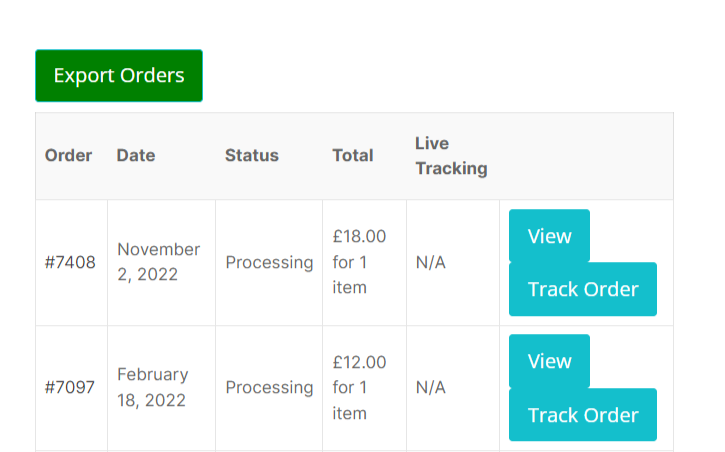
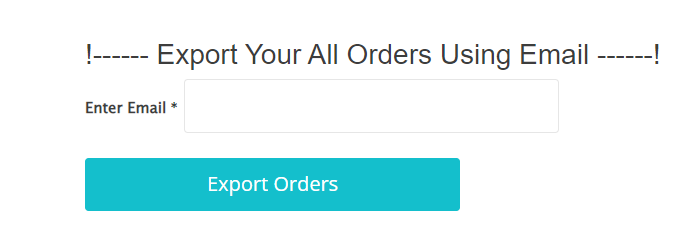
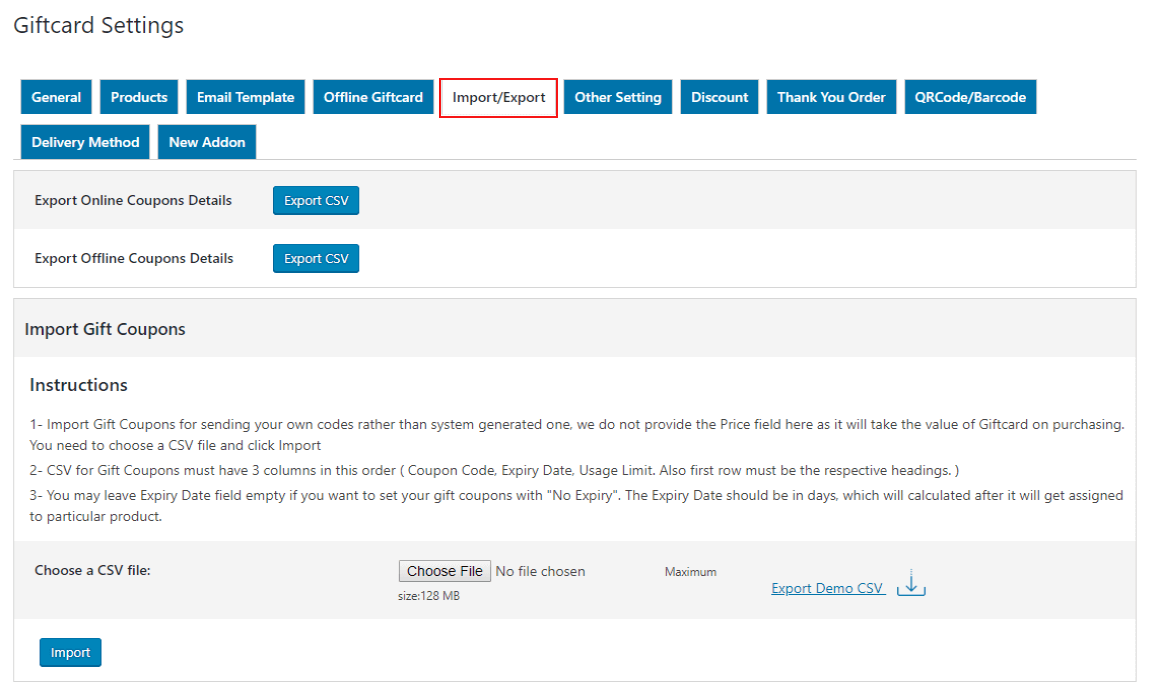
You will be able to view the order status and track order:

19.Order Export

This WooCommerce order tracking plugin allows Logged In Users can export their orders by going to My Account or Order Sections.

Export Option will appear on My Account page.
Guest Users will have to go to the Guest Tracking Page for exporting their orders.

20.Payment Link email Reminder on Pending Payment Order Status

In case the customer’s order is pending, then he/she will receive an email which will contain the payment link through which the customer can complete its order payment.

21.FAQs

How do my customers track their orders using the WooCommerce Order Tracker Plugin?

You can simply enable the feature of track order from woocommerce-> settings->track your order->enable checkbox of Enable Track Your Order Feature.

How does the WooCommerce Order Tracker Plugin used as shipment tracking with FedEx?

If you are using FedEx shipping services to deliver the package to your customers, and you want to provide the status of the package to your customers. Don’t worry, WooCommerce order tracker provides an easy way simply go to WooCommerce-> settings-> track your order-> enable api-> enable the check box for FedEx API and enter your details.

Do these order status update manually or automatic?

In WooCommerce, when an order is placed, you have to change the order status manually but if you are using a third-party integration then there is no need to change the order status manually because the status will change automatically by the shipping services company.

How does the WooCommerce Order Tracker Plugin used as shipment tracking with Canada Post?

If you are using Canada Post shipping services to deliver the package to your customers, and you want to provide the status of the package to your customers. Don’t worry, WooCommerce order tracker provides an easy way simply go to WooCommerce->settings->track your order->enable api-> enable the check box for Canada post API and enter your details.


22.Helpful Resources !!

  1. How Can Order Tracking Process Improve Customers Purchasing Frequency?
Suggest Edit

Filed Under: Codecanyon, WooCommerce / WordPress Tagged With: track order, woocommerce, woocommerce delivery and shipping options, Woocommerce Order Tracking, woocommerce shipment tracking, Woocommerce shipping plugin, woocommerce tracking, wordpress plugin

WooCommerce Ultimate Points And Rewards

May 15, 2018 by Vartika Sinha

search_image
  1. Overview
  2. General Setting
    1. Signup Points
    2. Comments Points
    3. Referral Points
    4. Referral Purchase Points
    5. Only Referral Purchase Points
    6. Share Referral Link on Social Media
    7. Text for the Point Page
    8. Notify users to gain more points
    9. Purchase Through Points
    10. Assigned Product Points Text
    11. Set Preferences
    12. Daily Login Points Settings
    13. Show Points in WP User Table
    14. Enable Wallet Settings
  3. Coupon Setting
    1. Redeem Reward Points Conversion
    2. Per Currency Point Conversion
    3. Required Points For Generating Coupon
    4. Custom Convert Points
    5. Individual Use of Coupon
    6. Free Shipping
    7. Coupon Length
    8. Coupon Expiry Date
    9. Restriction of Coupon Use
    10. Coupon Use Limit
    11. Disable Points Conversion
  4. Points Table
  5. Points Notification
  6. Membership
  7. Assign Product Points
    1. Global Setting
    2. Category wise Setting
    3. Per Product wise Setting
    4. Assigned Product Points Text & Set Preference
  8. Product Purchase Through Points
  9. Others Setting
    1. Use of Shortcodes
    2. Disable Points Conversion
    3. Point Sharing
    4. Static Referral Link & Referral Link Expiry
    5. Shortcodes for Thank You Page
    6. Enable apply points during checkout
    7. Redemption Over Cart
    8. Select Color Notification Bar
    9. Shortcode for Cart Page and Checkout Page
    10. Order Reward Settings
  10. Order Total Points
  11. Points Expiration Notification
  12. Compatibility With Currency Switcher
  13. Compatibility With MultivendorX Marketplace And MultivendorX
  14. FAQs

1.Overview

WooCommerce Ultimate Points And Rewards plugin is a Loyalty tool that makes it easy for you to recognize, reward points, and incentivize your loyal customers by giving them opportunities to earn points and further redeem the points for the varied reward program.

This Ultimate Rewards plugin is an alternative to your marketing approach as well by attracting new leads and higher traffic, ultimately resulting in a better conversion rate.

Features:

  • The administrator can provide the points to their customer at signing in on your website, Referral User, Share the Referral link, Referral Purchase, Product Assign, Per Product Purchasing, Per Currency Spend, and Reviewing the products.
  • Redeem rewards points into the Coupons, From the Cart SubTotal, or Directly purchase the products.
  • Set the expiration date of the coupons or set how many times a customer can use that particular coupon.
  • Set the expiry date of Points. On selected dates points will expire.
  • Create different Membership levels for the customer and provide discounts according to their membership level.
  • Deduct the customer’s points if they make a refund request.
  • Send the Notification Mail as a reminder of the expiration of reward points.
  • The administrator can also allow their customer to share earned points with someone.

Note:
The “Points” tab is a section that holds all the points of the customer which is display on the “My Account” page. It will be visible only for the registered customers, not to Admin. If the admin wants to see the “points” tab, register as a customer, and please make sure to save Permalink once.

For saving the permalink first Login to your admin panel and go to WordPress “Settings > Permalinks” and click on the “Save Changes” button. After Clicking on this button your permalinks will get saved successfully.

2.General Setting

In this section, Firstly you will enable the WooCommerce points and rewards plugin and set how many points customers will earn on which action.

2.1.Signup Points

Enable the Signup Points for your customers. When customers sign up on your site then they will get some signup points as reward points.

woocommerce points and rewards- signup-points

For example, we set the 100 points as the signup rewards, when the customer registers on site then they earn 100 points.

woocommerce points and rewards-login


Note: Please make sure you have enabled the required setting, as well as your Registration Form, must be of WooCommerce Registration. For any third party registration form, we need to check the possibility of making the compatibility.

2.2.Comments Points

After enabling Comments Reward Points, your customers will get review reward points when they comment on products or posts.

woocommerce points and rewards- comment-points

Here we set the 20 points as the comment reward. If the customer comment on your site then they will get 100 points and rewards.

woocommerce points and rewards- comment-points

2.3.Referral Points

After enabling this setting your customers earn WooCommerce points and rewards by inviting other users to the site through the referral link.  Here you can also add the required limit for the referral, after completing this limit your customers will get the points.

Minimum Referrals Required: Here you can enter the minimum required limit for the referrals, your customer will be able to get reward points after completing the condition.

woocommerce points and rewards- referral-points

Here you can see, a Minimum of 5 invites are required to get a reward of 100 reward points.

woocommerce points and rewards-social-links-front-end

2.4.Referral Purchase Points

Enable the Referral Purchase Points for the customers. Through this setting a customer can get the points on the referee(user invited by the customer)  purchase, you can also apply the restriction on the referral purchase points.

Referral Purchase limit: After enabling this setting, the referee(user invited by the customer) would get assigned points after till limit would be reached.

woocommerce points and rewards-referal-purchase-points-only

2.5.Only Referral Purchase Points

Enable this setting when you can allow the customer to get the points only for the referral purchase, not referral points. That means when the invited user(referee) purchased the product then only the customer gets WooCommerce reward points

woocommerce points and rewards-only-referal-purchase-points

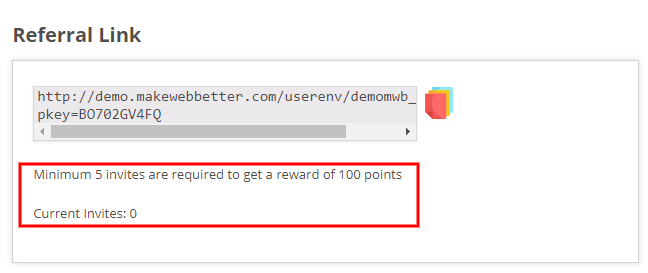
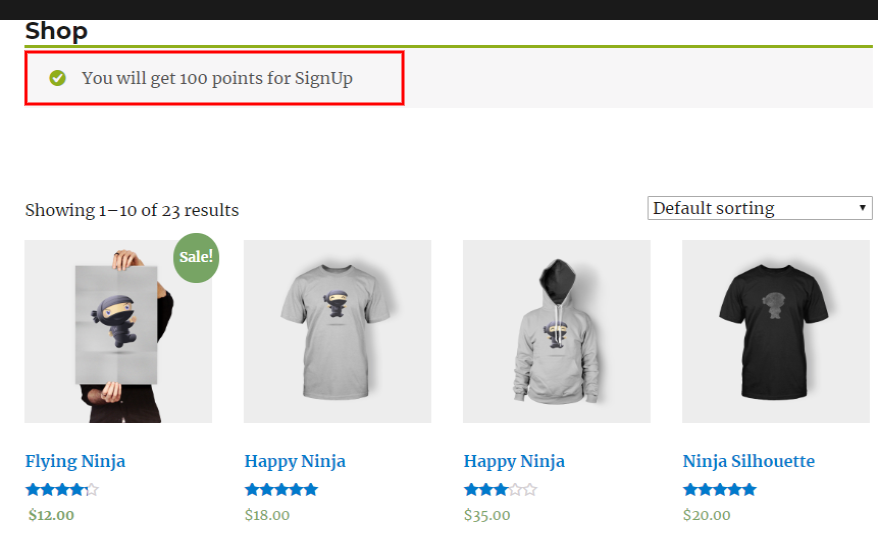
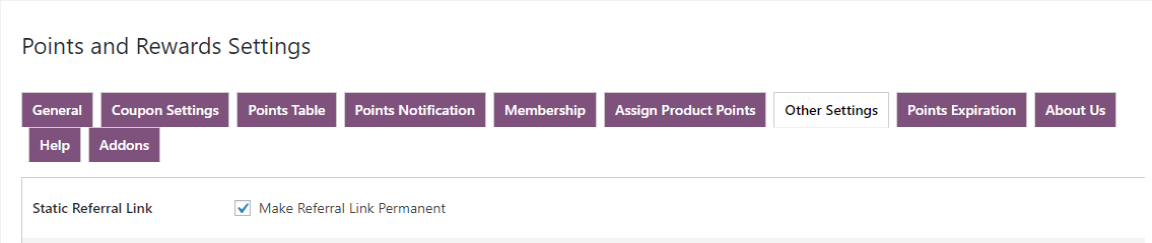
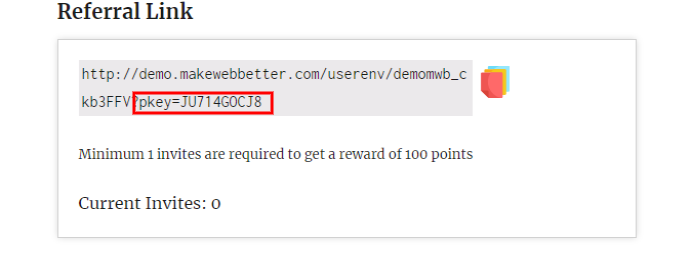
2.6.Share Referral Link on Social Media

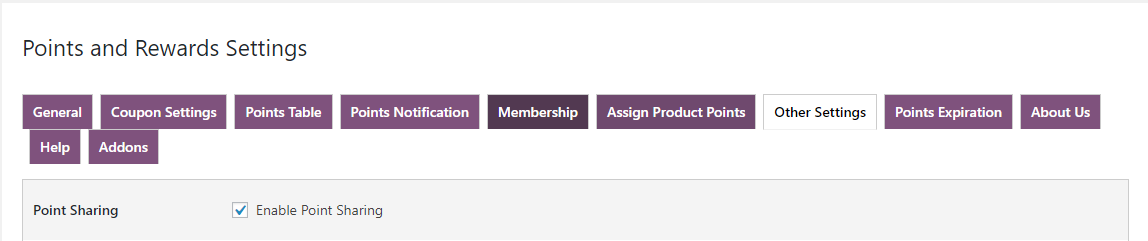
Enable social media channels for sharing the referral links.

woocommerce points and rewards- points-share-link-on-social-media-backend

After enabling this setting customers can share a referral link on selected social media channels.

woocommerce points and rewards- points-share-link-on-social-media

2.7.Text for the Point Page

This text displays on the points page, the total number of WooCommerce rewards points. 

woocommerce points and rewards-text-setting

Go to the My Account page -> Points tab

Here you can see the text append before the total number of points and rewards.

woocommerce points and rewards-text-setting-front-end

2.8.Notify users to gain more points

You can paste these shortcodes on the My Account Page to guide your customers to gain more WooCommerce reward points in various ways.

woocommerce points and rewards-gain-points-text-setting

Here display the various ways to earn more points on the front end.

2.9.Purchase Through Points

This setting allows/restricts your customers to purchase products through points.

woocommerce points and rewards-enable-purchase-through-points

Enable Purchase through points: After enabling the “Purchase through points” setting your customer will able to purchase the product through the earned points.

Purchase Point Conversion: The Admin can decide how many points he wants to provide for each purchase. Admin can set the currency settings accordingly for each purchase.

Enable Restriction for Purchase through points: For this setting, you can restrict the particular categories for purchasing through the reward points.
Here you can also apply the restriction per product-wise.

Enable Restriction on Per Product-wise for Purchase through points :

Go to the product-> edit page of the particular product.

02-woocommerce points and rewards-edit-page


Scroll down and go to the “Points and Reward section”

woocommerce points and rewards-edit-page-setting


Enable the setting to apply the condition for that particular product that doesn’t purchase through the points.

04-woocommerce points and rewards-do-not-purchase-setting


Enter Text: Enter the text in which you want to display the message on the single page of the product for notifying the user to use the points during purchasing the product.

woocommerce points and rewards-text-setting


Point Table Text: Through this setting, you can replace the Point tab text with your text.

woocommerce points and rewards-tab-text

2.10.Assigned Product Points Text

For this setting: Click here

2.11.Set Preferences

For this setting: Click here

2.12.Daily Login Points Settings

Enable the “daily points settings” for your customers. Now, when your customers will log in to their accounts, they’ll be rewarded with some reward points.

You can also enter the “number of daily points” for which you want your customer to be rewarded

2.13.Show Points in WP User Table

The admin can enable this setting if he wants to show the points in the WP User Table. This will make the overall process easy for the admins, as they’ll be able to see the reward points that the user is earning

This is how the WP User Table will look after enabling the feature


2.14.Enable Wallet Settings

wallet compatibility

This admin can enable this setting if he wants to activate the “Wallet compatibility”. We’ll also give you an overview of this compatibility. 

With this wallet compatibility, if the admin wants, he can allow his customers to redeem their points in their wallets, and use those points as and when required. He can also set the conversion rates for this. 

For example: If he sets the conversion rate for 1 point to be  ₹1. Then when he redeems the points he’ll get ₹100 for 100 points. 

  • Enable Wallet Settings: The admin can check the box to enable the wallet plugin setting, shown on my account page. 
  • Enter the Conversion Rate: The admin can set the conversion rate using this setting. 

After enabling this feature, this is how the front end will look,

frontend wallet

3.Coupon Setting

In this section, you can allow your customer to generate the coupon with multiple terms of conditions like how many reward points are equivalent to the money, Enable Per currency point conversion, Minimum Points limit for generating coupon, Set the expiration date of the coupon, Minimum Points limit for generating the coupon, Maximum and minimum spend of the coupon, how many time a coupon valid for use, etc.

woocommerce points and rewards-coupon-setting

3.1.Redeem Reward Points Conversion

The admin can set how many points are required that will convert to generate a coupon. For example, if 1 point equals 1 $, and the user has a total of 50 points, he can generate a 50$ coupon.

Here you can set how many points will be equivalent to the money.

woocommerce points and rewards-redeem-points

After enabling the setting your customer can generate the coupon by clicking on the “Generate Coupon” button.

woocommerce-points-and-rewards-point-conversion

3.2.Per Currency Point Conversion

Enable Per Currency Point Conversion: Admin can enable the per currency point conversion for coupons.

Per $ Point Conversion: Admin can set per point conversion to unit currency for coupons. For example, 1$ = 1 point If any user purchases a product worth 50 $ then he or she will be rewarded 50 points.

Here you can allow the customer to per dollar spent points, which means the customer will get points per dollar spent on the site.

woocommerce points and rewards-currency-conversion

Your customer can see the notification on the shop page.

3.3.Required Points For Generating Coupon

Here you can set a minimum points limit for coupon generating after that limit your customer can convert their points into the coupon.

woocommerce points and rewards-required-points-for-coupon

3.4.Custom Convert Points

Through this setting, you can allow the customers to convert their points into the coupon according to their necessity.

woocommerce points and rewards-custom-generate-coupon

After entering the points and clicking on the “Generate Coupon” customer can generate the custom coupon.

3.5.Individual Use of Coupon

WooCommerce Ultimate Points and Rewards allow you to enable the setting of individual use of a coupon. After enabling this setting your customer cannot be used as a coupon with the combination of other Coupons.

woocommerce points and rewards-individual-use

3.6.Free Shipping

Check this box if the coupon grants free shipping. A free shipping method must be enabled in your shipping zone and be set to require “a valid free shipping coupon”.

woocommerce points and rewards-allow-free-shipping

3.7.Coupon Length

You can enter the coupon length excluding the prefix. The Minimum length of the coupon is 5.

woocommerce points and rewards-coupon-length

3.8.Coupon Expiry Date

WooCommerce Ultimate Points and Rewards allow you to enter a number of days after which the Coupon will get expired. Keep value “1” for one-day expiry when the order is completed. Keep value “0” with no expiry.

woocommerce points and rewards-expiry-date

3.9.Restriction of Coupon Use

From this setting, you can restrict a customer for coupon use by the maximum and minimum limit of spending. If you enter the minimum spend limit is 500 and the maximum spend limit is 5000 then your customer uses a coupon under 500 to 5000 spending.

woocommerce points and rewards-max-min-spend

3.10.Coupon Use Limit

WooCommerce Ultimate Points and Rewards Plugin allows you to set how many times a coupon is valid for use.

For example, if you enter 2 then customers use a coupon only two times.

3.11.Disable Points Conversion

Goto, the “Others Setting” tab -> Scroll down to the “Disable Points Conversion” setting.
From here you can disable the coupon formation functionality for the customers.

woocommerce points and rewards- disable-coupon-setting

4.Points Table

Through this setting, the plugin allows you to view the point log, coupon detail, and modify the points of the customer with a specific remark. You can also import the .CSV file of the points table to update the points of customers. The users can also have a quick preview of the CSV file that they are importing, to find anomalies in the file (if any).

For example, if you want to add some points for a customer simply enter the necessary reward points, and a reason for that, and click on the update button. Similarly, you can also deduct the point of the customer.

On the Account page, your customers can view their point logs.

WooCommerce-Ultimate-Points-And-Rewards-PointsTable-front-end


If you want to see the point log of any customer click on “viewpoint log”.

WooCommerce-Ultimate-Points-And-Rewards-view-points-log-detail-click


Here you can see your user Point Log Detail.

WooCommerce-Ultimate-Points-And-Rewards-view-points-log-detail


If you want to see the Coupon Details of any customer click on “View Coupon Detail”.

WooCommerce-Ultimate-Points-And-Rewards-view-coupon-detail-click

Here you can see your user Coupon Detail.

WooCommerce-Ultimate-Points-And-Rewards-view-coupon-detail

5.Points Notification

Through this setting, you can notify your users about their points via email. You can easily customize that subject and description of the email according to necessity.

You can notify your users via multiple notifications like Total Points, Signup Points, Product Purchase points, Referral Points, Comment Points, Product Purchase Points, Referral Points, Comment Points, Product Purchase Points, Referral Points, Referral Purchase Points, Upgrade Membership Level, Purchase Products through Points, Deduct Assigned Points, Deduct ‘Per Currency Spent’ Point, Return ‘Product Purchase through Point’, Point Sharing, Points On Cart SubTotal.

woocommerce-notifications
woocommerce-points-and-rewards-notifications

6.Membership

Woocommerce Ultimate Points and Rewards plugin allows you to give the members of your customers. Membership Setting allows your customers to get the membership level through the required points and keep the discount on the selected categories or products fulfilled by that level.

You can create levels for the membership by following the steps:

1. Tick the checkbox to Enable Membership settings for your customers and create levels by clicking on “Create Member”.

woocommerce points and rewards-create-member

2. Fill the required field of the level like Level Name, Points for reach that level, Expiration Period of the current level, Select Product Category for the discount, Select Product for the discount, Enter Discount (%) amount.

woocommerce points and rewards-enter-membership-detail

3. After filling out all fields click on save changes. The level of membership will display on the user end.

woocommerce points and rewards-click-on-save

Here your customers can see the Membership List on the Account Page -> Points Tab.

woocommerce points and rewards-enter-membership-list-fron-end

View the benefits of that level.

woocommerce points and rewards-enter-view-benefits

From this setting, your user can select the level to upgrade your membership.

woocommerce points and rewards-enter-upgrat-user-role-level

After click on the “Upgraded level”, their membership is successfully upgraded.

woocommerce points and rewards-enter-view-upgrated-level

Now they can see the discount on the single page of the selected product.

woocommerce points and rewards-enter-view-single-product-benefit

Here they can see the discount.

woocommerce points and rewards-enter-view-benefits-on-single-product

7.Assign Product Points

This setting allows you to assign points to the products in three ways:

  1. Globally
  2. Category wise
  3. Per Product-wise
woocommerce points and rewards-assign-setting

7.1.Global Setting

Through this setting, you can assign equal points to each product at once in the global setting. Enable this setting if you want to assign the same points on all the products and enter the points which you want to assign for all products.

woocommerce points and rewards-points-assign-globaly

Your customer can see the assigned points on a single page of the product.

woocommerce points and rewards-points-frontend-text

7.2.Category wise Setting

This is the category-wise setting for assigning the reward points to the product. Enter some valid points for assigning or leave blank fields for removing assigned points and click on the “submit” button.

woocommerce points and rewards-points-assign-category-wise

Your customer can see those assigned points on a single page of the product.

woocommerce points and rewards-points-assign-category-wise-front-end

7.3.Per Product wise Setting

This setting for assigning points per product-wise. Go to the “products” and click on the edit page of the selected product.

woocommerce points and rewards-points-assign-product-wise-edit-page

Click on the “Points and Rewards” setting. Enable the setting and enter some valid numbers for assigning WooCommerce reward points.

woocommerce points and rewards-points-assign-product-wise-set-points

Your customer can see the assigned points on a single page of the product.

woocommerce points and rewards-points-assign-product-wise-frontend

7.4.Assigned Product Points Text & Set Preference

Go to the “General Setting” tab scroll down to that setting.

woocommerce points and rewards-points-notification-text-prefrences

Assigned Product Reward Points Text: Enter the notification text which you want to display on those products that have been assigned some points.

woocommerce points and rewards-points-frontend-text

Set Preferences: Here you can set the preferences of points in three ways:

  • Only Product-Assigned Points: Customers can get the points only for the product-assigned points.
  • Only Per Currency Spent Points: Customers can get points only per currency spent points.
  • Both: Customers can get the points both ways “per currency spent points” and “product assigned points”

8.Product Purchase Through Points

Through the Product Purchase Points setting, the admin can buy products only by the points. Assign Points to the particular category and click on the submit button.

woocommerce-points-and-rewards-product-purchase-point

Here you can see that your customer can purchase that particular product with only the points.

woocommerce-points-and-rewards-product-purchase-product-by-points

9.Others Setting

9.1.Use of Shortcodes

Shortcodes: Use shortcodes for displaying the notification anywhere on the site. we are proving five types of shortcodes

[MYCURRENTUSERLEVEL]: This shortcode use for displaying the current Membership Level of Users.

For example, If you want to show the current Membership Level for the customers on the shop page.
simple Go to the “Shop page” paste the Shortcode of Membership Level and click on the update button. The current Membership Level of the customer will get displayed along with the text.

Enter text for Current Points: Entered text will get displayed along with [MYCURRENTPOINT] shortcode.

woocommerce points and rewards-shortocode-frontend

[MYCURRENTPOINT]: This shortcode displays the current Points of Users.

For example, If you want to show the customer’s current points on the shop page.
simple Go to the “Shop page” paste the Shortcode of current points and click on the update button. The current points of the customer will display with the text.

Enter text for Current User Level: Entered text will get displayed along with [MYCURRENTUSERLEVEL] shortcode.

c-woocommerce points and rewards-shortocode-frontend

[SIGNUPNOTIFICATION]: This shortcode is used for displaying signup notifications at any place on-site.

For example, If you want to show the signup notification on the shop page.
simple Go to the “Shop page” paste the Shortcode of sign up notification and the most important thing is that the signup point feature must be enabled from the “General Setting”.

woocommerce points and rewards-shortocode-frontend-sign-up

[MWB_POINTS_LOG] : This shortcode is used to display points log at any place on-site. 

For example, if the admin wants to show the customer’s points log on the shop page. Simply Go to the “Shop page” paste the Shortcode of points log and click on the update button. The points log table  of the customer will be displayed.

[MWB_REFERRAL_LINK]: This shortcode is used to display the referral link at any place on-site. 

For example, if the admin wants to show the customer the referral link on the shop page. Simply Go to the “Shop page” paste the Shortcode of points log and click on the update button. The referral link of the customer will be displayed.

9.2.Disable Points Conversion

If you want to disable the coupon generation for the user, you can enable this setting here 

9.3.Point Sharing

Enable this setting if you want to allow your customers to share some points from his/her account with any other user.

woocommerce points and rewards-sharepoints

After enabling the setting your customer can share your points with other users by simply clicking on “GO”.

woocommerce points and rewards-share-points-userend

9.4.Static Referral Link & Referral Link Expiry

Static Referral Link: Enable the setting to make your referral link permanent.

woocommerce points and rewards-static-referral-link-setting


woocommerce points and rewards-static-referral-link

The Expiry date of Referral Link: Set the valid number of days after that the system will not able to remember the referred user anymore.

woocommerce points and rewards-static-referral-link-expiration

9.5.Shortcodes for Thank You Page

These shortcodes provide an appropriate message for your customers for their Total Points when they gain or spend points on the checkout page.

b-woocommerce points and rewards- shortcodes-for-thankyou page

Notification When Your Customer Gain Points After Checkout:

b-woocommerce points and rewards- shortcodes-for-gainpoints-thankyou page

9.6.Enable apply points during checkout

Through the “Enable Apply Points During Checkout” setting, the admin can allow your customers to apply points on the checkout page.

woocommerce-points-and-rewards-product-enable-checkout

Here you can see apply points options on the checkout page.

9.7.Redemption Over Cart

woocommerce points and rewards-static-redemption-points

Allow Users to Apply Points: Enable this setting if you want to allow your customer to redeem rewards points and their earn into the cart subtotal. There would be no relation for purchase through the points feature.

The conversion rate for Cart Sub-Total Redemption: Enter the points that you want the user to redeem on cart sub-total, i.e. how many points will be equal to your currency when applied on the cart subtotal.

Make “Per Product Redemption” Read-only: Enable this setting if you want to make the redemption box used read-only for your customers.

9.8.Select Color Notification Bar

Here you can select the color for the notification bar.

woocommerce-points-and-rewards-color-notification-bar

9.9.Shortcode for Cart Page and Checkout Page

[Wps_Cart_Page_Section]: This shortcode is used to enable the “Apply points” section on the cart page. 

For example: If you want to allow the “apply points”  section on the cart page. Simply enable the “enable to show the shortcode on cart page” settings.


[Wps_Checkout_Page_Section]: This shortcode is used to enable the “Apply points” section on the checkout page. 

For example: If you want to allow the “apply points”  section on the cart page. Simply enable the “enable to show the shortcode on checkout page” settings.


9.10.Order Reward Settings

This feature allows the admin to enable order reward points i.e. the customers will earn extra points on ordering a certain number of orders. 

  1. Enable Order Reward Settings: If you want your customers to earn extra points while purchasing products from your website. You can enable this particular feature. 
  2. Enter Number of Orders: The admin can specify the upper limit of the order. For example, if the admin has kept the number to 15 orders. Then the customer will be rewarded with the points, after successfully placing 15 orders. 
  3. Enter Order Reward Points: The admin also gets a chance to decide the number of points that the customer will be rewarded with. For example, let’s continue the example mentioned above. Say the admin decides that on placing 15 orders, the customer will be awarded 12 points. So, now when the customer completes placing 15 orders, he shall be rewarded with 12 points.       
  4. Enable to Show Order Message on the Cart Page: If you enable this setting, then the customer will be able to see an exclusive message on the cart page, stating the order rewards. 
  5. Enter Order Reward Message: This particular part of the settings, takes it to the next level. The admins can also customize the message at their convenience.    

Select Order Reward Settings Color: The admin can select the color of the message box as well.

10.Order Total Points

To enable the ‘Order Total Points’ setting first you have to click on the checkbox to enable the setting and then set the points within the order amount range and the last click on the ‘Save Changes’ button to save the settings.

woocommerce-ultimate-points-and-rewards


After successfully completed the order, your customers will get the points according to the order range and they can view their points from the My Account page.

woocommerce-points-and-rewards


To view the detailed description of the points go to the My Account > Points Tab > and then click on the View Points Log link, here you can see the detailed description of points.

woocommerce-ultimate-points-and-rewards

11.Points Expiration Notification

In this section, you can set the Expiration Period of the customer’s points and send the Notification Mail as a reminder of the expiration of points.

b-woocommerce points and rewards- points-expiration

Enable Points Expiration: Enable this checkbox if you want to set the expiration time period of rewarded points for your customers.

Show Points expiration on My Account Page: Enable this setting if you want to show the expiration time period of points on my account page.

woocommerce points and rewards- points-expiration-on-my-account-page

Set the Required Threshold: Set the threshold for rewarded point expiration, the expiration period will be calculated when the threshold will be reached.

Set Expiration Time: Set the maximum time limit for points expiration. After this time limit points need to get expired. It will be calculated after the above threshold time.

Email Notification(Re-Notify Days): Set the number of days before the mail will get sent out for the re-notify the customer for points expiration.

Enter the Message for notifying the user about they have reached their Threshold: Use these shortcodes for providing the first notification to the customer, that they have reached the threshold now they should redeem their point before it will get expired.

Re-notify Message before some days: Use these shortcodes for providing the re-notification their the customer that they have left some days more for the expiration of points.

Message when Points have been Expired: Enter the message notifying your customer that their points have been expired.

12.Compatibility With Currency Switcher

The WooCommerce Ultimate Points and Rewards plugin is compatible with the Currency Switcher for WooCommerce plugin.

The WOOCS plugin allows you to change your website’s working currency.

To change the currency of the wallet system, Install and activate the Currency Switcher plugin. And follow the instructions:

  1. Go to WooCommerce > Settings > Currencies.
  2. Select any of the listed currencies.
  3. Click on the Save Changes button.
  4. Afterward, all transactions will take place in the currency you choose.

13.Compatibility With MultivendorX Marketplace And MultivendorX

WooCommerce loyalty rewards plugin is compatible with MultiVendorX Marketplace and MultiVendorX, enabling the vendors to earn points and rewards on purchases made in their stores.

14.FAQs


How can I set up a membership level? And users can upgrade their membership level. I also want to display membership levels on different pages.

To create a membership level, go to the WooCommerce > Points and Rewards Manager > Membership and create Membership Levels as you want.
For Creating Membership:

  1. Enter Level: Enter the name of the membership (level name) for the user.
  2. Enter Points: Set the points of membership level for the user.
  3. Select Product Category: Select the product category for membership.
  4. Select Product: Choose the product of the selected category for membership.
  5. Enter Discount(%): Admin can also set the discount for membership.

Now, it will get display on the Customer Point tab. If the customer has sufficient points then they can upgrade membership level and it will also display on the Points tab. If you want to display on other pages for that we have provided shortcode in the “Other Setting” tab [MYCURRENTUSERLEVEL], You may use this.

I couldn’t locate where I set up the points amount for products?

You can assign points to the product in three ways.

  1. Global Point Assign (Assign Points to all Products)
  2. Per Category Point Assign ( Assign points to the different categories)
  3. Per Product Assign Points (Individually Assign Points )

For Globally assigned points visit WooCommerce > Assign Product Points Here you find “Global Product Points”. Now enable the setting and assign points to all products in a single click.

For Category assign points, below the “Global Product Points” setting you will find an option to assign points per category.

For the Per product assigned point, visit the particular product edit page. In the Product data section, you will find a tab “Points and Rewards” Click on that tab after that Enable Points Per Product and Enter the points. Now, update the product, and Product points will get displayed on the Product Page.

Why the social share button doesn't appear on my website?

Please make sure that you have Enabled the Settings from the "General Tab" and selected the social buttons you want to let it display on your site.

How can i translate your plugin in another language?

You can translate the plugin in any language you want. We have provided all our plugin translation ready. Using suitable software you can translate our plugin.

How to share the points?

Enable the required Setting from “Other Setting” (tab) i.e “Enable Point Sharing”, Now on My Account Page customer can see the related fields and can enter the Email of that customer( Valid WordPress User_Email Id ) to whom they want to share his/her Point.

What is the difference between “Redeem Points Conversion” and “Per $ Points Conversion” and also whats the use of “Enter Product Points”?

About Redeem Points Conversion: In this setting Merchant can set the amount for converting reward points to generate the coupon. For example, if you have set 1 point will be equivalent to the 1$ (for your site) and if any user has 50 points then he or she will get the coupon amount of 50 after converting it from the “My Account” section.

About Per $ Points Conversion: Let's take an example if Merchant has set the $1 = 1point (for their site) and any customer will purchase any product with 50$ then he or she will be rewarded with 50 points.

About entering Product Points: From here Merchant can select some product and can set the Points for a particular product, and if any user will purchase that selected product he or she will be rewarded with those Points.

Is it possible Admin can set the points per product , category wise product and globally?

Yes, We have the features Admin Can Set the points as follows:

  1. Globally
  2. Category wise
  3. Per Product-wiseGo to Points and Rewards Setting > Assign product Points Setting > Enable Global Product point and enter the points according to needs.
    Go to Points and Rewards Setting > Assign product Points Setting  > Enable Category Product point and enter the points according to needs.

Suggest Edit

Filed Under: Codecanyon, WooCommerce / WordPress Tagged With: coupon code, earn points and get rewards, points and rewards system, redeem points, woocommerce, woocommerce boost sale, woocommerce points, woocommerce points and rewrads, woocommerce rewards system

WooCommerce Ultimate Gift Card Documentation

May 15, 2018 by sanjeev maurya

search_image
  1. Overview
  2. Installation
  3. Create Gift Card Templates & Products
  4. General Setting
  5. Products Setting
  6. Email Template Setting
    1. Manage Template
    2. Left Coupon Amount Mail Setting
    3. Coupon Mail Setting
  7. Offline Giftcard Setting
  8. Import/Export Setting
  9. Other Setting
  10. Discount Setting
  11. Thank You Order Setting
  12. QRCode/BARCode Setting
  13. Delivery Method Setting
  14. Gift Card Portal: Scan, Fetch, Redeem, & Recharge
  15. Compatibility with Price Based on Country for WooCommerce plugin
  16. Compatibility with WooCommerce Currency Switcher
  17. FAQs

1.Overview

WooCommerce Ultimate Gift Card allows the merchant to create, sell, and redeem multiple gift card types of products on their WooCommerce store.

Features of WooCommerce Ultimate Gift Card:

(1) Gift Card Product: A separate gift card type product is created in WooCommerce and the merchant can create as many products as he wants.

(2) Gift Card Template: You can create a gift card product and assign suitable Gift Card Templates from the product edit page.

(3) Price Variation: There are many types of the pricing system for Gift Card products as given below:

  • Fixed Price
  • Selected Price
  • Range Price
  • User Price
  • Variable Price

(4) QR Code / BAR Code Feature: The QR Code/BAR Code is used over here for providing  security.

  • ECC (Error Correction Capability) Level:  This compensates for dirt, damage, or fuzziness of the BAR Code. Valid values are “L” (low ECC), “M”, “Q”, and “H” (highest ECC). A high ECC level adds more redundancy while using more space.
  • Size: Enable QR Code after selecting the ECC level to set the size of the QR Code.
  • Margin: Set the QR Code margin over here.
  • Code Type: You can use BARCode code types in various places for various purposes.
  • Enable BAR Code with Coupon Code:  The ultimate gift card will display the coupon code and Barcode together. 

(5) Automatic Coupon Code Generation: When the gift card order is marked complete, the gift card coupon code is generated automatically and sent to the mail to which the gift card is sent.

(6) Exclude Sale Items: The merchant can prevent the gift card discounts from applying to the sales items. 

 (7) Exclude Categories:  The admin can exclude categories from gift card discount applicability. If any excluded category product is available on the cart, the gift card discount doesn’t apply.

(8) Exclude Product: The merchant can also exclude a selected product from the gift card discount. If any excluded product is available on the cart, the gift card discount doesn’t apply. 

(9) Multiple Usability: A user can spend the whole Gift card amount in multiple times.

(10) Expiry Date: The admin can set after how many days the gift card coupon is expired.

(11) Cart Total Range: The admin can set a minimum and maximum cart total amount for applying the gift card discount.

(12) Individual Use: The merchant can determine whether the gift card coupon is usable for a single user or multiple users.

(13) Email Notification: A gift card template is sent to the user to which gift card is sent. The gift card email template depends on the gift product.

(14) Gift Card Scheduling: The customers can select the date of sending the gift card to the recipients. They can also send the scheduled Gift Card on the current day.

(15) Resend Email: If, for some reason, the gift card mail is not sent to the user, then an option to resend the gift card email is available.

(16) Export Online Gift Card Coupons Details: The admin can export the Gift Card Coupon Details generated from the orders in a CSV file. 

(17) Import/Export Offline Gift Card Details: Admin can export the offline gift card coupon details from the Export Coupon Tab section. Also, they can import the Gift Card coupon details into the offline gift card table from the Offline Gift Card Section.

(18) Resend Gift Card by adding more amount to the coupon: Admin can resend the unused Gift Card Coupons to the recipients by updating their value. They can select multiple gift card coupons and assign a similar amount to all coupons.

(19) Date Formatting: The merchant can set the date format they want to display on the front end. The expiry date in the Gift Card Template will be in the set date format.

(20) Gift Card Message Length: The merchant can set the Gift card message length. By default, the message length is 300.

(21) Downloadable Gift Card: Admin can download the gift card pdf and send it to the buyer or receiver, and the buyer can also download the gift card.

(22) Browse image for Gift Card: Customer can also set their customizable gift card image.

(23) Shipping Feature: The shipping feature is used for gift card shipping to the recipient’s address. It is for the admin and the buyer.

  • Coupons:  After enabling the shipping feature, you can use the coupon for gift card shipping and tax.

(24) Disable Category Feature: The admin can assign more than one category to the Gift Card product.

(25) Coupon Mail Setting: The user will get notified on their email upon each usage of the coupon amount. The users can also verify their remaining coupon amount. 

(26) Other Setting: In this setting, the sender has three delivery options to send their gift card email to the recipient.

(27) Delivery Method: The sender has three delivery options to send their gift card email to the recipient.

(28) Discount Feature: The admin can set the minimum and maximum discount amounts. It has two discount types; Fixed and Percentage. Admin can also enable the discount setting per product-wise.

(29) Gift Card PDF: Customers will get an email along with a PDF attachment. You can choose an A3/A4 size for the gift card PDF.

(30) Exclude Product Feature: When products are assigned any gift card (Per Product Setting), the generated coupon will not apply to the assigned product and the category.

(31) Shipping Class :  You can add a shipping class and apply it to gift card products

(32) Thank you gift coupon Feature: The merchant would be able to send Thank You gift coupons to their regular customers who have placed the required number of orders for that coupon.

(33) Validation may turn On or Off: Both merchants and customers can select from multiple Gift Cards templates. 

(34) Multiple templates for the customer: From now onwards, the merchant can select multiple templates for Gift Card and customer would be able to choose from them.

 (35) To Name Field for “Mail to Recipient Option”: Any customer who wants to send a Gift Card to their friend via the mail to recipient option can fill in their friend’s email id along with the name. 

(36) Recipients Email Editing: The admin can edit the recipient’s email address. Afterward, they have to resend it once.

(37) Tax Calculation: In this version, we provide the tax calculation for Gift Card Products.

(38) Gift Card Coupon Filter: From now on Gift Cards can be easily filtered by the provided setting, You may easily filter-out the Online/Offline/Imported Gift Cards among all of them.

(39) Email for Ship Your Card Delivery method: From now on email id can be changeable by Merchant easily, Whatever Email id has been filled in the given textbox, the Mail will get sent on that Id.

(40) The number of E-Gift Cards: The number of digital Gift Cards depends on the number of quantities mentioned.

(41) WPML/Translation: The system is fully compatible with WPML Plugin and we also come with multiple languages supported .po and .mo files like for Germany, France, Spanish, and English.

(42) Customizable Gift Card: Your customer can easily customize their Gift Card template. You can provide predefined images and upload more for your customers. It also lets customers upload their Gift Card images and make changes in real-time.


2.Installation

1. Automatic Installation
Automatic installation is the easiest option as WordPress handles the file transfers itself and you don’t need to leave your web browser.
Steps are as follows :
(i)
Download the zip folder of the plugin WooCommerce Ultimate Gift Card.
(ii) Once downloaded install the WooCommerce Ultimate Gift Card plugin through browsing and activate it.


2. Manual Installation
The manual installation of the plugin is another option to install the plugin to your WordPress-environment. The manual installation method involves downloading our WooCommerce Ultimate Gift Card Extension and uploading it to your webserver via your favorite FTP application.
Steps are as follows :
(i)
Upload the WooCommerce Ultimate Gift Card folder to the /wp-content/plugins/ directory.
(ii) Activate the WooCommerce Ultimate Gift Card plugin through the ‘Plugins’ menu in WordPress.

3.Create Gift Card Templates & Products

Gift Cards Templates:

After activation of the plugin WooCommerce Gift Card, a custom post type “Gift Cards” is created. From here Merchant can create as many Gift Card Templates as he wants.

WooCommerce Gift Card plugin already provides some gift card templates, which are automatically created on plugin activation and it will help the merchant to create new gift cards.

Gift Card Template
woocommerce-giftcard-template

To create a new Gift Card Template navigate to the sidebar and click on Gift Cards > Add New. Here you can design your template by using custom CSS. HTML and you can also use the shortcode.

woocommerce-giftcard-email-templete

Gift Card Products :

A separate gift card type product is created in WooCommerce. You can create as many products as you require. 

To create a new product, go to the sidebar and click on Products > Add New. 

(1) For creating a new Gift card, select a Gift Card as a product type and set up the product name, description, image, and other details required for a product.

woocommerce-giftcard-giftcad-type-product

(2) Here Merchant can select a different type of pricing for Gift Card products.

giftcard
  • Fixed Price
  • Selected Price
  • Range Price
  • User Price
  • Variable Price


  • Fixed Price (Default Price):
    wocommerce-giftcard-fixed-price

    On the product detail, page Fixed Price Gift Card product is shown as:

    woocommerce-giftcard-frontend-fixed-price
  • Selected Price:
    wocommerce-giftcard-selected-price

    On the product detail, page Selected Price Gift Card product is shown as:

    woocommerce-giftcard-frontend-selected-price
  • Price Range:
    wocommerce-giftcard-price-range

    On the product detail, page Price Range Gift Card product is shown as:

    woocommerce-giftcard-frontend-price-range
  • User Price:
    wocommerce-giftcard-user-price

    On the product detail page, the User Price Gift Card product is shown as:

    woocommerce-giftcard-frontend-user-price
  • Variable Price:

    gift-card


    On the product detail page, Variable Price of the Gift Card product is shown as:

    giftcard


(3) Give Discount: 
Enable discount on Gift Card Products.

(4) Select Email Template: Select Email Template or multiple Email Templates.

(5) Select the Default Template: If you use multiple Email Templates, you can choose a default template.

woocommerce-giftcard-set-template

(6) Exclude Product: The merchant can also exclude a selected product from the Gift Card discount. When any excluded product is available on the cart, then the Gift Card discount is not applied.

(7) Exclude Categories: The merchant can exclude categories to which he doesn’t want a Gift Card discount. When any excluded category product is available on the cart, then the Gift Card discount is not applied.

(8) Overwrite Delivery: In this setting, set per product delivery methods for a product your customer used to send their Gift Card email to their recipient.

And the last click on the ‘Publish‘, your Gift Card product is successfully created.

woocommerce-giftcard-complete-giftcard

Now your customer can easily purchase the Gift card from your shop.

Scheduling of Gift Card:

The customer can also schedule the time to send the gift card email to their recipient. If the schedule is left blank, the email is instantly after placing the order successfully.

woocommerce-giftcard-schedule-giftcard

Inventory: The admin can manage the inventory of gift card products.


giftcard-inventory

4.General Setting

woocommerce-giftcard-general-setting
  • Enable: Check this box to enable the WooCommerce Ultimate Gift Card plugin.
  • Enable Tax: Check this box to enable the tax on Gift Card products.
  • Enable Date Feature: Check this box to allow the  Gift Card products to send to the receiver on the selected date.
  • Date Format: Select the date format you want to show on the Gift Card.
  • Enable Listing Shop Page: Check this box to allow the listing of Gift Card products on the shop page.
  • Individual Use: Enable this setting to restrict the Gift Card coupon from being used in conjunction with other Coupons or Gift Cards.
  • Free Shipping: Check this box to enable free shipping for the Gift Card products.
  • Giftcard Coupon Length: Enter Giftcard coupon length. The minimum length of the coupon is 5.
  • Giftcard Prefix: Enter the Gift Card prefix for the coupon code.
  • Giftcard Expiry After Days: Enter a valid number on which a purchased Gift Card will expire. Keep the value 0 for no expiry date and 1 for one-day expiry after order completion.
  • Minimum Spend: Set the minimum spend of a Gift Card.
  • Maximum Spend: Set the maximum spend of a Gift Card.
  • Giftcard Number of Time Usage: Set the number of times a user can use the Gift Card before the Giftcard goes empty.
  • Enable Payment Gateway For Giftcard: Choose a different payment gateway method for Gift Card Products. Otherwise, default payment gateways will work
  • Disable category: Check this box if you want to change the category for Gift Card products. You must select the category every time you create a Gift Card product. The Default Gift Card category will not be assigned automatically.


5.Products Setting

You can include and exclude the product categories for the Gift Cards.

    • Exclude Sale Items: Check this box to make the Gift Card Coupon not apply to the sale items.
    • Excludes Products: You can also exclude a selected product from the Gift Card discount. If any excluded product is available in the cart, the gift card discount will not apply.
    • Exclude Product Category: You can exclude categories that you don’t want the gift card discounts to apply to. If any excluded category product is available in the cart, the gift card discount will not apply.
    • Include Products: Select products on which the Gift Card coupons will apply.
    • Include Product Category: Gift Card coupons will apply to the selected products’ categories.

      woocommerce-giftcard-product-setting

You can also exclude the products and categories for the specific product. Go to the product edit page and click on the ‘Product data’ section. You can exclude the products and categories from the gift card products.

woocommerce-giftcard-exclude-category

6.Email Template Setting

An email template is sent to the user to notify them about their Gift Card, Gift Card Coupon, etc. The merchant can manage their email templates with the following settings.

6.1.Manage Template

In this section, you can design your email template.

  • Upload Default Logo: Upload the image you want to use as the logo on the email template.
  • Logo Dimension (in “px”): Set the logo size in pixels.
  • Email Default Event Image: Upload the image you want to use as the default event/occasion logo.
  • Email Background Color: Merchants can change the background color of the email template.
  • Custom CSS: Write the custom CSS for the Email template.
  • Giftcard Message Length: The merchant can set the gift card message length. The Default length of the Gift card message is 300. Also, the customers to check the current count of the message characters.
  • Disclaimer Text: You can change the disclaimer text for the email template.
    Manage Template

    Here you can see the frontend email template.

6.2.Left Coupon Amount Mail Setting

Disable Coupon Amount Notification Email: By default, your users will get email notifications for the remaining amount after gift coupon usage. But you can disable this notification feature for the users.

left coupon amount mail setting
  • Coupon Email Subject: Write the subject of the coupon mail. Use [SITENAME] shortcode to place the site’s name dynamically.
  • Email Notification to Sender:  Write a message to the buyer acknowledging that the gift card has been sent successfully. You may use the shortcode [TO] for placing the Recipient Email dynamically.

6.3.Coupon Mail Setting

The user will get email notifications for each coupon amount usage. And the user can also check the amount left on their coupons.

woocommerce-giftcard-coupon-mail-setting
  • Coupon Email Subject:  Write the subject of the coupon mail. Use [SITENAME] shortcode to place the site’s name dynamically.
  • Email Notification to Sender: Write the message to notify the user about their coupon amount. Use [COUPONAMOUNT] shortcode to place the coupon amount dynamically. Also, the above Disclaimer text field will replace the [DISCLAIMER] shortcode. 

7.Offline Giftcard Setting

Import Offline Coupons:

Through this section, the admin can import Offline Coupons.

woocommerce-giftcard-import-offline-giftcard


Offline Giftcard List:

Through this section, The Merchant can create gift cards from the dashboard as per user request and send it to the recipient.
The merchant can also export the CSV of Gift Cards.

woocommerce-giftcard-offline-giftcard

To create a new Gift Card click on the ‘Add New‘ tab, a popup window will be displayed. Here you can fill out all the details of the gift card.

After successfully created a giftcard clicking on the ‘Preview‘ button to view the Gift Card and last click on the ‘Save & Send‘ button.

woocommerce-giftcard-add-new-gift-card

You can view detail of all shipped giftcard by clicking on the ‘View List‘ tab.

woocommerce-giftcard-view-liist

8.Import/Export Setting

Import Gift Coupons:

Through this section, you can import Gift Coupons.

woocommerce-giftcard-import-gift-coupon


9.Other Setting

In this setting, we provide some extra options i.e. BCC, Enable/Disable some option that the user needs to change.

woocommerce-giftcard-other-setting
  • Enable Bcc option for Giftcard Mails: Admin can enable the BCC feature for gift card mails. BCC (Blind Carbon Copy) is a copy of an email message sent to a recipient whose email address does not appear (as a recipient) in the message.
  • Disable Apply Coupon Fields: Admin can disable the apply coupon field which is applied to each order amount.
  • Disable Resend Button: Resend button is used to resend the gift card product mail to the recipient. Admin can disable the resend button option.
    The user can also resend the email to the receiver to which he wants to send gift cards.
WooCommerce Gift Card-ReSendMailSetting-25.png
  • Disable Send Today Button:  Send Today button is used for sending the gift card Admin can disable the send today button option.

The customers can select the date they wanted the gift card to be sent to the recipients. Customers can also send the scheduled Gift Card on the current day through the order details section.

WooCommerce Gift Card-Scheduling-27.png


  • Disable Preview Button: Preview Button is for the sender that he/she views their gift card template before sending the recipient. Admin can disable the preview button as they need.
    woocommerce-giftcard-preview-button


  • Enable Pdf Feature: After enabling this feature customers will get an email along with a PDF attachment.
    Pdf feature


  • Select the Pdf Template Size: After enabling this feature customer will get a Giftcard email along with the attached pdf.
woocommerce-giftcard-pdf-size
  • Enable Browse Image for Gift Card: After enabling this feature customers will browse the image for Gift Card Product.
    woocommerce-giftcard-upload-image

Here you can change the text for the email template as:

  • Text for the ‘Email To Recipient‘ section.
  • Enter the description will display below the ‘Email To Recipient’ option.
  • Text for the ‘You Print & Give’ section.
  • The description will display below the ‘You Print & Give’ option.
  • Text for the ‘Ship Your Card’ section.
  • The description will display below the ‘Ship Your Card’ option.
  • Making Optional ‘To’ Field: Check this box to remove the validation from the ‘To’ field.
  • Making Optional ‘From’ Field: Check this box to remove the validation from the ‘From’ field.
  • Making Optional ‘Gift Message’ Field: Check this box to remove the validation from the ‘Gift Message’ field.
  • Manual Increment usage count for Gift Coupon: Check this box to allow manual increment usage of Gift Coupon.
  • Enable Product for Custom Page: Check this box to display the Gift Card product on the custom page.
  • Select Custom Page: Select pages where you want to display the  Gift Card Product with the shortcode product_page id =”xyz”
  • Hide Giftcard Notice: check this box if you want to hide the Gift Card notice from the product page.
  • Hide Featured/Thumbnail Image: Check this box if you want to hide the features images from the product page.
  • Disable Buyer Notification: Check this box if you want to disable the notification to the buyer about there Gift Card has been sent.
  • Email for Ship your Card Delivery Method: Enter a mail where you want to mail the gift card when the customer chooses the delivery method id ‘Ship your card’. by default mail send to the admin.

10.Discount Setting

Here merchants can enable the discount amount on Gift Card products.

woocommerce-giftcard-discount-setting
  1. Enable Discount on Giftcard Products: Check this box to enable the discount on Giftcard Products.
  2. Select Discount Type: Choose the discount type for giftcard products either fixed or percentage.
  3. Enter Discount within Price Range: Enter discount within the maximum, minimum price range, and discount amount.

Select Discount Type is Fixed: Select discount type is fixed from the dropdown.
Set the Discount Amount with Price Range: After selecting the discount type, set the discount amount with the price range.

woocommerce-giftcard-fixed-discount

See the discount amount on the frontend.

woocommerce-giftcard-fixed-discount-1

Select Discount Type is Percentage: Select discount type is percentage from the dropdown.
Set the Discount Amount with Price Range: After selecting the discount type, set the discount amount with the price range.

woocommerce-giftcard-percentage-discount

See the discount amount on the frontend.

woocommerce-giftcard-percentage-discount-1

11.Thank You Order Setting

The merchant would be able to send Thank You gift coupon to their regular customers, who have placed the required number of orders for that coupon.

woocommerce-giftcard-thank-you-order-setting
  • Want to give ThankYou Gift coupon to your customers: Check this box to enable gift coupons for those customers they had placed orders on your site.
  • Select the Order Status: Set the status when the Thank you giftcard coupon would be sent.
  • Number of Orders, after which the thankyou giftcard would send: Enter the order number after that you want to give the giftcard coupon to your customer.
  • ThankYou Coupon Expiry: Enter the number of days for coupon expiry. Keep value 1 for one-day expiry after generating the coupon keep value 0 for no expiry.
  • Select ThankYou Gift Coupon Type: Choose the thank you coupon type. It either fixed or percentage.
  • Enter a Thankyou Message for your customers: This message will print inside the Thank You template. You may use shortcodes [COUPONCODE], [COUPONAMOUNT] and [COUPONEXPIRY].
  • Enter Coupon Amount within Order Range: Enter the thank you coupon amount with the price range.

12.QRCode/BARCode Setting

The QR Code/BAR Code is used over the Gift Card for providing the security.

Enable Barcode Setting:

  • Enable Barcode: If the user wants to generate their BAR Code with the Coupon code so here we give the option for the merchant to allow your user to generate their BAR Code with the Coupon Code.
  • Display Code: Check this box to display the coupon code below the Barcode.
  • CodeType: We have given some code type use for BAR Code, which is going to be used in different places for a different purpose.
  • Size: set the size of the barcode.
woocommerce-giftcard-barcode-setting

You can see the Barcode on the frontend

barcode

Enable QRCode Setting:

  • Enable QRCode: 
  • ECC Level: This compensates for dirt, damage, or fuzziness of the BAR Code. Valid values are “L” (low ECC), “M”, “Q”, “H” (highest ECC). A high ECC level adds more redundancy at the cost of using more space.
  • Size: Option to enable QR Code after selecting the ECC level to select the size of the QR Code.
  • Margin: Set the QR Code margin over here.
woocommerce-giftcard-qrcode-setting

You can see the QR Code on the frontend.

QR code

13.Delivery Method Setting

In this setting, we provide three delivery options to the buyer that he send their gift card email to the recipient.

  • Enable Email To Recipient:
    Email to recipient feature is used for sends the gift card via email only to the recipient.
woocommerce-giftcard-email-to-recipient

On the frontend, you can see the normal delivery method to send the Gift Card.

woocommerce-giftcard-email-to-recipient-1
  • Enable Downloadable:
    In this feature, the gift card email is sent back to the buyer. The buyer will download the email and send it to the recipient with the needed method.

    woocommerce-giftcard-email-to-downloadabe

    On the frontend, you can see the option of print your giftcard.

    woocommerce-giftcard-email-to-downloadabe-1
    • Enable Shipping on Gift Card:
      In this feature gift card email is sent to the admin and the admin will deliver the gift card to the shipping address of the recipient.

      woocommerce-giftcard-email-to-shipping

      After enabling this setting you can see the shipping option on the giftcard.

      woocommerce-giftcard-email-to-shipping-1

  • Allow Customer to choose:
    The customer can choose the method for gift card delivery i.e; Email to Recipient, Downloadable, and Shipping.
    (i) Customer can select: From this section enable the delivery methods for the customers.

    woocommerce-giftcard-delivery-method-setting

    After enabling this feature you can allow the customer to select the delivery methods within three delivery methods for the Gift Card products.

    woocommerce-giftcard-user-choise
  • Apply Coupon On Shipping & Tax:
    In this feature, the user can also apply their coupon for shipping and tax i.e, the Total amount of Gift Card product.
  • You can overwrite delivery methods via per product setting:
    This setting allows you to set the per-product delivery methods.
    Goto ‘Product edit page‘ and click on ‘product data‘ section, here you can see the ‘Overwrite Delivery‘ setting. Enable this setting and select the delivery methods for the specific product.

    woocommerce-giftcard-product-overwrite

14.Gift Card Portal: Scan, Fetch, Redeem, & Recharge

Your ultimate gift card plugin is equipped with a gifting portal to help you scale your WooCommerce card business. The frontend panel allows you to redeem, recharge, scan, and fetch details of gift cards. It works on online, offline, and hybrid businesses.


To use the Giftcard Redeem Link on the web-store follow these steps.

Step 1: First click on the “Get Me My FREE Redeem Link“.

woocommerce-ultimate-giftcard-generate-link

Step 2: Now a popup window will be displayed on your dashboard, here enter your Email Id, Name, and then click on the “Generate Link” tab.

woocommerce-ultimate-giftcard-enter-detail

Step 3: After clicking on the “Generate Link“, your Gift Card Redeem Link and Embedded link will be displayed on your panel with walkthrough steps and the login details will be sent to the given email id.

Redeem details

Step 4: Now Copy the Giftcard Redeem link or Embedded code to log in your web-store of gifting.wpswings.com by using the credentials given in the received email. To use the embedded code first you have to create a Page and then paste the embedded code on it.

Login

Step 5: After successful login with the dashboard, you will get the shop page of the web-store. Here you can see all transactions of Giftcard vouchers.

Gifting login dashboard

Step 6: Now go to the “DASHBOARD“, here you can start Scan/Fetch and Redeem/Recharge the giftcard coupon. You can scan or enter the coupon code to fetch the detail of the Giftcard and you can also redeem/recharge the Giftcard coupon easily.

The dashboard distributed into 3 sections.

  1. Scan: Click on the scan button you can scan the Gift Card Coupon details.
  2. Gift Card Details: Enter the gift card coupon code to display details such as the amount, expiry date, usage limits of the Gift Card Coupon, etc.
  3. Redeem: Here you can enter the number of amounts to Redeem the value from the Gift Card Coupon and Add the value to the Gift Card Coupon.
gift-card-fetch-details

To use the redeem link on this POS system, follow the steps below

  1. Copy the embed link and paste it on any page at POS.
  2. Login using the credentials given in the received email.
  3. Start Scan/Fetch and Redeem/Recharge.

Gifting Portal Settings 

The WP Swings gifting portal is an exclusive service of our plugin that allows merchants like you to efficiently manage their gift card program.

1. Dashboard

The dashboard shows an overview of the gift portal usage with Total Redeem, Total Recharge, and Transaction Comparison data. You can access the Dashboard from the admin menu on the left panel. 

2. Shop Tab

The shop settings tab allows you to configure gift card usage, view reports, give access control to your employees, and change the gifting portal language. 

2.1. Gift Card Settings 

The gift card settings tab allows you to set the usage limit and expiry date of recharged gift cards Plus, you can customize the working currency of the gifting portal. 

  • Currency
  • Expiry Days After Recharge
  • Usage Limit After Recharge

Enter the required details and Submit your changes. These settings will apply globally to all your recharged gift cards. So,

2.2 Recharge Report

 You can generate gift card recharge reports according to Date Range, Store, & Employee. The Recharge Report Table will show the filtered data. In the SEARCH, enter the following details:

gift card recharge report


  • Set a Date Range for the gift card recharge report. 
  • Choose one of the registered Stores. 
  • Select the Employee.

At last, click on the Submit button to produce the report. 

2.3. Redeem Report

The Redeem Report table shows all data related to gift card redemption. You can filter the report according to Date Range, Store, & Employee. To do so, follow these steps: 

  • Go to the SEARCH section. 
  • Select a Date Range for the report.
  • Select the relevant Store.
  • Choose the Employee that redeemed the gift cards for the selected store. 

And click on the Submit button to generate the report. 

2.4. Stores

The stores you’ve registered on the gifting portal appear in the Store tab. From there, you can Edit, Delete, or Add New stores.

list of all stores


To edit the details of an existing store, follow these steps: 

  1. Click on the edit button. 
  2. You can edit the following details: Name, Owner, Location, Phone, Language Set, Design Set, and Assign Employee. 

3. Click on Update Button to save your changes.

add new store


To delete a store, follow these steps: 

  1. Go to the Action Column of YOUR ALL STORES table. 
  2. Click on the Delete button and confirm. 

To add a new store: 

  1. Click on Add Store button.
  2. Enter the relevant data in the fields. 
  3. Lastly, hit the Add button. 

Language

You can translate all strings of the WP Swings gifting portal from the language tab.

language set


It allows you completely customize and translate textual elements to your preferred language. Follow these steps for string translation:


add new language set

  1. Open the Language tab from the admin menu. 
  2. Click on the Add New Language Set. 
  3. You can enter the Language set name. 
  4. Next, enter the translation in the text box opposite the strings. 
  5. Finalize your language set by hitting the Add button. 

Employees 

The Employees tab has the list of individual(s) that manage your gifting portal. You can add or remove employees and implement passwords for each of them. Thus, adding a layer of security to ensure authorized access only.

list of employee


The Employee table has the following columns: Serial No., Employee Name, Email ID, Position Phone, Manager, Added Date, and Action. 

Follow these steps to add a new employee:

add new employee

  1. Click on the Add Employee button. 
  2. Enter the following details: Employee Name, Email, Position, Manager Name, Phone, Shop, Password, and Confirm Password. 

At last, click the Add button to give access to the new employee.

15.Compatibility with Price Based on Country for WooCommerce plugin

From now, this plugin provides the compatibility with Price Based on Country for WooCommerce plugin. Through this, your customers bought a gift card in their own currency, it will get converted in your base currency according to the country of the customers.

woocommerce-ultimate-giftcard-shipping-zone
  1. Zone Name: Select your zone name.
  2. Countries: Select countries in which you want to convert your currency.
  3. Currency: Select your currency type in which you want to convert currency.
  4. Exchange Rate: Here you can enter the exchange rate of the selected currency.

16.Compatibility with WooCommerce Currency Switcher

WooCommerce Ultimate Gift Card is compatible with the WooCommerce Currency Switcher Plugin (Free & Pro). With this compatibility, you can convert the currency of your WooCommerce store to any of the existing currencies in the world, and the same will apply to the gift cards plugin. 

Your users can make gift card purchases in their local currency, and WOOCS will convert it into your store’s base currency.


currency switcher


Go to WooCommerce > Settings > Currency and choose the currency you want to apply to your store.

17.FAQs

How to setup this plugin?

Please reach the WooCommerce menu > Gift Card Manager Settings. Please check the Checkbox, to activate the plugin and add the new Gift Card Product is Enable or not.

How to add Gift Card Product?

Add a new WooCommerce Product, change the product type to the Gift Card Product, enter the default price and select the pricing type. After entering the price of selected pricing type you may need to Publish the product. That’s it your WooCoomerce Gift Card Product is ready to sell.

Where do I change Gift Card Subject of the recipient?

Please go to the Gift Card Manager Setting page and select the Email Template Tab Section. At the bottom, you can see the mail setting toggle bar. There you may change the Gift Card Subject to the recipient.

From where i can modify the email template?

We have provided a custom post type Gift Cards under the dashboard where we have provided 16 custom templates. You can use them or even add your own template.

Is Shipping Charges applicable on Gift Card?

If any Gift card Product is purchased through a Shipping method (one of the Delivery Methods) only then the shipping charges would be applied. Only admin will receive the gift card mail so that he can ship it to the customer.

Suggest Edit

Filed Under: Codecanyon, WooCommerce / WordPress Tagged With: gift card coupons, woocommerce, woocommerce gift, woocommerce gift card, woocommerce gift certificates, woocommerce gift product plugin, wordpress gift voucher plugin

  • « Go to Previous Page
  • Page 1
  • Page 2
  • Page 3
  • Page 4

Footer

Company

  • About Us
  • Partners
  • Affiliate Program
  • Services
  • WooCommerce Plugins

Resources

  • Blog
  • Offers
  • Plugins Demo
  • Knowledge Base
  • Case Studies

Help Center

  • Contact Us
  • Submit Query
  • License Activation
  • Support Plans
  • Forum

Copyright © 2025 WP Swings. All Rights Reserved.