
1.Overview
Features of WooCommerce Gift Card plugin:
- Import/ Export Gift cards
- Group Gifting Support
- Gift Cards Report for Admin
- Sell Offline Gift Cards As PDFs
- Access WP Swings’ Gifting Portal for Redeem/Recharge
- Multiple Templates For Gift Cards Customization
- Promote Product on Gift Certificates
- Price Variation
- Set Product-Wise Expiry Date
- Variable Pricing On Customizable Gift Card
- Coupon Mail Setting
- Gift Card Recharge by Customers
- Show Delivery Method on Gift Card
- Disable Fields from Gift Card Product Page
- QR Code / BAR Code Feature
- Automatic Coupon Code Generation
- Exclude Sale Items, Categories and Products
2.How to Download The Plugin?
To download the premium plugin that you purchased please follow the below steps:-
- Go To https://wpswings.com/my-account
- Visit Orders Section
There you will get a License code and a Premium purchased plugin zip file Download and use it on your website by activating it
Note: You need to have both Free and Pro plugins in order to use them smoothly
3.Installation
Let’s See how you can download and install both the free and pro version of the Gift Card plugin.
3.1.Free Gift Cards Plugin Installation
Automatic Installation:
Automatic installation is the easiest option for WordPress.
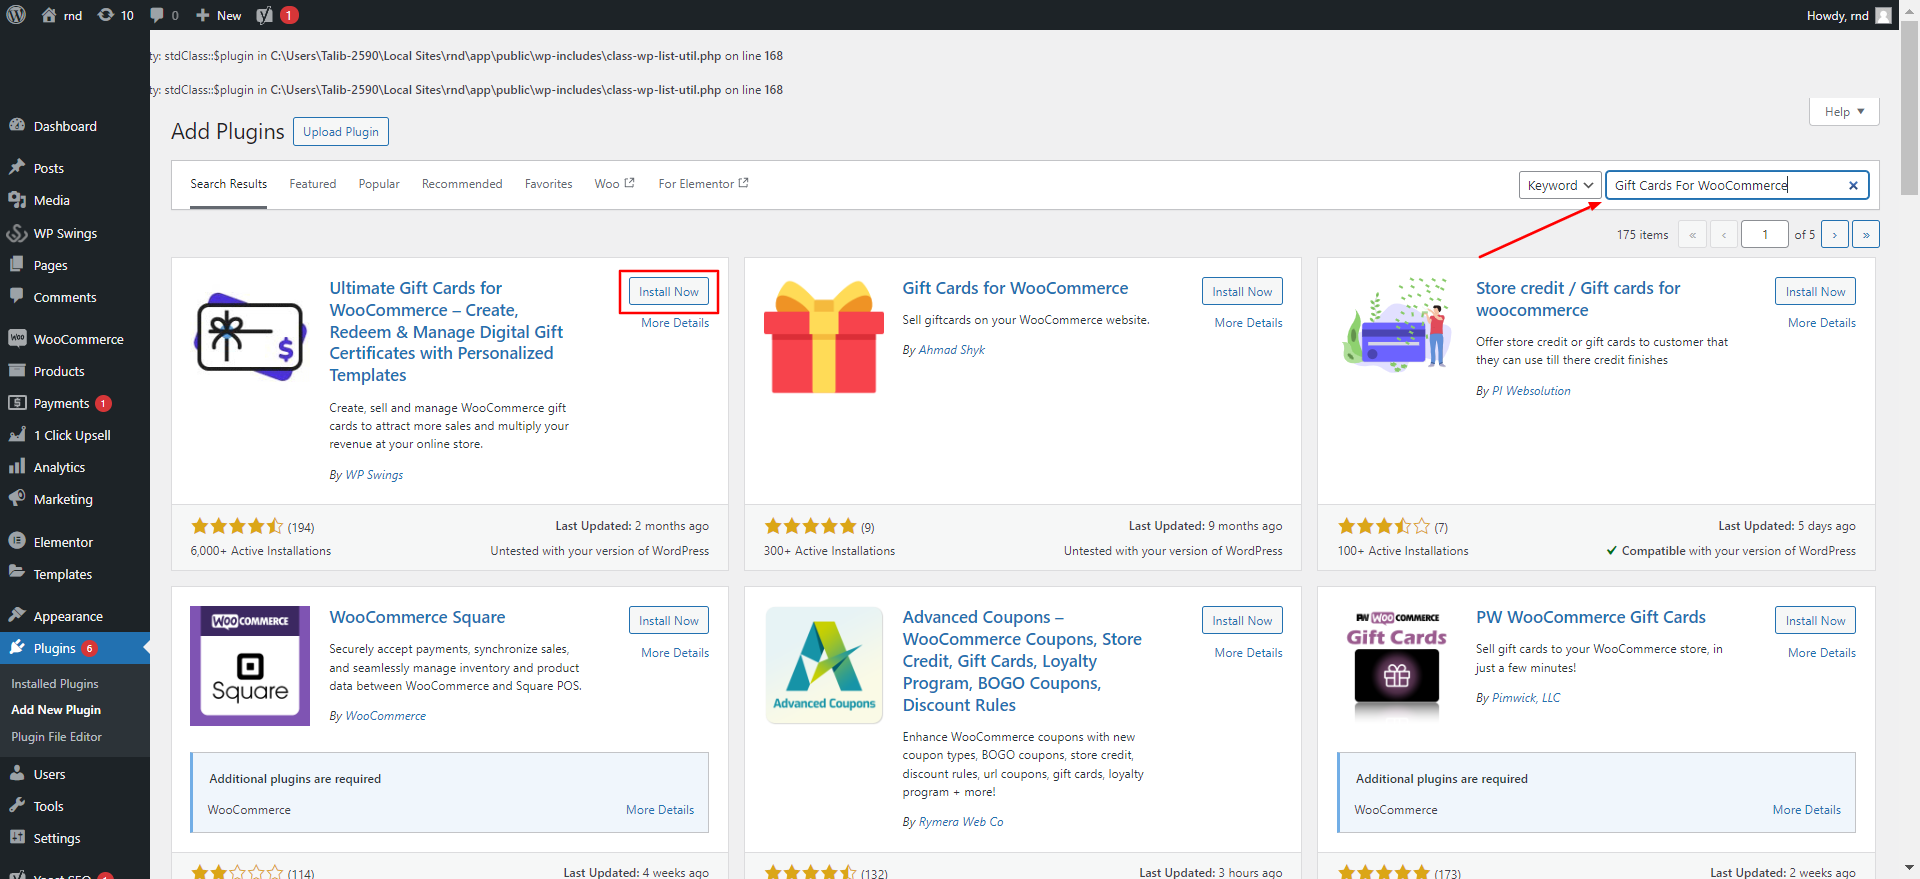
Follow these steps for the installation:1) Go to the Admin panel navigate to the sidebar click on the ‘Plugins’ menu > ‘Add New’.
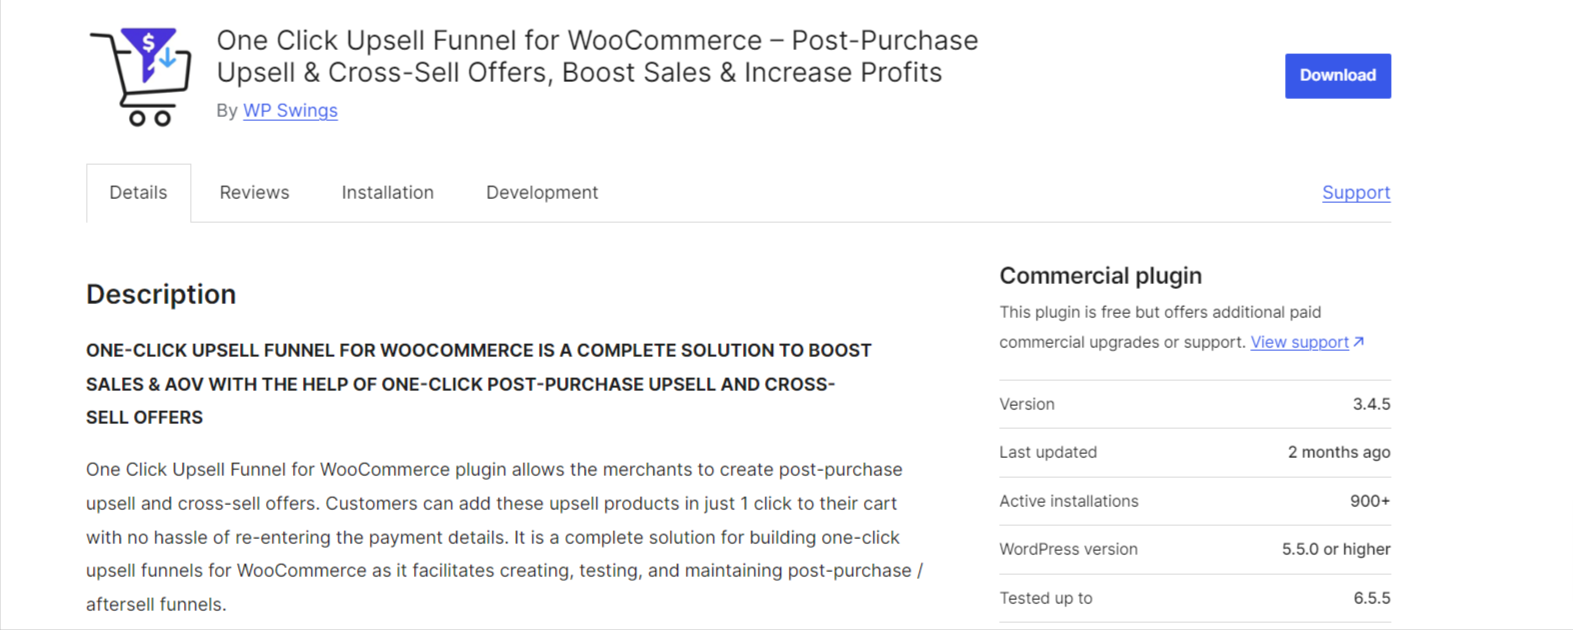
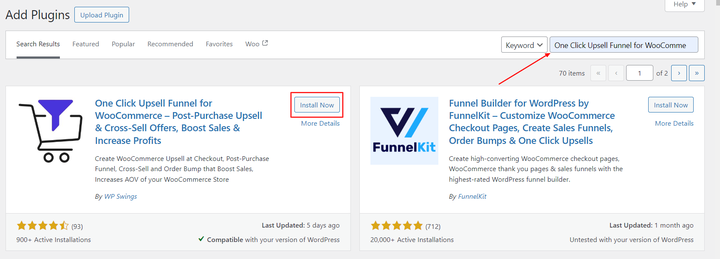
2) On the ‘Add Plugins’ page go to the search bar and type ‘Gift Cards For WooCommerce’.
Once you find ‘Gift Cards For WooCommerce’ by WP Swings, you can view the details about it such as the points release, rating, and description. One can install it, simply by clicking “Install Now”
Manual Installation:
The manual installation of the plugin is another option to install the plugin in the seller’s WordPress environment.
The manual installation method involves downloading our ‘Ultimate Gift Cards Extension and uploading it to the web server via their favorite FTP application.
The steps for manual installation are as follows:
1) Upload the ‘Gift Cards For WooCommerce’ folder to the /wp-content/plugins/ directory.
2) Activate the WooCommerce Gift Cards plugin through the ‘Plugins’ menu in WordPress.
**The best results can be viewed by using the “WooCommerce” standard theme (Storefront). Any third-party plugin might cause conflict with our plugin.**
3.2.Pro Plugin Installation
Automatic Installation:
Automatic installation is the easiest option as WordPress handles the file transfers itself and you don’t need to leave your web browser.

The steps are as follows :
1) Download the zip folder of the plugin Gift Cards For WooCommerce Pro from My Account > Orders > Click on view > Scroll down and download the plugin zip file
2) Once downloaded, install the Gift Cards For WooCommerce Pro plugin by browsing and activating it.
Note: Visit the Login page to create your account before completing your purchase.
Manual Installation:
The manual installation of the WooCommerce Gift Cards plugin is another option. To install the plugin to your WordPress environment.
The manual installation method involves downloading our Gift Cards For WooCommerce Pro Extension and uploading it to your web server via your favorite FTP application.
The steps are as follows :
(i) Kindly, upload the Gift Cards For WooCommerce Pro folder to the /wp-content/plugins/ directory.
(ii) Activate the Gift Cards For WooCommerce Pro plugin through the WooCommerce wallet ‘Plugins’ menu in WordPress.
Note: Before activating the Gift Cards For WooCommerce Pro, you should have the Ultimate Gift Cards for WooCommerce otherwise, the plugin will not function.
So, if you don’t already have it, you can download it directly from here:
3.3.License Activation
After Purchasing the premium version navigate to My Account > Orders > Your Order. There you’ll find the License Key.
If you want to benefit from all the premium features and automatic updates and access the support platform to receive help from our staff. In that case, it’s necessary to activate the license.
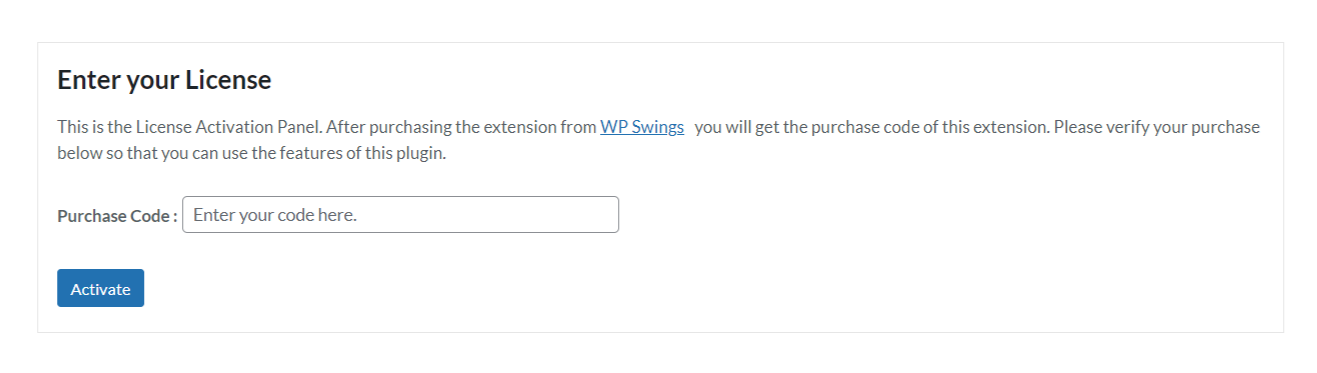
To do so, you have to navigate to the “License” tab, here you can enter the “License Key”, and click on the “Activate” button. Customers are supposed to receive these in their mail when they purchase the premium plugin.
You can also find the license activation code in the My Accounts > Order section
4.Create New Gift Card Product & Template
4.1.Gift Cards Templates
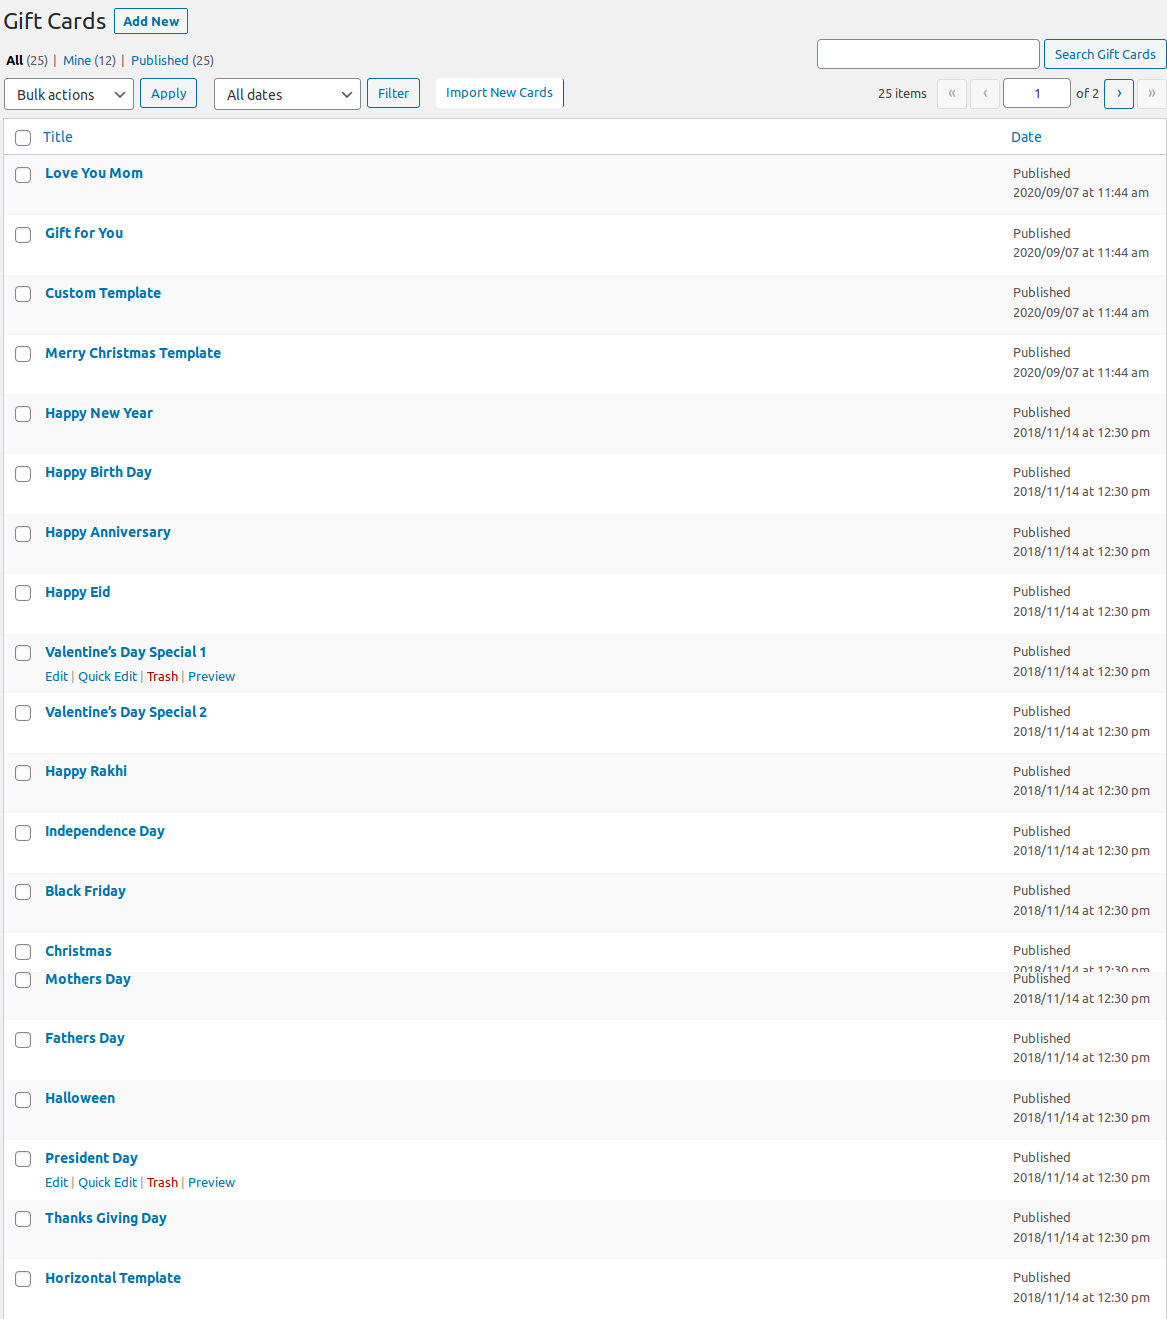
After activation of the WooCommerce gift card plugin, it creates “Gift Cards” a custom post type. From here, you can create as many templates for gift coupons as you want. This WooCommerce Gift Card Pro version already provides 20+ templates for gift coupons, which are automatically created on plugin activation. It will help the merchant create gift certificates for various festivals and celebrations.
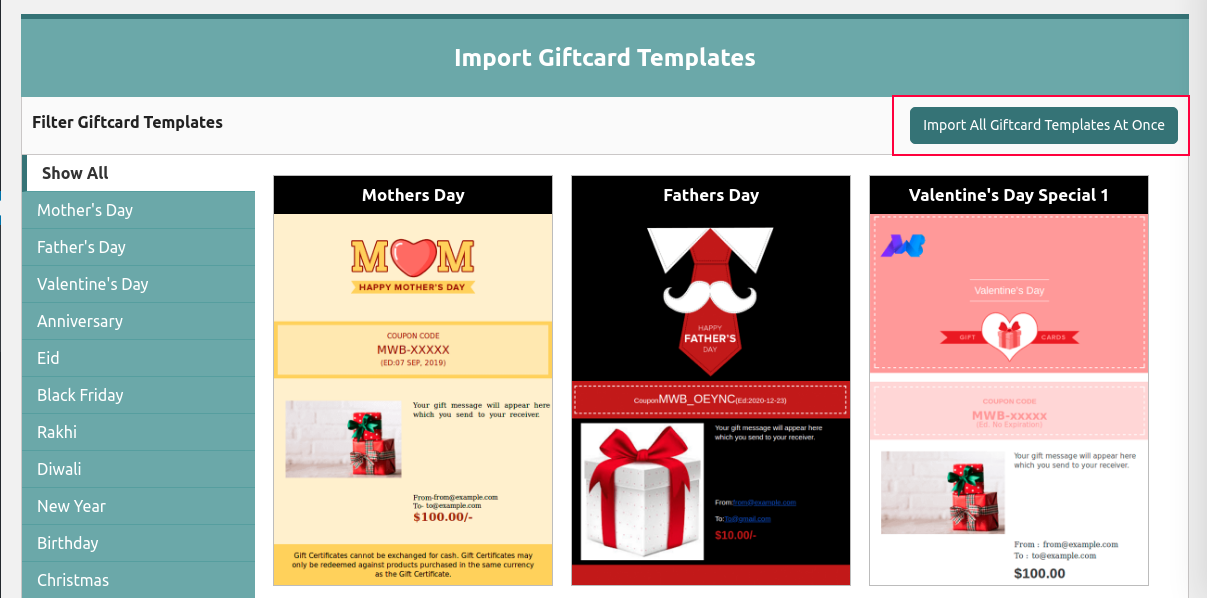
4.2.Import Gift Cards Templates
If you require more gift card templates dedicatedly designed for specific occasions, you can click on “Import New Cards”. Once you click, you’ll be redirected to a new page where all the templates for gift coupons are listed.
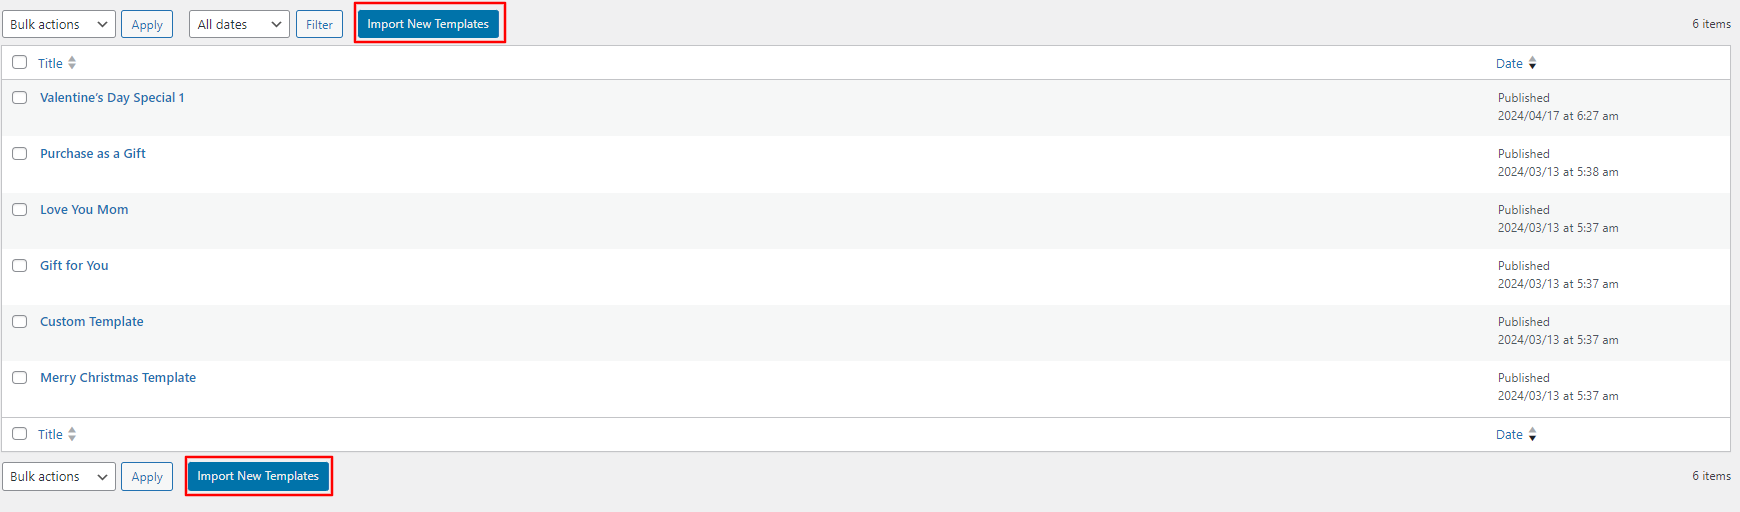
You can either download them individually or click on “Import All Gift Card Templates At Once” to import all of them at the same time.
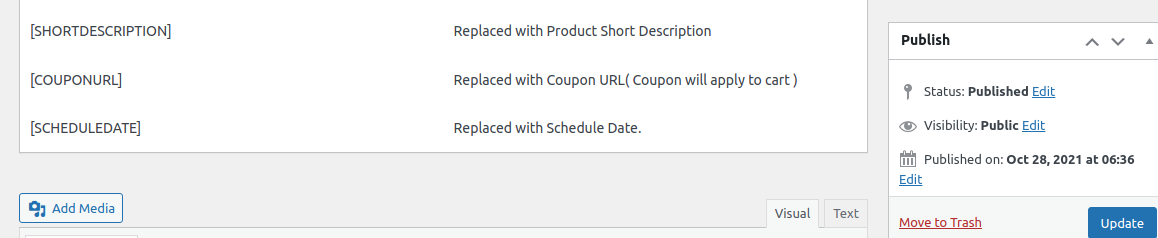
If you want to create a new Gift Card Template navigate to the sidebar and click on Gift Cards > Add New. Here you can design your template by using custom HTML and CSS. You can also use the given shortcodes to add some predefined elements to your gift card. After designing your template, click on “Publish” to make it live.
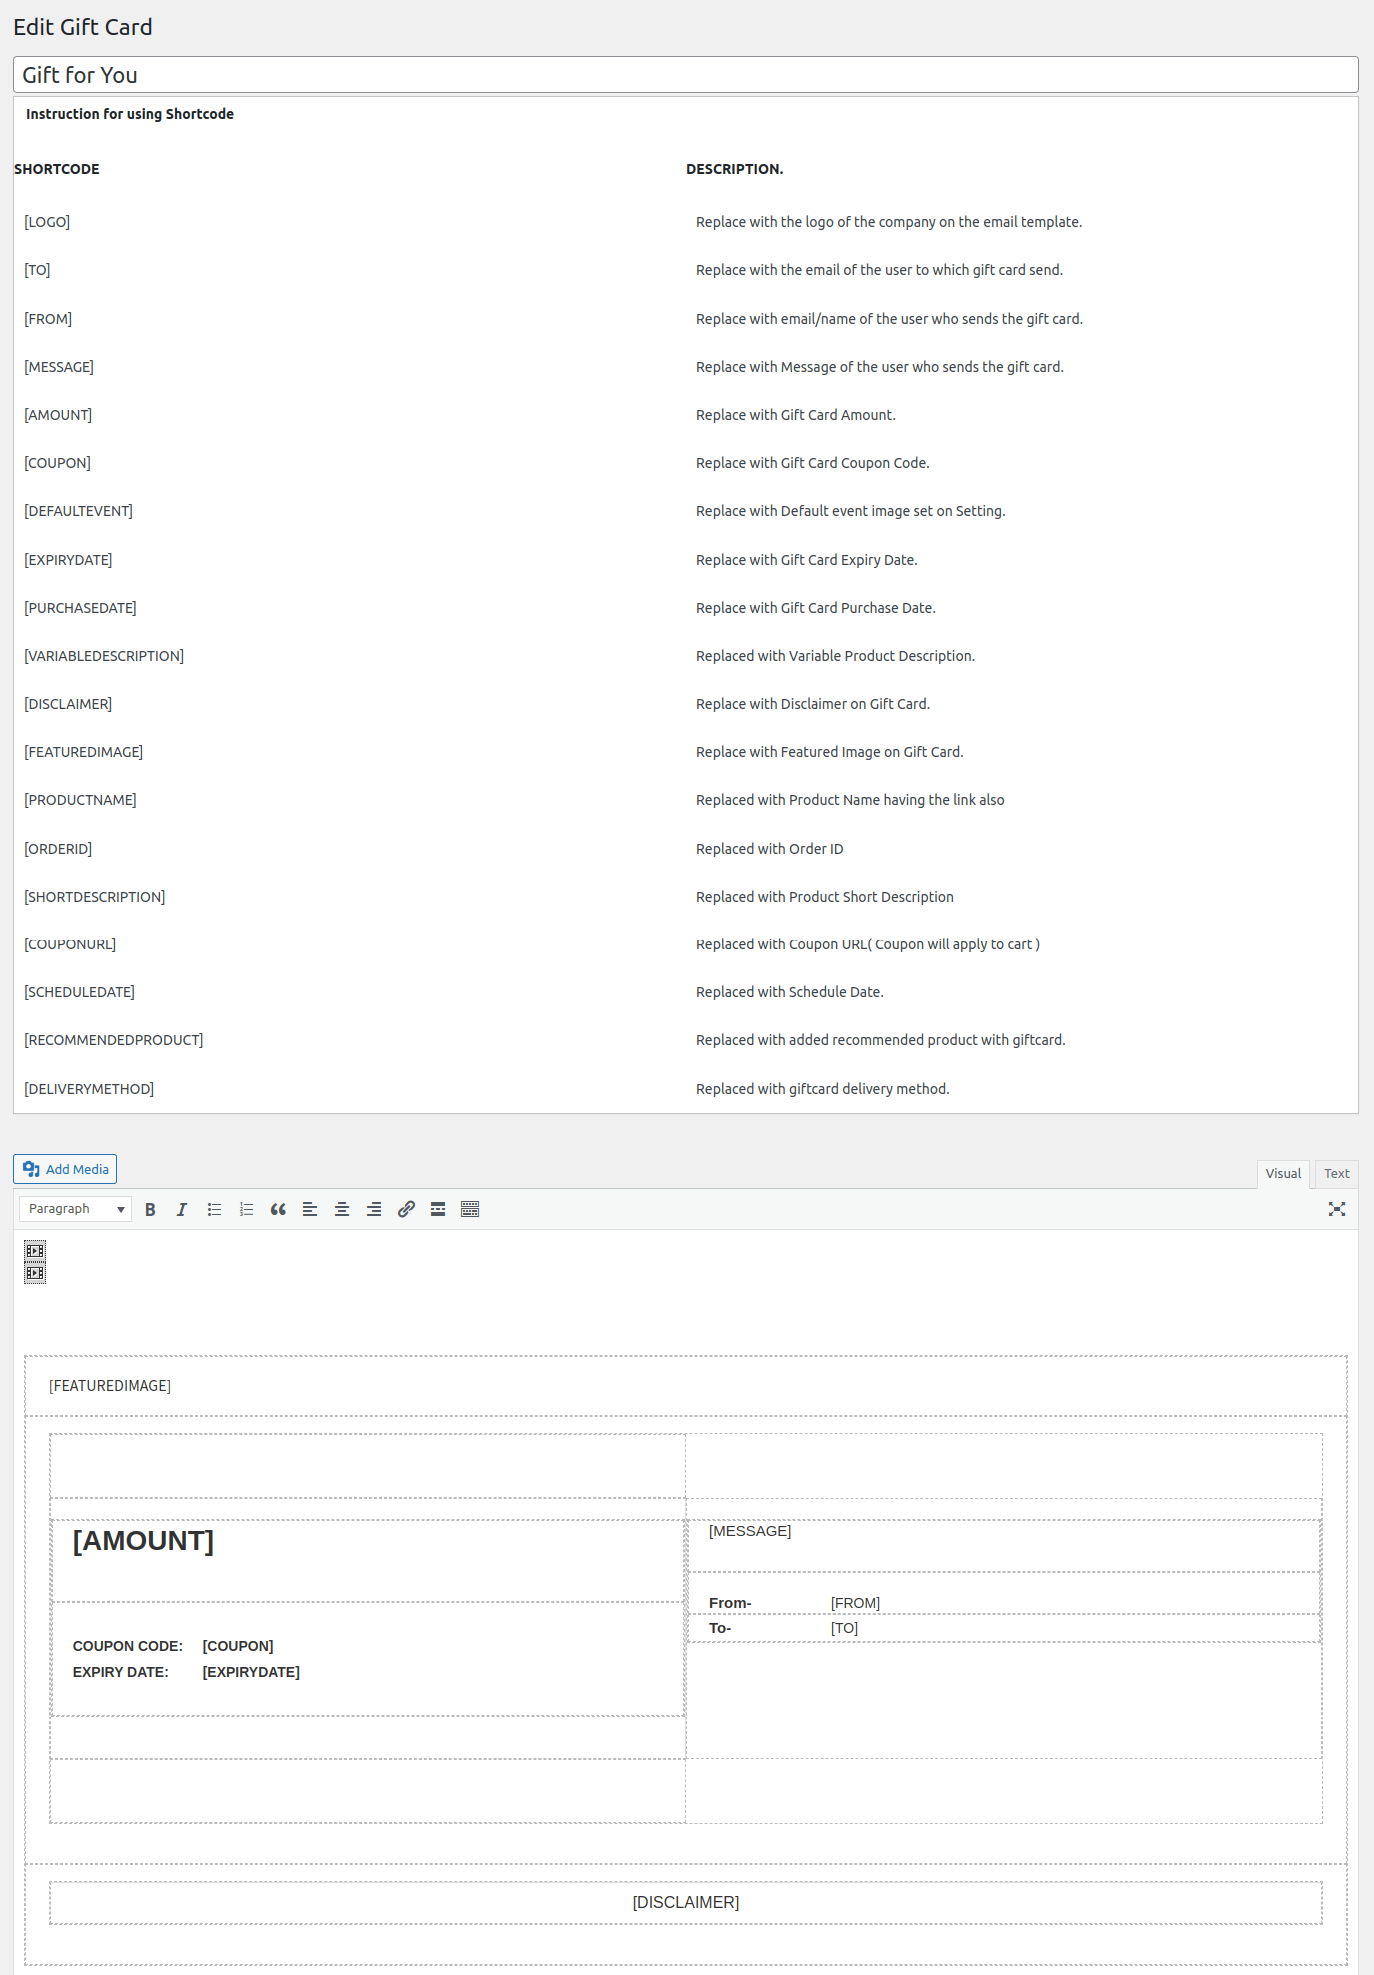
Additionally, you can also select the shortcode to generate a Coupon URL and apply it to the gift card templates while sending emails.

When the gift card template is shared via email, the link to apply for the gift card will appear below.
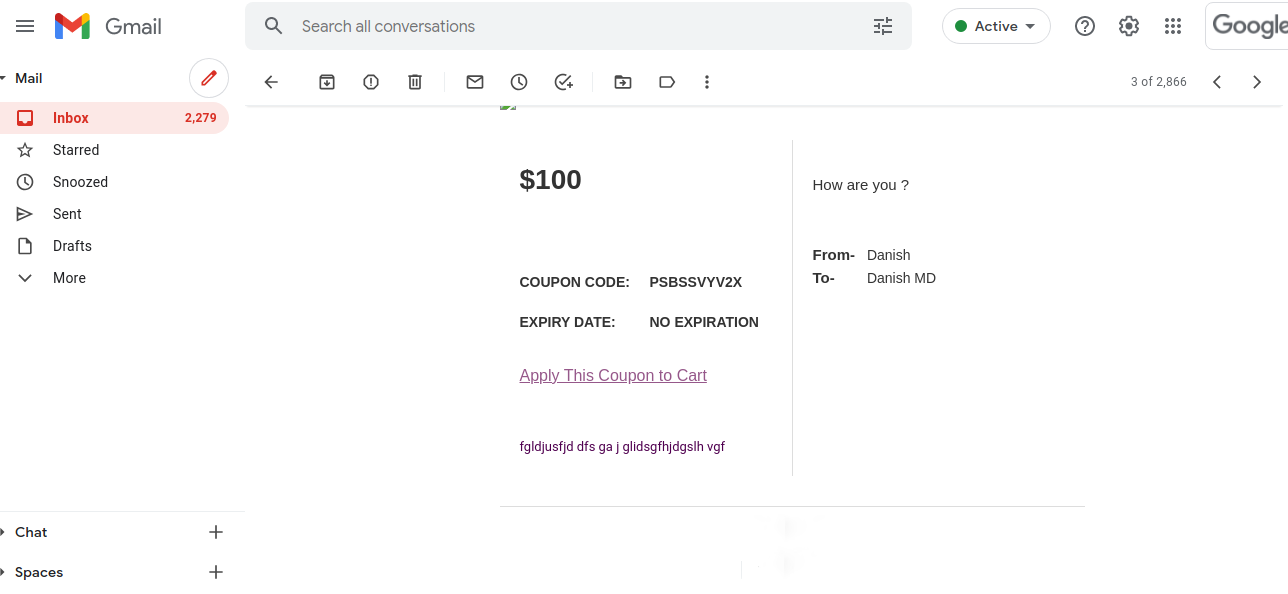
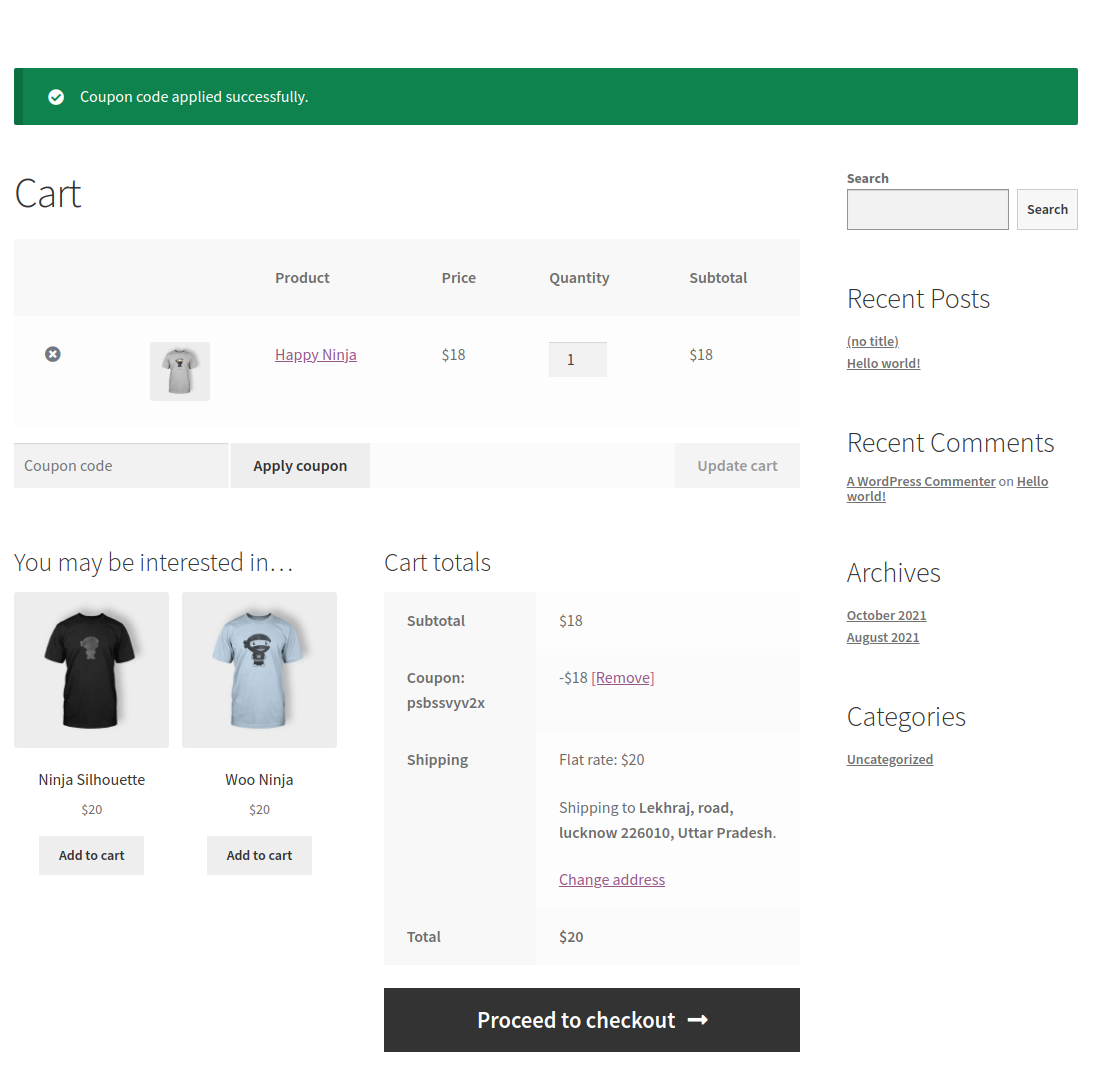
Clicking on the link, your customer will be redirected to the checkout page and the coupon will be auto-applied.
You can also use the Schedule Date shortcode on the gift card templates to display the scheduled delivery date.
4.3.Create Gift Cards Products
To create a new Gift Card product in WooCommerce you can navigate to the sidebar and click on the Products > Add New. After reaching the Add New Product page, follow these steps:
- Enter the name and description of your product.
- From the Product Data dropdown, select the “Gift Card” option.
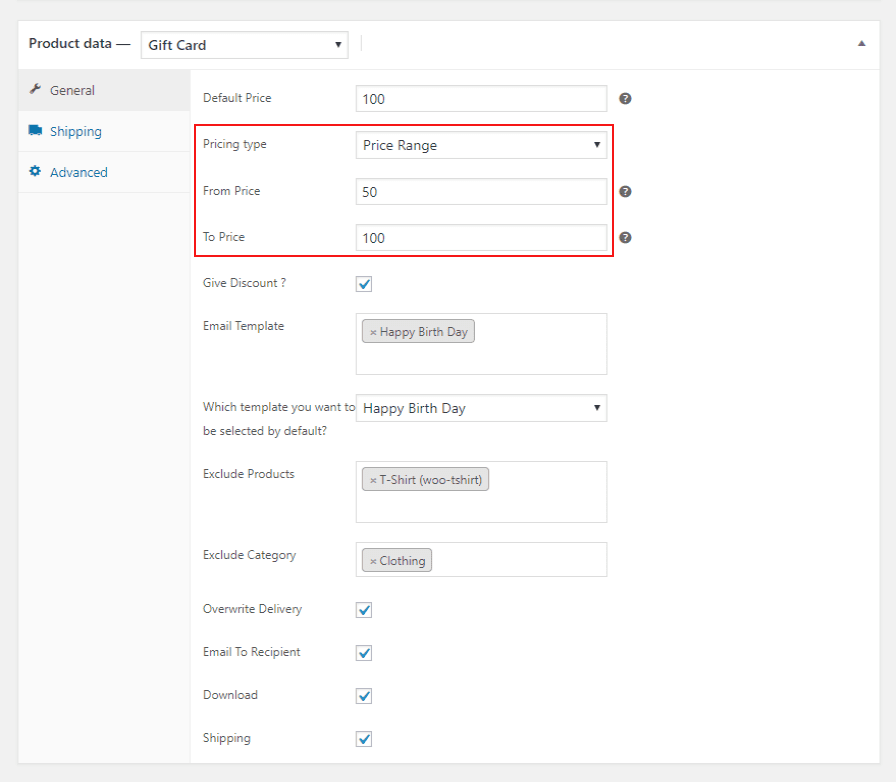
- Enter the Default price and select the Pricing Type for your gift card WooCommerce product.
There are five types of pricing you can choose from:
- Fixed Price
- Selected Price
- Range Price
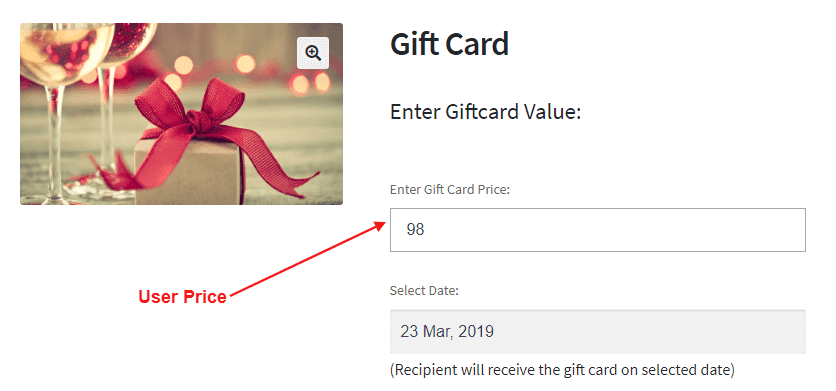
- User Price
- Variable Price
- Selected with Price Range
Fixed Price (Default Price): Select a fixed price for your gift coupons.
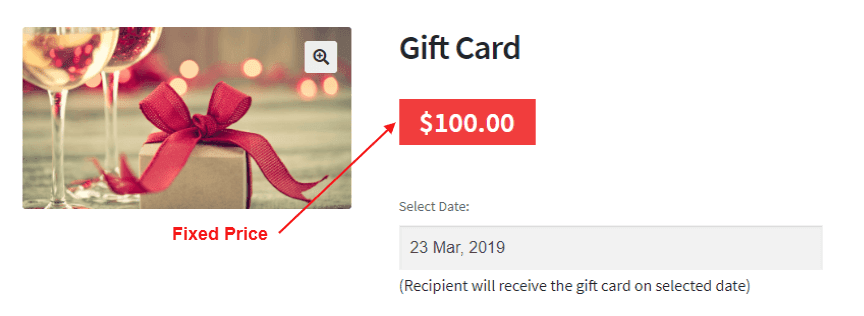
For example, look at this fixed-cost gift card on the product page.
Price Range: Give a price range between which the customers can buy the gift coupons.
They can enter their preferred price within the set range.

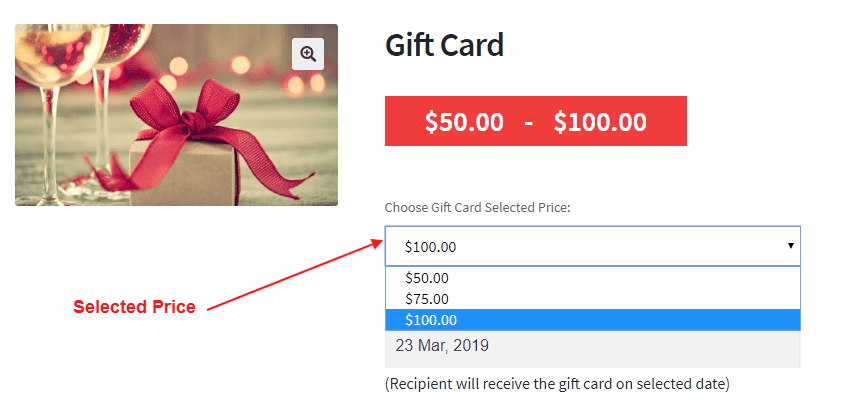
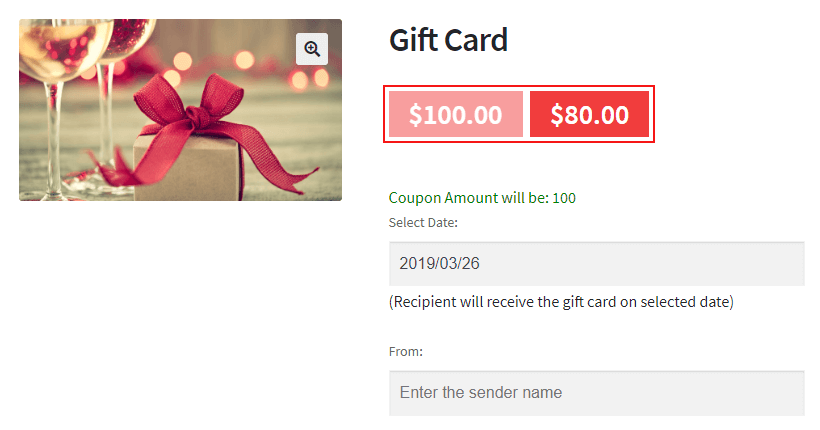
Selected Price: You can set multiple prices for the same gift card.
Enter the different prices and use a separator to separate them.
For example, $50|$75|$100.
User Price: Add a minimum limit.
WooCommerce gift card product with a minimum limit on User Price.
Variable Price: Add different prices for different durations.
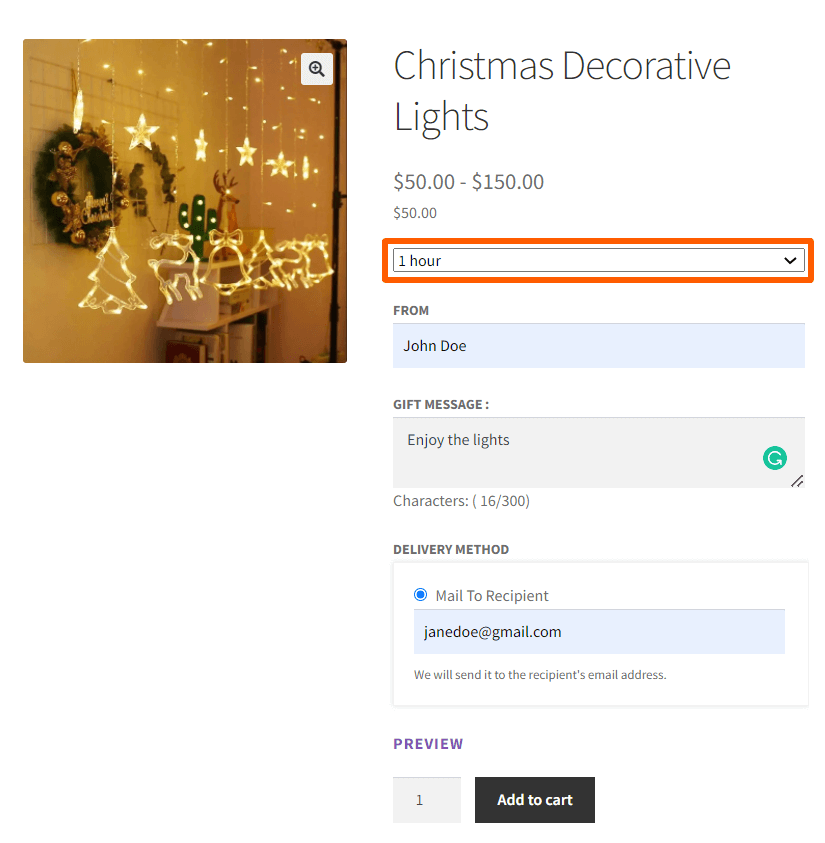
Create a gift card with duration-based pricing.
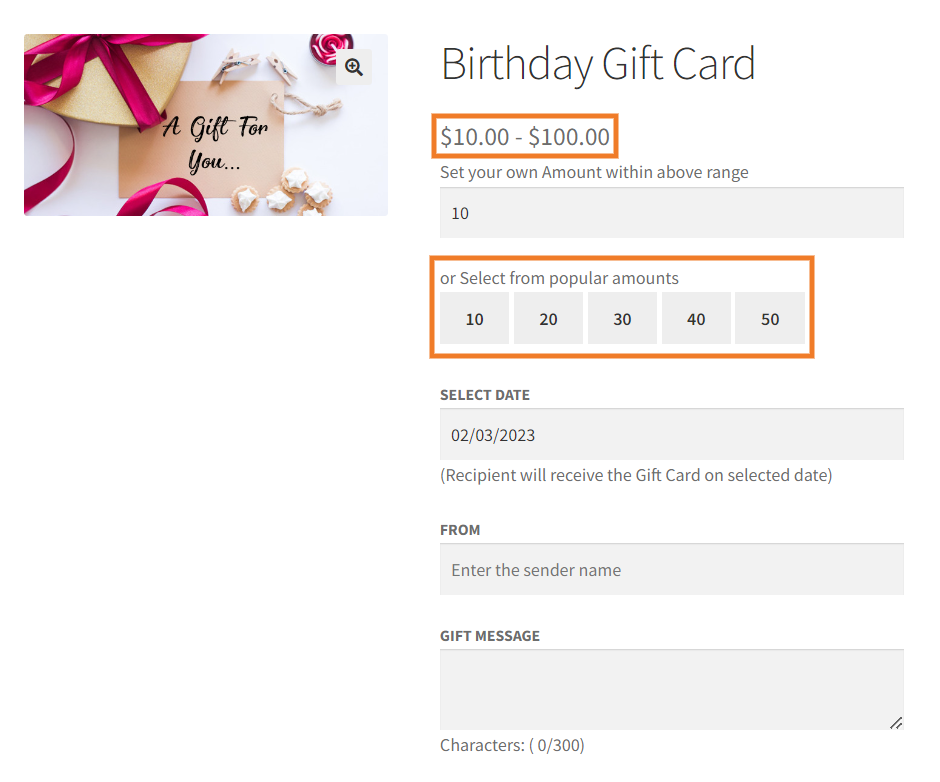
Selected With Price Range Type: Define a price range for the gift cards and give specific pricing options within the range.
For example, select a price range of $10-100 and give 10|20|30|40 selectable prices for users to purchase gift coupons.
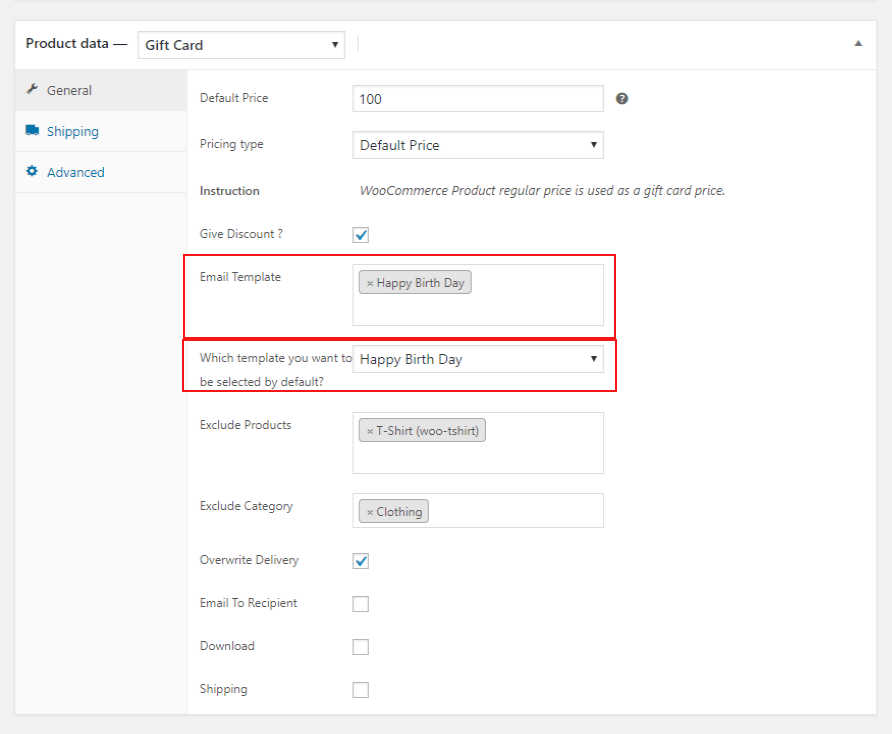
Give Discount: Enable discount on your gift card WooCommerce product.
Select Email Template: Select Email Template or multiple Email Templates.
Select the Default Template: If you use multiple Email Templates then you need to choose a default template you want to show by default.
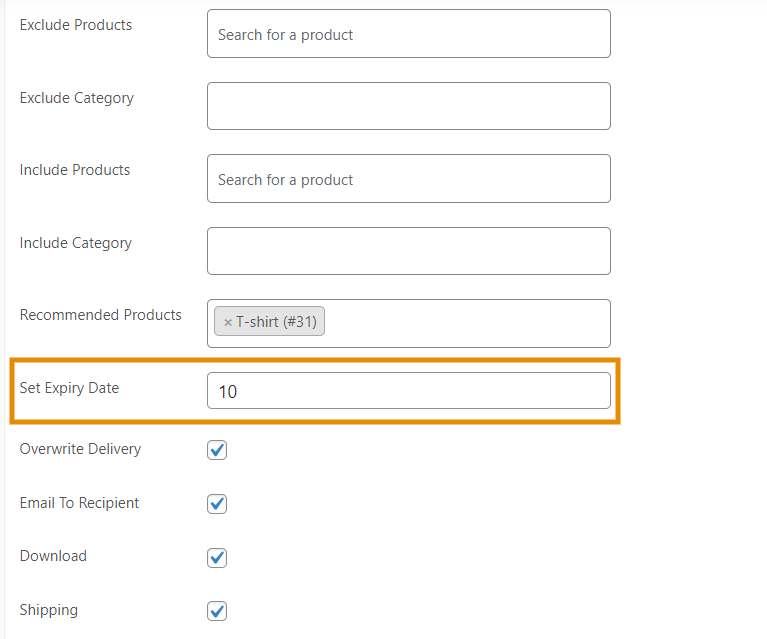
Display Recommended Products on Gift Cards: Premium While creating gift certificates, you can add products to the recommended products field, and your selected items will be displayed on the gift certificate preview, in the email, and on the PDF.
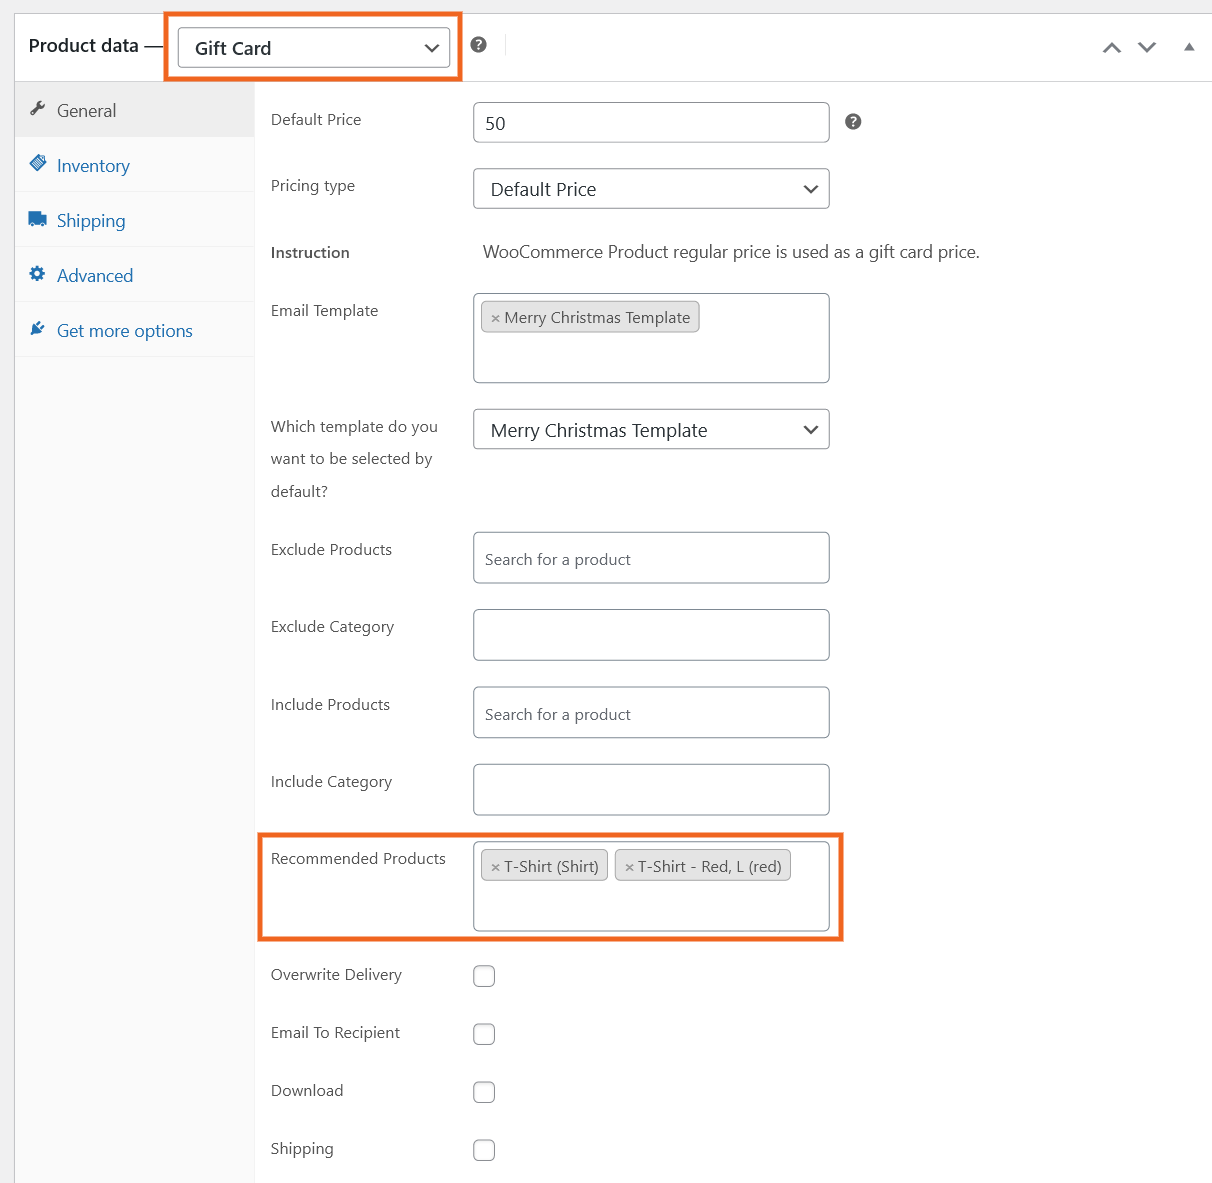
Add [RECOMMENDPRODUCT] shortcode in the template you want to use to create gift cards for this feature to start working.
Set Expiry Date: Premium You can set the expiration date of your gift certificates individually. It will override the global expiration date you set for all WooCommerce Cards and allow you to create special WooCommerce gift cards for your marketing campaigns.
Exclude Product: Premium You can also exclude a selected product from the gift coupon discount. The customers won’t be able to redeem gift card coupons while purchasing the excluded product.
Exclude Categories: Premium Exclude categories from gift card discounts to prevent customers from purchasing products in those categories with the gift coupon.
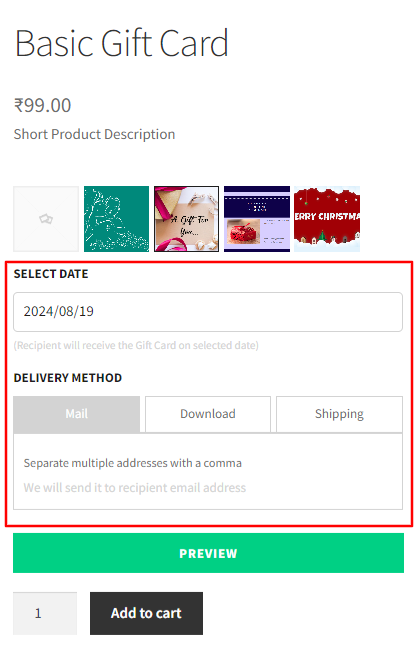
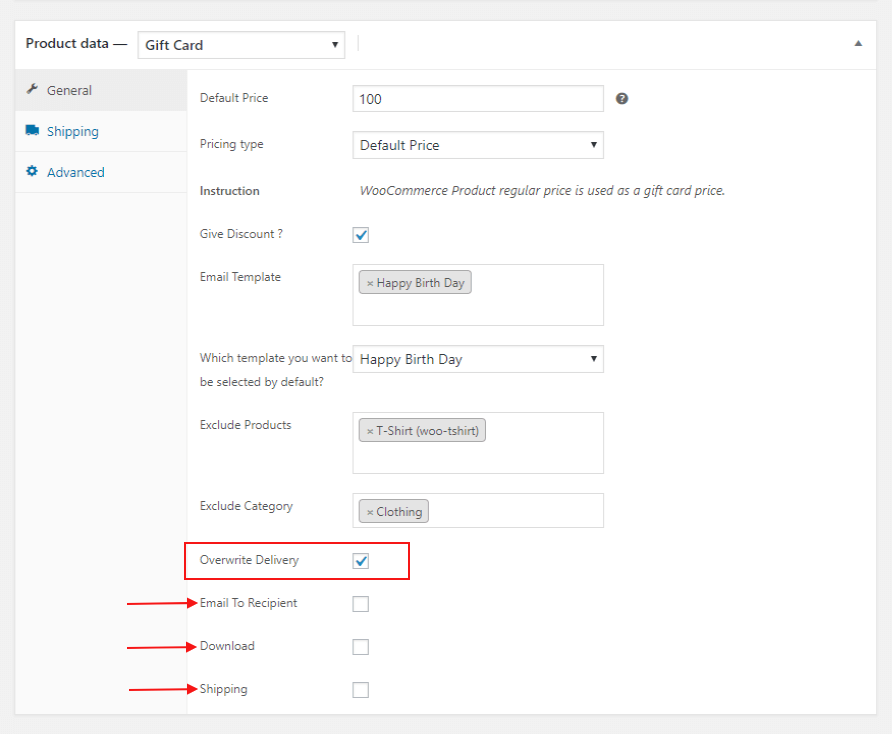
Overwrite Delivery: Premium With this setting, you can select different delivery methods for every individual gift card. You get three delivery options: Email to the Recipient, Download, and Shipping. You can either select all or a single one.
After making the changes, publish your gift card WooCommerce product.
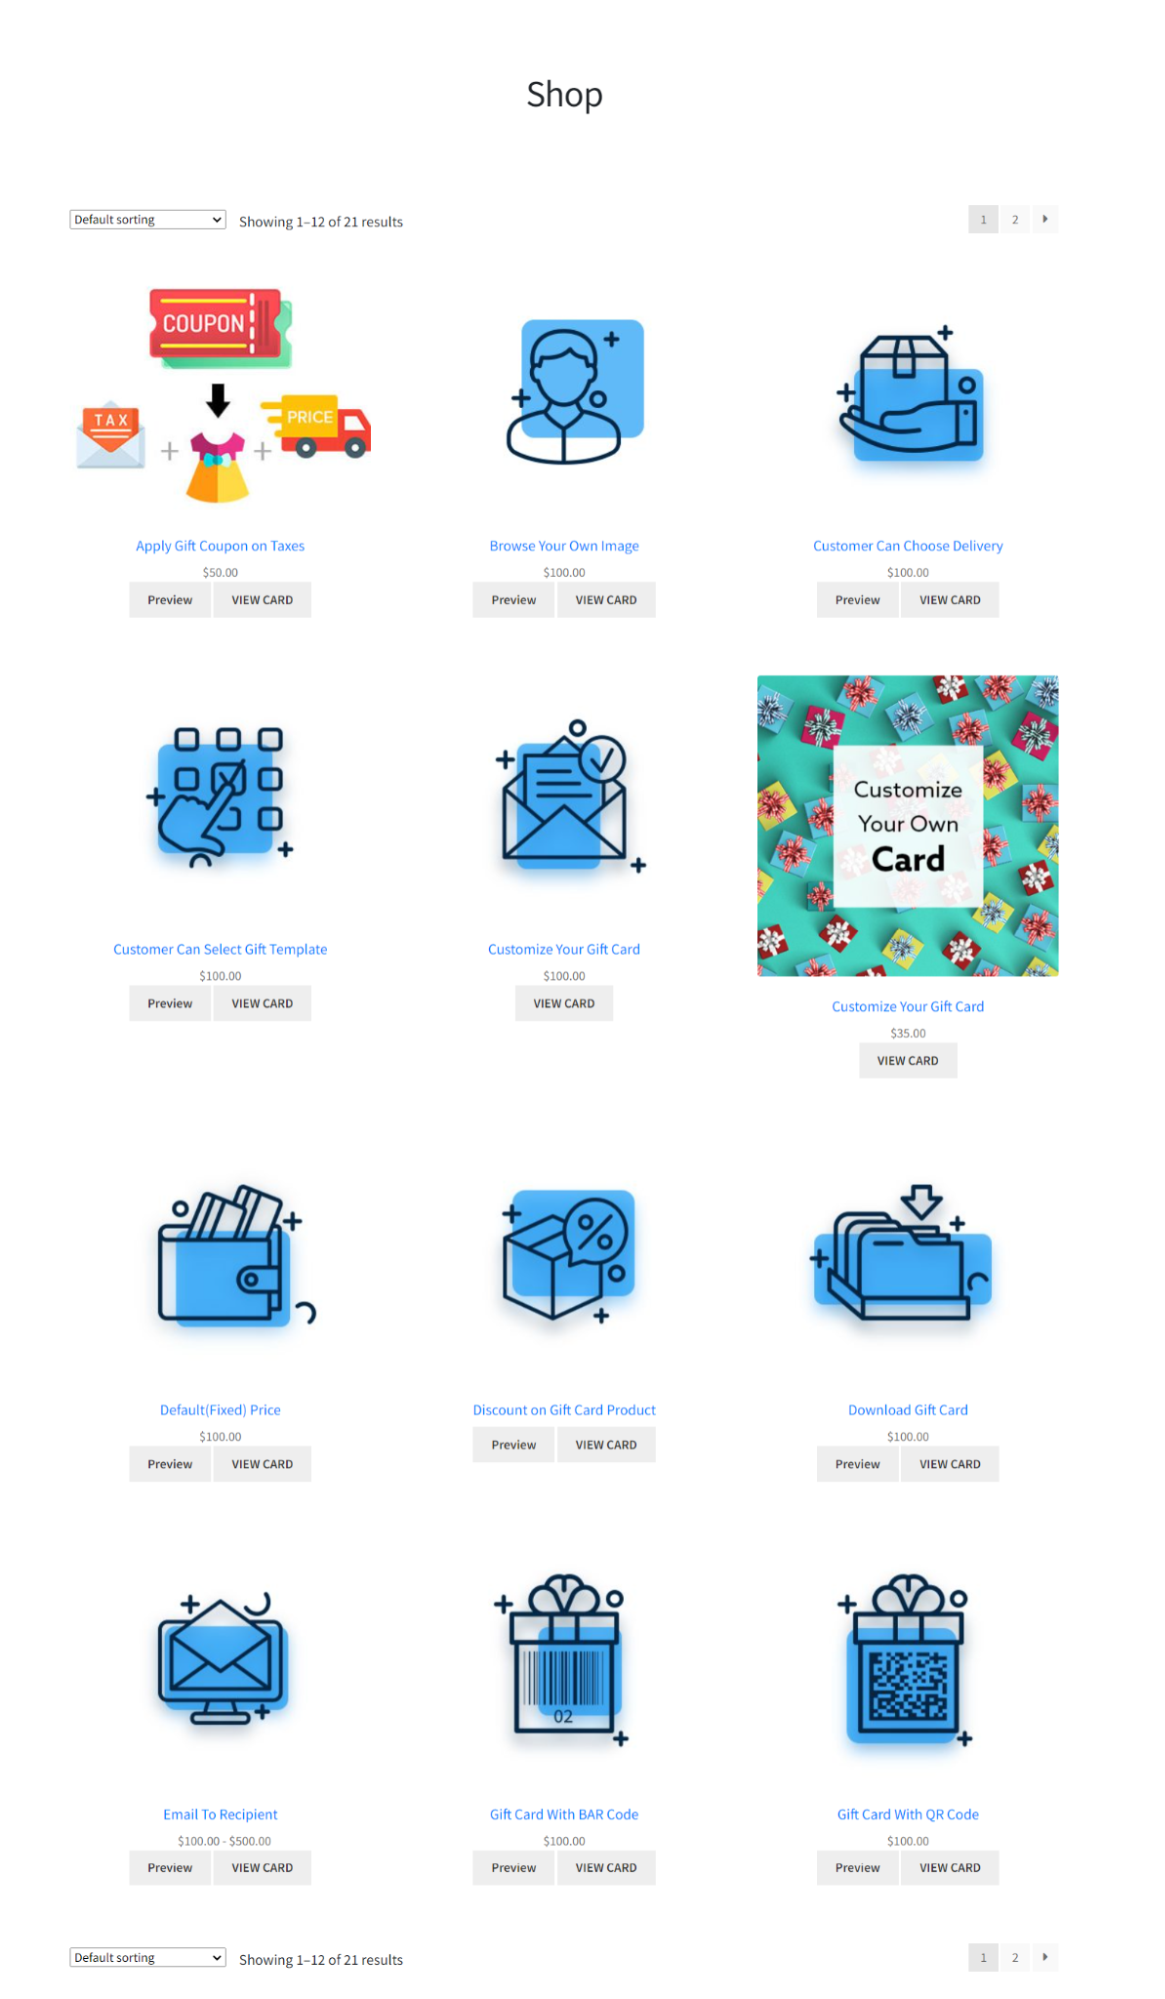
Now your customer can easily purchase the Gift card from your shop.
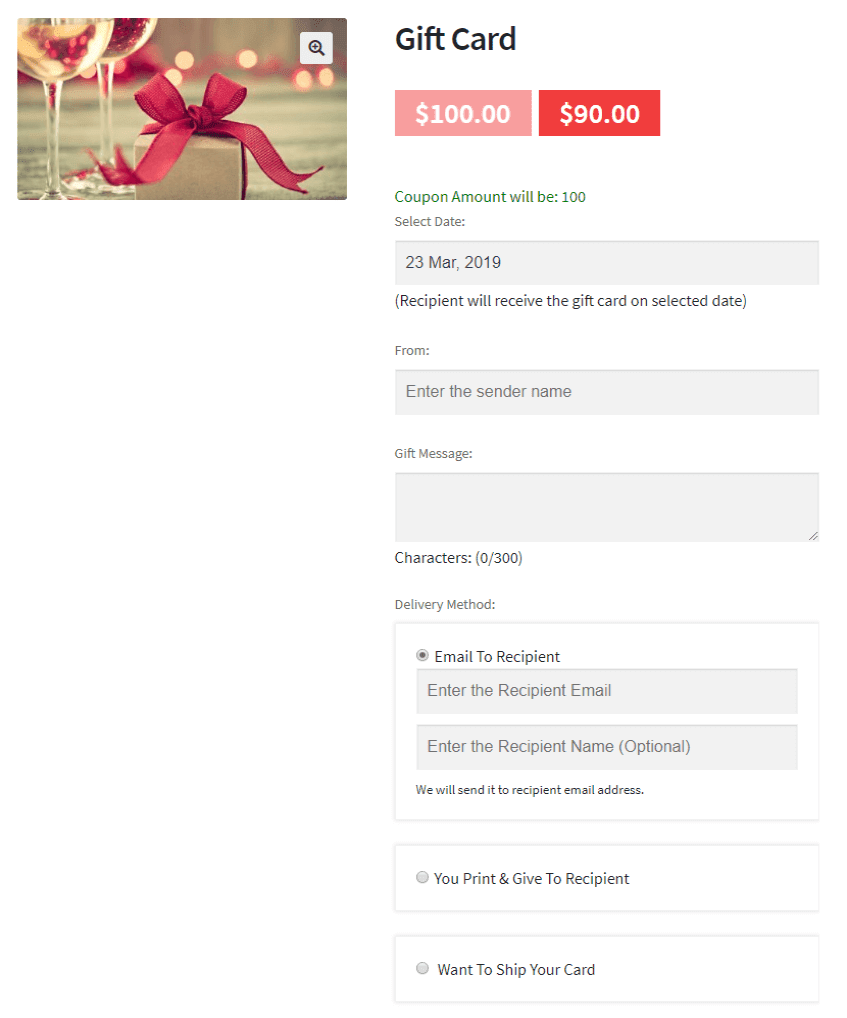
Scheduling of Gift Card: Premium While purchasing the gift vouchers, customers can select the specific date of delivery. If they don’t select a delivery date, the email is sent instantly after placing the order.
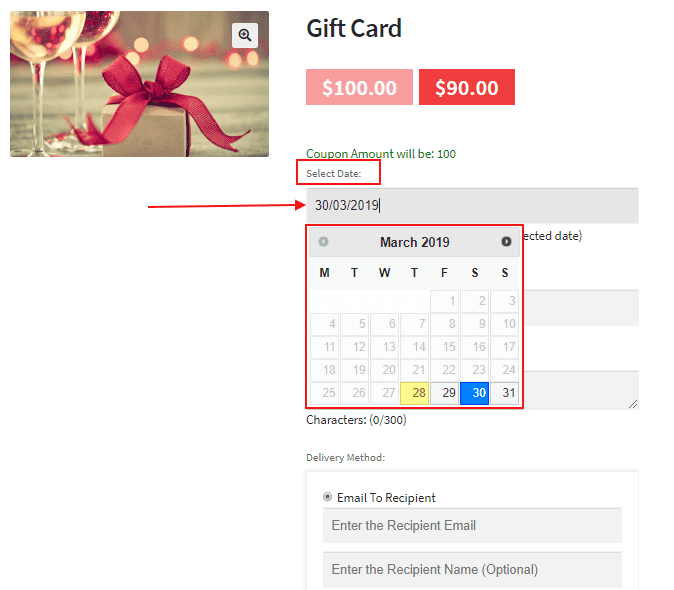
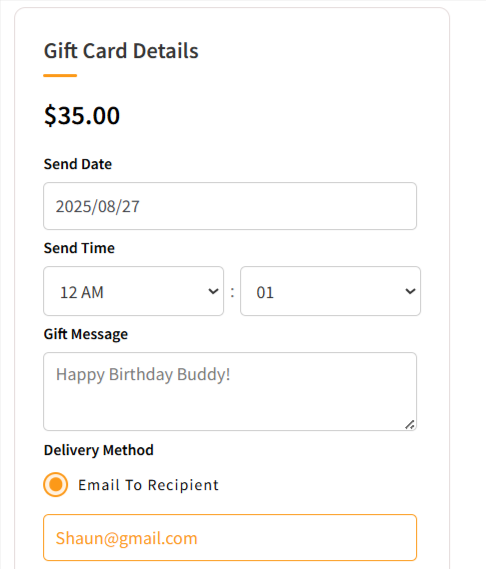
4.4.Scheduling of Gift Card
While purchasing the gift vouchers, customers can select the specific delivery date, time, and minutes. If they don’t select a delivery date, the email is sent instantly after placing the order.
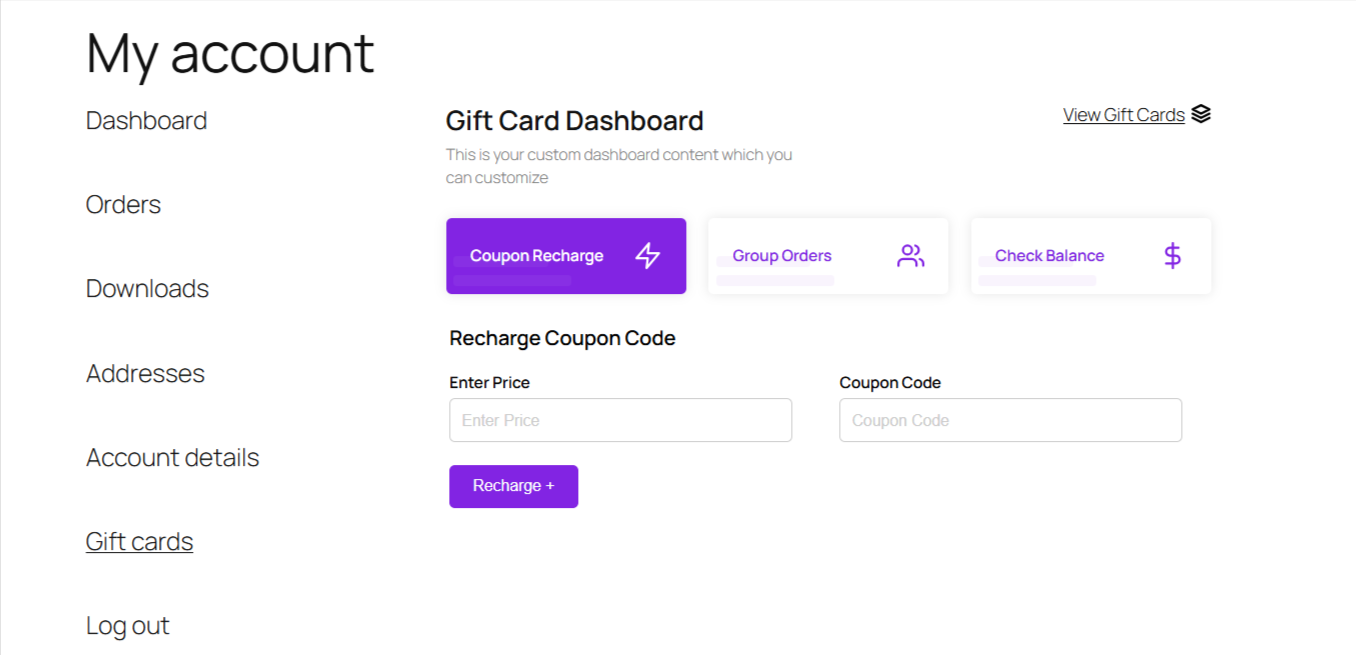
5.Gift Cards Frontend
Customers can directly recharge their coupons, Check their balance, and group gifting orders from here.
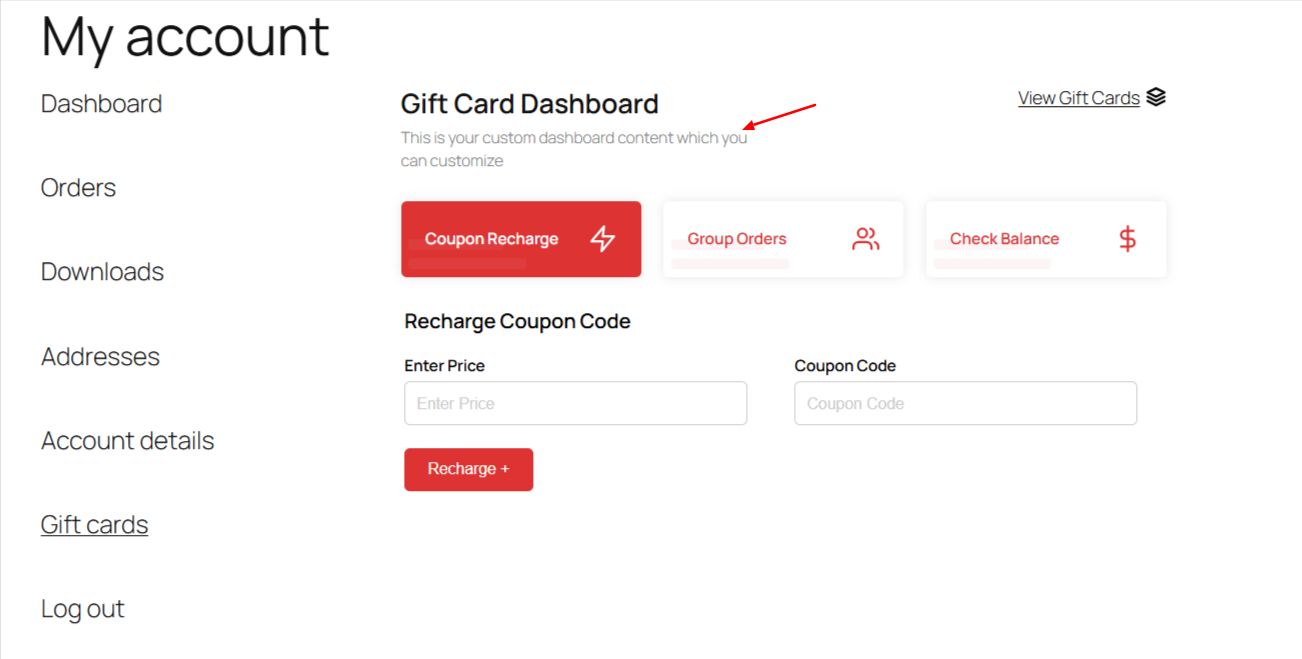
5.1 How Customers Can Recharge Their Gift Card
Customers can recharge their gift cards and extend their usability. To facilitate this top-up, customers have to go to the My Account >> Gift Cards tab >> Coupon Recharge.

After that, they can enter the recharge amount and coupon code to recharge their gift card.
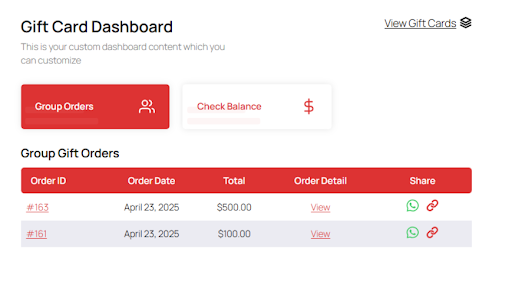
5.2. Group Orders
In this tab, customers can see their group gift card orders.
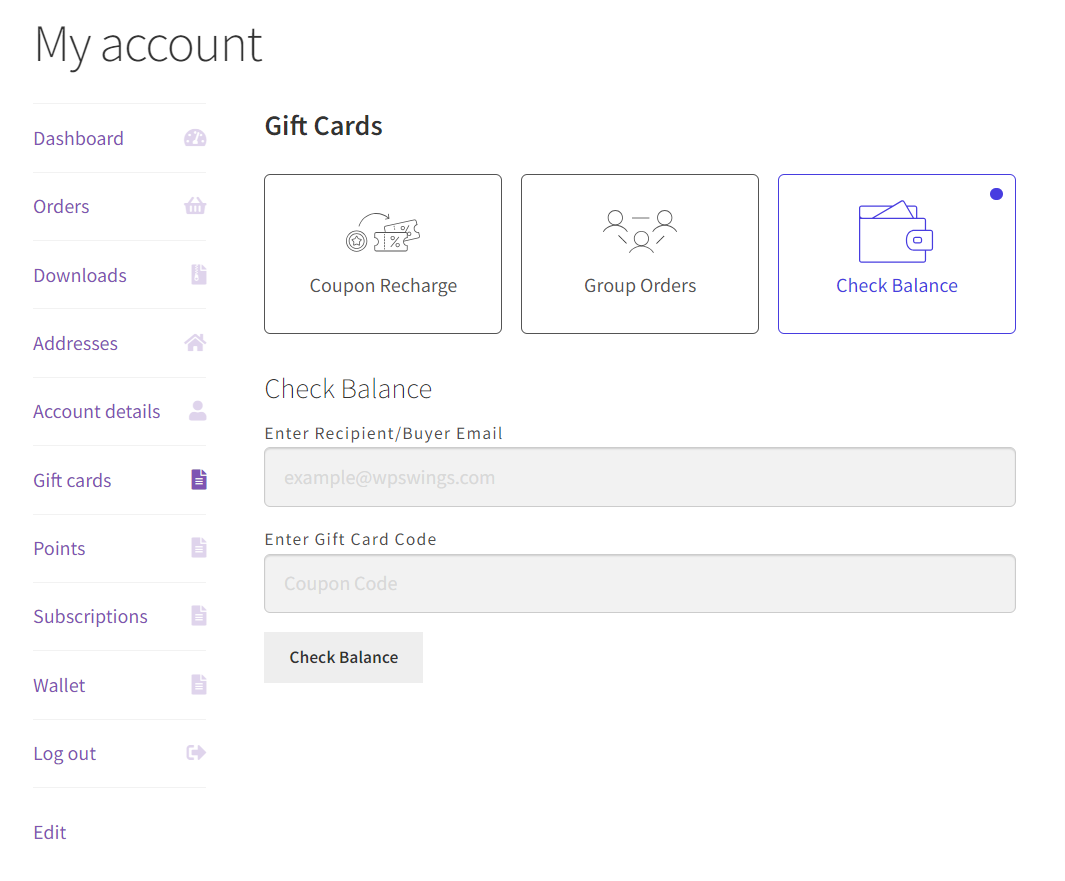
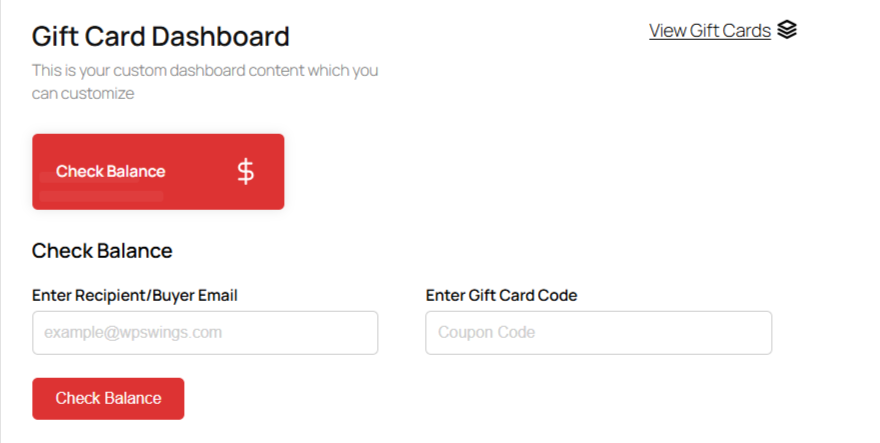
5.3. Check Balance
In this Tab, customers can enter the email associated with their gift card and coupon code to check their gift card balance. We also provide a shortcode in the free version of the plugin to create a page and check balance.
5.4. View Gift Cards
This new Gift Card Details tab has been added to the gift cards section to provide customers with detailed information about their gift cards.
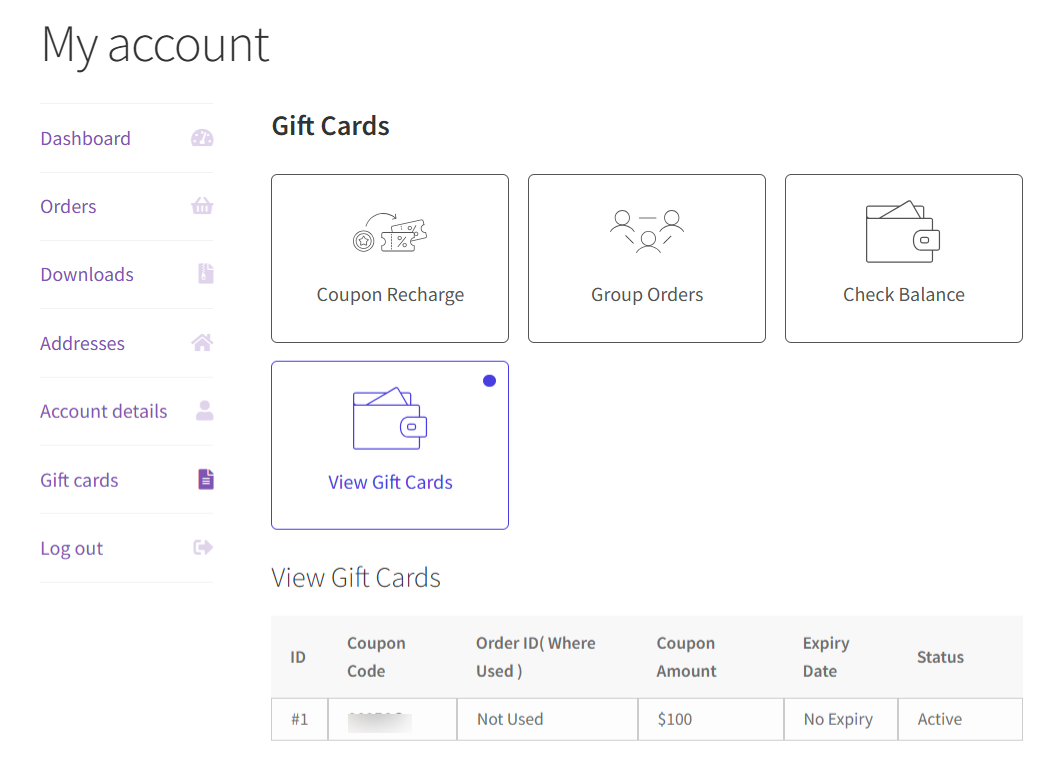
Customers can view coupon codes, check if the card has been used, see the order it was applied to (if applicable), check the expiry date, and review the gift card amount.
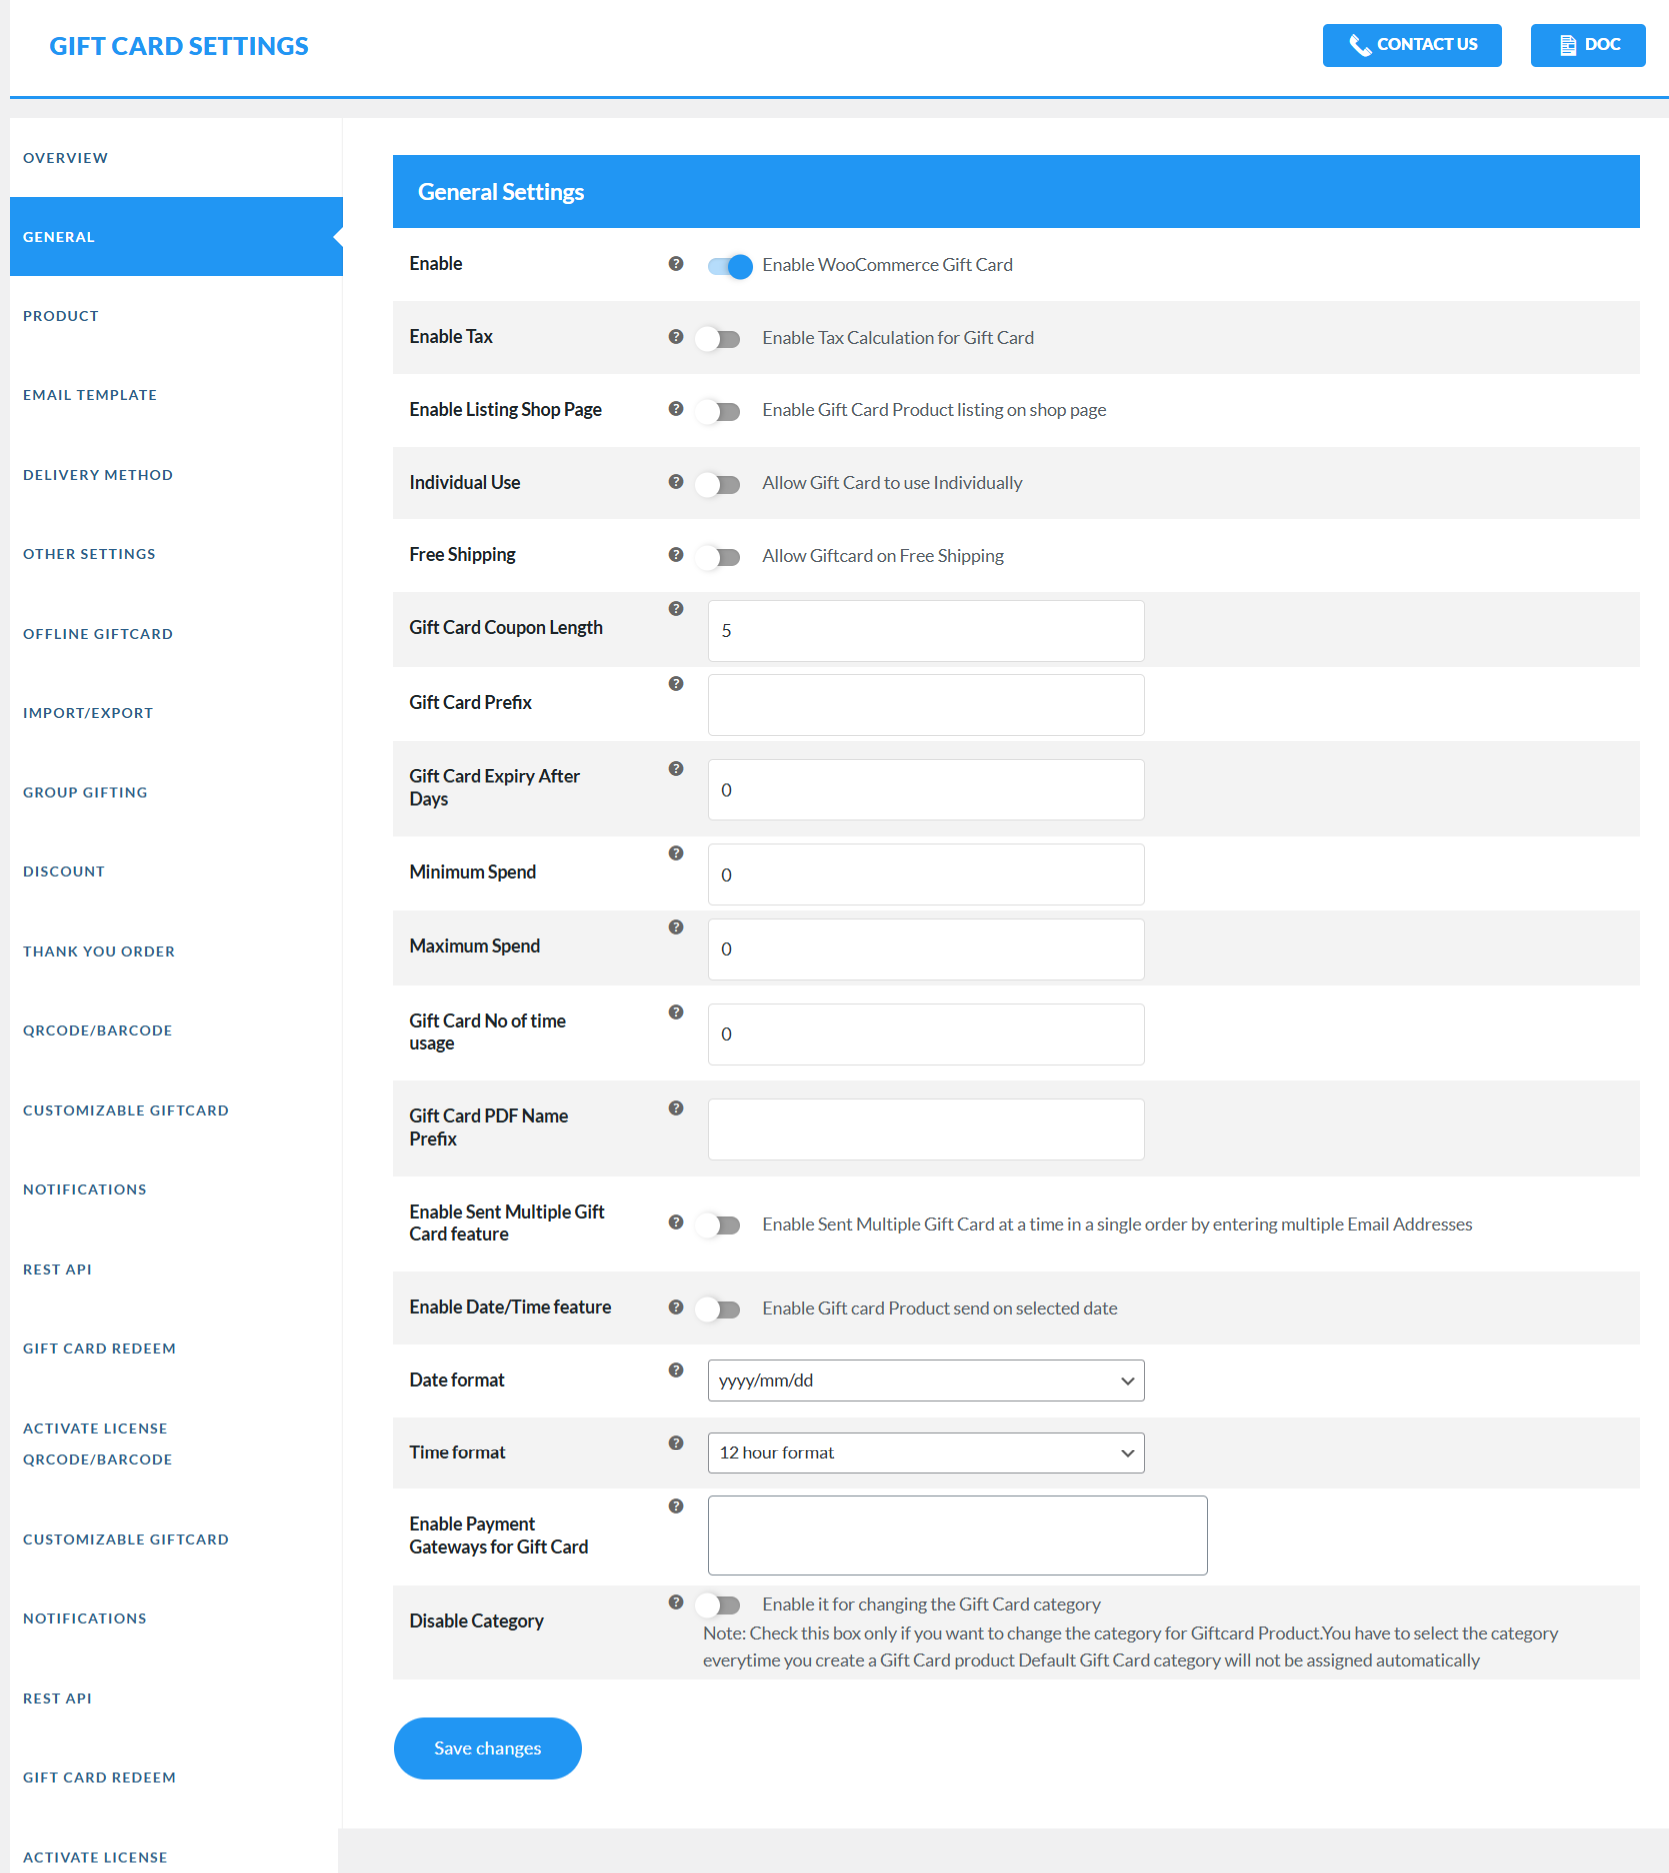
6.General Settings In Gift Cards For WooCommerce Plugin
After the successful installation and activation of the WooCommerce Gift Cards plugin, the admin can perform the following actions in the general settings:
-
Enable: Toggle this to enable the WooCommerce Gift Card plugin.
-
Enable Tax: Toggle this to enable the taxation on gift coupons.
-
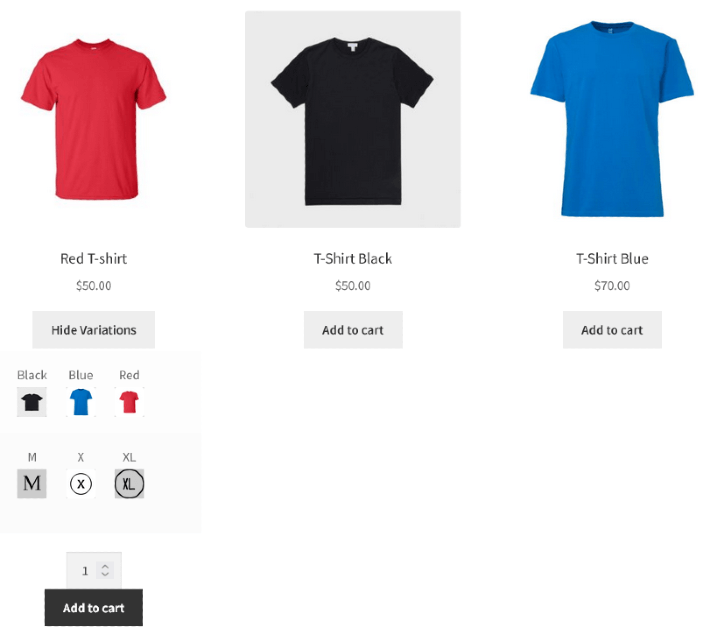
Enable Listing Shop Page: Toggle this to allow the listing of Gift Card products on the shop page.
-
Individual Use: Toggle this setting if the gift card coupon should not be used in conjunction with other gift vouchers & coupons.
-
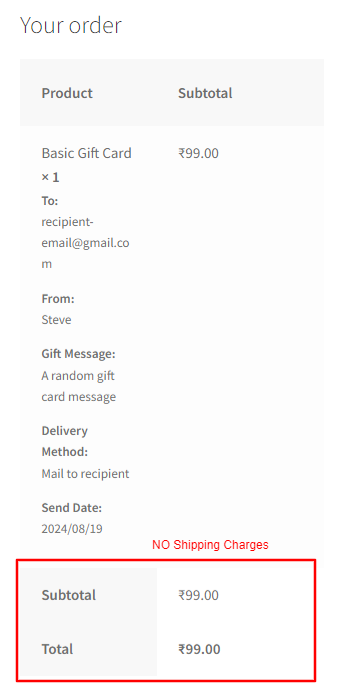
Free Shipping: Toggle this setting to enable free shipping for the gift card WooCommerce products.
-
Gift card Coupon Length: Enter card coupon length. The minimum size of the coupon is 5.
-
Gift card Prefix: Enter the Gift Card prefix for the coupon code.
-
Gift card Expiry After Days: Enter a valid number after that a purchased Gift Card will expire. Keep value 0 for no expiry date and value 1 for one-day expiry when the order is completed.
-
Minimum Spend: This setting lets you set the minimum spend for gift certificates.
-
Maximum Spend: Set the maximum spend on the gift certificates
-
Gift card Number of Time Usage: Decide how many times a Gift Card can be used before the Gift card goes empty.
- Maximum % of Order Payable via Gift Card: Here you can set the maximum payment limit for gift cards, this way you can control how much users pay using gift cards and how much payment they need to do via any other payment method.
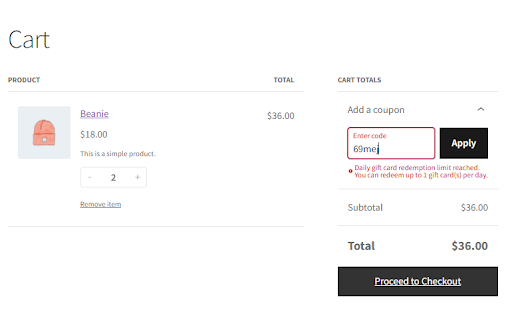
- Max Daily Redemptions Per User: Here you can limit how many times a user can redeem gift cards in a single day. This helps prevent repeated usage in a short period and ensures a fair and controlled redemption process across your store. User will get a message on the frontend if they have exceeded their daily limit for gift card redemption as shown in the below screenshot
Frontend Representation:
-
Premium Gift Card PDF Name Prefix: Add the prefix name to the PDF when attaching it to your gift card template using this feature.
-
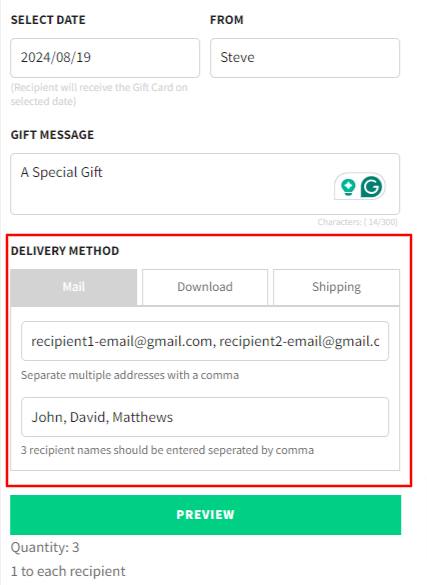
Enable the Sent Multiple Gift Card Feature : Premium You can allow customers to send gift coupons to multiple recipients in one go. They have to enter the recipient’s email address and separate them by a comma (,)
- Enable Date/Time Feature: Toggle this setting to allow the Gift Card products to be sent to the receiver on the selected date.
- Date Format: Select the date format that you want to show on the Gift Card.
- Time Format: Choose between 24-hour and 12-hour time format to show on the gift cards.
-
Enable Date Feature : Premium Toggle this setting to allow the Gift Card products to be sent to the receiver on the selected date.
-
Date Format : Premium Select the date format which you want to show on the Gift Card.
-
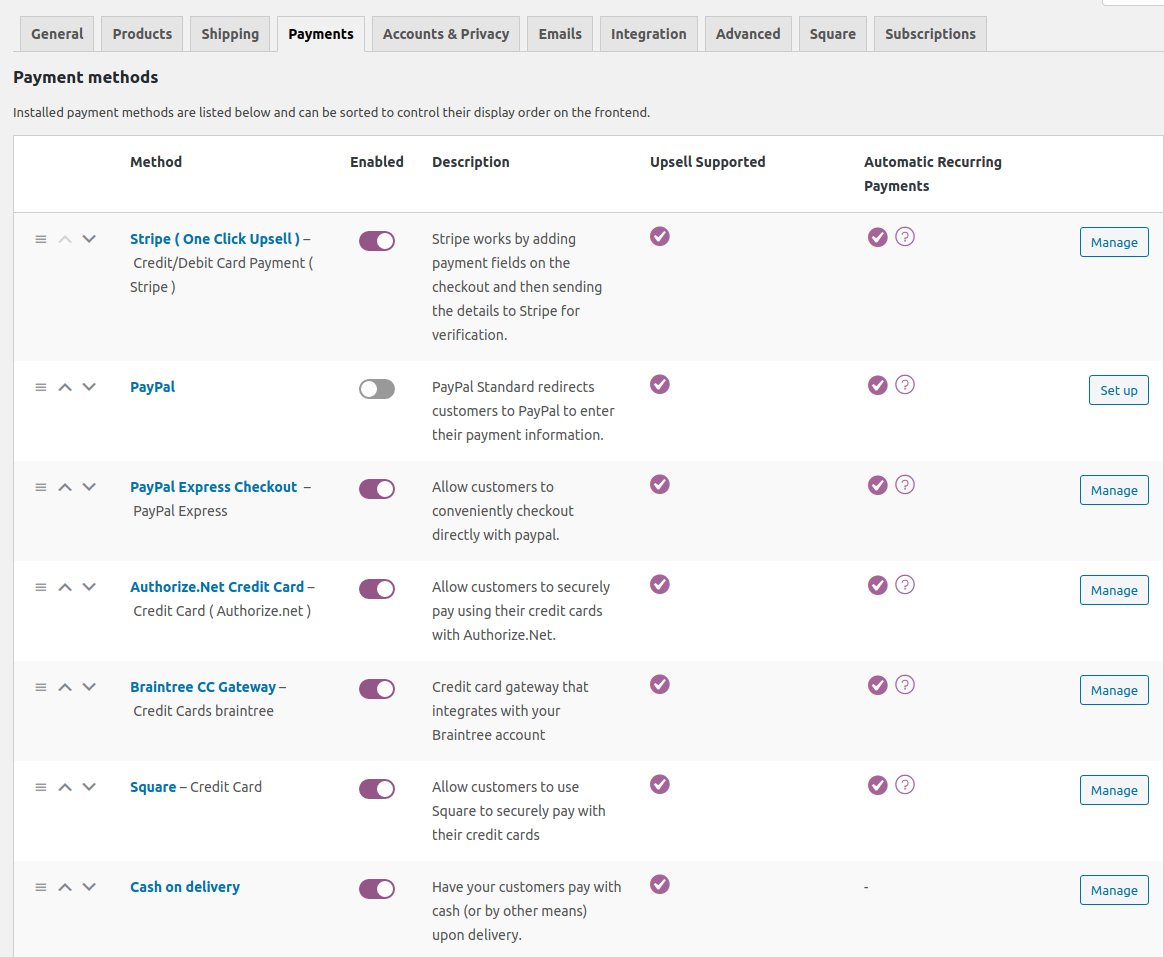
Enable Payment Gateway For Gift Card : Premium Here choose the separate payment gateway method for Gift Card Products otherwise default payment gateways will work.
-
Disable Category : Premium Toggle this box if you want to change the Gift Card Product category. You have to select the category every time you create a Gift Card product. The Default Gift Card category will not be assigned automatically.
-
Gift Card Dashboard Content : Premium As we have updated our gift cards layout to provide a clean and minimal look, this option is to customize the content that will be displayed on the Dashboard.
-
Hide Recharge Coupon Code : Premium The new dashboard design shows the three tabs Coupon Recharge, Group Orders and a tab to check balance. By enabling this option, you can hide the recharge Coupon Tab
-
Hide Group Order Details : Premium Just like the previous option, this will hide the Group Orders tab.
-
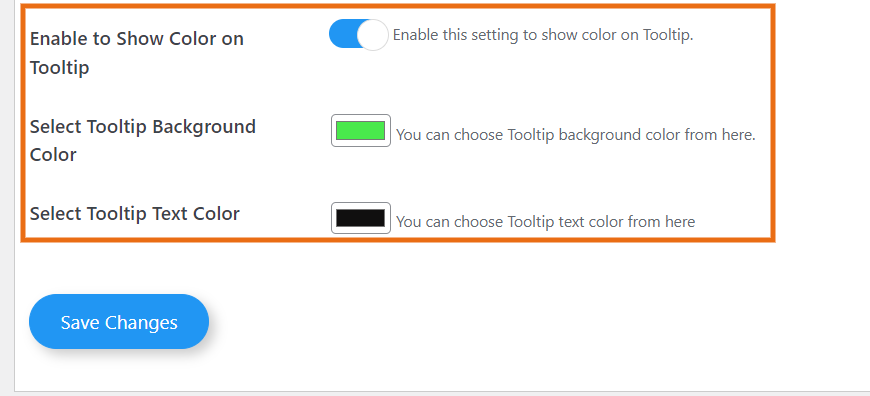
Select Color for Gift Card Dashboard : Premium With this option, you can customize the color of the dashboard.
7.Product Setting
In the Product Settings, you can include and exclude the product categories for the Gift Cards.

-
Exclude Sale Items: Check this box to restrict gift card coupons from applying to the sale items.
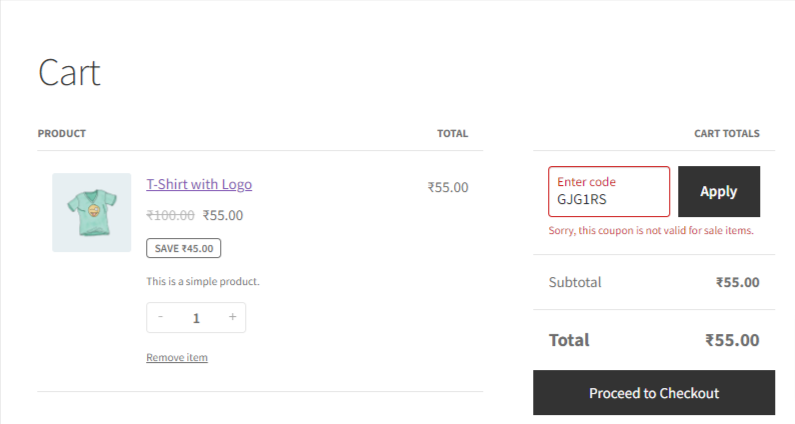
-
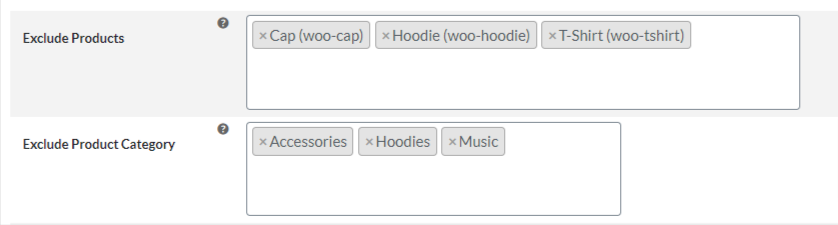
Excludes Products: You can limit gift cards for WooCommerce from applying to specific products. If any excluded product is in the cart, then the gift coupon will not work.
-
Exclude Product Category: You can set exclusions for the gift card coupons, and if any excluded category products are in the cart, the gift coupon discount won’t apply.
-
Include Products :Premium Add the products from your product catalog to which the gift cards will exclusively apply. The discount will only apply if the included products are present in the cart. If left empty, gift vouchers will apply to all products that aren’t excluded.
-
Include Categories : Premium You can select the product categories suitable for the gift card coupon application. The coupon will apply only when the included category product is in the cart.

- Days Excluded : Here You can now set specific days when customers won’t be able to use their gift card coupons on your website.

- Disable Fields From Gift Cards Product Page : Premium Click on the check boxes of From, Message, Email, and Name fields to remove them from the gift card product page.
Selected Fields From, Message, Email, and name are hidden.
- Making Optional ‘To Email’ Field: Remove the validation from the ‘To Email’ field.
- Making Optional ‘To Name Field: Remove the validation from the ‘To Name’ field.
- Making Optional “From” Field: Remove the validation from the ‘From’ field.
- Making Optional “Gift Message” Field: Remove the validation from the ‘Gift Message’ field.
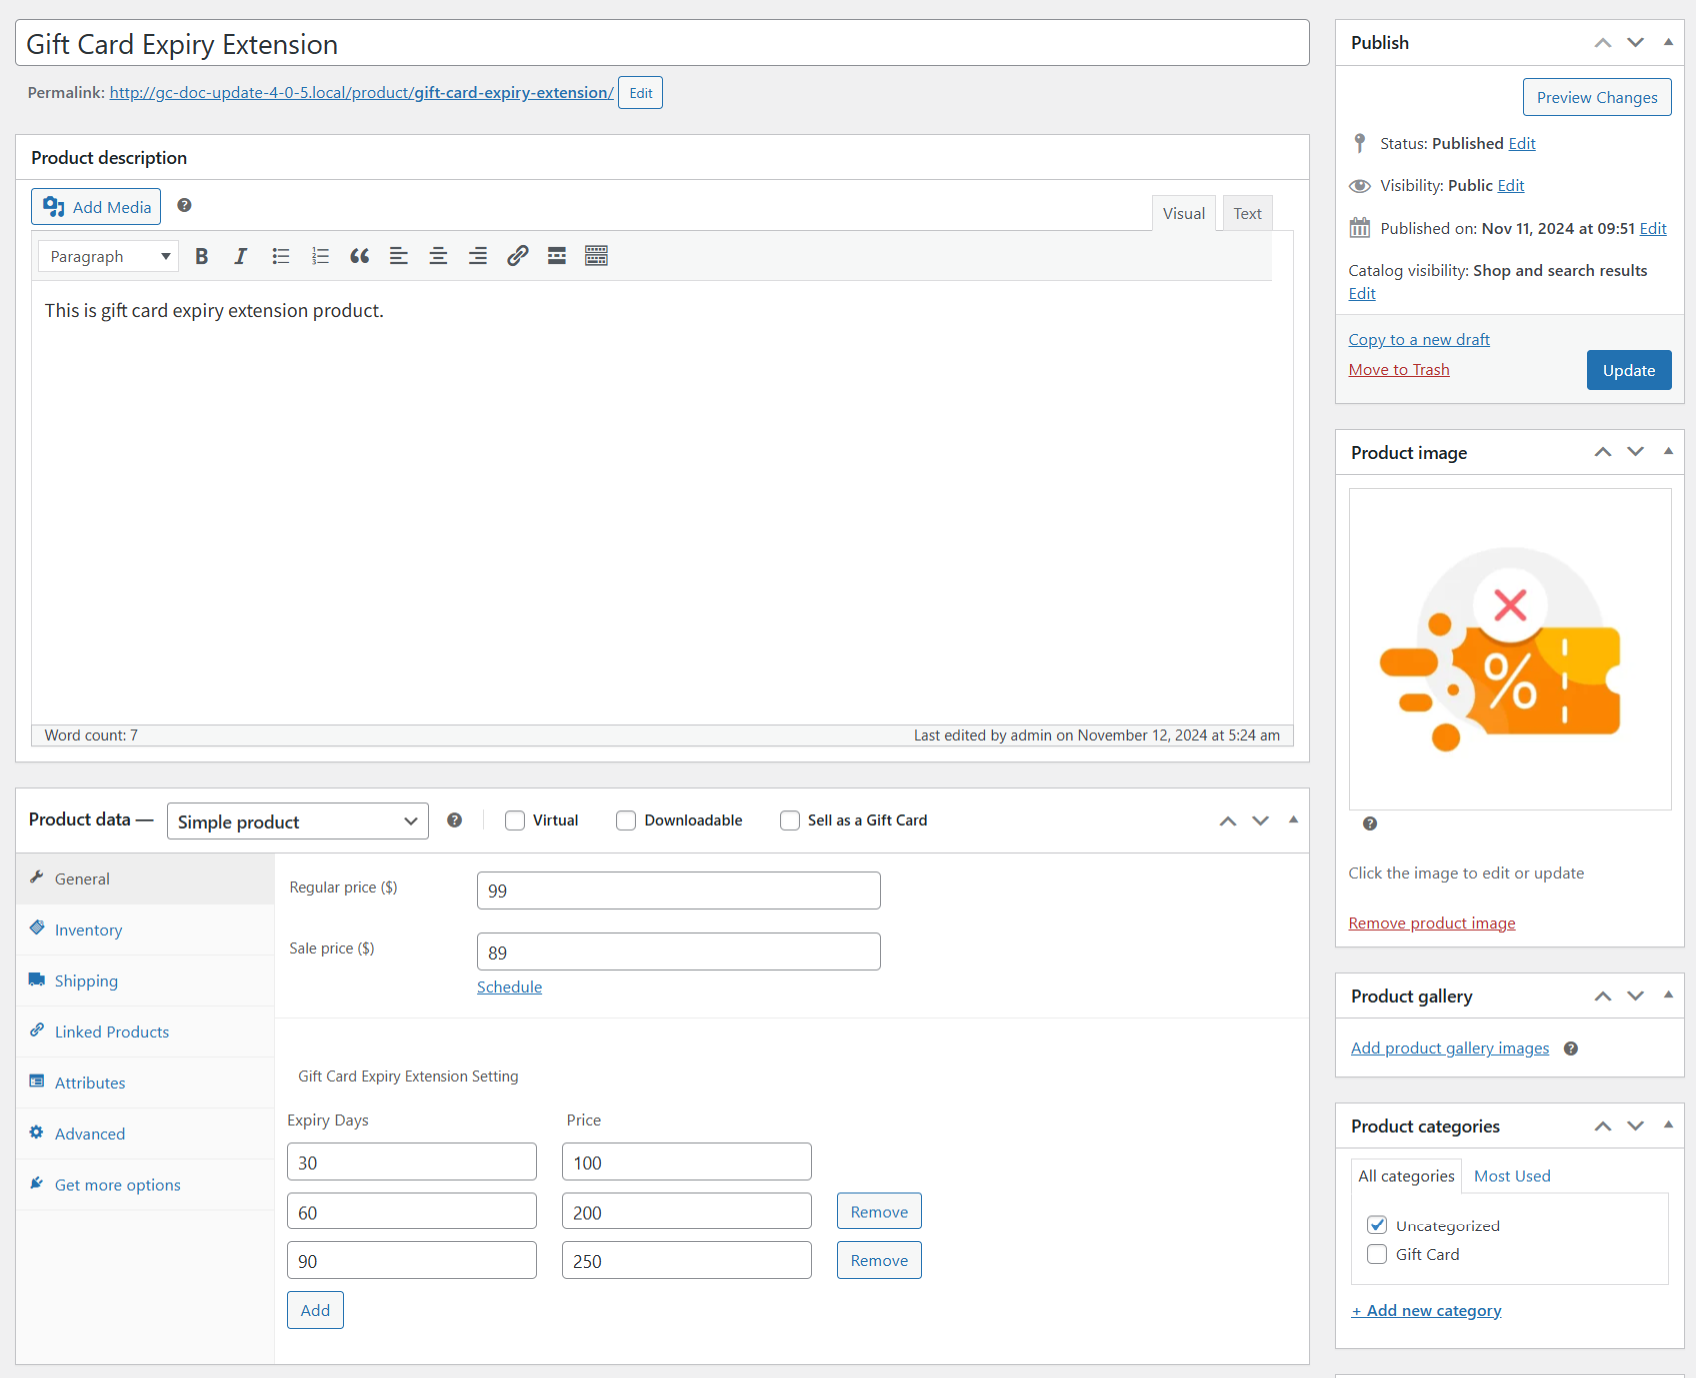
- Enable Gift Card Expiry Extension Product : Premium Toggle this option to create a product on the shop page, after enabling this option a new product will be created and shown on the shop page.

Users can add their coupon code here and purchase the extension product to extend the validity of their coupons. You can customize this expiry extension product from the product settings and set the price and extension options.

8.Email Template
An email is sent to the recipient to notify them about their gift card coupon purchase. You can manage their templates for gift coupon emails with the given settings.
8.1.Manage Template
In this section, you can design your email template.
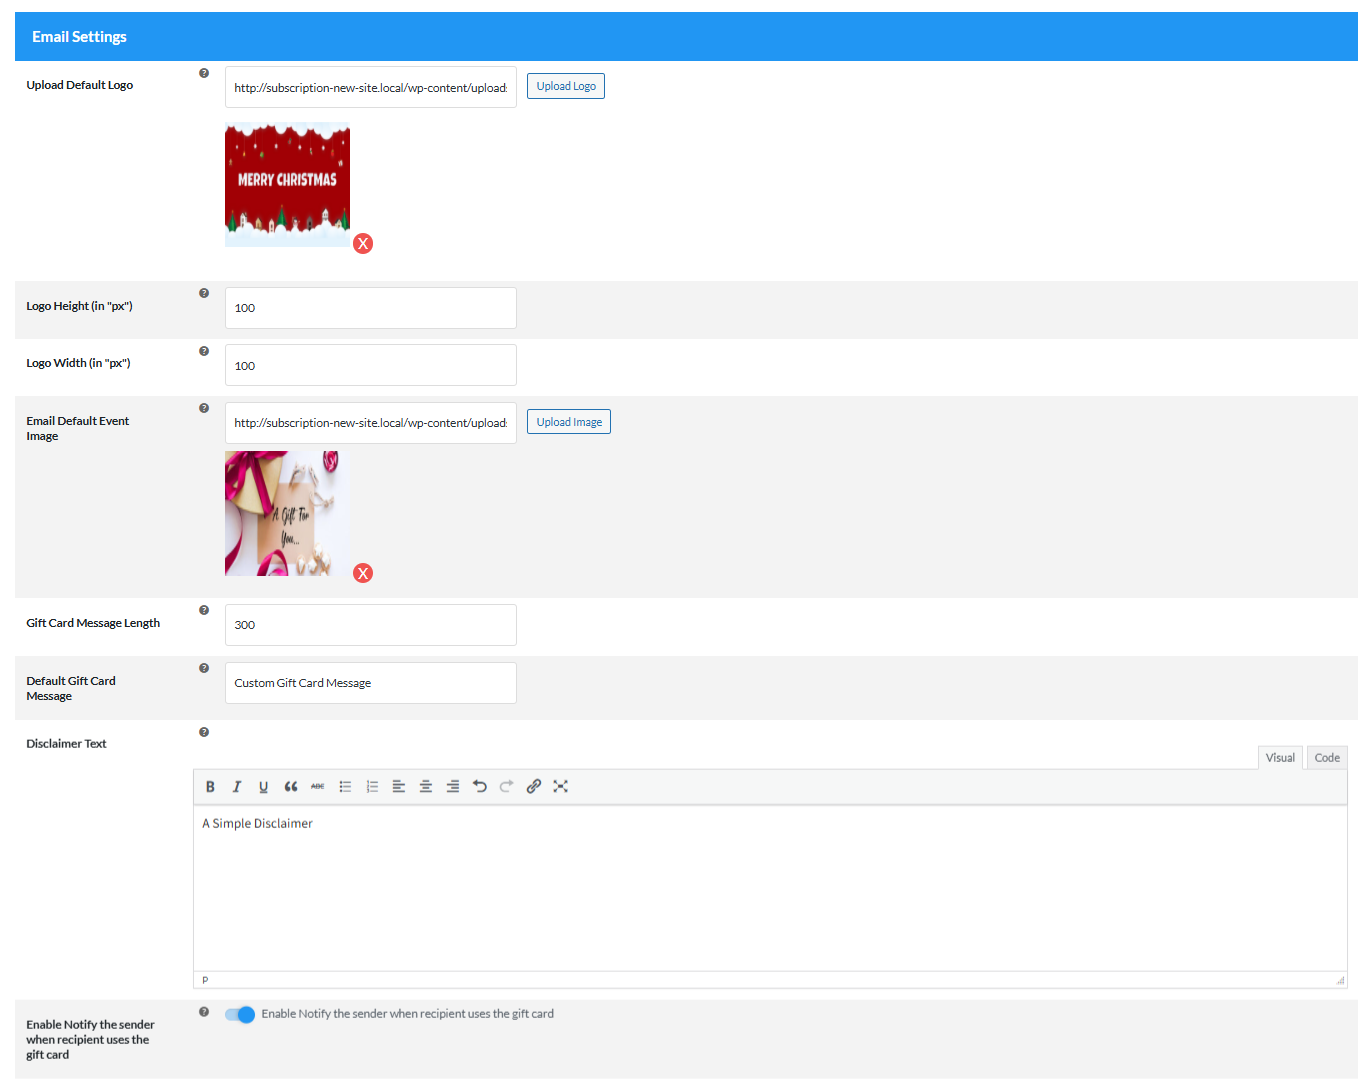
- Upload Default Logo: Upload an image that you want to use as the logo on the email template.
- Logo Height (in “px”): Set the height of the logo in pixels.
- Logo Width (in “px”): Set the width of the logo in pixels.
- Email Default Event Image: Upload the image that you want to use as the default event/occasion logo in the email template.
- Gift card Message Length: You can set the ultimate gift card message length. The default length of the message is 300. Users can check the current count of the message characters.
- Default Gift Cards Message: Set the default message for gift cards.
- Disclaimer Text: Here you can change the disclaimer text for the email template.
- Enable to notify the sender: Toggle this option if you want the sender to know when the recipient has used their gift card.
8.2.Mail Settings
Use this email template to acknowledge the buyer for their gift voucher purchase. You can tailor the mail elements according to your needs and create custom gift card templates for sending emails.

-
Gift card Email Subject: Use [SITENAME] shortcode as the name of the site and [BUYEREMAILADDRESS] shortcode as the buyer email address to be placed dynamically.
-
Email Subject to Sender : Premium Write an email subject of the email template for the receiver.
-
Email Notification to Sender : Premium Write the message acknowledging to the buyer that the gift card has been sent successfully. You may use the shortcode [TO] for placing the Recipient Email dynamically.
-
Downloadable Gift Card Email Subject for Buyer : Premium Downloadable Gift card email subject for gift card mail when received by the buyer. Use [SITENAME]shortcode as the name of the site to be placed dynamically.
-
Gift Card Email Subject for Admin : Premium You can customize the subject line for the gift card mail that’s sent to you when the buyer purchases the card. You can proceed to use the details to ship gift vouchers to the shipping address.
Use [SITENAME] shortcode as the name of the site and [ORDERID] shortcode as the order ID of the product to be placed dynamically.
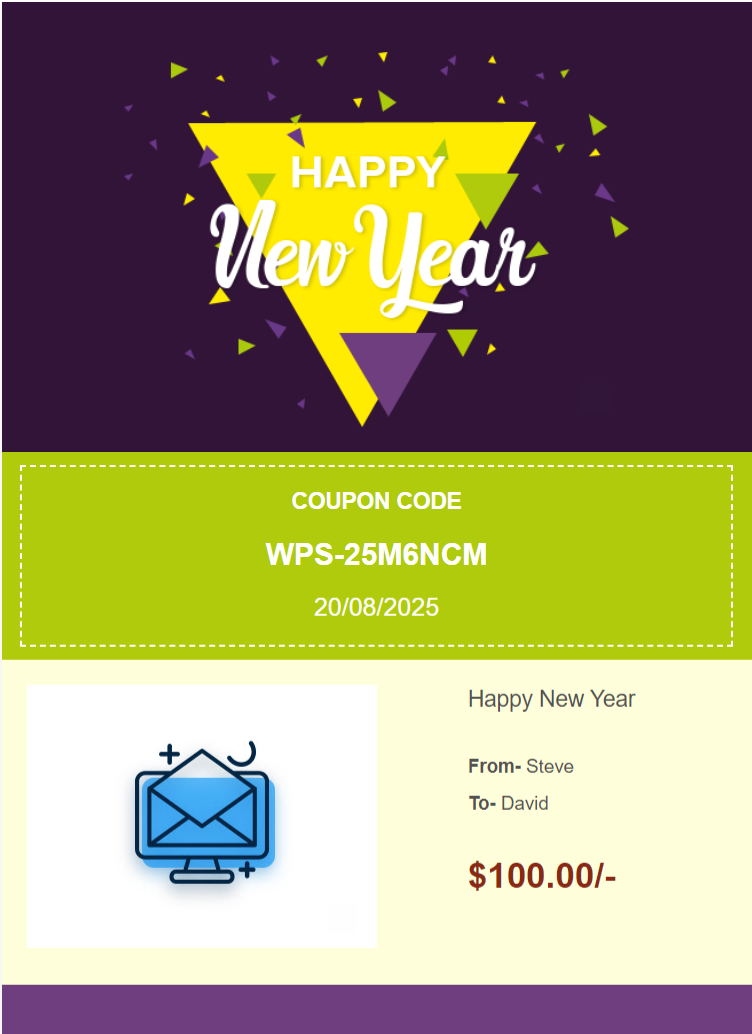
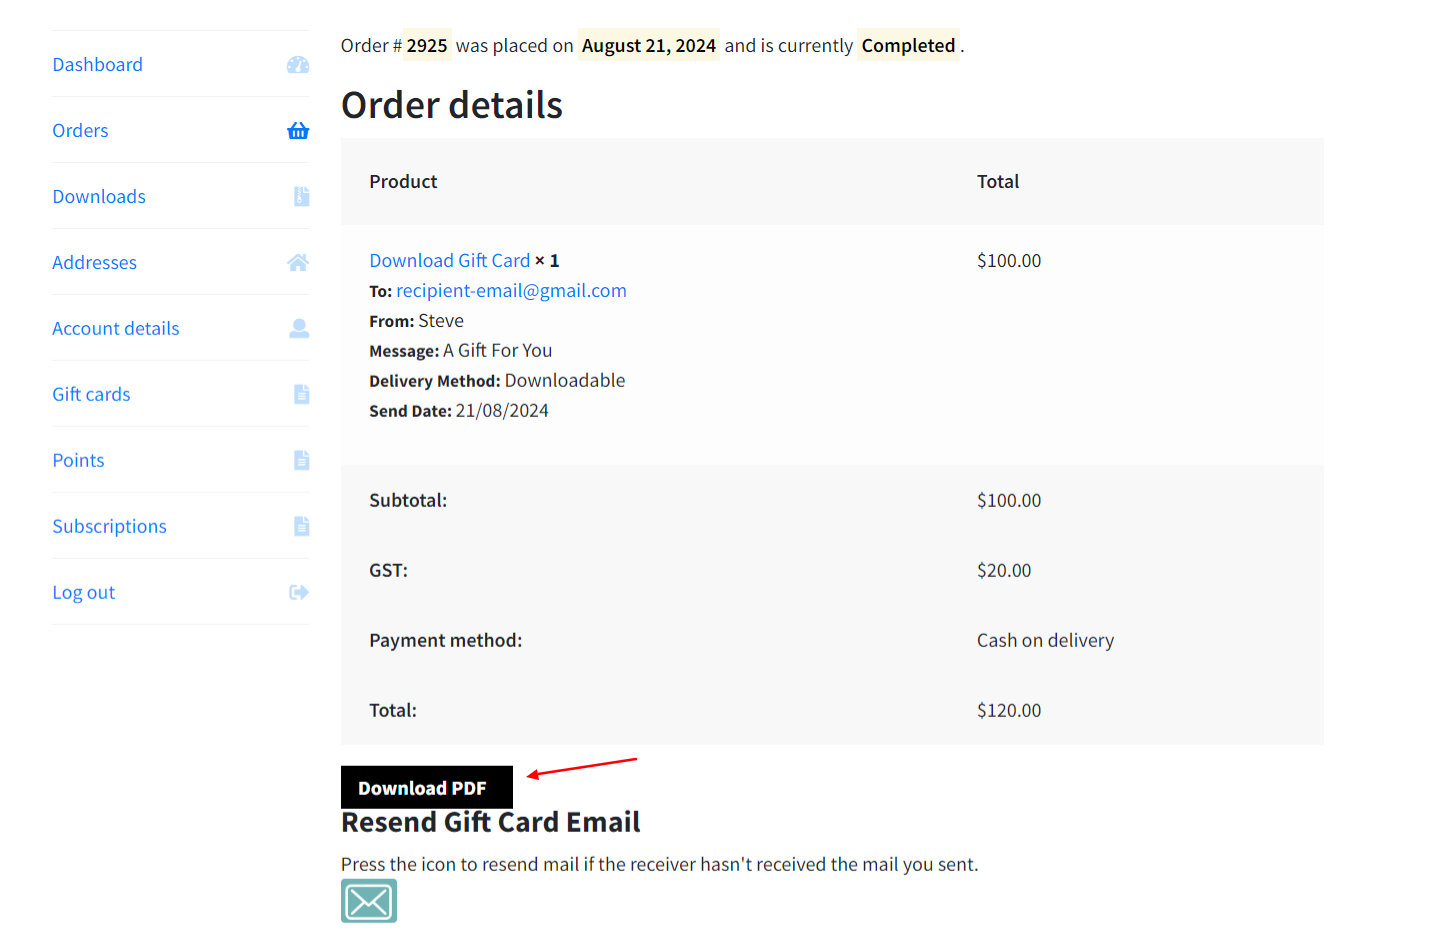
Here is how the email will look in the recipient email after customizing the necessary settings.

The recipient can also download the gift card by clicking on the mail attachment.

- Enable Bcc option for Gift card Mails: BCC (Blind Carbon Copy) is a copy of an email message sent to a recipient whose email address does not appear (as a recipient) in the message. Click on the check box to enable the BCC feature.
- Enable Bcc option for Gift card Mails (Admin): Same BCC feature is also available for admin.
- Disable Apply Coupon Fields: Admin can disable the apply coupon field which is applied to each order amount.
Coupon amount to be placed dynamically. You can utilize [SITENAME] and [COUPONCODE] as well
Here the [DISCLAIMER] shortcode would be replaced by the above Disclaimer text field.
Here is How the Coupon Mail Will Show to Users:

8.3.Coupon Mail Setting
The WooCommerce gift card plugin will send email notifications to users regarding the usage amount of their gift card coupons. This way, they can easily keep track of the remaining balance on their coupons.
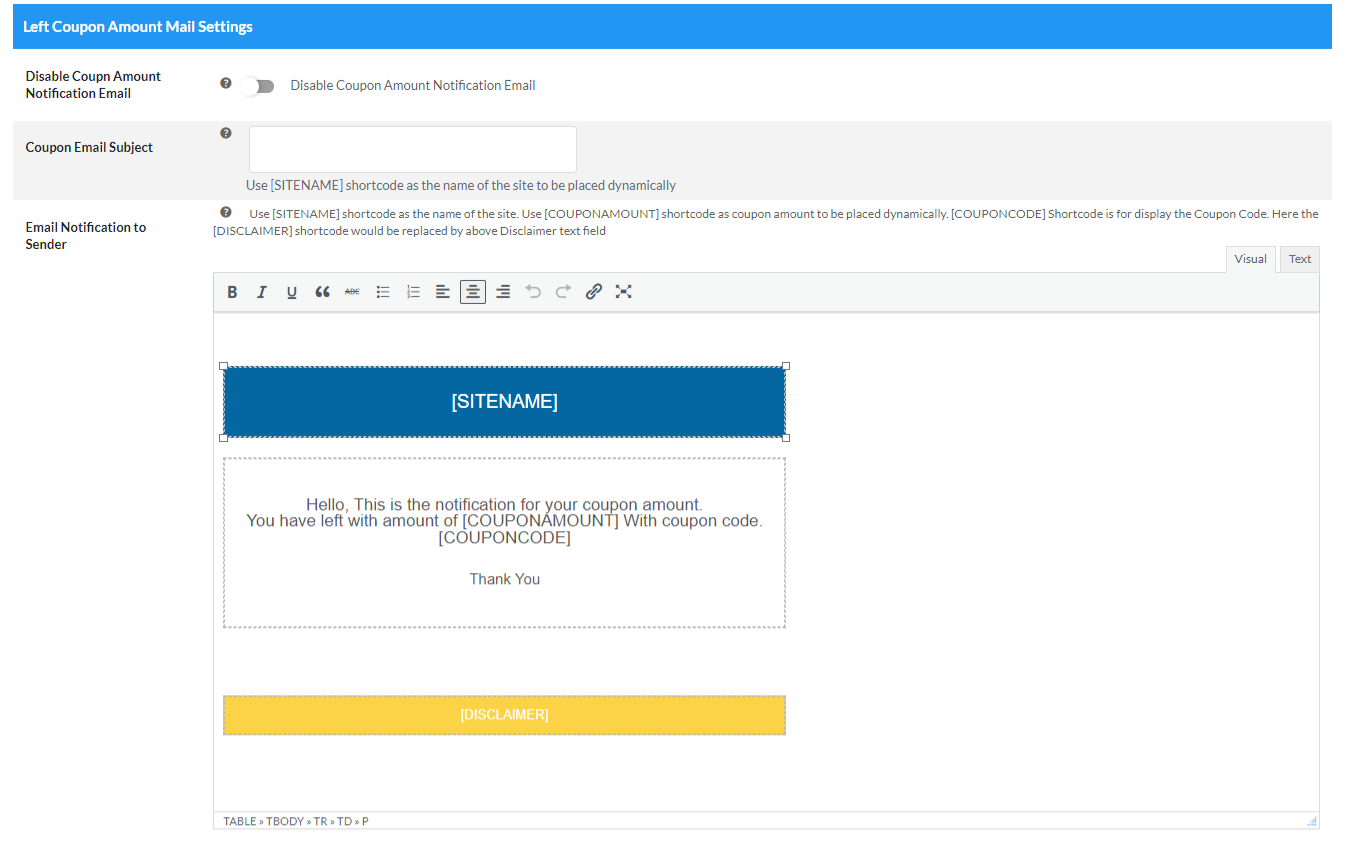
- Disable Coupon Amount Notification Email : Click on the checkbox to disable all users’ gift card coupon usage notification emails.
- Coupon Email Subject : Write the subject of coupon mail. Use [SITENAME] shortcode as the name of the site to be placed dynamically.
- Email Notification to Sender : Write the message to notify the user about their coupon amount. Use [COUPONAMOUNT] shortcode as a coupon amount to be placed dynamically. You can utilize [SITENAME] and [COUPONCODE] as well.
Here the [DISCLAIMER] shortcode would be replaced by the above Disclaimer text field.
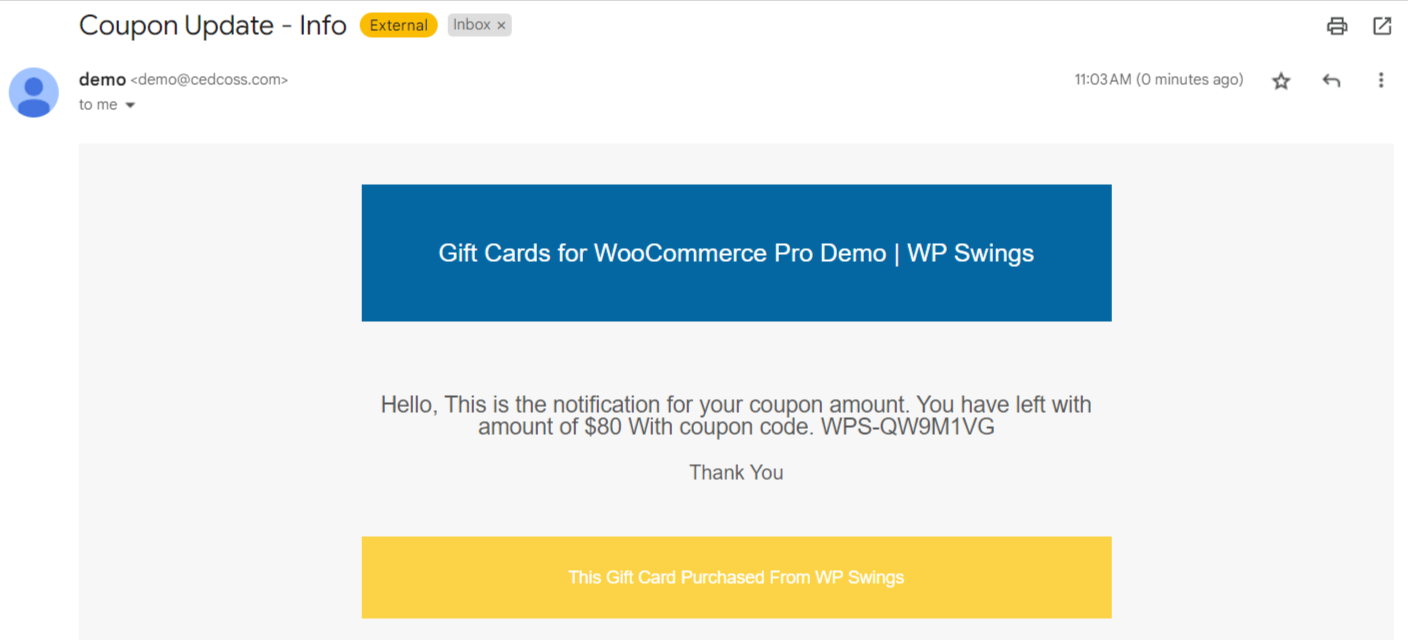
Here is How the Coupon Mail Will Show to Users:
8.4.Coupon Expiry Notification Mail
You can now easily remind your users before their coupon expires by sending them an email. This feature lets you customize the subject line and email content to match your brand.
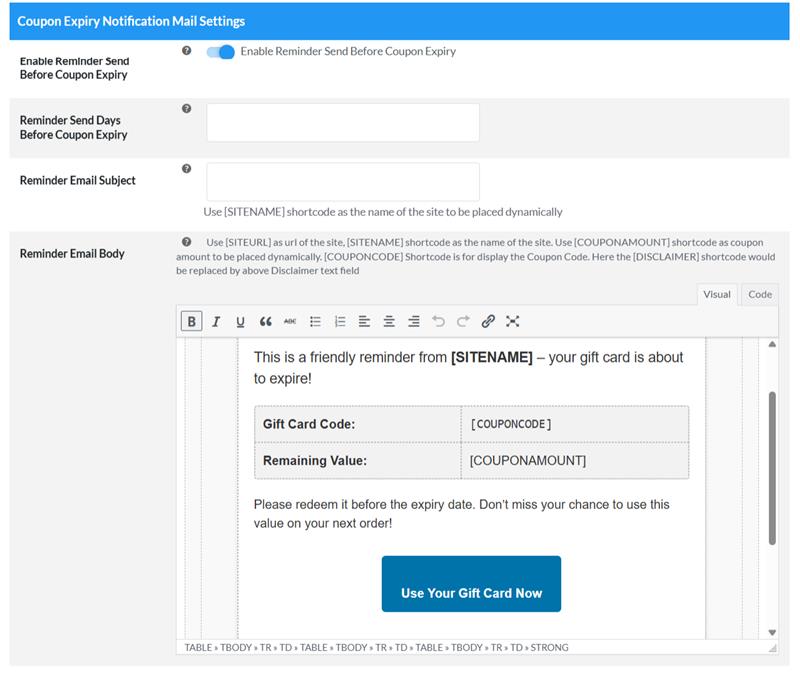
- Enable Reminder Send Before Coupon Expiry: Toggle this option to enable this feature
- Reminder Send Days Before Coupon Expiry: Set how many days before you want to send the reminder mail
- Reminder Email Subject: Type an engaging email subject “Hurry Up! Your Gift Card is about to expire!”
- Reminder Email Body: Customize email body, place shortcodes to dynamically fetch the details.
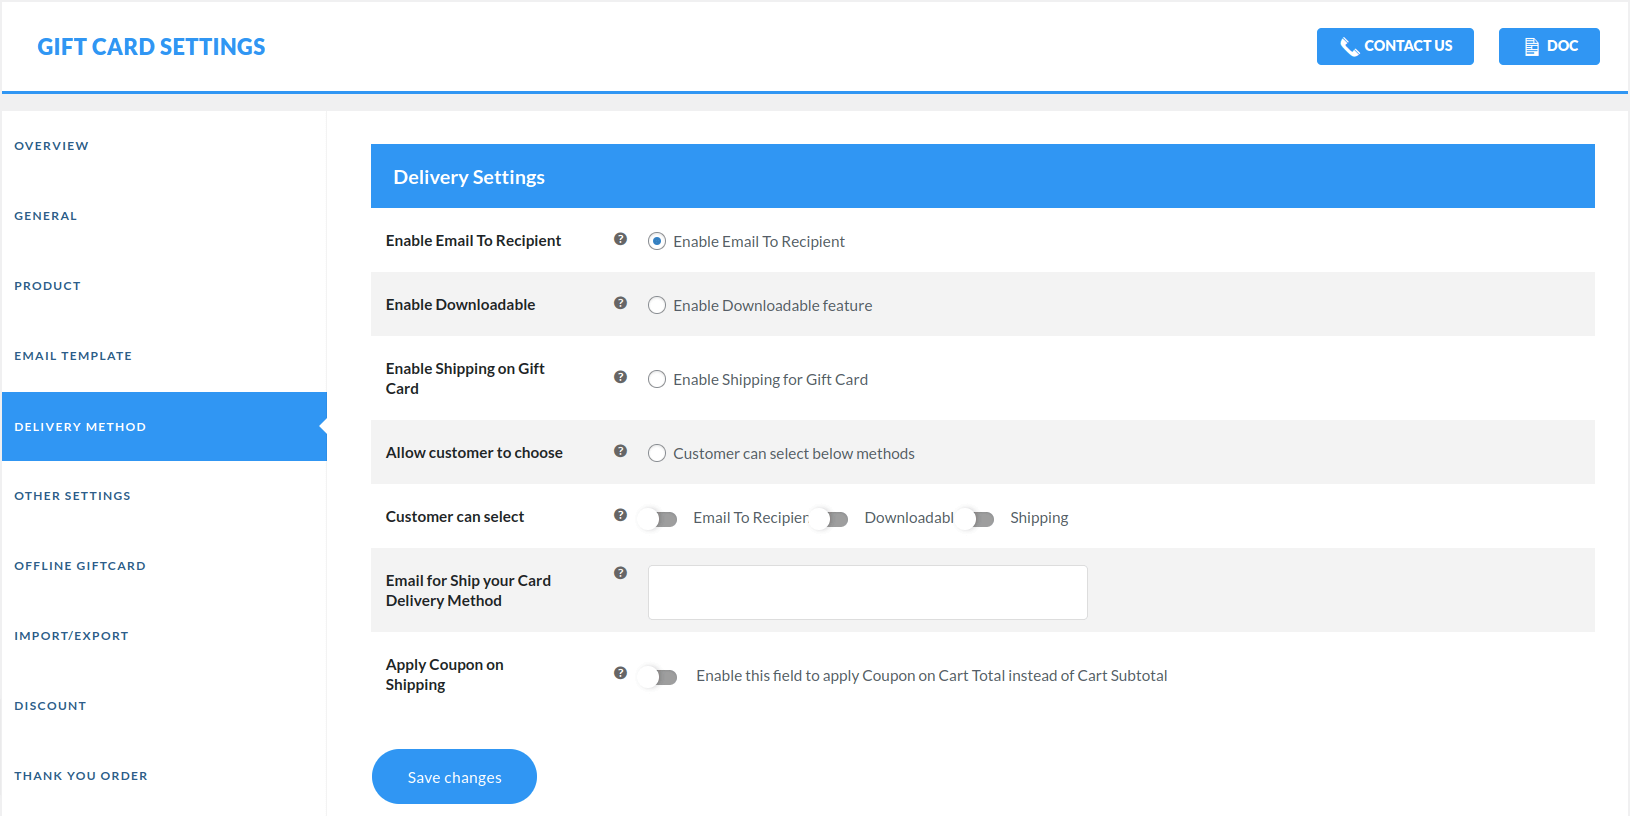
9.Delivery Method Settings
In this setting, you get to enable three delivery options for customers to send gift card emails to the recipient.
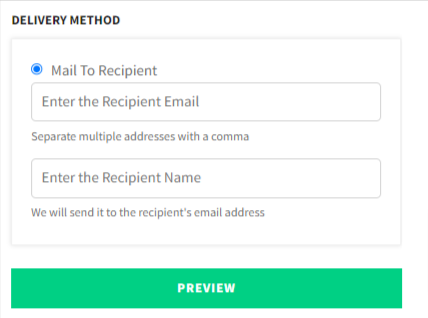
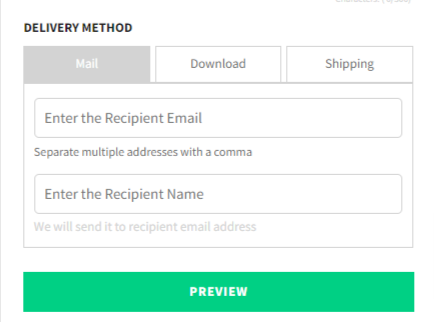
- Enable Email To Recipient: The email-to-recipient feature is used for sending the gift card for WooCommerce via email only to the recipient.
On the front end, you can see the normal delivery method to send the Gift Card.
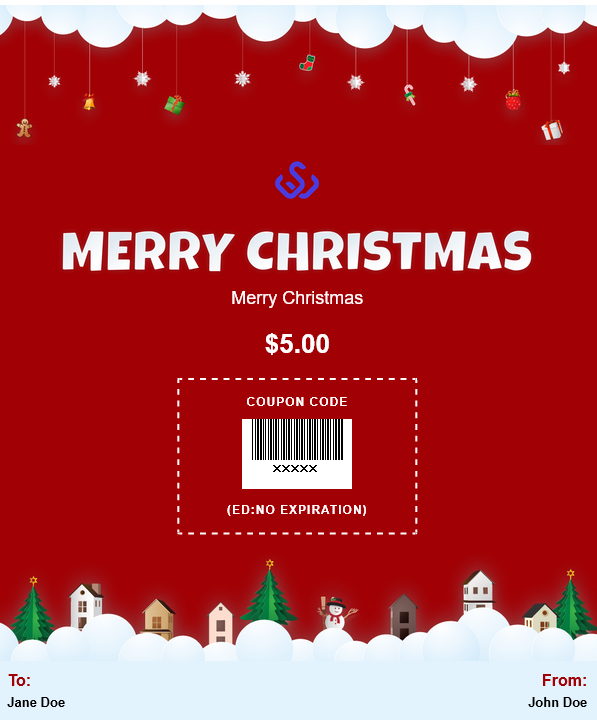
- Downloadable- In this feature, the gift card template is sent back to the buyer. The buyer will download the gift card template and send it to the recipient with the needed method.
On the front end, you can see the option of printing your gift card.
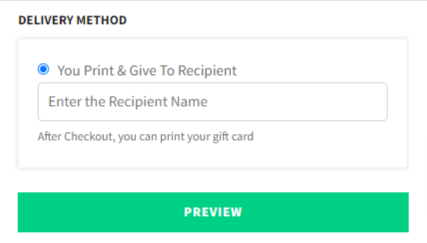
Downloadable Gift Card – Example:
- Enable Shipping on Gift Card : Premium In this feature gift card email is sent to the admin and the admin will deliver the gift card to the shipping address of the recipient.
After enabling this setting you can see the shipping option on the WooCommerce gift card.

Allow Customers to choose : Premium The customer can choose the method for gift card delivery i.e; Email to Recipient, Downloadable, and Shipping.
(i) Customers Can Select: From this section enable the delivery methods for the customers.
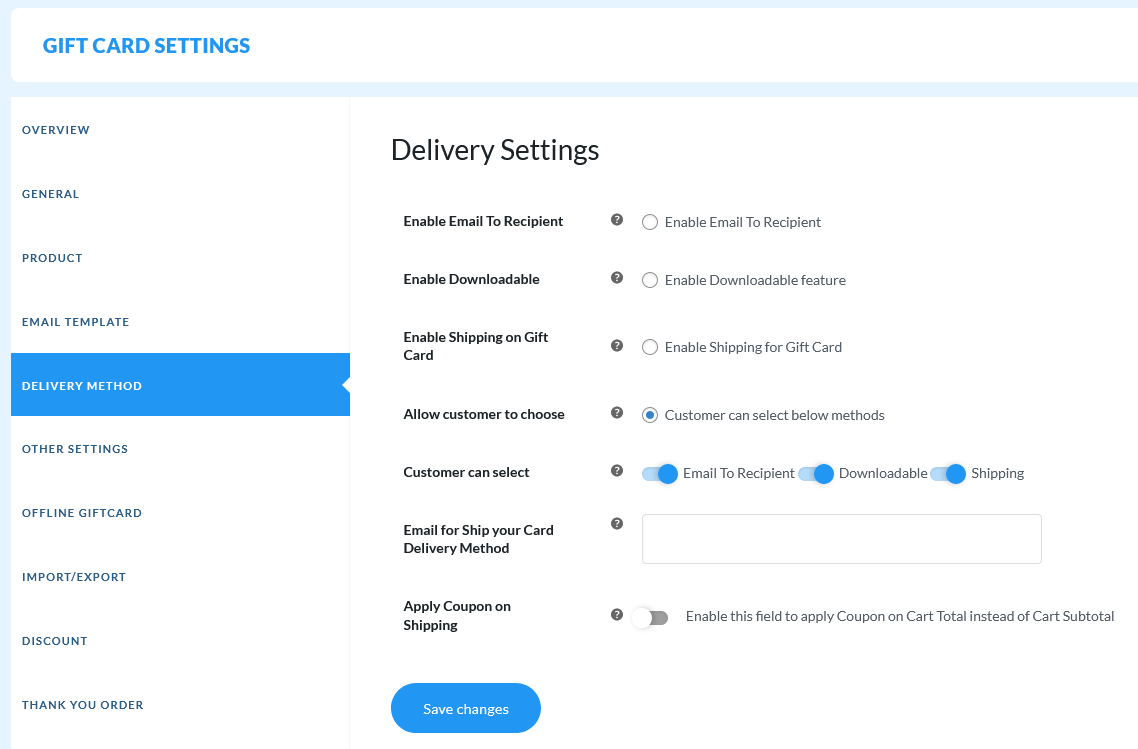
After enabling this feature you can allow the customer to select the delivery methods within three delivery methods for the Gift Card products.
Apply Coupon On Shipping & Tax: In this feature, the user can also apply their coupon for shipping and tax i.e, the total amount of Gift Card product.
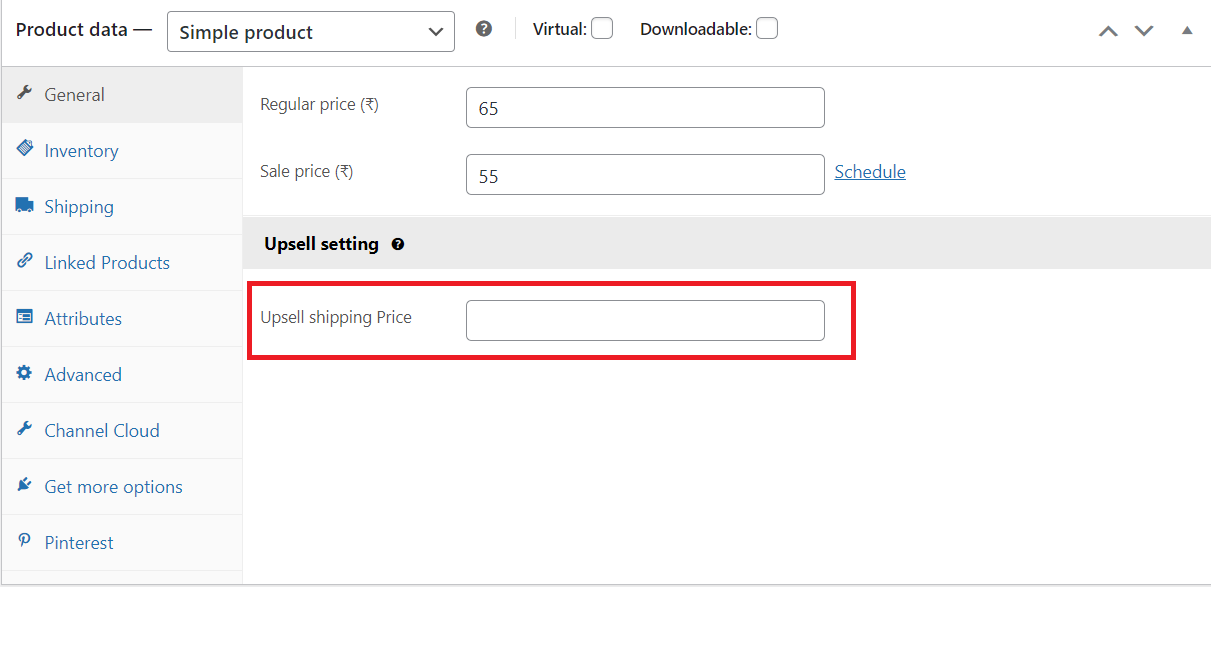
You can overwrite delivery methods via per-product setting: This setting allows you to set the per-product delivery methods.
Goto ‘Product edit page‘ and click on the ‘Product data‘ section, here you can see the ‘Overwrite Delivery’ setting.
Enable this setting and select the delivery methods for the specific product.
10.Other Settings
The WooCommerce gift voucher plugin offers two additional features to control coupon redemption and preview button usage.

- Disable Apply Coupon Fields: Admin can disable the apply coupon field which is applied to each order amount.

Frontend Representation – Before:

Frontend Representation – After:

- Enable Subscription Coupon Type: Toggle this button to enable coupon types for subscription. (Requires Subscription for WooCommerce Plugin)
- Select Coupon Type: Here you can select coupon discount. (Requires Subscription for WooCommerce Plugin).
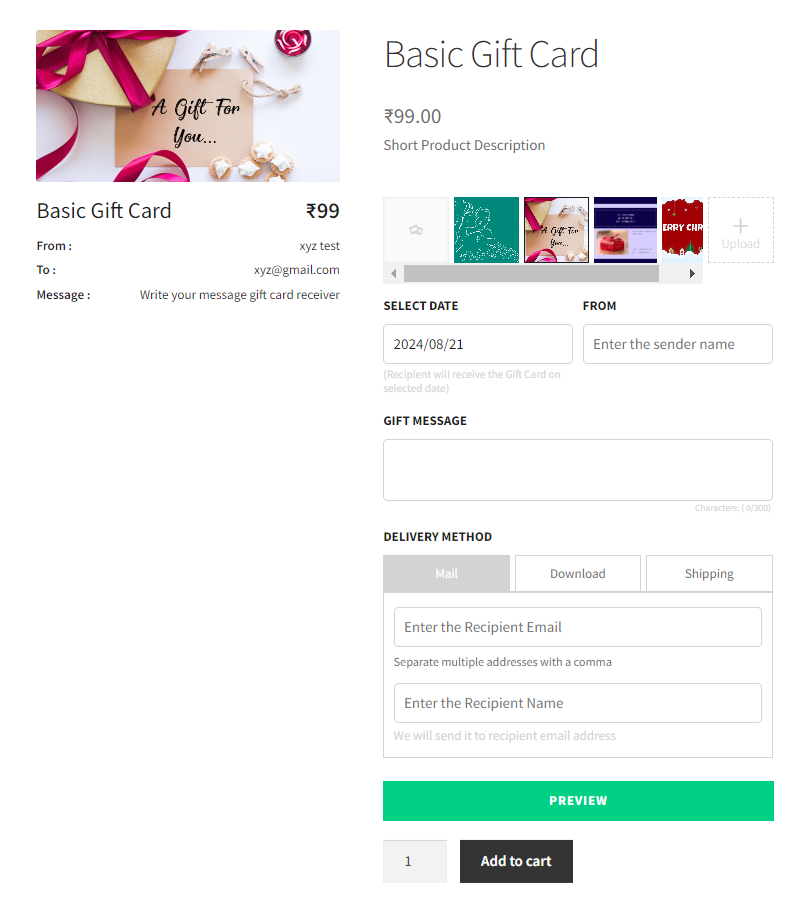
- Enable New Layout: A refreshed design for the Gift Cards Product Page – a simple, responsive, and intuitive layout for hassle-free gifting.
Frontend Representation – Old Layout:
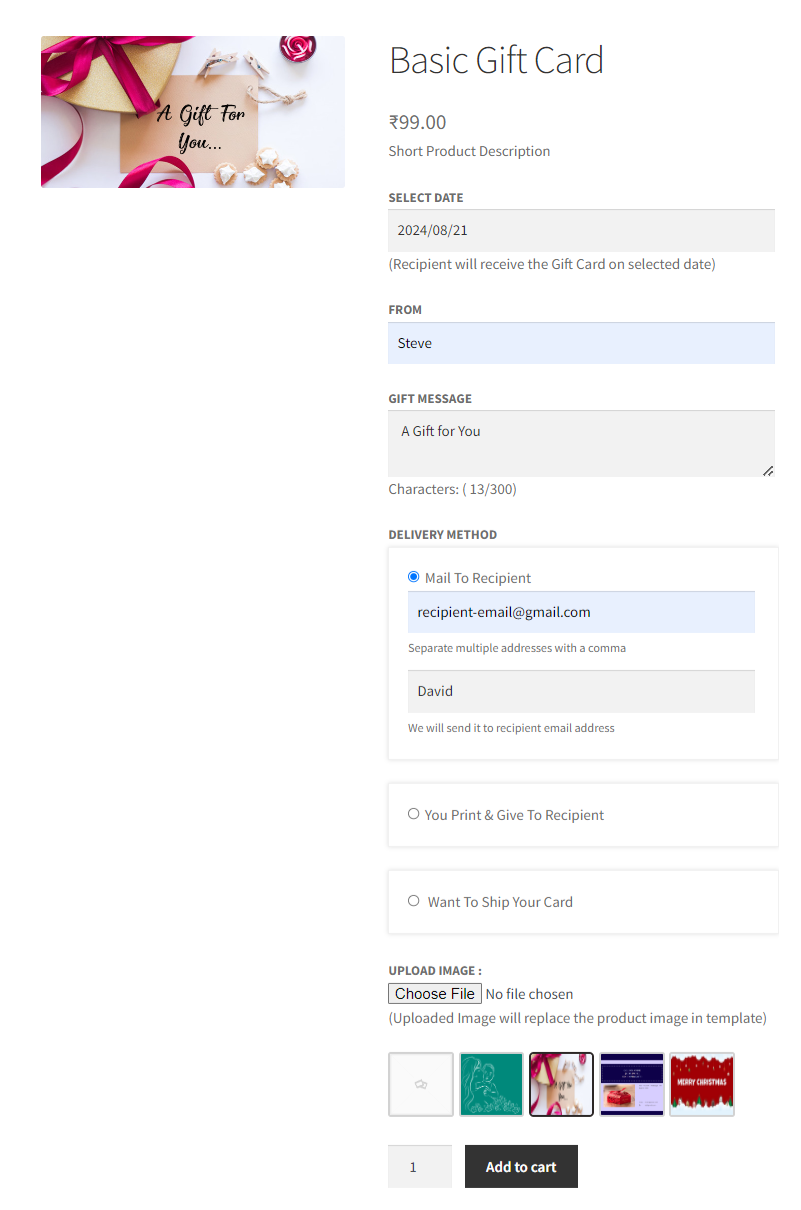
Frontend Representation – New Layout:
- Enable Auto-Complete Gift Card Orders : Premium Toggle this option to autocomplete gift card orders. It will automatically complete orders for gift cards delivered via email or as downloadable products (not shipped).
This only applies if the gift cards are delivered via email or as downloadable products, and the cart contains only gift card items.
Remove the bcc feature mentioned on live here.
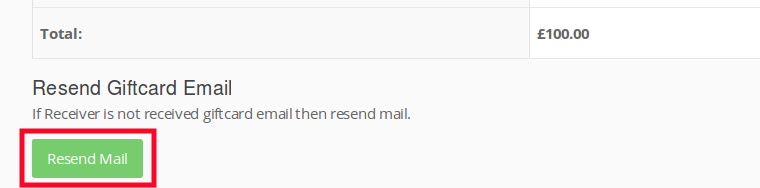
- Disable Resend Button:Premium Resend button is used to resend the gift card product mail to the recipient. Admin can disable the resend button option.
The user can also resend the email to the receiver in case their first attempt fails.
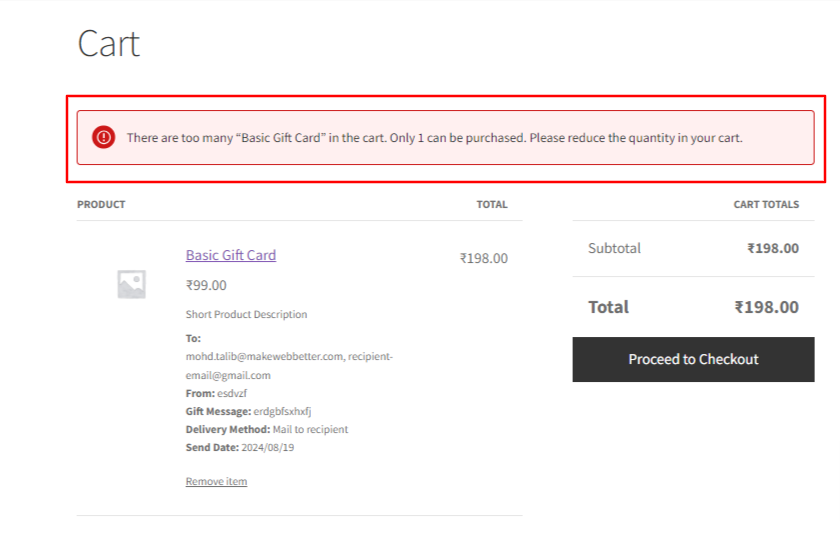
- Disable Quantity: Premium Toggle this option to disable quantity on the cart page, your users will not be able to send gift cards in multiple quantity if you enable this setting.
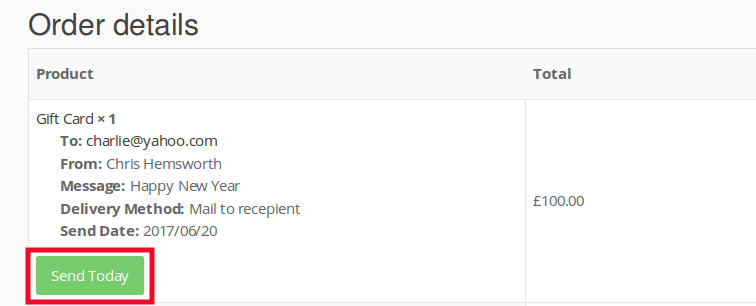
- Disable Send Today Button : Premium Send Today button is used for sending the gift card on the current day. You can disable this option for customers. The customers can select the date on which they want recipients to receive their gift certificates. They can also send the scheduled gift certificate on the current day through the order details section.
- Enable PDF Feature: Premium Enable this feature to allow customers to get WooCommerce gift certificates with PDF attachments along with the email.

After enabling the PDF feature, two library options will be shown only to old users so that they can switch to the new MPDF and WKHTMLTOPDF.

For the best experience, use MPdf, as WKHTMLTOPDF is deprecated.
Note: If you’ve been using the Gift Cards plugin for a while, after selecting the MPDF make sure to import new templates, as the old ones are no longer supported.
- Select the PDF Template Size: Premium After enabling this feature custom will get a Giftcard email along with the attached PDF.

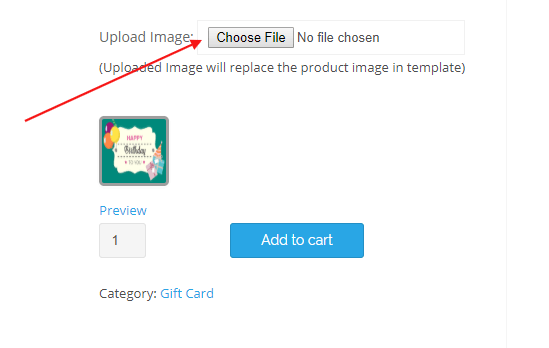
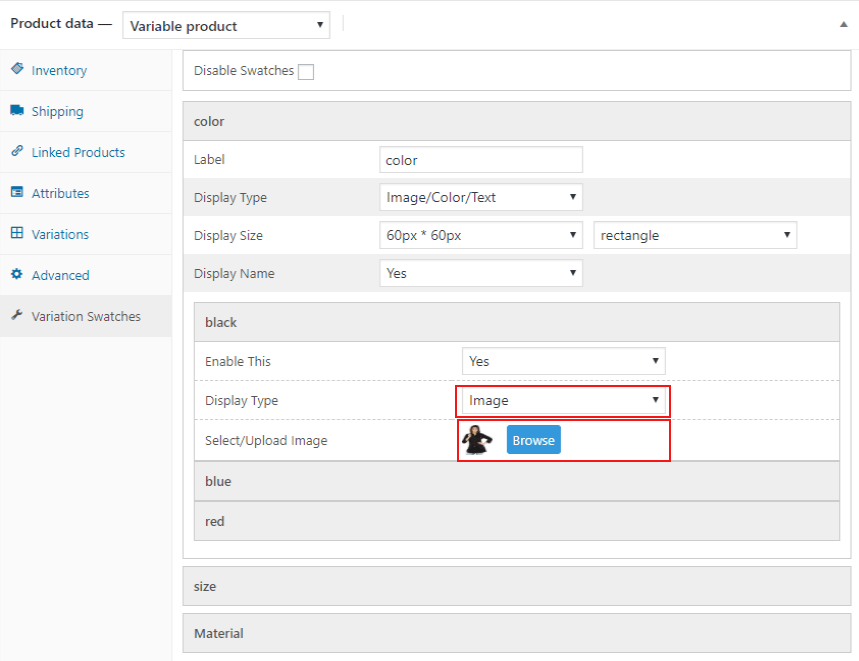
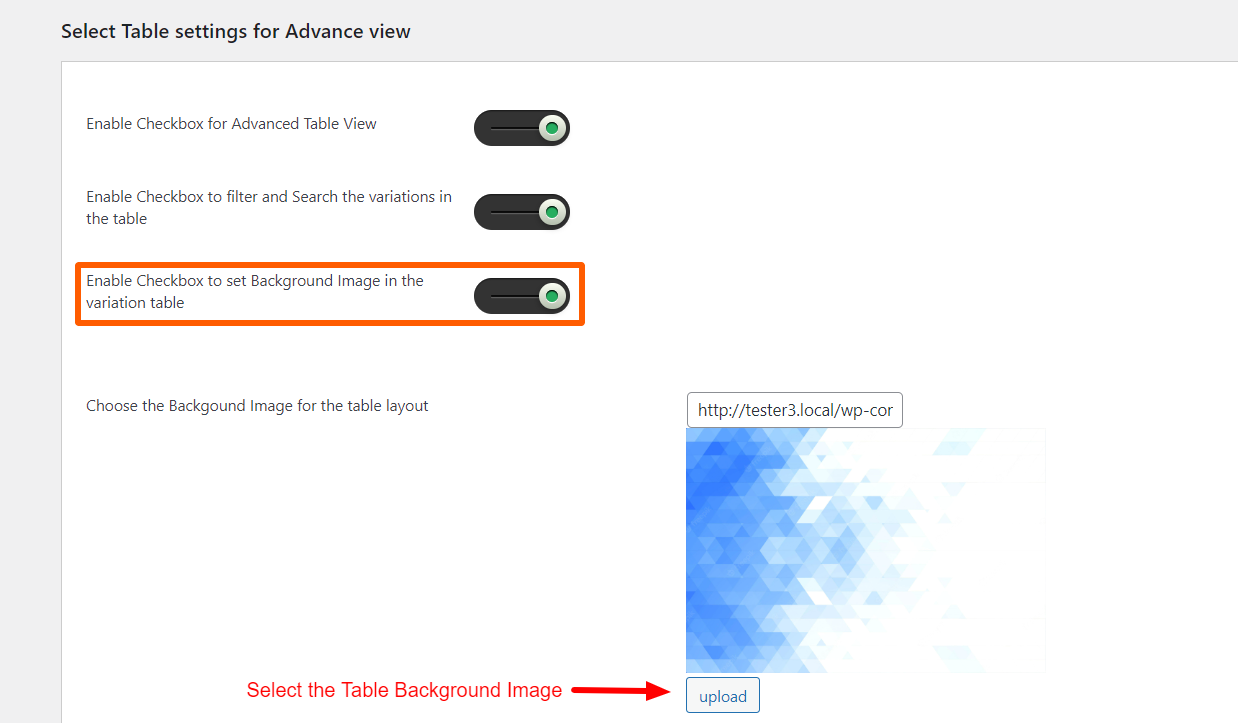
- Enable Browse Image for Gift Card: Premium After enabling this feature customers will browse the image for Gift Card Product.
You click on the following checkboxes to enable these listed functions of the gift card for WooCommerce plugin : (All setting is available in pro)
- Manual Increment Usage Count for Gift Coupon: Allow manual increment usage of Gift Coupons.
- Enable Product for Custom Page: Display the Gift Card product on the custom page.
- Select Custom Page: Select pages to display the Gift Card Product with the shortcode product_page id =”xyz”
- Hide Gift Card Notice: Hide the Gift Card notice from the product page.
- Hide Terms and Condition: Hide the terms and condition from the product page.
- Hide Featured/Thumbnail Image: Hide the feature images from the product page.
- Enable Product for Custom Page: Toggle This Option if you want to show any gift card product on a custom page.
- Select Custom Page: Select your custom page from this dropdown and use the [product_pageid=”XYZ”] shortcode to show the products on the custom page
- Hide Recharge Coupon Code Field: Toggle this option if you want to hide the recharge coupon field from the myaccount> gift cards section
11.Offline Gift Card Setting
11.1. Bulk Import or Migrate Third-Party Coupons into Gift Cards
You can migrate offline coupon details from another gift card plugin by exporting a CSV file in the correct format. The file should have four columns in this exact order: Coupon Code, Expiry Date, Usage Limit, and Price. The first row must include these column headings. Once the CSV file is ready, import it into the Gift Cards plugin to complete the migration.
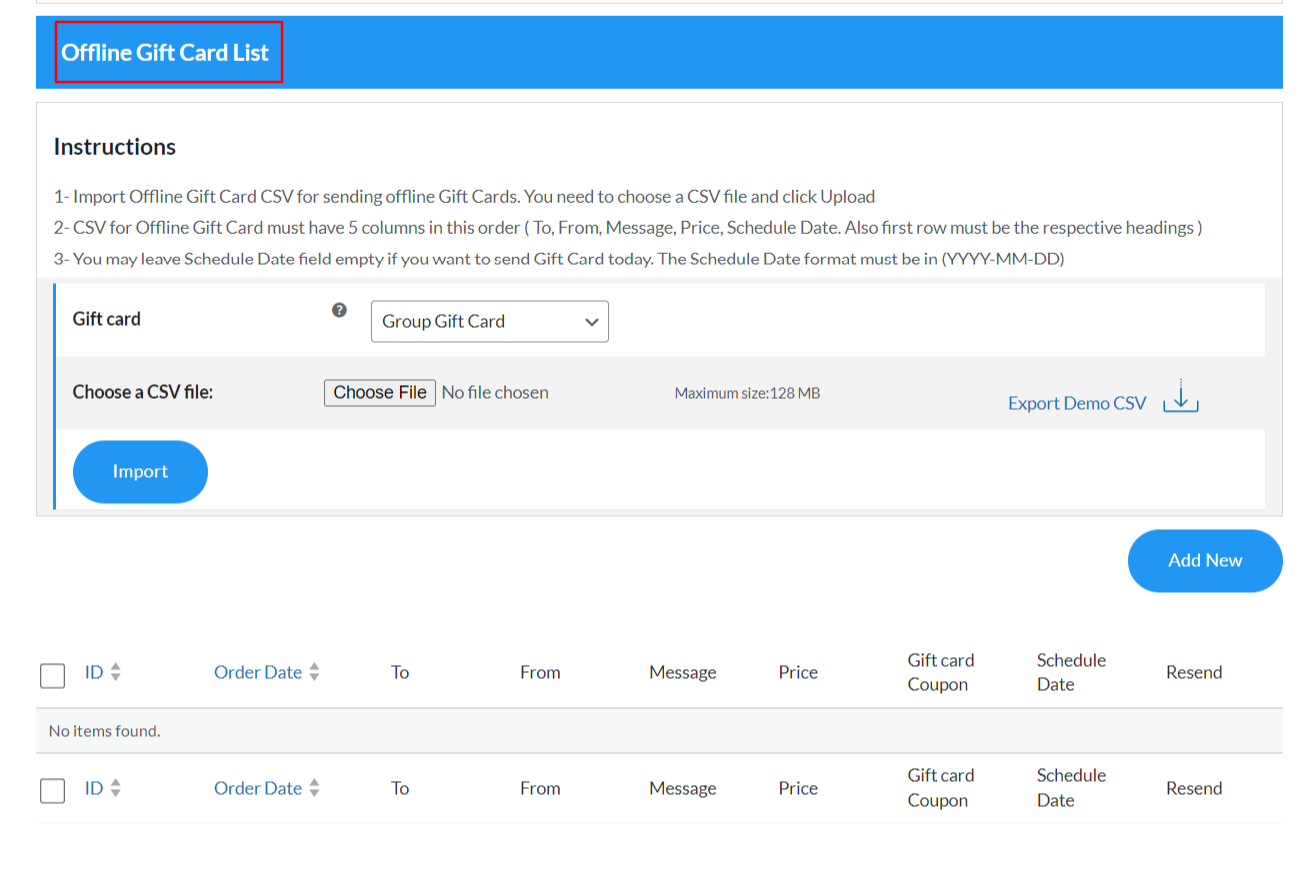
11.2. Offline Gift Card List
If you want to send gift cards to hundreds of customers, you just need to select and import the .csv file where all the required data is mentioned. Then you can choose the desired gift card product for gift coupons, and it will be sent to all the users.
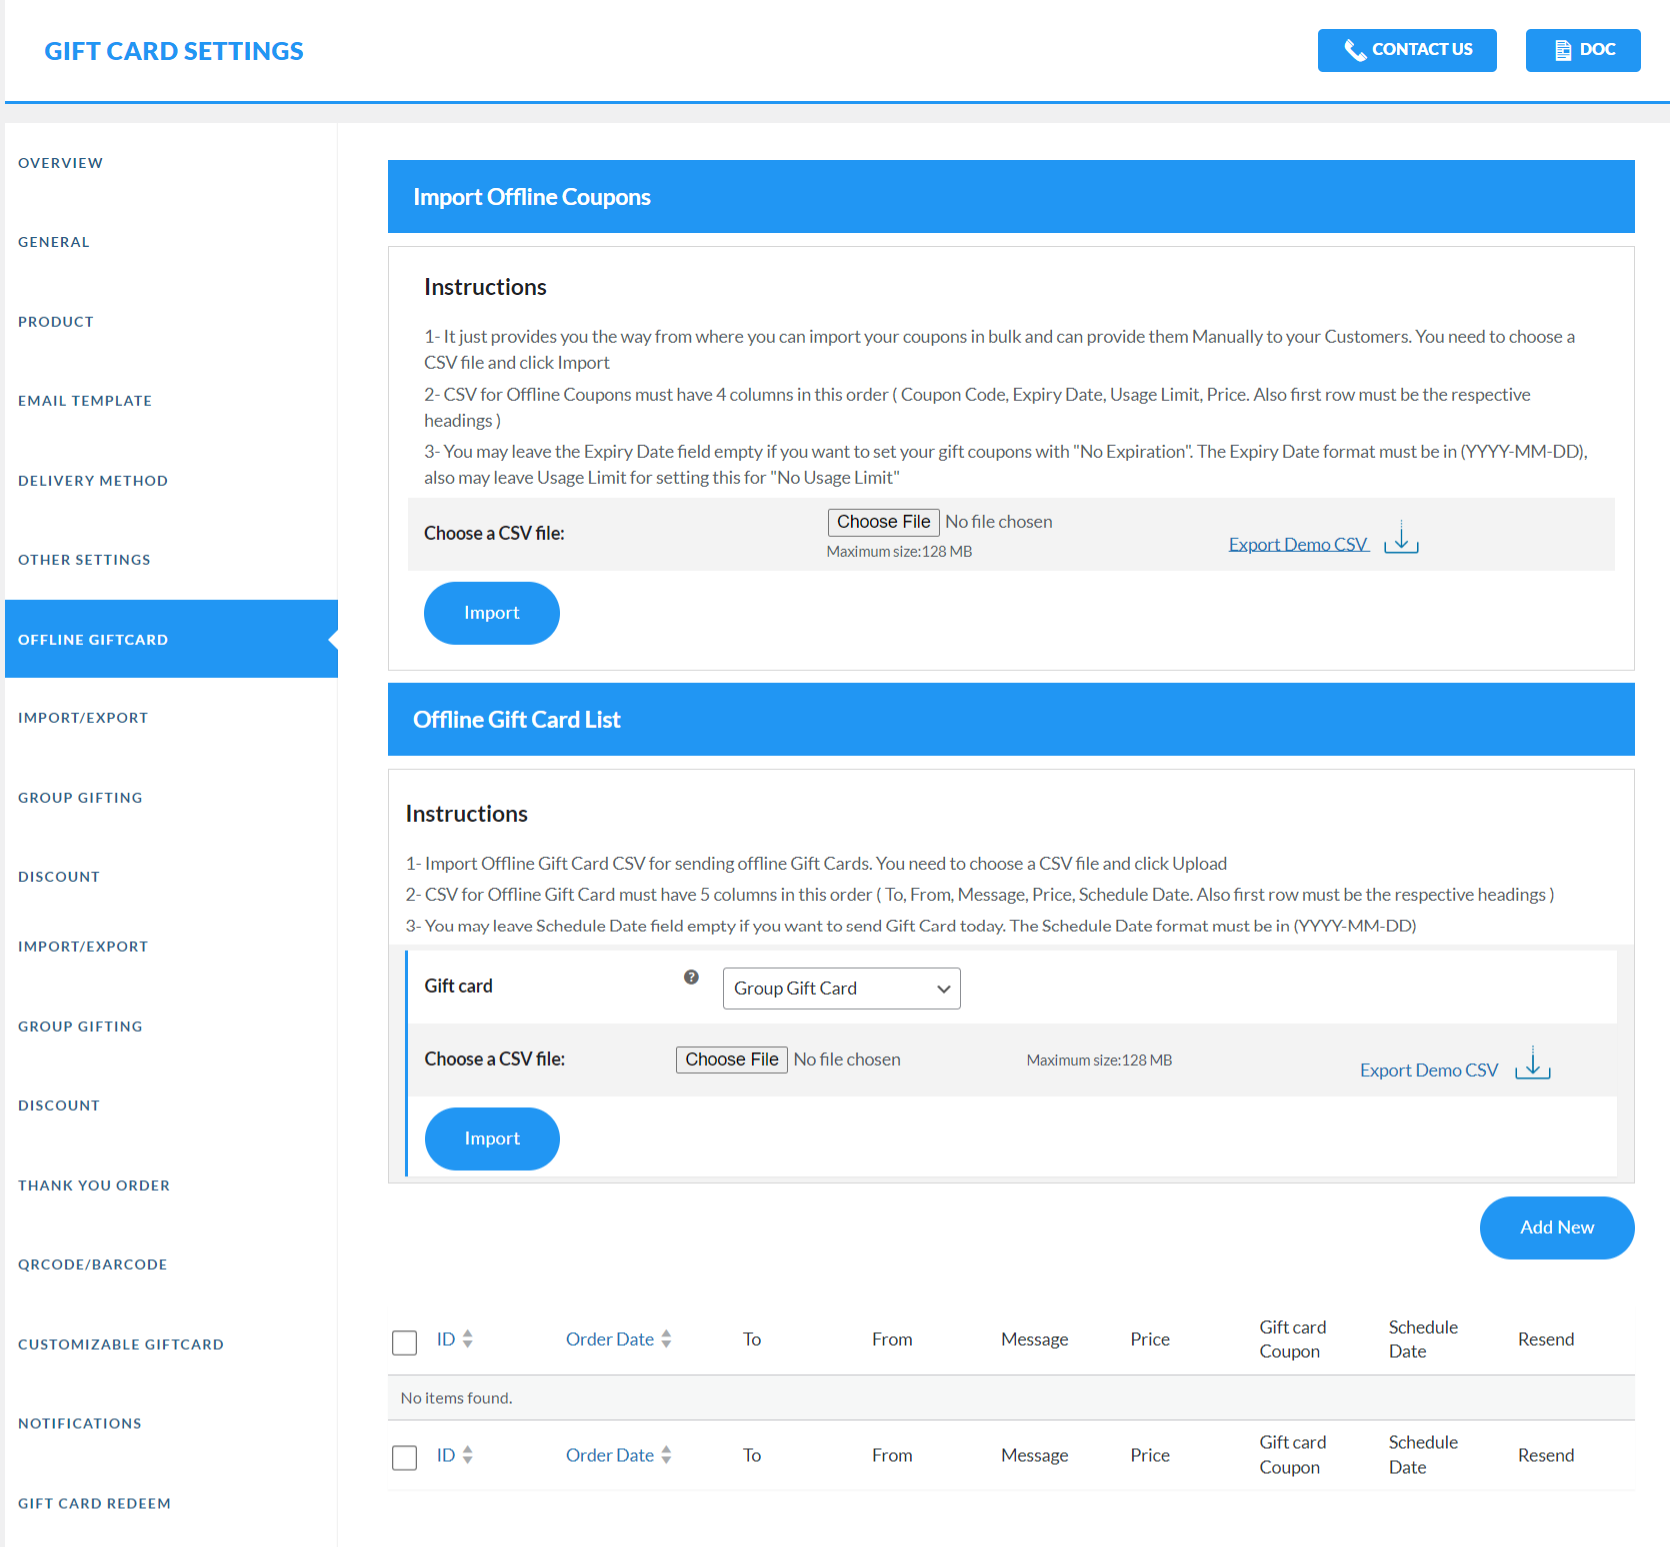
Read the instructions carefully before importing your .csv file.
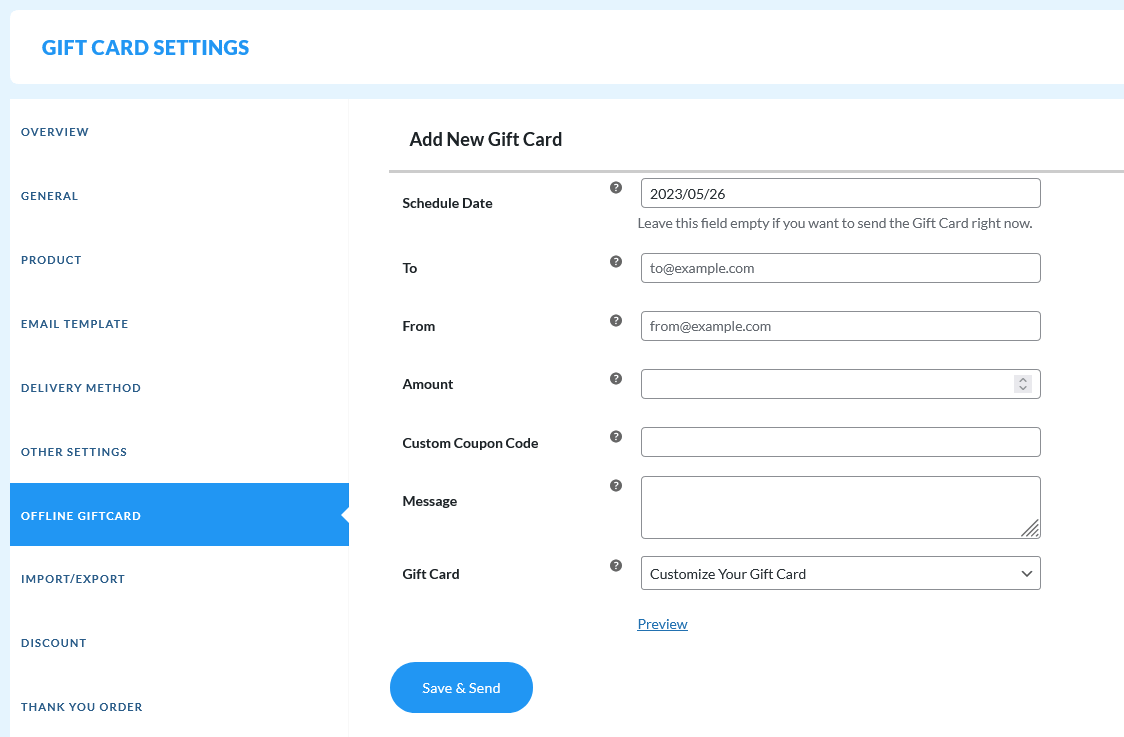
You can use this table to send gift card coupons to many users at once. Just click on Add New and add all the required details. Click on Save & Send, and your gift card coupon will be sent on the set date to the added email.
You can view details of all shipped gift cards by clicking on the ‘View List‘ tab.
12.Import/Export Setting
12.1. Export Gift Coupons
- Export Online Coupons Details: You can export a report of all the online gift card coupons in a .csv file format by clicking on the Export CSV button.
- Export Offline Coupons Details: Clicking on the Export CSV button to export a report of all the offline generated coupons in a .csv file format
12.2. Import Gift Coupons
In this section, you can import the gift coupon codes from a .csv file if you don’t want to use the predefined codes generated by our Gift Card Pro plugin.
Read the instructions carefully before importing a Gift Coupon file. To import a gift coupon file, just click on the “Choose File” button and select your file that contains the coupon codes, and click on Import.

You can also import gift card coupons for specific products by adding the Product ID to the CSV file. You can assign multiple coupons to a single product for automatic distribution. If no Product ID is provided, the coupon will be assigned randomly.
Make sure to export the demo CSV for reference to avoid any confusion.

Now you can directly import gift card coupons using the CSV and directly assign them to products; just select the product before importing your CSV from the option, this way, you don’t have to manually add the product details in the CSV, saving your precious time!
12.3. Import Gift Products
If you don’t want to create digital gift cards manually, you have to import the card details in a .csv file. To import a gift coupon product file, just click on the “Choose File” button and select the file that contains the product data, and click on Import.
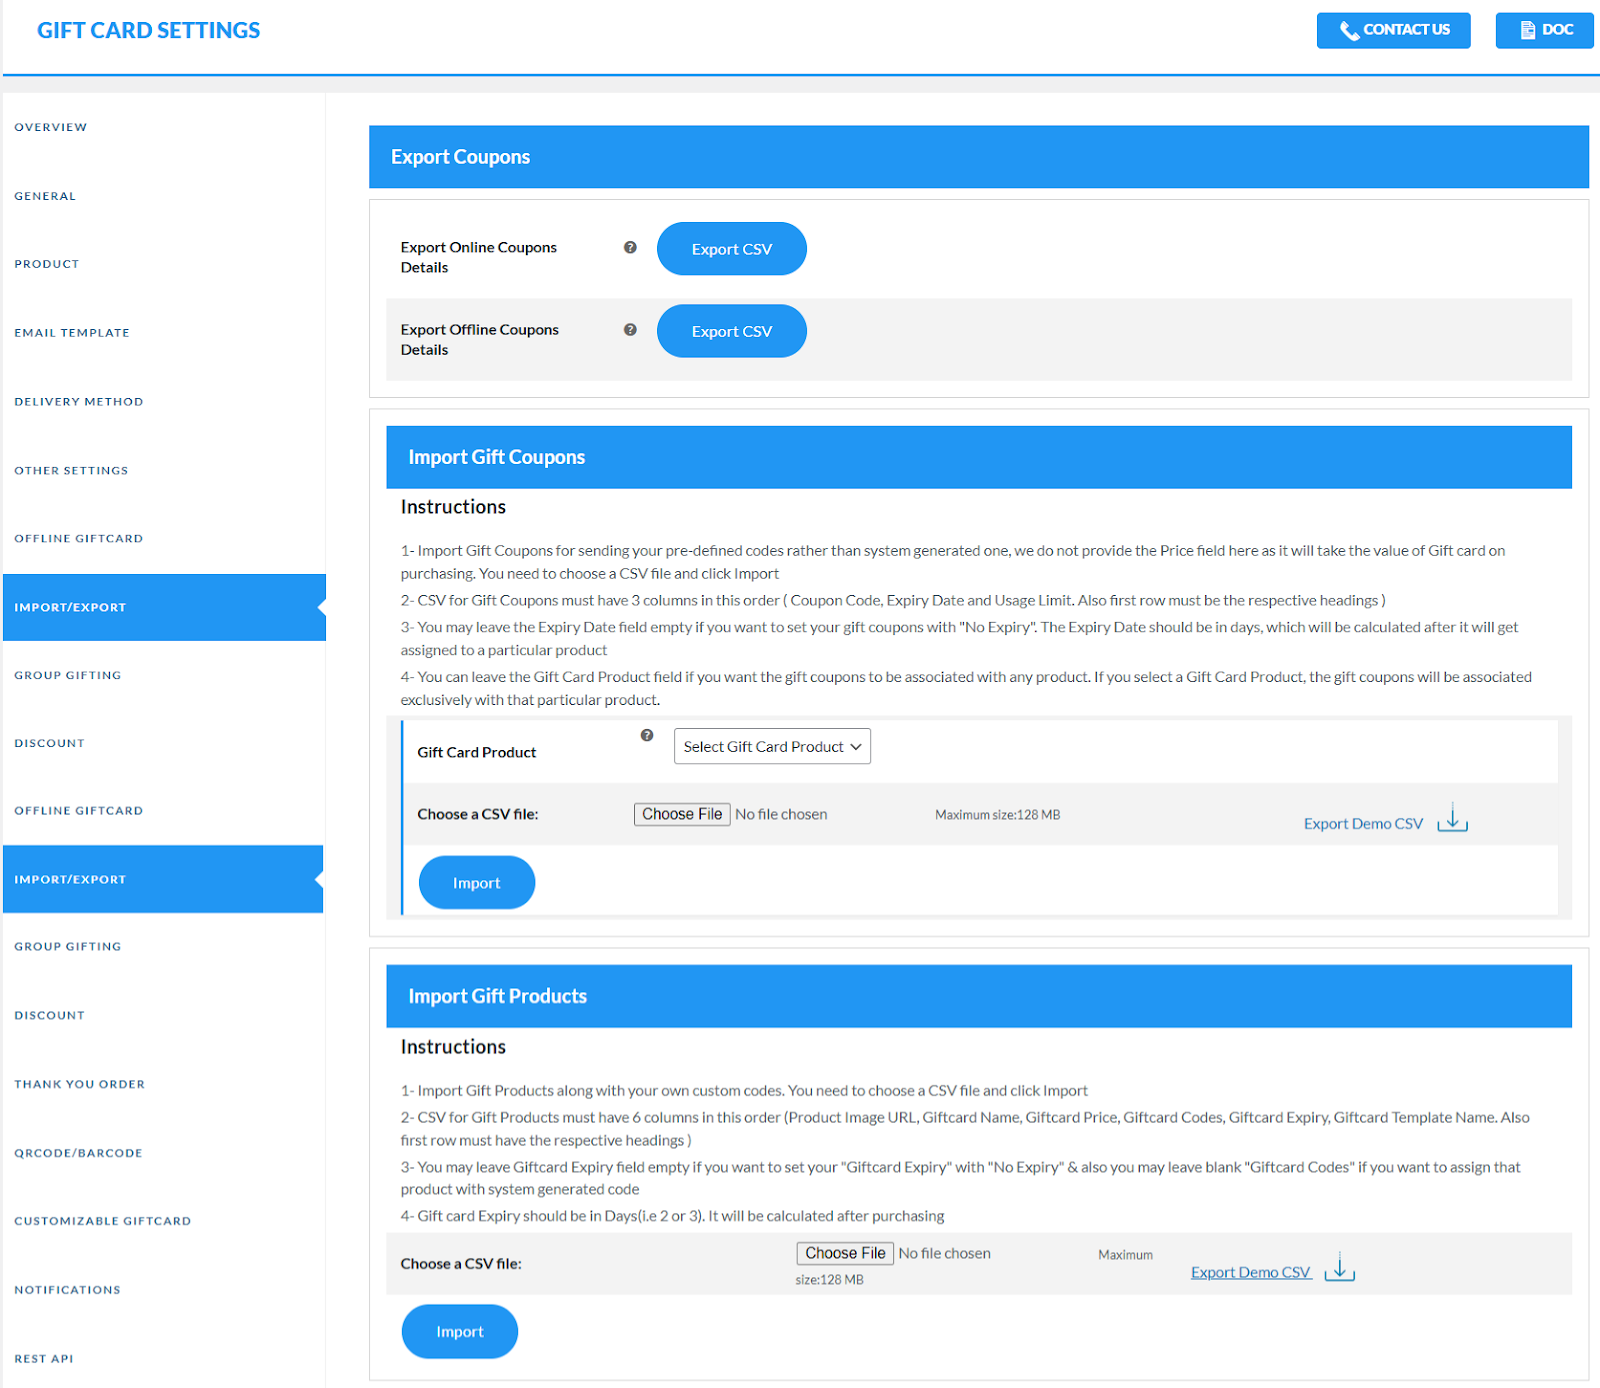
From this tab, you can import WooCommerce gift coupons and products and sell them.
13.Group Gifting
Group Gifting refers to a scenario where multiple individuals contribute money or resources to collectively purchase a gift for someone. This concept is often applied in various contexts, such as birthday gifts, wedding registries, or crowdfunding campaigns for specific items.
Our Gift Cards Plugin Supports The Feature For Group Gifting. You can read the group gifting documentation here
14.Discount Settings
Merchants can enable the discount amount on gift cards for WooCommerce.
Note: Please make sure that you have checked the GIVE DISCOUNT option from the product edit page only then will it reflect on the front.
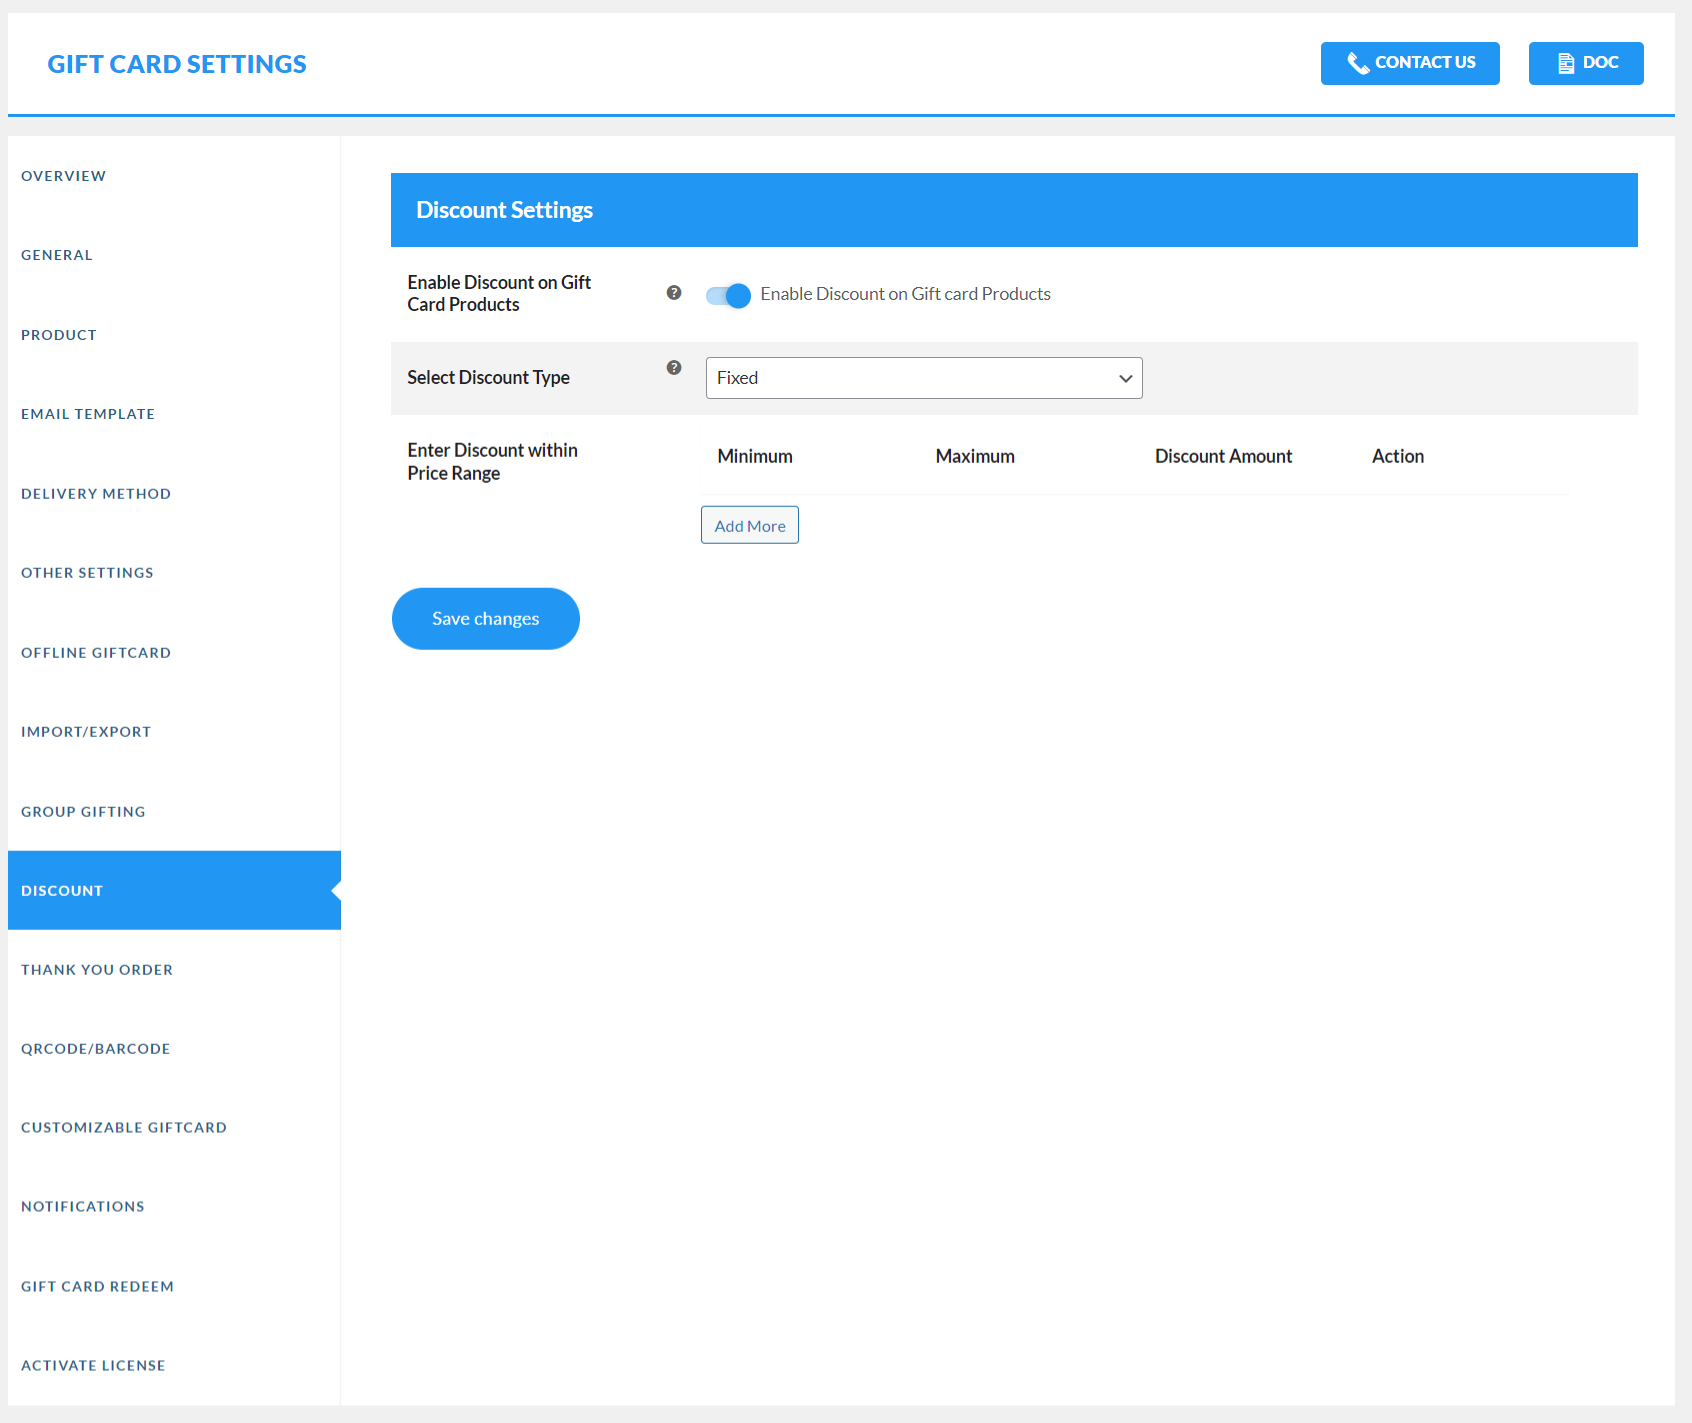
- Enable Discount on Giftcard Products: Check this box to enable the discount on gift certificates.
- Select Discount Type: Choose the discount type for gift card products either fixed or percentage.
- Enter Discount within Price Range: Enter discount within the maximum, minimum price range, and discount amount.
- Select Discount Type is Fixed: Select discount type is fixed from the dropdown.
- Set the Discount Amount with Price Range: After selecting the discount type, set the discount amount with the price range.

- Select Discount Type is Percentage: You can also select the discount type in percentage.
- Set the Discount Amount with Price Range: After selecting the discount type, set the discount amount with the price range.
15.Thank You Order Setting
The merchant would be able to send Thank You gift coupons to their regular customers, who have placed the required number of orders for that coupon.
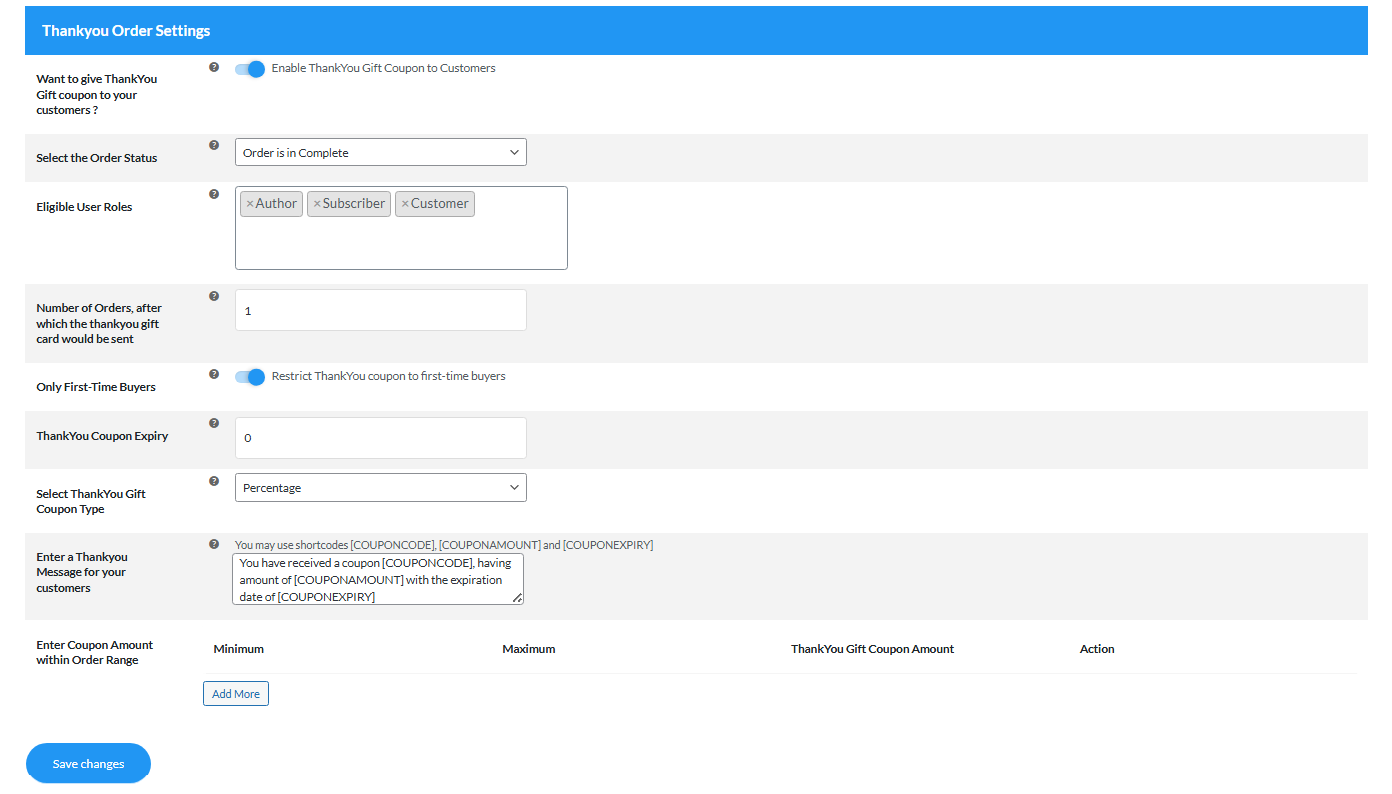
- Want to give a Thank You Gift coupon to your customers: Check this box to enable gift coupons for those customers who had placed orders on your site.
- Select the Order Status: Set the status when the Thank you gift card coupon would be sent.
- Eligible User Roles: You can send thank-you coupons to specific user roles such as customers, subscribers, authors, and more.
- Number of Orders, after which the thank you gift card would send: Enter the order number after that you want to give the gift card coupon to your customer.
- Only First-Time Buyers: Enable this to send thank you coupons to only first- time buyers.
- ThankYou Coupon Expiry: Enter the number of days for coupon expiry. Keep value 1 for one-day expiry after generating the coupon keep value 0 for no expiry.
- Select ThankYou Gift Coupon Type: Choose the thank you coupon type. It is either fixed or percentage.
- Enter a Thankyou Message for your customers: This message will print inside the Thank You template. You may use shortcodes [COUPONCODE], [COUPONAMOUNT], and [COUPONEXPIRY].
- Enter Coupon Amount within Order Range: Enter the thank you coupon amount with the price range.
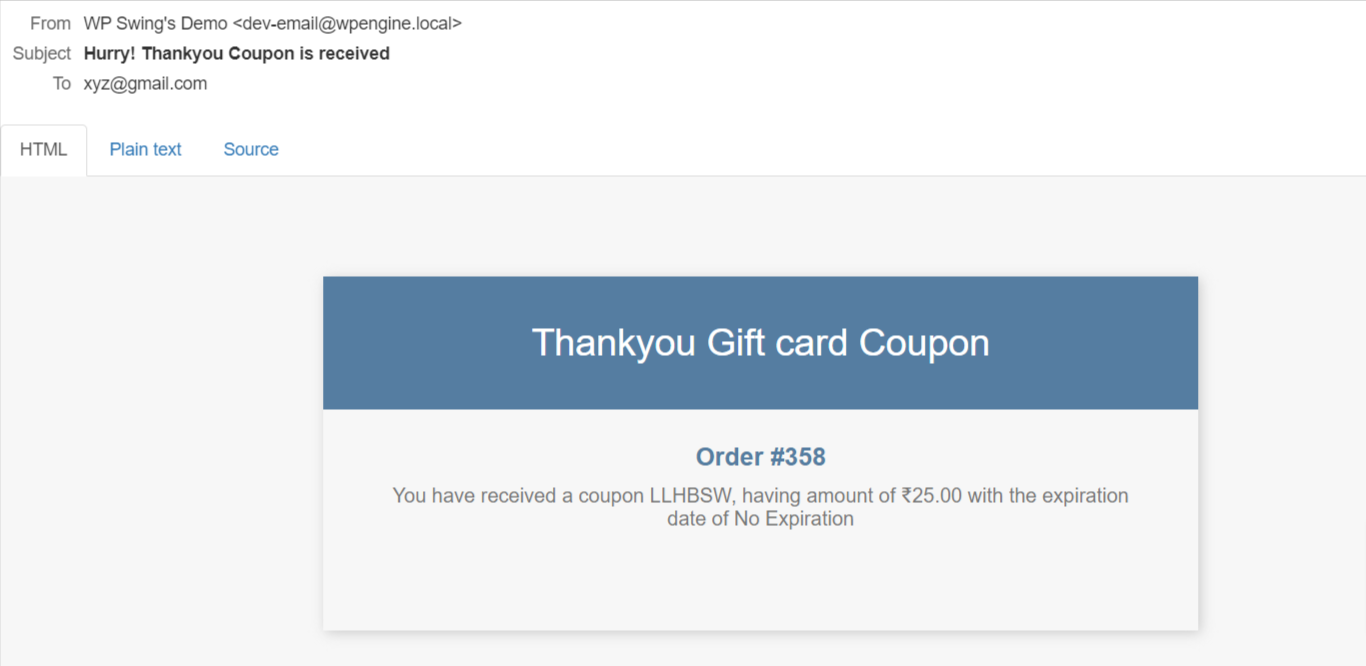
Email Representation:
Here is how customers will receive their thank you coupon
16.QR/Barcode Settings
The QR Code/Barcode is used over the WooCommerce gift card to provide security.
16.1.QR Code Settings
Enable QR Code: Choose this option to enable the QR code function
Display Coupon Code: Toggle this option to display the Coupon Code Below the QR Code
Select ECC Level: This compensates for dirt, damage, or fuzziness of the BAR Code. Valid values are “L” (low ECC), “M”, “Q”, “H” (highest ECC). A high ECC level adds more redundancy at the cost of using more space.
Size Of QR Code: Option to enable QRCode after selecting the ECC level to select the size of the QRCode.
Margin Of QR Code: Set the QR Code margin over here.
You can see the QR Code on the ultimate gift card preview.

16.2.BarCode Settings
Enable Barcode: If the user wants to generate their BARCode with the Coupon code so here we give the option for the merchant to allow your user to generate their BARCode with the Coupon Code.
Display Coupon Code: Enable this feature to generate your Barcode display the coupon code below the Barcode.
Select Code Type: There are pre-designed code types for barcodes that you can use in different places for different purposes.
Size Of Bar Code: Set the size of the barcode gift card. You can see the Barcode on the front end.
You can see the BAR Code on the front end.
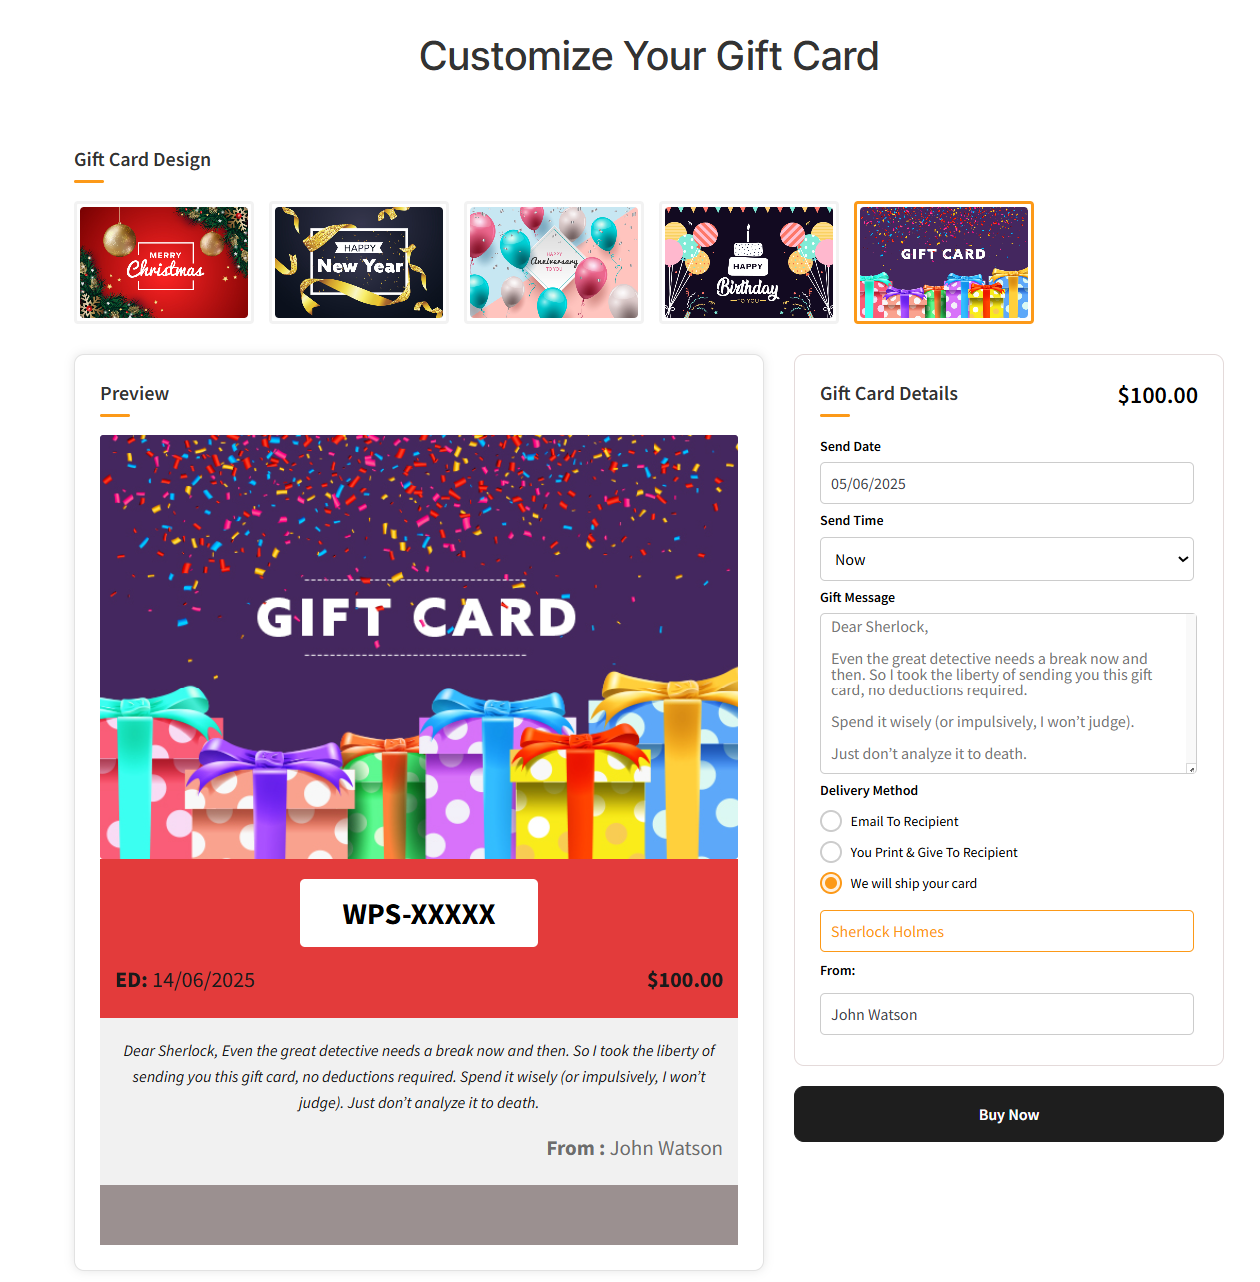
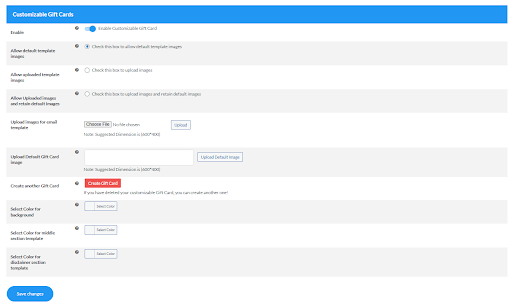
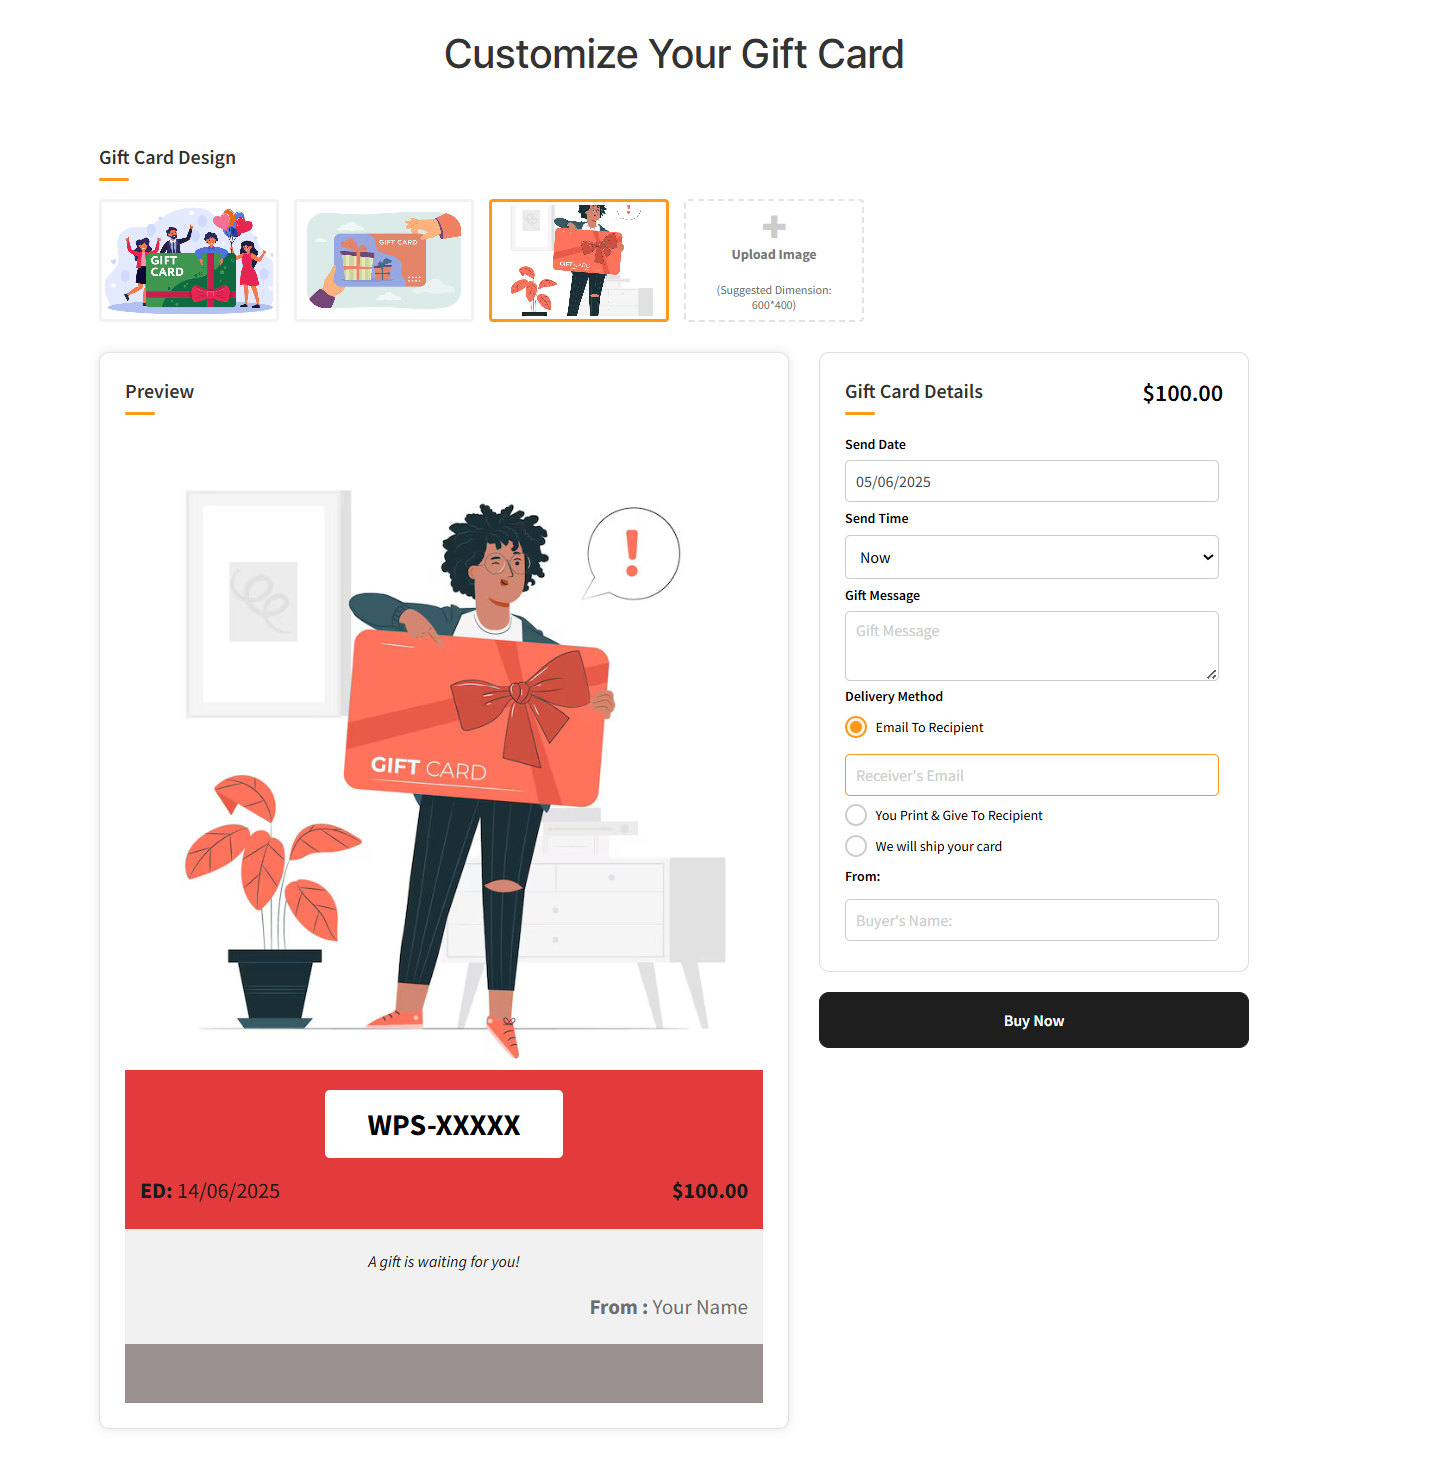
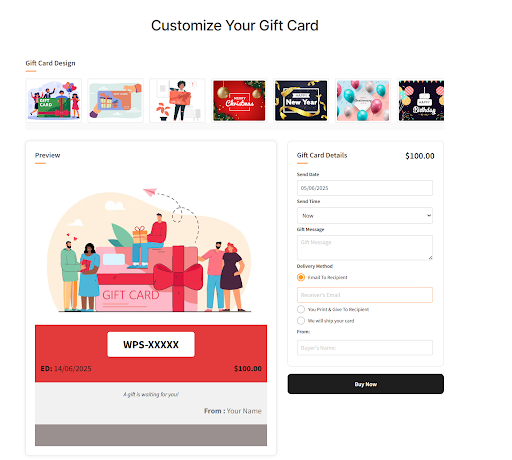
17.Customizable Gift Cards Setting
This setting allows your customer to create digital gift cards and customize them before purchase. You can set a default image for cards and also allow customers to upload their images for the customizable gift cards.
17.1. Enable
Click on the checkbox to enable this setting.
Afterward, a Customizable Gift Card product is automatically created in the shop.
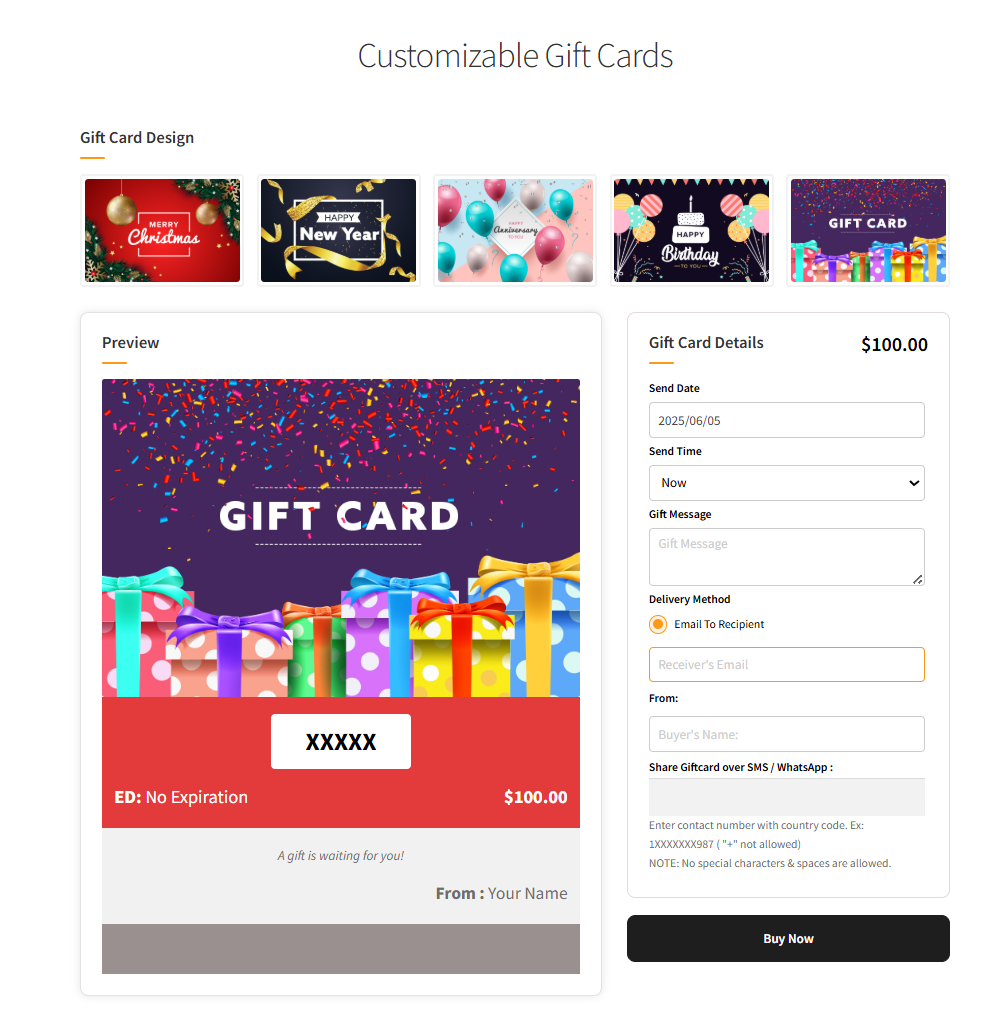
Your customer can buy gift coupons with the predefined Gift Card templates or make customizations in the template, such as uploading the Gift Card Image, entering the Message, Card Value, Sending Date, Enter Your Name, etc., in real-time.
Plus, you can implement duration-based pricing (variable) on the customizable gift card. Customers can select the duration from the price drop-down and pay accordingly.
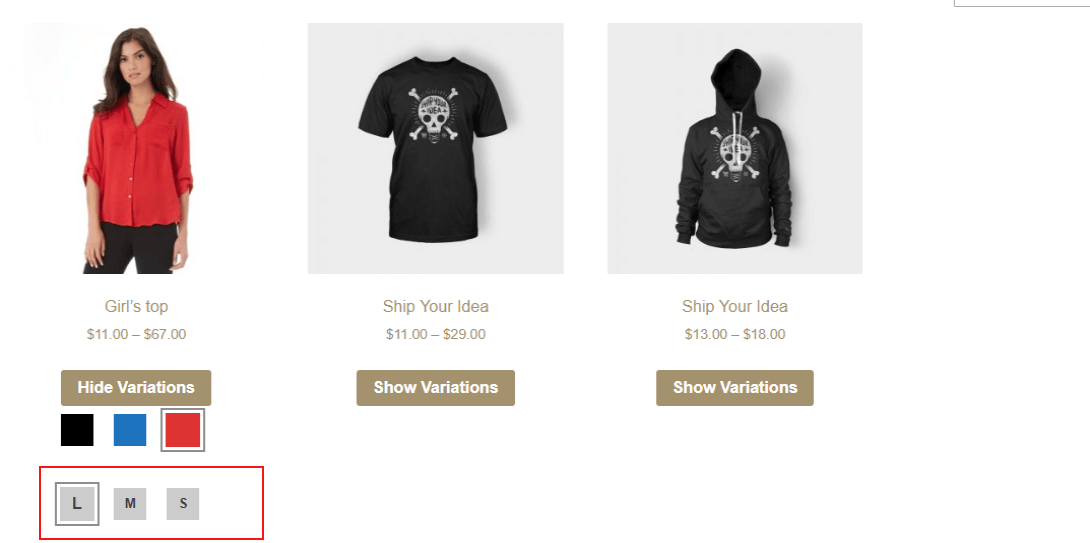
17.2. Allow Only Default Template Images
Through this setting, you can limit the customizable gift card image selection to default images only.
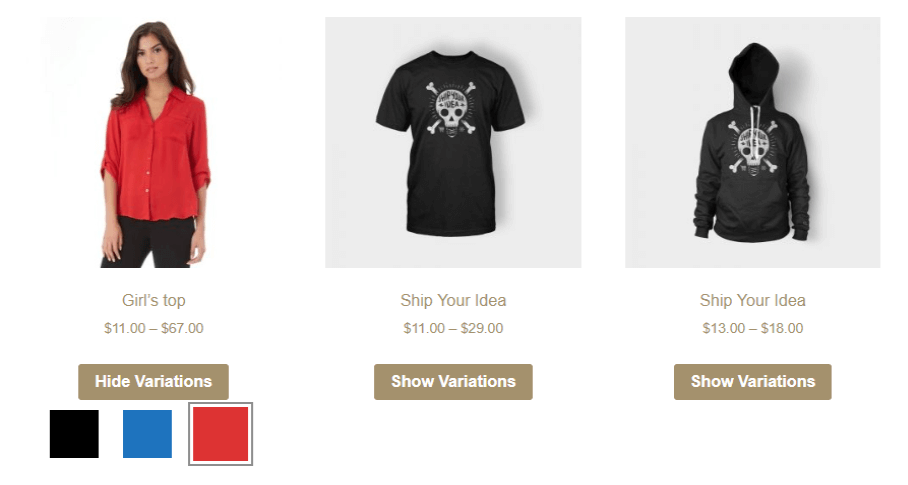
On the front end, your customers will only see the default images.
17.3. Allow Only Uploaded Template Images
Enable this setting to display only uploaded images on the front end.
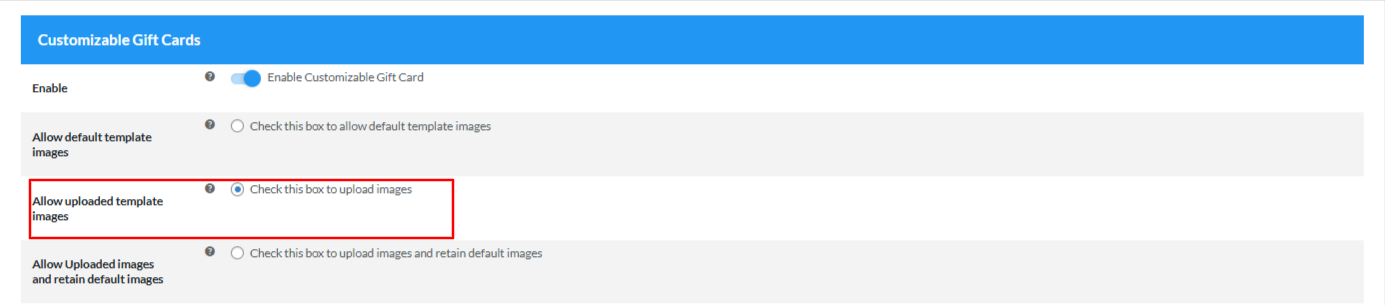
On the front end, your customers can use only the images you’ve uploaded. To upload these images, go to the “Upload Images for Email Template” option.
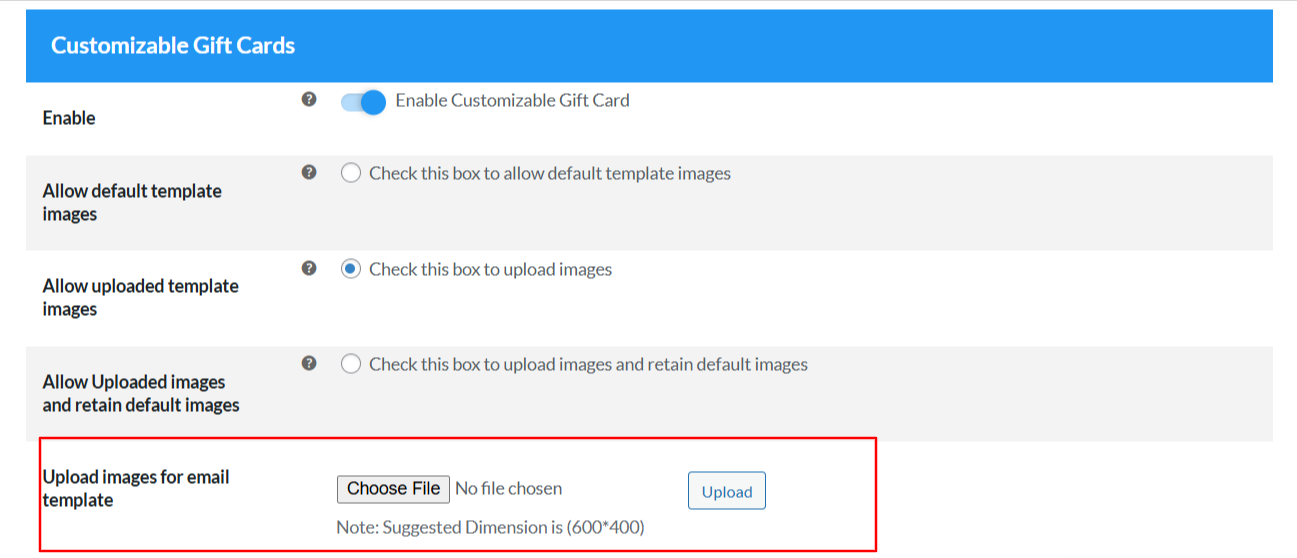
Here, you can upload multiple images, and only those will be visible on the front end.
Here’s how it will appear to the users.
17.4. Allow Both Uploaded Images and Default Images
You can display both uploaded images and pre-defined images on the front end.
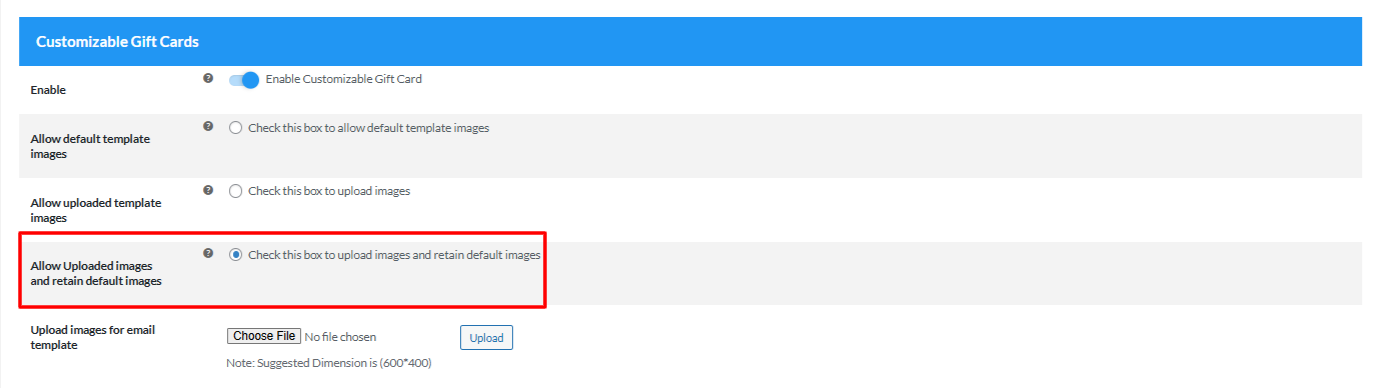
Here’s how it will appear to the users.
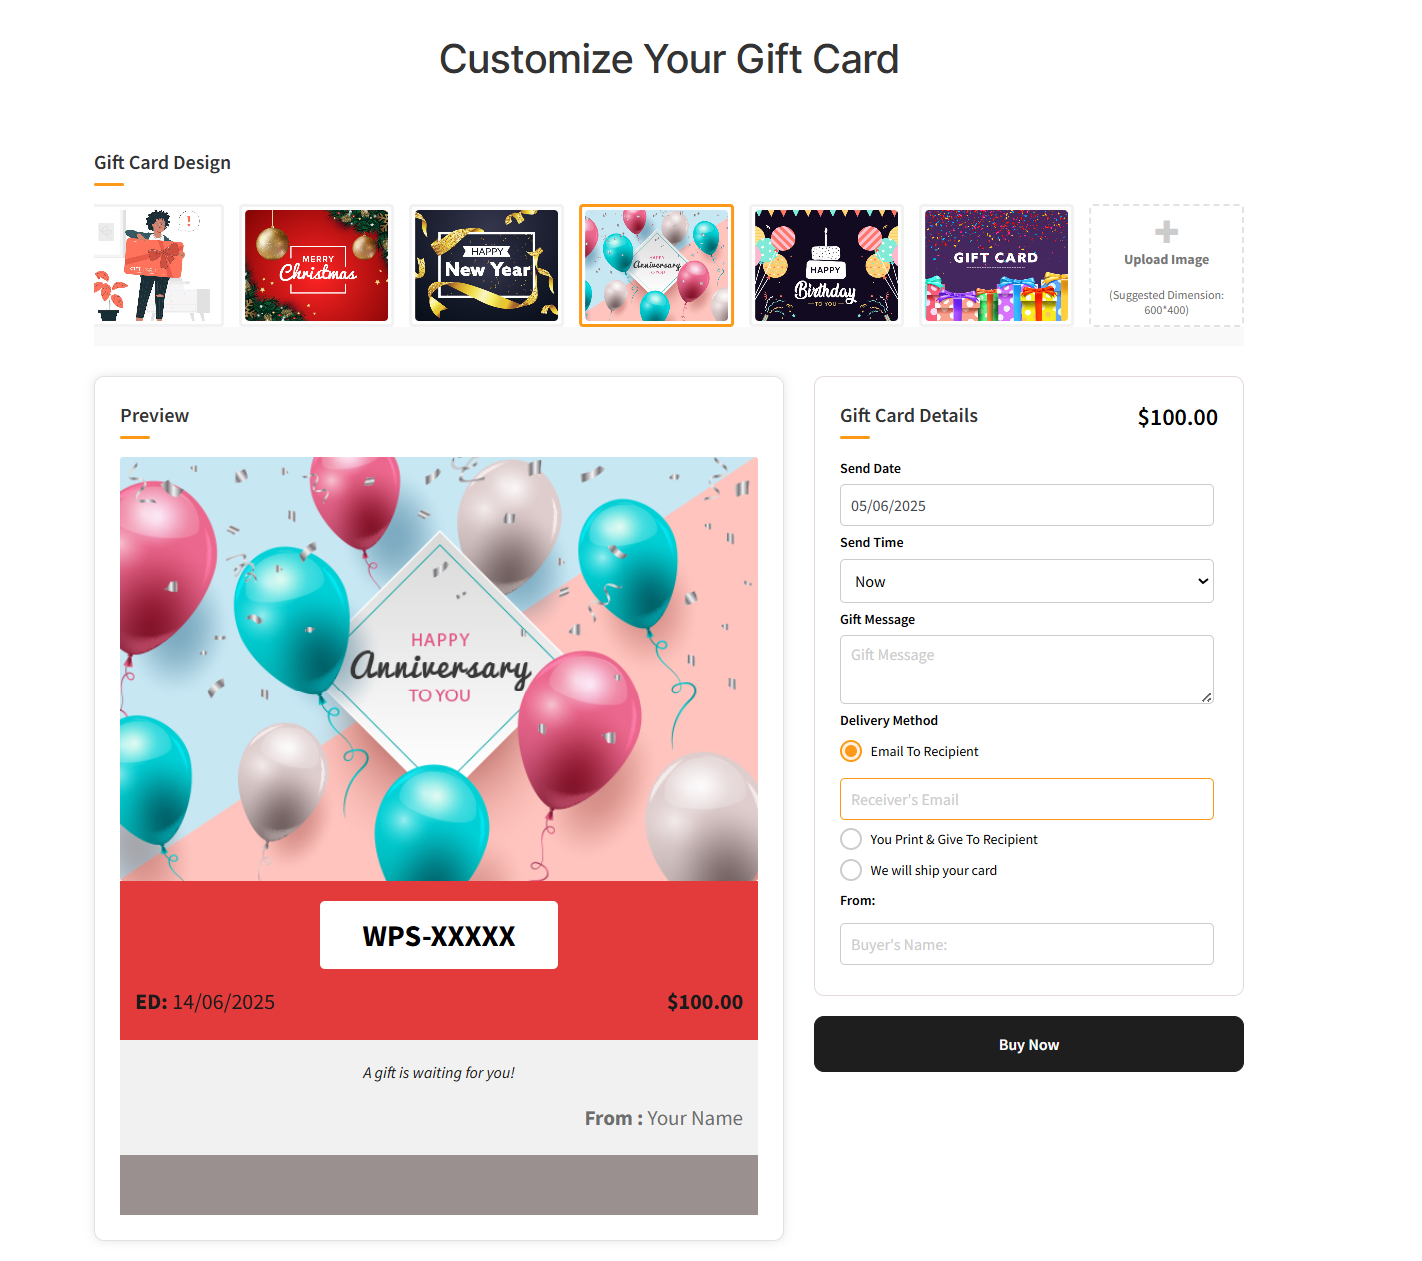 As you can see, both the default images and the uploaded images are visible.
17.5. Upload Default Gift Card Image
You can upload and set a default image for Customizable WooCommerce gift cards.
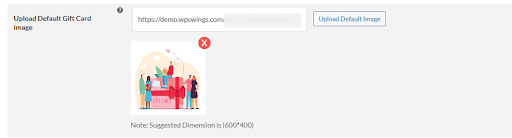
On the front end, you can see the default Gift Card image.
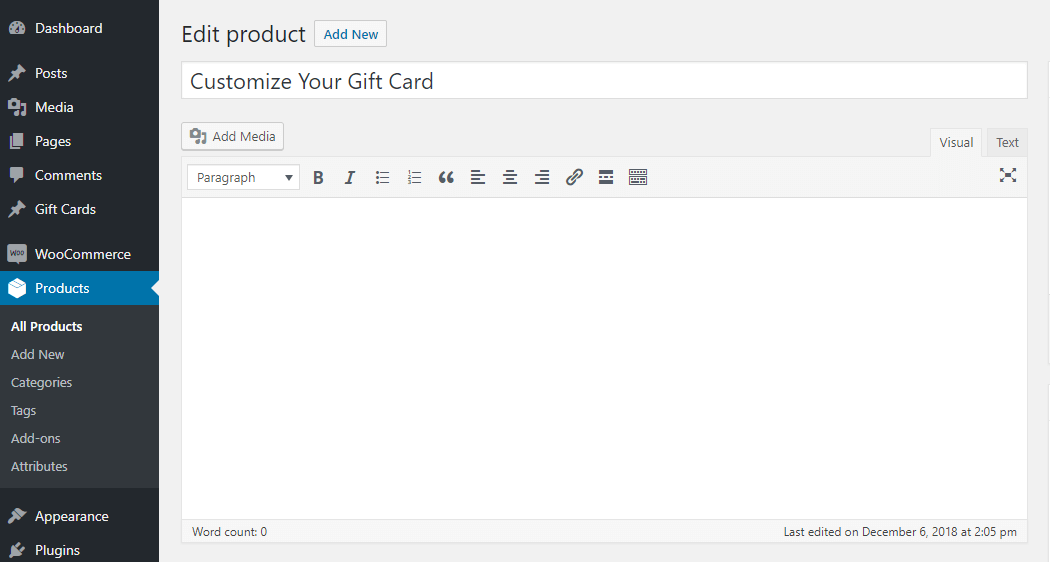
17.6. Create Gift Card Product
You can create a new customizable gift card only after deleting the previous one.
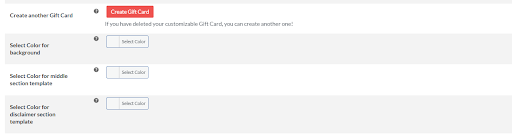
Click on the ‘Create Gift Card’ button, it will redirect to the product edit pages. Here, you can enter the required product information like product name, featured image of the product, etc, and lastly click on the ‘publish’ tab.
After successfully publishing the product, the product will be listed on the shop page.
 If you want to do further customization of the gift cards, you can use the gift cards setting tab, where you can customize the default price, pricing type, and many more.

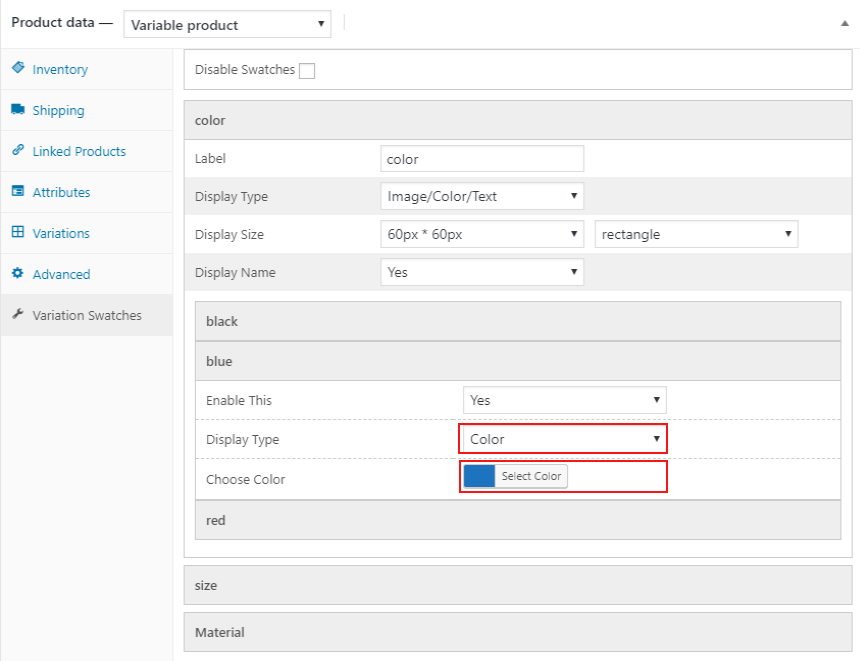
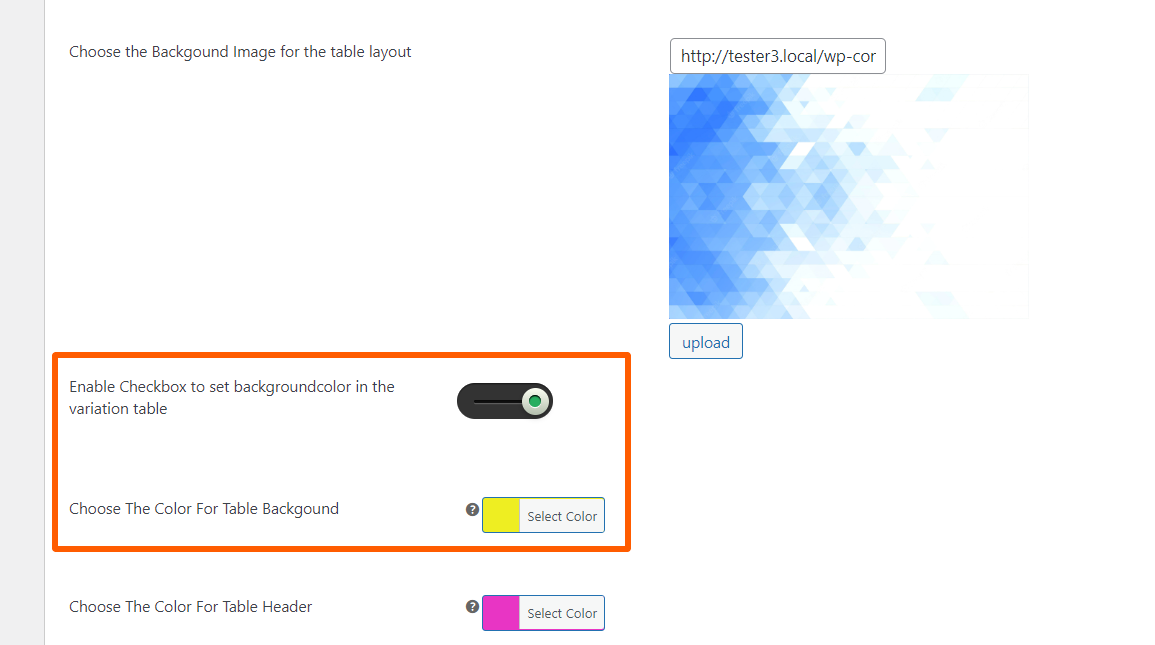
17.7. Select Color Setting
This setting allows you to set the personalized background and middle section template color for your gift cards. You can also select the color for the disclaimer section.
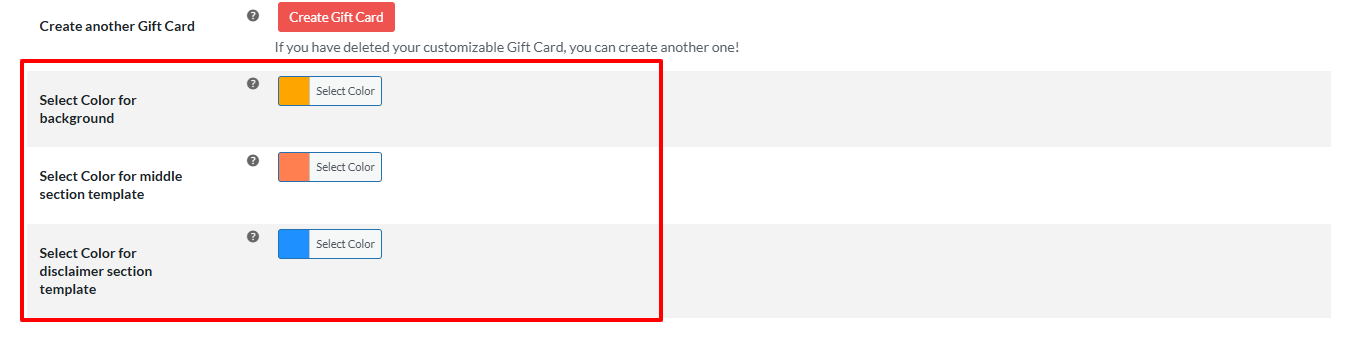
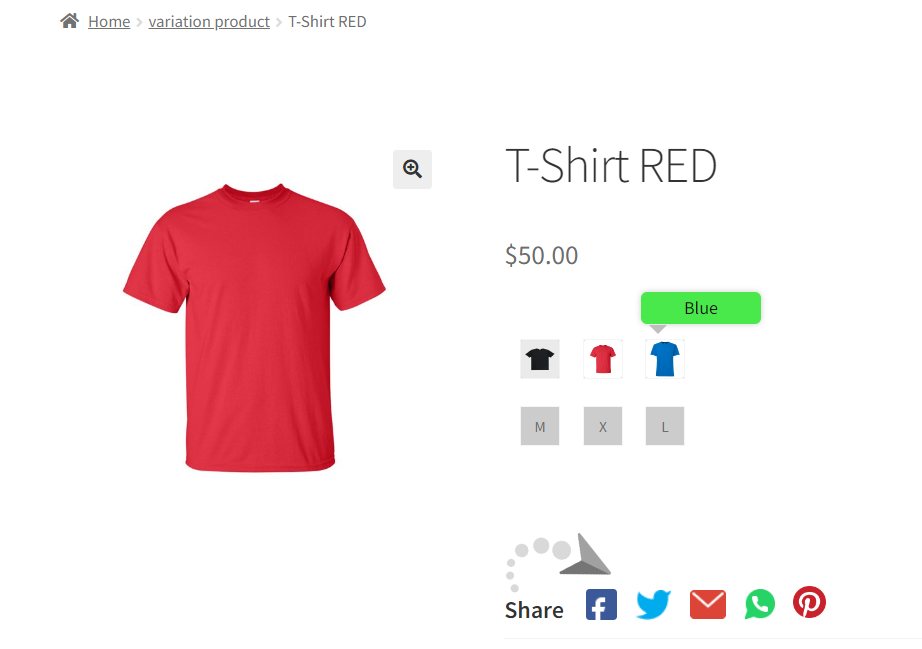
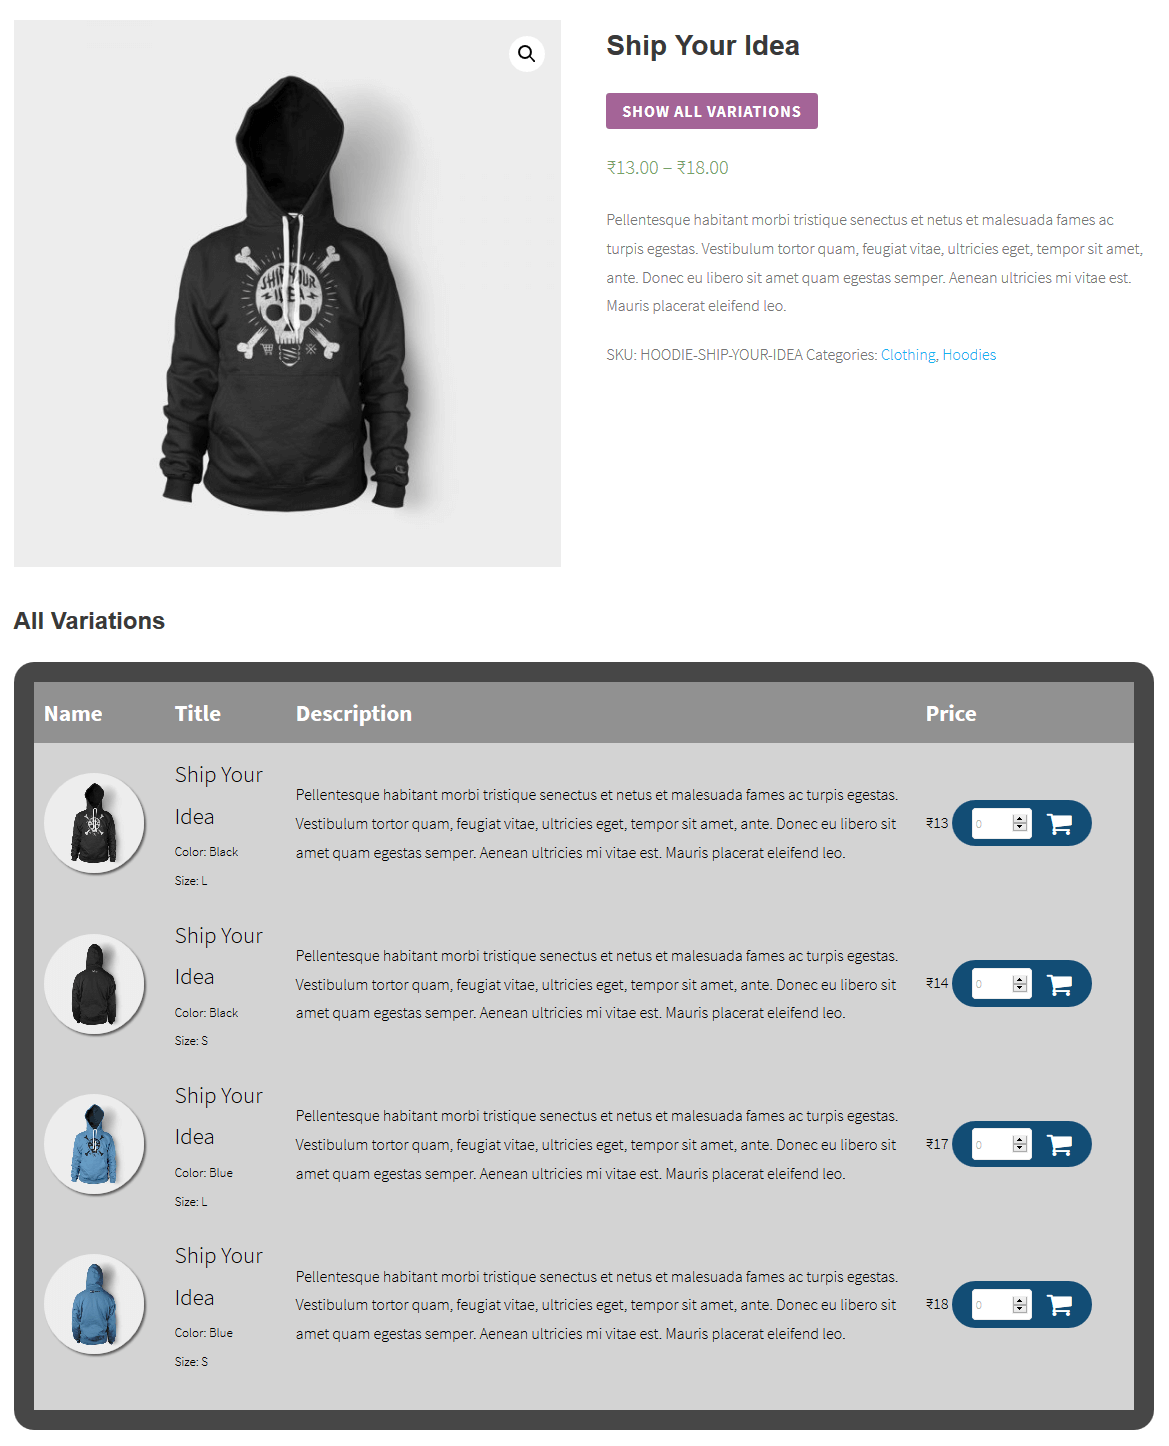
Here is how it’s updated over the frontend.

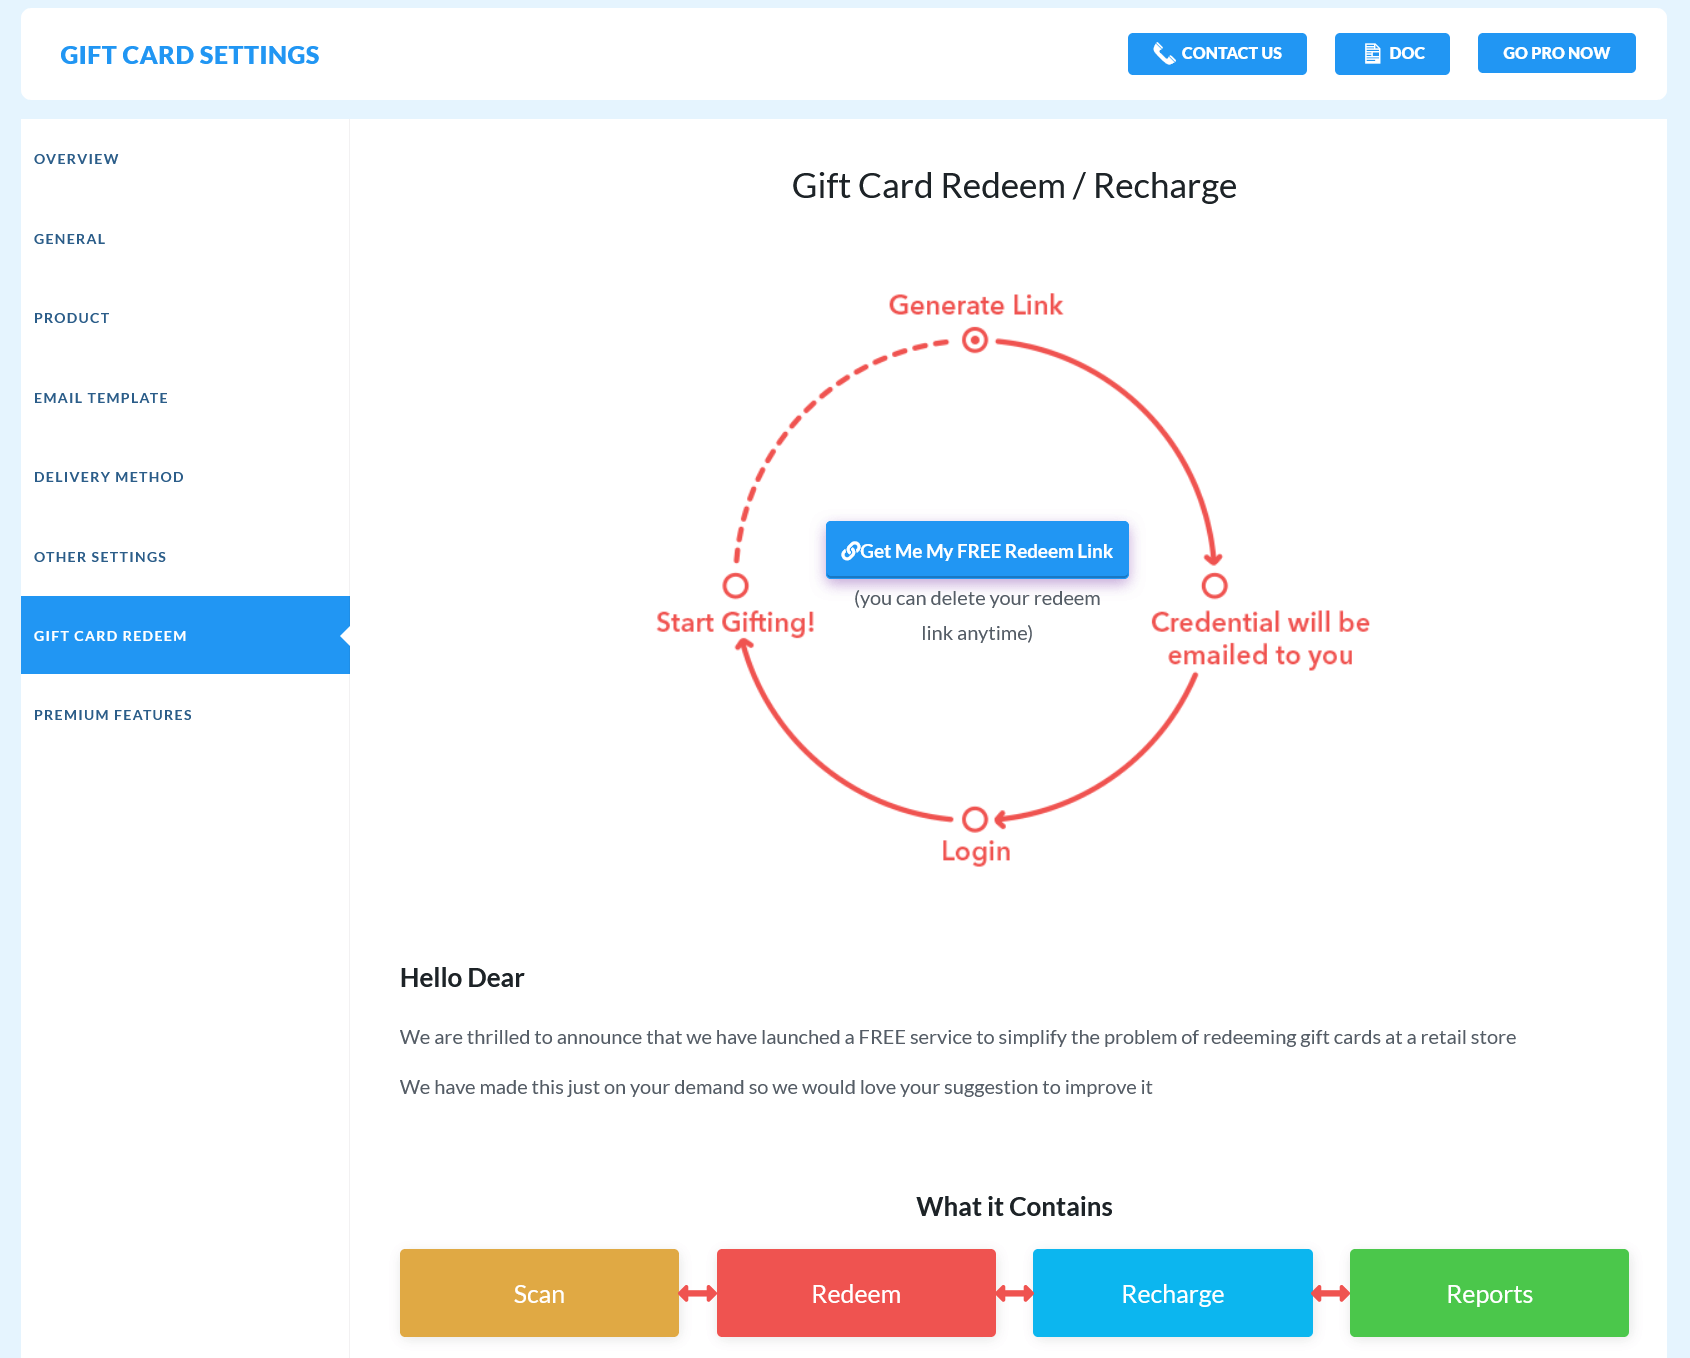
18.Scan/Fetch and Redeem/Recharge Giftcard Setting
This WooCommerce Gift Card plugin will help you to grow your revenue by offering easy redeeming/recharging of gift card vouchers for your offline businesses. You can redeem/recharge all types of gift card coupons from the gifting portal.
To use the Giftcard Redeem Link on the web-store follow these steps.
Step 1: First click on the “Get Me My FREE Redeem Link“.
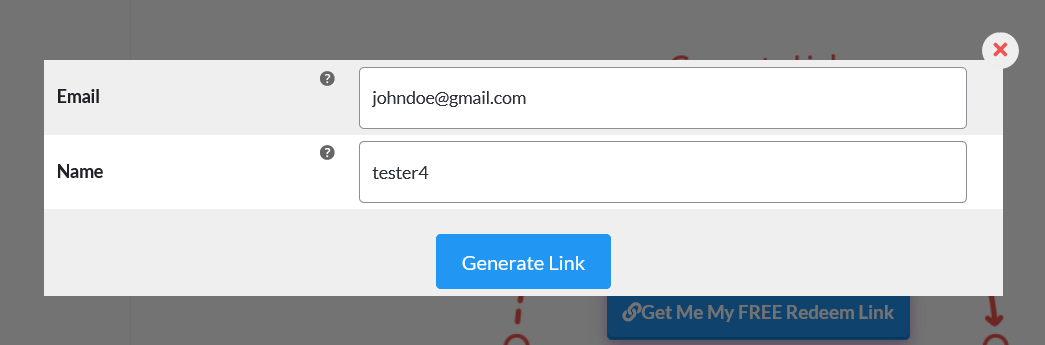
Step 2: Now a popup window will be displayed on your dashboard, here enter your Email Id, Name, and then click on the “Generate Link” tab.
Step 3: After clicking on the “Generate Link“, your Gift Card Redeem Link and Embedded link will be displayed on your panel with walkthrough steps and the login details will be sent to the given email id.
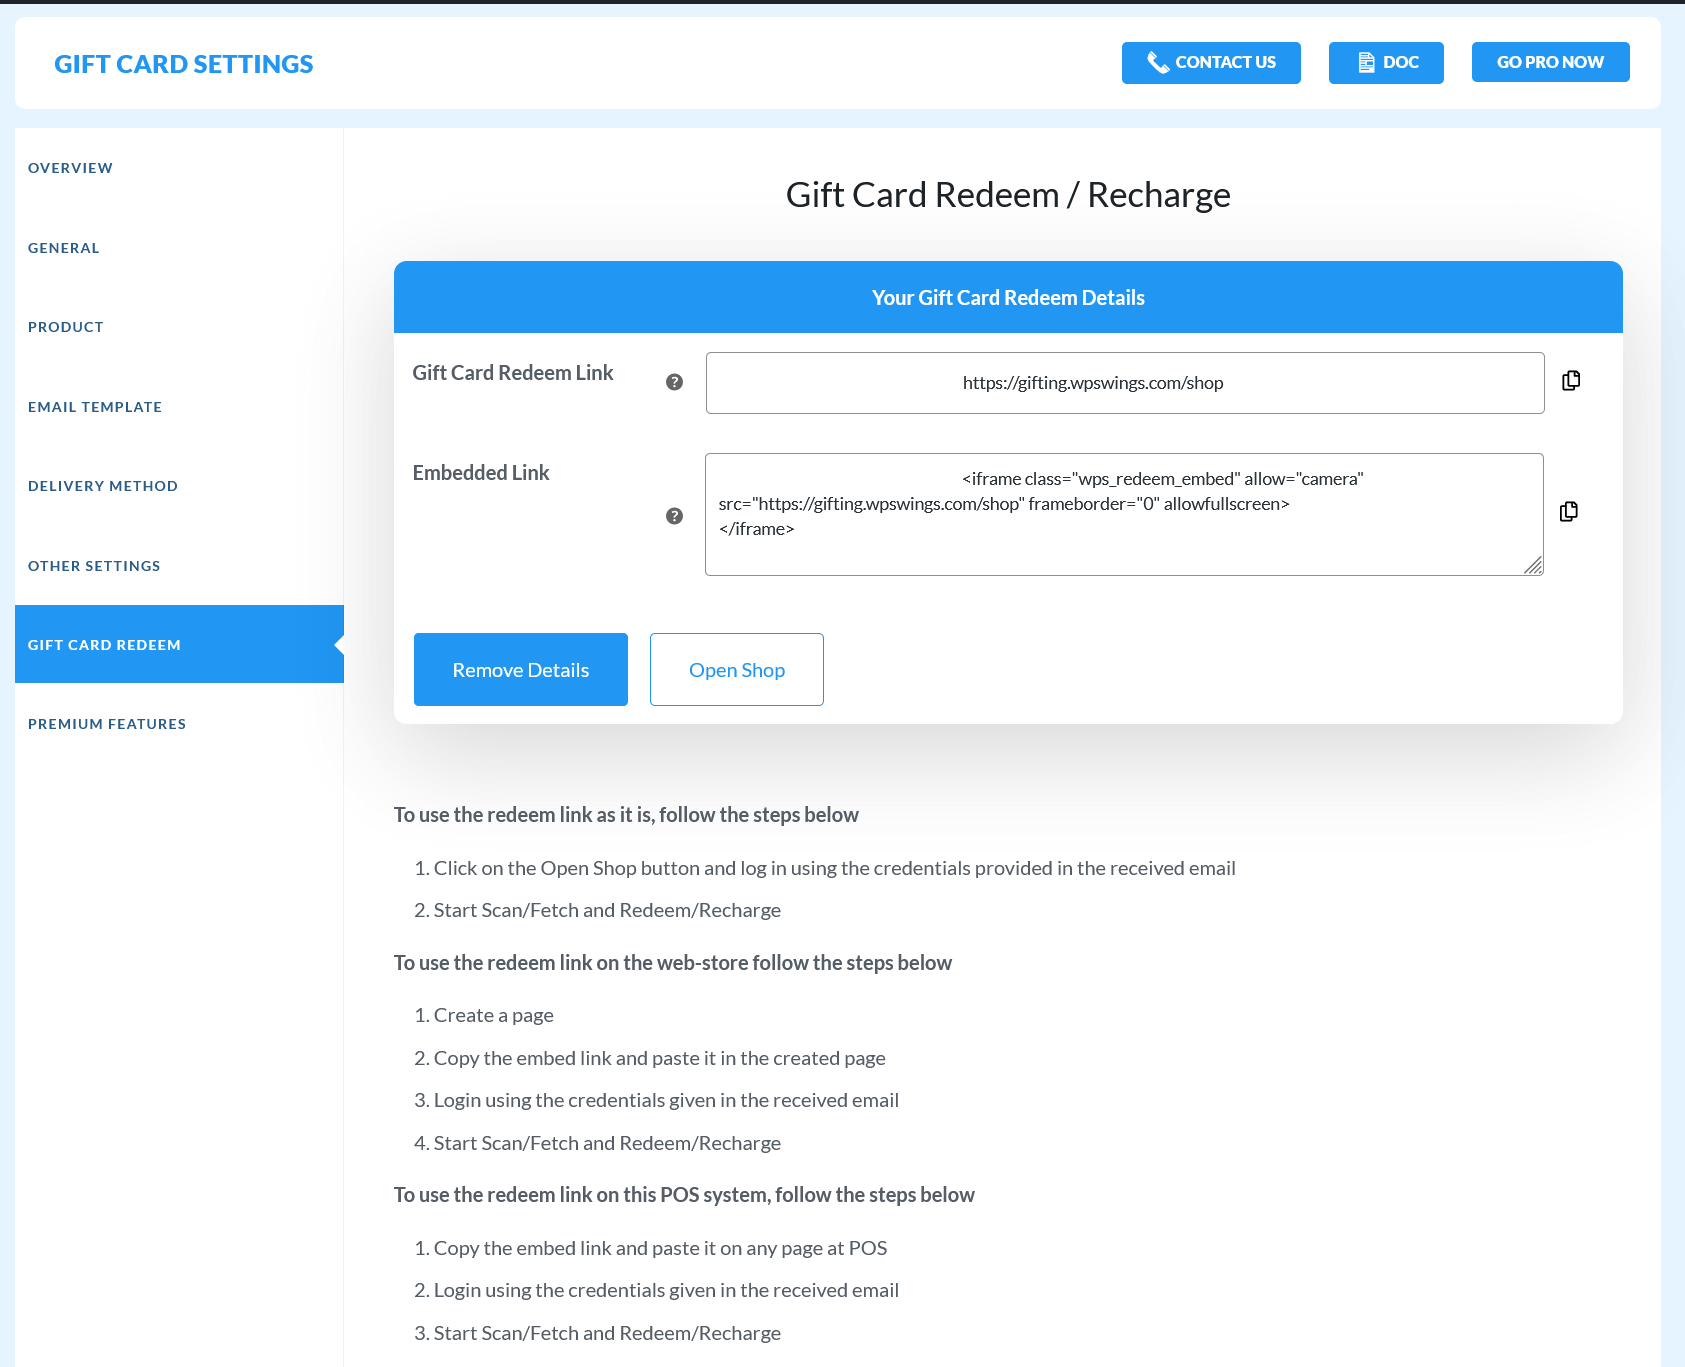
Step 4: Now Copy the Giftcard Redeem link or Embedded code to log in to your web-store of gifting.wpswings.com by using the credentials given in the received email. To use the embedded code first you have to create a Page and then paste the embedded code on it.
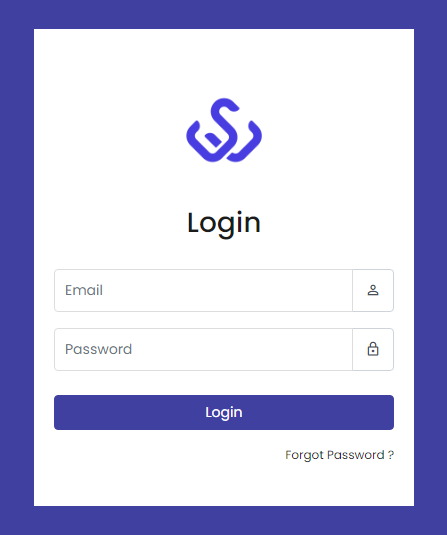
Step 5: After successful login with the dashboard, you will get the shop page of the web-store.
Here you can see all transactions of Giftcard vouchers. The WP Swings gifting portal allows you to scan, redeem, & recharge gift cards, and view various reports related to gift card sales.
It is an exclusive service of our WooCommerce gift cards plugin, suitable for both offline and online stores. Note: The gifting portal only works for gift cards created using our plugin.
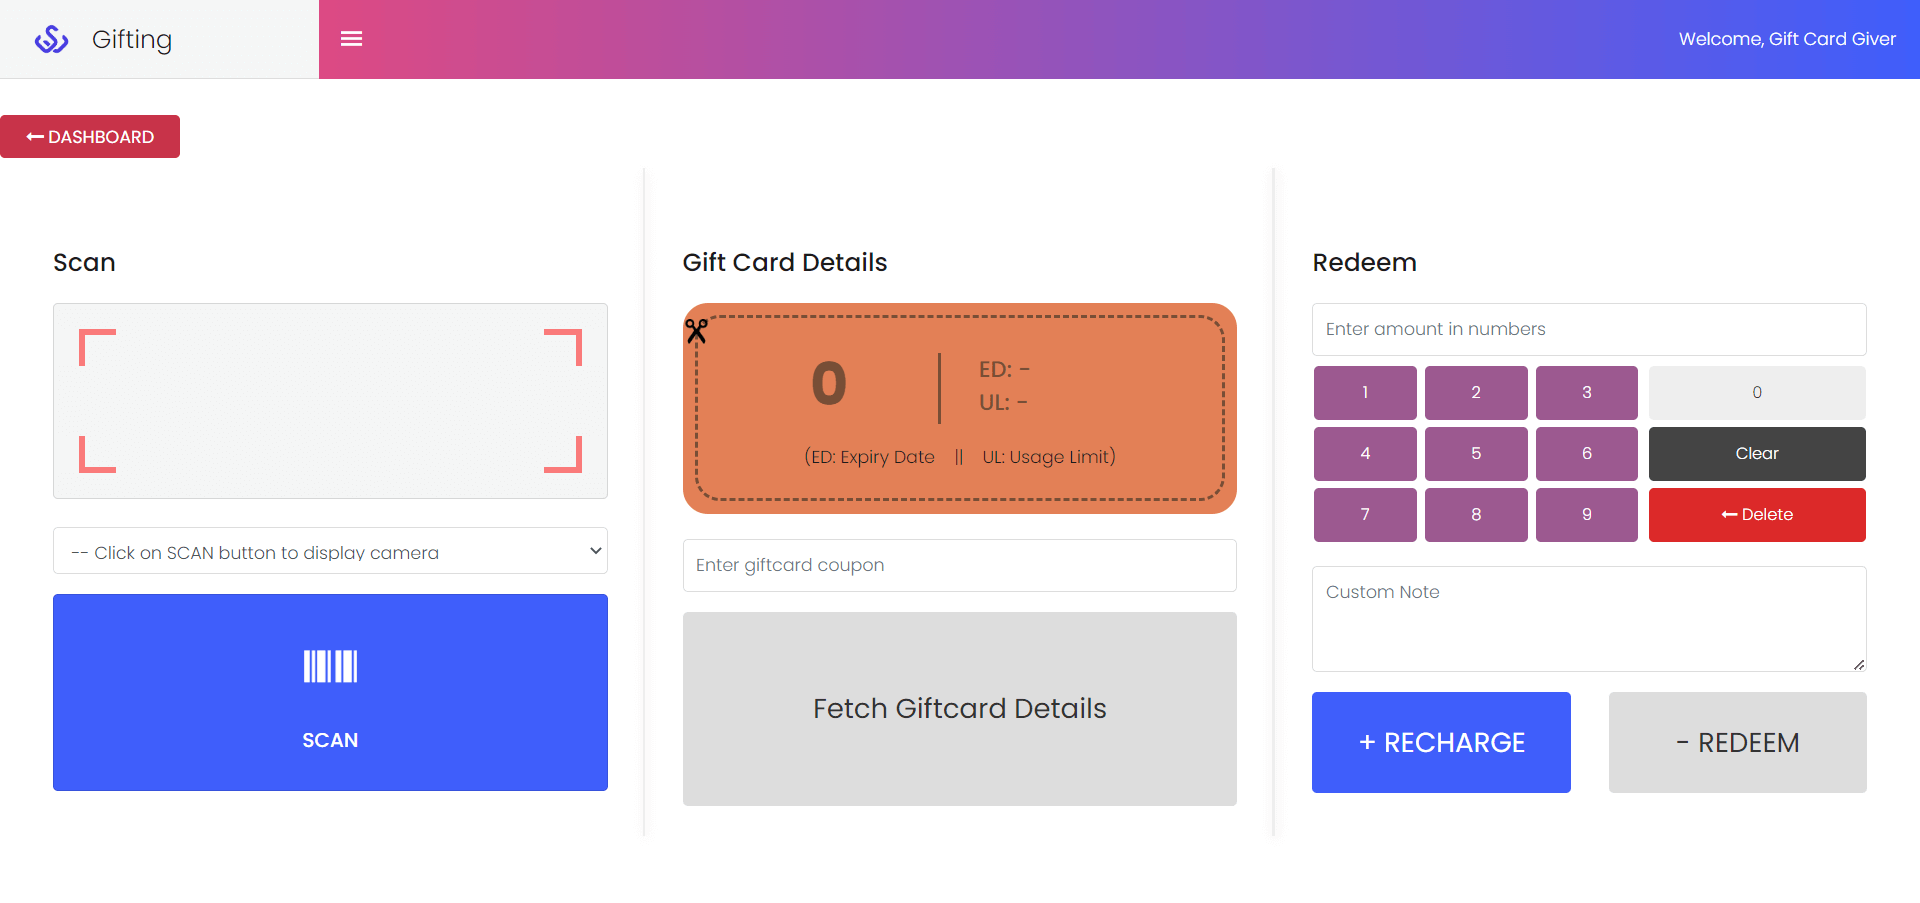
Step 6: Now go to the “DASHBOARD“, here you can start Scan/Fetch and Redeem/Recharge the gift card coupon. You can scan or enter the coupon code to fetch the detail of the Gift card and you can also redeem/recharge the Gift card coupon easily.
The dashboard distributed into 3 sections.
- Scan: Click on the scan button you can scan the Gift Card Coupon details.
- Gift Card Details: Here enter the Gift Card Coupon Code to fetch the details of the Gift Card. After entering the coupon code you can view all the details of the giftcard coupon like amount, expiry date, usage limits of the Gift Card Coupon, etc.
- Redeem: You can enter the amount to redeem the value from the Gift Card Coupon or add value to it.
To use the redeem link on this POS system, follow the steps below
- Copy the embed link and paste it on any page at POS.
- Login using the credentials given in the received email.
- Start Scan/Fetch and Redeem/Recharge.
18.1.Open Shop
You can open the front-end panel to scan QR/Bar codes, fetch details from coupon codes, and redeem & recharge gift cards. Also, you can add a custom note while editing the gift card value. This panel works for both online and offline stores.
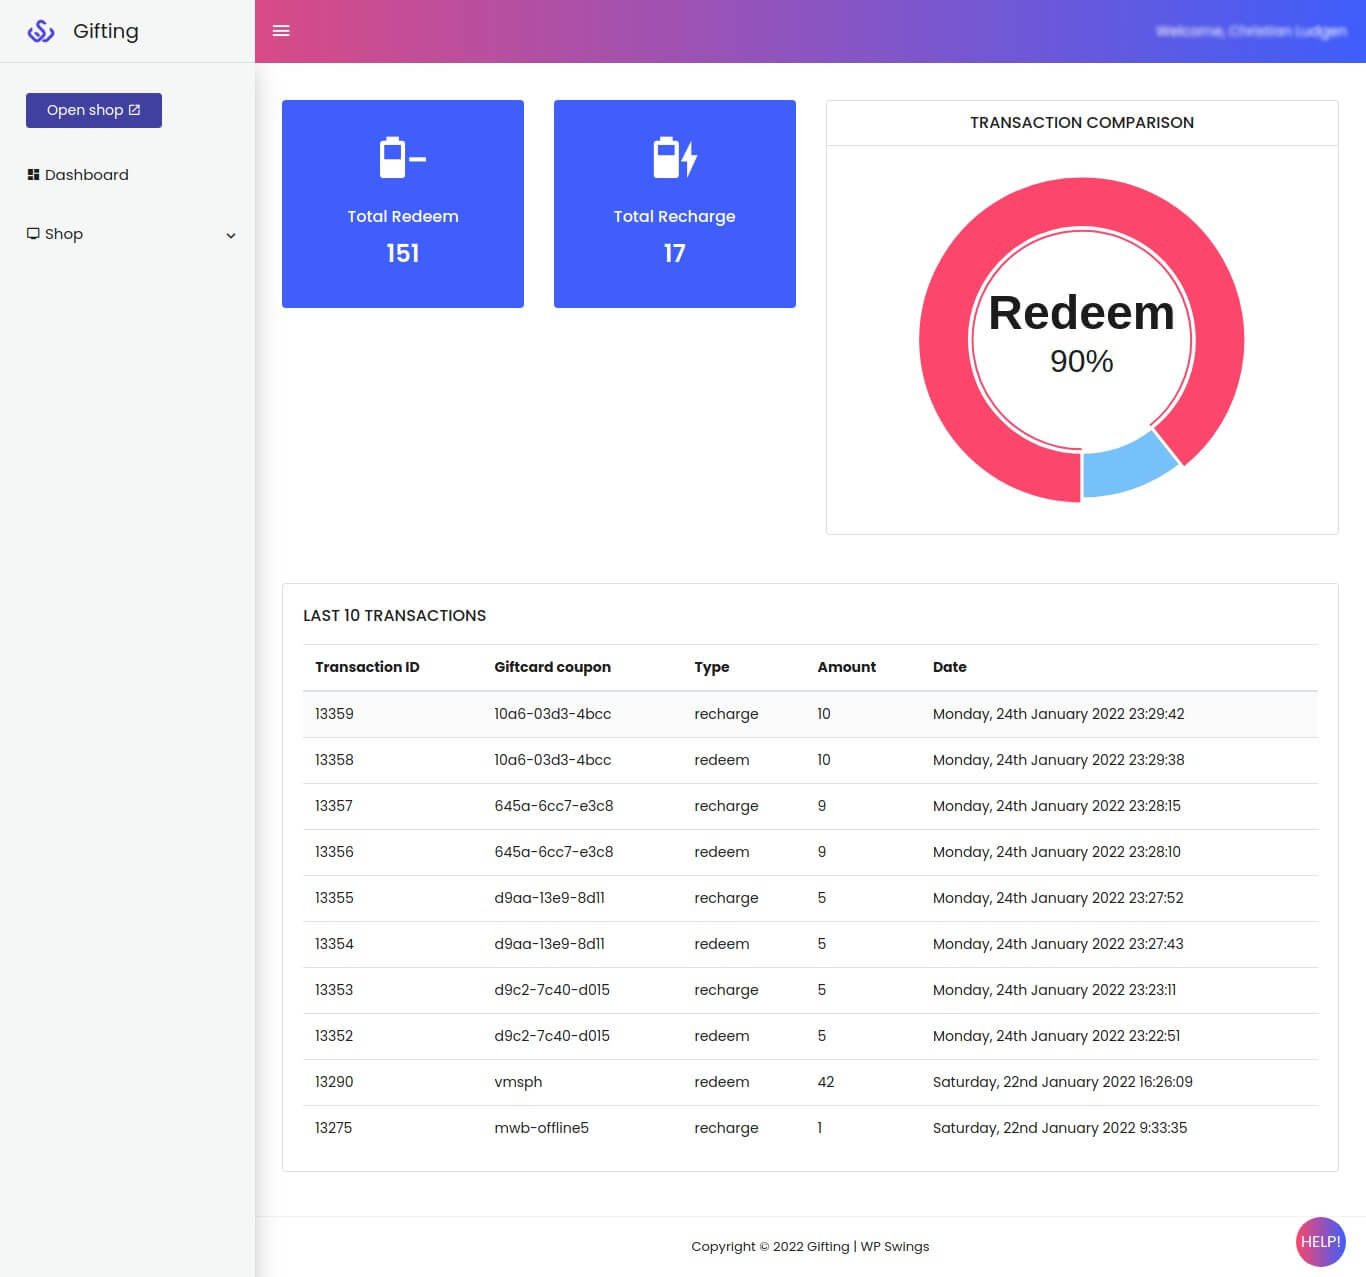
18.2.Dashboard
The dashboard shows an overview of the gift portal usage with Total Redeem, Total Recharge, and Transaction Comparison data. You can access the Dashboard from the admin menu on the left panel.

- Total Redeem: Number of gift cards you’ve redeemed.
- Total Recharge: Number of gift cards you’ve recharged.
- Transaction Comparison: Show the percentage of gift card redemption and recharge compared to the total transactions.
18.3.Shop
The shop settings tab allows you to configure gift card usage, view reports, give access control to your employees, and add new stores to the gifting portal.
18.4.Gift Card Settings
You can set the basic gift coupon usage limits using the settings tab.
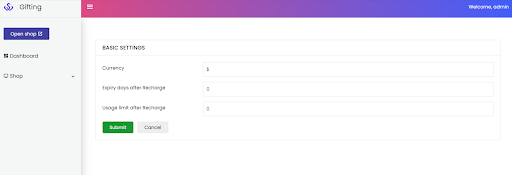
Follow these steps to edit the settings:
- Currency: Enter the currency symbol to change the operational currency of your gifting portal.
- Expiry Days After Recharge: Set the number of days after which a recharged gift card will expire.
- Usage Limit After Recharge: Enter the limit of gift card redeem limit of recharged gift card.
These settings will apply globally to all your recharged gift cards. So, click on Submit to implement your changes.
18.5.Gift Recharge Report
In the Recharge Report tab, you can view a detailed report of gift card recharge according to date, store, and employee.
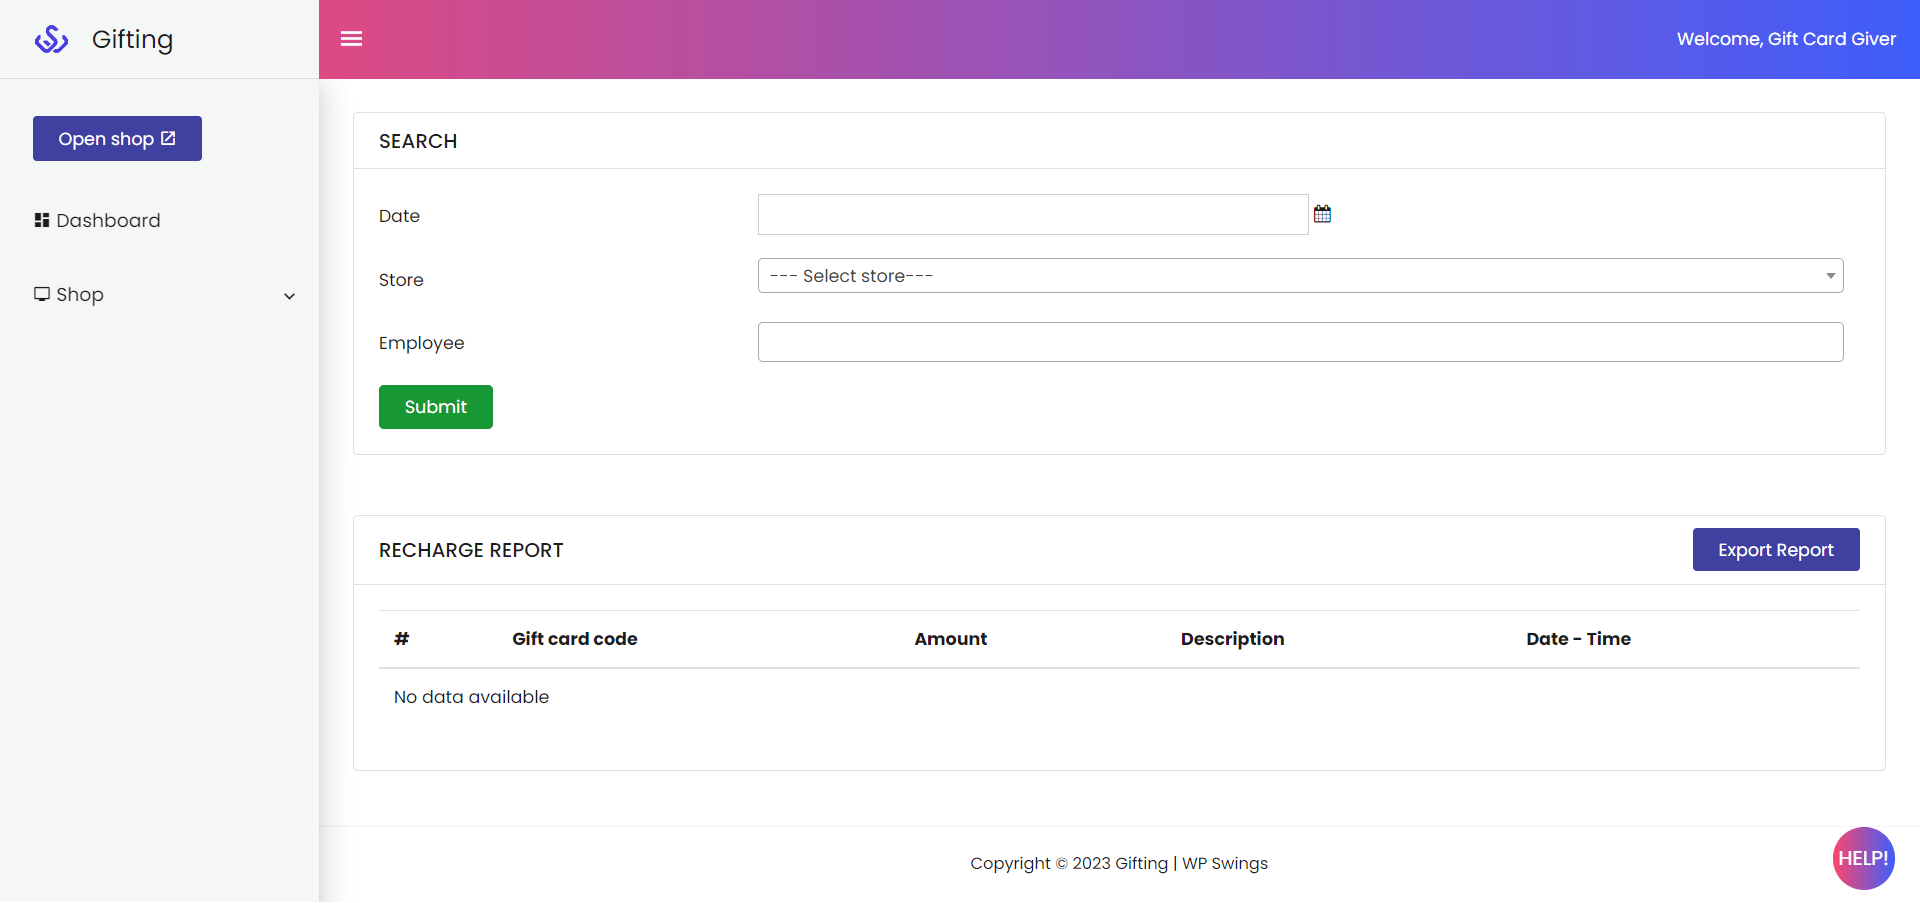
SEARCH From the Search section, you can filter the gift card recharge report by following these steps:
Date: Select a Date Range for the gift card recharge report. For example, This Month, Last Month, or Custom Range.
Store: Select a store from the ones registered on the gifting portal.
Employee: Select from the employees you’ve given access to the gifting portal. And click on the Submit button to render the report.
The fetched data will display in the Recharge Report table.
18.6.Gift Card Redeem Reporting
The Redeem Report Table contains data regarding all gift card redemptions carried out by you across all stores.
You can filter out the report using the following steps:
SEARCH
- Date: Select a Date Range for the gift card redemption report. For example, This Month, Last Month, or Custom Range.
- Store: Select the store whose redeem report you want to fetch.
- Employee: Select the employee who has access to redeem gift cards. Click on the Submit button to generate the report.
18.7.Add Multiple Stores
The Stores tab contains the list of stores you’ve registered on the gifting portal. You can edit, delete, or add new stores.

To edit the details of an existing store, follow these steps:
- Click on the edit button.
- Enter the required details you wish to change.
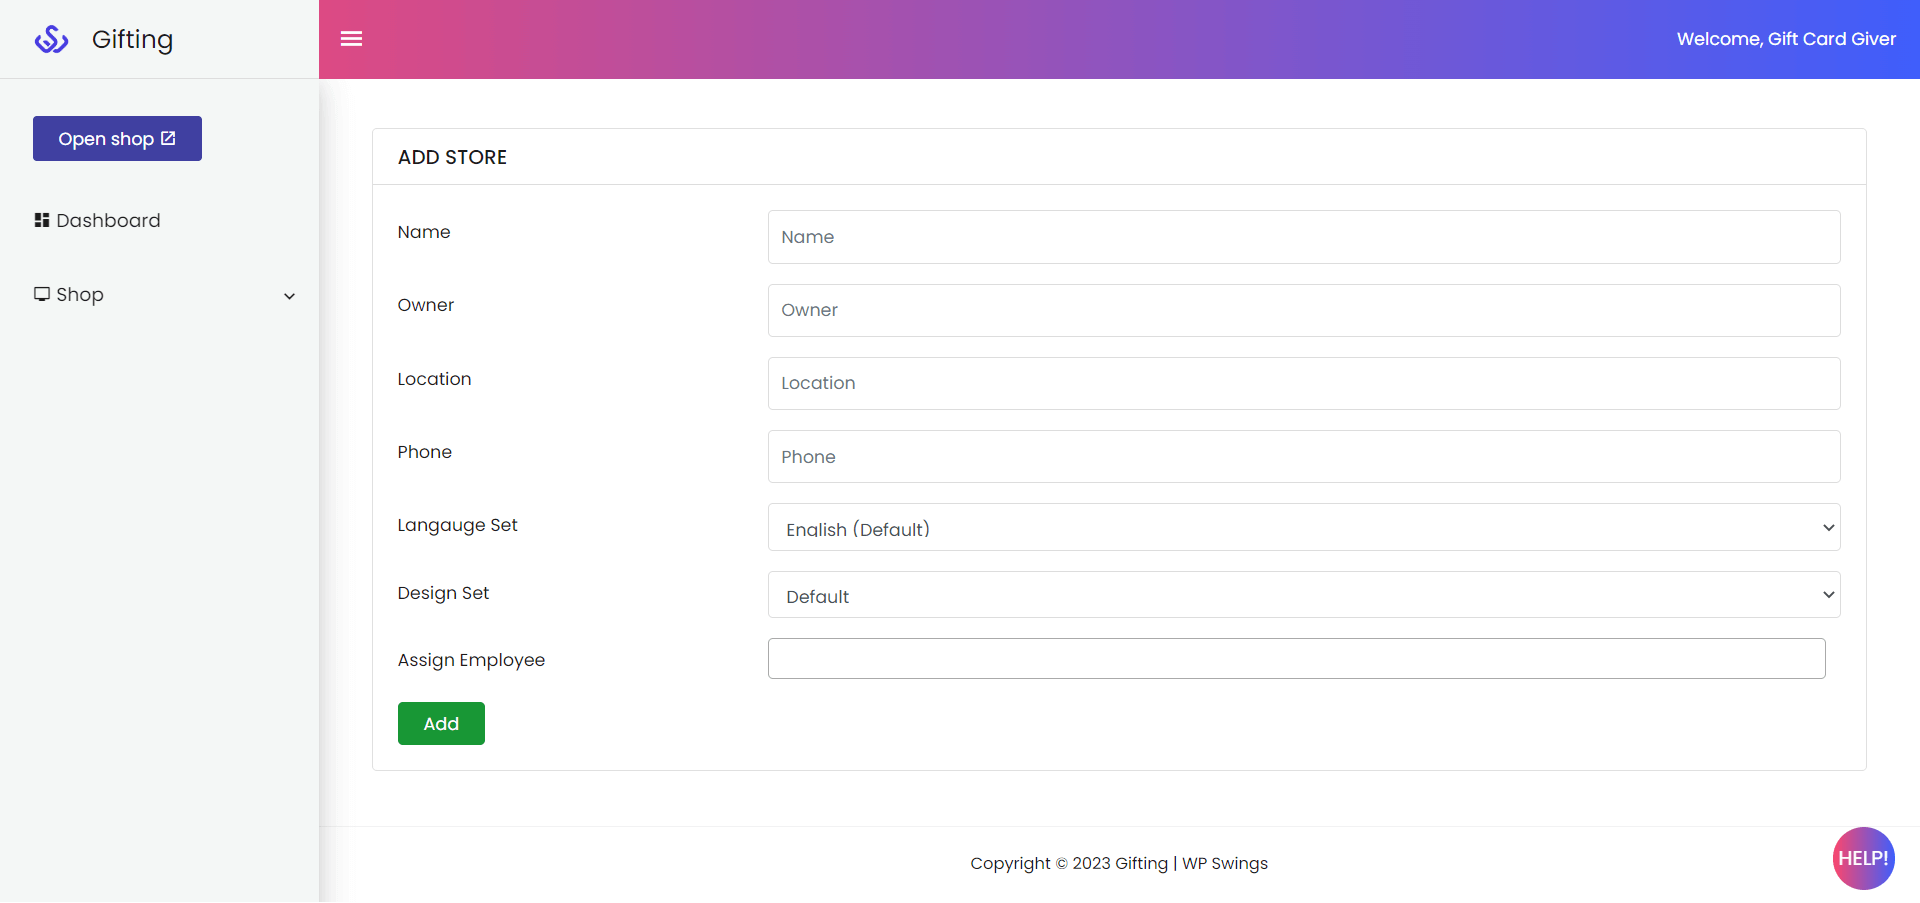
- You can edit the details like Name, Owner, Location, Phone, Language Set, Design Set, and Assign Employee.
- Click on the Update Button to save your changes.
To delete a store, follow these steps:
- Go to the Action Column of YOUR ALL STORES table.
- Click on the Delete button and confirm.
To add a new store:
- Click on Add Store button
- Add all the required information in the fields
- Lastly, hit the Add button
18.8.Add Unlimited Employees
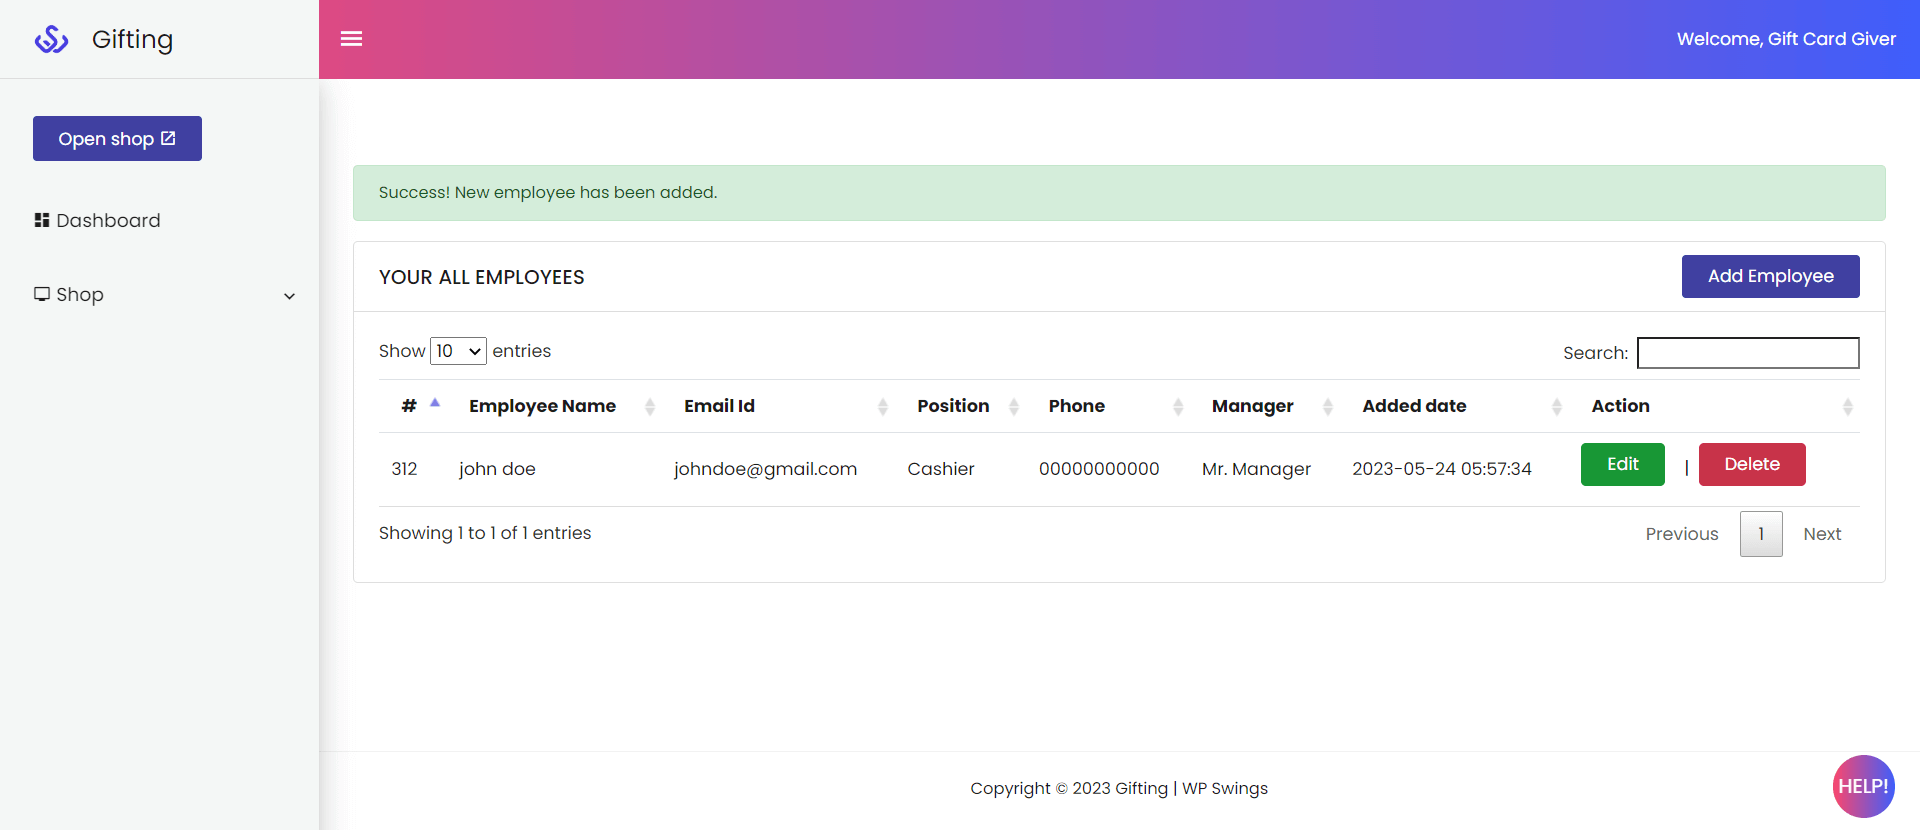
The Employee table has the following columns: Serial No., Employee Name, Email ID, Position Phone, Manager, Added Date, and Action.
Follow these steps to add a new employee:
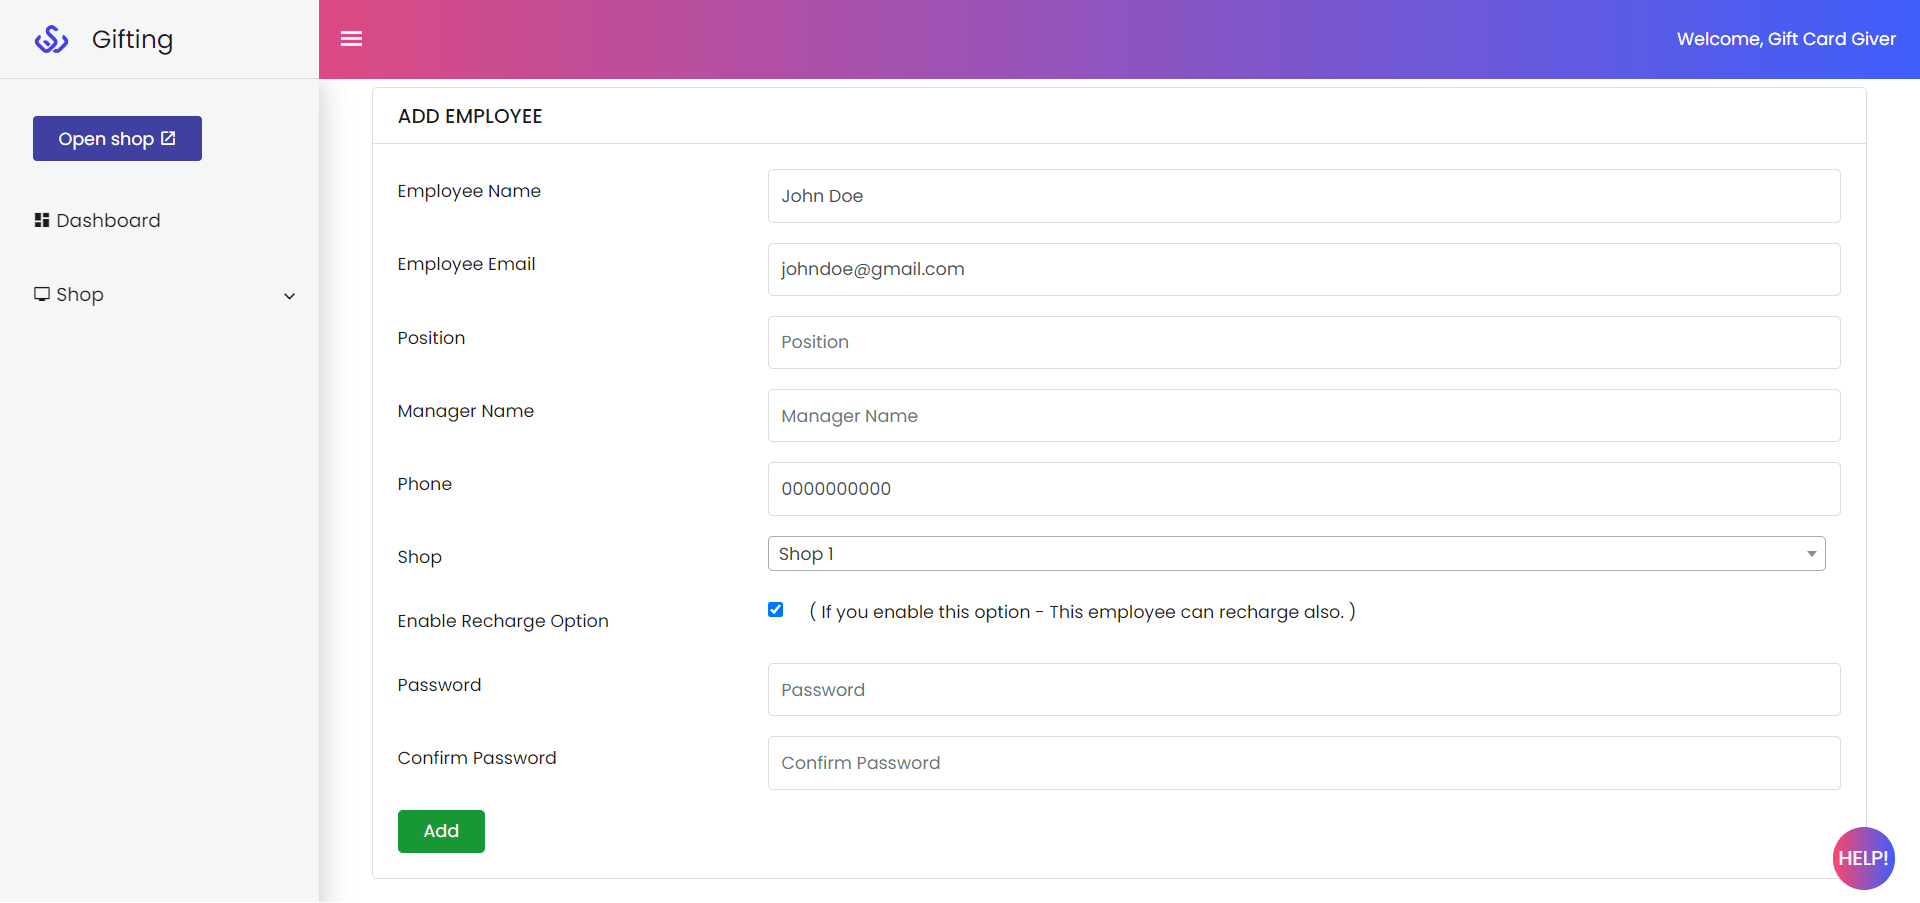
- Click on the Add Employee button.
- Enter the following details: Employee Name, Email, Position, Manager Name, Phone, Shop, Password and Confirm Password.
At last, click the Add button to give access to the new employee.
19.Notification
Enable WhatsApp Sharing
This setting allows your user to send the Gift card coupon details via WhatsApp to their recipient.
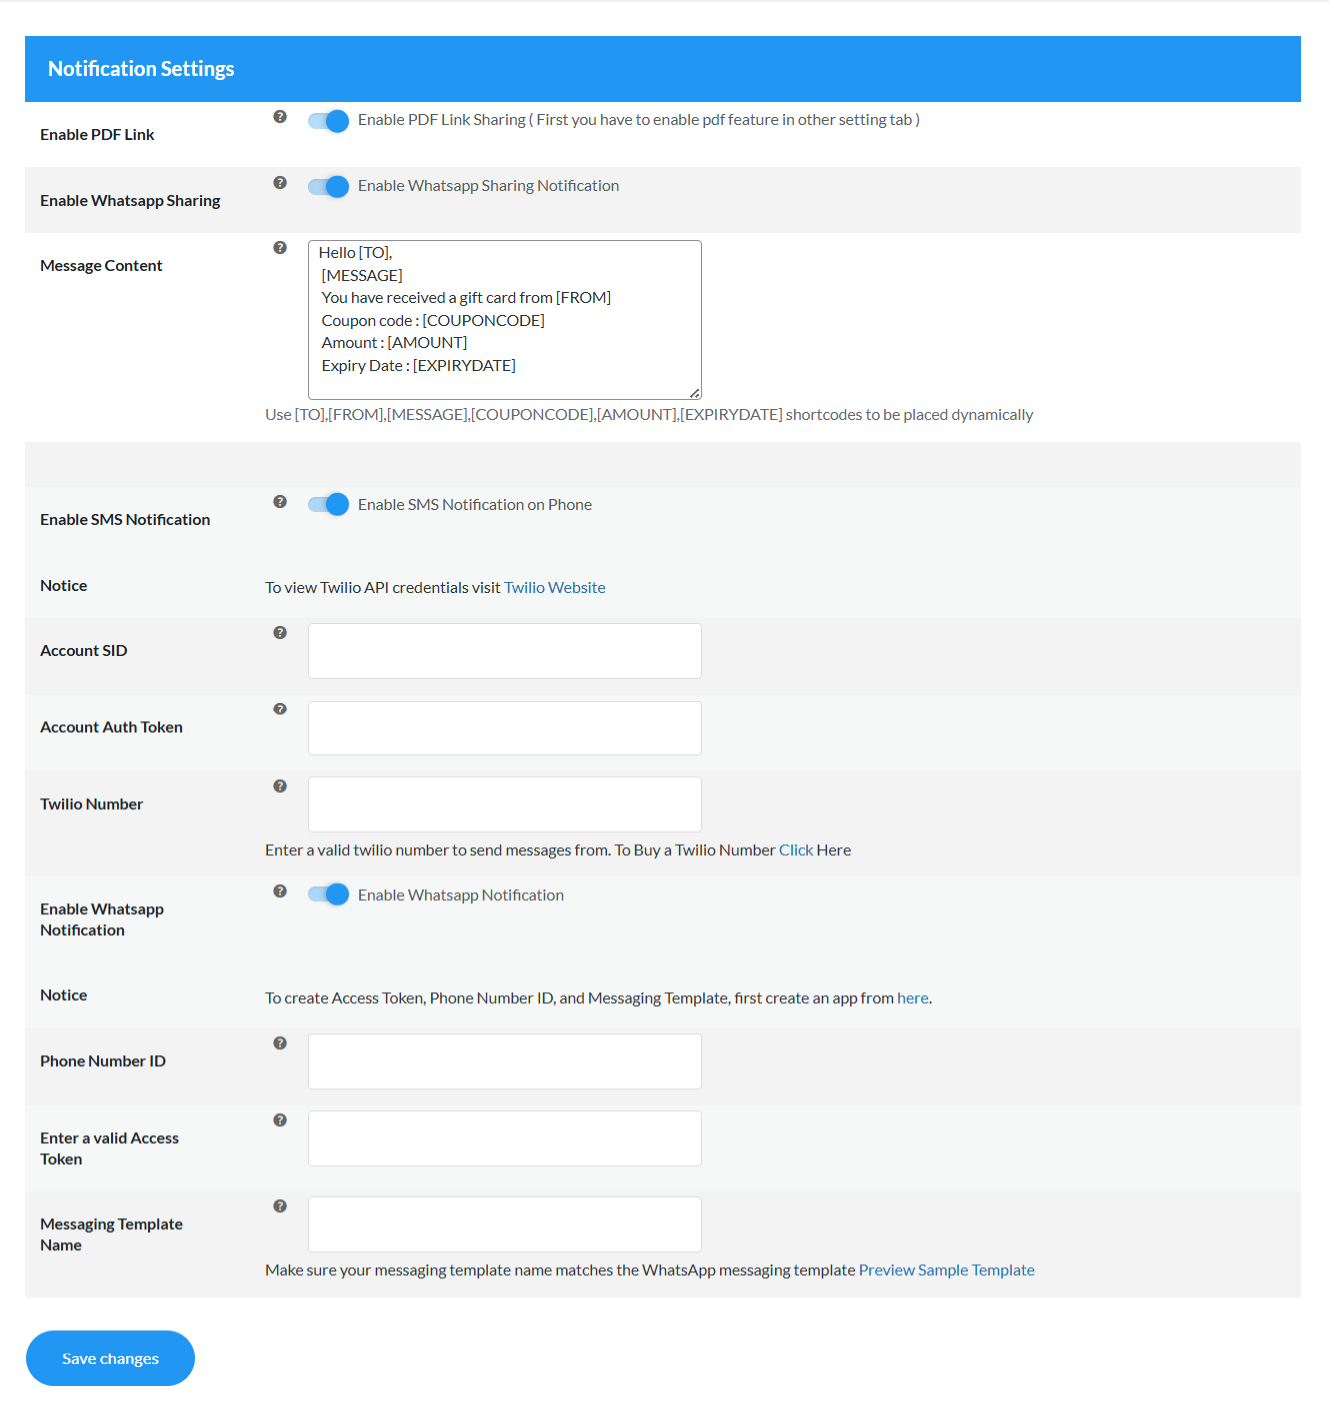
- Enable PDF Link: Click on this checkbox to share the ultimate gift card in PDF format through the PDF link on WhatsApp
- Enable WhatsApp Sharing: Through this setting, the admin can enable the WhatsApp sharing of Gift card Details.
- Message Content: Enter the content for the WhatsApp notification by using the specific shortcodes.
Use [TO] shortcodes as the name of the sender, use [FROM] shortcodes as the name of the receiver, use [MESSAGE] shortcodes for the gift card message, use [COUPONCODE] shortcodes as the coupon code, use [AMOUNT] shortcodes for the gift card amount, use [EXPIRYDATE] shortcodes as the expiration date of the gift card to be placed dynamically. And the last click on the save setting button.
After successfully saving the setting by the admin, the customer can see the ‘share on WhatsApp’ button on the order details page. Using this button they can share Gift Card details to their recipient directly via personal WhatsApp amount.

Enable SMS Notification
This setting allows your user to send the Gift card coupon details via message to their recipient.
To enable this setting first you have to fill out the Twilio Account credentials, If you don’t have a Twilio Account, visit the Twilio Website and create an account by clicking on the given link.
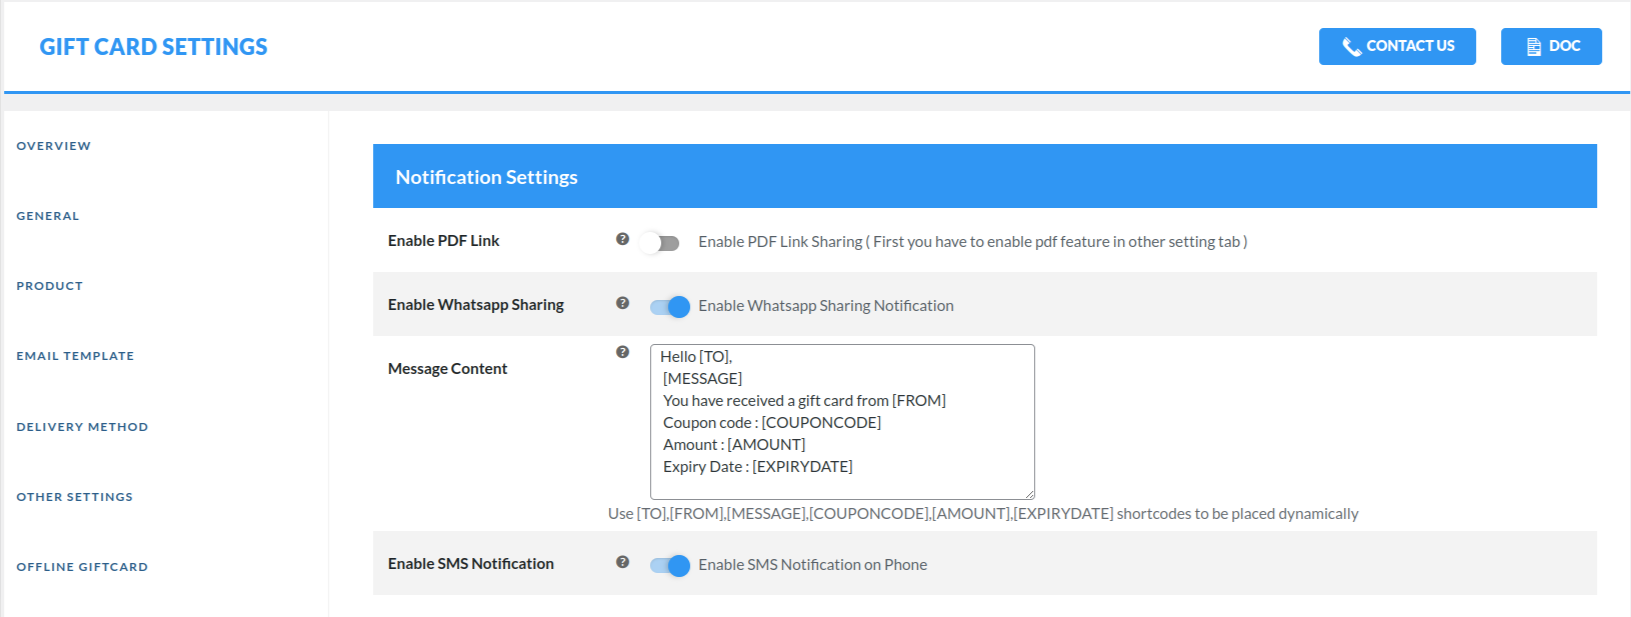
- Enable SMS Notification: Click on the checkbox to enable this setting.
- Account SID: Enter your Twilio Account SID.
- Account Auth Token: Enter your Twilio Account Auth Token.
- Twilio Number: Enter your Twilio Number.
After successfully saving the setting by the admin, the customer will be able to send the gift card coupon details via SMS to their recipient contact number.
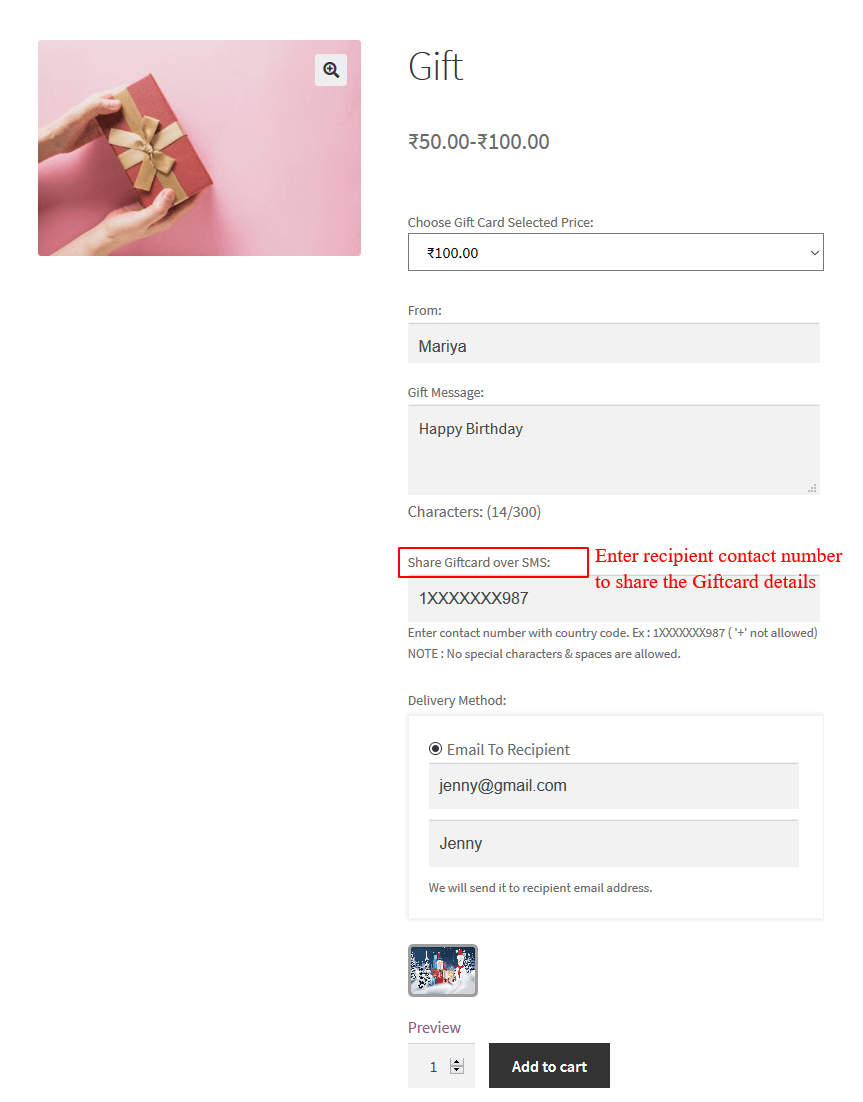
On the Add to the Cart page, customers can enter their recipient contact number to send the gift card coupon details after placing the order.
Enable WhatsApp Notification
Gift Cards Pro plugin lets you send gift card details to customers via WhatsApp notifications. With easy setup, you can quickly share personalized gift card details.
In the notification tab find the option to enable WhatsApp Notification, simply toggle this setting to activate WhatsApp notifications for your customers.
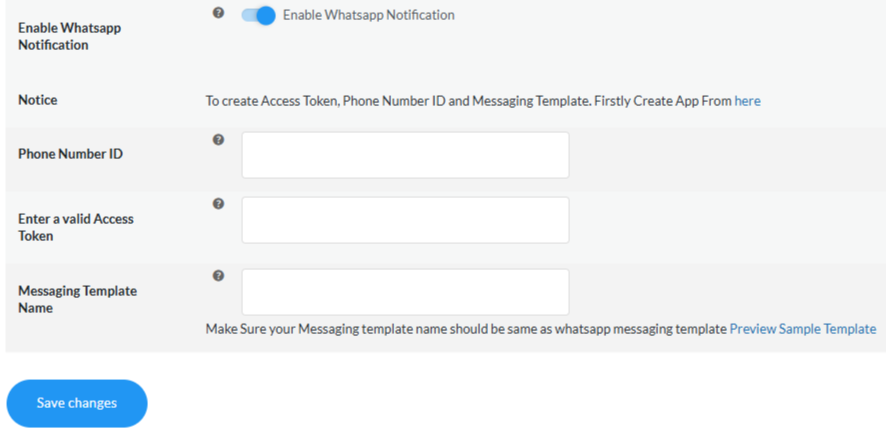 Enter Access Token: You need to enter your Access Token to integrate WhatsApp with your gift cards site. This token can be obtained from the Facebook Developer Dashboard after creating an account. Let’s see how to do it…
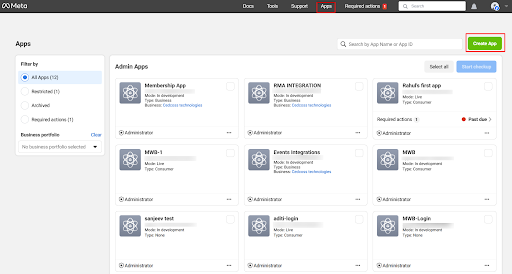 After creating your account on the Facebook Developer Dashboard, navigate to the Apps section from the top bar and create a new app.
 Fill out the required fields in the multi-step form based on your needs. Once completed, your new application will be set up, and you will be redirected to the application dashboard.
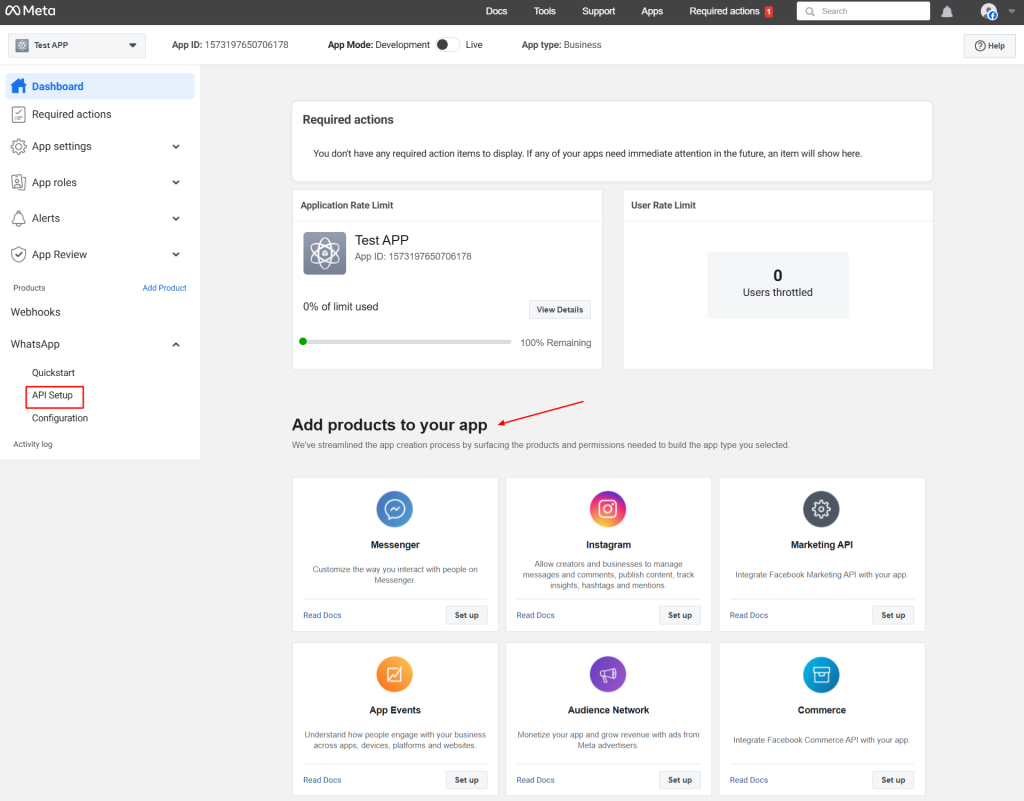 On the left sidebar, locate the WhatsApp section and click on API Setup. If you don’t see the WhatsApp option, you can easily add it from the Product section below with a single click.
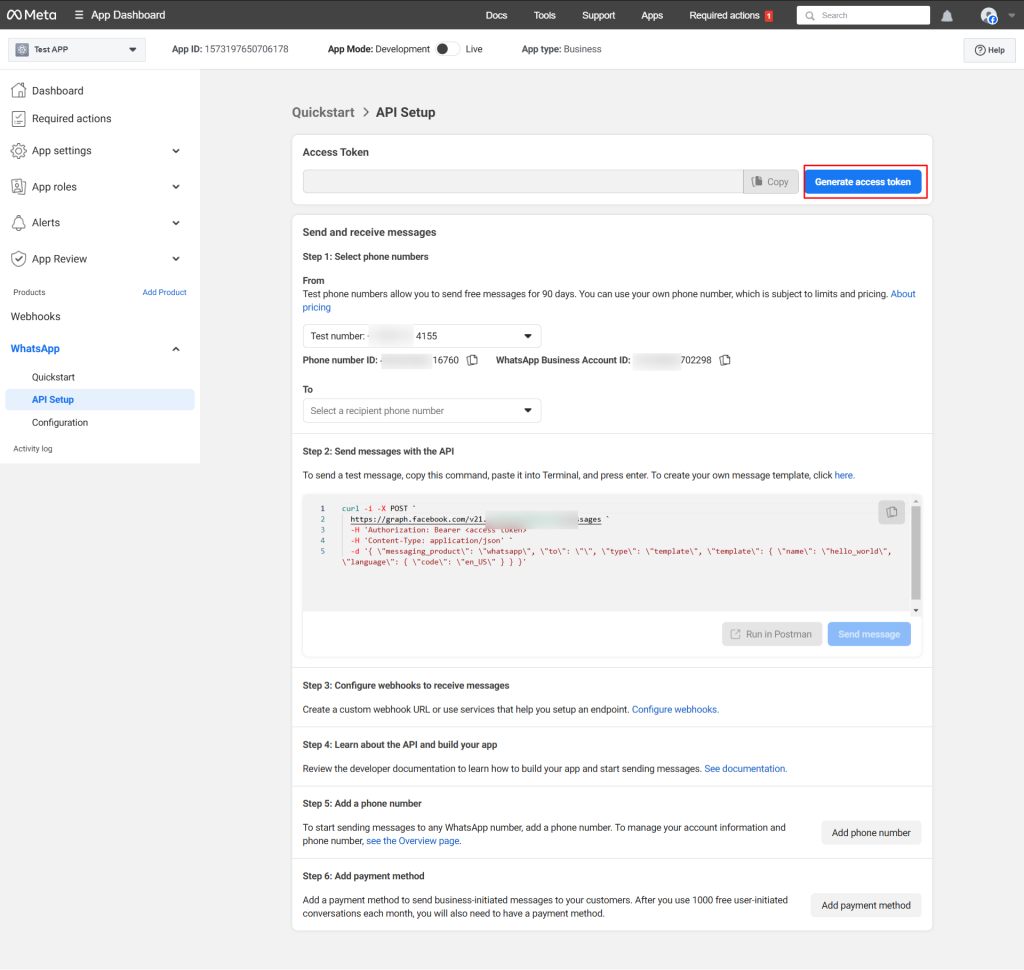 Inside the API Setup section, click on the Generate Access Token button. A pop-up window will appear, prompting authentication. Once authenticated, your Access Token will be generated and ready for use.
Once you have generated your Access Token, copy it and paste it into the Enter Access Token field in the plugin
Next, locate your Phone ID in the developer dashboard. As shown in the screenshot below (with some details blurred for security purposes).
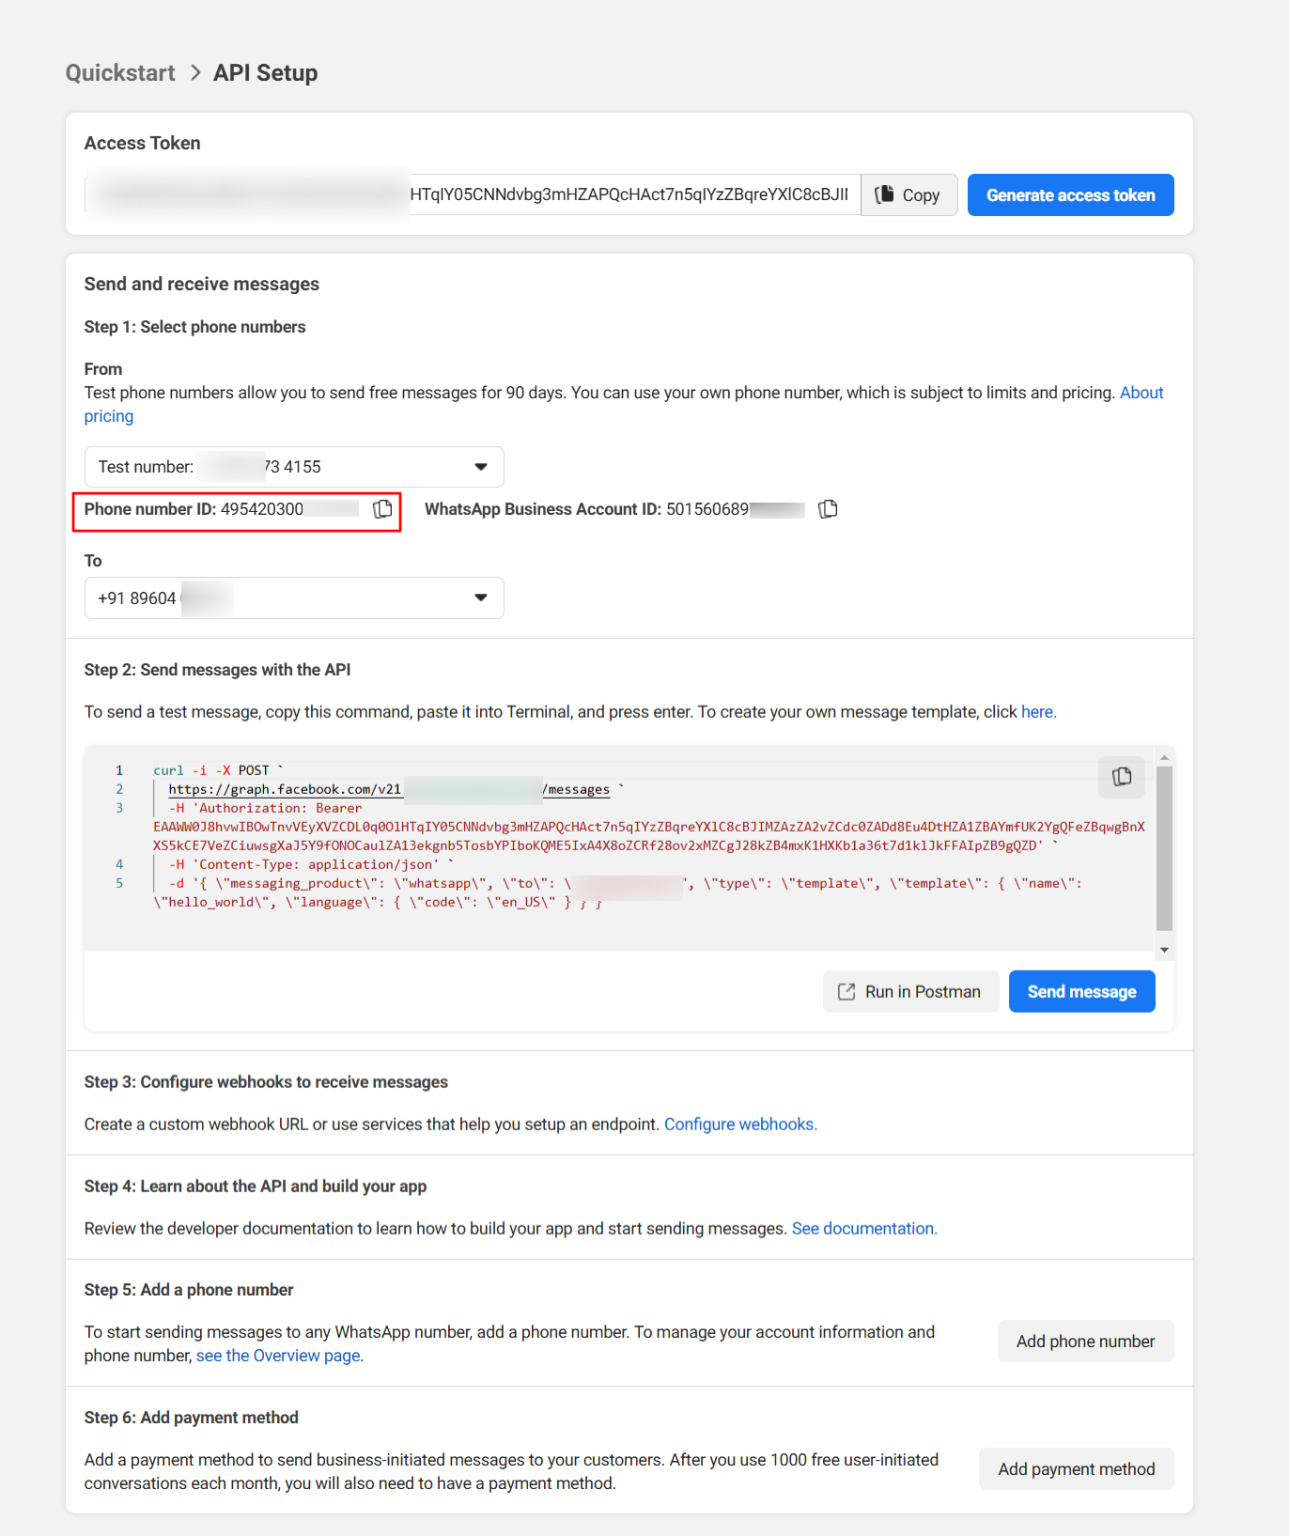 Copy the Phone ID and paste it into the Phone ID section of the plugin.
After completing these steps, the next step is to send a test message to verify that your WhatsApp configuration is working correctly. This will ensure that the integration is set up properly and ready for use.
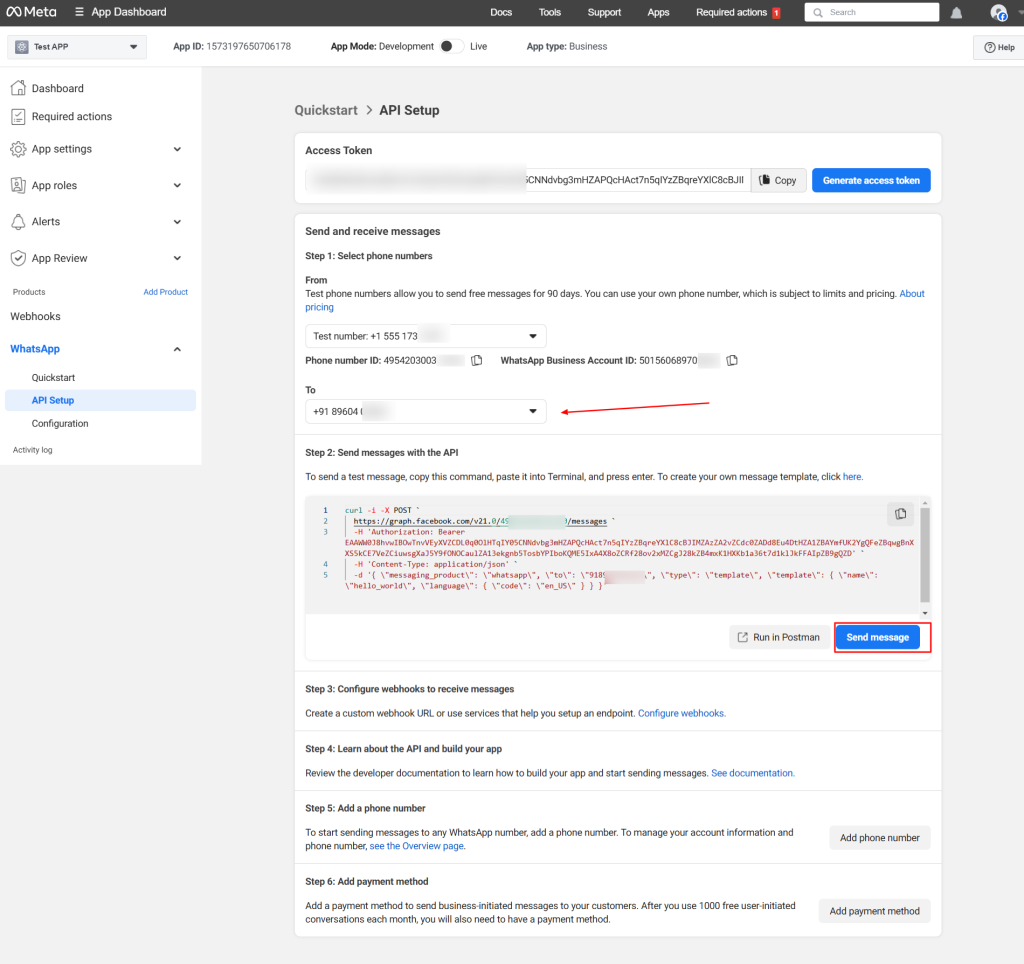 To verify your WhatsApp integration, enter the recipient’s phone number in the “To” section of the plugin. Then, click on the “Send Message” button.
If the configuration is correct, a message will be successfully sent to the recipient using the default template.
The next step is to create a WhatsApp Template for sending gift card details to your members.
 1. To create a WhatsApp template, follow these steps:
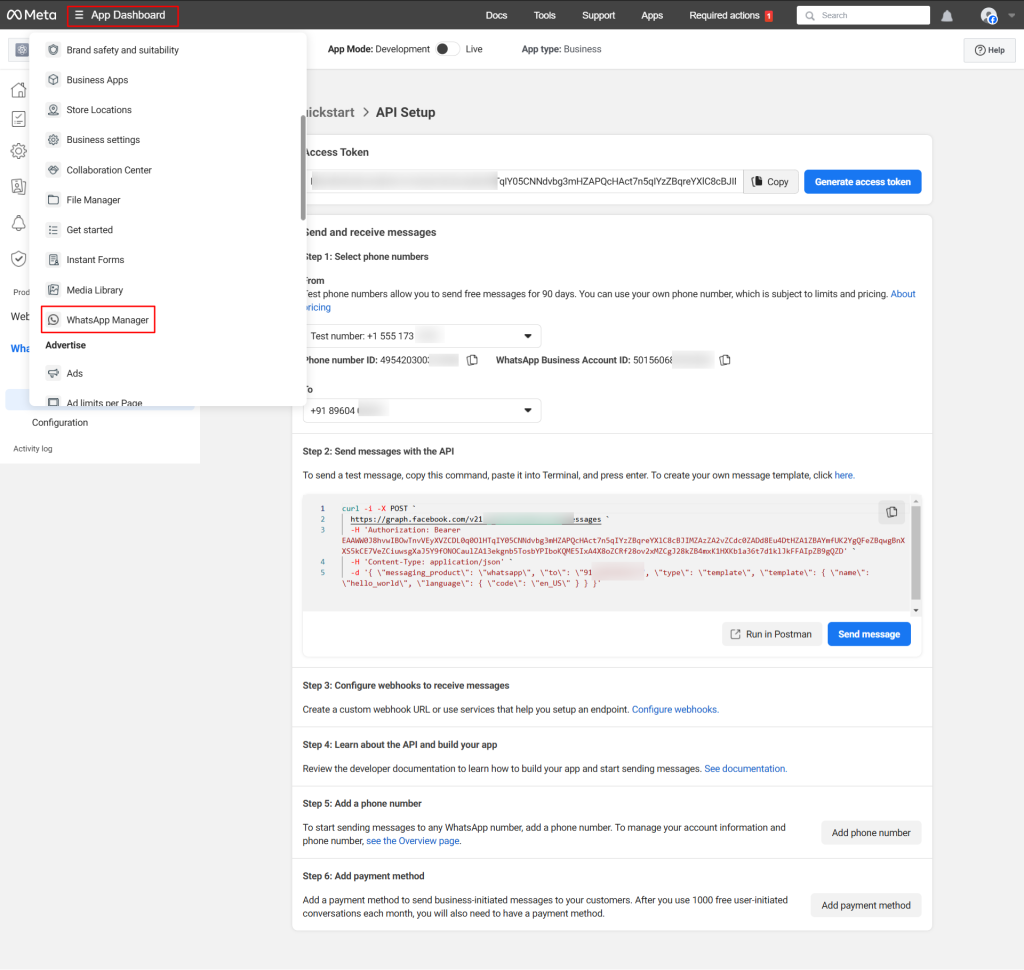
- Access WhatsApp Manager
- Navigate to the App Dashboard from the top left corner.
- Under the dashboard, click on WhatsApp Manager.
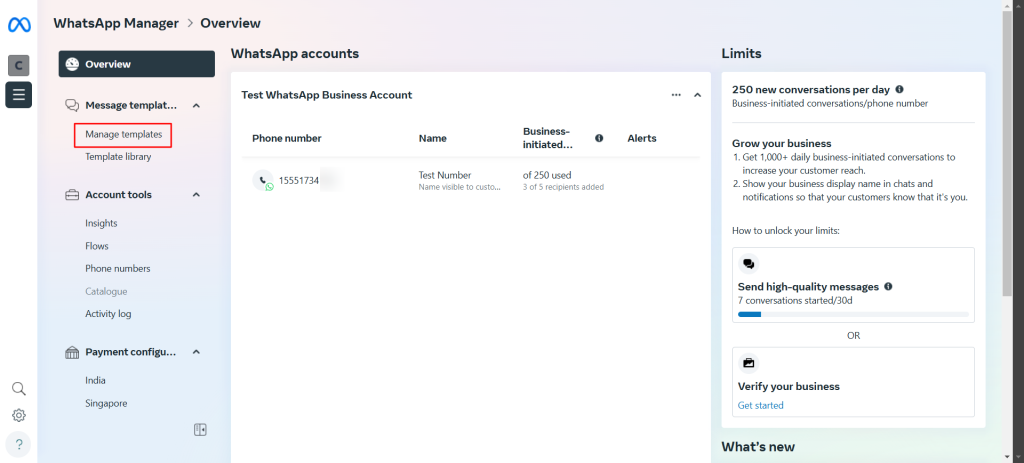 2. Manage Templates
- In the WhatsApp Manager, click on Manage Templates to view a list of previously created templates (if any exist).
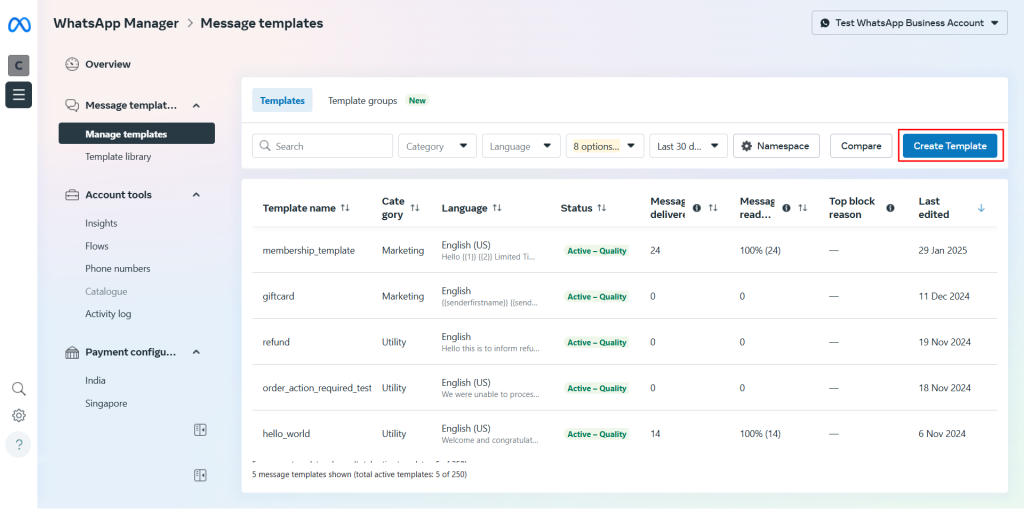 3. Create a New Template
- Click on the Create Template button.
In the screenshot below, you can see an example of a WhatsApp template.
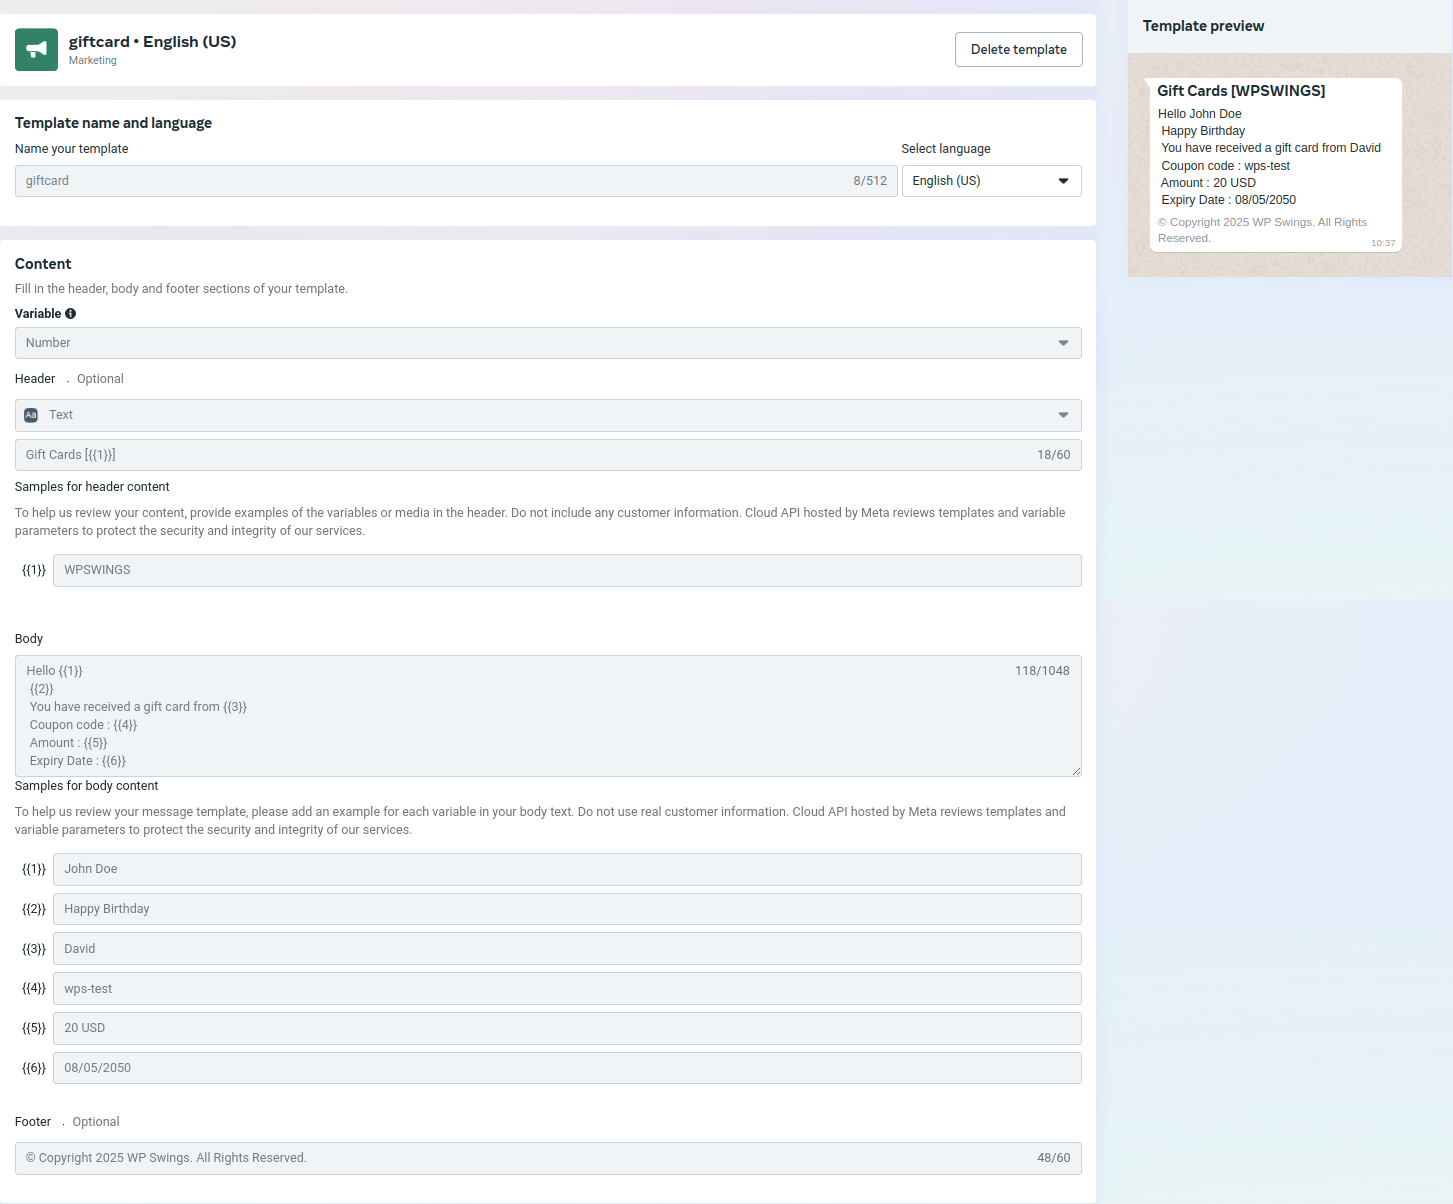 While creating your template, you can define the subject and body content, using placeholders for dynamic data.
- {{1}} will be replaced with the customer’s name.
- {{2}} will be replaced with the body content of the message.
- You can add additional placeholders for any other details you want to personalize.
Once you’ve customized your template, click the Submit for Review button in the top right corner. The Facebook review team typically takes around 24 hours to approve the template.
Once approved, your template will be active and ready to use.
Now, you are ready to send notifications to your members.
20.Rest API For Gift Cards
Base Url for accessing Gift Card Coupons : {home_url}/wp-json/api/v1/giftcard/
Click on the Generate API Key to Generate your consumer-key and consumer_secret key.

Authentication
For authentication, you need Consumer Key consumer_key and Consumer Secret consumer_secret keys.
Response on wrong API details
{
“code”: “rest_forbidden”,
“message”: “Sorry, your key details are incorrect.”,
“data”: {
“status”: 401
}
}
Retrieve GiftCard Coupon Details
POST {home_url}/wp-json/api/v1/giftcard/coupon-details
Required Parameters: consumer_key, consumer_secret, coupon_code
JSON request example:
{
“consumer_key”:”XXXXX”,
“consumer_secret”:”XXXXX”,
“coupon_code”:”wps-uwsqb”
}
JSON response example:
{
“code”: “success”,
“message”: “There is Giftcard Coupon Details”,
“remaining_amount”: “10”,
“discount_type”: “fixed_cart”,
“usage_count”: 2,
“usage_limit”: 10,
“description”: “GIFTCARD ORDER #491”,
“coupon_expiry”: “15/05/2025”
}
Gift Card Coupon Redeem
POST {home_url}/wp-json/api/v1/giftcard/redeem-coupon
Required Parameters: consumer_key, consumer_secret, coupon_code, redeem_amount
JSON request example:
{
“consumer_key”:”XXXXX”,
“consumer_secret”:”XXXXX”,
“coupon_code”:”wps-uwsqb”,
“redeem_amount”:5
}
JSON response example:
{
“code”: “success”,
“message”: “Coupon is successfully Redeemed”,
“remaining_amount”: 12,
“discount_type”: “fixed_cart”,
“usage_count”: 3,
“usage_limit”: 10,
“description”: “GIFTCARD ORDER #491”,
“coupon_expiry”: “30/05/2024”
}
Gift Card Coupon Recharge/Update Details ( Coupon Amount, Coupon Expiry, Usage Count, Usage Limit )
POST {home_url}/wp-json/api/v1/giftcard/recharge-coupon
- Required Parameters: consumer_key, consumer_secret, coupon_code, recharge_amount
- Optional Parameters: coupon_expiry( in timestamp ), usage_count, usage_limit
JSON request example:
{
“consumer_key”:”XXXXX”,
“consumer_secret”:”XXXXX”,
“coupon_code”:”wps-uwsqb”,
“recharge_amount”:6,
“coupon_expiry”:”1717050604″,
“usage_count”:2,
“usage_limit”:10
}
JSON response example:
{
“code”: “success”,
“message”: “Coupon is successfully Recharged”,
“remaining_amount”: 18,
“discount_type”: “fixed_cart”,
“usage_count”: 2,
“usage_limit”: 10,
“description”: “GIFTCARD ORDER #491”,
“coupon_expiry”: “30/05/2024”
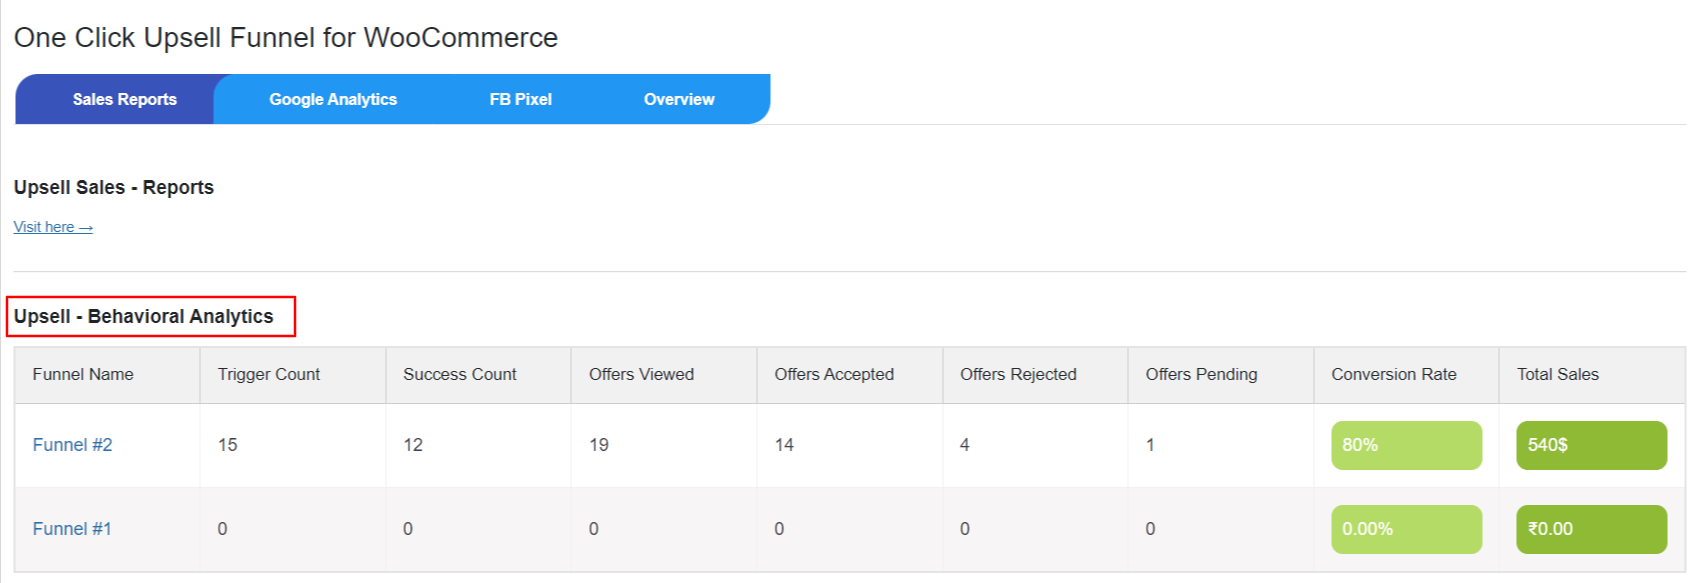
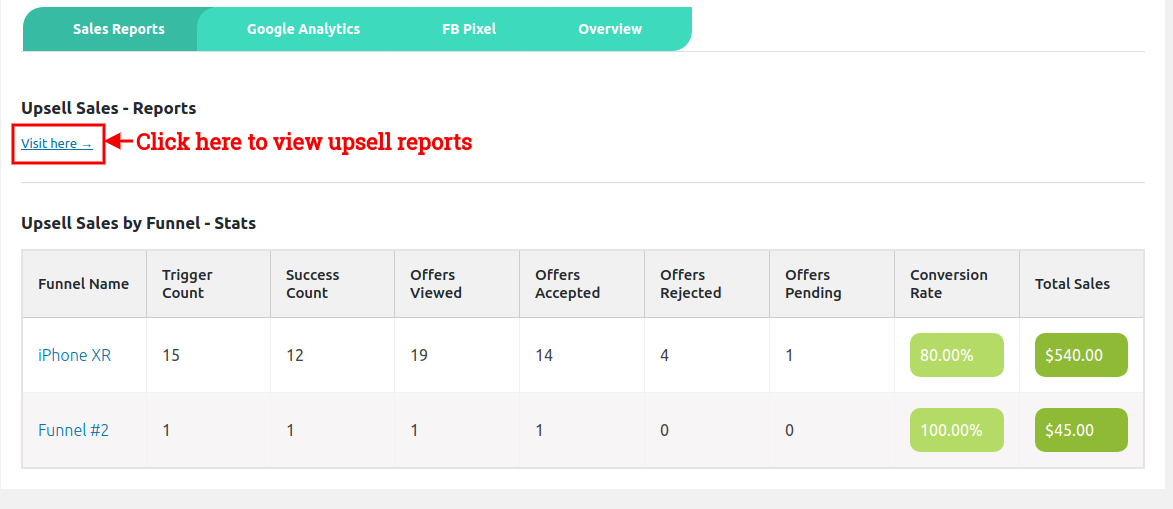
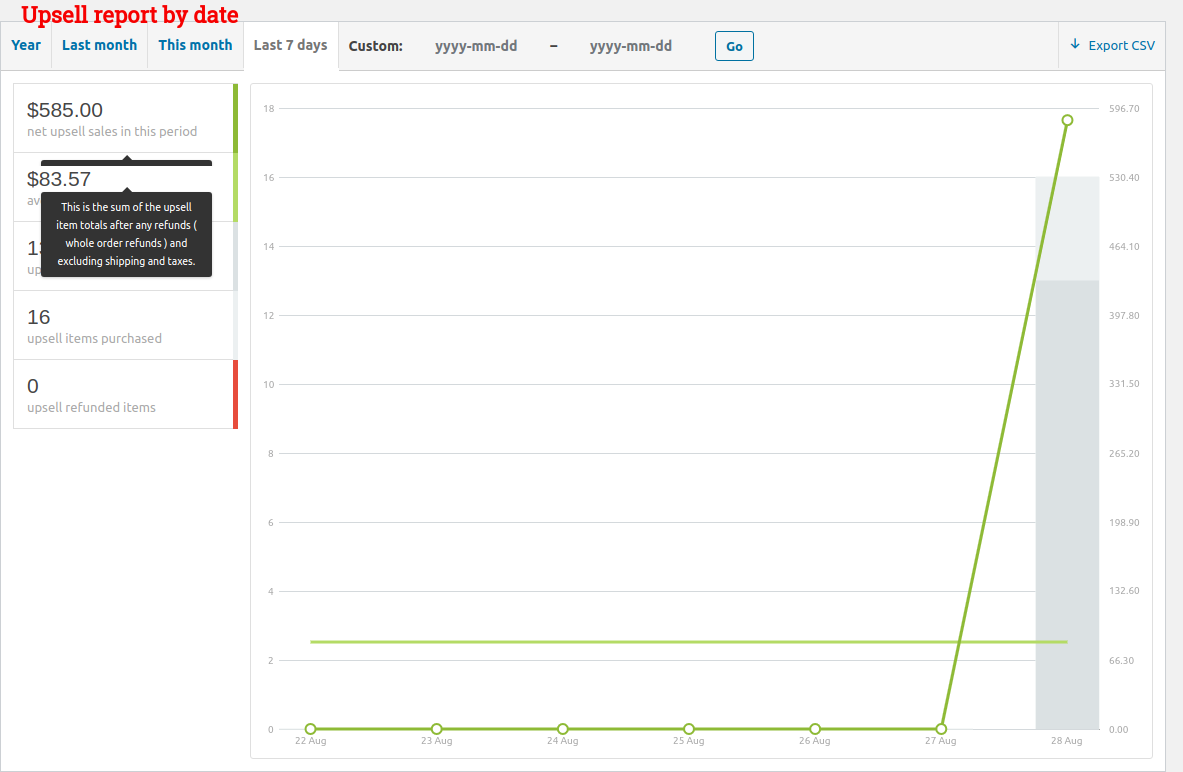
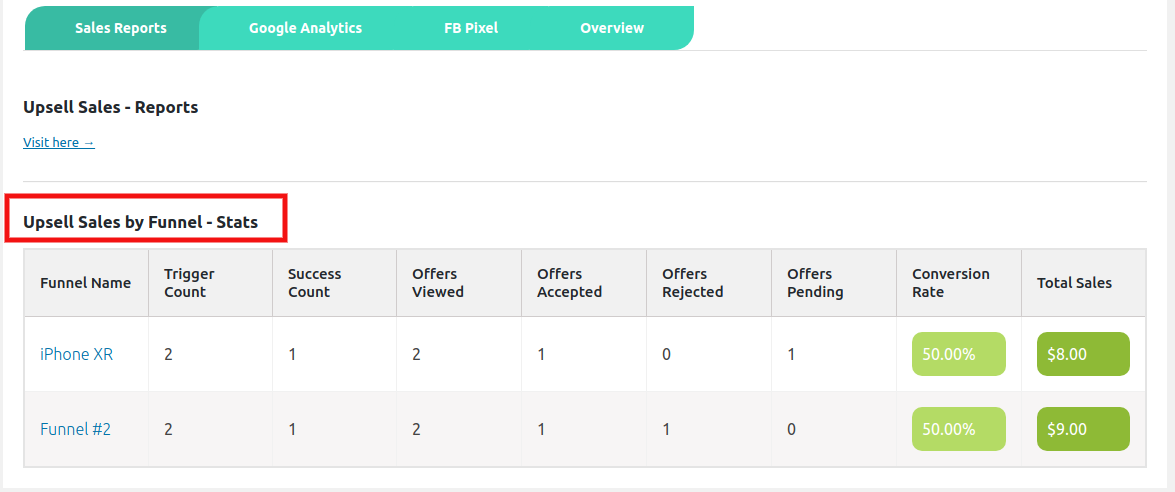
21.Reporting Gift card to the Admin
From now this WooCommerce gift voucher plugin provides reporting to the admin of all gift cards, There are two ways to view the report.
- Navigate to the dashboard click on the WooCommerce > Reports > Gift Cards. Here admin can view and edit the gift cards detail generated by the customers.
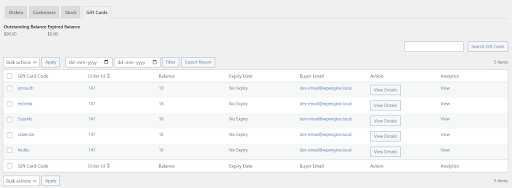
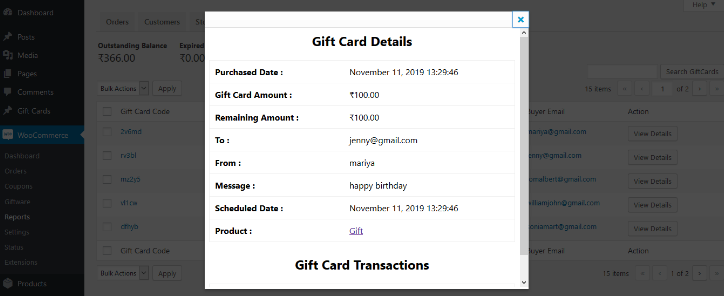
To view the complete description of the gift card click on the ‘View Details’ button of the specific gift card.
Here, the admin can see the full report of the gift card.
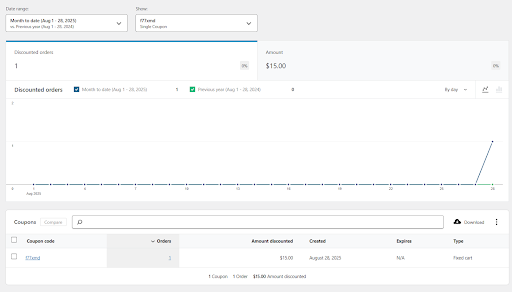
By Clicking on View on the Analytics Column you can see the detailed report for a specific coupon.
22.Compatibility with Points and Rewards For WooCommerce
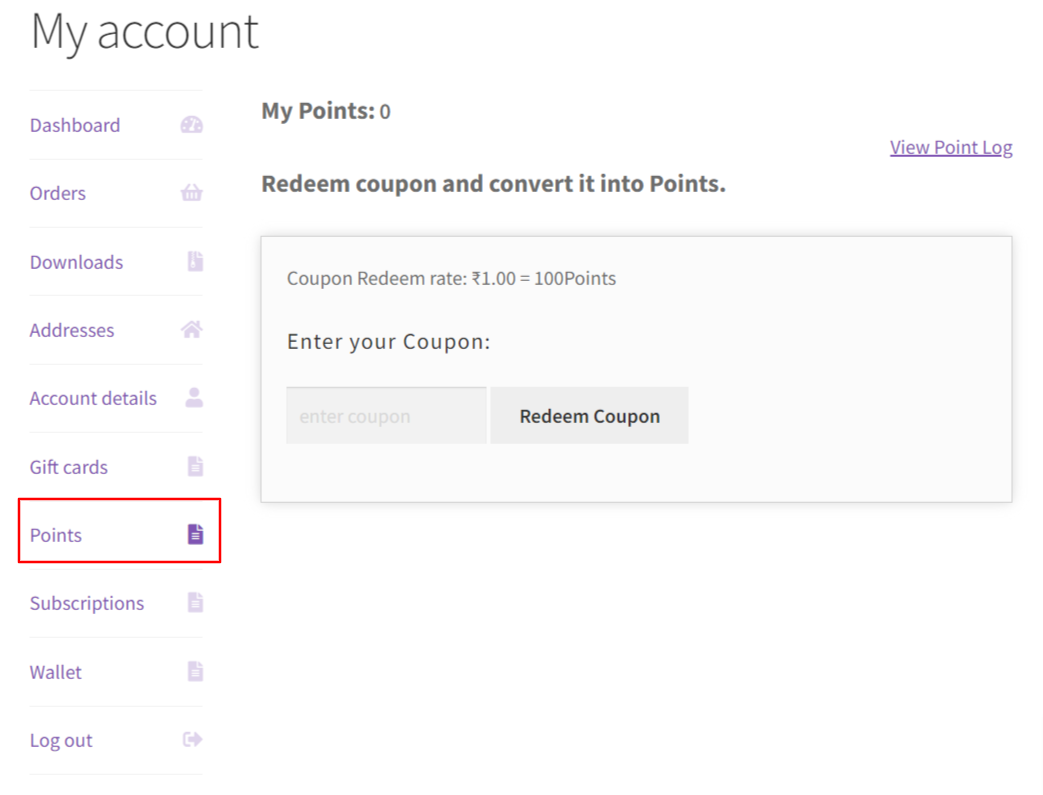
The Gift Card for WooCommerce Pro plugin is compatible with the Points and Rewards for WooCommerce plugin allowing your customers to convert the value of their gift card into points.
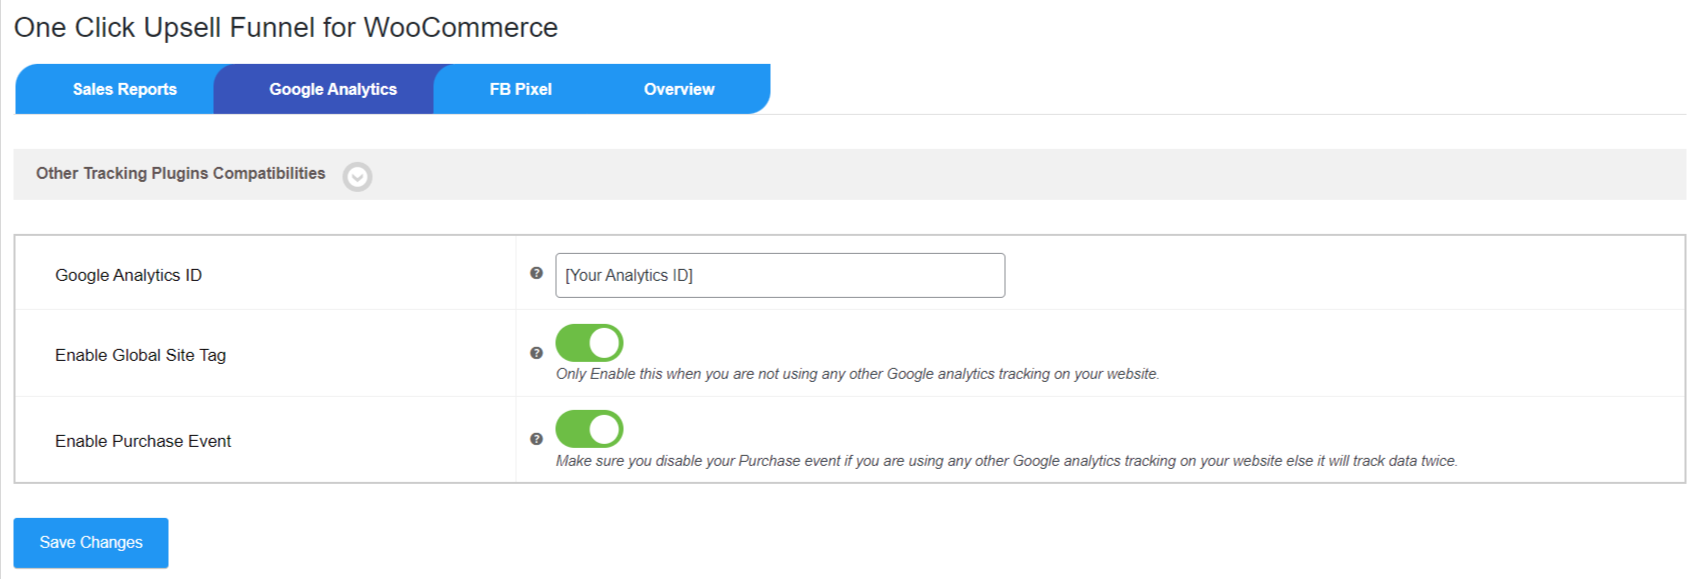
The admin can enable this feature and set the conversion rate by navigating to the GiftCards >> Settings >> Other Settings 
Then, the customers can convert their coupon into points by navigating to the My Account >> Points Section.
23.Compatibility With Subscription for WooCommerce Pro
The WooCommerce gift card plugin is compatible with the Subscriptions for WooCommerce Pro plugin. It enables you to leverage the following benefits:
a) You can allow users to use gift card coupons for subscription-related activities like the first signup fee discount, a signup percentage discount, and recurring discounts.
b) Use gift cards on existing subscriptions for renewal orders based on coupon amount.
c) If the subscription is purchased using a gift card, the same gift card will be applicable for the renewals.
24. Compatibility with Return Refund & Exchange For WooCommerce
The gift Card for WooCommerce Pro plugin is compatible with the Return Refund & Exchange for WooCommerce and RMA Return Refund & Exchange for WooCommerce Pro.
With this compatibility, the customers are able to file refunds and exchange requests for the gift card products they purchase.
But customers must fulfill these two conditions:
- a) The expiration period of the gift card shouldn’t be achieved
- b) Its usability should be equal to zero.
You can credit the refund into their RMA wallets instead of paying them back through the payment methods they used for gift card purchases.
25.Compatibility With Wallet System for WooCommerce
Our Ultimate Gift Cards for WooComerce plugin is compatible with Wallet System for WooCommerce Pro and Wallet System for WooCommerce.
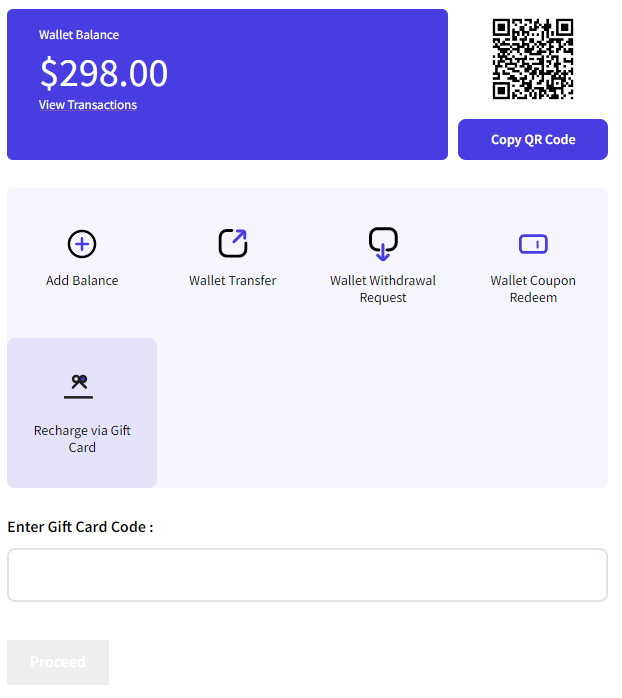
The WooCommerce Wallet users can redeem their gift cards to add balance to their wallets. The complete value of the gift card will be transferred to the user’s wallet upon redemption. They may use the updated balance however they like.
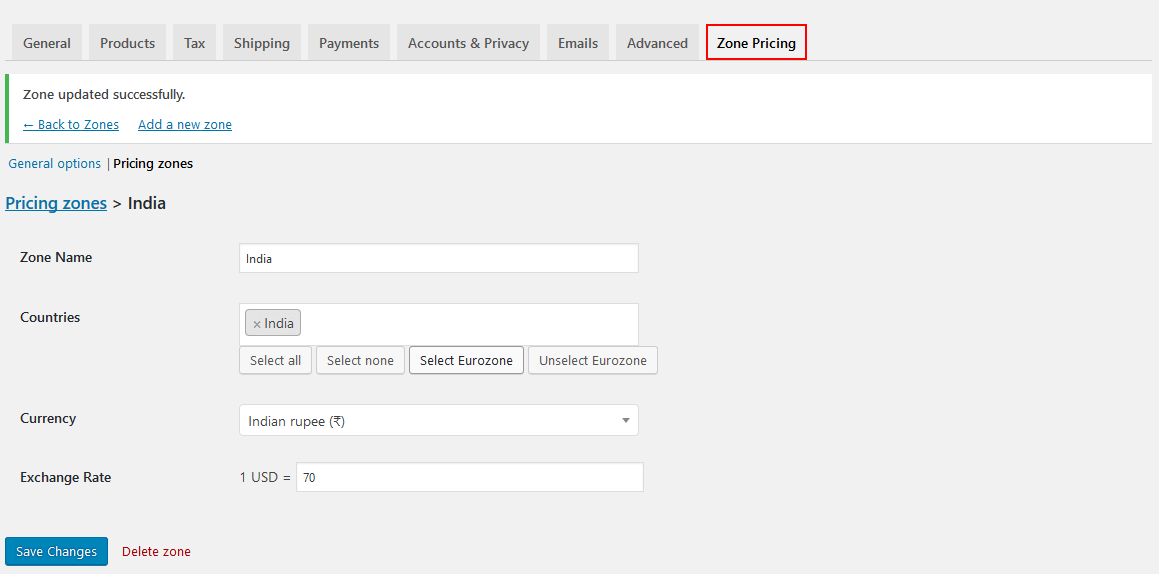
26.Compatibility with "Price Based on Country for WooCommerce" plugin
Our gift cards plugin is compatible with the Price Based on Country for WooCommerce plugin. With this compatibility, you can define the currency for different countries. So, based on the geolocation tracking of your users, the WooCommerce gift card currency will be different from your base currency.
28.Feedback and Suggestions
Don’t see a feature in the Gift Cards for WooCommerce Pro plugin that you think would be useful?
We’d love to hear it: Reach out to our Support query and we’ll consider adding it in a future release.
29.FAQs
Can a customer redeem the gift card total amount in different transactions? Like a $100 coupon is used for a $60 transaction and then the remaining $40 in the next order.
Yes, we have this feature in our plugin. To let customers do this, you need to increase the usage of the gift card. Go to your WordPress Dashboard and navigate to Gift Cards > General Settings. Under the General Settings, you’ll find Gift Card No. of time usage. Increase the usage to the number of times you want your customers to redeem a gift card amount
Can I set the expiry of the Gift card?
Yes. In the General Settings of the plugin, you can set the number of days after which the gift card will expire.
I want gift card coupons that can't be used on a few product categories. How can I do that?
You can easily exclude the product and product categories on which you don't want to apply the gift card coupons. Just go to the Gift Card > Settings > Product tab. Here you can select the product and product categories on which you don't want to apply the gift coupons. You also get an option to exclude Sale Items in this tab.
How can I allow the customer to enter their own price for purchasing the Gift cards?
If you want your customers to enter the price of their own choice, you can select the "User Price" option from the Pricing Type dropdown in the gift card product edit page while creating your Gift Card product. This will let your customers enter the gift card price of their own choice.
After receiving the Gift coupon, How can the recipient use this coupon code?
We have inherited WooCommerce features for creating Gift coupons. So your customer can use Gift coupons the same as the WooCommerce coupons. They can apply the coupons on the cart/checkout page to get the discount.
How can I restrict the customer to purchase the Gift card products from the coupons?
Yes, We have provided this feature under the "Other Setting" tab of the plugin. After enabling this setting, the "Apply Coupon" field will not get displayed on the cart/checkout page if only the gift card product is in the cart.
From where can I mention the "Disclaimer" in all the gift card templates?
To add the disclaimer in your Gift Card email templates, go to Gift Card > Settings > Email Template > Disclaimer Text. Add the disclaimer text here and Save Changes when done. The added text will be displayed on all the gift card product templates.
Can we set the minimum price for user price type?
Yes, the admin can set the minimum price for the user price type. For this, please go to the Product edit page, Choose User Price type, and Set Minimum Limit.


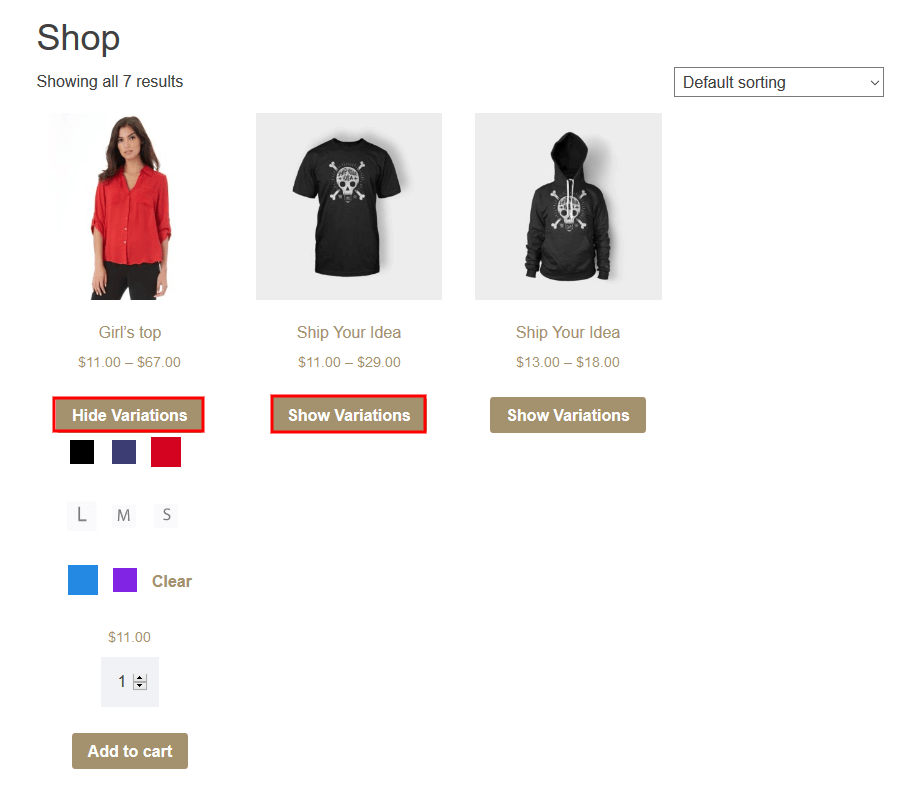

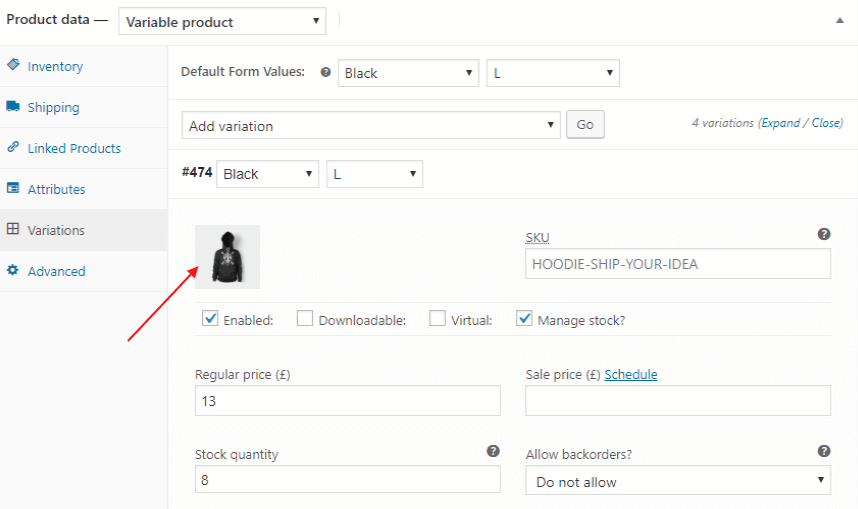
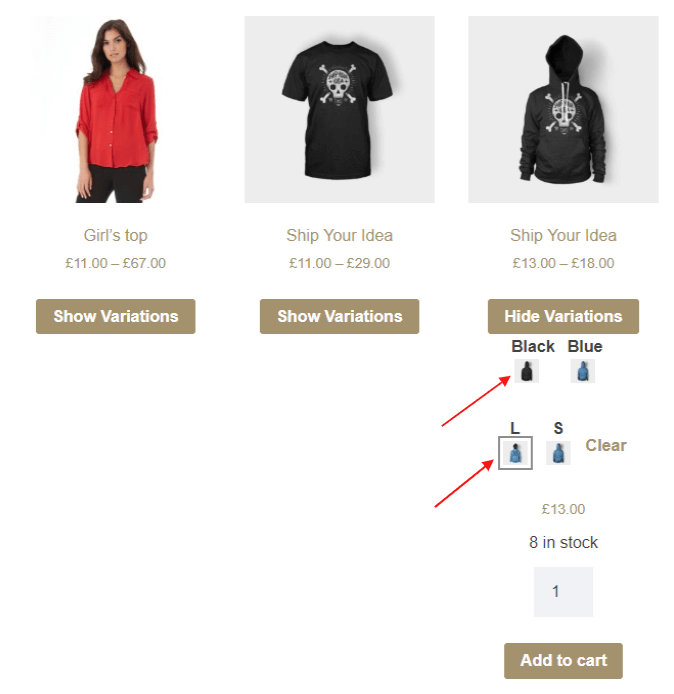
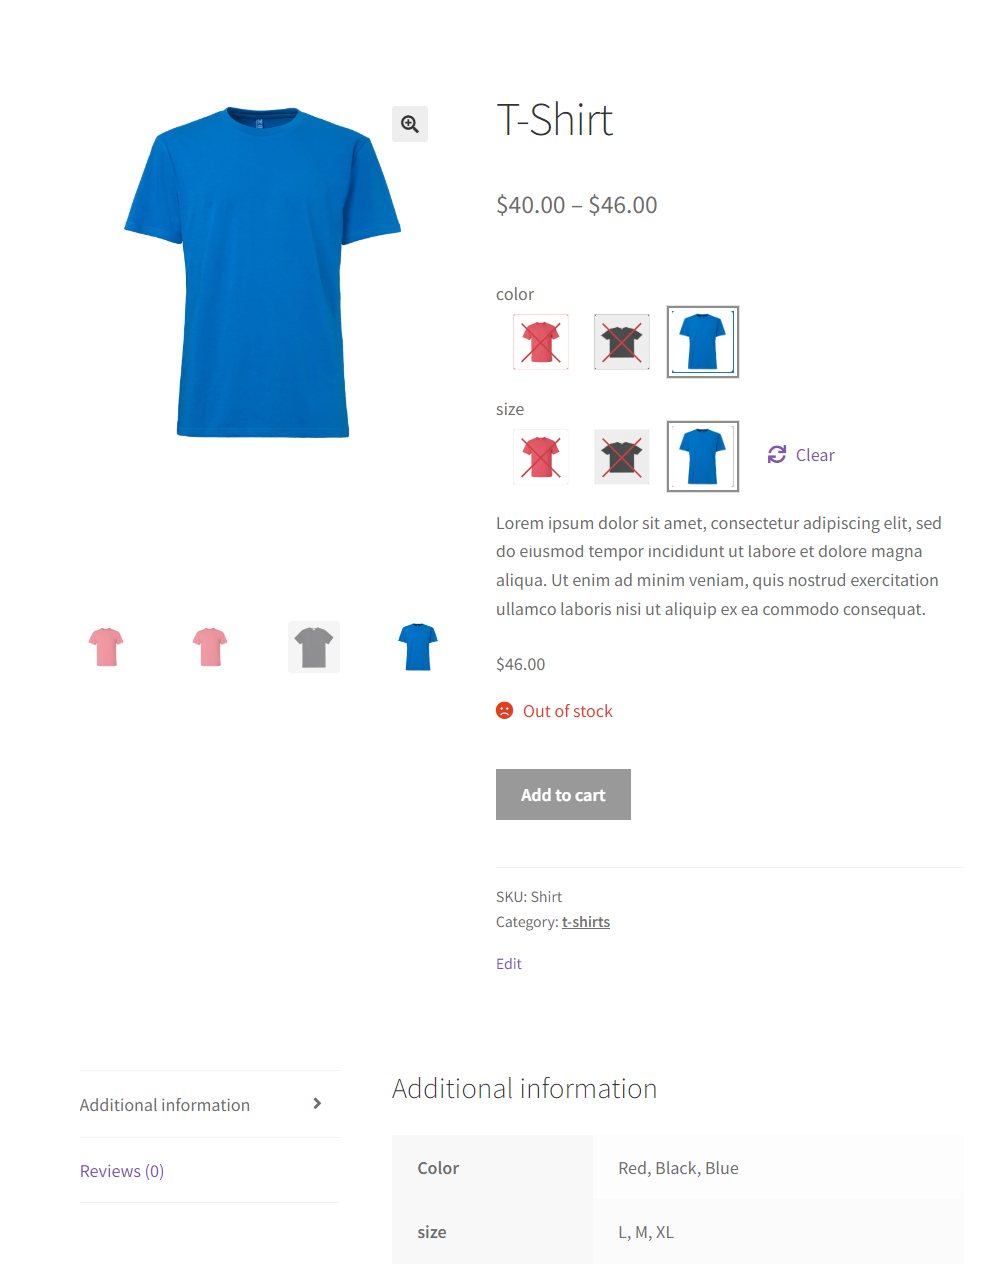

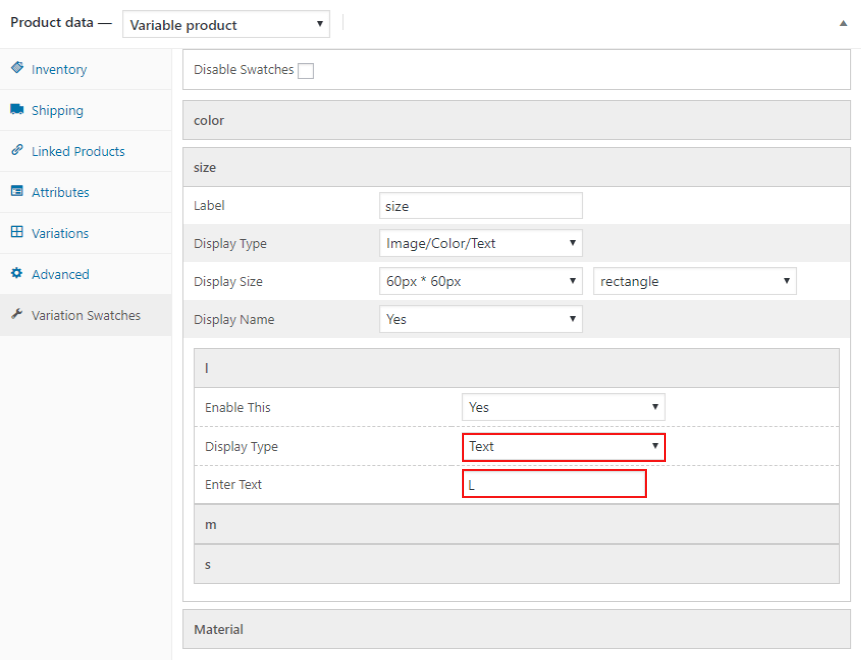

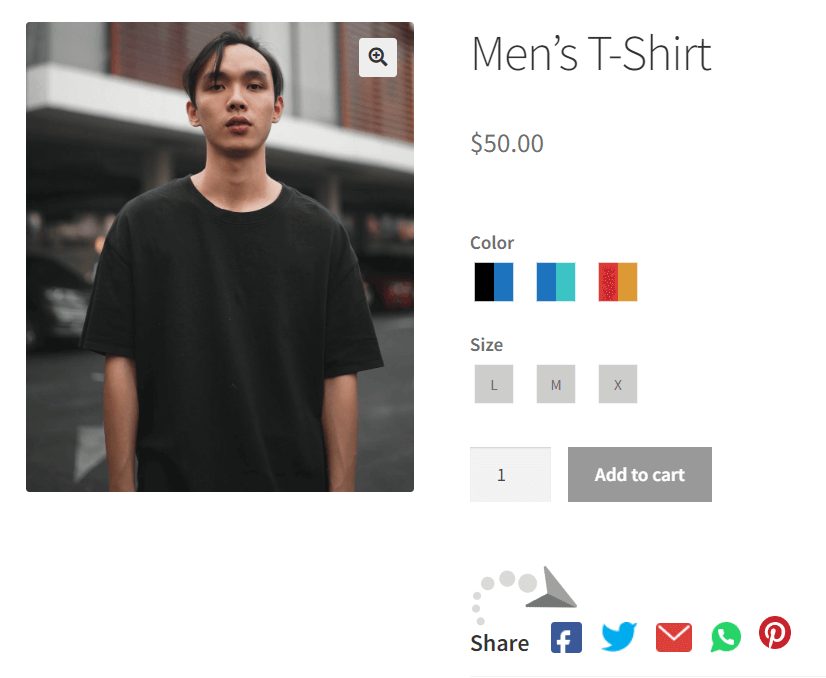

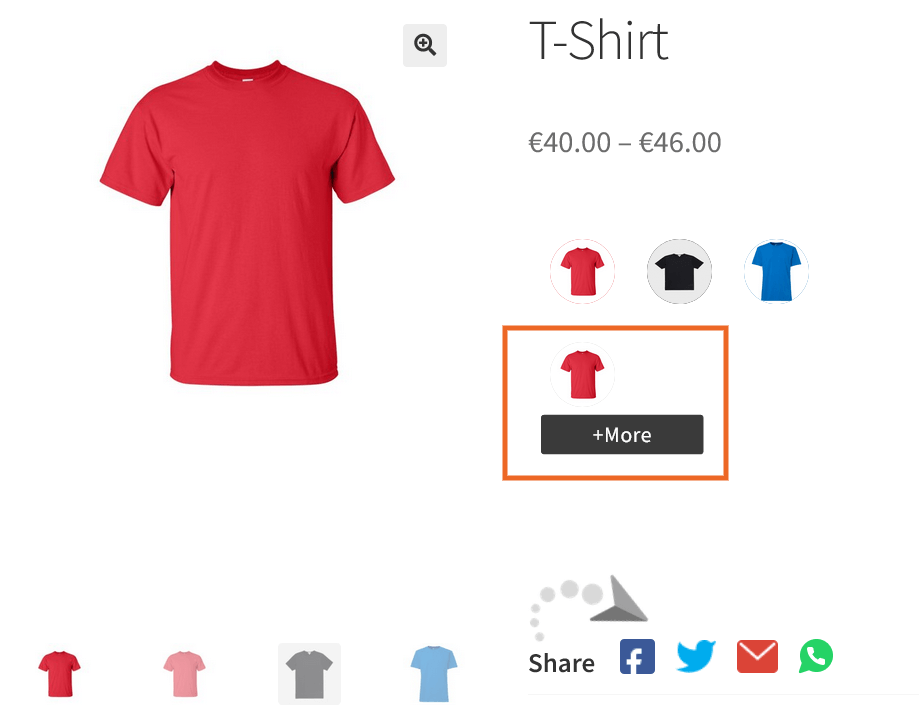


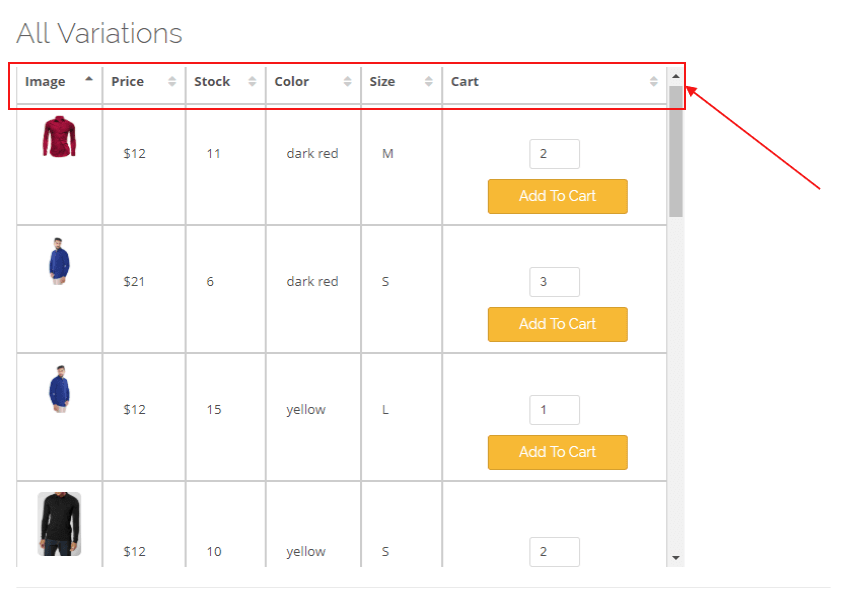


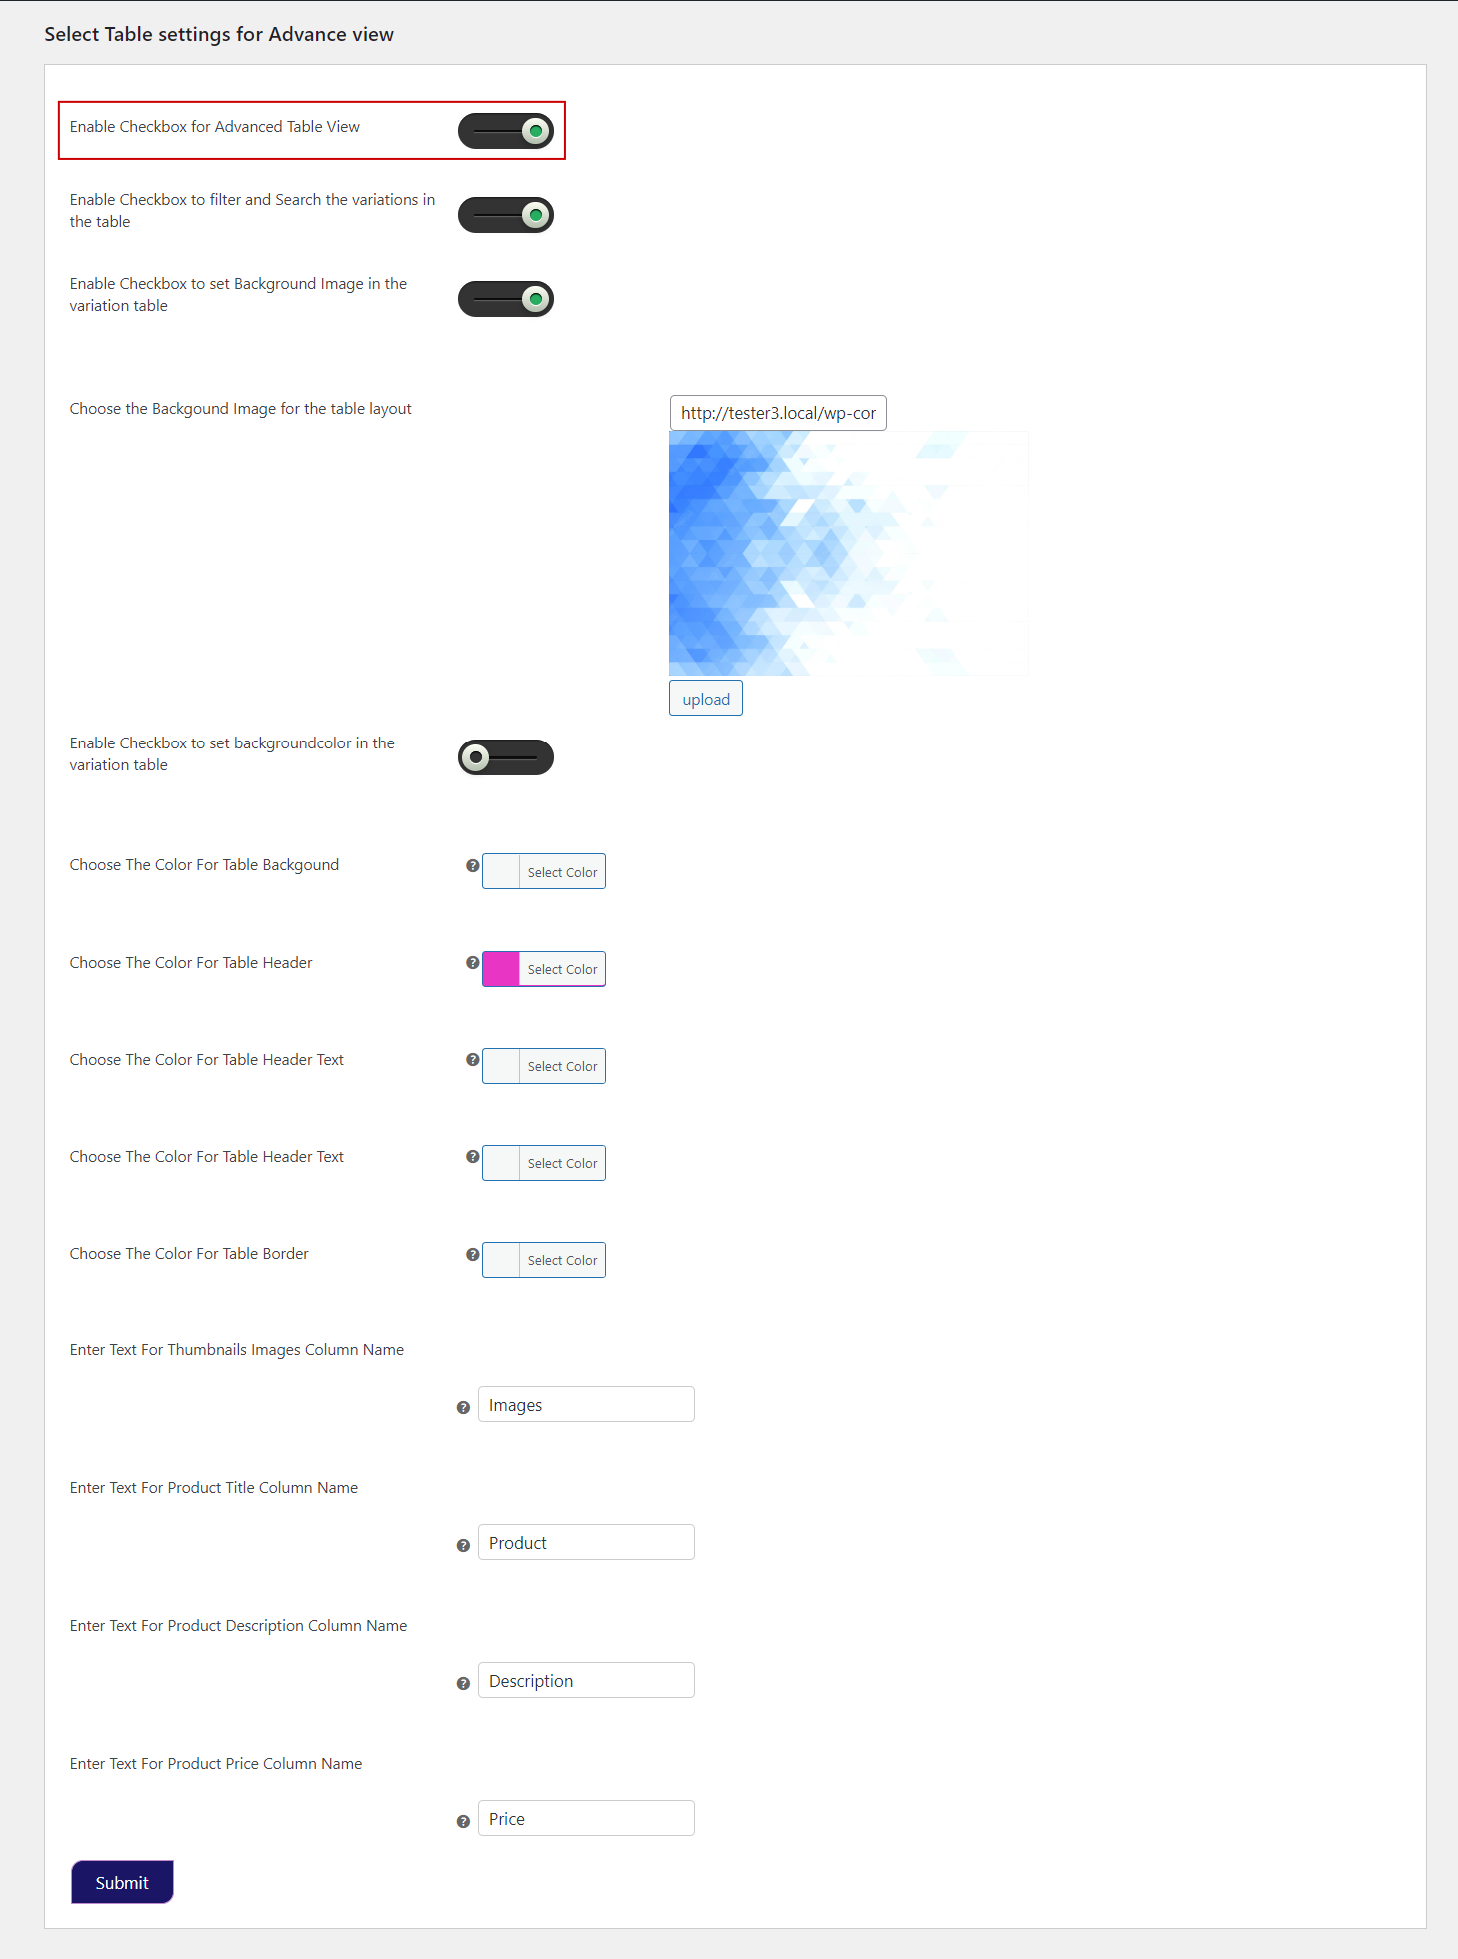
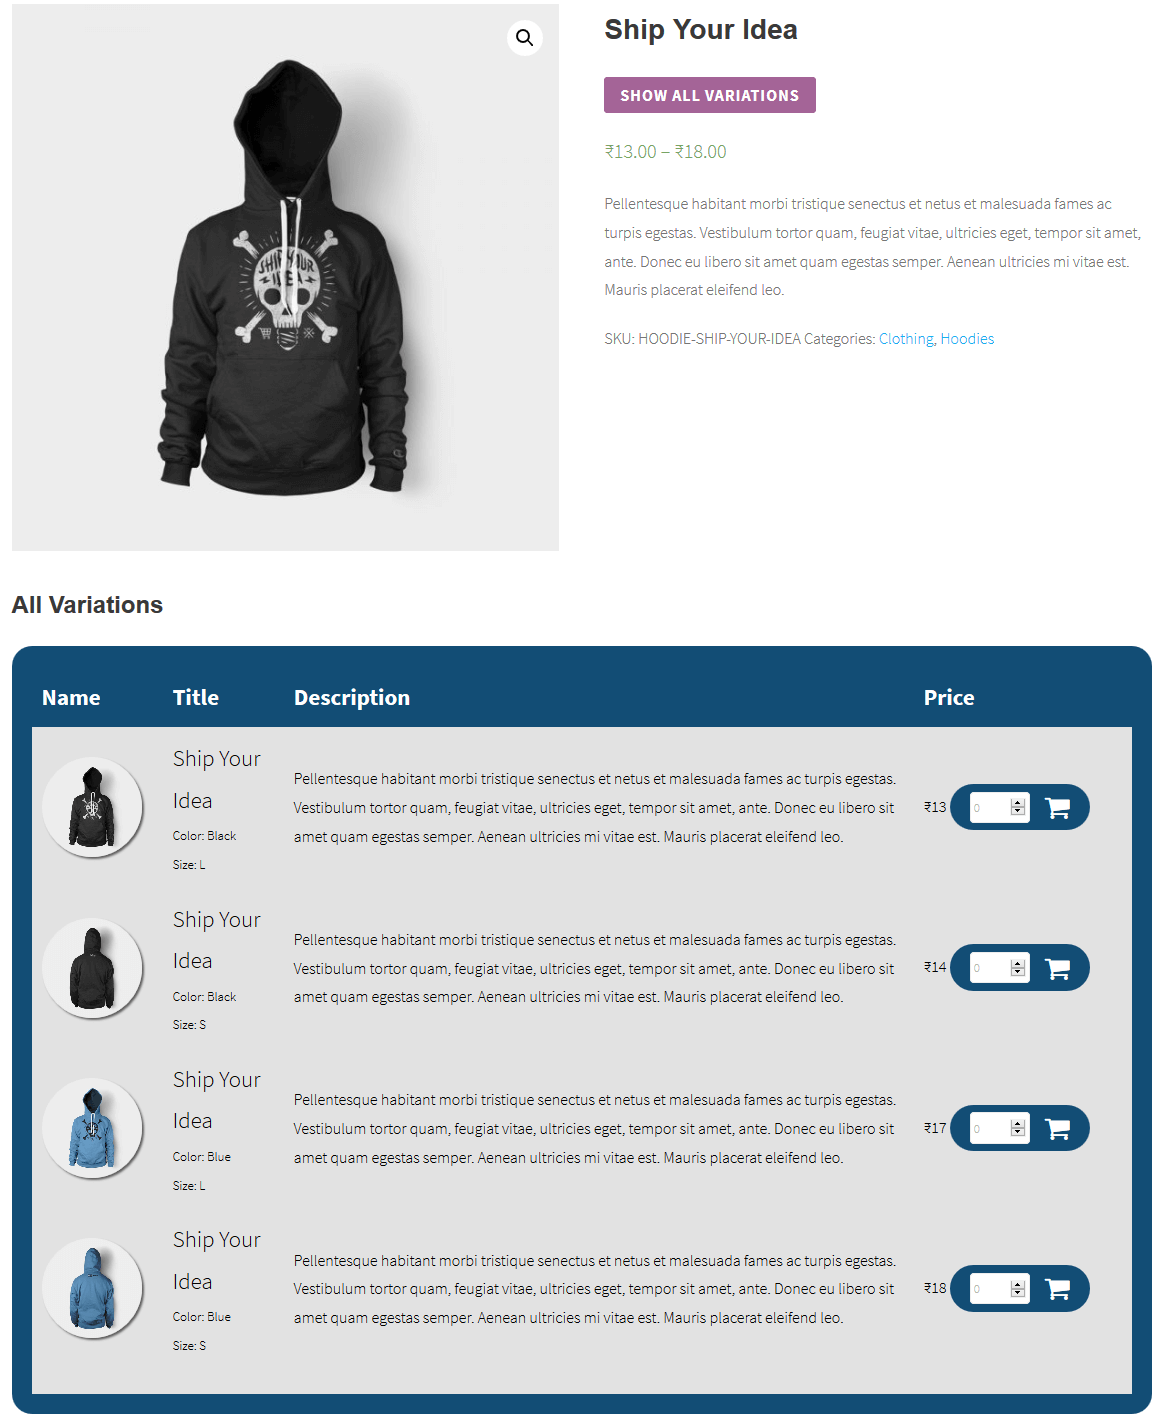
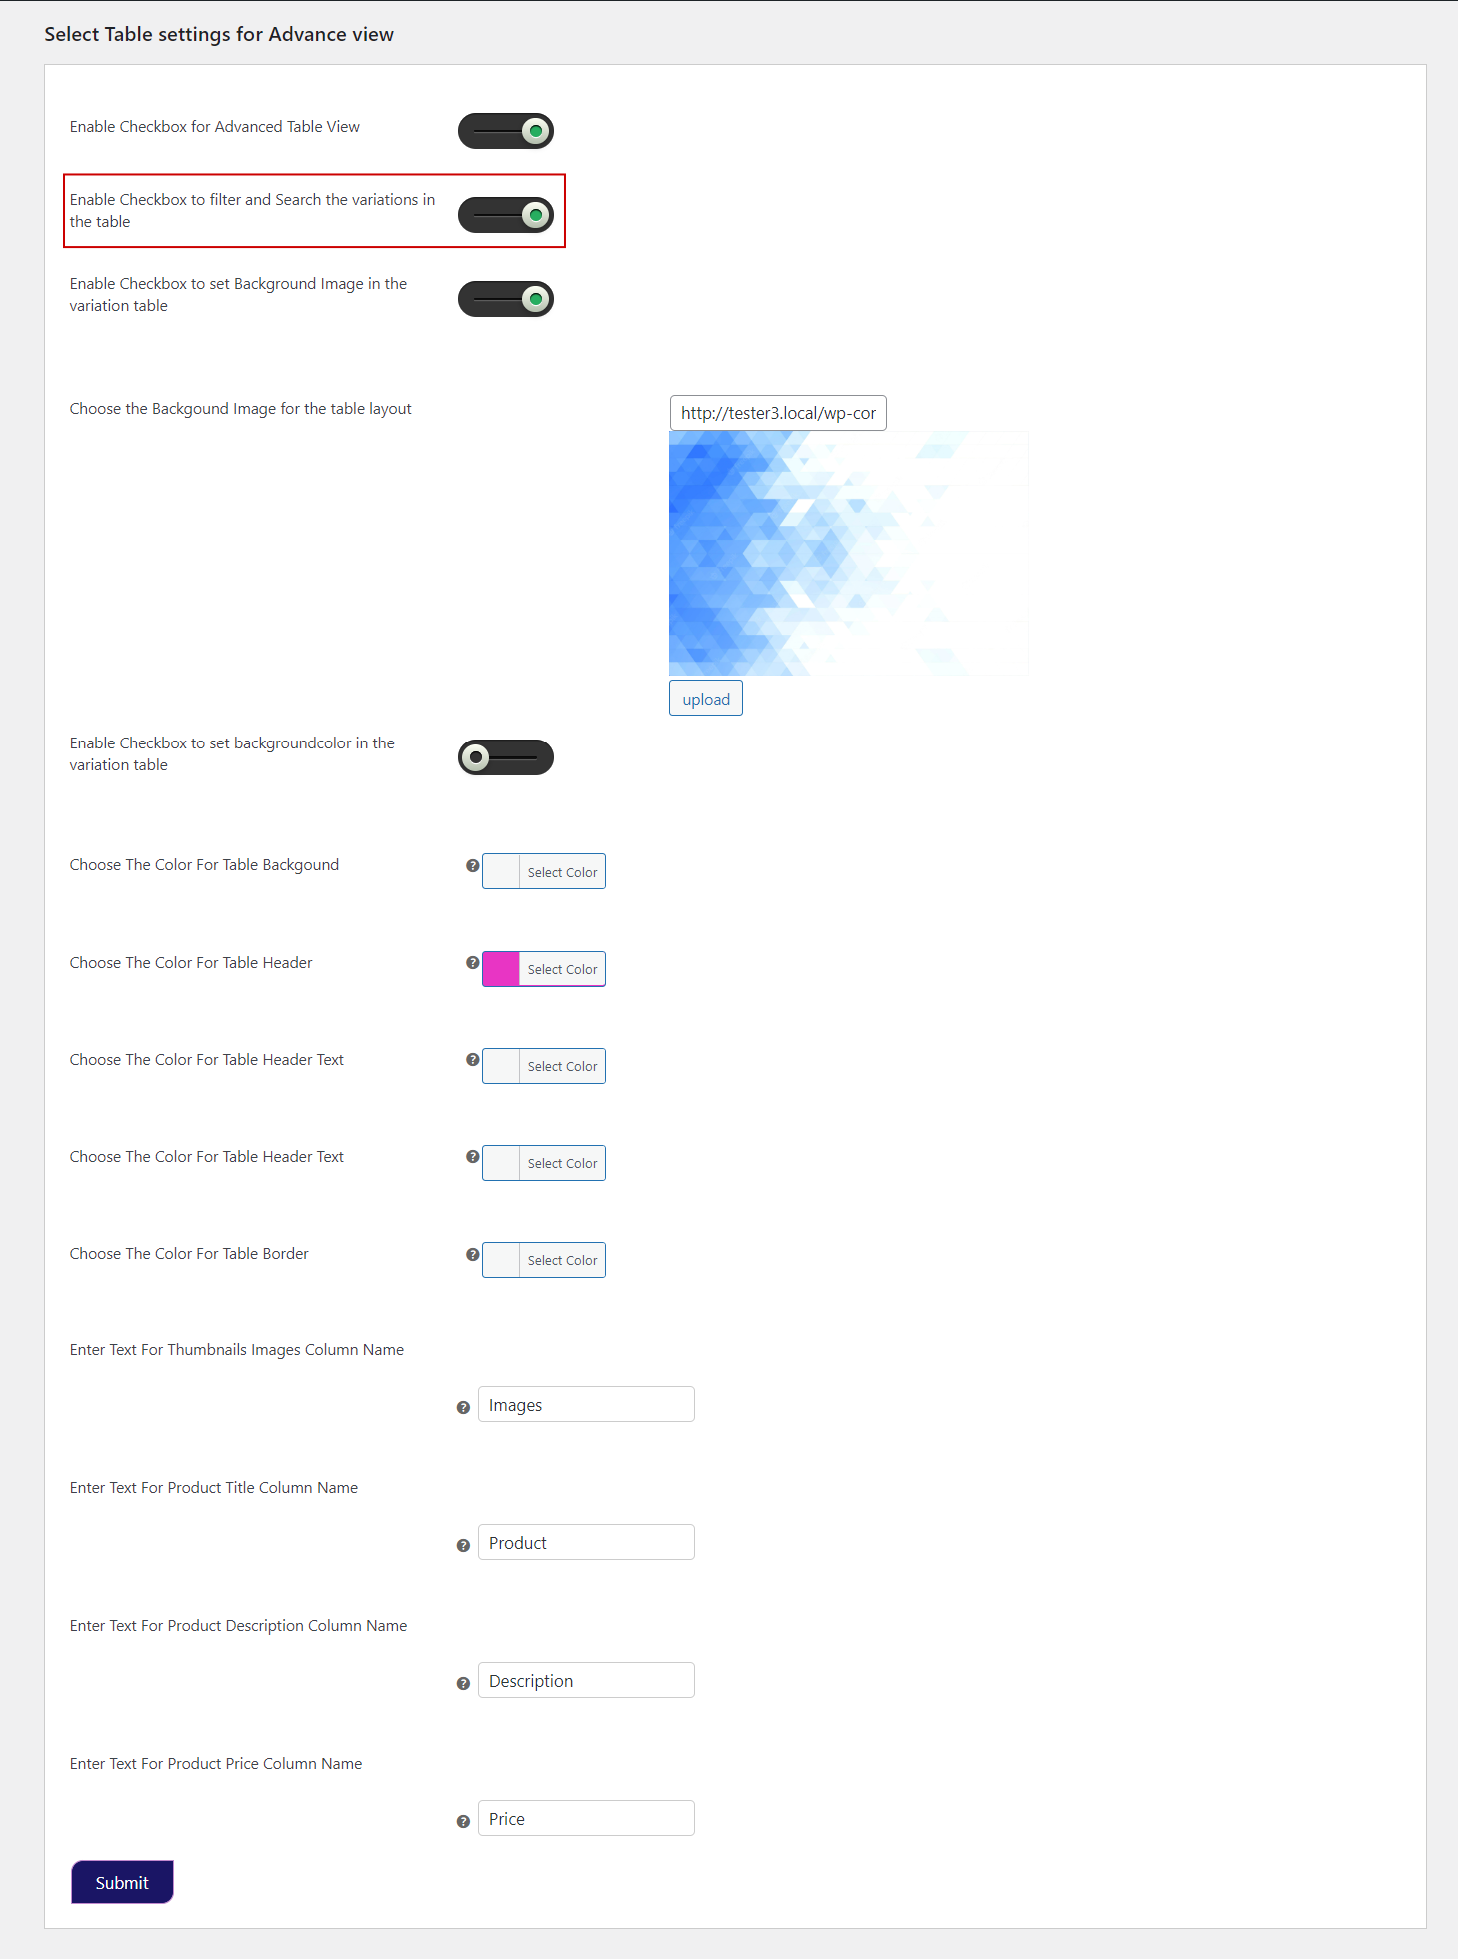
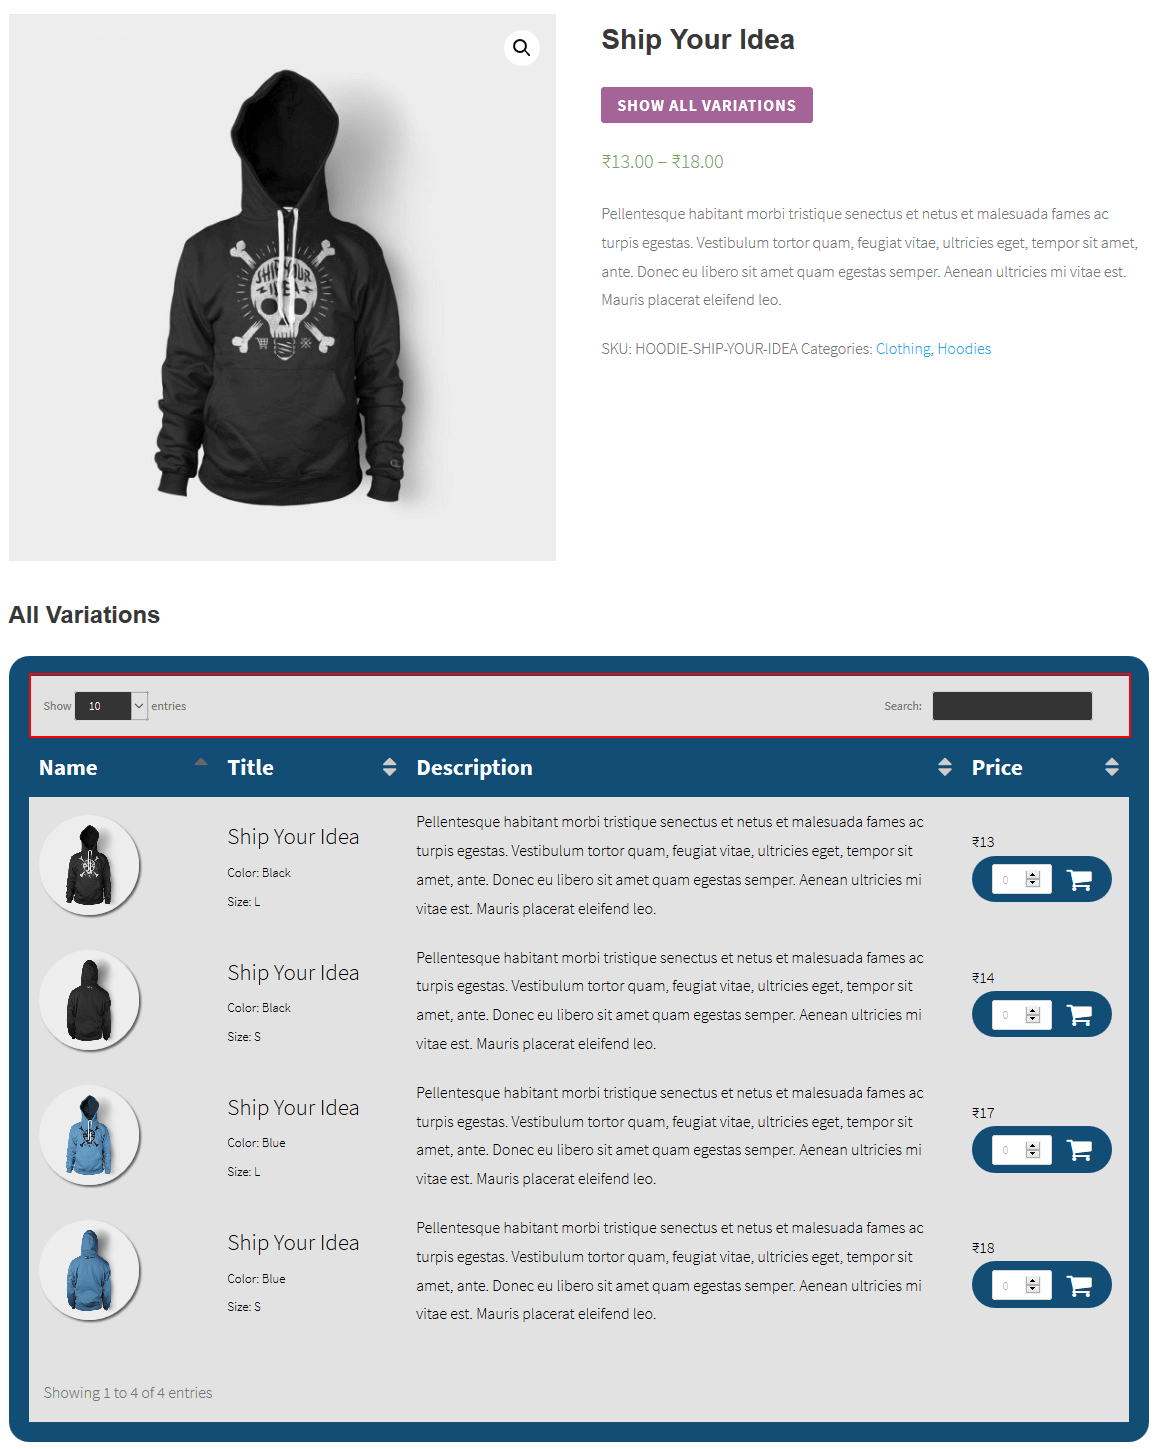
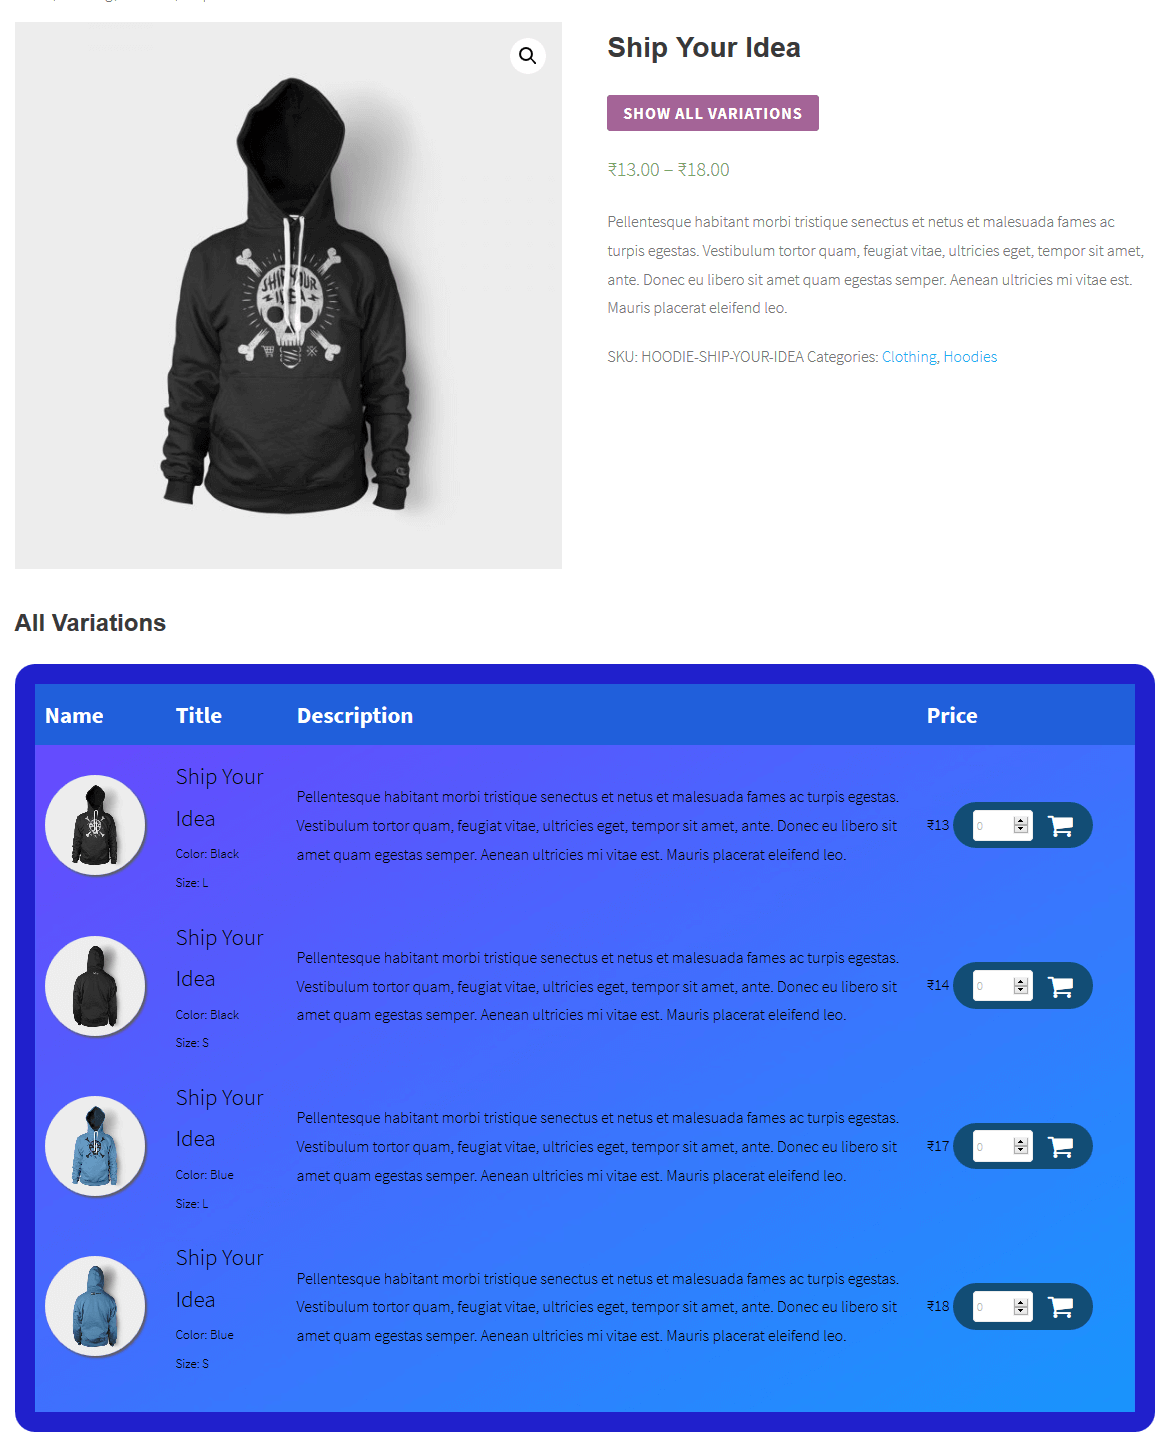
7.2.Social Sharing of Variable Product
You can easily add social share buttons to the product pages and allows users to share your products.
To do this, follow these instructions: